U798CH1 - Air Conditioning ROTEL - Free user manual and instructions
Find the device manual for free U798CH1 ROTEL in PDF.
Document temporarily unavailable
The manual is currently being transferred to our new server. It will be accessible again in a few hours. Thank you for your patience.
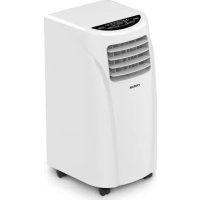
| Product type | Monoblock mobile air conditioner |
| Brand | Rotel |
| Model | U798CH1 |
| Dimensions (H x W x D) | 730 x 360 x 430 mm |
| Weight | 27.5 kg |
| Power supply | 220-240 V, 50 Hz |
| Rated power | 910 W |
| Refrigerant | R410A (PRG 2090) |
| Refrigerant quantity | 500 g |
| Operating modes | Air conditioning, ventilation, dehumidification |
| Control type | LED touch panel + remote control |
| Timer | Programmable from 1 to 24 hours (on/off) |
| Fan speed | 3 speeds (high, medium, low) |
| Adjustable louvers | Yes, manually and remote control adjustable (SWING) |
| Thermostat | Adjustable, display in °C or °F |
| Dehumidification capacity | Not specified |
| Noise level | Not specified |
| Operating temperature range | 7 °C to 35 °C |
| Mobility | 4 multidirectional casters |
| Included accessories | Flexible exhaust hose, window sealing kit, remote control with batteries |
| Filter maintenance | Clean every 2 weeks with warm water and mild detergent |
| Safety | Anti-freeze protection, overflow protection, automatic defrost, compressor protection |
| Storage | Drain, dry in fan mode, store in a dry place |
Frequently Asked Questions - U798CH1 ROTEL
User questions about U798CH1 ROTEL
0 question about this device. Answer the ones you know or ask your own.
Ask a new question about this device
Download the instructions for your Air Conditioning in PDF format for free! Find your manual U798CH1 - ROTEL and take your electronic device back in hand. On this page are published all the documents necessary for the use of your device. U798CH1 by ROTEL.