U797CH1 - Air Conditioning ROTEL - Free user manual and instructions
Find the device manual for free U797CH1 ROTEL in PDF.
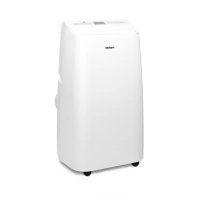
| Product type | Portable air conditioner |
| Brand | Rotel |
| Model | U797CH1 |
| Dimensions (H x W x D) | 605 x 320 x 360 mm |
| Weight | 21 kg |
| Power supply | 220-240 V, 50 Hz |
| Nominal input power | 785 W |
| Refrigerant gas | R410A (GWP 2090, 360 g) |
| Operating temperature range | 17 °C to 35 °C |
| Operating modes | Air conditioning, dehumidification, ventilation |
| Remote control functions | On/off, mode, temperature, timer, speed, night |
| Timer | Delayed start and stop from 30 min to 24 h |
| Fan speed | Low and high |
| Condensate tank capacity | Not specified in manual, but WATER FULL alarm indicates level |
| Exhaust hose length | 60 cm to 170 cm (connector sleeve included) |
| Filter cleaning | Every 2 weeks in dusty environments, with lukewarm water and mild detergent |
| General maintenance | Clean surfaces with a soft cloth, avoid solvents |
| Safety | Overheat protection, automatic shut-off if tank full, unplug before maintenance |
| Repairability and spare parts | Repairs must be carried out by authorized service center; parts available via Rotel AG |
| Warranty | Warranty covering material and manufacturing defects, excluding wear parts and misuse |
| Storage | Drain, dry in fan mode, clean filters, store in a dry place |
| Disposal | Do not dispose with household waste; recycle via distributor or Rotel AG (WEEE compliant) |
Frequently Asked Questions - U797CH1 ROTEL
User questions about U797CH1 ROTEL
0 question about this device. Answer the ones you know or ask your own.
Ask a new question about this device
Download the instructions for your Air Conditioning in PDF format for free! Find your manual U797CH1 - ROTEL and take your electronic device back in hand. On this page are published all the documents necessary for the use of your device. U797CH1 by ROTEL.
USER MANUAL U797CH1 ROTEL
MOBILEAIRCONDITIONER797CH1
U797CH1
English 53
- Safety instructions 53
Unpacking 56
Installation 56
General information 56
Instructions 56
Installation of window sealplate 57
Installation illustration 58
Control Panel 59
Remote Control 60
- Operating instructions 61
Mode selection. 61
Timer setting 62
Drainage operation 62
Cleaning and maintenance 64
Cleaning 64
Maintenance 64
Storage 64
Troubleshooting 65
Technical specifications 66
Disposal 67
D/F/I/E 68
Garantie/Garantie/Garanzia/Warranty 68
Deutsch
SICHERHEITSHINWEISE
- SAFETY INSTRUCTIONS
Please read all instructions before using the device.
-
This appliance may be used by persons with limited physical, sensory or mental abilities or lack of experience and/or knowledge, if they are supervised by persons responsible for their security or if they have been instructed about the safe use of the appliance and therefore fully understand the hazards involved.
-
This appliance must not be used by children; the appliance and its power cord must be kept away from children.
-
This appliance has been designed for air conditioning domestic environments (indoor operation only) and must not be used for any other purpose, such as for drying clothing, cooling food, etc.
The installation must be in accordance with regulations of the country where the unit is used. If case of doubt about the electrical installation, it shall
be checked and if necessary modified by a qualified electrician.
-
The appliance must be plugged into an outlet that is properly installed and earthed.
-
Before plugging into a socket, it shall be ensured that the mains voltage matches the voltage specified on the rating plate of the appliance.
-
The appliance shall not be operated with a damaged cord or plug, or after the appliance malfunctions, or has been damaged in any manner. It shall be returned to the nearest authorized service facility for examination, repair or adjustment.
-
The appliance shall always be unplugged when not in use or when left unattended, and before disassembling or cleaning. It must be unplugged by grasping the plug and never by pulling the cord.
-
This appliance is not intended to be used with an external timer or a separate remote control system.
-
After the air conditioning is installed, it shall be ensured that the power plug is firmly plugged into the power outlet, and the power cord orderly placed to prevent someone from tripping or pulling out the plug.
-
No object or obstacle shall ever come into or block the air inlet and outlet of the air conditioner. Cooling
performance may be reduced or stopped completely.
- The appliance must always be operated with the air filter mounted. The use of the conditioner without the air filter could cause an excessive accumulation of dust or waste on the inner parts of the device with possible subsequent failures.
○ Incorrect repair attempt, assembly, reassembly or use of any accessory attachment not recommended or sold by the manufacturer may cause fire, electric shock or personal injury and will void the manufacturer's warranty.
-
The air conditioner shall not be installed and used in bathroom or other humid environments and contact with water or other fluid shall be avoided. Water can cause electrical shock or equipment damage.
-
The appliance shall not be installed closer than 50 ~cm from flammable substances (alcohol, etc.), heat sources or pressurized containers (e.g. spray cans).
-
A clearance of above 50cm from walls, furniture and curtains shall always be kept when operating the device.
- UNPACKING
This product has been packaged to protect it against transportation damage. Keep the original manual, packaging carton and materials in a safe place. It will help prevent any damage if the product needs to be transported in the future or handed to others.
In the event it is to be disposed of, please recycle all packaging materials where possible.
○ Remove unit from box and tape and glue residue from surfaces before turning on the appliance.
Unwind the cord fully and inspect it for damage.
Do not use the appliance if any part is damaged. In case of damage, contact your after sales service.
- INSTALLATION
General information
- When moving the machine, make sure that it is in an upright position.
Do not install the air conditioner in a room where frost may occur. There is a risk of damage if the condensate water freeze in the device or its pipe.
While adjusting the upper and lower wind-guide strips of the air outlet, pluck it with hands gently to avoid damaging wind-guide strips.
Instructions
Select mounted place
Install the air conditioner in a flat and dry place, with a minimum clearance of 50cm around the unit to enable smooth circulation of air, as shown in Fig. 3 (before connection of exhaust pipe).
Assembly method of exhaust pipe (For COOL Mode)
- Extend either side of the pipe and screw the pipe to adaptor (Fig. 4).
Insert the round ending of the exhaust pipe into the rear air outlet of the air conditioner, as shown in Fig. 5. - Connect the oval ending of the connected exhaust pipe with the window slide bar connector.
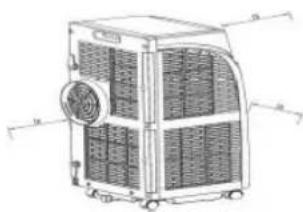
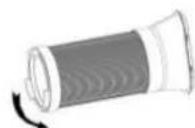
Fig. 3
Fig. 4
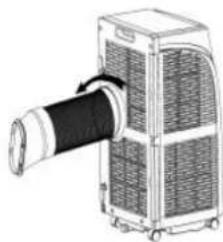
Fig. 5
- Make sure the exhaust pipe is firmly attached to the oval connector that fits into the window slide bar. Snap pipe connector into the window slide bar opening.
Caution
To ensure proper drainage, make sure that the exhaust pipe does not have any sharp bends or sags.
The pipe can be extended from 60~cm to 170~cm (including adapter). Consider keeping the length of the pipe to minimum required to save energy.
This length has been designed especially to the specifications of the air conditioner. Do not use an extension or exchange for a different pipe as that may lead to malfunctioning.
Installation of window sealplate
Design of window sealplate complies with most standard horizontal or vertical windows, and the installation methods are shown in Fig.8 and 9.
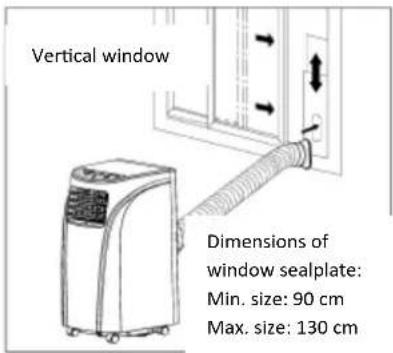
Fig. 6
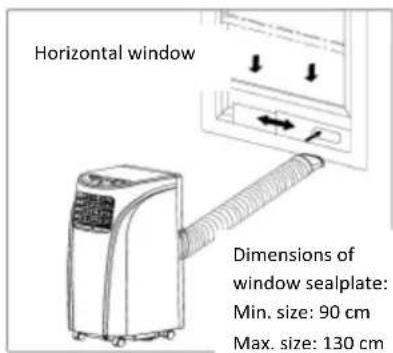
Fig. 7
Installation illustration
Wall mounted
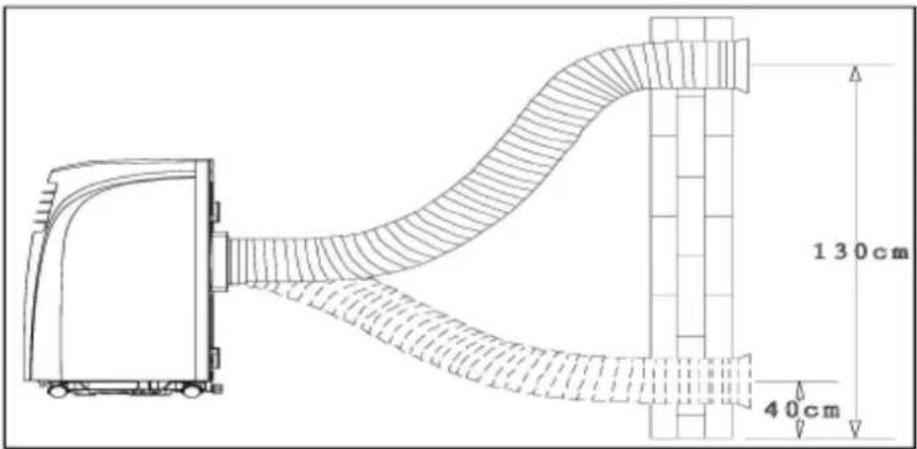
Fig. 8
Bow alignment
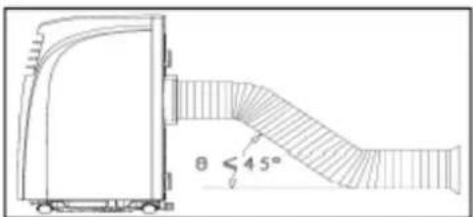
Fig. 9
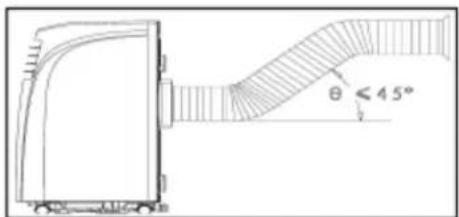
Fig. 10
Incorrect bending
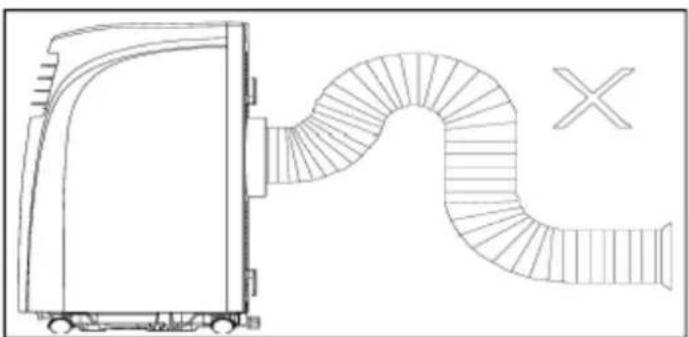
Fig. 11
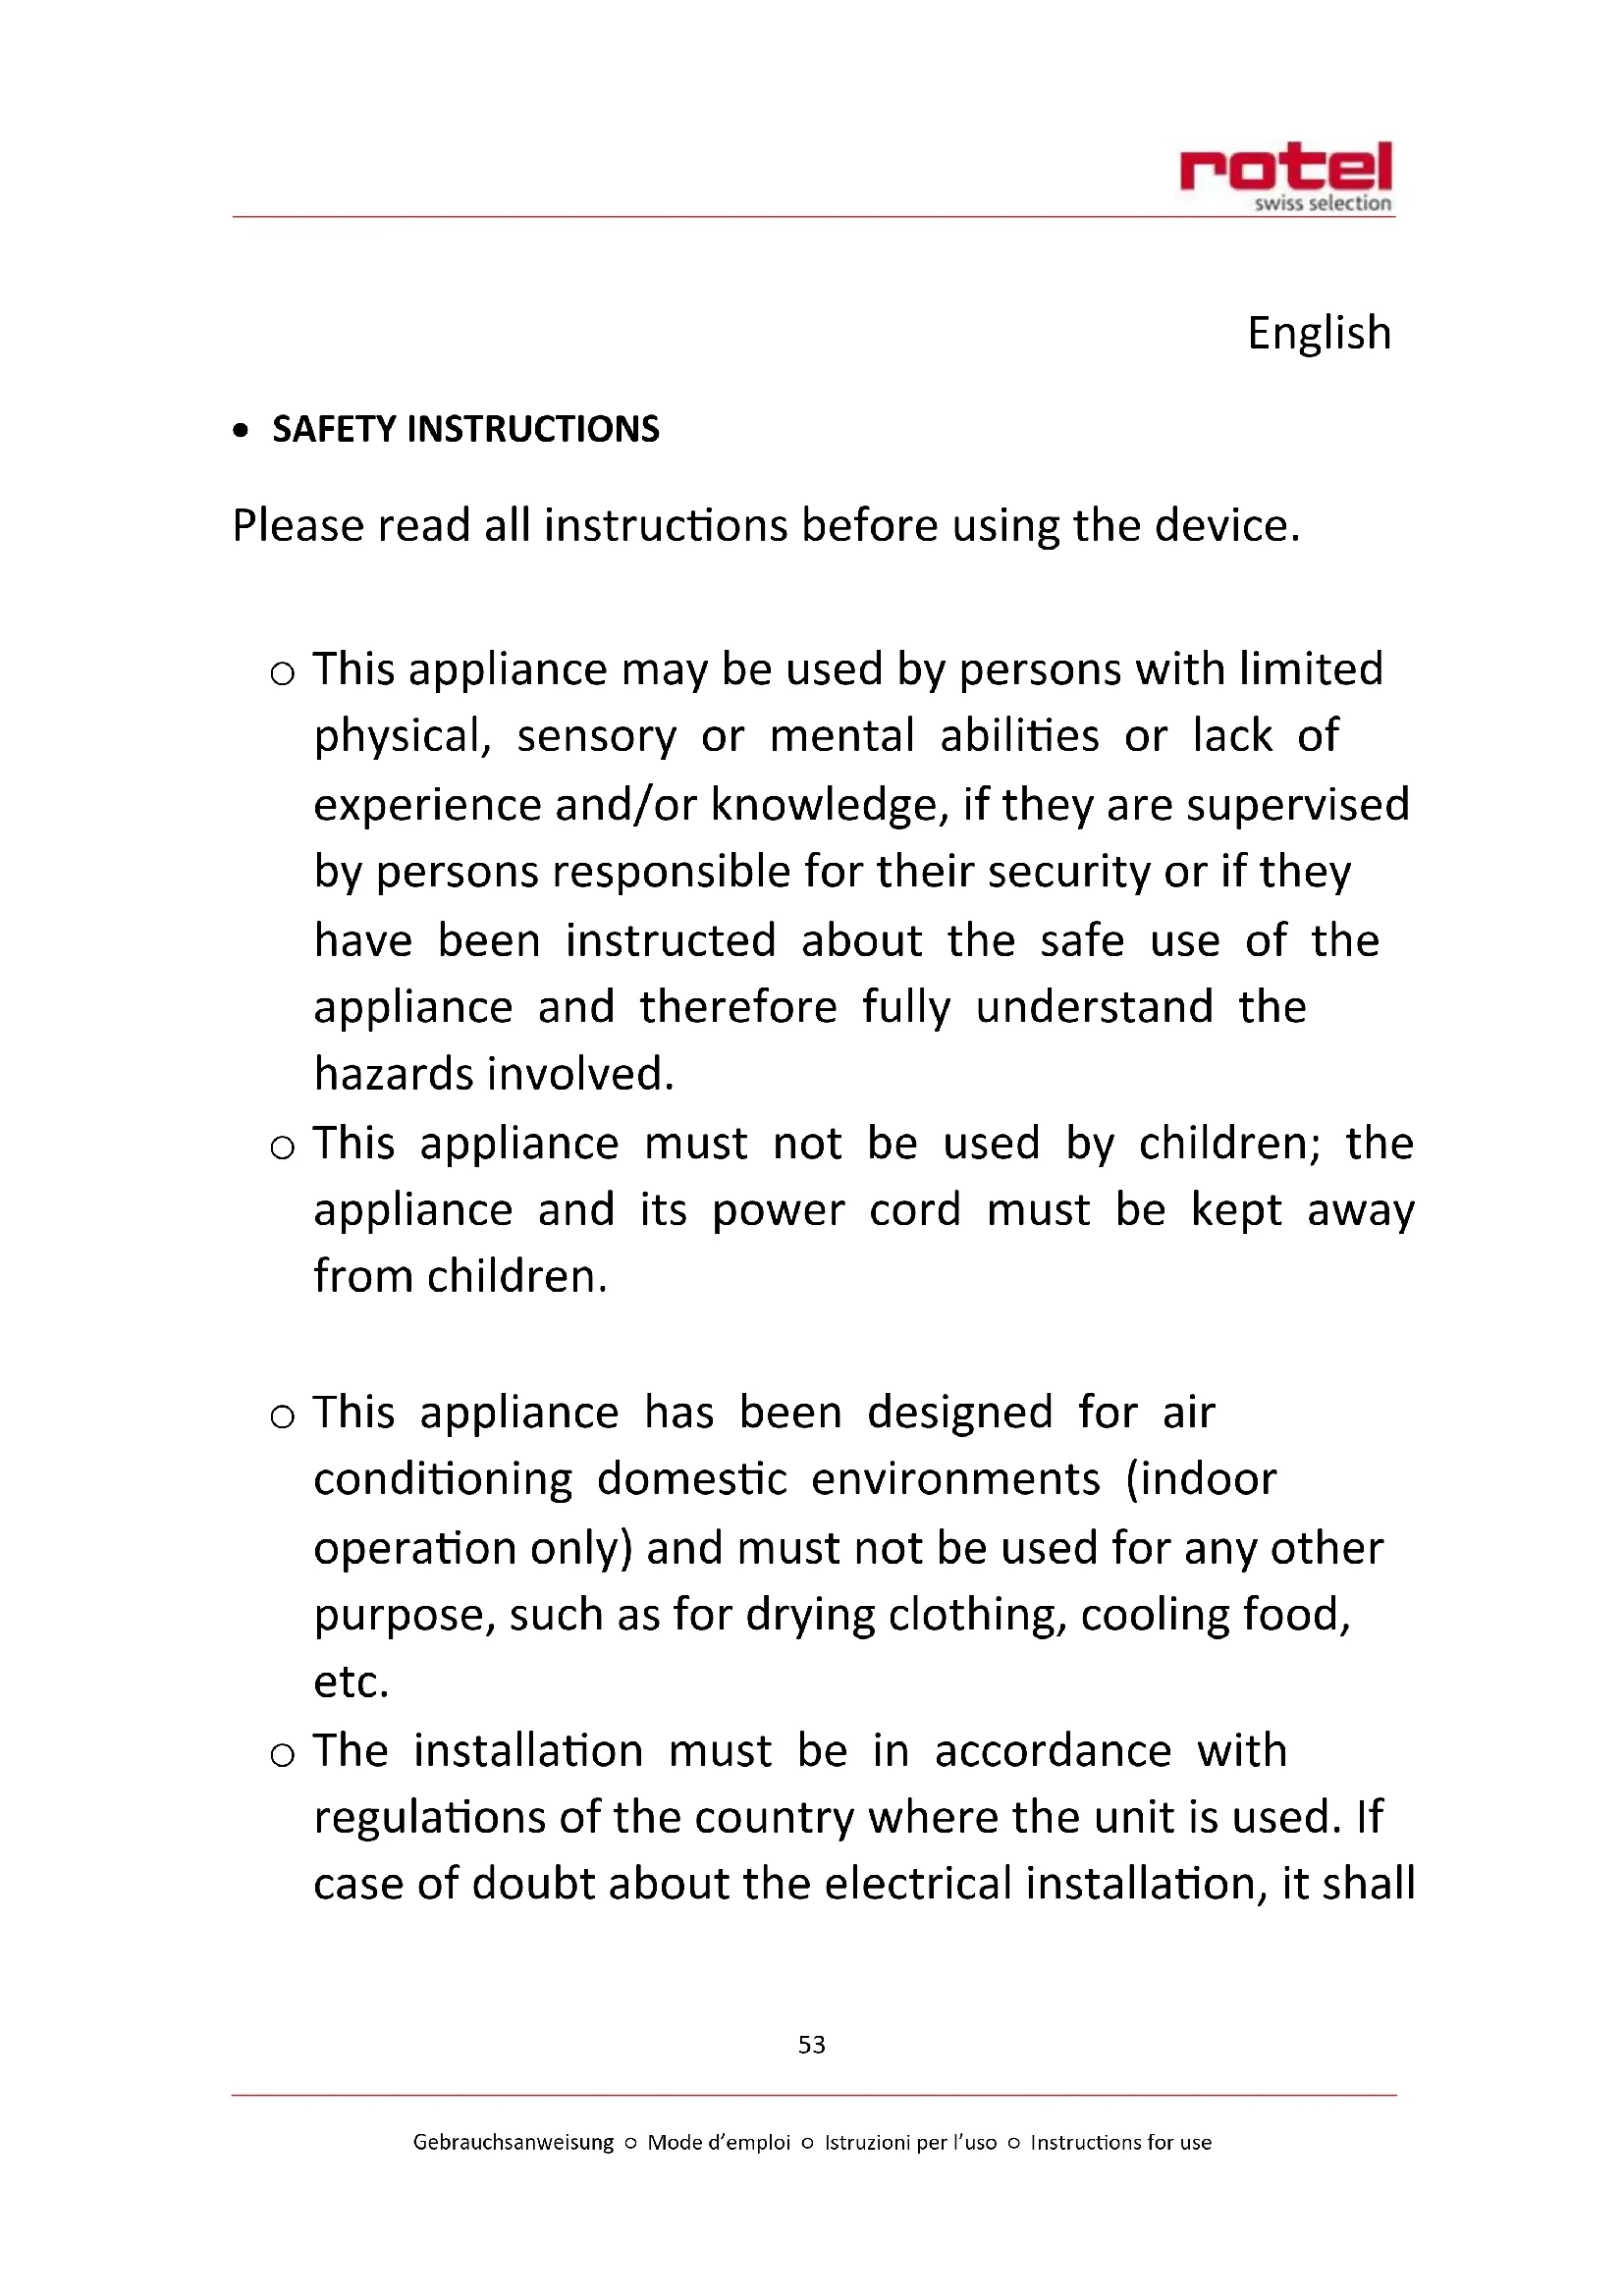
- CONTROL PANEL
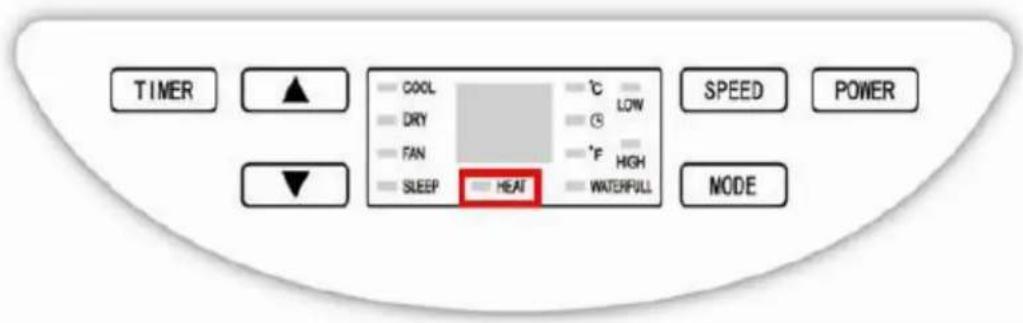
Fig. 12
Functions and display
O POWER: press this button to turn on or off the air conditioner.
MODE: Press repeatedly to select the desired mode of operation (cooling, dehumidifying or fan). The corresponding indicator lamp to the selected mode is on.
O UP and DOWN: When the timer is on, pressing UP or DOWN can adjust on/off time; in running state of COOL mode or timer state, pressing UP or DOWN can adjust the set temperature; and pressing UP and DOWN simultaneously will switch the temperature displayed between ^ C and ^ .
O SPEED: press to choose high or low fan speed.
TIMER: Press to set the period (in hours) for automatic switch-on/ switch-off, or to delete the timer setting. The corresponding indicator lamp is on.
SLEEP: this indicator lamp is on when SLEEP mode is activated.
- WATER FULL: when the water container is full, the unit automatically stops, the warning light WATER FULL will flash to signal that the container must be emptied.
HEAT: optional
- REMOTE CONTROL
The air conditioner responds to all signals that are sent by the remote control. Two AAA-batteries are required to use the remote control. Point the remote control towards the control panel of the unit and press the relevant button, the red LED will flash whenever a button is pressed.
Note: the air flow direction can not be adjusted with the remote control.
| POWER | Press this button to turn on/off the air conditioner |
| TIMER | Press to set the period (in hours) for automatic switch-on/ switch-off, or to delete the timer setting |
| TEMPERATURE CONVERSION BUTTON | Press to convert temperature from °C to ° |
| COOL | Press this button to select COOL mode |
| DEHUMIDIFY | Press this button to select DEHUMIDIFY mode |
| FAN | Press this button to select FAN mode |
| UP/DOWN | Press UP or DOWN to set temperature to adjust timer |
| HIGH | Press this button to select HIGH fan speed |
| LOW | Press this button to select LOW fan speed |
| SLEEP | Press this button to set SLEEP mode. When the speed of the upper and lower fans is fixed at LOW, temperature and speed cannot be changed anymore in this mode. Press this button again to cancel |
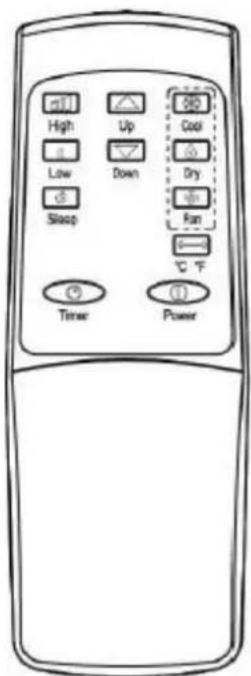
Fig. 13
OPERATING INSTRUCTIONS
Mode selection
COOL mode
Press MODE until the COOL indicator lights on the panel.
Press UP/DOWN to set the appropriate temperature within a range between 18^ and 30^ (64 to 86^ ). When UP or DOWN is pressed once, the temperature will increase or decrease by 1^ or 1^ .
Press SPEED to select the appropriate fan speed, either LOW or HIGH.
After selecting the COOL mode, press SLEEP on the remote control (or Timer button + Down button together on the control panel) to choose Sleep mode. Both upper and lower fans are forcibly set at LOW speed. Under this mode, after the unit operates for 2 hours, the setting temperature raises 1^ automatically. After operating for another 2 hours, the setting temperature raises 1^ again. After that, the setting temperature won't change. Press SLEEP again to cancel this function.
Caution:
- When WATER FULL indication is displayed, the air conditioner will stop operating until the condensate water has been drained. After drainage, the air conditioner will start automatically.
If you turn the air conditioner off and immediately restart it, or in the event of a power failure during use, allow 3 minutes for the compressor to restart cooling. There is an electronic device in the unit that keeps the compressor turned off for three minutes for safety.
DEHUMIDIFY mode
Press MODE until the DEHUMIDIFY indicator lights on the panel.
o Temperature and speed are not adjustable when this mode is selected.
Important: for best efficiency in dehumidifying mode, make sure that windows and doors are kept closed.
FAN mode
Press MODE until the indicator lights on the panel.
Press SPEED to select appropriate speed. LOW and HIGH speeds can be circularly selected (high > low > high).
o Temperature is not adjustable when this mode is selected.
The sleep function is not available for the fan mode.
Timer setting
Timer on
- When the unit is in standby, first press TIMER button to go to delay stop setting (from 0.5h to 24h), until the indicator LED lights. The display will blink.
- Tap or hold the UP or the DOWN arrow to change delay stop timer at 0.5 hour increments up to 3 hours, then at 1 hour increments up to 24 hours.
During this setting procedure, the operating modes after start can be selected; if the cool mode is selected, the temperature can be adjusted simultaneously. After the set time expires, the air conditioner starts automatically and runs in the selected operating mode.
Timer off
- When the air conditioner is running, press the TIMER button, the timer indicator LED is on, and the display will blink.
Press UP and DOWN to adjust time as shown previously.
When the set time expires, the air conditioner turns off automatically.
Change of the set time
- You can press TIMER once in the running process of the timer, the remaining time will be displayed. Press the UP and DOWN buttons to increase/decrease the time. If you press the TIMER button again during blinking, the set time will be cancelled.
o Condensation water that forms during cooling or dehumidifying will drop into an inbuilt bottom tray.
- When the appliance is activated in humid weather, more condensate water is produced. The WATER FULL alarm will be issued if the water level of the bottom tray reaches a predetermined level; the air conditioning/dehumidification process will immediately stop, however, the fan motor will continue to operate (this is normal).
The WATER FULL indicator will light up on the display and an signal will be issued simultaneously 10 times every 5 min, until the level in the water tray gets lower than the alarm level or the water tray has been drained manually.
Carefully move the unit to a drain location, unscrew nut and pull out the water plug to drain all water.
- When the alarm is relieved, the air conditioner will resume normal operation automatically.
o Be sure to reinstall the nut and the water plug before using the unit.
Caution: when the WATER FULL indicator light turns on, please move the air conditioner steadily, otherwise, the water may overflow from the inside.
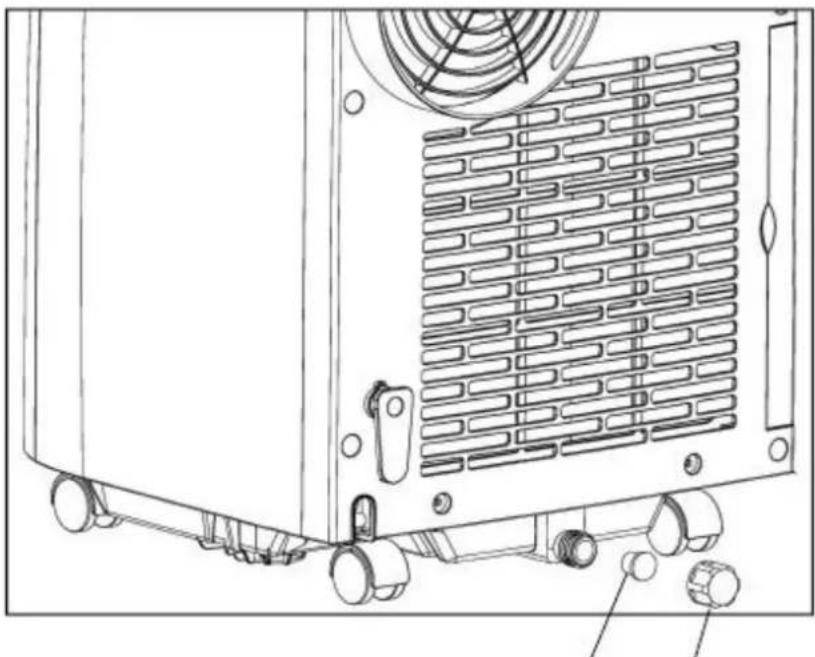
Fig. 14 Water plug Nut
Advice
- Never remain exposed directly to the flow of cold air for a long time, as direct and prolonged exposure to cold air from the air conditioner could be dangerous for your health. Take particular care in rooms where there are children, old, or sick people.
Do not direct the airflow into plants or animals, as long and direct exposure to cold air from the air conditioner could adversely affect them.
To help cooling efficiency, keep blinds and curtains closed during the sunniest part of the day. - Do not drink or cook with water drained from air conditioner; It contains contaminants and could make you sick.
- Ventilate the room periodically during use, especially if using gas appliances in conjunction with the air conditioner, as an oxygen shortage may occur.
- CLEANING AND MAINTENANCE
Cleaning
Clean the surface of the air conditioner with duster or semi-wet soft cloth. Do not use chemical solvents such as gasoline and alcohol.
If the machine is indeed very dirty, wipe it with neutral cleaner.
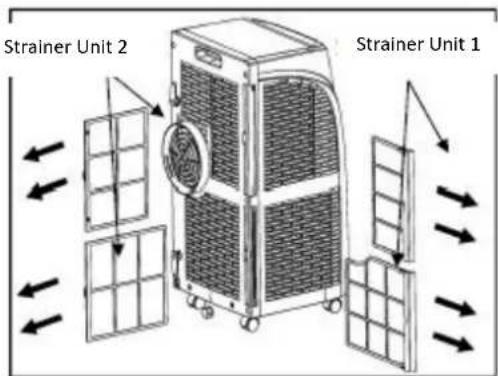
Fig. 15
Maintenance
If the strainers are blocked by dust, the air circulation will be impeded, reducing the efficiency of the air conditioner.
Cleaning the strainers once every two weeks is recommended.
Take out the strainers frame gently in the direction shown by the arrow in Fig.15.
First take out the strainer unit 1 and then the strainer unit 2.
Put strainers into warm water with neutral detergent (about 40^ ), rinse and then dry them in the shade.
Reinstall the strainers in their original position.
O First replace the strainer unit 2 and then the strainer unit 1.
Caution: please turn off the air conditioner and pull out the plug before cleaning and maintenance.
STORAGE
At the end of the season or if the air conditioner is no longer used, follow the simple steps below before storing the portable air conditioner.
Drain water from the bottom tray and the unit (water can be poured out by slowly leaning the body backward during drainage).
o Keep the appliance running on FAN mode for half a day in a warm room to dry the appliance inside and prevent mold formation.
Clean the strainers if necessary.
Turn off the air conditioner and unplug it, wrap the power cord around the hooks at the back of the device.
○ Remove the exhaust pipe and store it aside.
o Remove the batteries from the remote control
o Cover the air conditioner with a plastic bag. Store in a dry place, keep it out of the reach of children and take dust control measures.
TROUBLESHOOTING
Please check the following before contacting your after-sale services.
| Problem | Reasons | Solutions |
| The air conditioner does not work. | There is no electricity | Turn it on after connecting it to a socket with electricity. |
| The overflow indicator displays FL | Discharge the water inside. | |
| Ambient temperature is too low or too high | Recommended temperature range to use the machine 17 to 35 °C | |
| In cooling mode, the room temperature is lower than the set temperature | Change the set temperature | |
| In dehumidification mode, the ambient temperature is low | The machine is placed in a room with an ambient temperature of more than 17 °C | |
| The cooling effect is not good | There is direct sunlight | Pull the curtains |
| Doors or windows are open; there are a lot of people; or in cooling mode, there are other sources of heat | Close doors and windows, and add new air conditioning | |
| The filter screen is dirty | Clean or replace the filter screen | |
| The air inlet or outlet is blocked | Clear obstructions | |
| The device is very noisy | The air conditioner is not placed on a flat surface | Put the air conditioner on a flat and hard place (to reduce noise) |
| The compressor does not work | Overheat protection starts | Wait for 3 minutes until the temperature is lowered, and then restart the machine |
| The remote control does not work | The distance between the machine and the remote control is too far | Let the remote control get close to the air conditioner, and make sure that it directly faces to the direction of the receiver |
| The remote control is not aligned with the direction of the remote control receiver | ||
| Batteries are dead | Replace batteries |
Caution:
When the following abnormalities occur, turn the air conditioner off, pull out the plug, and then contact a professional electrician.
Fuse and switch are often broken.
Power line is overheating or its coat is naked.
The unit produces abnormal odour or smoke.
Automatic fault detection functions
| Detection Codes | Meaning |
| E2 | Room temperature sensor failure |
| E3 | Pipe temperature sensor failure |
| FL | The air conditioner is in water full alarm state |

Caution
When "df" is displayed, the air conditioner runs an anti-freezing or defrosting state, which is a normal phenomenon.
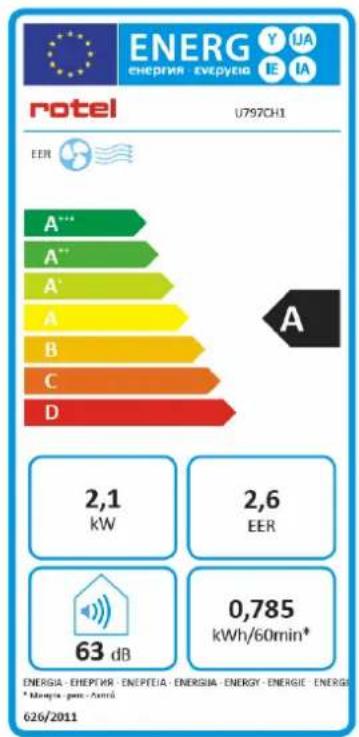
- TECHNICAL SPECIFICATIONS
| Dimensions (LxWxH) | 320x360x605 mm |
| Ambient temperature range | 17 – 35 °C |
| Rated input power | 785 W |
| Rated voltage | 220 – 240 V |
| Rated frequency | 50 Hz |
| Net weight | 21 kg |
| Refrigerant | R410A |
| GWP | 2090 |
| Amount of refrigerant | 360 g |
This air conditioner uses R410A refrigerant, which is a fluorinated non-flammable greenhouse gas covered by Kyoto Protocol, with a Global Warming Potential (GWP) of 2090.
DISPOSAL
For proper disposal, please return device to a retailer, a service agent or Rotel AG.
European Directive 2012/19/EC concerning Waste Electrical and Electronic Equipment (WEEE) states that household appliances should not be disposed of using the normal solid urban waste cycle. Exhausted appliances should be collected separately to optimise the cost of re-using and recycling materials comprising the machine, while preventing potential damage to public health and the environment. The crossed-out wheeled bin symbol appears on all products to remind owners of the obligations regarding separate waste collection. Owners should contact their local authorities or appliance dealers for further information concerning the correct disposal of household appliances.
This appliance conforms to the following EU directives:

2014/35/EU (Low Voltage Directive)
2014/30/EU (Electromagnetic Compatibility Directive)
D/F/I/E
- GARANTIE / GARANTIE / GARANZIA / WARRANTY
2 JAHRE GARANTIE
2 ANS DE GARANTIE
2 ANNI DIGARANZIA
2 YEARS WARRANTY
We commit ourselves to repair this device free of charge, should a failure occur within the period of warranty despite proper handling. We repair all defects caused by material or manufacturing faults. The guarantee will be fulfilled either by repairing the device or replacing the defective parts, according to our judgement. A warranty does not cover damages due to wearing parts, damages and defects caused by improper handling or maintenance (such as limescale and commercial use). It will only be granted if either the warranty card stating date of purchase, dealer's stamp and signature, or the purchase receipt is sent with the device to the relevant after-sales service (see address below). Devices shall be returned in their original packaging. Transport costs are to be borne by the purchaser. Remember to specify your address to your sending, as well as a short declaration about the failure, shall the defect not be obvious.
Servicestation:
Service après-venture: Rotel AG
After-sales service:
5012 Schonenwerd
E-mail: office@rotel.ch