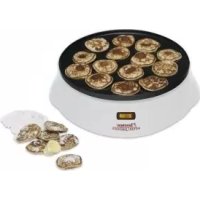
DLD5009 - Fondue, raclette and wok appliance BESTRON - Free user manual and instructions
Find the device manual for free DLD5009 BESTRON in PDF.


| Brand | Bestron |
| Model | DLD5009 |
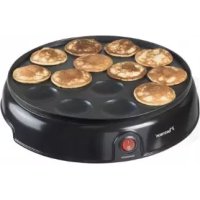
| Appliance type | Appliance for fondue, raclette and wok (also suitable for poffertjes) |
| Power | 650 W |
| Voltage | 230 V ~ 50 Hz |
| Plate coating | Non-stick |
| Number of wells | 14 |
| Housing material | Heat-resistant plastic |
| Switch | On/off with indicator light |
| Power cord | With storage under the appliance |
| Included accessories | Sauce pan |
| Warranty | 60 months (5 years) |
| Cleaning | Plate: damp cloth; housing: damp cloth and mild detergent; do not immerse or put in dishwasher |
| Safety | Do not use outdoors; do not touch hot surfaces; unplug after use |
| Main functions | Cooking poffertjes, raclette, fondue, wok |
| Maintenance | Do not use metal utensils or abrasive sponges |
Frequently Asked Questions - DLD5009 BESTRON
User questions about DLD5009 BESTRON
0 question about this device. Answer the ones you know or ask your own.
Ask a new question about this device
Download the instructions for your Fondue, raclette and wok appliance in PDF format for free! Find your manual DLD5009 - BESTRON and take your electronic device back in hand. On this page are published all the documents necessary for the use of your device. DLD5009 by BESTRON.
USER MANUAL DLD5009 BESTRON
natural_image
Line drawing of a circular tray with multiple circular indentations and a central knob (no text or symbols)Nederlands
Handleiding poffertjesmaker
Deutsch
WERKING - Poffertjes bakken
natural_image
Abstract line drawing with overlapping curved shapes (no text or symbols)N. van de Vossenberg Quality control
SUGGESTIES VOOR POFFERJTESRECEPTEN
Traditioneel Poffertjesrecept
Ingrediënten
natural_image
Abstract line drawing with overlapping curved shapes (no text or symbols)N. van de Vossenberg Qualitätskontrolle
REZEPTVORSCHLÄGE FÜR POFFERTJES
CONDITIONS DE GARANTIE
DÉCLARATION DE CONFORMITÉ CE
• Directive EMC 2004/108/EC
natural_image
Abstract line drawing with overlapping curved strokes (no text or symbols)Congratulations with the purchase of your Dutch Poffertjes Maker. This Dutch Poffertjes Maker has a high-quality baking plate, finished with a non-stick coating, which will enable you to bake fourteen golden-brown Dutch Poffertjes within seconds. The Dutch Poffertjes Maker is equipped with an heat-insulated housing and a rapidaction heating element. The power cord for the power supply (230 V) can be stored in the base of the housing after use. These instructions also contain suggestions for some recipes for delicious Dutch Poffertjes.
SAFETY INSTRUCTIONS - General
- Please read these instructions carefully and retain them for reference.
- Use this appliance solely in accordance with these instructions.
- This appliance is not intended for use by persons (including children) with reduced physical, sensory or mental capabilities, or lack of experience and knowledge, unless they have been given supervision or instruction concerning use of the appliance by a person responsible for their safety.
• Children should be supervised to ensure that they do not play with the appliance.
• Have any repairs carried out solely by a qualified electrician. Never try to repair the appliance yourself.
SAFETY INSTRUCTIONS - Electricity and heat
- Before use please verify that the mains voltage is the same as indicated on the rating plate of the appliance.
• Make sure that you always use an earthed wall socket to connect the appliance.
• Always remove the plug from the wall socket when the appliance is not in use. - Remove the plug from the wall socket by pulling the plug, not the power cord.
- Check the appliance's power cord regularly to make sure it is not damaged. Do not use the appliance if the power cord is damaged. Have a damaged power cord replaced by a qualified repair service.
• Certain parts of the appliance may get hot. Do not touch these parts to prevent burning yourself. - Make sure that the appliance has sufficient space around it, and does not come in contact with flammable material. The appliance must not be covered.
• Make sure that the appliance, the power cord or the plug do not make contact with hot services, such as a hot hob or naked flame.
• Make sure that the appliance, the power cord and plug do not make contact with water.
SAFETY INSTRUCTIONS - Use
• Never use the appliance outdoors.
- Place the appliance on a flat, stable surface.
- Never allow the power cord to hang over the edge of the draining board, worktop or table.
• Make sure that your hands are dry before touching the appliance, power cord or plug.
• Never use the appliance in a humid room.
- Keep house birds away from the appliance when it is in use; fumes released from the non-stick coating when the baking plate is hot can cause stress to birds.
- Do not pick up the appliance if it falls into water. Remove the plug from the wall socket immediately. Do not use the appliance any more.
• Make sure that the appliance has sufficient ventilation whilst in use.
- Clean the appliance thoroughly after use (see 'Cleaning and maintenance').
- Never immerse the appliance, the plug or the power cord in water or other liquids.
• This appliance may not be used through an external timer or by means of a remote control.
THE ENVIRONMENT
- Dispose of packaging material, such as plastic and boxes, in the appropriate waste containers. When this product reaches the end of its useful life do not dispose of it by putting it in a dustbin; hand it in at a collection point for the reuse of electrical and electronic equipment. Please refer to the symbols on the product, the user's instructions or the packaging.
The materials can be re-used as indicated. Your help in the re-use, recycling or other means of making use of old electrical equipment will make an important contribution to the protection of the environment.
- Contact your municipality for the address of the appropriate collection point in your neighbourhood.
TECHNICAL INFORMATION
Type: DLD5009
Output: 650 W
Power supply: 230 V \~ 50 Hz
OPERATION - General
The appliance is intended only for domestic use, not for professional use.
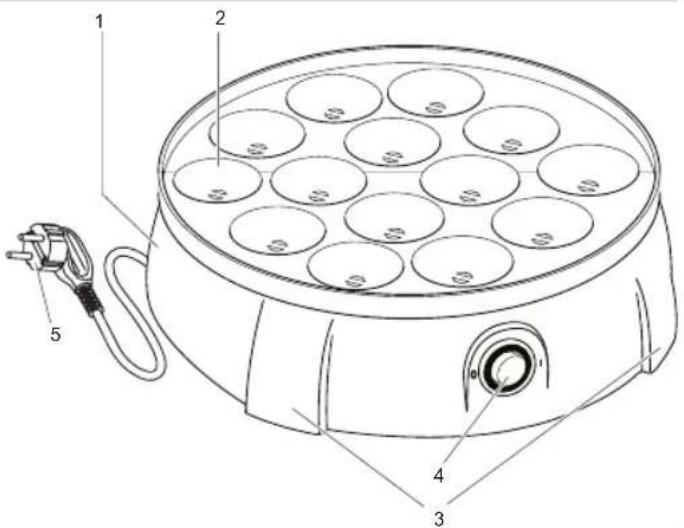
- Housing
- Baking plate
- Handle
- On/Off switch with indicator light
- Power cord and plug
Figure 1
OPERATION - Using for the first time
Clean the baking plate before using the appliance for the first time (see 'Cleaning and maintenance'). The appliance may emit a little smoke and a characteristic smell when you switch it on for the first time. This is normal, and will soon stop. Make sure the appliance has sufficient ventilation. During use the heating element will switch on and off to keep the temperature of the baking plate constant.
OPERATION - Baking Dutch Poffertjes
- Grease the baking plate with a little oil or butter.
- Put the plug into the wall socket.
- Switch on the appliance by pressing the On/Off switch. The indicator light will now illuminate.
- Wait until the heating plate has heated up sufficiently (about 5 minutes). The heating element will keep the baking plate at the correct temperature.
- Pour the Dutch Poffertjes batter into the indentations in the baking plate. Pour quickly; this will be easiest when you use a squeeze-bottle, gravy spoon, or jug.
- Carefully turn the Dutch Poffertjes over using a fork or a shish kebab skewer once the top surface becomes dry. The Dutch Poffertjes are ready once both sides turn golden-brown. The baking time will range between about 3 and 5 minutes, depending on the type of batter and your personal preference, etc.
- Remove the Dutch Poffertjes from the baking plate using a fork or shish kebab skewer and serve on a plate.
- Once you have finished baking switch off the baking plate with the On/Off switch.
- Remove the plug from the wall socket, and allow the appliance to cool.
CLEANING AND MAINTENANCE
- Remove the plug from the wall socket, and allow the appliance to cool down completely.
- Clean the baking plate after each use. Use a damp cloth to clean the plate, and dry it thoroughly.
- Clean the housing with a damp cloth, if necessary with an additional couple of drops of washing-up liquid. Remove the washing-up solution from the appliance with a damp cloth, and then dry thoroughly.
- Wrap the power cord around the lugs on the base of the housing, and store the appliance.

- Never use metal implements or scourers to clean the baking plate. Be careful when using metal objects to turn the Dutch Poffertjes or remove them from the baking plate; these could damage the on-stick coating on the baking plate.
- Never immerse the appliance, plug or power cord in water. Never put the appliance in a dishwasher.
- Never use corrosive or scouring cleaning agents or sharp objects (such as knives or hard brushes) to clean the appliance.
GUARANTEE TERMS
The importer guarantees the appliance against defects caused by manufacturing and/or material faults for 60 months from the date of purchase, subject to the following conditions.
-
No charges will be made for labour costs or materials during the warranty period. Any repairs carried out during the warranty period do not extend the warranty period.
-
The importer automatically becomes the owner of any faulty parts that he replaces or a faulty appliance (in the event of replacement of the appliance).
-
All claims submitted under warranty must be accompanied by the original bill of sale.
-
Claims under warranty must be submitted to the dealer where the appliance was purchased or to the importer.
-
The warranty is issued solely to the first purchaser and cannot be transferred.
-
The warranty does not cover damage caused by:
a. Accidents, incorrect use, wear and/or neglect.
b. Faulty installation and/or use in a manner contravening the prevailing legal, technical or safety regulations.
c. Connection to a mains voltage other than the voltage specified on the type plate.
d. Unauthorized modifications.
e. Repairs carried out by third parties.
f. Careless transport, i.e. without suitable packaging materials or protection.
- No claims may be made under this warranty for:
a. Losses incurred during transport.
b. The removal or changing of the appliance's serial number.
-
The guarantee does not cover power cords, lamps or glass parts.
-
No claims can be submitted under this warranty for damage other than the repair or replacement of faulty parts. The importer can never be held responsible for any consequential loss or damage or any other consequences, resulting either directly or indirectly from the appliance supplied by the importer.
-
In case of claims under guarantee you can contact your dealer where the appliance is purchased. Bestron offers you also the possibility to send the appliance directly to our Service Department. Do not send your appliance without consulting us. The package may be refused and any any costs will be for your account. Please contact the Service Department and they will tell you how to pack and send the appliance.
-
This appliance is not suitable for professional use.
SERVICE
If a fault should occur please contact the BESTRON service department:
THE NETHERLANDS:
BESTRON NEDERLAND BV
Bestron Service
Moeskampweg 20
5222 AW 's-Hertogenbosch
Tel: +31 (0) 73 - 623 11 21
Fax: +31 (0) 73 - 621 23 96
Email: info@bestron.com
Internet: www.bestron.com
CE DECLARATION OF CONFORMITY
This product conforms to the essential requirements of the following EU safety directives:
• EMC Directive 2004/108/EC
• Low Voltage Directive 2006/95/EC
natural_image
Abstract line drawing with overlapping curved shapes (no text or symbols)Dutch Poffertjes are baked in a special Dutch Poffertjes pan, a pan with indentations of a diameter of about 3 cm. Your Bestron Dutch Poffertjes Maker bakes delicious Dutch Poffertjes – and is ideal for use in every kitchen!
Traditional Dutch Poffertjes recipes
Ingredients
• 125 g flour
• 125 g buckwheat flour
• 1 egg
- 250 ml milk
- approx. 250 ml water
• 15 g fresh yeast (1 sachet of dry yeast)
- 50 g molten butter
• salt (when using butter without salt)
- (You can also use ordinary flour instead of buckwheat flour; however, you will then miss a little of the characteristic flavour of Dutch Poffertjes!)
Preparation
Dissolve the yeast in 3 tablespoons of lukewarm milk. Mix the flour with the buckwheat flour. Prepare a smooth batter from the flour, yeast, milk and water (the batter should not run easily from the spoon, but may not be too thick; adjust the quantity of water as required). Stir the salt, molten butter and beaten egg through the batter. The batter should be lukewarm. Set the batter, covered with a moist tea towel, in a warm place (next to a radiator, in the sun, or in an oven at 50 °C) and allow it to rise for at least 30 minutes.
Baking
Heat the Dutch Poffertjes Maker, and grease the indentations with a little butter. Quickly pour a little batter into each indentation. This will be easiest when you use a squeezebottle with a reasonably-sized opening, a gravy spoon, or a jug. Turn the Dutch Poffertjes over using a fork or a shish kebab skewer once the top surface becomes dry. The Dutch Poffertjes should be baked golden-brown on both sides. Put the Dutch Poffertjes on a plate, and repeat for the other Dutch Poffertjes. Dutch Poffertjes are eaten whilst they are hot, with a curl of butter and covered by a thick layer of castor sugar (plus a few drops of liqueur for really mouth-watering Dutch Poffertjes).
Ham/cheese Dutch Poffertjes
Ingredients
• 125 g flour
• 125 g buckwheat flour
• 1 egg
- 250 ml milk
- approx. 250 ml water
• 15 g fresh yeast (1 sachet of dry yeast)
- 50 g molten butter
• salt (when using butter without salt)
- 100 g ham
• 20 sprigs chives
• 100 g grated cheese
- (You can also use ordinary flour instead of buckwheat flour; however, you will then miss a little of the characteristic flavour of Dutch Poffertjes!)
Preparation
Dissolve the yeast in 3 tablespoons of lukewarm milk. Mix the flour with the buckwheat flour. Prepare a smooth batter from the flour, yeast, milk and water (the batter should not run easily from the spoon, but may not be too thick; adjust the quantity of water as required). Stir the salt, molten butter and beaten egg through the batter. The batter should be lukewarm. Set the batter, covered with a moist tea towel, in a warm place (next to a radiator, in the sun, or in an oven at 50 °C) and allow it to rise for at least 30 minutes. Chop the ham very finely. Also chop the chives very finely.
Baking
Pour the batter into a bowl or dish and stir in the ham, chives and half of the cheese. Heat the Dutch Poffertjes Maker, and grease the indentations with a little butter. Pour the batter into the indentations using a gravy spoon. Bake the Dutch Poffertjes until the top surface is almost dry. Turn the Dutch Poffertjes over using a fork or a shish kebab skewer once the top surface becomes dry. The Dutch Poffertjes should be baked golden-brown on both sides. Put the Dutch Poffertjes on a plate, and repeat for the other Dutch Poffertjes. Sprinkle the rest of the cheese over them, and top with a pat of butter!
Neapolitan Dutch Poffertjes
Ingredients
- 125 g flour
• 125 g buckwheat flour
• 1 egg - 250 ml milk
- approx. 250 ml water
• 15 g fresh yeast (1 sachet of dry yeast)
• 50 g molten butter
• salt (when using butter without salt)
- (You can also use ordinary flour instead of buckwheat flour; however, you will then miss a little of the characteristic flavour of Dutch Poffertjes!)
• 100 g mortadella
• 2 tablespoons finely-chopped basil
• 1 tablespoons olive oil
Preparation
Dissolve the yeast in 3 tablespoons of lukewarm milk. Mix the flour with the buckwheat flour. Prepare a smooth batter from the flour, yeast, milk and water (the batter should not run easily from the spoon, but may not be too thick; adjust the quantity of water as required). Stir the salt, molten butter and beaten egg through the batter. The batter should be lukewarm. Set the batter, covered with a moist tea towel, in a
SUGGESTIONS FOR DUTCH POFFERTJES RECIPES
warm place (next to a radiator, in the sun, or in an oven at 50 °C) and allow it to rise for at least 30 minutes. Prepare the filling by cutting the mortadella very finely, and mix it through the basil. Fry the mortadella briefly in a little olive oil.
Baking
Heat the Dutch Poffertjes Maker, and grease the indentations with a little butter. Put 12 a tablespoon of filling in each indentation, and cover with a layer of batter. This will be easiest when you use a squeeze-bottle with a reasonably-sized opening, a gravy spoon, or a jug. Turn the Dutch Poffertjes over using a fork or a shish kebab skewer once the top surface becomes dry. The Dutch Poffertjes should be baked goldenbrown on both sides. Put the Dutch Poffertjes on a plate, and repeat for the other Dutch Poffertjes. Eat the Dutch Poffertjes whilst they are hot; serve with a curl of butter.
Dutch Poffertjes with ice cream and hot cherries
Ingredients
- 125 g flour
• 125 g buckwheat flour
• 1 egg
• 250 ml milk - approx. 250 ml water
• 15 g fresh yeast (1 sachet of dry yeast) - 50 g molten butter
• salt (when using butter without salt)
- (You can also use ordinary flour instead of buckwheat flour; however, you will then miss a little of the characteristic flavour of Dutch Poffertjes!)
• 1 jar seedless cherries in syrup (350 g)
• 1/2 dl red port
• 1 cinnamon stick
• 2 tablespoons binder
• 4 scoops ice cream
Preparation
Dissolve the yeast in 3 tablespoons of lukewarm milk. Mix the flour with the buckwheat flour. Prepare a smooth batter from the flour, yeast, milk and water (the batter should not run easily from the spoon, but may not be too thick; adjust the quantity of water as required). Stir the salt, molten butter and beaten egg through the batter. The batter should be lukewarm. Set the batter, covered with a moist tea towel, in a warm place (next to a radiator, in the sun, or in an oven at 50 °C) and allow it to rise for at least 30 minutes. Whilst the batter is rising allow the cherries to drain in a sieve, catching the juice. Add the port and cinnamon stick to the cherry sauce, and heat in a sauce pan. Allow the sauce to simmer for about 15 minutes. Take the cinnamon stick out of the sauce, and add the cherries. Sprinkle the binder into the sauce, and stir whilst the sauce thickens.
Baking
Heat the Dutch Poffertjes Maker, and grease the indentations with a little butter. Quickly pour a little utter into each indentation. This will be easiest when you use a squeezebottle with a reasonably-sized opening, a gravy spoon, or a jug. Turn the Dutch Poffertjes over using a fork or a shish kebab skewer once the top surface becomes dry. The Dutch Poffertjes should be baked golden-brown on both sides. Put the Dutch Poffertjes on a plate, and repeat for the other Dutch Poffertjes. Eat the Dutch Poffertjes whilst they are hot; pour the hot cherry sauce over them, with a scoop of ice cream in the centre.
Rum Dutch Poffertjes
Ingredients
- 125 g flour
• 125 g buckwheat flour
• 1 egg
• 250 ml milk - approx. 250 ml water
• 15 g fresh yeast (1 sachet of dry yeast) - 50 g molten butter
• salt (when using butter without salt) - (You can also use ordinary flour instead of buckwheat flour; however, you will then miss a little of the characteristic flavour of Dutch Poffertjes!)
• 1 teaspoon cinnamon - 50 g raisins
• 1 tablespoon rum - 6 ginger corms
Preparation
Dissolve the yeast in 3 tablespoons of lukewarm milk. Mix the flour with the buckwheat flour. Prepare a smooth batter from the flour, yeast, milk and water (the batter should not run easily from the spoon, but may not be too thick; adjust the quantity of water as required). Stir the salt, molten butter, cinnamon and beaten egg through the batter. The batter should be lukewarm. Set the batter, covered with a moist tea towel, in a warm place (next to a radiator, in the sun, or in an oven at 50 °C) and allow it to rise for at least 30 minutes. Allow the raisins to soak in the rum. Chop the ginger corms finely, and mix them through the soaked raisins.
Baking
Heat the Dutch Poffertjes Maker, and grease the indentations with a little butter. Quickly pour a little batter into each indentation (do not fill the indentations completely). Add a little of the raisin/ ginger mixture, and cover with a thin layer of batter. This will be easiest when you use a squeeze-bottle with a reasonably-sized opening, a gravy spoon, or a jug. Turn the Dutch Poffertjes over using a fork or a shish kebab skewer once the top surface becomes dry. The Dutch Poffertjes should be baked goldenbrown on both sides. Put the Dutch Poffertjes on a plate, and repeat for the other Dutch Poffertjes. Dutch Poffertjes are eaten whilst they are hot, with a curl of butter and covered by a thick layer of castor sugar (plus a few drops of rum liqueur for really mouth-watering Dutch Poffertjes).
natural_image
Abstract line drawing with overlapping curved shapes and a small mark (no text or symbols)natural_image
Abstract line drawing with overlapping curved shapes and a small mark (no text or symbols)natural_image
Line drawing of a circular tray with multiple circular indentations and a central knob (no text or symbols)
BESTRON®
DLD5009
v 230311-08
- WERKING - Poffertjes bakken
- SUGGESTIES VOOR POFFERJTESRECEPTEN
- Traditioneel Poffertjesrecept
- Ingrediënten
- REZEPTVORSCHLÄGE FÜR POFFERTJES
- CONDITIONS DE GARANTIE
- DÉCLARATION DE CONFORMITÉ CE
- SAFETY INSTRUCTIONS - General
- SAFETY INSTRUCTIONS - Electricity and heat
- SAFETY INSTRUCTIONS - Use
- THE ENVIRONMENT
- TECHNICAL INFORMATION
- OPERATION - General
- OPERATION - Using for the first time
- OPERATION - Baking Dutch Poffertjes
- CLEANING AND MAINTENANCE
- GUARANTEE TERMS
- SERVICE
- THE NETHERLANDS:
- CE DECLARATION OF CONFORMITY
- Ingredients
- Preparation
- Baking
- Ham/cheese Dutch Poffertjes
- Neapolitan Dutch Poffertjes
- SUGGESTIONS FOR DUTCH POFFERTJES RECIPES
- Dutch Poffertjes with ice cream and hot cherries
- Rum Dutch Poffertjes
- BESTRON®
Brand : BESTRON
Model : DLD5009
Category : Fondue, raclette and wok appliance