
HD4437 - Fondue, raclette and wok appliance PHILIPS - Free user manual and instructions
Find the device manual for free HD4437 PHILIPS in PDF.
| Product type | Fondue, raclette and wok appliance (grill/steamer function) |
| Brand | Philips |
| Model | HD4437 |
| Power supply | 220-240 V, 50/60 Hz, earthed wall socket |
| Power | 1500 W (estimated) |
| Water reservoir capacity | 1.5 litres maximum (MAX mark) |
| Dimensions (approx.) | 50 x 30 x 20 cm (with tripod) |
| Weight (approx.) | 3.5 kg |
| Materials | Chrome-plated steel (inner bowl), painted steel (outer bowl), metal grill |
| Main functions | Grilling, steaming (thanks to water), keep warm, lid for roasting (model HD4437) |
| Temperature settings | On/Off switch with temperature control (positions 1 to MAX), model HD4437 |
| Safety | Earthed power cord, 30 mA residual current device recommended, safety contact on heating element |
| Maintenance and cleaning | Grill and inner bowl washable with soapy water; heating element and control panel not immersible |
| Included accessories | Grill, inner bowl, outer bowl, tripod (legs), wind shield (models HD4436/86 and HD4437/87), lid (model HD4437/87) |
| Spare parts and repairability | Repair by Philips or Authorised Service Centre; power cord replaceable by professional |
| General information | Manual available in several languages; used for grilling, vegetables, fish, meat; preheating time 15 min |
Frequently Asked Questions - HD4437 PHILIPS
User questions about HD4437 PHILIPS
0 question about this device. Answer the ones you know or ask your own.
Ask a new question about this device
Download the instructions for your Fondue, raclette and wok appliance in PDF format for free! Find your manual HD4437 - PHILIPS and take your electronic device back in hand. On this page are published all the documents necessary for the use of your device. HD4437 by PHILIPS.
USER MANUAL HD4437 PHILIPS
natural_image
Black-and-white illustration of a vintage-style alarm kit with open lid and internal compartments (no text or symbols)English Page 4
- Keep page 3 open when reading these operating instructions.
Français Page 9
HD 4436/86
English
Important
- Read these instructions carefully in conjunction with the illustrations before using the appliance.
- Before connecting the appliance, check that the voltage indicated on the appliance corresponds to the mains voltage in your home.
- Only connect your appliance to an earthed wall socket.
- When using an extension cord, pay particular attention to the following:
- the cord should be earthed (3 wires with corresponding plugs);
- the cord should be completely unwound (especially with closed cord reels);
- the cross-section of each wire should be at least 1 mm ^2 (cord suitable for current rating 10 Ampere.)
- If the mains cord of this appliance is damaged, it must only be replaced by Philips or their service representative, as special tools and/or parts are required.
- The mains cord of this appliance should regularly be examined for signs of damage. Never use the appliance if the mains cord is damaged.
- It is recommended to supply the appliance through a residual current device (RCD) having a tripping current not exceeding 30 mA.
- WARNING: Charcoal or similar combustible materials must not be used with this appliance.
- Ensure that the barbecue/grill is placed in a safe and stable position. Allow enough free space around the appliance.
- Do not place the appliance on a vulnerable surface (e.g. table cloth, varnished table top, over parquet or carpet).
- Ensure that nobody stumbles over the mains cord or pulls it while using the appliance. Make sure that the cord is not in the way.
- Keep the mains cord away from the hot parts of the appliance.
- The appliance will become very hot during use. Ensure that no objects remain on or leaning against the appliance after switching on.
- Keep a watchful eye on children: especially when the appliance is hot.
- Before use, always fill the outer tray with water up to the “MAX” indication, but never pour more than 1.5 litre of water into the outer tray.
- Ensure that there is always water in the outer tray during use, refill regularly.
- Never pour water on the heating element.
- Avoid overheating: never cover the grill entirely with aluminium foil.
- IMPORTANT: It is not advisable to grill fatty meat (like large sized chicken legs, and especially their skin, as these contain much fat). The fat would drip on to the heating element, causing flames which would set the food burning.
We advise you to pre-cook large fatty chicken legs in boiling water (20-25 minutes), or partially cook them in a microwave oven before grilling, to remove most of the fat. This also guarantees that the food will be well-done, which is important for your health. - In the course of time some disolouration of the inner wall of the outer basin may occur due to scale setting. This is quite harmless.
- Clean the appliance as indicated. Never immerse the heating element and/or the control panel in water.
- Remove the plug from the wall socket immediately after use and allow the appliance to cool down.
- Avoid touching the heating element.
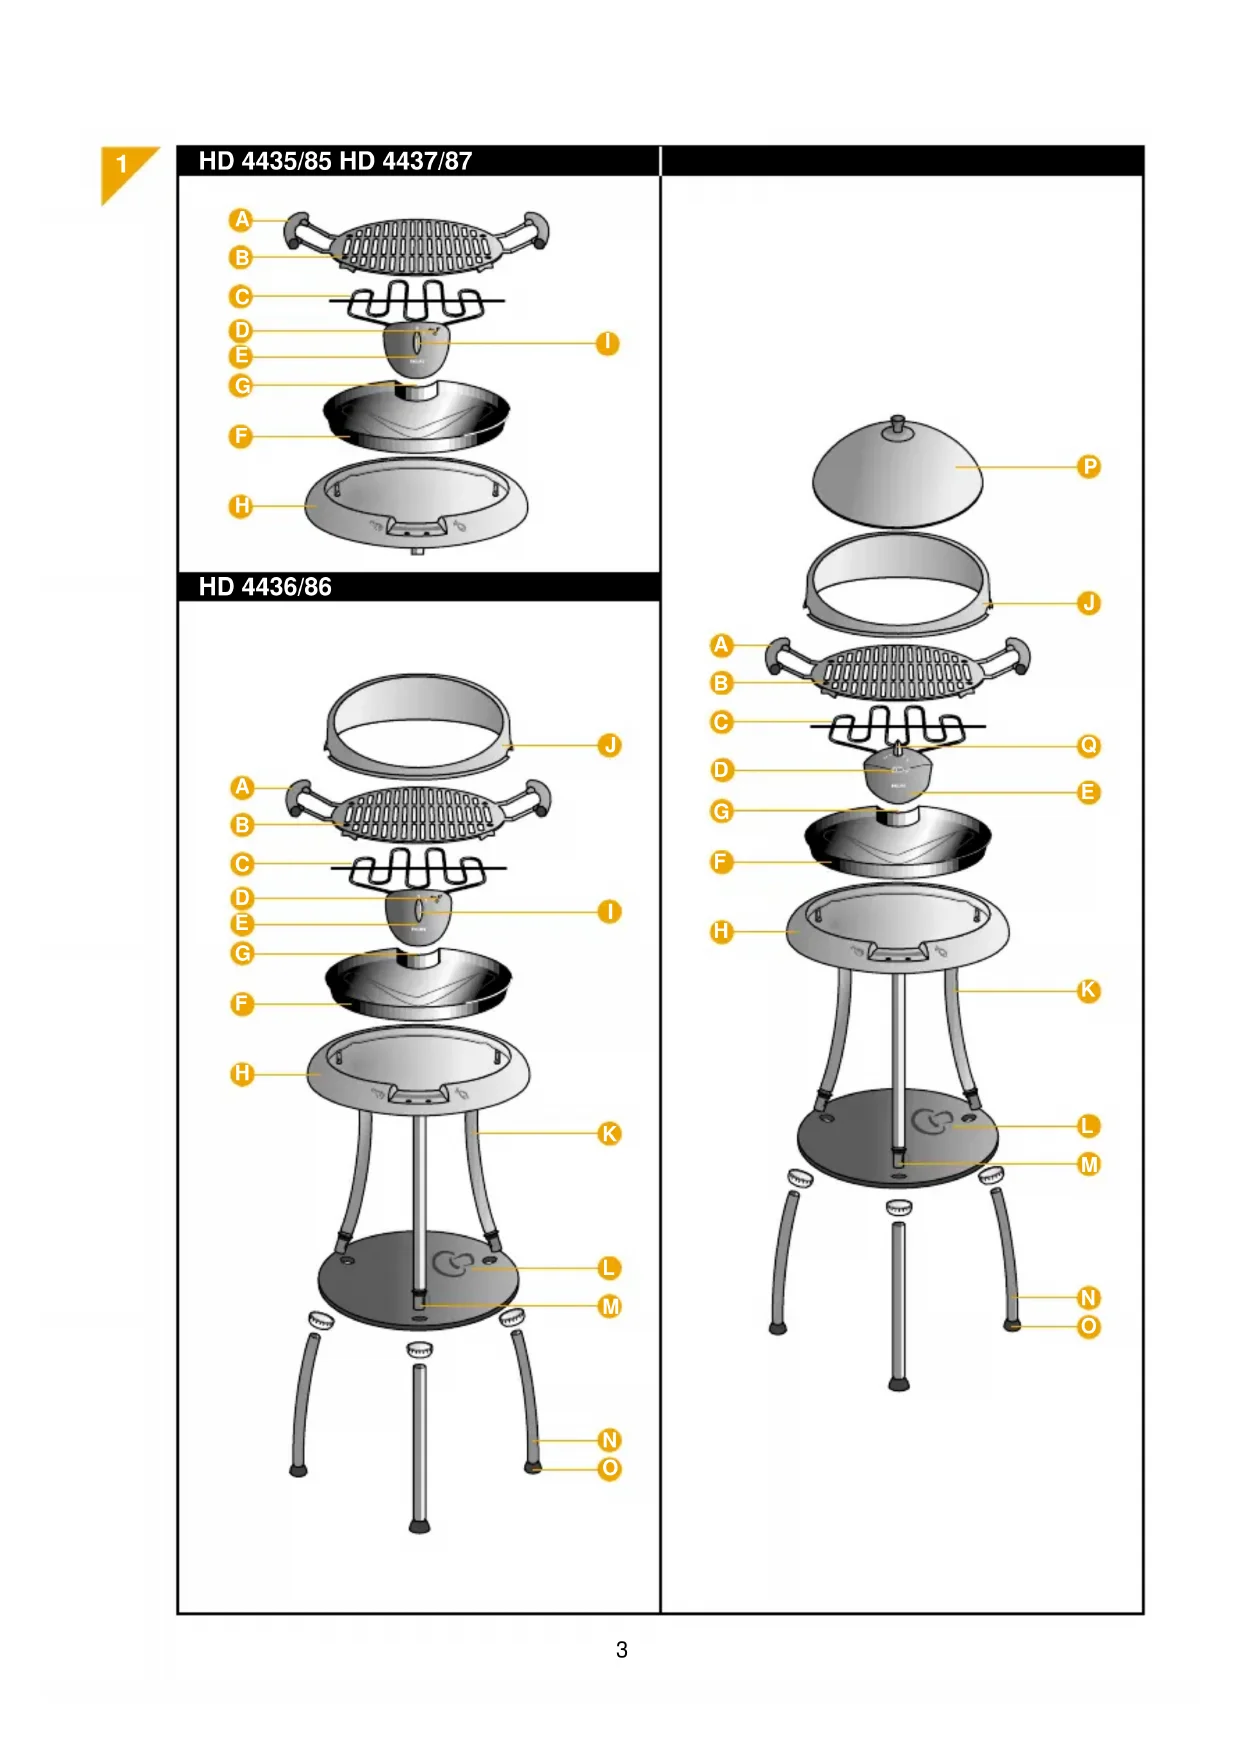
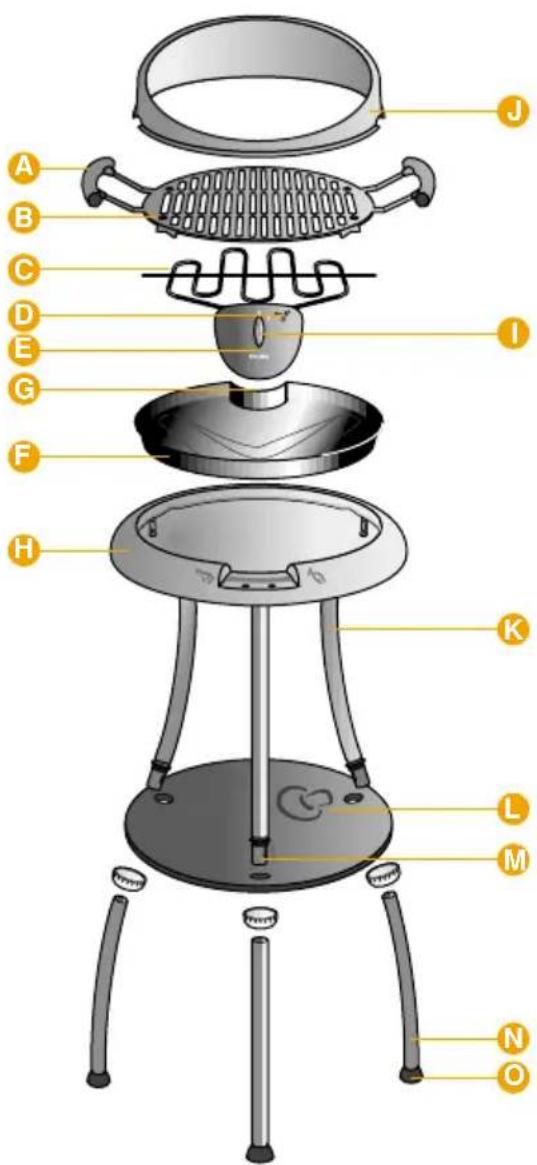
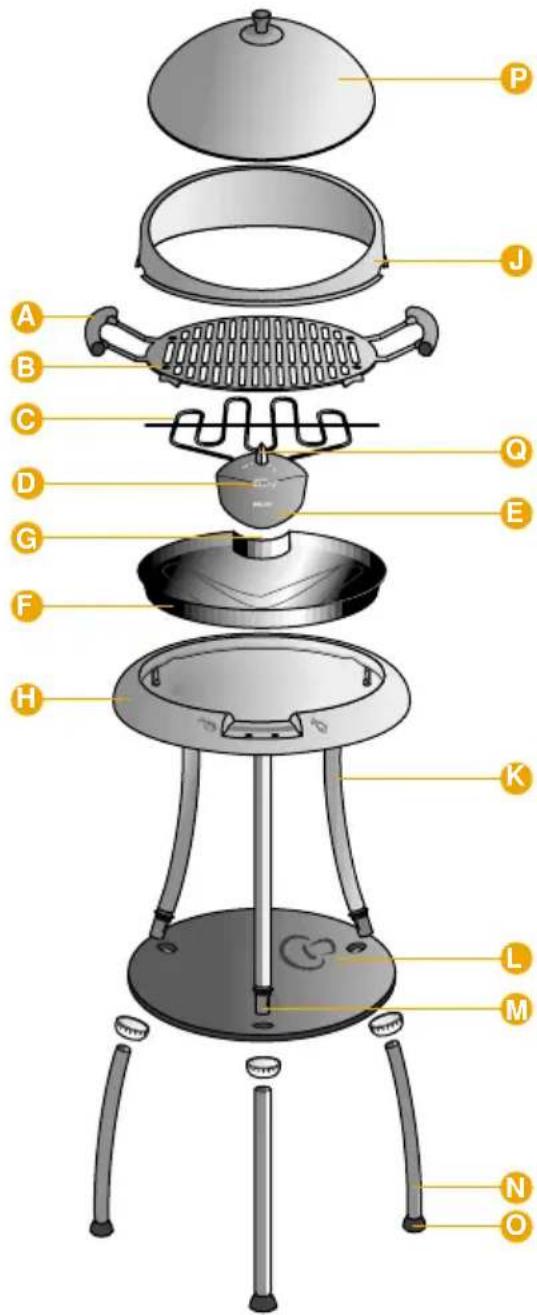
General description (fig. 1 on page 3)
All types:
A Handgrips
B Grill
Heating element
D Pilot light
E Control panel (fixed to heating element)
F Inner tray (chrome plated steel)
G Filling aperture (for filling (up) with water)
H Outer tray
With types HD 4435/85 and HD 4436/86 only:
On/Off switch
With types HD 4436/86 and HD 4437/87 only:
Wind screen
K Legs: upper sections
L Shelf (for e.g. barbecue utensils)
M Joints
N Legs: lower sections
Feet
With type HD 4437/87 only:
P Hood
On/Off switch with heat control.
(Rotate clockwise for higher temperature.)
Types HD 4436/86 and HD 4437/87 only
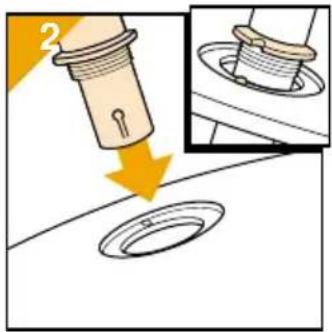
Assembling

natural_image
Diagram showing a mechanical component with a yellow arrow indicating motion, no text or symbols present- Mount the stand; place the upper sections of the legs through the openings of the shelf (fig. 2). Note the correct position.
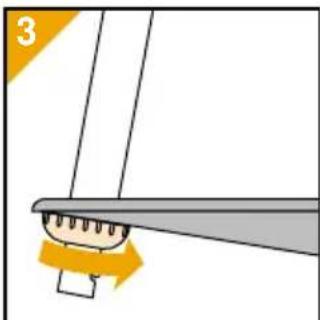
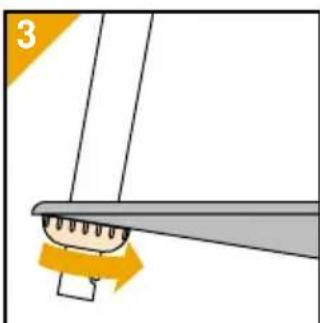
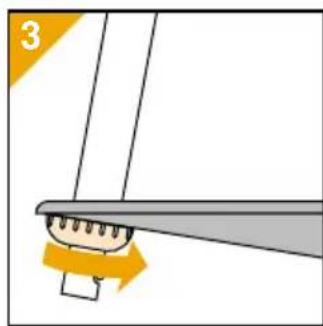
- Fix the nuts (fig. 3).
natural_image
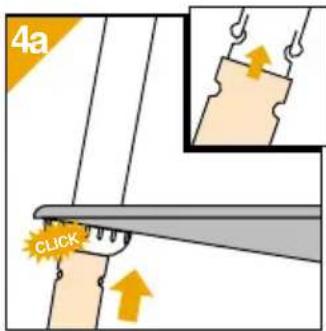
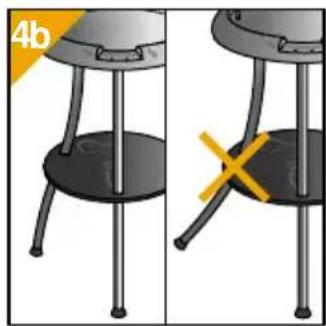
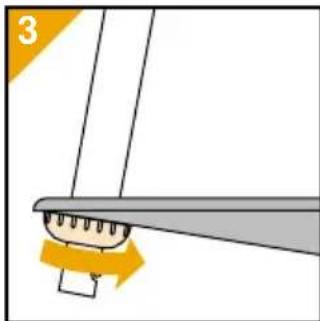
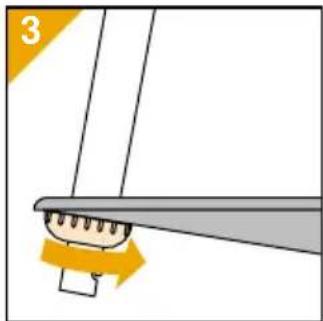
Illustration of a stool with legs and a black seat, showing a cross mark on the base (no text or symbols present)- Mount the lower sections of the legs ("Click!") (fig. 4a). Note the correct position (fig 4b). (Press the snap hook to dissamble the legs.)
- Secure the tray by fixing the nuts.
natural_image
Diagram of a mechanical setup with a circular component and two vertical supports, no text or symbols present.
natural_image
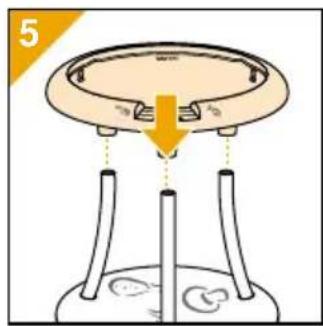
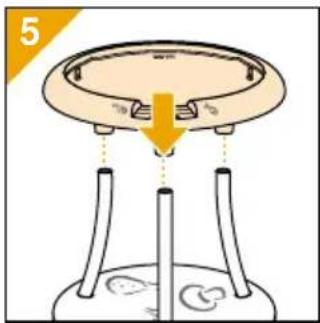
Illustration of a steamer with a downward arrow indicating compression or cooling process (no text or symbols)- Position the basis barbecue unit on the pedestal (fig. 5).
- When the barbecue is ready for use (see also figs. 8-14), you may place the wind screen (fig. 6).
- Put the barbeque on a horizontal surface!
- Always put the barbeque on an even surface to avoid instability.
- Position the barbeque so that the control panel focuses away from the wind direction. This ensures optimal performance.
All types
Before use
• Before first use wash and dry the grill.
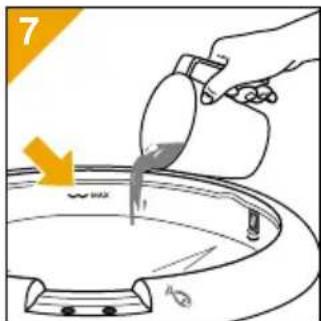
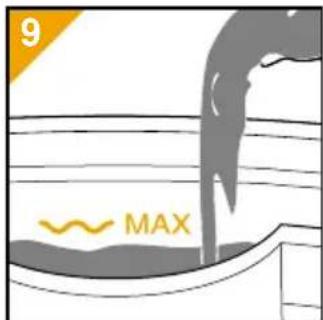
- Pour cold water into the outer tray (fig. 7).
Note: Do not fill higher than the MAX indication.
For the best results, avoid pouring water into the inner tray.
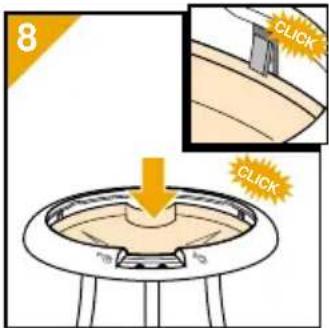
- Position the inner tray ("Click!") (fig. 8).
- When water needs to be refilled during usage this can be done via the filling aperture (fig. 9)
- Place the control panel (fig. 10, 11).

natural_image
Diagram of a mechanical component with a downward arrow indicating motion, no text or symbols present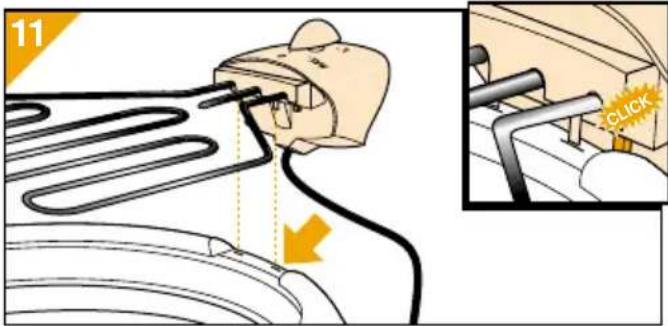
- Be sure that the safety switch, located at the bottom of the control panel, is activated when the appliance is switched on ("Click") (fig. 11).
natural_image
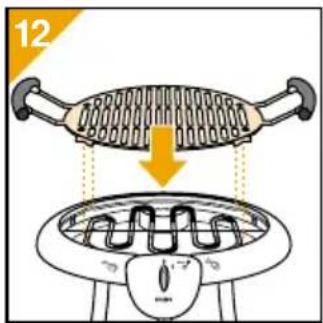
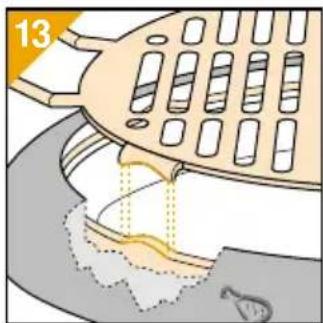
Illustration of a perforated metal grate with a pipe and a fish, no text or symbols present- Place the grill (fig. 12, 13).
natural_image
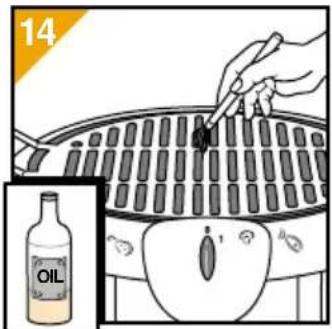
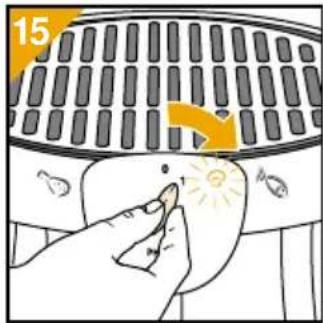
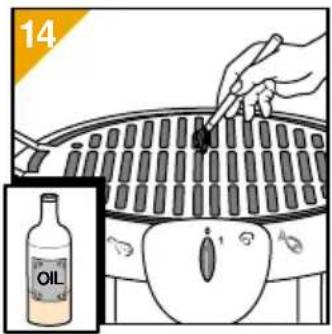
Illustration of a hand touching a light bulb on a fan-shaped device (no text or symbols)- Brush some oil onto the grill (fig. 14).
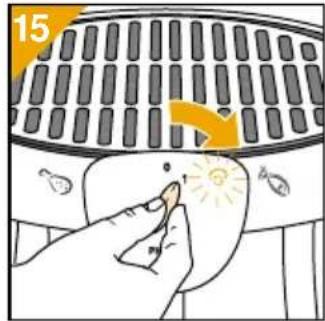
- Plug in. Switch on and allow the appliance to heat up for approximately 15 minutes (fig. 15).
Tips
- Keep the meat and fish cold and fresh in the refrigerator until you actually start grilling it.
- Do not use the same cutlery and the same chopping board for raw and grilled food.
- Do not salt the meat, chicken or fish before grilling: then too much juice will be extracted. You can of course salt the food after grilling.
• Always use meat, chicken or fish of good quality, cut into pieces/slices which are 112 - 2 cm thick and which are not carved or flattened.
• Always use the appliance with a layer of water in the outer tray. This prevents smoke and makes cleaning the inner tray much easier. If necessary add water during the cooking. Please note: Do not pour water on the heating element! Only pour water through the special filling aperture. - If you wish to grill sausages, do not forget to prick a number of holes before grilling. (This avoids the saucage bursting which can result in hot fat spattering and the saucages becoming dried out.)
- Turn the food on the grill at regular intervals. Then it will become evenly browned and will be well-done throughout.
- It is advisable to wrap fish in aluminium foil before grilling.
- To avoid sticking to the grill it is advisable to pad the meat dry with a kitchen towel before putting it on the grilling plate.
- The required grilling time is primarily dependent upon the thickness of the meat, chicken or fish (and not upon its weight). Attention: Especially pork, minced meat and fish must be very well done. Make sure that the pieces of meat are not too thick.
- For the best grilling result indoors, we advise you not to use the windscreen. However, you can use the windscreen in combination with the hood.
Type HD 4437/87 only
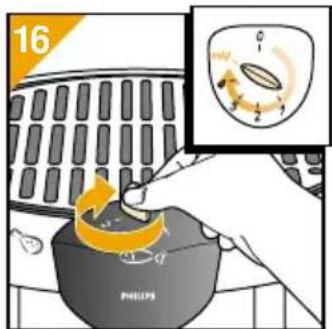
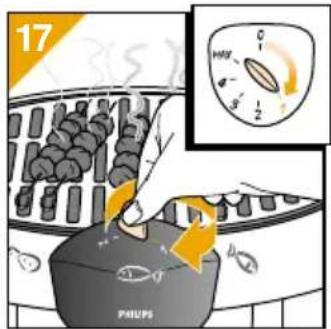
- Select the maximum temperature for heating-up (fig. 16).
- You can keep grilled food warm for some time. Select position 1 and place the hood on the wind-screen (fig. 17, 18).

natural_image
Illustration of a cooking step showing a lid being heated by a pot, with a hand holding the lid and an arrow indicating heating (no text or symbols)- Cooking settings:
1: To keep food warm
2 - 3: To melt cheese (e.g. on a baguette) with the lid on
3: To braise chunks of meat with the lid on.
3-MAX: To grill marinated meat, fish, fresh vegetables and fruit
MAX: To grill meat
All types
Cleaning
- Never immerse the heating element and/or the control panel in water.
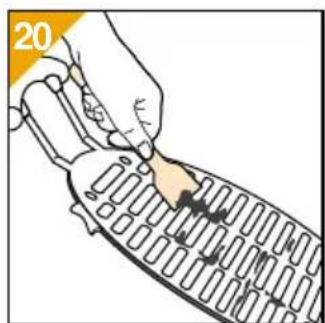
- After use first switch off (fig. 19) and unplug. Allow the appliance to cool down
- Remove the grill from the appliance. Stuck particles can be removed with a spatula (fig. 20).

natural_image
Illustration of a hand using a tool to press or inspect a grid-patterned object (no text or symbols visible)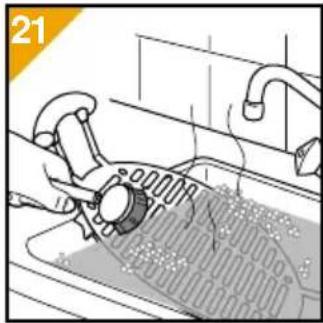
natural_image
Illustration of a kitchen sink with a hand using a tool to clean or wash the surface (no text or symbols visible)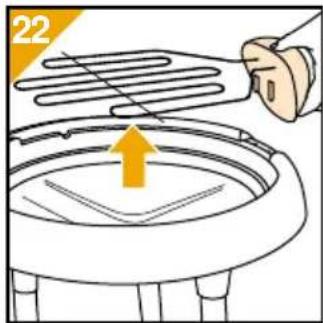
natural_image
Illustration of a hand cleaning a circular object with a yellow arrow indicating direction (no text or symbols)- You can wash the grill in hot soapy water (fig. 21) or in a dish washer.
- We advise you strongly to clean the grill directly after usage.
- You can use Brillo soap pads (very fine abrasive pads with soap) to clean the grill.
- A steel brush can be used to clean between the grilling bars.
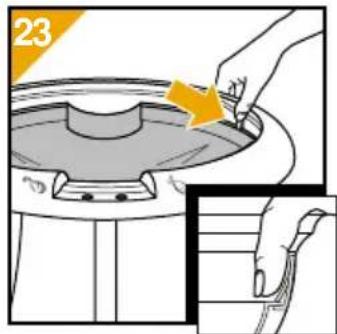
- Lift the heating element from its position (fig. 22). Carefully place it on a safe surface (e.g. stone) for a moment.
- For cleaning, release the inner tray from the outer tray (fig. 23). A plastic scouring pad or sponge may be up
- Empty the outer tray.
• After cleaning store the appliance in a dry place. (Especially the heating element is sensitive to moisture.)
- In due course of time some discolouration of the inner wall of the outer tray may occur, due to scale setting. This is quite harmless.
Marinades
A marinade can give your barbecue meat or fish a special taste.
Below you will find a number of suggestions for making marinades.
Of course you adapt these to your personal taste and preference. By adding extra ingredients, or by omitting and changing, you can make your own specialities.
Mix all ingredients well. Put the meat/fish into the marinade and let it stand for approx. 2 hours.
Please note: remove excess marinade from the food before grilling.
Simple basic marinade
4 tablespoons wine or vinegar various herbs (such as parsley, pepper grains, bay leaf, thyme, marjoram) onion (finely cut).
Marinade with white wine (especially for fish)
^1/_2 litre white wine
1 teaspoon thyme
1 teaspoon basil
1 teaspoon parsley
pinch of pepper and salt
1 tablespoon oil
Lemon marinade (for veal, fish)
4 tablespoons oil
4 tablespoons lemon juice
1 onion (finely cut)
1 clove of garlic (crushed)
pinch of salt, pepper, sugar
1 teaspoon thyme
1 teaspoon marjoram
Red wine marinade (for beef)
^1/_2 litre red wine
2 tablespoons oil
1 onion (finely cut)
1 clove of garlic (crushed)
2 bay leaves
1 teaspoon thyme
1 clove
pinch of salt and pepper
Sauces
Spicy grill sauce
^1/_2 litre water
some drops tabasco pinch of salt
1 onion (finely cut)
1 teaspoon chili powder
1 clove of garlic (crushed)
2 tablespoons brown sugar
1 teaspoon paprika powder
2 tablespoons worcester sauce
1 pinch cayenne pepper
1 / 2 tablespoon tomato ketchup
Put all ingredients into a pan and bring to the boil.
Let the sauce simmer on a low heat for half an hour.
Caper sauce
4 tablespoons yoghurt
2 tablespoons olive oil
1 tablespoon lemon juice
1 teaspoon curry powder
1 teaspoon paprika powder
1 tablespoon capers
^1/_2 onion (finely cut)
1 tablespoon fresh parsley (finely cut)
Spicy tomato sauce
5 tablespoons tomato ketchup
3 tablespoons olive oil
1 tablespoon mustard
1 teaspoon curry powder
1 teaspoon paprika powder
salt and pepper
Français
Important

natural_image
Diagram showing a mechanical component with a yellow arrow indicating motion, no text or symbols presentnatural_image
Two-panel image showing a stool with legs and a cross mark, no text or symbols presentnatural_image
Diagram of a mechanical setup with a circular component and two vertical supports, no text or symbols present.
natural_image
Illustration of a steamer with a downward arrow indicating cooling (no text or symbols)natural_image
Illustration of a hand pouring liquid into a basin with an arrow indicating flow direction (no text or symbols)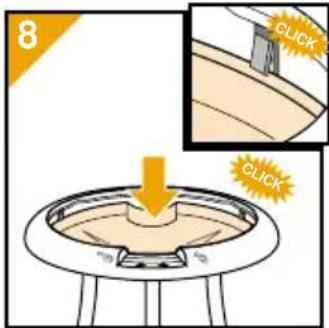
natural_image
Diagram of a mechanical component with a downward arrow indicating force or direction (no text or symbols)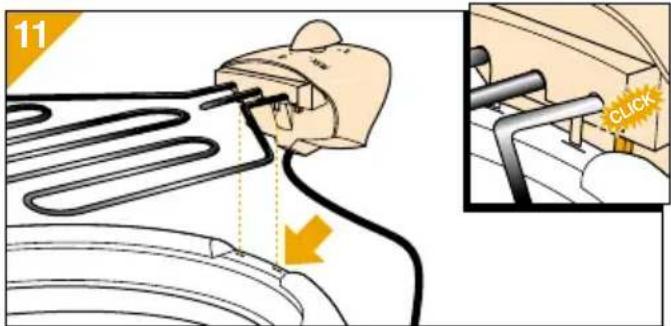
natural_image
Illustration of a hot air grater with cooling effect, showing top-down view and bottom view (no text or symbols)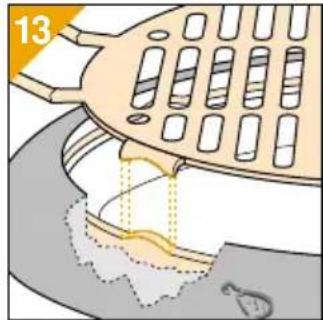
natural_image
Illustration of a pipe being inserted into a container with a hook, showing fluid flow (no text or symbols)natural_image
Illustration of a hand using a tool to clean or inspect a grid-patterned object (no text or symbols visible)
natural_image
Illustration of a kitchen sink with a hand cleaning the surface (no text or symbols)natural_image
Illustration of a hand cleaning a circular object with a yellow arrow indicating direction (no text or symbols)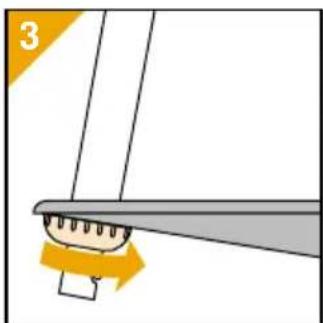
natural_image
Diagram showing a mechanical component with a yellow arrow indicating motion, no text or symbols presentnatural_image
Two-panel illustration showing a stool with legs and a cross mark, no text or symbols presentnatural_image
Diagram of a mechanical setup with a circular component and two vertical supports, no text or symbols present.
natural_image
Illustration of a steamer with a downward arrow indicating cooling (no text or symbols)natural_image
Diagram of a mechanical component with internal flow and a numbered label (13), showing no readable text or symbols.natural_image
Illustration of a hand touching a car's nose with a sun symbol, no text or symbols presentnatural_image
Illustration of a hand using a tool to interact with a grid-patterned device (no text or symbols visible)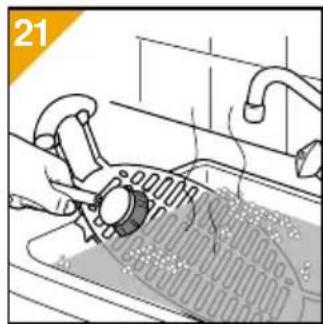
natural_image
Illustration of a kitchen sink with a hand cleaning the surface (no text or symbols)natural_image
Illustration of a hand pouring liquid into a circular tank with an arrow indicating flow (no text or symbols)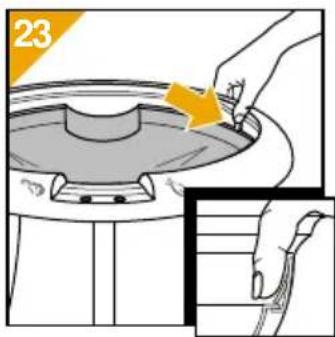

natural_image
Diagram showing a mechanical component with a yellow arrow indicating motion or force direction (no text or symbols)natural_image
Two-panel illustration of a stool with legs and a black base, showing a yellow X mark on one side (no text or symbols)natural_image
Diagram of a mechanical device with a central rotating component and two vertical supports, no text or symbols present.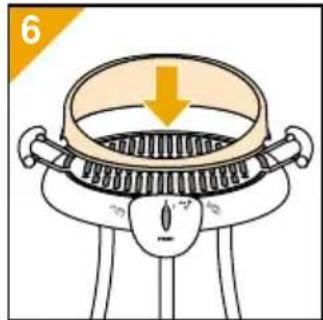
natural_image
Illustration of a steamer with a downward arrow indicating cooling (no text or symbols)natural_image
Illustration of a hand pouring liquid into a pot with a downward arrow indicating flow (no text or symbols)
natural_image
Diagram of a mechanical component with internal flow and a hook, no visible text or symbolsnatural_image
Illustration of a hand using a tool to draw or mark a grid-patterned object (no text or symbols)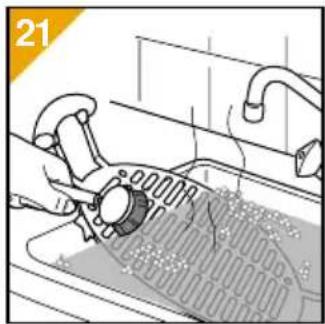
natural_image
Illustration of a kitchen sink with a hand cleaning the surface (no text or symbols)natural_image
Illustration of a cooking step with a hand pouring liquid into a bowl (no text or symbols)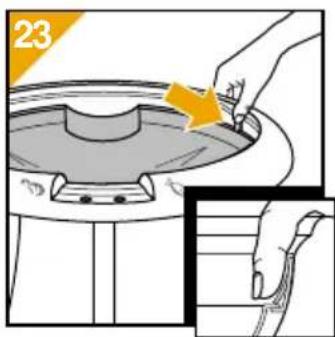

natural_image
Diagram showing a mechanical component with a yellow arrow indicating motion, no text or symbols presentnatural_image
Two-panel illustration of a small stool with legs and a black base, showing a cross mark (no text or symbols)natural_image
Diagram of a mechanical component with a circular top and two vertical supports, showing a downward force arrow (no text or symbols)
natural_image
Illustration of a steamer with a downward arrow indicating cooling (no text or symbols)natural_image
Illustration of a grating machine with cooling effect, showing top-down view and bottom view (no text or symbols)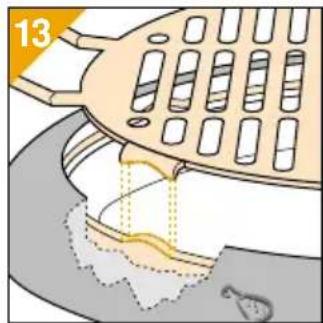
natural_image
Diagram of a mechanical component with internal flow and a hook, no visible text or symbolsnatural_image
Illustration of a hand touching a lamp at the front of a grating (no text or symbols)natural_image
Illustration of a cooking step showing a lid being heated by a pot on a stove (no text or symbols)natural_image
Illustration of a hand using a tool to press down a grid-patterned device (no text or symbols visible)
natural_image
Illustration of a kitchen sink with a hand cleaning the drain (no text or symbols)natural_image
Illustration of a hand pouring liquid into a circular tank with an arrow indicating flow (no text or symbols)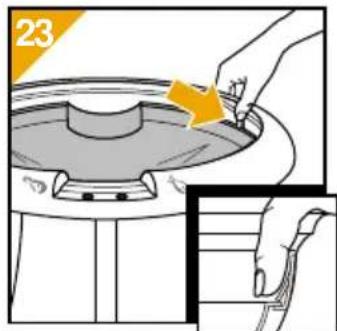
natural_image
Diagram showing a mechanical component with a yellow arrow indicating rotation or force direction (no text or symbols)natural_image
Two-panel image showing a stool with legs and a cross mark, no text or symbols presentnatural_image
Diagram of a mechanical setup with a circular component and three vertical supports, no text or symbols present.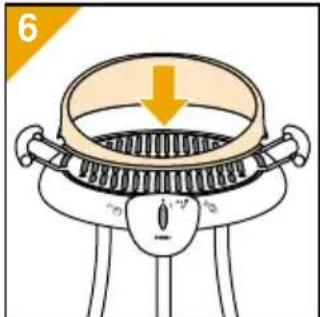
natural_image
Illustration of a steamer with a downward arrow indicating compression or cooling process (no text or symbols)natural_image
Illustration of a kitchen grater with a handle and water flowing from it, no text or symbols presentnatural_image
Illustration of a hand touching a small object with a light source, next to a grating grille (no text or symbols)natural_image
Illustration of a hand using a tool to clean or inspect a grid-patterned object (no text or symbols visible)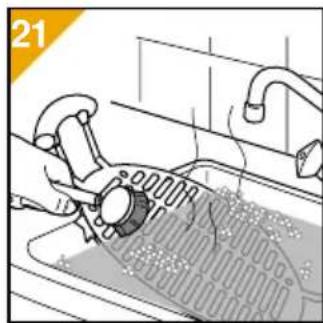
natural_image
Illustration of a kitchen sink with a hand cleaning the surface (no text or symbols)natural_image
Illustration of a hand pressing down on a circular object with a yellow arrow indicating motion (no text or symbols)
natural_image
Diagram showing a mechanical component with a yellow arrow indicating motion or force direction (no text or symbols)natural_image
Illustration of a two-leg stool with a black base and four legs, showing a yellow X mark on the side (no text or symbols)natural_image
Diagram of a lampshade setup with a circular base and three legs, no text or symbols present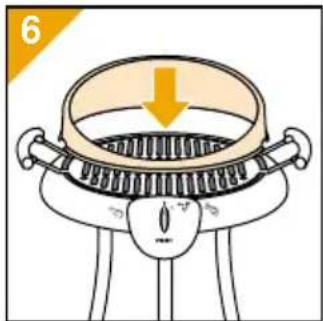
natural_image
Illustration of a steamer with a downward arrow indicating cooling or reduction (no text or symbols)natural_image
Illustration of a pipe being inserted into a container with a hook, showing fluid flow (no text or symbols)- Coloque a grelha (figs. 12, 13).

natural_image
Illustration of a hand using a tool to press down a grid-patterned object, no text or symbols present
natural_image
Illustration of a hand washing a kitchen sink with a drain filter (no text or symbols)natural_image
Illustration of a hand cleaning a circular object with a handle and arrow indicating direction (no text or symbols)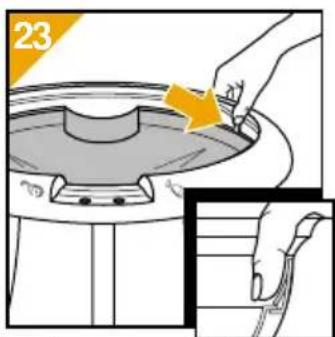
natural_image
Diagram showing a mechanical component with a yellow arrow indicating rotation or force direction (no text or symbols)natural_image
Illustration of a small stool with legs and a black seat, showing a cross mark on one leg (no text or symbols present)- Sæt de nederste ben på ("klik") (fig. 4a). Sørg for, at benene sidder rigtigt (fig. 4b). (Tryk på karabinhagen for at demontere benene.)
- Sæt skålen fast ved at skrue møtrikkerne til.
natural_image
Diagram of a mechanical setup with a circular component and two vertical supports, no text or symbols present.
natural_image
Illustration of a steamer with a downward arrow indicating cooling (no text or symbols)natural_image
Diagram of a mechanical component with internal flow and a labeled section (13), showing no readable text or symbols.natural_image
Illustration of a hand using a tool to press down a grid-patterned device (no text or symbols visible)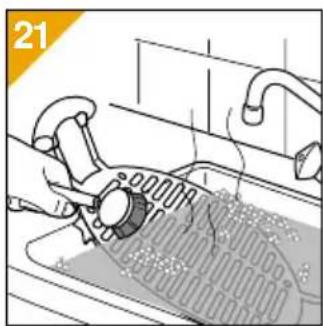
natural_image
Illustration of a kitchen sink with a hand cleaning the drain (no text or symbols)natural_image
Illustration of a hand pressing down on a circular object with an arrow indicating upward motion (no text or symbols)
Bare for type HD 4437/87

natural_image
Diagram showing a mechanical component with a yellow arrow indicating motion or force direction (no text or symbols)natural_image
Two-panel illustration showing a stool with legs and a black seat cover, one marked with a yellow X (no text or symbols)natural_image
Diagram of a mechanical device with a central rotating component and two vertical supports, no text or symbols present.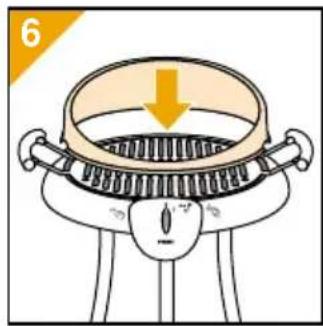
natural_image
Diagram of a mechanical component with a downward arrow indicating force or direction (no text or symbols)
natural_image
Diagram of a water channel with pipe and outlet, showing flow direction (no text or symbols)- Sett på plass grillristen (fig. 12, 13).

- Pensle litt olje på grillristen (fig. 14).
- Plugg inn apparatet og slå det på. La apparatet varmes opp i ca. 15 minutter (fig. 15).
Tips
natural_image
Illustration of a hand using a tool to press down a grid-patterned device (no text or symbols visible)
natural_image
Illustration of a kitchen sink with a hand cleaning the surface and using a tool (no text or symbols visible)natural_image
Illustration of a hand pouring liquid into a circular tank with an upward arrow (no text or symbols)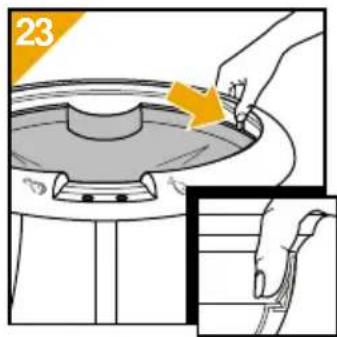
natural_image
Diagram showing a mechanical component with a yellow arrow indicating motion, no text or symbols presentnatural_image
Illustration of a two-leg stool with a black seat and a yellow X mark indicating a specific point (no text or symbols present)natural_image
Diagram of a mechanical setup with a circular component and three vertical supports, no text or symbols present.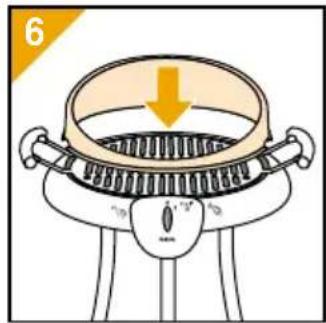
natural_image
Illustration of a steamer with a downward arrow indicating cooling (no text or symbols)natural_image
Diagram of a mechanical component with internal channels and a handle, no visible text or symbolsnatural_image
Illustration of a hand cleaning a kitchen appliance with a grating and sun (no text or symbols)natural_image
Illustration of a hand using a tool to cut a grid-like object with arrows indicating motion (no text or symbols)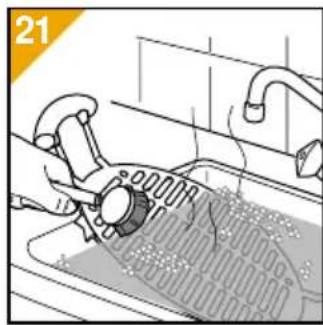
natural_image
Illustration of a kitchen sink with a tool applying material to the drain (no text or symbols visible)natural_image
Illustration of a kitchen appliance with a handle and a yellow arrow indicating a point (no text or symbols)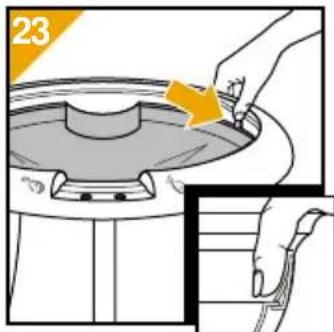
1 matsked citronjuice
1 tesked currypulver
1 tesked paprikapulver
1 matsked kapris
^1/_2 lök finhackad
1 matsked persilja finhackad
Kryddig tomatsås
5 matskedar tomatketchup
3 matskedar olivolja
1 matsked senap
1 tesked currypulver
1 tesked paprikapulver
salt och peppar
Suomi
Tärkeää
natural_image
Diagram showing a mechanical component with an arrow indicating motion, no text or symbols presentnatural_image
Two-panel illustration showing a small stool with a black base and a yellow X mark, no text or symbols present.natural_image
Diagram of a mechanical device with a circular top and two vertical supports, showing a downward force or compression process (no text or symbols)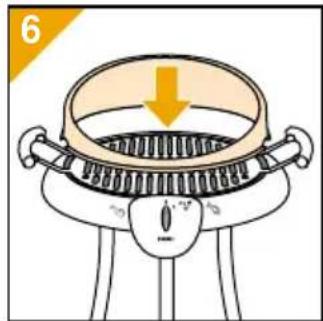
natural_image
Illustration of a steamer with a downward arrow indicating cooling effect (no text or symbols)natural_image
Diagram of a mechanical device with a lever and base, showing a downward force (no text or symbols)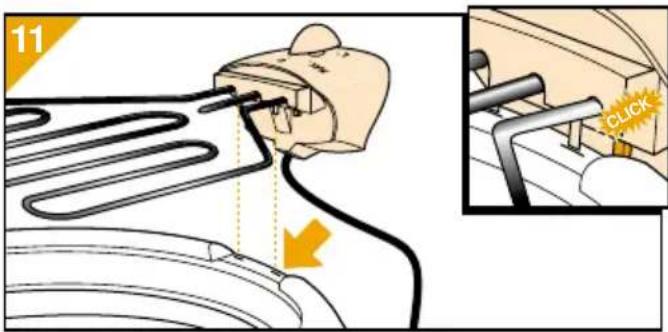
natural_image
Illustration of a mechanical component with internal flow and a numbered label (13), no readable text or symbols present.natural_image
Illustration of a hand using a tool to cut a mechanical component (no text or symbols visible)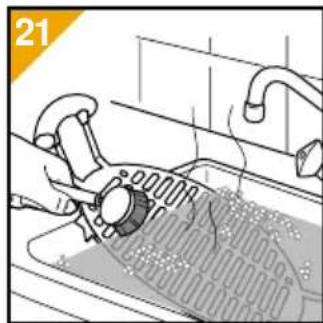
natural_image
Illustration of a kitchen sink with a hand cleaning the surface (no text or symbols)natural_image
Illustration of a kitchen appliance with a hand pouring liquid from a lid onto a tray (no text or symbols)

natural_image
Diagram showing a mechanical component with a yellow arrow indicating motion, no text or symbols presentnatural_image
Two-panel illustration of a small stool with legs and a black seat, one marked with a yellow X (no text or symbols)natural_image
Diagram of a mechanical setup with a circular component and two vertical supports, no text or symbols present.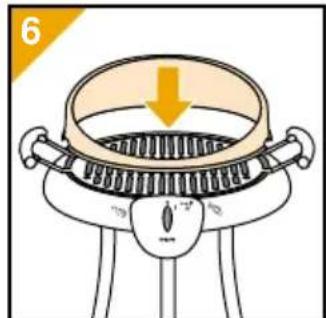
natural_image
Illustration of a steamer with a downward arrow indicating cooling (no text or symbols)natural_image
Diagram of a mechanical device with a lever and base, showing a downward force (no text or symbols)natural_image
Diagram of a water channel with pipe and outlet structures, no text or symbols presentnatural_image
Illustration of a hand cleaning a car grille with a light bulb and heat source (no text or symbols)natural_image
Illustration of a hand using a tool to cut or mark a grid-patterned object (no text or symbols)natural_image
Illustration of a hand using a tool to clean or operate a circular device with a yellow arrow indicating the process (no text or symbols present)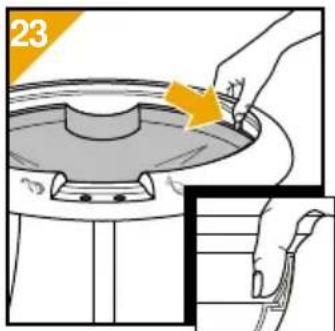


- English Page 4
- Français Page 9
- English
- Important
- General description (fig. 1 on page 3)
- All types:
- Types HD 4436/86 and HD 4437/87 only
- All types
- Before use
- Tips
- Type HD 4437/87 only
- Cleaning
- Marinades
- Simple basic marinade
- Marinade with white wine (especially for fish)
- Lemon marinade (for veal, fish)
- Red wine marinade (for beef)
- Sauces
- Spicy grill sauce
- Caper sauce
- Spicy tomato sauce
- Français
- Kryddig tomatsås
- Suomi
- Tärkeää
Brand : PHILIPS
Model : HD4437
Category : Fondue, raclette and wok appliance