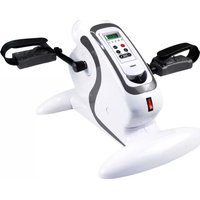
FF17 - Exercise bike Fysic - Free user manual and instructions
Find the device manual for free FF17 Fysic in PDF.

| Product type | Exercise bike (Mini Bike) |
| Brand | Fysic |
| Model | FF-17 |
| Maximum user weight | 100 kg |
| Mains power supply | 230 V ~ 50 Hz, 80 W |
| Computer power supply | LR44 battery (included) |
| Display | LCD with Scan, Calories, Timer, Distance, Rev counter, Total revolutions |
| Resistance | Adjustable via rotary control |
| Automatic shut-off | Computer after 4 min of inactivity; device after 15 min |
| Pedals | With L and R markings |
| Assembly | Assembly required; tools and hardware provided |
| Safety | Detailed instructions in the manual; do not use as a toy |
| Maintenance | Regularly check screws and bolts; replace defective parts |
| Warranty | 24 months |
| Usage | Indoors, on a flat, stable surface |
| Disposal | Batteries and device in accordance with local regulations |
| Included exercises | Warm-up and stretching program |
| Reset | MODE button held for 4 seconds |
Frequently Asked Questions - FF17 Fysic
User questions about FF17 Fysic
0 question about this device. Answer the ones you know or ask your own.
Ask a new question about this device
Download the instructions for your Exercise bike in PDF format for free! Find your manual FF17 - Fysic and take your electronic device back in hand. On this page are published all the documents necessary for the use of your device. FF17 by Fysic.
USER MANUAL FF17 Fysic
WARMING UP EXERCISES / STRETCHING / COOL-DOWN 36
EXERCISES 38
DISPOSAL NOTES 38
SPECIFICATIONS 38
YOUR GUARANTEE CARD 39
OPWARMEN/STREKKEN/AFKOELEN
1 This equipment is not a toy and may only operated for the purposes specified in this user manual. Read the following instructions carefully, before you operate the equipment for the first time.
2 Children are quickly willing in their first enthusiasm to operate the equipment inappropriately. If children receive the permission for the use of the equipment, the children thereby must be under supervision and must be instructed to operate the equipment in the correct way. The equipment may be in no case misused as toy.
3 Always consult your family doctor, before you start exercises on this or any other workout equipment.
4 Always wear protecting and comfortable clothes, if you use the workout equipment. Preferably wear sport or aerobic shoes.
5 If you suddenly feel bad or any trouble occurs, you must immediately stop the exercise. This is also valid if you feel pain or pressure on your joints.
6 Take care that the equipment is installed correctly, before you start to train on it. Make sure that all screws, bolts and nuts are mounted and tightened correctly. Only use accessories, which are recommended and provided by the importer.
7 Do not use a damaged or broken equipment.
8 Most of all pay attention how your body reacts on the training. Dizzinesses are a sign for the fact that you trained too intensively with the equipment. If you feel dizzy, lie on the ground and only stand up if you feel better again.
9 Always use the equipment on a smooth and clean surface.
10 Exclusively use this equipment for the purposes specified in this user manual.
11 Only use accessories recommended by the manufacturer.
12 Take care that no pointed items are in the direct surroundings of the workout equipment.
13 We suggest handicapped persons to use this equipment only in presence of qualified responsible persons.
14 First the equipment must stop completely, before you are allowed to leave it.
15 The maximum weight on this equipment is 100kg
16 Place the equipment a stable and flat surface. Select the position for placing in such a way that no orifices of heating or vent ducts are blocked.
17 Make sure all persons who use the Mini-Bike, are informed about operation and warning notes.
18 Take care that at all sides around the equipment about 1 meter space is left, in order to be able to train unhindered.
19 Do not turn round while you train on the equipment. Always look forward in the direction of the steps.
20 We suggest placing a skid-proof base, e.g. a rubber mat or the like under the workout equipment in order to avoid possible damage to the floor.
WARNING
Consult your family doctor, before you start exercises at this equipment. If you want to train regularly and intensively, you must obtain first the agreement of your physician. Most of all this is valid for persons over 35 as well as for persons with health problems. Carefully read the whole user manual, before you start with the training. We do not take any responsibility for personal injury or physical discomforts, which are caused by the use of this equipment and therefore also cannot make responsible for it. Keep this user manual well. Not appropriate or adequate use can cause injuries. Notice: the maximum weight on this equipment is 100kg .
This user manual will help you to ease the installation of the equipment and in addition to explain correct use of it. Therefore read this user manual carefully. In order to become more familiar with the accessories and the equipment, we recommend checking the construction drawing pedantic before mounting. Place all mounting materials clearly on the floor and remove all packaging. Check by means of the related accessory table if all accessories are available. See the next pages for further mounting details.
MAINTENANCE AND USE
Before starting the training first consult your physician. A frequent and arduous training program first must be authorized by your family doctor.
- The equipment must be checked regularly, in order to avoid injuries. That means, that regularly must be checked if screws and nuts are well tightened, or if hair-cracks or sharp edges etc. are existing, which could lead to physical injuries.
Defective components must be renewed immediately. If this should not be possible, the equipment may not be used anymore if not repaired. - Caution! Avoid smoking or open fire or the near of a hot oven or an open fireplace.
If you have an allergy against synthetics, you should first ask your physician, before you use the equipment.
THE PRODUCT
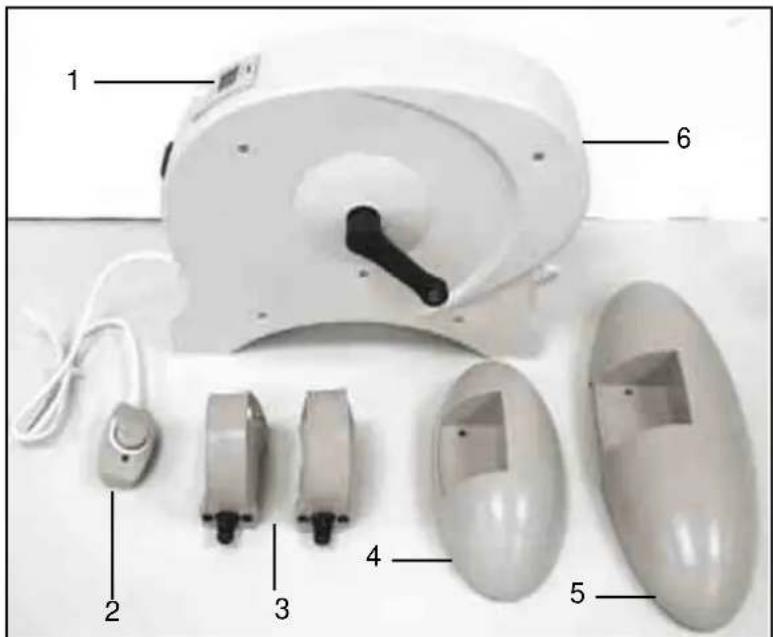
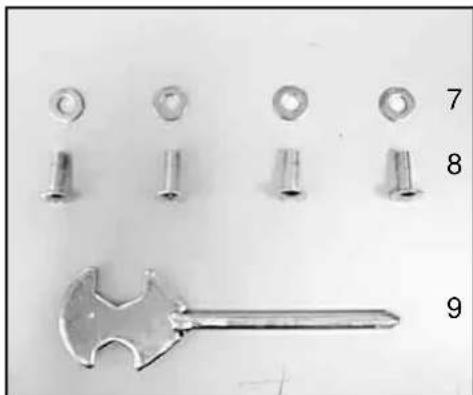
TABLE OF THE COMPONENTS
1 Computer
2 Controller
3 Pedals
4 Front stand
5 Rear stand
6 Main element
7 Washer
8 Bolt
9 Tool
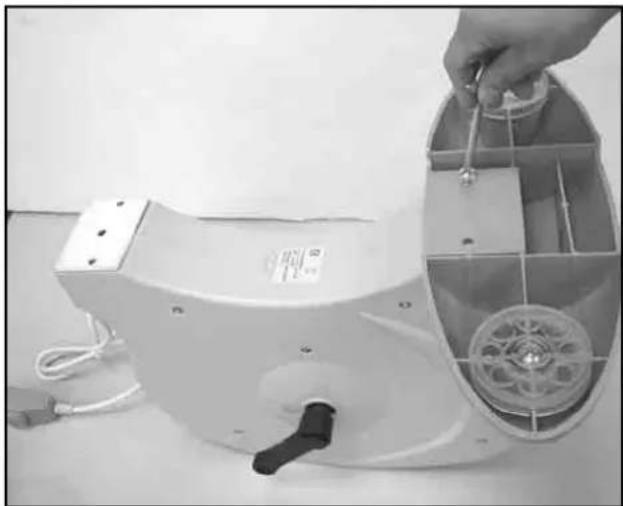
MOUNTING
Step 1:
Fix the front and the rear stand by the means of bolts (8) and washers (7) at the main element (6) as shown in the illustration.
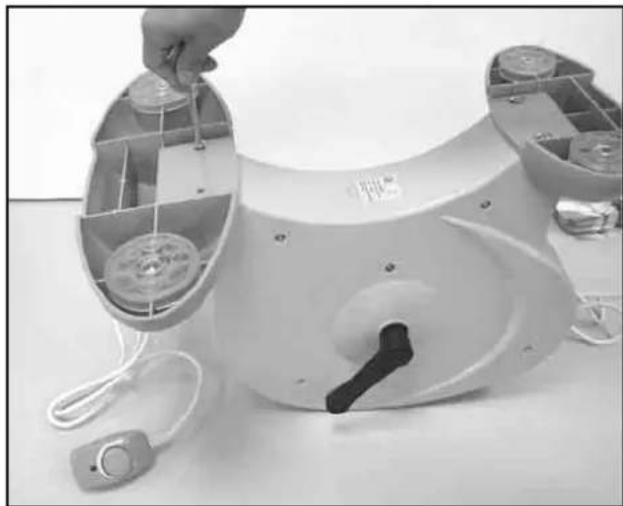
Step 2:
Fix the left and right pedal (3) at the crank arm as shown in the illustration. Heed thereby the markings (L&R) at the pedals.

Tighten all bolts firmly.
COMPUTER COMMANDS
- Turn on the computer by pressing the MODE button or operate the pedals. The computer turns off automatically, if for 4 minutes neither the MODE button is pressed nor the pedals are operated.
-
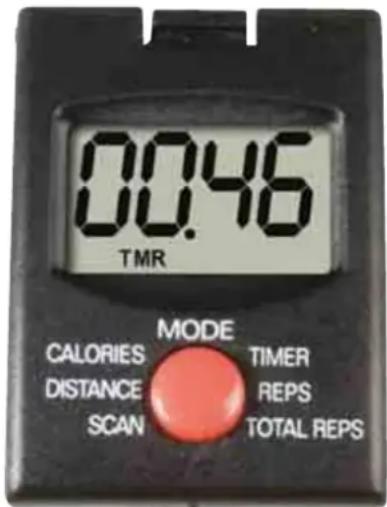
Indication of the computer:
-
Scan (S): all values are displayed alternating in intervals of 5 seconds.
- Calories (CAL): displays the so far consumed calories.
- Timer (TMR): displays the actual training time.
- Distance (KM): displays the actually traveled training distance.
- Cycling Times (REPS): displays the number of actually traveled steps.
- Total Cycling Times (T-REPS): displays the number of total traveled steps.
Please note that the values displayed by the computer can only be used as information and are not allowed to be used for medical purposes.
- By the pressing the MODE button the following values are displayed successively:
CAL (Calories)
SCAN (automatic alternating display in intervals of 5 seconds)
TMR (actual training time)
KM (actual training distance)
REPS (number of actually traveled steps)
T-REPS (number of total traveled steps)
CAL (number of the actually consumed calories)
- Set the values to ZERO (RESET): Hold and press the MODE button for four seconds to reset all values to ZERO. Except the value of total traveled steps (T-REPS) all values will be reset to ZERO. You can also reset the value for T-REPS to ZERO by moving with the MODE button to this value on the display and subsequently hold the MODE button 4 seconds pressed.
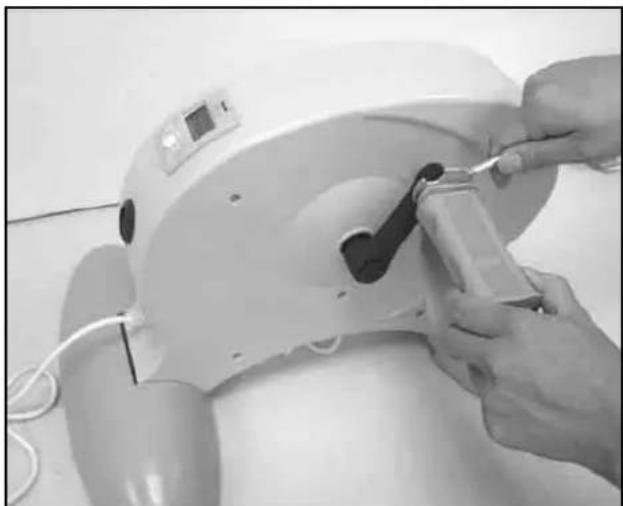
Power supply of the computer:
The battery compartment is on the rear of the computer. Open the cover and insert 1 button cell (LR44). Observe the correct polarity and sufficient contact with the battery springs. If the indication is illegible or individual segments of the digits are missing, please remove the battery for about 15 sec. and insert it again.
POWER SUPPLY FOR THE MINI-BIKE
Please observe the following notes on the power supply and on the power cable in order to avoid short-circuits and electrical shocks.
- The Mini-Bike is supplied with electrical power via a wall socket. Insert the power plug into a grounded wall socket. We suggest not connecting additional electrical appliances to this wall socket, e.g. with assistance of a multiple socket, because otherwise the electronics of the computer and the motor could be damaged. In this case the guarantee for the Mini-Bike will be expired.
- Before each training make sure that the power plug is completely inserted into the wall socket and does not wiggle.
- Always pull the power plug, if you do not use the equipment, if you clean it, maintain or build it up to avoid an electrical shock. Never leave the Mini-Bike unsupervised, as long it is connected to the electric mains. Always pull at the power plug, never pull at the power cord to disconnect the power plug from the wall socket.
- Rotate the controller to the OFF position und pull the power plug to turn off the Mini-Bike.
- If you notice damage at the power cord, do not train under any condition with the equipment and replace absolutely the damaged cord before the next training.
- Pay attention the power cord is not jammed by any objects.
- Do not twist or knot the power cord together.
Important! Place the Mini-Bike on flat and stable surface. We suggest laying a skid-proof pad e.g. a rubber mat or the like, under the equipment in order to avoid possible damages to the floor.
1 Rotate the controller (2) to turn on the Mini-Bike and to adjust the desired speed.
2 Perhaps it can happen that the pedals lock due to sudden and strong load. In this case demount briefly the Mini-Bike, turn it off and turn it on again after a short moment.
Note: after 15 minutes the Mini-Bike turns off automatically. You can continue the training immediately, if you briefly turn the Mini-Bike off and turn it on again afterwards.
IMPORTANT NOTES ABOUT THE TRAINING
Before you start with training, consult your physician. Ask him which extent of training for you is appropriate. False or excessive training can lead to health hazard.
- Avoid excess load of your body. Do not train, if you are tired or exhausted. If you are not used to work physically, start slowly at the beginning.
- Stop the exercises immediately, if you notice pain.
- Do not eat for 30 minutes before and after training.
Pay attention to an even and calm respiration during the training.
- To avoid injuries start training with warming up exercises and finish with a cool down phase. Use the exercises described in this guidance. Additional exercises can also be found in the relevant literature.
- Pay attention to the fact that you drink enough during the training. Consider that the recommended drinking amount of about 2 liters per day is increased by physical load. The liquid you drink should have room temperature.
Use the product only with sport clothes and suitable shoes, which are equipped with a skid-proof sole. Avoid wide clothes, which could be caught by the moving parts of the product.
WARMING UP EXERCISES / STRETCHING / COOL-DOWN
A successful training starts with warming up exercises and ends with exercises for cooling down and relaxing. The warming up exercises prepare your body for the following stresses. The cool down/relax phase after the exercises therefore ensures you will have no muscle discomforts and over-worked muscles. Guidance for stretching exercises for warming up and cooling down follows. Thereby pay attention to the following points:
- Warm up carefully each group of muscles for approximately 5 to 10 minutes, which you will stress in the following training. If you feel a pleasant tension in the corresponding muscle, the stretching exercises are carried out correctly.
- Speed does not play a role at stretching exercises. Avoid quick and jerky movements.
Exercises for the neck (1)
Turn your head to the right and feel the tension in your neck. Lift the chin to the ceiling and thereby open the mouth. Turn your head to the right and you finally move it down to the chest. You can repeat this several times.

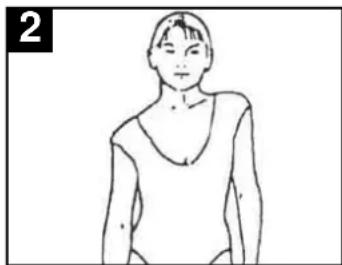
Exercises for the shoulder area (2)
Pull up the left and the right shoulder alternating or both shoulders at the same time.
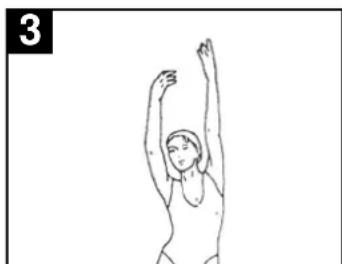
Stretch exercises with the arms (3)
Stretch the left and right arm alternating to the direction of the ceiling. Feel the tension in your right and left side. Repeat this exercise several times.
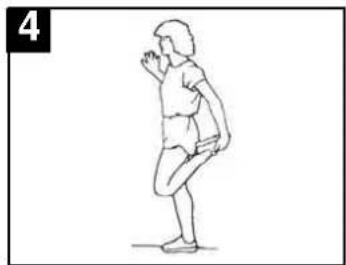
Exercises for the thighs (4)
Support one hand at the wall, with the other go to your foot and pull the right or left one as near as possible to your buttock. Repeat this exercise 15 times per leg.
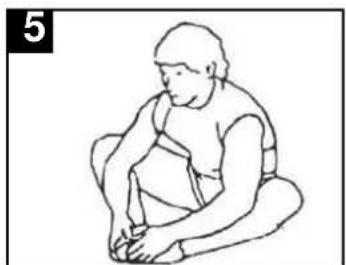
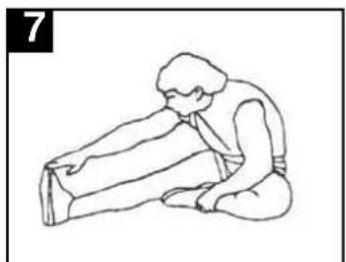
Stretch inside thigh and legs (5)
Sit down on the floor and you put your feet together in the way, that your knees point outwards. Pull your feet as near as possible to your groin. Now carefully push the knees downwards. If possible repeat this exercise 15 times.
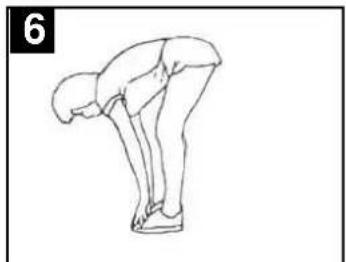
Touch toes (6)
Bend your torso slowly forward and you try to touch the feet with the hands. Move down to your toes as far as possible and repeat it 15 times.
Exercises for the knee tendons (7)
Sit down on the floor and stretch your right leg. Bend your left leg and lay your foot on the right thigh. Now try to reach with the right arm your right foot. Repeat the exercise 15 times for each leg.
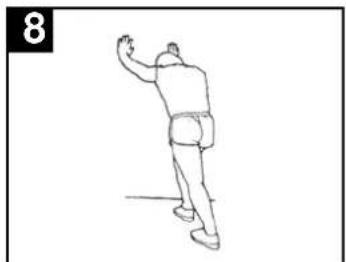
Exercises for the calves/Achilles tendon (8)
Put both hands to the wall and you support yourselves with your entire body. Place the left and the right leg alternating to the rear. Thereby the rear leg will be stretched. Repeat the exercise 15 times for each leg.
EXERCISES
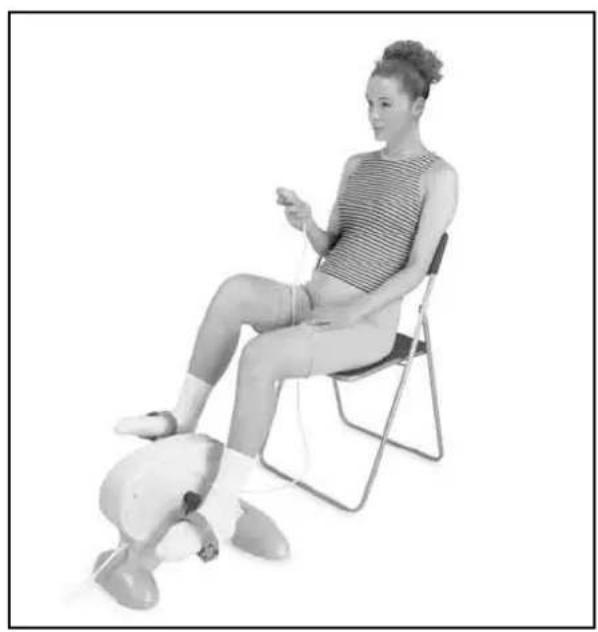
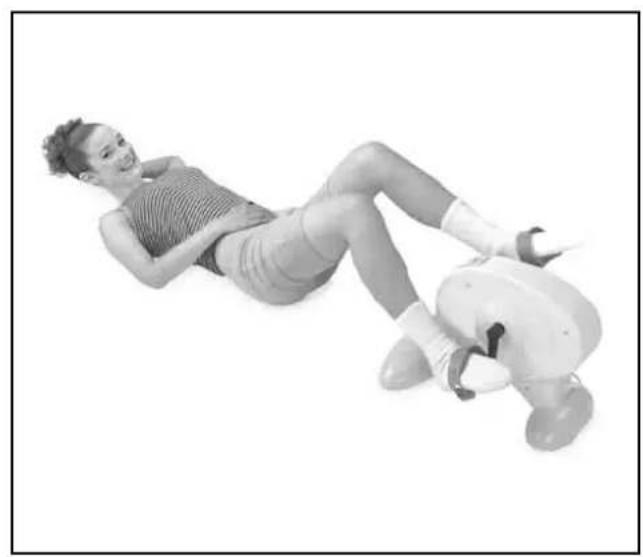
For the training equipment we suggest the basic exercises described here: You can train your struts with the back situated on the floor or sitting on a chair. Place the Mini-Bike on the floor or on a desk in order to train your arms.
DISPOSAL NOTES
For the adequate battery disposal the battery selling trade as well as the municipal office offers collecting points. Batteries should not be disposed in domestic rubbish! If you want to dispose the product follow the actual regulations. The local city office will give information.

SPECIFICATIONS
Model number: FF-17
Power: 80W
Rated voltage 230V
Rated frequency: 50Hz
GUARANTEE CARD
Name: attach here your
Address: purchase ticket
Zip-code:
City:
Telephone:
You have a guarantee of 24 months after the date of purchase of this FF-17. We guarantee during this period the free repair of defects caused by material- and construction faults. This at the importers discretion. It is only possible to claim to the guarantee when you enclose your purchase ticket with the FYSIC FF-17.
HOW TO ACT:
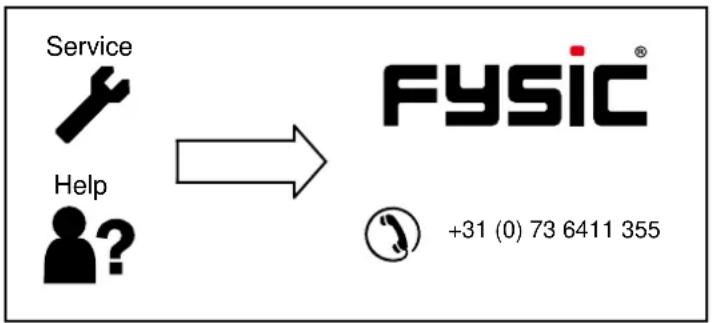
If you notice a defect, consult the manual first. If this manual gives you no definite answer, than consult the FYSIC hepline at the number +31 (0) 73 6411 355.
THE GUARANTEE EXPIRES:
When used in expert, faulty connections, use of unoriginal parts or accessories, negligence and defects caused by fire, flood, stroke of lightning and natural disasters. With unqualified modifications or repairs by third persons. With incorrect transport without a suitable packing. If the device is not handed in with the correct filled in guarantee card and the purchase ticket.
NOT UNDER THIS GUARANTEE: cords and plugs.
All further responsibilities, in particular subsequent damages, are excluded.
DECLARATION OF CONFORMITY
This product complies with the essential requirements for Radio and Telecommunications Terminal Equipment. Please refer to our website WWW.FYSIC.COM
To prevent any inconveniences, we advise you to carefully read the directions for use prior to contacting us.

Service Help


+31(0)736411355