ATA 1110 - Router TOPCOM - Free user manual and instructions
Find the device manual for free ATA 1110 TOPCOM in PDF.
User questions about ATA 1110 TOPCOM
0 question about this device. Answer the ones you know or ask your own.
Ask a new question about this device
Download the instructions for your Router in PDF format for free! Find your manual ATA 1110 - TOPCOM and take your electronic device back in hand. On this page are published all the documents necessary for the use of your device. ATA 1110 by TOPCOM.
USER MANUAL ATA 1110 TOPCOM
This product is in compliance with the essential requirements and other relevant provisions of the R&TTE directive 1999/5/EC.
The Declaration of conformity can be found on:
http://www.topcom.net/support/cedeclarations.php
UK The features described in this manual are published with reservation to modifications.
UK The CE symbol indicates that the unit complies with the essential requirements of the R&TTE directive.
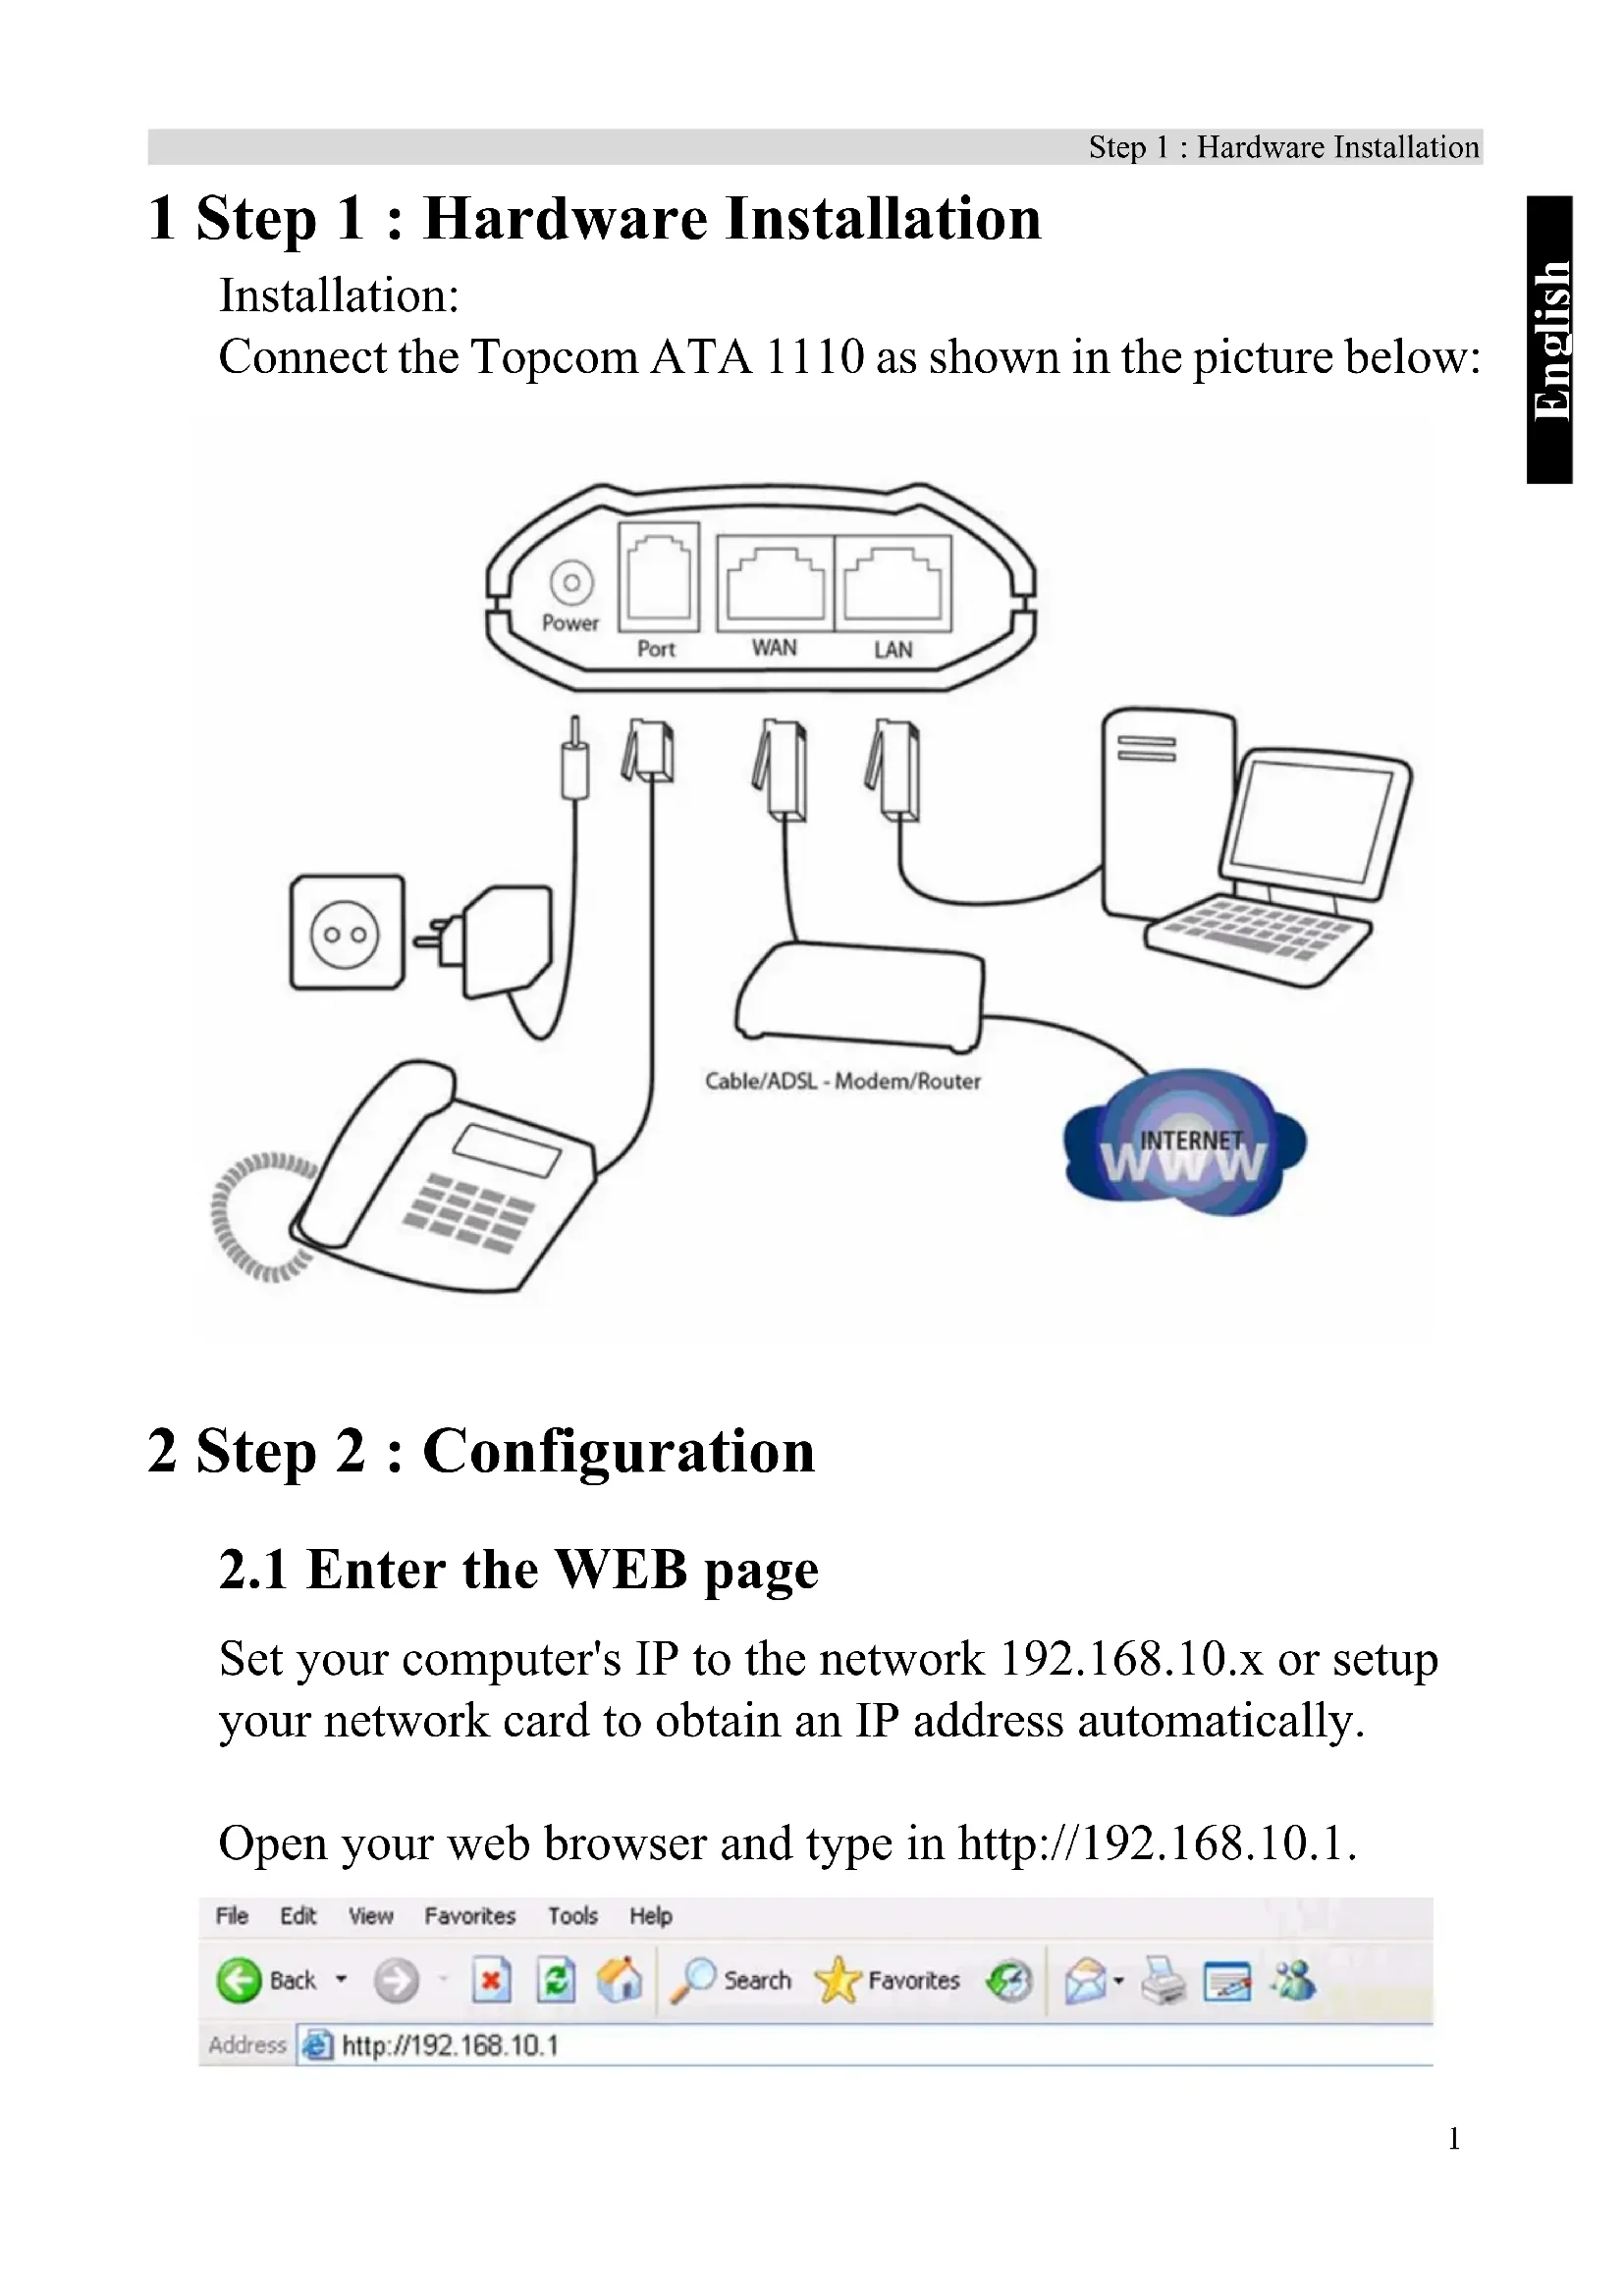
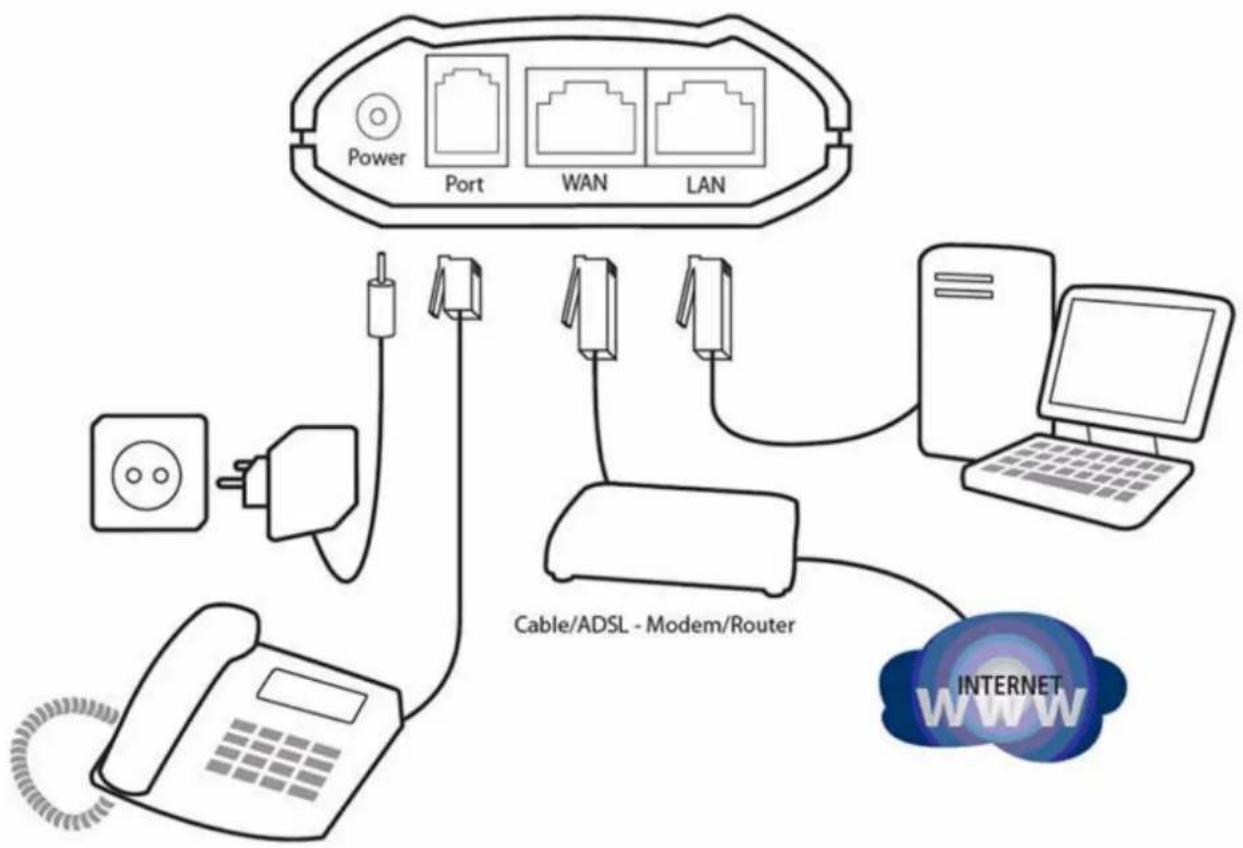
Connect the Topcom ATA 1110 as shown in the picture below:
flowchart
graph TD
    A["Power"] --> B["Port"]
    A --> C["WAN"]
    A --> D["LAN"]
    E["Cable/ADSL - Modem/Router"] --> F["Client"]
    G["Internet"] --> H["PC"]
    I["Phone"] --> J["Switch"]
    K["Radio"] --> L["Ap"]
    M["Wireless"] --> N["Power"]
2 Step 2 : Configuration
2.1 Enter the WEB page
Set your computer's IP to the network 192.168.10.x or setup your network card to obtain an IP address automatically.
Open your web browser and type in http://192.168.10.1.

text_image
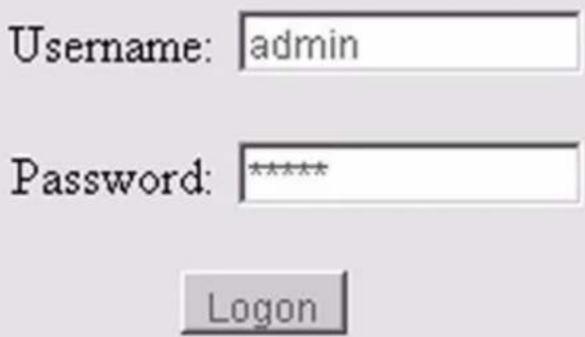
File Edit View Favorites Tools Help Back Search Favorites Address http://192.168.10.1The logon page of ATA 1110 will appear:
text_image
Username: admin Password: ***** Logon- Enter the default username and password admin/admin for administrator and guest/guest for guest.
- Click Logon to enter the configuration page.
2.2 WAN Configuration
Enter Network - WAN Config to set the WAN setting:
The ATA 1110 supports three different IP types: Static IP, Dynamic obtain IP (DHCP) and PPPoE.

text_image
TOPCOM® Current State Network WAN Config LAN Config VoIP Advance Dial-Peer Config Manage Update System ManageATA 1110
WAN Configuration
| Active IP | Current Netmask | MAC Address | Current Gateway | ||
| 192.168.2.101 | 255.255.255.0 | 00:09:45:52:9c:d8 | 192.168.2.1 | ||
| Mac Authenticating Code | Valid MAC | ||||
| Static | IP Address | 192.168.1.179 | Netmask | 255.255.255.0 | |
| Gateway | 192.168.1.1 | DNS Domain | |||
| Preferred DNS | 202.96.134.133 | Alternate DNS | 202.96.128.68 | ||
| PPPoE Server | ANY | ||||
| Username | user123 | ||||
| Password | ********** | ||||
Static IP:
- Select "Static"
- Enter the ATA 1110's IP address in the "IP address" field.
- Set the "Net mask", default 255.255.255.0
- Enter the ATA 1110's gateway IP address (this will be your router's IP address) in the "Gateway" field
- Enter the DNS information in the "Primary DNS" and "Alter DNS" fields.
DHCP (default setting) : In case you are connected to a Cable/ADSL router
- Select DHCP
If you have a DHCP server in your network (for example your Cable/ADSL router), the ATA 1110 will automatically obtain the network information from your DHCP server.
PPPoE : In case you are connected to an Ethernet ADSL modem.
- Select PPPoE
- Type your PPPoE dialup information in the PPPoE setting fields: PPPoE server (optional), Username and password.
The ATA 1110 will connect to the internet through PPPoE and will automatically obtain the IP address, Netmask, Gateway, Primary DNS and Alter DNS information.

The ATA 1110 can also be configured via the WAN IP address. You can hear the WAN IP address in the ATA 1110 from your handset:
- pick up the handset;
- enter #*111#;
Then your handset will prompt ATA 1110 IP address.
2.3 SIP Configuration
text_image
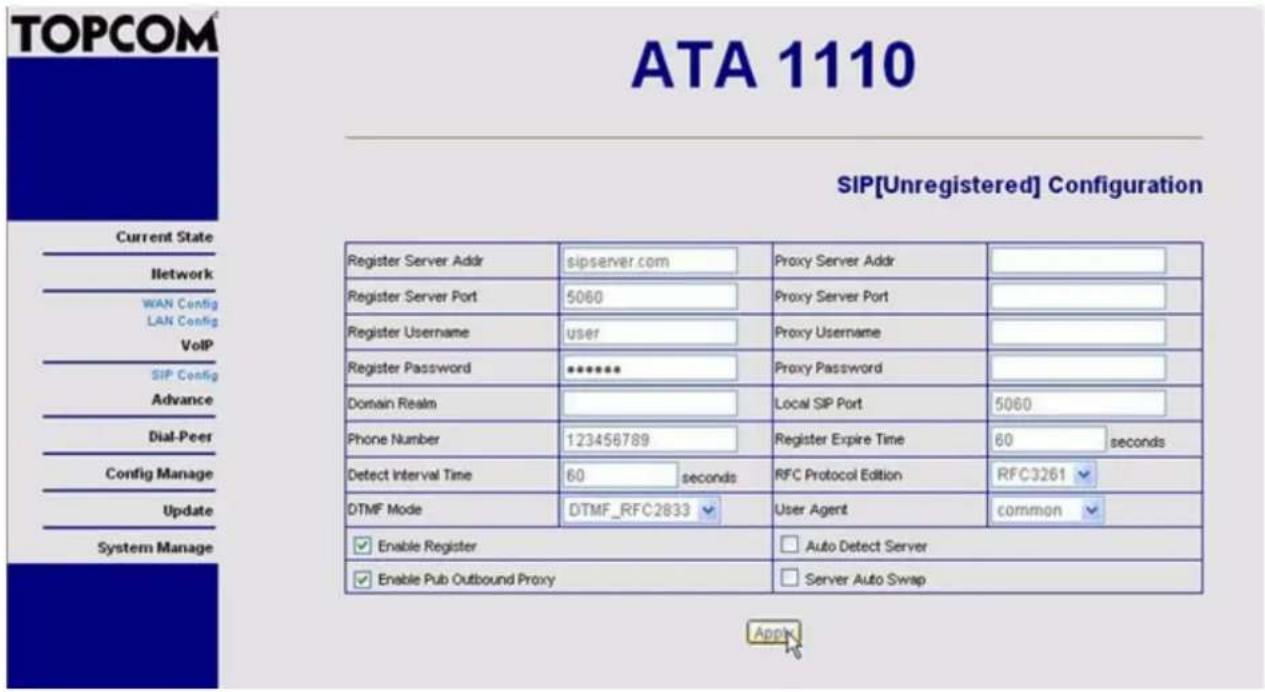
TOPCOM ATA 1110 SIP[Unregistered] Configuration Current State Network WAN Config LAN Config VoIP SIP Config Advance Dial-Peer Config Manage Update System Manage Register Server Addr sipserver.com Proxy Server Addr Register Server Port 5060 Proxy Server Port Register Usernameicer User Proxy Username Register Password ******* Proxy Password Domain Realm Phone Number 123456789 Local SIP Port 5060 Detect Interval Time 60 seconds RFC Protocol Edition RFC3261 DTMF Mode DTMF_RFC2833 User Agent(common) Enable Register Auto Detect Server Enable Pub Outbound Proxy Server Auto SwapEnter the VoIP - SIP Config setting page to setup the sip information:
- Register Server Addr:enter the SIP provider server address
- Register Server Port: enter the SIP server register port (typical 5060)
- Register Username:enter the username of your SIP account
- Register Password:enter the password of your SIP account
-
Phone Number: enter phone number of your SIP account. (if there is no phone number available, just enter the username).
-
Check Enable Register
- Check Enable Pub Outbound Proxy
Click Apply to confirm the settings.

Go to the Config Manage - Save Config page and click "save" to save the configuration, otherwise you will lose the setting after the ATA reboots.
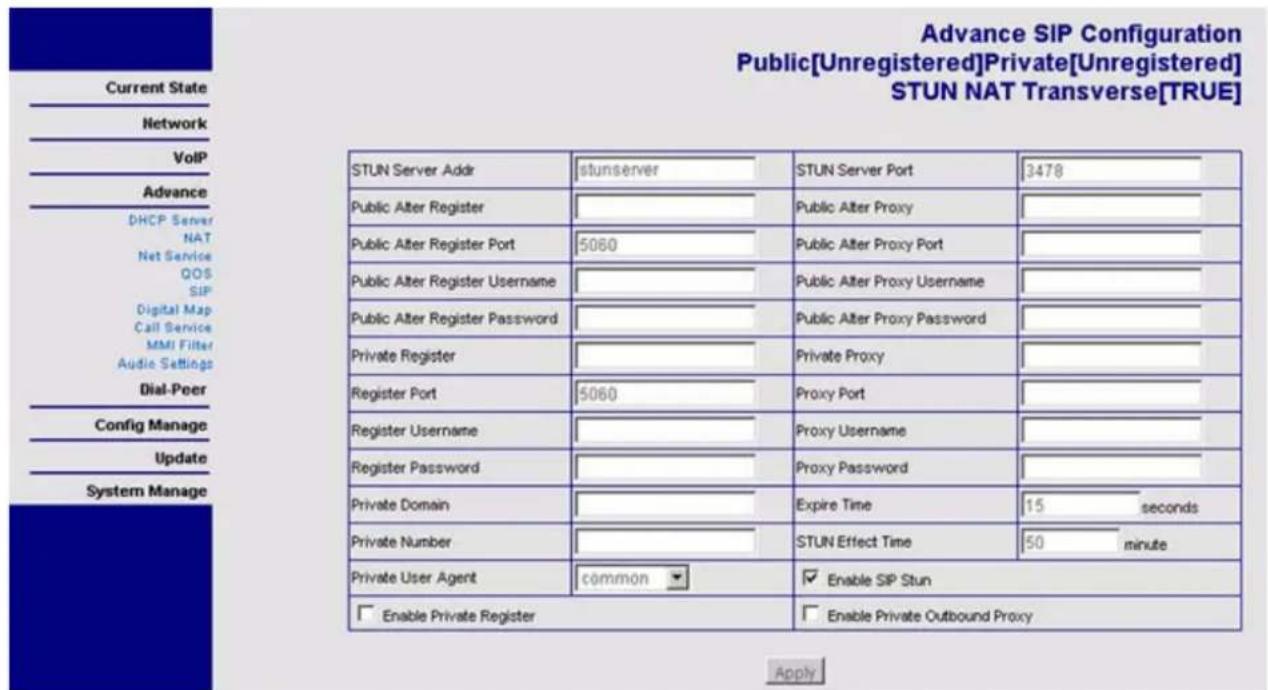
2.4 NAT Traversal
If the ATA 1110 is connected behind a router it is recommended to enable the STUN settings.
Your SIP provider should be able to provide this information. Enter the Advance - SIP setting page.
text_image
Advance SIP Configuration Public[Unregistered]Private[Unregistered] STUN NAT Transverse[TRUE] Current State Network VoIP Advance DHCP Server NAT Net Service QOS SIP Digital Map Call Service MMI Filter Audio Settings Dial-Peer Config Manage Update System Manage STUN Server Addr stunserver STUN Server Port 3478 Public Alter Register Public Alter Register Port 5060 Public Alter Register Username Public Alter Register Password Private Register Register Port 5060 Proxy Port Register Username Register Username Proxy Username Register Password Proxy Password Private Domain Expire Time 15 seconds Private Number STUN Effect Time 50 minute Private User Agent common Enable SIP Stun Enable Private Register Enable Private Outbound Proxy Apply• STUN Server Addr: enter the STUN server addres
• STUN Server Port: enter the STUN server port number
- Check "Enable SIP Stun"
Click Apply to confirm the settings.

Go to the Config Manage - Save Config page and click "save" to save the configuration, otherwise you will lose the setting after the ATA reboots.
3 Step 3 : Reboot
When all settings are done it is recommended to reboot the ATA.
Go to System manage - Reboot and choose "Reboot" to restart the ATA.

After the reboot the Server LED will go on when the ATA is successfully registered.
You should be able to make VOIP calls now.

for advanced settings, please read the full English user guide on the provided CD.
4 Warranty
4.1 Warranty period
The Topcom units have a 24-month warranty period. The warranty period starts on the day the new unit is purchased. The warranty on batteries is limited to 6 months after purchase. Consumables or defects causing a negligible effect on operation or value of the equipment are not covered.
The warranty has to be proven by presentation of the original purchase receipt, on which the date of purchase and the unit-model are indicated.
4.2 Warranty handling
A faulty unit needs to be returned to a Topcom service centre including a valid purchase note.
If the unit develops a fault during the warranty period, Topcom or its officially appointed service centre will repair any defects caused by material or manufacturing faults free of charge.
Topcom will at its discretion fulfil its warranty obligations by either repairing or exchanging the faulty units or parts of the faulty units. In case of replacement, colour and model can be different from the original purchased unit.
The initial purchase date shall determine the start of the warranty period. The warranty period is not extended if the unit is exchanged or repaired by Topcom or its appointed service centres.
4.3 Warranty exclusions
Damage or defects caused by incorrect treatment or operation and damage resulting from use of non-original parts or accessories not recommended by Topcom are not covered by the warranty.
The warranty does not cover damage caused by outside factors, such as lightning, water and fire, nor any damage caused during transportation.
No warranty can be claimed if the serial number on the units has been changed, removed or rendered illegible.
Any warranty claims will be invalid if the unit has been repaired, altered or modified by the buyer or by unqualified, non-officially appointed Topcom service centres.
5 Disposal of the device (environment)

At the end of the product lifecycle, you should not throw this product into the normal household garbage but bring the product to a collection point for the recycling of electrical and electronic equipments. The symbol on the product, user guide and/or box indicate this.
Some of the product materials can be re-used if you bring them to a recycling point. By re-using some parts or raw materials from used products you make an important contribution to the protection of the environment.
Please contact your local authorities in case you need more information on the collection points in your area.
6 Cleaning
Clean the device with a slightly damp cloth or with an anti-static cloth. Never use cleaning agents or abrasive solvents.
1 Stap 1: Hardware-installatie
Installatie:
text_image
Username: admin Password: ***** Logon| Active IP | Current Netmask | MAC Address | Current Gateway | ||
| 192.168.2.101 | 255.255.255.0 | 00:09:45:52:9c:d6 | 192.168.2.1 | ||
| Mac Authenticating Code | Valid MAC | ||||
| Static | IP Address | 192.168.1.179 | Netmask | 255.255.255.0 | |
| Gateway | 192.168.1.1 | DNS Domain | |||
| Preferred DNS | 202.96.134.133 | Alternate DNS | 202.96.128.68 | ||
| PPPoE Server | ANY | |
| Username | user123 | |
| Password | ********** |
Apply
Static IP:
text_image
Advance SIP Configuration Public[Unregistered]Private[Unregistered] STUN NAT Transverse[TRUE] Current State Network VoIP Advance DHCP Server NAT Net Service QOS SIP Digital Map Call Service MMI Filter Audio Settings Dial-Peer Config Manage Update System Manage STUN Server Addr stunserver STUN Server Port 3478 Public Alter Register Public Alter Register Port 5060 Public Alter Proxy Public Alter Proxy Password Private Register Private Proxy Register Port 5060 Proxy Port Register Username Proxy Username Register Password Proxy Password Private Domain Expire Time 15 seconds Private Number STUN Effect Time 50 minute Private User Agent common Enable SIP Stun Enable Private Register Enable Private Outbound Proxy Applytext_image
Username: admin Password: ***** Logon| Active IP | Current Netmask | MAC Address | Current Gateway | ||
| 192.168.2.101 | 255.255.255.0 | 00:09:45:52:9c:d6 | 192.168.2.1 | ||
| Mac Authenticating Code | Valid MAC | ||||
| Static | IP Address | 192.168.1.179 | Netmask | 255.255.255.0 | |
| Gateway | 192.168.1.1 | DNS Domain | |||
| Preferred DNS | 202.96.134.133 | Alternate DNS | 202.96.128.68 | ||
| PPPoE Server | ANY | |
| Username | user123 | |
| Password | ********** |
Apply
IP statique :
2.3 Configuration SIP

text_image
TOPCOM Current State Network WAN Config LAN Config VoIP SIP Config Advance Dial-Peer Config Manage Update System ManageATA 1110
SIP[Unregistered] Configuration
| Register Server Addr | sipserver.com | Proxy Server Addr | |||
| Register Server Port | 5060 | Proxy Server Port | |||
| Register Username | user | Proxy Username | |||
| Register Password | ***** | Proxy Password | |||
| Domain Realm | Local SIP Port | 5060 | |||
| Phone Number | 123456789 | Register Expire Time | 60 | seconds | |
| Detect Interval Time | 60 | seconds | RFC Protocol Edition | RFC3261 | |
| DTMF Mode | DTMF_RFC2833 | User Agent | common | ||
| Enable Register | Auto Detect Server | ||||
| Enable Pub Outbound Proxy | Server Auto Swap | ||||

text_image
Advance SIP Configuration Public[Unregistered]Private[Unregistered] STUN NAT Transverse[TRUE] Current State Network VoIP Advance DHCP Server NAT Net Service QOS SIP Digital Map Call Service MMI Filter Audio Settings Dial-Peer Config Manage Update System Manage STUN Server Addr stunserver STUN Server Port 3478 Public Alter Register Public Alter Register Port 5060 Public Alter Proxy Public Alter Register Username Public Alter Register Password Private Register Register Port 5060 Private Proxy Proxy Port Register Username Proxy Username Register Password Proxy Password Private Domain Expire Time 15 seconds Private Number STUN Effect Time 50 minute Private User Agent common Enable SIP Stun Enable Private Register Enable Private Outbound Proxy Applytext_image
Username: admin Password: ***** Logon| Active IP | Current Netmask | MAC Address | Current Gateway | ||
| 192.168.2.101 | 255.255.255.0 | 00:09:45:52:9c:d6 | 192.168.2.1 | ||
| Mac Authenticating Code | Valid MAC | ||||
| Static | IP Address | 192.168.1.179 | Netmask | 255.255.255.0 | |
| Gateway | 192.168.1.1 | DNS Domain | |||
| Preferred DNS | 202.96.134.133 | Alternate DNS | 202.96.128.68 | ||
| PPPoE Server | ANY | |
| Username | user123 | |
| Password | ********** |
Apply
Statische IP:
text_image
Advance SIP Configuration Public[Unregistered]Private[Unregistered] STUN NAT Transverse[TRUE] Current State Network VoIP Advance DHCP Server NAT Nat Service QOS SIP Digital Map Call Service MMI Filter Audio Settings Dial-Peer Config Manage Update System Manage STUN Server Addr stunserver STUN Server Port 3478 Public Alter Register Public Alter Register Port 5060 Public Alter Proxy Public Alter Proxy Password Private Register Register Port 5060 Private Proxy Proxy Port Register Username Proxy Username Register Password Proxy Password Private Domain Expire Time 15 seconds Private Number STUN Effect Time 50 minute Private User Agent common Enable SIP Stun Enable Private Register Enable Private Outbound Proxy ApplyDigital Media Service Sp. z o.o.