Beatbox Portable - Speaker BEATS - Free user manual and instructions
Find the device manual for free Beatbox Portable BEATS in PDF.

User questions about Beatbox Portable BEATS
0 question about this device. Answer the ones you know or ask your own.
Ask a new question about this device
Download the instructions for your Speaker in PDF format for free! Find your manual Beatbox Portable - BEATS and take your electronic device back in hand. On this page are published all the documents necessary for the use of your device. Beatbox Portable by BEATS.
USER MANUAL Beatbox Portable BEATS
natural_image
Abstract black circular shape with a white lowercase 'b' at the center (no text or symbols)Beatbox
User Guide

bar
| Category | Value | |---|---| | Category 1 | 100 | | Category 2 | 100 | | Category 3 | 100 | | Category 4 | 100 | | Category 5 | 100 | | Category 6 | 100 | | Category 7 | 100 | | Category 8 | 100 | | Category 9 | 100 | | Category 10 | 100 | | Category 11 | 100 | | Category 12 | 100 | | Category 13 | 100 | | Category 14 | 100 | | Category 15 | 100 | | Category 16 | 100 | | Category 17 | 100 | | Category 18 | 100 | | Category 19 | 100 | | Category 20 | 100 | | Category 21 | 100 | | Category 22 | 100 | | Category 23 | 100 | | Category 24 | 100 | | Category 25 | 100 | | Category 26 | 100 | | Category 27 | 100 | | Category 28 | 100 | | Category 29 | 100 | | Category 30 | 100 | | Category 31 | 100 | | Category 32 | 100 | | Category 33 | 100 | | Category 34 | 100 | | Category 35 | 100 | | Category 36 | 100 | | Category 37 | 100 | | Category 38 | 100 | | Category 39 | 100 | | Category 40 | 100 | | Category 41 | 100 | | Category 42 | 100 | | Category 43 | 100 | | Category 44 | 100 | | Category 45 | 100 | | Category 46 | 100 | | Category 47 | 100 | | Category 48 | 100 | | Category 49 | 100 | | Category 50 | 100 | | Category 51 | 100 | | Category 52 | 100 | | Category 53 | 100 | | Category 54 | 100 | | Category 55 | 100 | | Category 56 | 100 | | Category 57 | 100 | | Category 58 | 100 | | Category 59 | 100 | | Category 60 | 100 | | Category 61 | 100 | | Category 62 | 100 | | Category 63 | 100 | | Category 64 | 100 | | Category 65 | 100 | | Category 66 | 100 | | Category 67 | 100 | | Category 68 | 100 | | Category 69 | 100 | | Category 70 | 100 | | Category 71 | 100 | | Category 72 | 100 | | Category 73 | 100 | | Category 74 | 100 | | Category 75 | 100 | | Category 76 | 100 | | Category 77 | 100 | | Category 78 | 100 | | Category 79 | 100 | | Category 80 | 100 | | Category 81 | 100 | | Category 82 | 100 | | Category 83 | 100 | | Category 84 | 100 | | Category 85 | 100 | | Category 86 | 100 | | Category 87 | 100 | | Category 88 | 100 | | Category 89 | 100 | | Category 90 | 100 | | Category 91 | 100 | | Category 92 | 100 | | Category 93 | 100 | | Category 94 | 100 | | Category 95 | 100 | | Category 96 | 100 | | Category 97 | 100 | | Category 98 | 100 | | Category 99 | 100 | | Total (Total) = [sum of bars] / [values] * (sum of bars + bars) * (sum of bars + bars) * (sum of bars + bars). The values in the table represent the sum of the bars and the corresponding sum of the bars. There is no additional data series or categories specified.Table of Contents
EN Important Safety Information 3
Features and Benefits 7
Setting up your Beatbox 8
Connecting Audio Devices 9
Connecting Devices using 3.5 mm mini-jack 12
Volume 13
Using the Remote Control 13
Speaker Placement 16
Troubleshooting 17
- Read, follow, and keep these instructions.
- Pay attention to all warnings.
- Do not use this apparatus near water.
- Clean only with dry cloth.
- Do not block any ventilation openings. Install in accordance with the manufacturer's instructions.
- Do not install near any heat sources such as radiators, heat registers, stoves or other apparatus (including amplifiers) which produce heat.
-
Do not defeat the safety purpose of the polarised plug. A polarised plug has two blades with one wider than the other. The wider blade is provided for your safety. If the provided plug does not fit into your outlet, consult an electrician for replacement of the obsolete outlet.
-
Protect the power cord from being walked on or pinched, particularly at the plugs and the point where it exits from the apparatus.
- Only use attachments/accessories specified by the manufacturer.
- Unplug this apparatus during lightning storms or when unused for long periods of time.
- Do not expose this apparatus to dripping or splashing and ensure that no objects filled with liquids, such as vases, are placed on the apparatus.
- To completely disconnect this apparatus from the AC mains, disconnect the power supply cord plug from the AC receptacle.
- The mains plug of the power supply cord shall remain readily operable.
WARNING: To reduce the risk of fire or electrical shock, do not expose this apparatus to rain or moisture.
WARNING: No naked flame sources — such as candles — should be placed on the product.
Place the equipment near a main power supply outlet and make sure that you can easily access the power breaker switch.
UK English
WARNING: This product is intended to be operated ONLY from the AC voltages listed on the back panel. Operation from voltages other than those indicated may cause irreversible damage to the product and void the product's warranty. The use of AC plug adapters is cautioned because it can allow the product to be plugged into voltages in which the product was not designed to operate. Use only the type provided with your product. If you are unsure of the correct operational voltage, please contact your local distributor and/or retailer.
natural_image
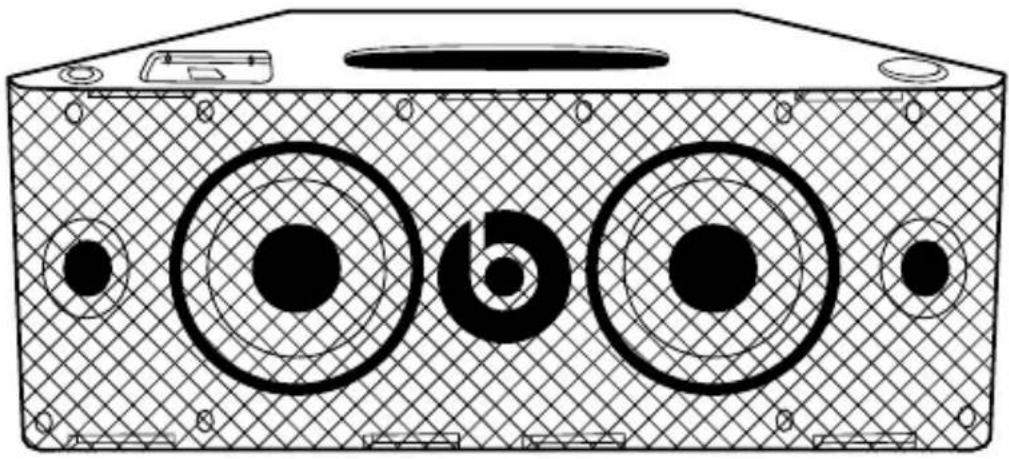
Technical line drawing of a box with three circular components and mounting holes (no text or symbols)Front view

text_image
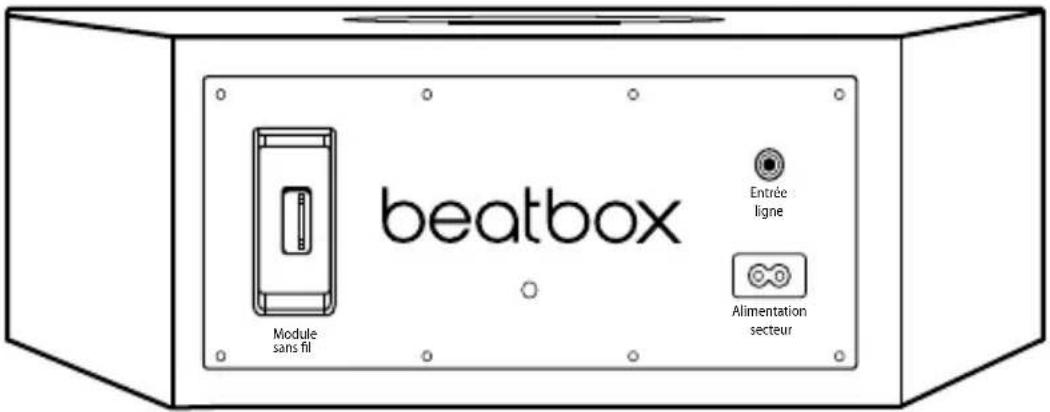
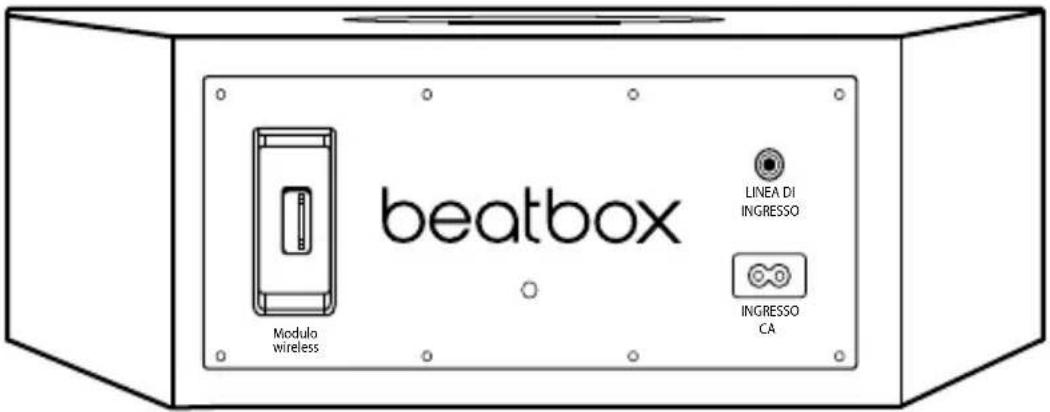
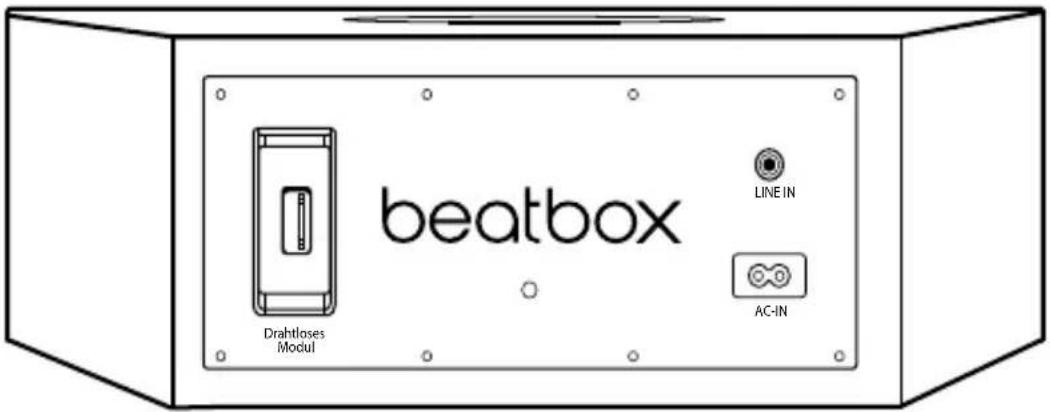
beatbox Wireless Module LINE IN AC-INBack view
Features and Benefits
Digital power amp
For powerful, room-filling sound
iPod®/iPhone® dock
Just set your iPod or iPhone in the integrated dock and start listening
3.5 mm stereo mini-jack input
Connect any music player with a standard headphone output
Advanced 5.25-inch long throw bass drivers
Deliver powerful, punchy bass without distortion
Two optimised concave 2-inch high frequency drivers
Deliver crisp mids and highs and precise sound staging
Remote control
Control iPod/iPhone playback and volume
Setting up your Beatbox
Tilting Feet
Beatbox is designed to rest level. However, Beatbox comes with two tilting feet if you would rather it rest on a slightly back-tilting angle. This is ideal if you're going to be placing Beatbox in a low position and you want sound to be projected upwards. To install, simply push the pegs on the feet into the holes on the front corners of Beatbox.
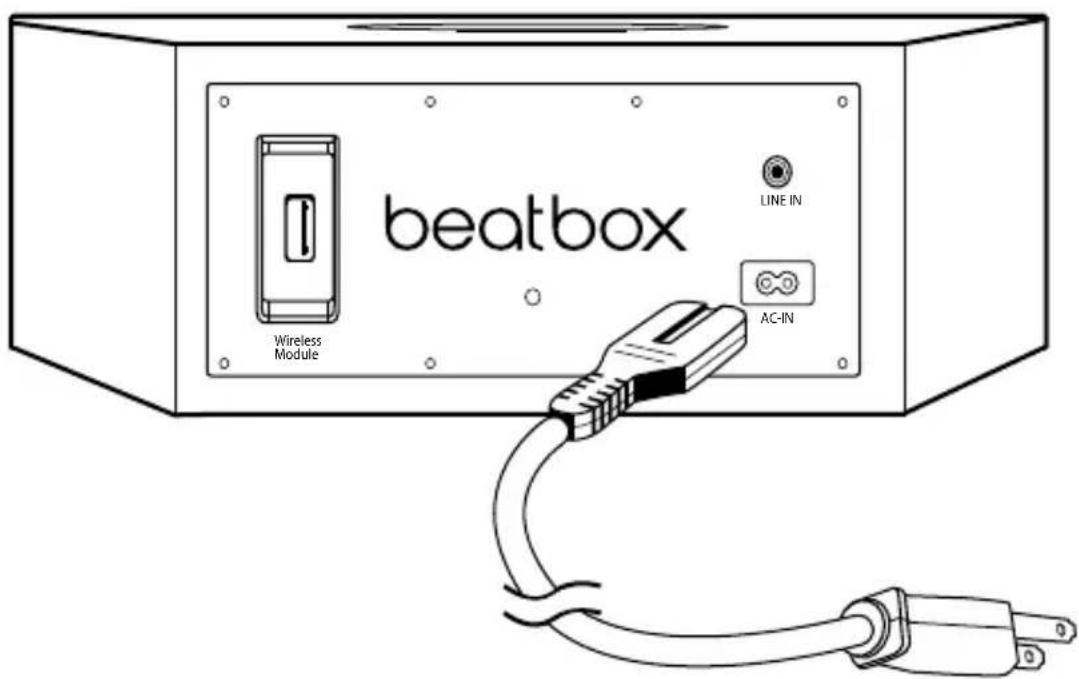
Power
Plug the AC power cord into the back of Beatbox, as shown. Plug the pronged plug end into a power outlet.
text_image
beatbox Wireless Module LINE IN AC-INConnecting Audio Devices
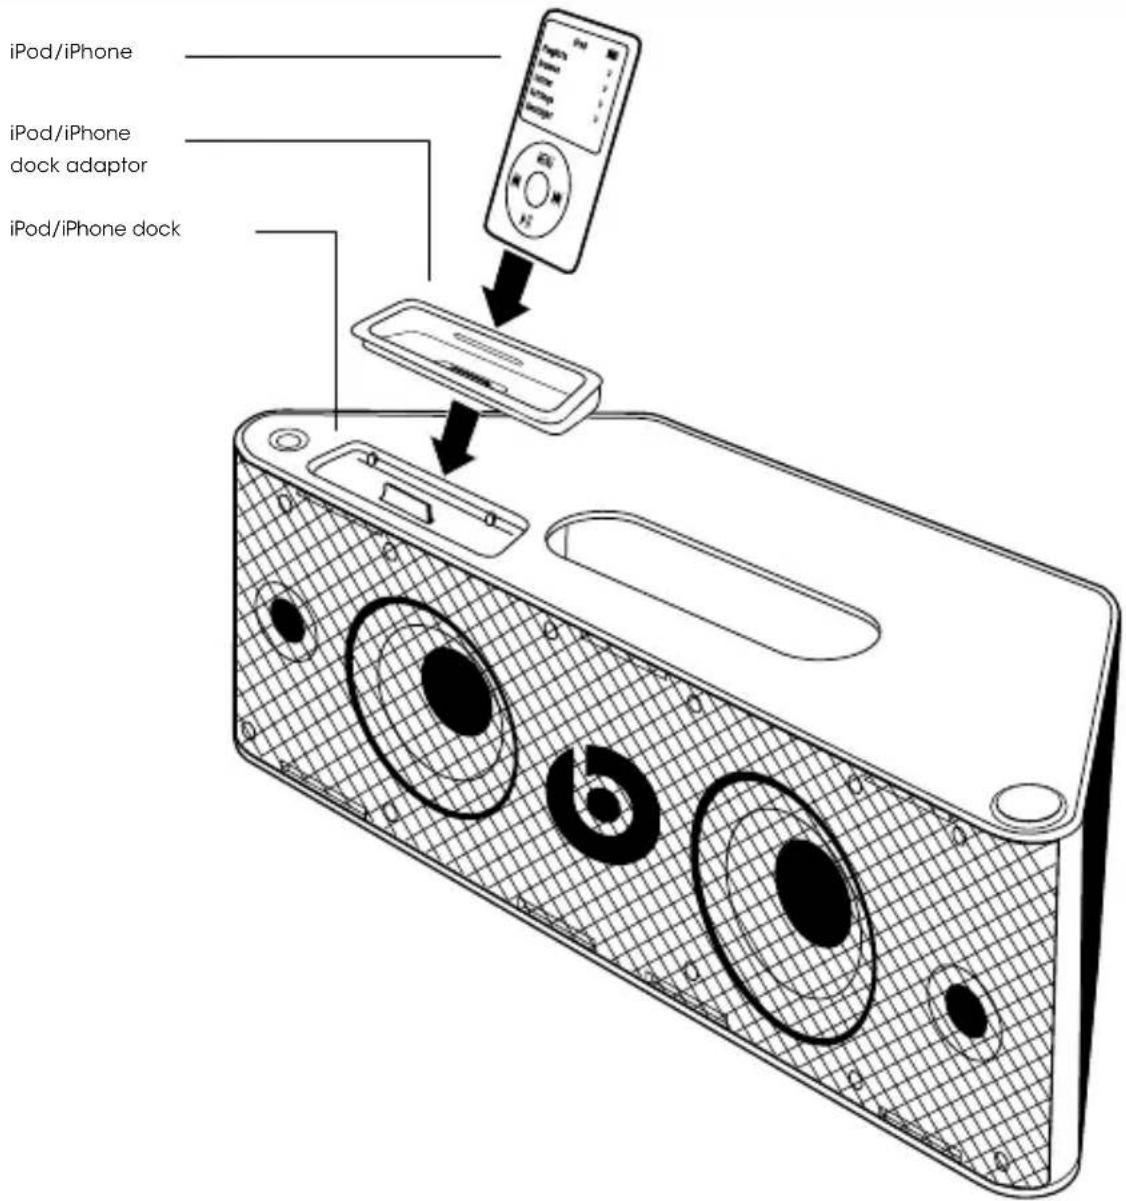
Connecting to iPod®/iPhone®
Beatbox™ features a built-in dock for iPod and iPhone for an easy, direct connection. This will also give you the ability to control playback with the included remote control.
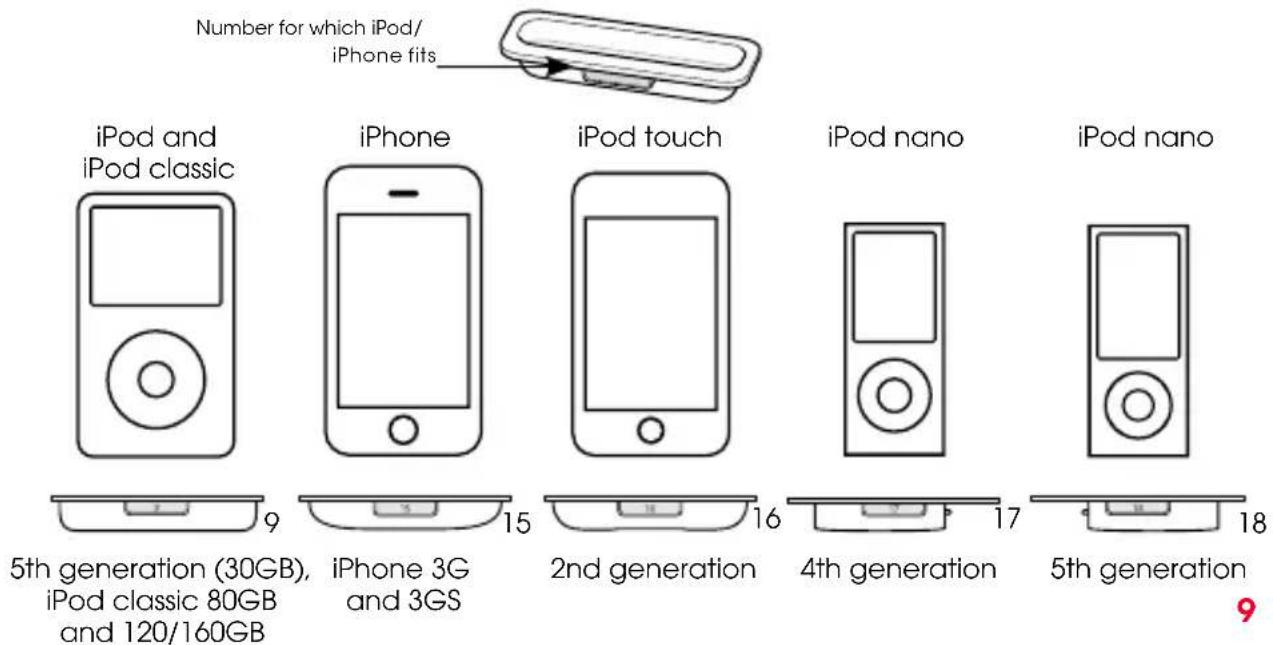
Using iPod/iPhone Dock Adaptors
Beatbox includes multiple Dock Adaptors which fit iPod Nano (4th and 5th generations), iPod touch (2nd generation), iPod classic (80GB and 120GB/160GB), iPod with video (30GB) and iPhone 3G and 3GS.
To install, simply push the adaptor plate which fits your model into the iPod/iPhone dock.
bar
| Generation | iPod Count | |---|---| | iPod and iPod classic | 9 | | iPhone | 15 | | iPod touch | 16 | | iPod nano | 17 | | iPod nano | 18 | Number for which iPod/ iPhone fits.NOTE: If a dock adaptor for your model of iPod® or iPhone® is not included with Beatbox, you can purchase one at www.apple.com/store. Apple's dock adaptors do not come in black, but the Beatbox's dock is made to be compatible with Apple Dock Adaptors.
Docking iPod/iPhone
After installing the proper dock adaptor, set your iPod or iPhone onto the dock on the top of Beatbox, being sure the dock port on your player and the dock plug are aligned properly. Your player should connect easily and remain upright in the port, with no forcing necessary.
Important: Make sure the "Shake to Shuffle" setting is turned off on your iPod or iPhone. The bass of the speaker may activate it and interfere with playback.
UK English
text_image
iPod/iPhone iPod/iPhone dock adaptor iPod/iPhone dockConnecting Devices using 3.5 mm (1/8 inch) mini-jack input
You can connect and listen to any music player which has a standard 3.5 mm headphone port using a mini-to-mini stereo cable (not included).
To connect, plug one end of the cable into the 3.5 mm headphone output of your player and the other end into the 3.5 mm input on the back of Beatbox.
Important: The iPod®/iPhone® dock will override and disable the 3.5 mm mini-jack input when an iPod or iPhone is docked. Be sure to remove your iPod/ iPhone from the dock before using the 3.5 mm input.
Listen
Be sure a music player is securely connected, as described in the previous sections. Turn on Beatbox by pushing the power button on the left side of the top surface of Beatbox or with the remote control. Start your player.
Volume
Volume can be controlled with the volume control on the right side of the top surface of Beatbox or with the remote control.
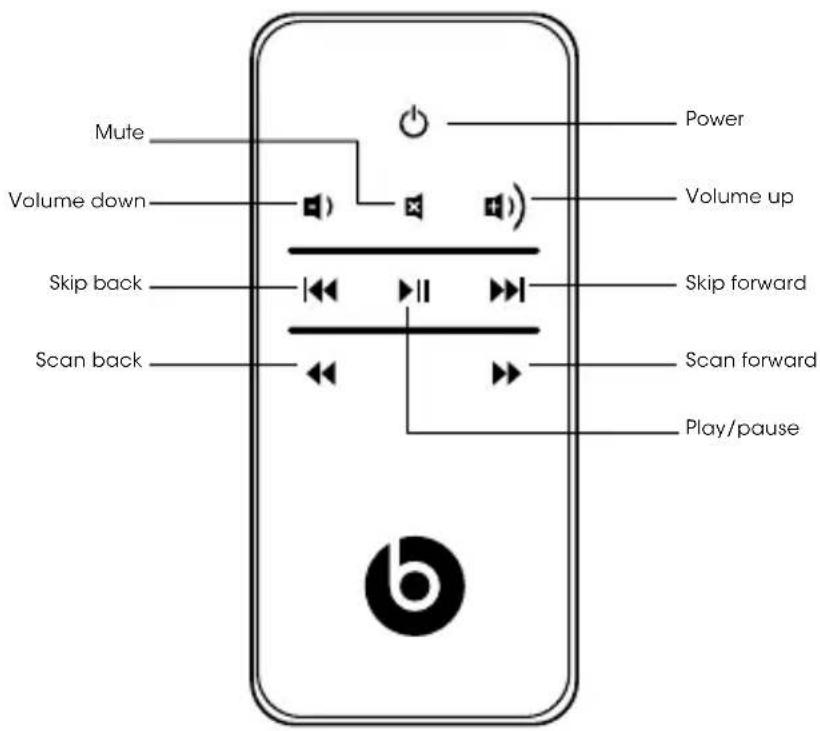
Using the Remote Control to Control Beatbox
Make sure the CR2025 battery used by the remote is installed correctly. If it is old, replace it.
Power on and off: Push ⏻ and release.
Volume: Push and hold to increase volume. Release when desired volume is reached. Push and hold to decrease volume. Release when desired volume is reached.
Mute: Push ✗ and release. To resume sound, push again.
Using the Remote Control to Control iPod®/iPhone®
The included remote control can be used to control playback of a docked iPod or iPhone. It cannot control playback of other connected devices.
Using the Remote Control for iPod or iPhone Playback
Play: Push ▶|| and release.
Pause: Push ▶II and release. Push again to resume play.
Skip forward to next track: Push ▶▶ and release.
Skip back to previous track: Push ◀◀ and release.
Scan forward through a track: Push ▶▶ and hold. Release to stop scanning and resume normal play.
Scan back through a track: Push ◀ and hold. Release to stop scanning and resume normal play.
text_image
Mute Volume down Skip back Scan back Power Volume up Skip forward Scan forward Play/pauseSpeaker Placement
Some helpful guidelines which will help you achieve the best performance from your Beatbox.
Your Beatbox is designed and engineered to sound great anywhere you place it. However, realising that every space is different, there are placements which will maximise the performance of your Beatbox. The home environment can present a challenge in choosing the best location for your Beatbox. The trick is to place the Beatbox in a location which will take advantage of the acoustic properties of your room and give you the best overall balance of sound.
Distance to the side walls, back wall and corners can have the biggest impact on the sound of your Beatbox. The closer the Beatbox is to a wall, floor or ceiling the more bass reinforcement you will receive. Maximum bass comes when it is placed in a corner.
The shape of Beatbox allows you to place it perfectly into a corner, giving you a great combo of space saving and deep bass. The surface you place your Beatbox on can also significantly impact the sound. Make sure you place your Beatbox on a solid surface to avoid unwanted distortion to the sound.
The height of your Beatbox in relation to your listening position can also affect the sound quality. Ideally, your Beatbox should be as close to ear level as possible and at least four feet away from your listening position for the best performance.
We encourage you to spend the time to experiment with the location of your Beatbox. Trial and error is the best way to hear how your Beatbox reacts in your environment. Take your time to find the ideal location to ensure you experience the best sound quality your Beatbox can offer.
Troubleshooting
The table can help solve most operating problems with your Beatbox. First, follow these precautions:
- Remove your iPod®/iPhone® from the dock completely.
- Reseat it in the dock firmly.
- Make sure your iPod/iPhone has the latest software installed.
UK English
| Problem What to do | |
| I hear no sound coming from my Beatbox. | Make sure you have your iPod/iPhone docked securely.Make sure your iPod/iPhone is turned on and music is playing.Make sure you have the power cord properly connected on the back of your Beatbox and that it is plugged into a working AC outlet.Make sure you press the power button and verify the power LED is lit.If you're trying to listen to a device connected to your Beatbox via the mini-jack input and cannot hear it, be sure to remove your iPod/iPhone from the dock.On the remote control, press the Play/Pause button.Raise the volume.Remove your iPod/iPhone from the dock.Wait 5 seconds. Then reseat your iPod/iPhone.Reset the system. First, unplug the power cable for 60 seconds. Next, plug it back in and push the power button - verify the power LED is lit.If you are listening to a device connected via AUX IN, make sure the device is turned on and music is playing. Raise that device's volume. |
UK English
| Problem What to do | |
| My BeatboxTM suddenly stopped working and the red LED is flashing. | Carefully check if the back plate of the amplifier is hot. If the Beatbox has been running at its highest power output for an extended period, the amplifier may have overheated and the protection circuitry has shut down the Beatbox temporarily. Your Beatbox provides maximum protection from amplifier overdrive and overheating. Switch off the Beatbox and wait 30 minutes to let the back plate cool down. Switch the power back on.Raise the volume to check that it is operating normally.If the Beatbox is still not responding, contact the dealer you purchased it from, or Beats. |
| My iPod®/ iPhone® does not charge up. | Make sure you have the power cord properly connected on the back of the unit.Make sure you have the power cord plugged into a working AC outlet.Remove your iPod/iPhone from the dock. Wait 5 seconds. Then reseat your iPod/iPhone. |
UK English
| Problem What to do | |
| My iPod/iPhone does not respond to the remote control. | Make sure there's a clear path between the remote and the system with no obstructions.Wipe the small lens on the front end of the remote using a clean, dry cloth.Bright room lights or sunlight can cause interference.Try using the remote from another location.Remove your iPod/iPhone from the dock.Wait 5 seconds. Then reseat your iPod/iPhone.Make certain the remote battery is installed correctly.If it is old, replace it. |
| The system won't respond to any controls. | Reset the system. First, unplug the power cable for 60 seconds. Next, plug it back in.Contact your dealer or Beats Customer Service at www.beatsbydre.com. |
Register Your Beats Today
www.beatsbydre.com/register

natural_image
Technical line drawing of a box with three circular components and mounting holes (no text or symbols)Vue avant
Station iPod®/iPhone®
Supports orientables
text_image
iPod/iPhone iPod/iPhone Adaptateur de station Station iPod/iPhonenatural_image
Technical line drawing of a box with three circular components and mounting holes (no text or symbols)Vista frontal

text_image
beatbox Módulo inalámbrico ENTRADA AUDIO ENTRADA C.A.Vista posterior
natural_image
Technical line drawing of a box with three circular components and mounting holes (no text or symbols)Vista anteriore
text_image
beatbox Modulo wireless LINEA DI INGRESSO INGRESSO CAVista posteriore
text_image
iPod/iPhone Adattatore dock iPod/iPhone Dock per iPod/iPhonenatural_image
Technical line drawing of a box with three circular components and mounting holes (no text or symbols)Vorderansicht
text_image
beatbox Drahtloses Modul LINE IN AC-INRückansicht
iPod/iPhone-Dock-Adapter
text_image
iPod/iPhone iPod/iPhone Dock-Adapter iPod/iPhone-Docktext_image
iPod/iPhone iPod/iPhone dock-adapter iPod/iPhone-dockBeats Electronics, LLC
1601 Cloverfield Blvd
Suite 5000N
Santa Monica
CA 90404
beats by dr. dre.
771-00003-03-C