
TFT1900LED - Monitor Monacor - Free user manual and instructions
Find the device manual for free TFT1900LED Monacor in PDF.
| Product type | TFT LCD monitor with LED backlight |
| Brand | Monacor |
| Model | TFT1900LED |
| Screen diagonal | 48 cm (19 inches) |
| Maximum resolution | SXGA 1280 × 1024 pixels |
| Brightness | 450 cd/m² |
| Contrast ratio | 1000:1 |
| Viewing angle | 170° horizontal, 160° vertical |
| Response time | 5 ms (GTG) |
| Color display | 16.7 million |
| Horizontal frequency | 24 – 82 kHz |
| Vertical frequency | 50 – 85 Hz |
| Video inputs | 1× HDMI, 1× DVI-D, 1× VGA (Sub-D 15-pin), 2× Composite (BNC) |
| Audio input | 1× stereo jack 3.5 mm |
| Video outputs | 2× Composite (BNC) loop-through |
| Built-in speakers | 2 × 2 W |
| Power supply | External power adapter 230 V~ / 50 Hz |
| Power consumption | Adjustable power saving (Off/Low/Mid/High/Super) |
| Dimensions (without stand) | 420 × 360 × 60 mm |
| Weight | 6.9 kg |
| Mounting | Standard VESA-75 (holes for bracket) |
| Main functions | OSD menu, source selection, image modes (Standard/Dynamic/Soft/User), zoom, PIP/POP, programmable sleep, auto adjustment (VGA), 3D and MPEG noise filter |
| Supplied accessories | Remote control (batteries included), stand, power adapter, VGA cable |
| Cleaning | Dry, soft cloth only, no chemicals |
| Safety | Indoor use, do not expose to water or excessive heat, do not block ventilation slots |
| Repairability | Repairs by specialized technician only; warranty void if unauthorized opening |
| Screen lifespan | 100,000 hours |
Frequently Asked Questions - TFT1900LED Monacor
User questions about TFT1900LED Monacor
0 question about this device. Answer the ones you know or ask your own.
Ask a new question about this device
Download the instructions for your Monitor in PDF format for free! Find your manual TFT1900LED - Monacor and take your electronic device back in hand. On this page are published all the documents necessary for the use of your device. TFT1900LED by Monacor.
USER MANUAL TFT1900LED Monacor
natural_image
Front view of a black MONACOR monitor with blank screen and control buttons (no visible text or symbols on the device body)TFT-1900LED
Bestellnummer 18.7000
BEDIENUNGSANLEITUNG
INSTRUCTION MANUAL
MODE D'EMPLOI
ISTRUZIONI PER L'USO
VEILIGHEIDSVOORSCHRIFTEN
GB Before switching on ...
We wish you much pleasure with your new MONACOR unit. Please read these operating instructions carefully prior to operating the unit. Thus, you will get to know all functions of the unit, operating errors will be prevented, and yourself and the unit will be protected against any damage caused by improper use. Please keep the operating instructions for later use.
The English text starts on page 9.
natural_image
Pure technical diagram of a mechanical component with mounting holes and a central rectangular feature, no text or symbols present.natural_image
Pure mechanical component diagram without any text, numbers, or symbolstext_image
Picture Contrast 50 Brightness 50 Hue 50 Saturation 50 Sharpness 50 Color Temp. Normal Scale Full Picture Mode Standard Move Adjust ExitContrast (Kontrast)
Brightness (Helligkeit)
text_image
PC Contrast 50 Brightness 50 Color Temp. Scale Picture Mode Full Standard Move Adjust ExitContrast (Kontrast)
Brightness (Helligkeit)
text_image
PC Color Temp. Normal User_R 130 User_G 128 User_B 125 Move Adjust Exittext_image
Sound Bass 50 Treble 50 Balance 50 Sound Mode Standard AVC Off Surround Off Move Adjust Cancel ExitBass (Bässe)
Treble (Höhen)
OSD H-Position, OSD V-Position
text_image
Multi Window Sub Source Size Position Border Color Picture Swap Off VGA Large Top L Black Move Adjust ExitAll operating elements and connections described can be found on the fold-out page 3.
1 Operating Elements and Connections
1.1 Front side of monitor
1 Button SOURCE/SEL.
- to select the signal source:
-
Press SOURCE /SEL., a source list is inserted
-
Select the source with ◀or ▶(3).
-
Confirm with SOURCE /SEL.
- to select the menu items
2 ButtonMENU/EXIT
- to call the menu
- to go back to the next higher menu level and to exit the menu
3 Buttons ◀and ▶
– to adjust the volume
- to select a signal source from the source list button SOURCE/SEL. (1)
- to select the menu pages in the main menu bar
– to make adjustments in the menu
4 Button to set the monitor to the stand-by mode (button lighting in red) or to switch it on (button lighting in blue)
1.2 Remote control
5 Button POWER :like button (4)on the monitor
6 Button INPUT to select the signal source:
- Press INPUT, a source list is inserted
- Select the source with ▲or ▼(15).
- Confirm the selection with ◀or ▶(16)
7 Numerical keys 1 to 5 for direct selection of the signal sources
Note: The numerical keys 6 to 0 have no function for this model.
8 Button INFO for short-time insertion of
– the name of the signal source
– short information about the signal source
– the software version of the monitor
9 Button MUTE to switch the sound on and off
10 Button AUTO for automatic adjustment of the picture for PC operation via the VGA jack
11 Button ZOOM for selection of the picture format
12 Button SLEEP ① to activate/deactivate the sleep function (automatic switching-over to stand-by mode after an adjusted time has elapsed)
13 Button PICTURE MODE to switch over between different picture presettings
14 Button CANCEL ☐ cancel displays in the screen
15 Buttons ▲and ▼
- to select a signal source from the source list button INPUT (6)
- to select the menu items
16 Buttons ◀and ▶
– to adjust the volume
- as a button to confirm when selecting a signal source from the source list 📄 button INPUT (6)
- to select the menu pages in the main menu bar
– to make adjustments in the menu
17 Button MENU: like button MENU/EXIT (2) on the monitor
18 Button PIP ☐ to select a multi-window display (switching over between PIP mode, POP mode and individual picture)
19 Button SUB SOURCE □ to select the second signal source in a multi-window display
20 Button SIZE to switch over between three sizes for the inserted picture in the PIP mode
21 Button POSITION ☐ to switch over between four picture positions for the inserted picture in the PIP mode
22 Button P.SWAP C to change the picture assignment of the signal sources in a multi-window display
1.3 Rear side of monitor (without base)
23 Power supply jack for connection of the power supply unit supplied
24 HDMI™ input (jack type A)
25 DVI input (DVI-D, via DVI-I jack)
26 VGA input (D-Sub jack, 15-pole)
27 Video input AV IN1 (BNC jack)
28 Feed-through output AV OUT1 (BNC jack) for passing on the input signal of the jack AV IN 1 (27)
29 Video input AV IN2 (BNC jack)
30 Feed-through output AV OUT2 (BNC jack) for passing on the input signal of the jack AV IN2 (29)
31 Stereo audio input (3.5 mm jack)
2 Safety Notes
The units (monitor and power supply unit) correspond to all relevant directives of the EU and are therefore marked with €€.
WARNING

The power supply unit is supplied with hazardous mains voltage. Leave servicing to skilled personnel only. Inexpert handling or modification of the power supply unit may cause an electric shock hazard.
It is essential to observe the following items:
- The units are suitable for indoor use only. Protect them against dripping water and splash water, high air humidity, and heat (admissible ambient temperature range 0 – 40 °C).
- Do not place any vessels filled with liquid, e. g. drinking glasses, on the units.
- The heat being generated in the monitor must be carried off by air circulation. Therefore, the air vents at the housing must not be covered.
- Do not set the units into operation, and immediately disconnect the mains plug of the power supply unit from the mains socket if
- there is visible damage to a unit or the mains cable,
- a defect might have occurred after a drop or similar accident,
- malfunctions occur.
The units must in any case be repaired by skilled personnel. - Never pull the mains cable to disconnect the mains plug from the mains socket, always seize the plug.
- For cleaning only use dry, soft cloth, never use chemicals or water.
- No guarantee claims for the units and no liability for any resulting personal damage or material damage will be accepted if the units are
used for other purposes than originally intended, if they are not correctly connected or operated, or not repaired in an expert way.

If the units are to be put out of operation definitively, take them to a local recycling plant for a disposal which is not harmful to the environment.
3 Applications
This TFT LCD monitor is ideally suited for applications in surveillance systems, but it can also be used for other purposes, e. g. as a computer monitor or for multimedia applications. The LED backlight of the screen provides high colour brilliance and precise details when reproducing pictures. For connecting the signal sources the monitor is equipped with five inputs (HDMITM, DVI, VGA and 2 × BNC). Feed-through outputs allow to pass on the BNC input signals to further units. In addition, the monitor has an additional stereo audio input and two integrated speakers for audio reproduction. Via a screen menu the monitor can exactly be adapted to the respective application.
A remote control, a base, a power supply unit and a VGA connection cable are supplied with the monitor.
4 Setting-up/Mounting
Set up the monitor via its base and incline it so that a favourable angle of view will result. To prevent annoying reflections, it should be placed so that light will not fall directly onto the screen surface.
Instead of the base another monitor bracket can be used which corresponds to the VESA-75 standard (e. g. the wall bracket MST-2 from MONACOR).
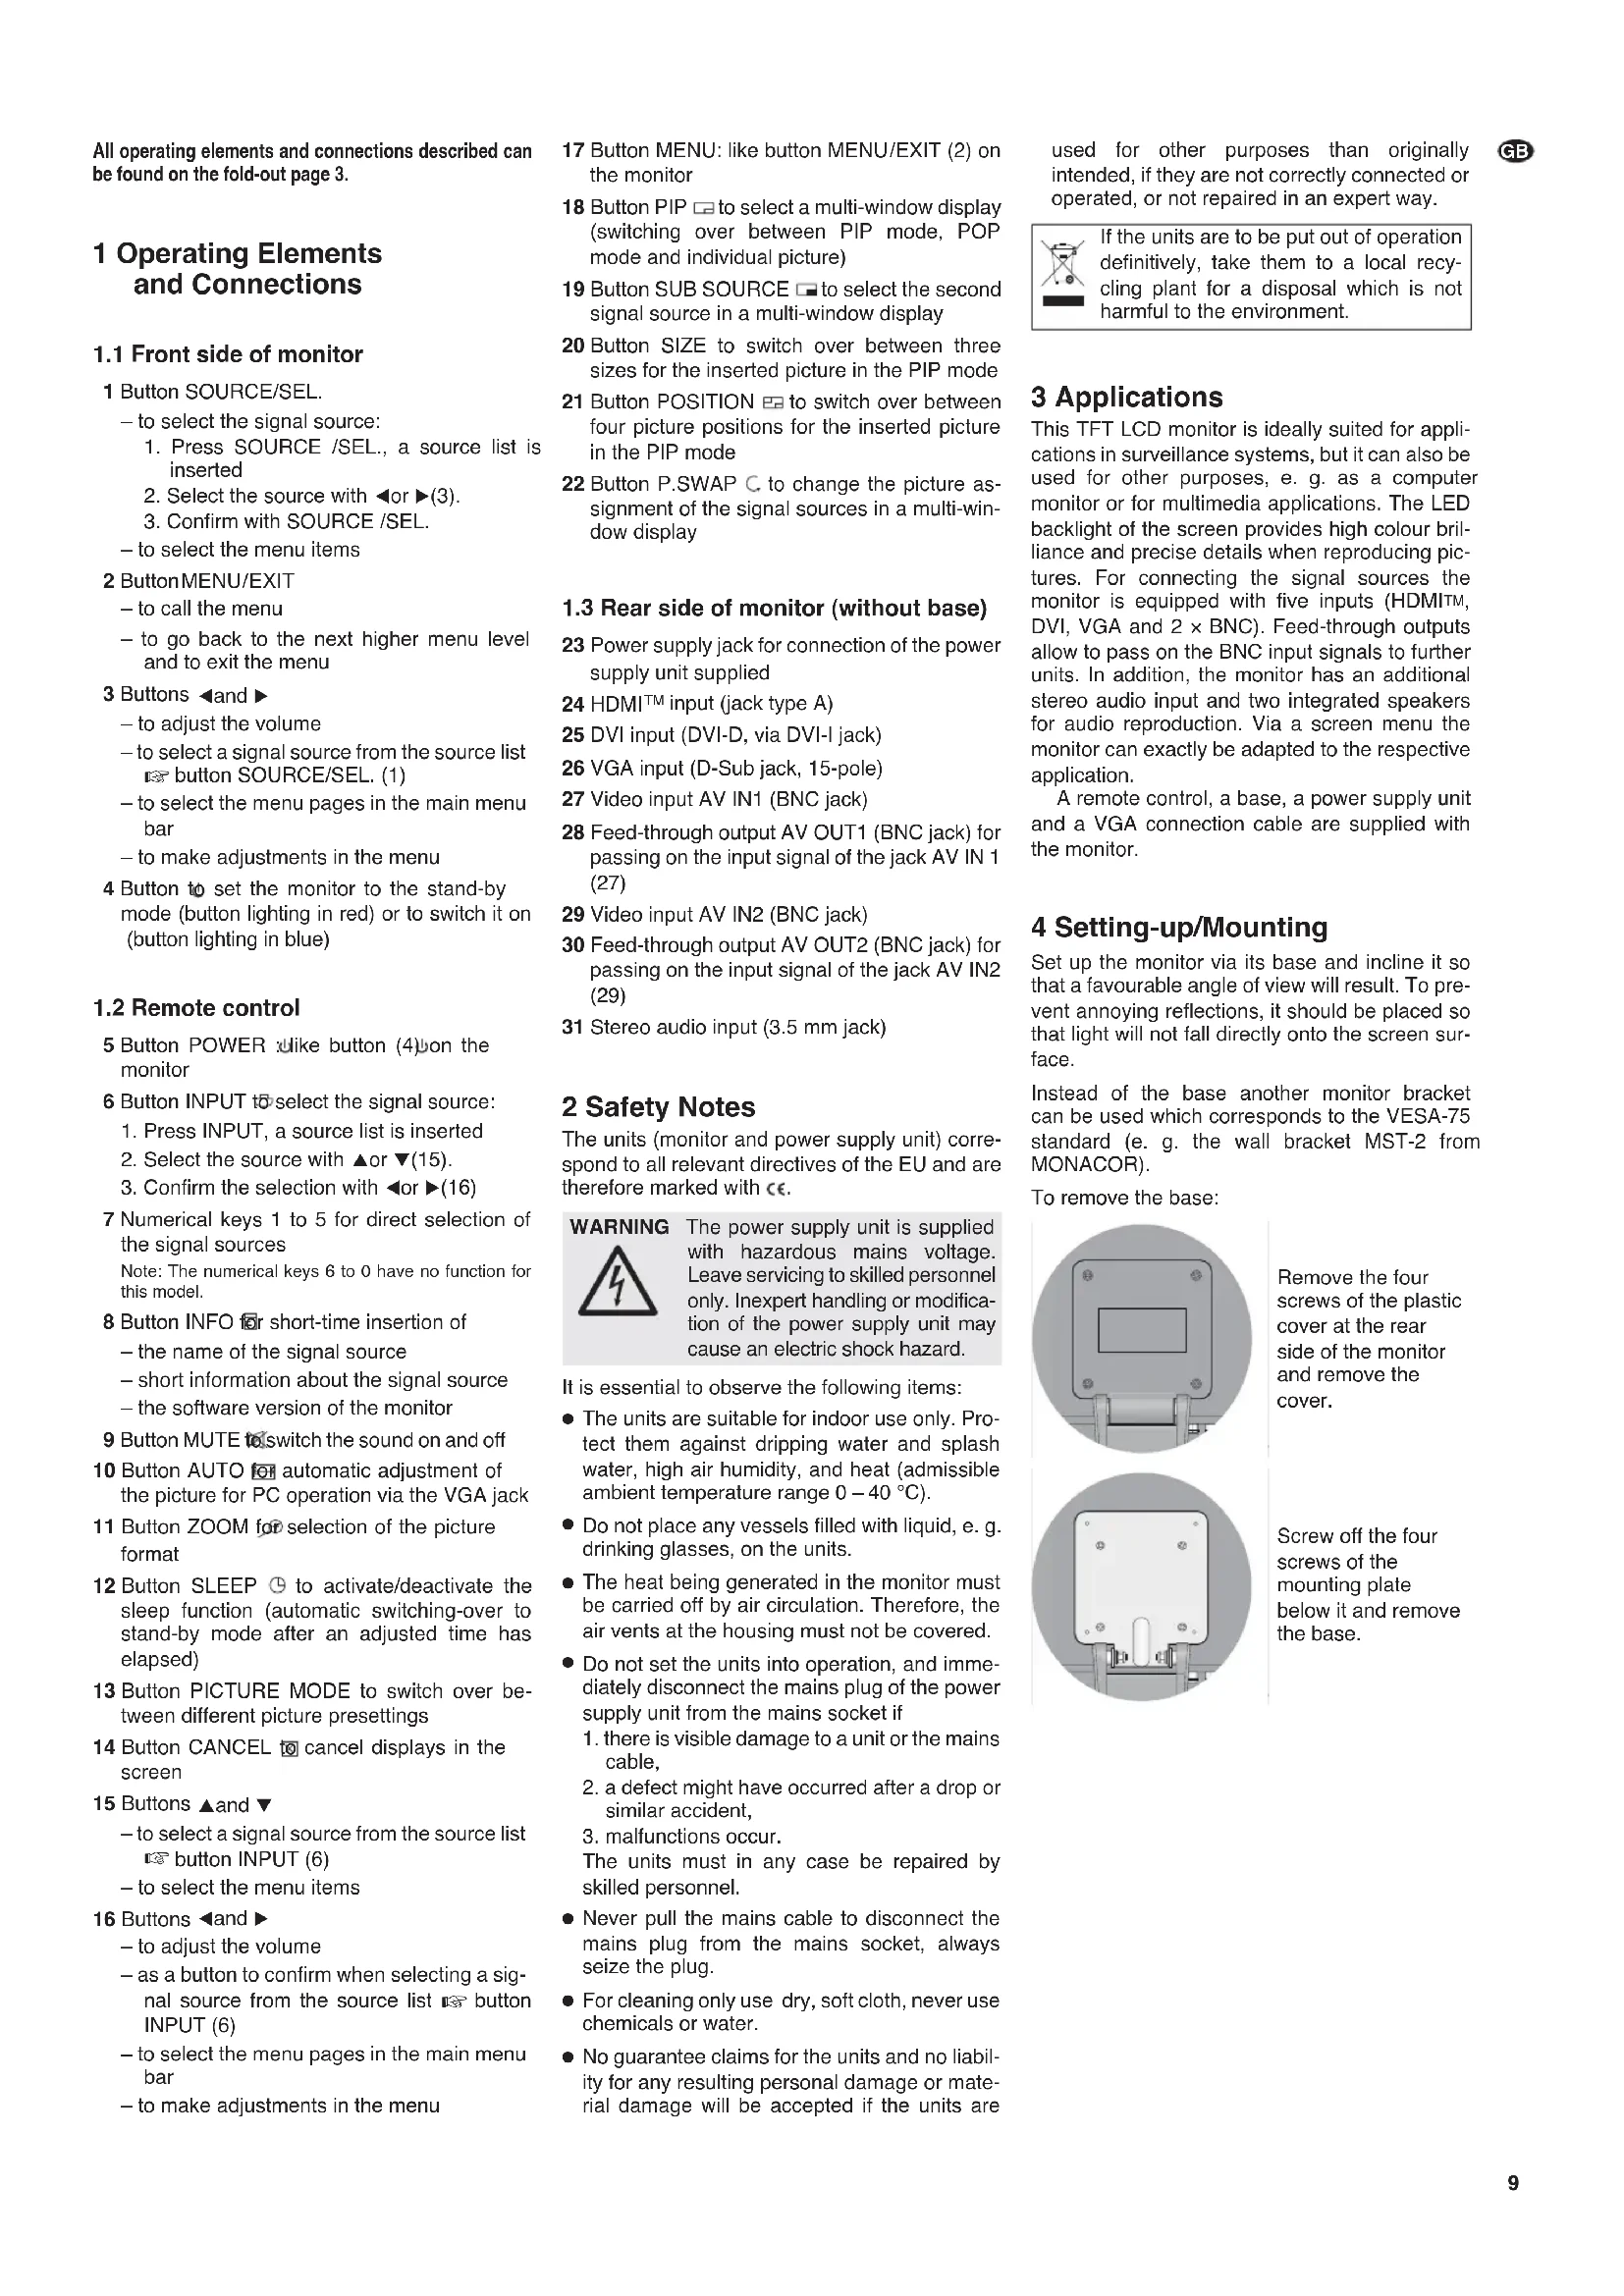
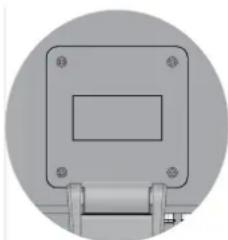
To remove the base:
natural_image
Pure technical diagram of a mechanical component with mounting holes and a central rectangular slot, no text or symbols present.Remove the four screws of the plastic cover at the rear side of the monitor and remove the cover.
natural_image
Pure mechanical component diagram without any text, numbers, or symbolsScrew off the four screws of the mounting plate below it and remove the base.
5.1 Digital inputs HDMI ^TM and DVI
If a digital output is provided at the signal source, this output should be used by preference as the digital connection generally supplies a higher picture quality. The monitor has an HDMI ^TM input (24) and a DVI input (25) as digital interfaces. Via DVI (“Digital Visual Interface”) only video data are transmitted, via HDMI ^TM (“High Definition Multimedia Interface”) both video and audio data. Connect the respective output of the signal source to the matching input.
Note: The DVI input of the monitor is a DVI-D input with a jack of the type DVI-I. For connection of the jack a cable with DVI-D plug can be used.
5.2 Analog inputs AV IN and VGA
For analog video connection of a computer the monitor has a VGA input: Connect the VGA output at the computer to the 15-pole D-Sub jack VGA (26), a matching VGA connection cable is supplied.
It is possible to connect the video outputs of two signal sources which supply composite video signals, e. g. surveillance cameras, video re corders, to the BNC inputs AV IN1 (27) and AV IN2 (29).
5.3 Stereo audio input AUDIO IN
For audio reproduction connect the audio output of the signal source to the 3.5 mm jack AUDIO IN (31) [not necessary for HDMI™ connection ➕ chapter 5.1].
5.4 Feed-through outputs AV OUT
Via the BNC outputs it is possible to pass on the signals of the BNC inputs, e. g. to a video input of another monitor or a recorder: output AV OUT1 (28) to feed through the signal at the input AV IN1 (27) and output AV OUT2 (30) to feed through the signal at the input AV IN2 (29).
5.5 Power supply
Only use the supplied power supply unit for power supply of the monitor. Connect the power supply unit to the jack DC 12V (23) and connect it to a mains socket (230 V\~/50 Hz) via the supplied mains cable. When connected to the socket, the power LED on the power supply unit will light up.
6 Remote control
Remove the battery compartment cover on the rear side, insert the two supplied 1.5 V batteries of size AAA as marked in the compartment and close the compartment. To protect the remote control against damage by leaking batteries, they should be removed as a precaution if the remote control is not in use for a longer time.
Do not put exhausted batteries into the household rubbish but take them to a special waste disposal (e. g. collective container at your retailer).
7 Setting into Operation
If the power supply has been connected and the button (4) on the monitor lights in red and the screen remains dark, the unit is in the stand-by mode.
To switch on, press the button (4 or 5). The button on the monitor lights in blue and the picture of the last signal source selected appears on the screen. The name of the source (= input it is connected to) and short information about it (Chapter 8.4) are shortly inserted. If the signal source on the VGA input is selected, an automatic picture adjustment takes place (Chapter 8.5).
If the monitor does not receive any video signal from the source selected, the indication "No Sync" appears. With missing video signal there will also be no audio reproduction.
To change to stand-by, press the button 📄To switch off completely, the monitor has to be disconnected from the power supply. If the monitor is not used for a longer period of time, also disconnect the power supply unit from the socket. Otherwise there will be a low current consumption, even if the power supply unit is not connected to the monitor.
8 Operation
The monitor can either be operated with the buttons at its front or with the buttons of the remote control supplied. When operating the remote control, always direct it to the button (4) of the monitor.
This chapter includes all adjustments which are not made via the on-screen menu (adjustments in the on-screen menu 1 chapter 9).
8.1 Selecting a signal source
on the monitor:
1) Press the button SOURCE/SEL. (1). At the top left of the picture a source list appears, the selected source is marked yellow.
2) Select the source with the button ◀or ▶(3).
3) Confirm the selection with the button SOURCE/SEL.
via the remote control:
for direct selection either press the corresponding numerical key (7)
or select the source from a list:
1) Press the button INPUT (6). At the top left of the picture a source list appears, the selected source is marked yellow.
2) Select the source with the button ▲or ▼(15).
3) Confirm the selection with the button ◀or ▶ (16).
If no source is selected, the list automatically disappears after the insertion time adjusted in the menu has elapsed ( [35] menu item "OSD Timeout", chapter 9.4). It can also be cancelled manually:
- on the unit with the button SOURCE/SEL. or MENU/EXIT(2)
- on the remote control with the button INPUT, MENU (17) or CANCEL ☒(14).
8.2 Adjusting the volume
The volume can be changed via the buttons ◀ and ▶ (3 or 16). After pressing one of the buttons, the scale "Volume" is inserted: reduce the value with the button ◀ or increase it with the button ▶.
The scale will automatically disappear after the insertion time adjusted in the menu has elapsed (I ^25 menu item "OSD Timeout", chapter 9.4). It can also be cancelled manually:
- on the unit with the button MENU /EXIT (2)
- on the remote control with the button MENU (17) or CANCEL ☒(14).
8.3 Sound on/off
To switch off the sound, press the button MUTE (9), on the right at the bottom in the picture "Mute" is inserted. To switch on the sound again, press the button again.
8.4 Inserting information
When the button INFO ☐ (8) is pressed, the name of the signal source, short information about it (e.g. video standard for sources at the BNC inputs or resolution and picture frequency for a computer at the VGA input) and the software version of the monitor are inserted for a few seconds.
8.5 Automatic picture adjustment
For each selection of the signal source at the input VGA (26) the monitor makes an automatic picture adjustment. For the time of the adjustment "Auto-Adjust" is shown. Menu values adjusted manually (e.g., menu items "H-Position" to "Phase", chapter 9.3.2) are then corrected.
The automatic picture adjustment can also be activated at any time by pressing the button AUTO ☐ (10) or via the menu (☐ menu item "Auto", chapter 9.3.2).
8.6 Selecting the picture format
It is possible to select different picture formats with the button ZOOM Ⓧ (11). Each time the button is pressed, the unit goes to the next picture format. The picture formats correspond to those in the menu ↕ menu item "Scale", de pending on the signal source chapter 9.1.1 or 9.1.2.
The indication of the picture format automatically disappears after the insertion time adjusted in the menu has elapsed (☐ menu item "OSD Timeout", chapter 9.4). It can also be cancelled manually with the button CANCEL ☒(14).
8.7 Selecting the picture presetting
The button PICTURE MODE (13) allows to switch between four picture presettings. Each time the button is pressed, the unit changes to the next picture presetting. The picture presettings correspond to those in the menu menu item "Picture Mode", depending on the signal source chapter 9.1.1 or 9.1.2.
The indication of the picture presetting automatically disappears after the insertion time adjusted in the menu has elapsed (☐ menu item "OSD Timeout", chapter 9.4). It can also be cancelled manually with the button CANCEL ☑(14).
8.8 Multi-window display
For a multi-window display, the picture of a second signal source is shown in addition to the picture of the main signal source. The multi-window settings can be made with the lower five buttons of the remote control (or via the menu page 5 chapter 9.5).
1) The button PIP (18) serves for selection of the type of display. It can be used to switch between PIP mode ("picture in picture"), POP mode ("picture outside picture") and individual picture.
2) The button SUB SOURCE (19) serves for selection of the second signal source. It can be used to switch between
- "AV1" and "AV2" when the main signal source is connected to the HDMI™ input (24), DVI input (25) or VGA input (26)
- "VGA", "DVI" and "HDMI", when the main signal source is connected to the input AV IN1 (27) or AV IN2 (29)
3) The button SIZE (20) serves for selection of the size of the inserted picture in the PIP mode. It can be used to switch between three sizes.
4) The button POSITION (21) serves for selection of the position of the inserted picture in the PIP mode. It can be used to switch between four positions on the screen.
5) The button P.SWAP (22) serves to change the picture assignment of the signal sources in a multi-window display.
When switching to stand-by mode or to another signal source, the display will be reset to individual picture.
8.9 Sleep function
The button SLEEP (2) can be used to activate or deactivate the sleep timer (automatic switching over to stand-by mode after an adjusted time has elapsed). Press the button so many times until the desired time (15 min., 30 min., 45 min. or 60 min.) or "Off" (function deactivated) will be shown. (The function can also be adjusted via the menu menu item "Sleep Timer", chapter 9.4)
The indication of the sleep timer automatically disappears after the insertion time adjusted in the menu has elapsed (✗ menu item "OSD Timeout", chapter 9.4). It can also be cancelled manually with the button CANCEL [14].
With activated sleep timer the remaining time up to the change to stand-by can be shown if the button SLEEP is pressed once. One minute before the change to stand-by a warning message appears and the time up to the change is counted down. Press any button during this count-down to deactivate the sleep timer.
9 Adjustments in the On-screen Menu
1) To call the menu, press the button MENU / EXIT (2) on the unit or the button MENU (17) on the remote control, the first menu page is inserted.
In the main menu bar 5 menu pages are marked with the following icons:

video adjustments

audio adjustments

optimizing the picture / additional functions

basic adjustments

multi-window adjustments
2) To select a menu page, go to the respective icon in the main menu bar with the button ◀or ▶(3 or 16). The icon of the selected page is highlighted.
3) To activate the selected menu page, either press the button SOURCE/SEL. (1) on the unit or the button ▼(15) on the remote control: The first menu item of the page is selected (yellow marking).
4) To select menu items on the page, either use the button SOURCE/SEL. (1) on the unit or the buttons ▲ and ▼(15) on the remote control. The menu items marked grey are deactivated.
5) To adjust the menu items, use the button ◀ or ▶(3 or 16).
6) To return to the main menu bar, either press the button MENU/EXIT (2) on the unit or the button MENU (17) or CANCEL (14) on the remote control (no menu item with yellow marking any more on the page).
7) To cancel the menu either press the button MENU/EXIT (2) on the unit or the button MENU (17) or CANCEL ☒(14) on the remote control.
The menu will automatically disappear after the adjusted insertion time has elapsed ( chapter 9.4, "OSD Timeout").
9.1 Menu page 1: Picture adjustments
The menu page 1 shows different setting options, depending on the signal source.
- If the source is no computer but e. g. a DVD player or a camera, the version "Picture" is shown ➡ chapter 9.1.1.
- If the source is a computer, the version "PC" is shown chapter 9.1.2.
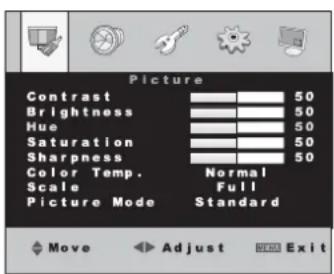
9.1.1 Version "Picture"
text_image
Picture Contrast 50 Brightness 50 Hue 50 Saturation 50 Sharpness 50 Color Temp. Normal Scale Full Picture Mode Standard Move Adjust ExitContrast
Brightness
Hue (shade of colour, for NTSC sources only)
Saturation (colour saturation)
Sharpness
Values from 0 to 100 can be adjusted for these parameters with the buttons ◀ and ▶, separately for each signal source.
Color Temp. (colour temperature)
It is possible to switch between three colour displays with the buttons ◀ and ▶:
"Normal" standard setting
"Warm" warm colour display
"Cool" cool colour display
Scale (picture format)
It is possible to switch between five picture formats with the buttons ◀and ▶:
| “Full” | for pictures in the 4 : 3 format, the picture completely fills the screen |
| “Zoom” | the picture is vertically extended for a slightly enlarged display, instead the upper and lower picture edges are no longer visible |
| “Zoom2” | the picture is horizontally extended for a slightly enlarged view, instead the left and right picture edges are no longer visible |
"Panorama" for pictures in the 16:9 format
"14 : 9" for pictures in the 14 : 9 format, pictures in the 4 : 3 format are cut at the top and bottom
Picture Mode (picture presetting)
It is possible to switch between the picture presettings "Standard", "Dynamic", "Soft" and "User" with the buttons ◀and ▶.
| Name | Contrast | Brightn. | Hue | Saturation | Sharpn. |
| Standard | 50 | 50 | 50 | 50 | 50 |
| Dynamic | 55 | 55 | 50 | 55 | 55 |
| Soft | 45 | 45 | 50 | 45 | 45 |
| User | 52 | 52 | 50 | 52 | 52 |
| or individual values | |||||
Note: When adjusting individual values for "Contrast" to "Sharpness", the unit automatically changes to "User". Before exiting the menu, do not switch to another picture presetting so that the individual values are accepted as a "user" setting.
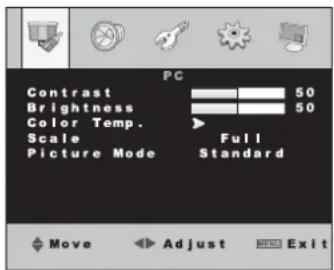
9.1.2 Version "PC"
text_image
PC Contrast 50 Brightness 50 Color Temp. Scale Picture Mode Full Standard Move Adjust END ExitContrast
Brightness
Values from 0 to 100 can be adjusted for these parameters with the buttons ◀ and ▶, separately for each signal source.
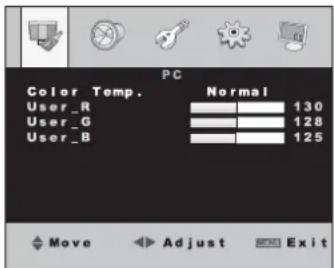
Color Temp.
To call the submenu "Color Temp.", press the button ◀or ▶:

text_image
PC Color Temp. Normal User_R 130 User_G 128 User_B 125 Move Adjust ExitIt is possible to switch between five colour displays with the buttons ◀and ▶:
"Normal" standard setting
"Warm" warm colour display
"Cool" cool colour display
"S-RGB" common colour standard in the computer field
"USER" individual setting
Use the button SOURCE/SEL. or the buttons ▲ and ▼ to select the lines "USER_R" (proportion of red), "USER_G" (proportion of green) and USER_B (proportion of blue) successively and adjust the desired value with the buttons ◀ and ▶.
Note: Do not switch to another colour display before exiting the submenu so that the values are accepted as a "user" setting.
To exit the submenu, press the button MENU / EXIT, MENU or CANCEL.
Scale (picture format)
It is possible to switch between the picture formats "Full" (4 : 3 format, picture fills the screen completely) and "16 : 9" with the buttons◀ and ▶.
Picture Mode (picture presetting)
It is possible to switch between the picture presettings "Standard", "Dynamic", "Soft" and "User" with the buttons ◀and ▶.
| Name | Contrast | Brightness |
| Standard | 50 | 50 |
| Dynamic | 55 | 55 |
| Soft | 45 | 45 |
| User | 52 | 52 |
| or individual values | ||
Note: When adjusting individual values for "Contrast" and "Brightness", the unit automatically changes to "User". Before exiting the menu, do not switch to another picture presetting so that the individual values are accepted as a "user" setting.
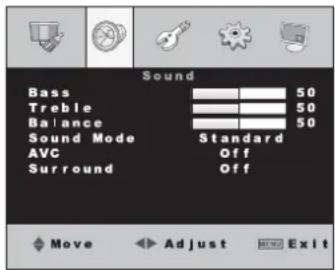
9.2 Menu page 2: Audio settings
text_image
Sound Bass 50 Treble 50 Balance 50 Sound Mode Standard AVC Off Surround Off Move Adjust ExitBass
Treble
The levels for bass and treble can be attenuated (button ◀) or increased (button ▶).
Balance (stereo balance left / right)
The volume ratio Left / Right is balanced at the value 50. The sound can be moved to the right with the button ◀ and moved to the left with the button ▶.
Sound Mode (audio presetting)
It is possible to switch between the audio presettings "Standard", "Movie", "Music" and "User" with the buttons ◀and ▶.
| Name | Bass | Treble |
| Standard | 50 | 50 |
| Movie | 35 | 65 |
| Music | 65 | 35 |
| User | 50 | 50 |
| or individual values | ||
Note: When adjusting individual values for "Bass" and "Treble", the unit automatically changes to "User". Before exiting the menu, do not switch to another audio presetting so that the individual "treble" values are accepted as a "user" setting.
AVC
The menu item "AVC" has no function for this model.
Surround (surround sound effect)
The function can be switched on or off with the buttons ◀ and ▶. With the function switched on, the menu item "Balance" cannot be adjusted.
9.3 Menu page 3:
Optimizing the picture/additional functions
The menu page 3 shows different adjusting options, depending on the signal source.
- If the source is not a computer but e. g. a DVD player or a camera, the version "Function" is shown chapter 9.3.1.
- If the source is a computer, the version "Geometry/Function" is shown chapter 9.3.2.
9.3.1 Version "Function"
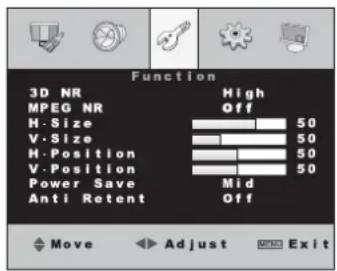
text_image
Function 3D NR High MPEG NR Off H-Size 50 V-Size 50 H-Position 50 V-Position 50 Power Save Mid Anti Retent Off Move Adjust Exit3D NR (3D noise filter)
In case of interference and noise in the picture, the 3D noise suppression can be activated in three steps to improve the picture quality. Select "Off" (filter deactivated) "Low" (low level), "MID" (medium level) or "High" (high level) with the button ◀or ▶.
MPEG NR (MPEG noise filter)
To remove interference in the picture caused by video compression (block artefacts), an MPEG noise filter can be activated in two steps. Select "Off" (filter deactivated), "Low" (low level) or "High" (high level) with the button ◀or ▶.
H-Size (width of picture)
V-Size (height of picture)
H-position (move picture horizontally)
V-position (move picture vertically)
Line "H-Size"
button ←= reduce picture width
button ▶= increase picture width
Line "V-Size"
button ◀= reduce picture height
button ▶= increase picture height
Line "H-Position"
button ◀= move picture to the left button ▶= move picture to the right
Line "V-Position"
button ←= move picture upwards
button ▶= move picture downwards
Note: The menu items "H-Size" to "V-Position" can separately be adjusted for the signal sources "AV1" and "AV2". These menu items are deactivated for signal sources connected digitally.
Power Save (energy saving mode)
By reducing the brightness of the LED backlight, the energy consumption may be reduced. Select one of the following settings with the button ◀ or ▶: "Off" (energy saving mode off, max. brightness) → "Low" → "Mid" → "High" → "Super" (min. brightness).
Anti Retent (preventing shadow images)
To prevent image retention (= continued lighting of preceding picture contents, may occur with longer still pictures), different anti-retention modes may be activated. It is possible to select with the button ◀or ▶:
"Off" no anti-retention mode activated
"1 Hour" realized every hour
"2 Hour" realized every two hours (slower but more precise than the "1 Hour" mode)
"4 Hour" realized every 4 hours (the slowest but most precise anti-retention mode)
"Test" realized every 30 seconds, for testing purposes
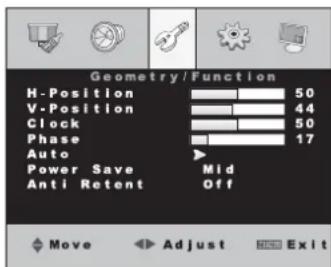
9.3.2 Version "Geometry/Function"
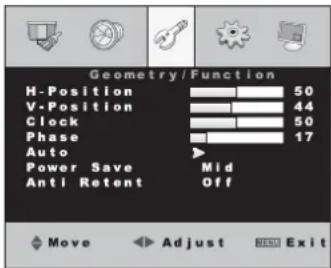
text_image
Geometry/Function H-Position 50 V-Position 44 Clock 50 Phase 17 Auto Power Save Mid Anti Retent Off Move Adjust ExitFor picture adjustment with analog computer connection the auto correction should be used button AUTO (10) or menu item "Auto". If the result is not as desired, the picture can be adjusted manually via the menu items "H-Position" to "Phase". With digital computer connection the menu items "H-Position" to "Auto" are deactivated.
H-Position, V-Position (picture position)
Line "H-Position"
button ←= move picture to the left
button ▶= move picture to the right
Line "V-Position"
button ←= move picture downwards
button ▶= move picture upwards
Clock (pixel clock)
Via the pixel clock adjust the optimum picture width at which no vertical stripes appear in the picture:
button ←= reduce picture width
button ▶= increase picture width
Phase
Adjust the phase so that an optimum sharpness (e. g. of lettering displayed) is reached and no horizontal picture interference occur:
button ◀= reduce value
button ▶= increase value
Auto (automatic picture adjustment)
The automatic picture adjustment is activated with the button ◀ or ▶. The menu is exited and "Auto-Adjust" is inserted for the time of the adjustment. Values manually adjusted for
the menu items "H-Position" to "Phase" are corrected.
Power Save and Anti Retent
see chapter 9.3.1
9.4 Menu page 4: Basic settings
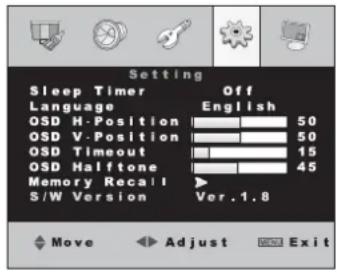
text_image
Setting Sleep Timer Off Language English QSD H-Position 50 QSD V-Position 50 QSD Timeout 15 QSD Halftone 45 Memory Recall S/W Version Ver.1.8 Move Adjust ExitSleep Timer (sleep function)
Via this menu item a time can be defined after which the monitor is automatically switched to stand-by. It is possible to select "Off" (function off), 15, 30, 45 or 60 minutes with the button ◀or ▶.
The sleep function can also conveniently be adjusted via the button SLEEP (2) chapter 8.9.
Language (language of the menu)
It is possible to switch between English and an Asian language with the buttons ◀and ▶.
OSD H-Position, OSD V-Position
(menu position on the screen)
line "OSD H-Position" button ←= move menu to the left button ▶= move menu to the right line "OSD V-Position" button ←= move menu downwards button ▶= move menu upwards
OSD Timeout (insertion time of menu)
Via this menu item it is defined how long the menu will remain inserted after pressing the last button. The adjustment also applies to other screen insertions outside the menu (e.g. volume scale or source list). Reduce the time with the button ◀or increase it with the button ▶(adjusting range 5 to 60 seconds).
OSD Halftone (transparency of the menu)
Via this menu item the transparency of the menu and of all screen insertions outside the menu can be adjusted:
button ←= increase transparency button ▶= reduce transparency
Memory Recall (reset)
When activating this menu item, the menu adjustments and volume adjustment are reset to the factory settings. Press the button ◀or ▶: The adjustments are reset and the menu is exited.
Note: Individual values of the "user" setting in the sub-menu "Color Temp." ( chapter 9.1.2) and settings of the menu items "H-Size" to "V-Position" in the menu version "Function" ( chapter 9.3.1) are not reset.
The line S/W Version at the end of the menu page which cannot be selected shows the present software version of the monitor.
9.5 Menu page 5:
Multi-window Adjustments

text_image
PIP Multi Window Off Sub Source VGA Size Large Position Top L Border Color Black Picture Swap ▶ Move Adjust ExitAll settings of this menu page (except for the menu item "Border Color") can also be made conveniently via the buttons of the remote control chapter 8.8.
Multi Window (multi-window display)
It is possible to select one of the following adjustments with the button ◀or ▶:
"Off" no multi-window display
(for this adjustment all remaining menu items of the page are deactivated)
“PIP” “picture in picture”: the picture of a second signal source is inserted in reduced size in the full screen picture of the main signal source
"POP Full" "picture outside picture": the screen is divided into two halves, the left half shows the full screen picture of the main signal source, the right half shows the full screen picture of a second signal source
Sub Source (second signal source)
Select the second signal source with the button ◀or ▶:
- If the main signal source is connected to the input AV IN1 (27) or AV IN2 (29), the source at the VGA input (26), DVI input (25) or HDMITM input (24) can be selected as a second signal source.
- If the main signal source is connected to the VGA input, DVI input or HDMITM input, the source at the input AV IN1 or AV IN2 can be selected as a second signal source.
Size (size of the picture inserted)
Select the size of the picture inserted in the PIP mode with the button ◀or ▶: "Large", "Small", "Mid".
Position (position of the picture inserted)
Select the position of the inserted picture on the screen in the PIP mode with the button ◀ or ▶:
"Top L" top left
"Bottom L" bottom left
"Bottom R" bottom right
"Top R" top right
Border Color (colour of the border line)
Select the colour of the border line between the pictures with the button ◀or ▶: "Black", "White" or "Blue".
Picture Swap (swap of the picture assignment)
Swap the picture assignment for the main signal source and the second signal source with the button ◀or ▶.
10 Specification

Diagonal
screen size: ..... 48 cm (19")
Maximum
display resolution: SXGA 1280 × 1024 pixels
Colour system: . . . PAL/NTSC (auto)
Angle of view .... hor. 170°, vert. 160°
Time of response: 5 ms (GTG)
Pixel distance: . . . 0.294 mm
Brightness: ..... 450 cd /m ^2
Contrast ratio: . . . . 1000 : 1
Colour display: . . . 16.7 million colours
Lifetime of display: 100 000 hours
Hor. resolution: . . . 625 TV lines (PAL), 600 TV lines (NTSC)
Hor. frequency: . . . 24 kHz – 82 kHz
Vert. frequency: .. 50 Hz – 85 Hz
Inputs for the
signal sources: ... 1 × HDMI™ 19-pole (jack type A)
1 × DVI-D 24-pole (via DVI-I jack)
1 × VGA 15-pole (D-Sub jack)
2 × composite (BNC jacks)
1 × stereo audio (3.5 mm jack)
Video outputs: ... 2 × composite (BNC jacks)
Speaker:....2×2W
Power supply: . . . . via supplied PSU connected to 230V\~/50Hz
Ambient
temperature: ..... 0 - 40 °C
Dimensions: ..... 420 × 360 × 60 mm (w/obase)
Drill holes for the
bracket mounting: VESA-75 standard
Weight: 6.9 kg
Subject to technical modification.
natural_image
Pure technical diagram of a mechanical component with mounting holes and a central rectangular housing (no text or symbols)natural_image
Pure mechanical component diagram without any text, numbers, or symbolstext_image
Picture Contrast 50 Brightness 50 Hue 50 Saturation 50 Sharpness 50 Color Temp. Normal Scale Full Picture Mode Standard Move Adjust Remove ExitContrast (contraste)
text_image
PC Contrast 50 Brightness 50 Color Temp. Scale Picture Mode Full Standard Move Adjust ExitContrast (contraste)
text_image
PC Color Temp. Normal User_R 130 User_G 128 User_B 125 Move Adjust Exittext_image
Sound Bass 50 Treble 50 Balance 50 Sound Mode Standard AVC Off Surround Off Move Adjust ExitBass (graves)
Treble (aigus)
Surround (effet surround)
9.3.2 Version "Geometry/Function"
text_image
Geometry/Function H-Position 50 V-Position 44 Clock 50 Phase 17 Auto Power Save Mid Anti Retent Off Move Adjust ExitOSD H-Position, OSD V-Position
text_image
Multi Window Sub Source Size Position Border Color Picture Swap Off VGA Large Top L Black Move Adjust NEW ExitSub Source (seconde source de signal)
natural_image
Pure technical diagram of a rectangular component with mounting holes, no text or symbols presentnatural_image
Pure diagram of a mechanical component with mounting holes and a central shaft (no text or symbols)text_image
Picture Contrast 50 Brightness 50 Hue 50 Saturation 50 Sharpness 50 Color Temp. Normal Scale Full Picture Mode Standard Move Adjust ExitContrast (contrasto)
text_image
PC Color Temp. Normal User_R 130 User_G 128 User_B 125 Move Adjust Exittext_image
Sound Bass 50 Treble 50 Balance 50 Sound Mode Standard AVC Off Surround Off Move Adjust MENU ExitBass (bassi)
Treble (acuti)
OSD H-Position, OSD V-Position
Riga "OSD H-Position"
Riga "OSD V-Position"
text_image
Multi Window Sub Source Size Position Border Color Picture Swap Off VGA Large Top L Black Move Adjust Exit1 × DVI-D 24 poli (tramite presa DVI-I)
1 × VGA 15 poli (presa D-Sub)
2 × Video composito (prese BNC)
1 × Stereo-Audio (presa jack 3,5 mm)
Uscita video: ..... 2 × Video composito (prese BNC)
Altoparlanti ..... 2 × 2 W