SEQ0501 - Air Conditioning Acson - Free user manual and instructions
Find the device manual for free SEQ0501 Acson in PDF.

| Brand | Acson |
| Model | SEQ0501 |
| Product Type | Air conditioning (split or multi-split system) |
| Main Functions | Cool (COOL), Heat (HEAT), Fan (FAN), Auto (AUTO), Economy Mode (SAVE) |
| Auxiliary Electric Heater | Yes, up to 2 heaters |
| Temperature Range | 16°C to 30°C |
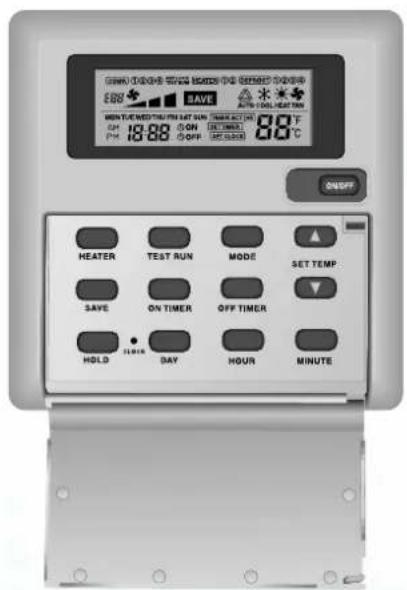
| Display | LCD screen with clock, compressor indicators, lock, heater, energy saving, defrost, mode, temperature |
| Timer | 7-day programmable timer with ON TIMER and OFF TIMER |
| Lock | Key lock system (KEY LOCK) |
| Number of Compressors | Up to 4 |
| Error Codes | Display of codes E01 to E35 |
| Included Accessories | Remote control, 2 wood screws 4.1 x 16, user manual |
| Remote Control Installation | Wall mounting, wired connection to terminals GND, +V, B, A |
| Power Supply | 230 V / 50 Hz (estimate) |
Frequently Asked Questions - SEQ0501 Acson
User questions about SEQ0501 Acson
0 question about this device. Answer the ones you know or ask your own.
Ask a new question about this device
Download the instructions for your Air Conditioning in PDF format for free! Find your manual SEQ0501 - Acson and take your electronic device back in hand. On this page are published all the documents necessary for the use of your device. SEQ0501 by Acson.
USER MANUAL SEQ0501 Acson
for PACKAGED AIR CONDITIONER (PAC)
CONTROLEUR SEQUENTIEL
pour CLIMATISEUR
FOLGESTEUERUNG
Press once to start the air conditioning unit.
Press again to stop the unit.
The operation lamp next to the key lights up and goes off respectively when the unit is running or not running.
Caution : In the case when the ON/OFF key is pressed immediately after the operation is stopped, the unit will not restart until 3 minutes later to protect the compressor.
2.2 Selecting Operation Mode
Press the MODE key to select the type of operating mode. Consecutive press of the key switches the operation over "COOL", "HEAT", "AUTO" and "FAN".
2.3 SAVE Mode
Press the SAVE key to select the energy saving function. This option is only available for "COOL", "HEAT" and "AUTO" modes.
2.4 Auxiliary Electric Heater
If the "HEAT" mode provides insufficient heating to a room even at the highest temperature setting (30^) , press the HEATER key to activate the auxiliary electric heater. For models with two heaters, consecutive press of the key allows the selection of one or both heaters active.
2.5 Temperature Setting
To set the desired room temperature, press to increase or decrease the set temperature in the range of 16^ to 30^ .
Press both and simultaneously to toggle between ^ C and ^ setting.
2.6 Time Setting
Real time Clock
Press the CLOCK key once to activate set clock mode.
Press again to disable set clock mode.
Under set clock mode, the time of the present day can be set by pressing the respective MINUTE, HOUR and DAY key.
7-days timer
Press the ON TIMER key to activate auto-ON timer mode. Under this mode, press the respective MINUTE, HOUR and DAY key to select the time of the week when the air-conditioning unit is to automatically start running. Press the ON TIMER key again to save the setting.
Press the OFF TIMER key to activate auto-OFF timer mode. Under this mode, press the respective MINUTE, HOUR and DAY key to select the time of the week when the air-conditioning unit is to automatically start running. Press the ON TIMER key again to save the setting.
Then to activate the 7-days timer, press and hold the TIMER ACTIVE key until the word "TIMER ACTIVE" appears on the LCD screen. Repeat the same step to disable the 7-days timer.
2.7 Other Function
Key Lock
Press the MINUTE key 3 times consecutively to activate the key lock. A "KEY LOCK" symbol will appear on the LCD screen. At this point, only the ON/OFF key is valid. To disable the key lock, again press the MINUTE key 3 times consecutively.
Test run
Press the TEST key 2 times consecutively to test run the unit.
3. Error Code
When the system is on and an error occurs, the ON/OFF LED on the LCD panel will blink and an error code is shown. When the system is off and there is a thermistor error, the ON/OFF LED is off but the error code is still displayed. Each error code represents different message as below:
| E01 | Require manual reset | E19 | Indoor coil sensor 4 short |
| E02 | Compressor 1 high temperature (overload) | E20 | Indoor coil sensor 1 open |
| E03 | Compressor 2 high temperature (overload) | E21 | Indoor coil sensor 2 open |
| E04 | Compressor 3 high temperature (overload) | E22 | Indoor coil sensor 3 open |
| E05 | Compressor 4 high temperature (overload) | E23 | Indoor coil sensor 4 open |
| E06 | Compressor 1 high pressure trip / contact open | E24 | Outdoor coil sensor 1 short |
| E07 | Compressor 2 high pressure trip / contact open | E25 | Outdoor coil sensor 2 short |
| E08 | Compressor 3 high pressure trip / contact open | E26 | Outdoor coil sensor 3 short |
| E09 | Compressor 4 high pressure trip / contact open | E27 | Outdoor coil sensor 4 short |
| E10 | Compressor 1 trip / low R-22 / outdoor abnormal | E28 | Outdoor coil sensor 1 open |
| E11 | Compressor 2 trip / low R-22 / outdoor abnormal | E29 | Outdoor coil sensor 2 open |
| E12 | Compressor 3 trip / low R-22 / outdoor abnormal | E30 | Outdoor coil sensor 3 open |
| E13 | Compressor 4 trip / low R-22 / outdoor abnormal | E31 | Outdoor coil sensor 4 open |
| E14 | Room sensor short | E32 | Compressor 1 de-ice |
| E15 | Room sensor open | E33 | Compressor 2 de-ice |
| E16 | Indoor coil sensor 1 short | E34 | Compressor 3 de-ice |
| E17 | Indoor coil sensor 2 short | E35 | Compressor 4 de-ice |
| E18 | Indoor coil sensor 3 short |
4. Installation Of LCD Remote Controller
4.1 Accessories
The following accessories are included together with this manual. If any part is missing, contact your dealer immediately.
①Remote controller
②Wooden screw 4.1 × 16 (2 pieces)
③ Instruction manual
4.2 Step-by-step Guide
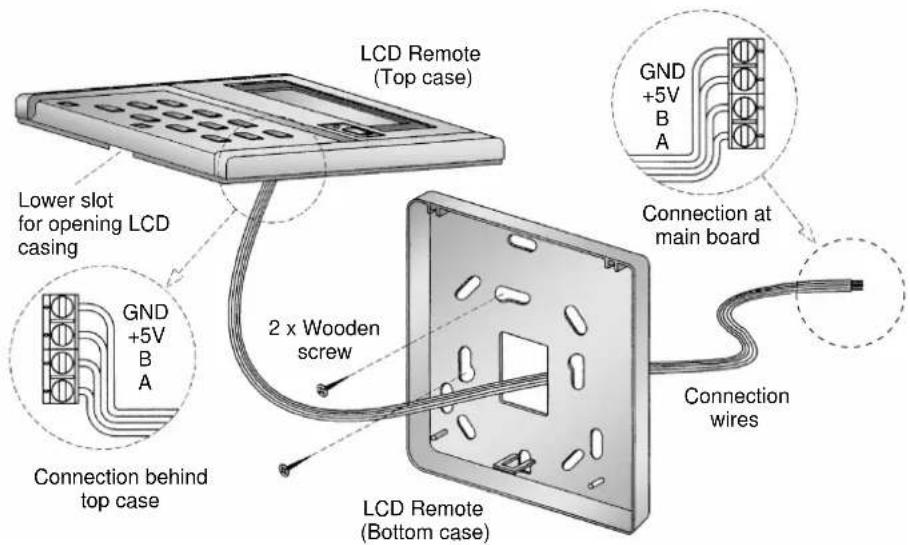
i) First, open up the casing of the LCD remote controller into its top and bottom case using a screwdriver. To do this, insert the screwdriver into the lower slot and slide it in the outward direction.
ii) Fix the bottom case onto the wall with the 2 wooden screws provided. Then, insert the 4 connecting wires (from the main board) through the slot on the lower center of the case as shown below.
iii) Connect one end in each of the 4 wires to the terminal block behind the top case as illustrated. The wire that goes into the "GND" terminal at the top case must be connected at the other end to the "GND" terminal at the main board. The same goes for the "+"V", "B" and "A" connection.
iv) Fasten back the top and bottom case into place. Hook the two upper claws into their respective slots and snap the lower part shut.
BHObBaHxMnTeIJIaOCTaHOBKnMoDyJN.
INHdkatop onepaun pRDOM C KnaBnue 3arOpNTcN IOTyXHT COOTBeTCTBEHHO BO BpMa pa6oTbMOdyIaI INI pIn eO TKJIIOHeHN.
Octopoxho:Bcnyae,ecn knaBnwa ON/OFF (BKJI/BbIKJ) haxata cpa3y je nocne npkekpaueHn pa60tbi,MOynb He BO3o6HOBnT pa60Ty no nCTeHn 3 MInHyT dIraaunTbKOMnPecccopa.
2.2 Pekm Bbopa Oepaui
Haxmte knaiba MODE (PEXMM) nBbIbopa Tnnpa pexma pa6oTbi.
IocneObaTeNbHoe HaxaTne KnaBnU nepeKlnoayet onepaun "COOL" (XOIO), "HEAT" (OBOFPEB), "AUTO" (ABTO) n "FAN"(BEHTNJIAR).
2.3 PeknM SAVE
Hajmte KlaBnuy SAVE nI Bb6opa cyHKun 3heproc6pexehna. 3Ta onu HOBMOXHa TOnbKO dIpeKIMOB "COOL"(XOIOHO), "HEAT"(OBOFPEB) u AUTO" (ABTO).
2.4 DOnOpHnHTeBHy 3IeKtpuYeckn O6OrpeBaTeIb
Ecni pejxim "HEAT"(OBOFPEB) He oecneuBaet dOnKhoro oborpba B KOMHaTe daxe npu yctaHObKe camo BblcOKoT emnepaTpyb (30°C), To haxmnte KnaBnU HEATER (XAPKO) nra BKIOueHn DOONHnTEJbHOrO 3JeKtpueckoro oborpbaTeJI. Ima moJe ne C DByMa OBorpeBaTeJIaMn, nocJeobatbHoe Haxkata Ne KnaBnI N03BOJnE T BKNIOHTb OINn II INo6a OborpbaTeJI.
2.5 YctahOBka TemnepaTpybl
IyTaHOBKn XeNaemOy TemnepaTpyb B KOMHaTe, HaxMnte 1nn
IIOBbHn HnnnoHNKeHHy yCTaHOBHeHHo TEMpepaTpyb IB npedeJax oT 16°C do 30^
HaKMTe o6e A uIN OHOBpeMeHNO dIa nepeKIOUeHnO T yCTaHOBKn C nF.
2.6 YctaHObKa BpeMeHn
YacbpeanbHoroBpeMeHH
Haxmnte KnaBnuy CLOCK Odn pa3 Dn BkNoeHnpeXnMa yCTaHOBKn YacOB.
HaXmnte ChOBA nIy BbIXoJa I3 peKIma yCTaHOBKn YacOB.
B pexime yctahOBKn YacOB Tekyuee Bpem MOKeT 6bIb yCTaHOHe HaxaTNEM COOTBETCTByOuNX KnaBn MINUTE, HOUR n DAY.
7-Дневский TaMep
Haxmte KnaBnuy ON TIMER (BKITAIMEP) nIBy BKIOHeHrpeKIma TaIMepa
abTO-BKJI. B 3TOM peXkIMe HaxMITE COOTBETCTBYIOUHNE KJlABuIN MINUTE, HOUR IN DAY nIy Bb6opa BpeMeHN HeJeN, KOJa npEiNoNAraeTCR abTOMaTuYeCKoe BKLIQUHeHne KOHdNtioHepa. BHOBb HaxMITE KJlABuWY ON TIMER (BKJI TAIIMEP) dIa coxpaHEnH yCTaHOBKn.
Haxmnte KnaBnuy OFF TIMER (BbIKI TAIMEP) nla BkNIOeHnpeXnma Taimepa aBTo-BbIKJ. B 3TOM peXnme HaxmTe COOTBeTCTBYUOuNE KNaBnMINUTE, HOUR i DAY nBbIbopa BpemeHn HeJeIN, KOJa npEiNojaraetcABTOMaTnueckoe BKIOeHne KOHNIOHOepa. BHObHaxmTe KnaBnuy ON TIMER (BKJI TAIMEP) nla coxpaHeHn yCTaHOBKn.
3aTeM BKNIOHnTE 7-HeBnI TaIMep, HAnmTe n IepKnTe KnaBnSy "TIMER AC-TIVE" (BKJIIOUeHNE TAIMEPA) Do Tex nop, noka HaDnncb "TIMER ACTIVE" (BKJIIOUeHNE TAIMEPA) He noBnTcHa KKd 3kpaHe. NOBTOPte TaKne Xe WaHn DnA OTKIOUeHn 7-HeBHO rTaIMepa.
2.7Дугпe Функциn
Блokировka
Haxmte KlaBnWY MINUTE 3 pa3a noDprdI nIe BkIIOueHn6bOKPOBKn. Ha KKd 3KpaHe NOBtCn CMBON "KEY LOCK" (BJOKNPOBKA). C 3TOrO MoMeHTa cyHKUHOHPyET ToIbKO KlaBnWA ON/OFF. IINoOTKJIIOueHn6bOKPOBKn, BHOBb Haxmte KlaBnWY MINUTE 3 pa3a noDpI.
Pa6oyne nCnblTahna
Haxmte KnaBly TEST da paa npra dnil npoBeHn pa6ohnx ncbtAn moyn.
3. KoД HeиспраьнocтИ
Korpa npa60taoue CnCTeMe clyaetc HncnpabHocTb,TO CN ON/OFF (BKJI/ Bblk) Ha KKII naHeI 3amraet n NorBNTc KoH HeNcnpabHocTn. Korda cnCTema BblknIOheHa n cyueCTByET HeNCnpabHocTb TepMope3nctopa,TO CN ON/OFF (BKJI/ Bblk) BblknIOueH, HO KOJ HeNcnpabHocTn BCE Je N3O6paXeH. KaKdbi KOn HncnpabHocTn HeceT pa3nHyIO INΦopMaunIO KAK NOKa3aHO BH3y:
| E01 | pe6yterch pyuHЯ nepeyctaHObka | E19 | KopOTKoe 3ambKaHHe BHyTPenHrO daTmHa paRdIaTopa 4 |
| E02 | KomPpeccop 1 blicokAa Temnepatypa (nepepy3ka) | E20 | OTcyTCTBHe KONTAKTa BHyTPenHrO daTmHa paRdIaTopa 1 |
| E03 | KomPpeccop 2 blicokAa Temnepatypa (nepepy3ka) | E21 | OTcyTCTBHe KONTAKTa BHyTPenHrO daTmHa paRdIaTopa 2 |
| E04 | KomPpeccop 3 blicokAa Temnepatypa (nepepy3ka) | E22 | OTcyTCTBHe KONTAKTa BHyTPenHrO daTmHa paRdIaTopa 3 |
| E05 | KomPpeccop 4 blicokAa Temnepatypa (nepepy3ka) | E23 | OTcyTCTBHe KONTAKTa BHyTPenHrO daTmHa paRdIaTopa 4 |
| E06 | KomPpeccop 1 klananb Blicckoro daBlenHm / oTCytCTBHe KOtAKTa | E24 | KopOTKoe 3ambKaHHe BHeUHrO daTmHa paRdIaTopa 1 |
| E07 | KomPpeccop 2 klananb Blicckoro daBlenHm / oTCytCTBHe KOtAKTa | E25 | KopOTKoe 3ambKaHHe BHeUHrO daTmHa paRdIaTopa 2 |
| E08 | KomPpeccop 3 klananb Blicckoro daBlenHm / oTCytCTBHe KOtAKTa | E26 | KopOTKoe 3ambKaHHe BHeUHrO daTmHa paRdIaTopa 3 |
| E09 | KomPpeccop 4 klananb Blicckoro daBlenHm / oTCytCTBHe KOtAKTa | E27 | KopOTKoe 3ambKaHHe BHeUHrO daTmHa paRdIaTopa 4 |
| E10 | KomPpeccop 1 klananb / HIX3Koe R-22 / HeuCnpaBHOCTb BO BHeUHrM MOdyne | E28 | OTcyTCTBHe KONTAKTa BHeUHrO daTmHa paRdIaTopa 1 |
| E11 | KomPpeccop 2 klananb / HIX3Koe R-22 / HeuCnpaBHOCTb BO BHeUHrM MOdyne | E29 | OTcyTCTBHe KONTAKTa BHeUHrO daTmHa paRdIaTopa 2 |
| E12 | KomPpeccop 3 klananb / HIX3Koe R-22 / HeuCnpaBHOCTb BO BHeUHrM MOdyne | E30 | OTcyTCTBHe KONTAKTa BHeUHrO daTmHa paRdIaTopa 3 |
| E13 | KomPpeccop 4 klananb / HIX3Koe R-22 / HeuCnpaBHOCTb BO BHeUHrM MOdyne | E31 | OTcyTCTBHe KONTAKTa BHeUHrO daTmHa paRdIaTopa 4 |
| E14 | KopOTKoe 3ambKaHHe BHyTPenHrO daTmHa | E32 | KomPpeccop 1 pazMpoxkHBaHme |
| E15 | OTcyTCTBHe KOtAKTa BHyTPenHrO daTmHa | E33 | KomPpeccop 2 pazMpoxkHBaHme |
| E16 | KopOTKoe 3ambKaHHe BHyTPenHrO daTmHa paRdIaTopa 1 | E34 | KomPpeccop 3 pazMpoxkHBaHme |
| E17 | KopOTKoe 3ambKaHHe BHyTPenHrO daTmHa paRdIaTopa 2 | E35 | KomPpeccop 4 pazMpoxkHBaHme |
| E18 | KopOTKoe 3ambKaHHe BHyTPenHrO daTmHa paRdIaTopa 3 |
- YctahOBka KKD nyIbTa DuctaHNOHoro YnpabNeHIA
4.1 PpinaIeXHocTn
HnKecneIyUOuIe npHaJnxKHOCTN NOCTaBJIIOCTB MecTe C 3TNM pyKOBOCDtBOM. Ecnn YTO-JIN60 OTCYTCTByET, TO HEmeJInEHO oBaPauaNTecb K BaWemy dIInepy.
①IyntdNCTaHNoHHOrOynpaBHeHH
②Uypyn 4,1 x 16 (2 wTykn)
③PykoBOIDTO NO yCTaHOBKe
4.2 NpOpO6Hoe PyKoBOdCTBO
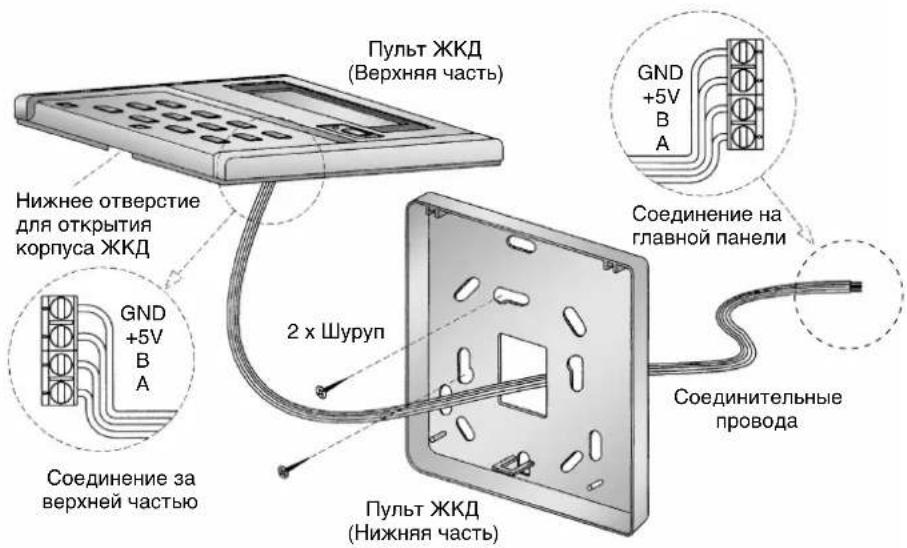
i) Ipnexde Bcero, OTKpoTe Hn3 n Bepx Kopnyca KKD npbTa dntaHnoHHoro ynpabHeHH npn NMOOu OTBepTK.ДЯ 3TOrO, BCTaBBTe OTBepTKy B HnxHee OTBepCTne n NODeHbTe eIO Hapxyk.
ii) 3akpeHnTe HnXnIO nHa HeB Ha CTeHy DByM NMeIOUmmncs Wpypamn. 3aTe m npOBeHnTe 4 coeINHIOx npoBoDa (c rIaNBOH nAHeN) uepe3 OTBepCTne, HaxOJaueecBaHTpaIbHOH HNXnE Yactn Kopnyca, KaK NOKa3aHO BHn3y.
iii) CoeINHInTe KOHbI KaKDoRo n3 4 npoBOOB K 6nOky TepMHaHa 3a BepxHei YacTbIO KOpnyCa, KaK nOKa3aHO Ha pncyHke. IpopoBD, coeINHeHHbIK TepMHAny "GND" Ha BepxHei YacTHn KOpnyCa DoJIxHeN 6bITb CoeINHeH dpyrIM KOHcOM K TepMHAny "GND" Ha rnaBHO nnHeHn. To xe camoe OTHocntc K COeINHeHNm +5V", "B" n"A".
iv) 3aФИКСИРУТЕ ВЕХHIIOU И HIXHIOU YAcTn KOpNyca Ha IN NpEeKHee MecTo. 3aueINTE DBA BepxHINX BbICTyNa B IN X COOTBeTcTBYIOUne THe3Ja I NLOTHO 3akpoIte HIXHIOU YAcTb.
OPERATING MANUAL
Before using your air conditioner, please read this operating manual carefully and keep it for future reference.