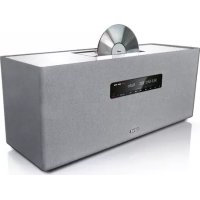
SoundBox - Loudspeaker LOEWE - Free user manual and instructions
Find the device manual for free SoundBox LOEWE in PDF.



| Product type | Speaker with docking station for iPod/iPhone, CD player, FM radio |
| Brand | Loewe |
| Model | SoundBox (ref. 51202-T/W00) |
| Dimensions (W x H x D) | 45 x 14.5 x 17 cm |
| Weight | 5.1 kg |
| Power supply | 230 V, 50 Hz |
| Power consumption | 23 W (operation); < 1 W (standby, energy saving mode) |
| Laser | Class 1, wavelength: 790 nm |
| Output power | 2 x 15 W (max. music) |
| Interfaces | 3.5 mm headphone jack, 3.5 mm AUX input, 2 USB 2.0 Type A ports, 75 Ω FM antenna |
| Supported audio formats | Audio CD, CD-R/RW (MP3, WMA), USB (FAT16/32, MP3, WMA) |
| Compatible Apple devices | iPod, iPhone (integrated docking station, includes charging) |
| Radio | FM RDS, 30 presets, automatic and manual search |
| Main functions | Alarm (audio source or beep), sleep timer, auto off, bass/treble adjustment, display dimming |
| Remote control | Assist remote control with AAA batteries (included); programmable for other Loewe devices |
| Care and cleaning | Aluminum surface: slightly damp soft cloth; speaker grille: gentle vacuuming |
| Safety | Do not expose to water, shocks, magnetic fields, high temperatures; do not open; disconnect during storms |
| Operating temperature | 5 °C to 40 °C |
| Humidity (non-condensing) | 30% to 90% |
| Country of manufacture | Germany (Loewe Opta GmbH) |
Frequently Asked Questions - SoundBox LOEWE
User questions about SoundBox LOEWE
0 question about this device. Answer the ones you know or ask your own.
Ask a new question about this device
Download the instructions for your Loudspeaker in PDF format for free! Find your manual SoundBox - LOEWE and take your electronic device back in hand. On this page are published all the documents necessary for the use of your device. SoundBox by LOEWE.
USER MANUAL SoundBox LOEWE
natural_image
Exterior view of a gray LOEWE-branded audio workstation with a smartphone on top (no visible text or symbols on the device body)Bedienungsanleitung, Operating instructions, Mode d'emploi, Istruzioni per l'uso, Instrucciones de manejo, Gebruiksaanwijzing
natural_image
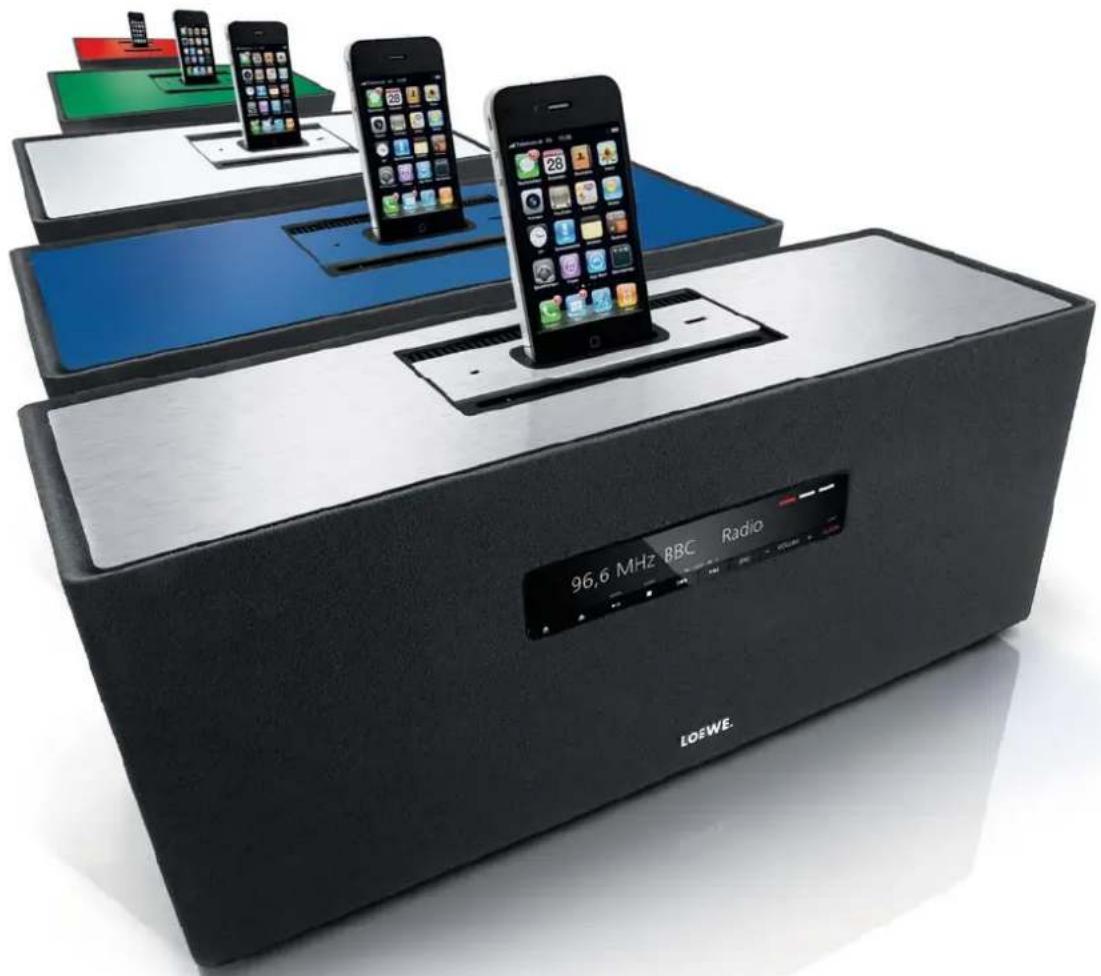
Black LOEWE-branded radio device with multiple smartphones on top, no visible text or symbols on the device body.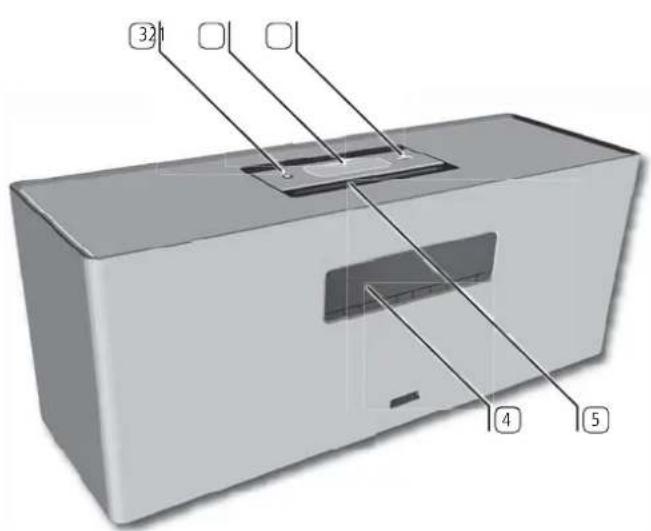
natural_image
3D rendering of a remote control casing with battery and port, showing no visible text or symbols on the casing itself.natural_image
Illustration of a hand pressing down on a circular object with a checkmark and cross mark (no text or symbols)natural_image
Simple line drawing of a rectangular box with a circular top and a rectangular base (no text or symbols)natural_image
Line drawing of a rectangular appliance with a top panel and a small circular button (no text or symbols)natural_image
Line drawing of a refrigerator with an iPod icon above it (no text or symbols)REPEAT REPEAT REPEAT
ALL ONE OFF
iPod touch (4th generation), iPod touch (3rd generation)
iPod touch (2nd generation), iPod touch (1st generation)
iPod classic
iPod nano (6th generation)
iPod nano (5th generation), iPod nano (4th generation)
iPod nano (3rd generation), iPod nano (2nd generation)
iPhone 4, iPhone 3GS, iPhone 3G, iPhone
Impressum
Instructions for Use
Control elements
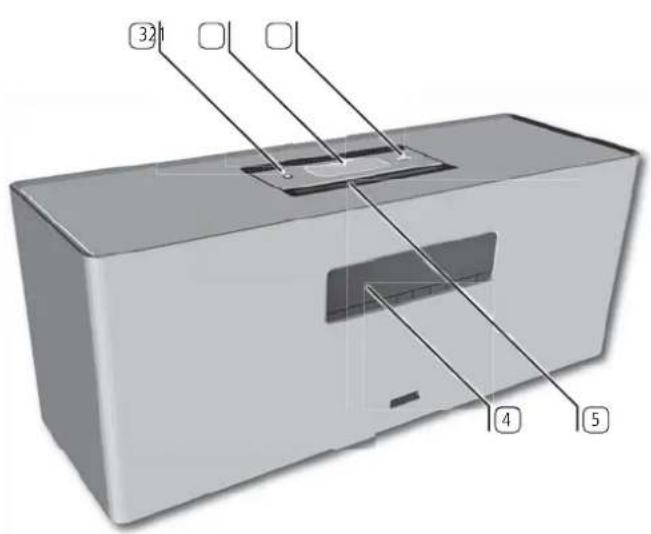
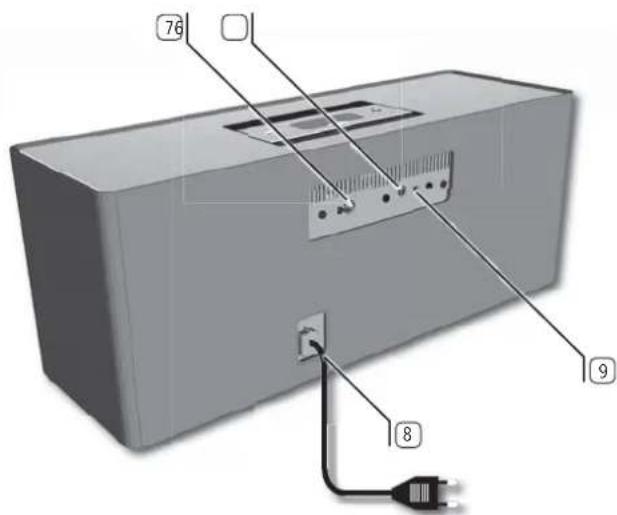
1 USB socket
② iPod / iPhone dock ^(1)
3 HEADPHONE - headphone socket
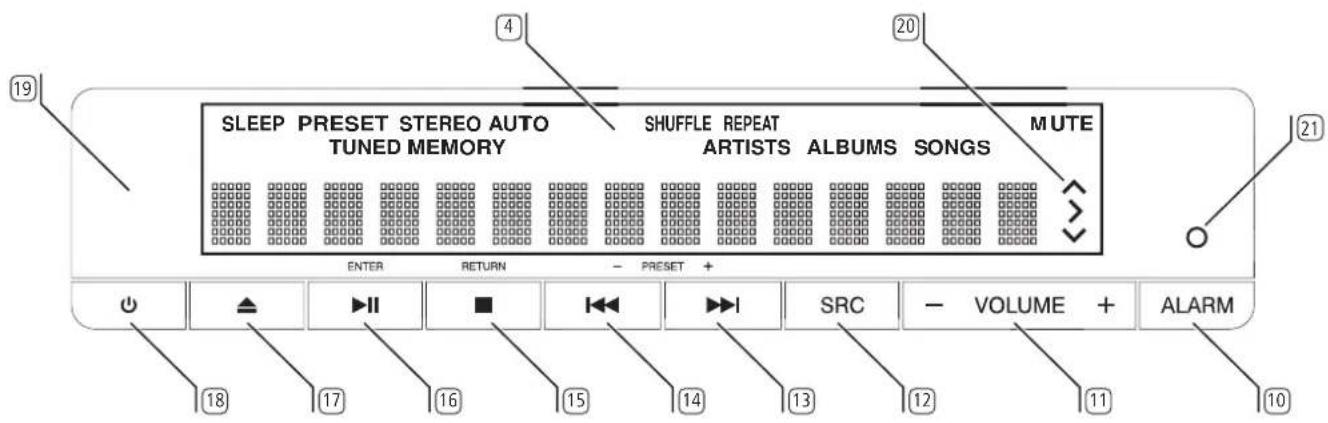
4 Display
⑤ CD / MP3 - Slot-in drive
6 AUX - Stereo input 3.5 mm jack
⑦ ANT FM - FM antenna socket
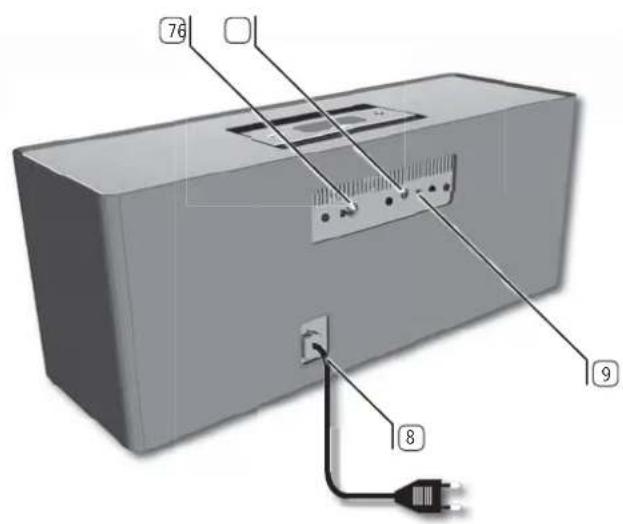
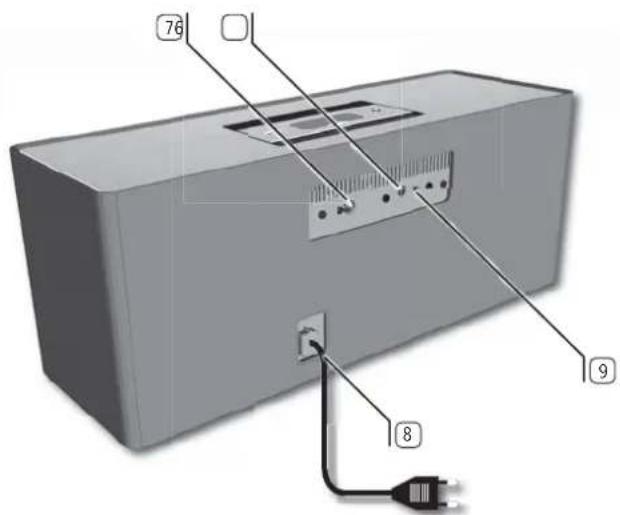
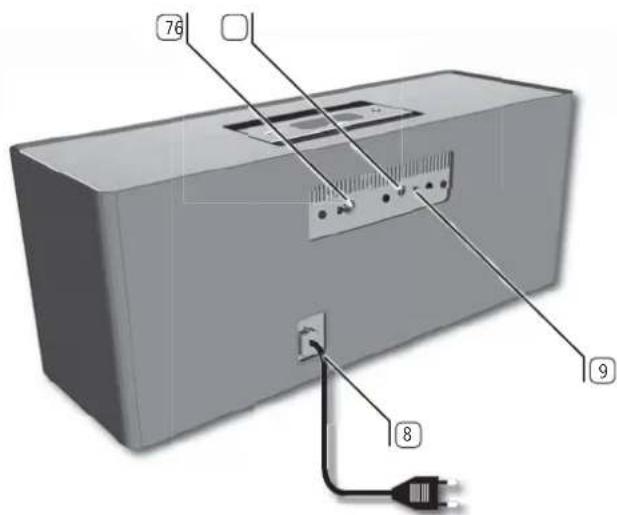
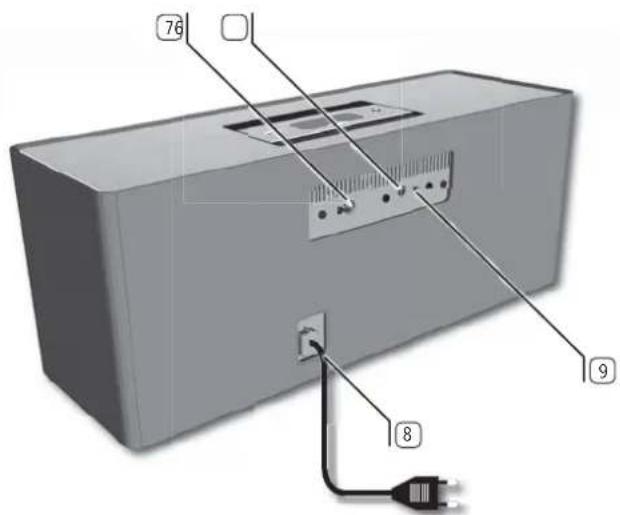
8 Mains cable
⑨ CLOCK slide switch
10 ALARM - Alarm function button
11 VOLUME +/- Set volume
12 SRC - Set audio source
13 CD/USB/iPod: Next title; FM-Radio: short: Select station up
14 CD/USB/iPod: Previous title; FM-Radio: short: Select station down
15 CD/USB/iPod: Stop; at settings: back
16 CD/USB/iPod: Pause/Resume play; at settings: confi rm
17 CD: Eject disc
18 Switch ON / OFF - in Standby mode
19 IR receiver
20 Control functions in "Settings" menu
21 LED indicator light ALARM ON/OFF
Loewe SoundBox - 16
16
Instructions for Use
Assist remote control
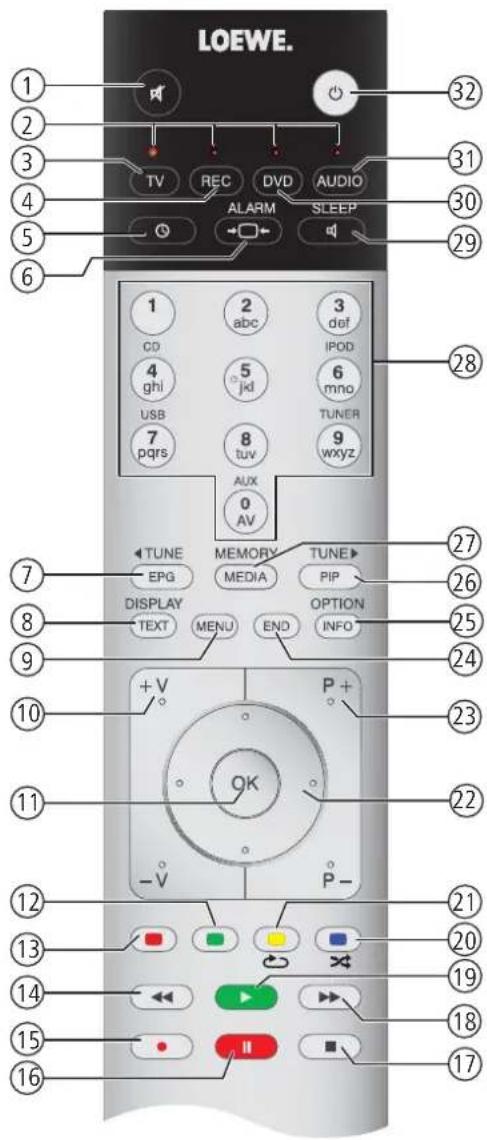
① Sound Mute/On
② LED indicator light for current operating mode
③ Switch over to TV mode
④ Switch over to operate recorder ^1
⑤ Time
⑥ Alarm
⑦ FM radio: Search backwards
⑧ Display functions
⑨ iPod menu
⑩ V+/V- volume up / down
⑪ In the menu: Conf i rm/Call up; iPod: Select/Play
⑫ Green coloured button: No function
⑬ Red coloured button: No function
⑭ iPod/CD/USB: short: Select title down; long: Search down
⑮ No function
⑯ Pause/Resume play
⑰ Stop
⑱ iPod/CD/USB: short: Select title up; long: Search up
⑲ Pause/Resume play
⑳ Blue coloured button: Random play
②1 Yellow coloured button: Repeat
②2 ▲▼ Folder up/down; ◀▶ select in the iPod menu
②3 P+/P- radio station up/down
⑳ No function
25 Options menu
②6 FM radio: Search forwards
27 RADIO: Save radio stations
⑳ Audio source selection
29 Snooze/Sleep mode
③0 Switch over to operate DVD player ^1
31 Switch over to operate SoundBox
③2 Switch ON / OFF - in Standby mode
Contents
Control elements ......15
Assist remote control ....16
Contents......17
Welcome....18
Scope of supply 18
Cleaning 18
For your safety 18
Set-up 19
Connection....19
Start-up 20
Inserting batteries 20
Setting the remote control 20
Operating other Loewe devices 20
Connecting to the mains supply 20
Switching on/off 20
Setting time 21
Setting the volume 21
Setting the sound 21
Dimming the display 21
Setting radio stations 21
Listening to the radio 21
Delete radio station 21
Control....22
CD/USB play 22
Playing from external audio sources 22
iPod operation 23
Wake-up function 24
Sleep function....24
Switch off automatically 24
Troubleshooting 25
Troubleshooting....25
Technical Data 26
Legal information 26
Trademark rights 26
Markenrechte 26
Environmental protection 26
Loewe SoundBox - 18
18
Instructions for Use
Welcome Safety
Thank you
for choosing a Loewe product. We are happy to have you as a customer.
At Loewe we combine the highest requirements regarding technology, design and ease of use. This applies equally for TV, DVD, video, audio and ac ces sor ies.
Neither technology nor design is an end in itself, but both are intended to provide our customers with the best possible audio and visual experience.
Our design is not influenced by short-term, fashionable trends. You have, after all, purchased a high-quality piece of equipment which you do not want to tire of tomorrow or the day after.
Scope of supply
Loewe SoundBox, art. no. 51202-T/W00
- Assist remote control with 2 batteries
- Antenna
- Instructions for Use
Cleaning
Only clean the aluminium surface with a slightly damp clean, soft cloth (without using any abrasive cleaning fluid).
You can remove any dust on the speaker surface by carefully using a vacuum cleaner if needs be.
For your safety
For your safety, and to avoid unnecessary damage to your unit, please read and follow the safety advice below.
Use for the intended purpose and ambient conditions
- The unit is intended exclusively for the playback of audio signals.
- Always switch off the unit before connecting or disconnecting other devices.
- Do not operate the unit unattended. Pull out the mains plug if you are away for a longer period.
Protect the unit from:
• Water, dampness, dripping or sprayed water or steam
• Impacts and mechanical stresses
• Magnetic and electric fi elds
• Higher electrical powers than specified
- Cold, heat, direct sunlight and high temperature fluctuations
- Dust
• Covering which obstructs air circulation
• Interference with the internal workings of the unit


Do not place objects containing liquids on top of the unit.
Candles and other open fl ames must be kept away from the unit at all times to prevent the spread of fi re.
This unit has been built exclusively for private use in domestic environments. Warranty services cover this intended use.
WARNING: To prevent electrical shock, do not open the unit. There are no parts inside the unit that can be repaired by the user. Repairs should only be carried out by a Loewe dealer.
If you have moved the unit out of the cold into a warm environment, leave it switched off for about an hour to avoid condensation forming. Do not switch the unit on until it has reached room temperature. This prevents serious damage to the components.
Volume
Loud music can result in impaired hearing. Avoid extreme volumes, especially over longer periods and if you use headphones.
About these Instructions for Use
The information in these instructions refers to the product Loewe SoundBox. Unless stated otherwise, the instructions refer to the operating elements on the Assist remote control.
Paragraphs beginning with the ➕ symbol indicate important hints, tips or conditions for perfect operation.
Terms which you will find in the menu or printed on the unit are printed in bold type. In the functional descriptions, the necessary operating elements are arranged to the left of the text containing the handling instructions.
Set-up
- Place the unit on an even, firm, horizontal surface.
- Do not set up the unit near strong heat sources or in direct sunlight.
- If setting up in a shelf or a closed cupboard: Leave at least 2.5 cm clearance around the unit, so that the air can circulate unhindered and there is no heat backup. Do not cover the opening at the back. The device may not be laid on its back during operation.
- Incorrect voltages can damage the unit. This device may only be connected to a power supply with the voltage and frequency indicated on the type plate using the mains cable.
- Pull out the power cable during thunderstorms. A voltage surge caused by lightning conducted through the mains could damage the unit.
- If the unit is not to be used for an extended period, the plug should also be disconnected from the mains.
- The power plug of the unit must be easily accessible so that the device can be disconnected from the power supply at all times.
- Position the mains cable in such a way that it can not be damaged. The power cable may not be kinked or laid over sharp edges, stood on or exposed to chemicals; the latter also applies to the unit as a whole. A power cable with damaged insulation can cause electric shocks and poses a fire risk.
- When you want to unplug from the mains, pull on the plug housing rather than on the cable. The cables in the mains plug could otherwise be damaged and could cause a short-circuit when plugged in again.
Connection
Connect the ANT FM 7 jack to an FM antenna socket via an optional FM antenna cable (available from your dealer).
Alternatively, use the antenna provided. Position the antenna so as to ensure the best reception, e.g. close to a window.
You can connect an external audio source to the socket AUX ⑥ Use an audio cable with 3.5 mm jack cable available from your dealer. Plug the mains cable into a 230 V 50 Hz wall socket.
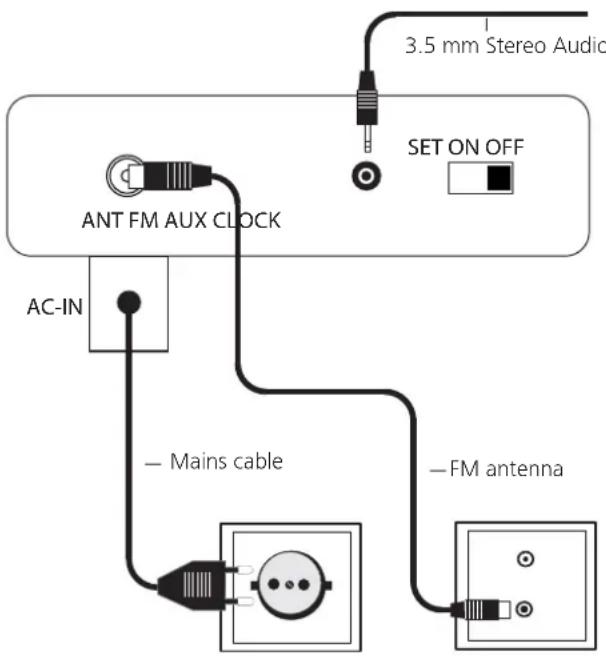
You can connect a headphone with a 3.5 mm jack socket to the HEADPHONE ③ socket. The speakers of the SoundBox are then switched off.
| Loewe SoundBox - 20 - | - 20 - |
| Instructions for Use | |
| Start-up | |
| Assist remote control |
Inserting batteries
natural_image
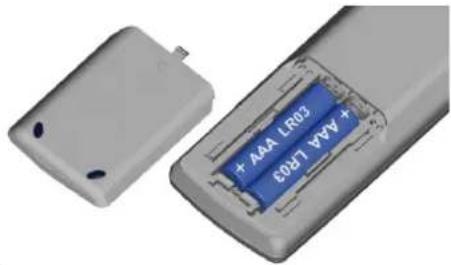
3D rendering of a remote control module with battery and port (no visible text or symbols)To insert or replace the batteries, press on the point marked with the arrow. While doing so, simply slide the battery compartment lid down and remove it. Insert alkaline manganese batteries LR 03 (AAA) and ensure the correct position of + and -. Slide the cover on again from the bottom.
Do not insert rechargeable batteries in the battery compartment of the remote control.
The batteries used must not be exposed to excessive heat such as sunlight, fire or similar!
Setting the remote control
Other devices
You can operate various Loewe devices using the Assist remote control. The unit buttons REC - DVD - AUDIO can be set for this.
Press the required unit buttons and the Stop button simultaneously for 5 sec. until the corresponding LED indicator light flashes twice.
Then select the two-digit unit code from the table:
| Unit Code Factory setting | ||
| Loewe ViewVision 8106 H 10 | ||
| Loewe Viewvision, Centros 21x2 12 | ||
| Loewe ViewVision DR+ DVB-T 13 | REC | |
| Loewe Auro 2216 PS/8116 DT 14 | ||
| Loewe BluTechVision 15 | ||
| Loewe Soundprojector 1 17 | ||
| Loewe TV Radio digital 19 | ||
| Loewe Mediacenter 20 | ||
| Loewe BluTechVision Interactive 21 | DVD | |
| HDMI CEC Modus 22 | ||
| Loewe AudioVision | 24 | |
| Loewe Sound Projector SL | 25 | |
| Apple | 26 | |
| Apple TV | 27 | |
| SoundBox | 28 | AUDIO |
| SoundVision | 29 | |
| Air Speaker | 30 | |
| Restore defaults | 99 |
The corresponding LED indicator light flashes twice.
Operating other Loewe devices
Using the remote control for the Loewe SoundBox

Press the AUDIO button, the LED indicator lights up for about 5 seconds
Using the remote control for a Loewe TV set

Press the TV button, the LED indicator lights up for about 5 seconds
Using the remote control for a Loewe recorder

Press the REC button, the LED indicator lights up for about 5 seconds
Using the remote control for a Loewe DVD player

Press the DVD button, the LED indicator lights up for about 5 seconds
Every time a button is pressed, the LED indicator lights up for the selected operating mode to allow you to check (TV - REC - DVD - AUDIO). Please refer to the respective operating instructions on how to operate the individual devices.
Connecting to the mains supply
Make the required cable connections as shown in the section "Connection" (page 19). Plug the mains plug into the mains socket 230V 50 Hz.
Switching on/off

Activate the remote control for SoundBox operation by pressing the AUDIO button briefly.

To switch on the unit, press the ON/OFF button 18 on the SoundBox or on the remote control Assist 32.

The LED indicator light above the ON/OFF button 18 lights up.
To switch off the unit, press the ON/OFF button ☐ ⑱ on the SoundBox or on the remote control Assist ⑲ again.
If you will be absent for some time, first switch off the unit with the ON/OFF button and then pull out the mains plug. You can thus save energy and protect the environment.
The unit switches off automatically after 60 minutes without playback in the operating mode CD or USB (into Standby Mode) in order to save energy (page 24).
The unit switches automatically off after 4 or 8 hours (into Standby Mode) in order to save energy (page 24).
| Loewe SoundBox - 21 - | - 21 - |
| Instructions for Use | |
| Start-up | |
| Basic settings Radio operation |
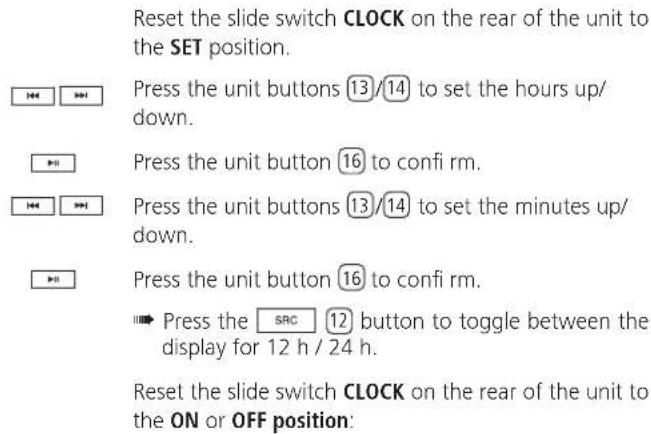
Setting time
The current time can be set.
ON
OFF
mode)
SET
Time display in Standby mode
Clock is off in Standby mode (En
Setting the time

The unit briefly shows the current time.
The time setting is lost about five minutes after removing the power supply. Now reset the time.
Setting the volume

V+ / V- Set volume.
Setting the sound
The base and treble can be set.

Select Settings menu.

▲ ▼ Select option TREBLE / BASS
Press OK to confirm.
▲ ▼ Set higher or lower in the range from -10 to +10 dB.
Press OK to confirm.

Quit Settings menu.
Dimming the display
The brightness of the display can be set.

Select Settings menu.

▲ ▼ Select option DIMMER.
Press OK to confirm.
▲ ▼ Set DIMMER 1/2/OFF.
Press OK to confirm.

Quit Settings menu.
Setting radio stations
You can save up to 30 FM radio stations.
Automatic preset
Only stations that support the RDS are found saved in the automatic preset. Please use the manual preset for non-RDS stations.

Tuner FM radio play

Keep the MEDIA button pressed down for > 2 seconds.

Press OK to confirm.
The automatic preset starts. All radio stations previously selected are deleted and overwritten by new ones (max. 30 stations).
Manual preset

Tuner FM radio play
Set desired radio station with EPG/PIP.

Press MEDIA to save.

▲▼ Select desired storage location.
Press OK to confirm.
Listening to the radio
Select saved radio station

Tuner FM radio play

P+ / P- Select station up/down.
Set radio station manually

Set desired radio station with EPG/PIP.
Press briefl y again: Set frequency incrementally.
Long press: Search forwards and playback of the next radio station found.

Press again. Various details on the set RDS radio station are displayed. For example: PS station name, PTY type of program, RT text messages, CT station time.
Delete radio station

Select Settings menu.

▲ ▼ Select option PRESET DELETE.
Press OK to confirm.
▲ ▼ Select station. OK
| Loewe SoundBox - 22 - | - 22 - |
| Instructions for Use | |
| Control | |
| CD/USB play External sources | |
CD/USB play
You can play standard audio CDs (CD-DA) with a diameter of 8/12 cm with the Loewe SoundBox. The device can also play audio data CDs you have written yourself in the format CD-R (ISO 9660) and CD-RW. Audio files are played in the format MP3 and WMA (without DRM). USB sticks are supported in the format FAT16 and FAT32.
Prerequisites for audio fi les
- Sampling frequency: 16 - 48 kHz (MP3), 22 - 48 kHz (WMA).
• Bit rate: 8 - 320 kbps (MP3), 16 - 320 kbps (WMA).
• Number of files: Maximum 512 (CD), 9999 (USB).
• Number of directories: Maximum 255 (CD), 999 (USB).
• Number of files per directory: Maximum 511 (CD), 255 (USB). - File extensions: ".mp3" / ".wma".
Handling discs
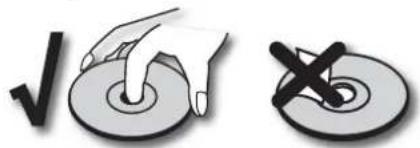
Do not touch the playing side of the disc. Hold the disc at the edges so as not to touch the surface with your fingers. Do not attach paper or adhesive tape onto either side of the disc.
natural_image
Illustration of a hand pressing down on a circular button with checkmark and cross symbols (no text or labels)CD-R/RW discs written with a PC or a DVD or CD recorder cannot be played if the disc is damaged or dirty or the lens of the player is contaminated with condensation.
If you write a disc with a PC, it may be the case that the disc cannot be played owing to the application software settings, even if your format is compatible. (You can obtain more information from your software provider). Discs must be finalised.
Depending on the recording device or the CD-R/RW disc itself, some discs cannot be played with this device.
Do not use CDs with unusual shapes (e.g. heart shaped or octagonal). Otherwise malfunctions or damage cannot be ruled out.
→ Finger prints and scratches on the disc can impair the playing quality. Handle the discs carefully.
Inserting discs
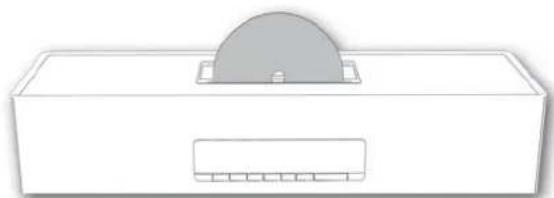
The unit has a so-called slot-in drive ⑤. This is located at the top (in front of the iPod dock). Insert the disc in the drive until it is automatically drawn in. The cover side of the disc points forwards here.
natural_image
Simple line drawing of a rectangular box with a circular top and side window (no text or symbols)On the display 4 LOAD and then Disc Reading or USB Reading is displayed while the media recognition runs.
Ejecting the disc
To remove the inserted disc press ▲ 17.
Playing the media
As soon as the CD or USB stick is inserted, the playback starts automatically with the first title. The playback is in alphabetic order of the title names in the case of data media.
Replay functions

CD play.

USB play.

Play Start / Continue.

Pause Stop play.
Press briefly: Select title up/down.
Press twice briefly to return to the previous title.
Press longer: Search up/down.

Press Stop once: Stop play, last title is played from the start with Play. Press twice: Playback completely terminated.

▲▼ Select directory of data media.
The main directory is designated with ROOT, the names of the directories on the storage medium being displayed below this.
Blue coloured button: Press multiply for random play.
SHUFFLE
ALL
The titles of the current medium are play
random order.
SHUFFLE
FOLDER The titles of the current directory are played in random order.
SHUFFLE OFF Play in normal order.

Yellow coloured button: Press several times for repeat.
REPEAT ALL
Repeats all titles
REPEAT ONE
eats the current title
REPEAT FOLDER
Repeats all titles in the current directory
REPEAT OFF
epeat

Press TEXT again. Various details on the current title can be displayed during the playback. For example: Title number, remaining play time, total play time of the disc, file name, title/album/artist name.
Playing from external audio sources
You can play an external audio source with the Loewe SoundBox. The source must be connected to the 3.5 mm jack socket AUX on the rear of the unit.

AUX play.
Start playing the connected audio source.
| Loewe SoundBox - 23 - | - 23 - |
| Instructions for Use | |
| Control | |
| iPod operation | |
iPod operation
You can connect your Apple iPod to the SoundBox allowing you to listen to your music in the very best quality. The SoundBox has an integrated iPod dock ②. Once you switch on the SoundBox, the battery of the connected iPod is charged. A list of which Apple models are compatible with the SoundBox can be found on page 26.
Connecting the iPod
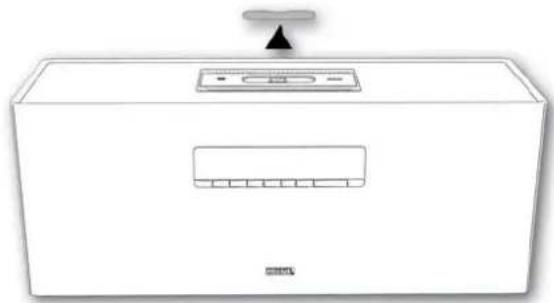
Remove the cover from the iPod dock 2.
natural_image
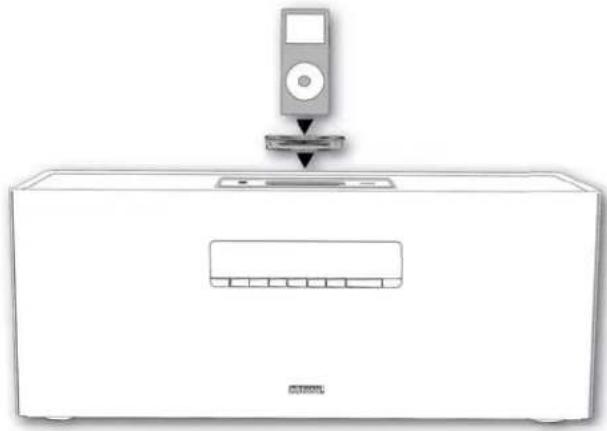
Line drawing of a rectangular appliance with a top-mounted indicator and a small triangular pointer (no text or symbols)Insert the dock adapter supplied with your iPod in the loading recess of the iPod dock. Then place your iPod in the dock.
natural_image
Line drawing of a white appliance front view with a iPod icon above it (no text or symbols)Use the corresponding Apple Dock Adapter of your Apple iPod/iPhone to avoid damaging your iPod plug.
When inserting and handling the iPod in the dock, only apply gentle force so as not to damage any sensitive plug-in connections.
iPod audio play

iPod play

Play Start / Continue.

Pause Stop play.
Press briefly: Select title up/down.
Press longer: Search up/down.

Press briefly twice to return to the previous title.

Stop End play.

iPod menu.

◀ ▶ Select entries in the iPod menu.

OK Confi rm/Play selected title.

Blue coloured button: Press multiply for random play.
SHUFFLE SHUFFLE
SONGS ALBUMS
Play all titles in random order. Play titles of the current album in a random Play in normal order.
SHUFFLE

Yellow coloured button: Press several times for repeat.
REPEAT
REPEAT
REPEAT
ALL
ONE
OFF
Repeats all titles
Repeats the current title
No repeat

Press again. Various details on the current title can be displayed during the playback. For example: Title number, remaining play time, title/album/artist name.
Depending on the software version, your iPod can possibly not be operated via the SoundBox. We recommend updating the software of your iPod to the latest version.
The compatibility with your iPod can vary depending on the model. For Apple devices supported see page 26.
Faults can occur depending on the iPod device.
Only disconnect your iPod from the SoundBox when there is no access to it.
Loewe SoundBox - 24 - 24 -
Instructions for Use
Control
Wake-up function Sleep function
Wake-up function
Your SoundBox can wake you up at a preset time with one of the available audio sources or an acoustic signal.
Setting the wake-up time

Keep the ALARM button ⑩ pressed for >2 seconds.
The LED indicator light above the unit button ALARM and the hour display of the wake-up time flashes.
Press the unit buttons 13/14 to set the wake-up time "hours".

Press the unit button to confirm.
Press the unit buttons 13/14 to set the wake-up time "minutes".

Press the unit button to confirm.
Press the unit buttons 13/14 to set the wake-up signal.
BEEP SOURCE
time
A signal sound is emitted for the wake-up time. The music source set is played for the wake-up
The music source set is played and a signal omitted for the wake-up time

Press the unit button 16 to confirm.
Press the unit buttons 13/14 to make further settings for the selected source, e.g. the desired radio station for FM radio.

Press the unit button 16 to confirm.
Press the unit buttons 13/14 to set the volume of the wake-up signal.

Press the unit button 16 to confirm.
The LED indicator light [21] above the unit button ALARM lights up. This shows that the alarm is switched on.
Activate/Deactivate wake-up function

Press the ALARM button 10 or the button -0.0 the remote control to activate/deactivate the wake function.
The LED indicator light 21 above the ALARM button shows whether the wake-up function is active. The wake-up time is displayed briefly when activating the wake-up function.
If the audio source set is not available during the wake-up time (e.g. iPod is not in the dock), the acoustic sound will be buzzed.
Snooze function

Or press buttons: on → → ■ → → → → → → the unit for wakeup time. The alarm stops and automatically starts again in five minutes.
The LED indicator light above the unit button ALARM fl ashes.

The alarm is switched off.

Set alarm volume.
If the wake-up signal SRC+BEEP has been set, pressing the button once stops the acoustic sound and if you press it again the music source.
Switch off alarm

Press the ON/OFF 18 or ALARM button 10 or the button → on the remote control to switch off the alarm.
The LED indicator 21 light above the unit button ALARM goes out.
The wake-up signal stops automatically after about 60 minutes.
The wake-up function is deactivated after switching off the wake-up signal. Activate the wake-up function again, as described under "Activating /Deactivating the wake-up function".
Sleep function
You can listen to music for a certain time with the SoundBox until it switches off automatically.
Setting the run time

Select desired music source.

Select desired play time 30, 60, 90, 120 Min / SLEEP OFF by pressing again.
Switch off automatically
The unit switches off itself after an adjustable time.

Select Settings menu.

▲ ▼ Select option AUTO POWER OFF.
Press OK to confirm.
▲ ▼ Set 8H or 4H.
Press OK to confirm.

Quit Settings menu.
Troubleshooting
| Problem Possible cause Remedy | ||
| Not working at all. Mains cable not plugged in. Plug the mains cable into a socket | 230 V 50 Hz. | |
| No sound. Defective connections at the input cable. Connect the cable correctly (page | 19). If the problem continues, the cable might be defective. | |
| CD playback not possible. No disc inserted. Insert a disc. | ||
| A media file cannot be played. | The file format is not supported. | Convert the file to a supported format on a computer with a converter program. |
| The unit is not working properly. | Unplug the mains plug from the mains socket and then try plugging it in again after 30 seconds. | |
| The remote control is not working properly. | The batteries in the remote control are dead. | Replace the batteries with new ones. |
| The time display is flashing; the unit cannot be operated. | The CLOCK switch9on the rear of the unit is in the SET position. | Set the switch to the ON or OFF position. |
| The unit switches off automatically. | The unit switches to Standby mode to save energy after 60 minutes without playing a CD or USB. | |
| The sleep function (page 24) has been activated. | Switch the unit on again. | |
| The iPod function is selected, but no iPod is docked. | Place the iPod in the dock or select another operating mode. | |
| The unit has an energy saving function (page 24). | Switch the set on again manually. | |
| The radio reception is disrupted. | The antenna is loose or damaged. | Insert the antenna cable firmly in the socket or replace it with a new one. |
| iPod operation is disrupted. | The iPod is not correctly inserted in the dock. | Pull the iPod out and insert it carefully in the dock again until the correction is properly established. |
| The iPod playback stops and another title is played. | The iPod function "Shake to Shuffle" is activated. | Deactivate this function in your iPod. |
| USB playback is not possible. | The combination of file and directory name is too long. | The combination of file and directory name must not exceed 250 characters. Please make the names shorter. |
| The file format of the USB storage medium is not compatible. | Format the USB storage medium in FAT16/32 format. | |
| The number of files / directories is greater than the maximum allowed. | Reduce the number of files / directories (page 22). | |
Loewe SoundBox - 26 - - 26 -
Instructions for Use
Technical Data
Technical Data
General
Loewe SoundBox Art.no. 51202-T/W00
Operating temperature [°C] 5 ... 40
Humidity [%] (no condensation) 30 ... 90
Dimensions [W x H x D in cm] 45 x 14.5 x 17
Weight [kg] 5.1
Electrical data
Mains voltage [Volt 50 Hz] 230
Power consumption [Watt] 23
Power consumption in Standby [Watt] (Energy Saving mode) < 0.5
Laser Laser class 1, wavelength: 790 nm
Output stages 2
Load bearing capacity [Watt] (max. music) 2x 15
Interfaces
Headphones Jack socket 3.5 mm
AUX Jack socket 3.5 mm
USB 2x V 2.0, type A
ANT FM FM antenna input, 75 Ohm
Media formats supported
USB, CD-R, CD-RW MP3, WMA (without DRM)
CD Audio-CD
Apple devices supported - Made for
(only for audio playback)
iPod touch (4th generation), iPod touch (3rd generation)
iPod touch (2nd generation), iPod touch (1st generation)
iPod classic
iPod nano (6th generation)
iPod nano (5th generation), iPod nano (4th generation)
iPod nano (3rd generation), iPod nano (2nd generation)
iPhone 4, iPhone 3GS, iPhone 3G, iPhone
Legal information
Loewe Opta GmbH is a public limited company of German law with its Head Office in Kronach.
Industriestrasse 11, 96317 Kronach
Telephone: +49 (0)9261 / 99-0
Fax: +49 (0)9261 / 99-500
Email: ccc@loewe.de
Commercial Register: Municipal Court Coburg, No. HRB 42243
Editorial date 10.11. 2nd edition
© Loewe Opta GmbH, Kronach
All rights reserved including translation.
Design and technical specifications are subject to change without notice.
Trademark rights
Markenrechte

"Made for iPod" and "Made for iPhone" mean that an electronic accessory has been designed to connect specifically to iPod or iPhone, respectively, and has been certified by the developer to meet Apple performance standards. Apple is not responsible for the operation of this device or its compliance with safety and regulatory standards. Please note that the use of this accessory with iPod or iPhone may affect wireless performance.
iPod is a registered trademark of Apple Inc. in the USA and other countries.
Environmental protection
Cardboard box and packaging
In line with national regulations regarding the disposal of packaging materials, we pay a fee to authorised recyclers who collect packaging from dealers.
The unit
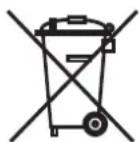
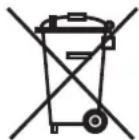
Attention: The EU Directive 2002/96/EC governs the proper return, handling and recycling of used electronic appliances.
Old electronic appliances must therefore be disposed of separately. Never dispose of this unit in normal domestic waste! You can hand in your old unit free of charge at identified collection points or to your dealer if you buy a similar new unit. Other details about return (also for non-EU countries) are available from your local authorities.
Remote control batteries
The batteries provided contain no harmful materials such as cadmium, lead or mercury.
Regulations concerning used batteries mean that batteries may no longer be disposed of in household waste. You can dispose of used batteries free of charge at the collection points in commercial outlets. Your dealer will also have a collection point for used batteries.
Loewe SoundBox - 27 - - 27 -
Mode d'emploi
Effacer la station radio ....33
Commande 34
Lecture CD/USB 34
Lecture de sources audios externes ....34
Mode iPod 35
natural_image
3D rendering of a remote control unit with battery and port (no visible text or symbols)Effacer la station radio

natural_image
Illustration of a hand pressing down on a circular button with a checkmark and cross symbol (no text or labels)natural_image
Simple line drawing of a rectangular box with a circular top and side slots, no text or symbols present.Lecture des supports
natural_image
Line drawing of a rectangular appliance with a control panel and a hanging knob (no text or symbols)natural_image
Line drawing of a white electronic device with an iPod icon above it, showing front panel and base (no text or symbols)REPEAT REPEAT REPEAT
ALL ONE OFF
iPod touch (4th generation), iPod touch (3rd generation)
iPod touch (2nd generation), iPod touch (1st generation)
iPod classic
iPod nano (6th generation)
iPod nano (5th generation), iPod nano (4th generation)
iPod nano (3rd generation), iPod nano (2nd generation)
iPhone 4, iPhone 3GS, iPhone 3G, iPhone
Mentions légales
natural_image
3D rendering of a remote control unit with battery and port (no visible text or symbols)natural_image
Illustration of a hand pressing down on a circular object with a checkmark and cross mark (no text or symbols)natural_image
Simple line drawing of a rectangular box with a circular top and a rectangular bottom (no text or symbols)natural_image
Simple line drawing of a rectangular appliance with a lid and top handle (no text or symbols)natural_image
Line drawing of a portable air conditioner unit with an iPod icon above it (no text or symbols)REPEAT REPEAT REPEAT
ALL ONE OFF
iPod touch (4th generation), iPod touch (3rd generation)
iPod touch (2nd generation), iPod touch (1st generation)
iPod classic
iPod nano (6th generation)
iPod nano (5th generation), iPod nano (4th generation)
iPod nano (3rd generation), iPod nano (2nd generation)
iPhone 4, iPhone 3GS, iPhone 3G, iPhone
Diritti del marchio
Made for

iPod

iPhone
natural_image
3D rendering of a remote control casing with a blue internal component labeled 'AAA LR03' and 'E08T1VY4+' (no additional text or symbols visible)natural_image
Two hand-drawn icons: one with a checkmark and the other with a cross, both pointing at a circular button (no text or symbols)natural_image
Simple line drawing of a rectangular box with a circular top and side slot, no text or symbols present.natural_image
Line drawing of a rectangular appliance with a top-mounted control panel and a triangular indicator light (no text or symbols)natural_image
Line drawing of a white appliance front view with a iPod icon above it (no text or symbols)USB, CD-R, CD-RW MP3, WMA (sin DRM)
CD CD de audio
iPod touch (4th generation), iPod touch (3rd generation)
iPod touch (2nd generation), iPod touch (1st generation)
iPod classic
iPod nano (6th generation)
iPod nano (5th generation), iPod nano (4th generation)
iPod nano (3rd generation), iPod nano (2nd generation)
iPhone 4, iPhone 3GS, iPhone 3G, iPhone
Pie de imprenta
natural_image
3D rendering of a remote control unit with battery and port (no visible text or symbols)natural_image
Illustration of a hand pressing down on a circular object with checkmark and cross symbols (no text or labels)natural_image
Simple line drawing of a rectangular box with a circular top and side slot, no text or symbols present.natural_image
Line drawing of a rectangular appliance with a lid and top handle, no text or symbols presentnatural_image
Line drawing of a portable air conditioner unit with an iPod (no text or symbols)REPEAT REPEAT REPEAT
ALL ONE OFF
iPod touch (4th generation), iPod touch (3rd generation)
iPod touch (2nd generation), iPod touch (1st generation)
iPod classic
iPod nano (6th generation)
iPod nano (5th generation), iPod nano (4th generation)
iPod nano (3rd generation), iPod nano (2nd generation)
iPhone 4, iPhone 3GS, iPhone 3G, iPhone
Colofon
Audio Products Group Pty Ltd
67 O'Riordan St
Alexandria NSW 2015, Australia
Tel +61 - 1300 130 492
Fax +61 - 02 9578 0140
E-mail: help@audioproducts.com.au
B NL L
Loewe Opta Benelux NV/SA
Uilenbaan 84
2160 Wommelgem, Belgie
Tel +32 - 3 - 2 70 99 30
Fax +32 - 3 - 2 71 01 08
E-mail: ccc@loewe.be
BG Darlington Service
193 Kn. Klementina St.
1612 Sofi a, Bulgaria
Tel +359 - 2 9556399
E-mail: darlington@psp-bg.com
CH Telion AG
Rütistrasse 26
Customer Care Center
Industriestraße 11
1st Floor, 237A Kensington High St
London
W8 6SA, UK
Tel +44 - (0) 207 368 1100
Fax +44 - (0) 207 368 1101
E-mail: enquiries@loewe-uk.com
King's Tower 28/F, 111 King Lam Street
Kowlaon, Hong Kong
Tel +852 - 27 77 89 88
Fax +852 - 23 10 08 08
E-mail: service@loewe-cn.com
HR Plug&Play Ltd.
Bednjanska 8, 10000 Zagreb
Hrvatska (Kroatia)
Tel +385 1 4929 683
Fax +385 1 4929 682
E-mail: info@loewe.hr
① Loewe Italiana S.r.L.
Largo del Perlar, 12
37135 Verona (VR), Italia
Tel +39 - 045 5281690
Fax +39 - 045 82 51 622
E-mail: info@loewe.it
L
Clear electronic entertainment Ltd
13 Noah Mozes St.
Agish Ravad Building
Tel Aviv 67442, Israel
Tel +972 - 3 - 6091100
Fax +972 - 3 - 6092200
E-mail: info@loewe.co.il
KSA Salem Agencies & Services Co.
Hamad Al Haqueel Street, Rawdah, Jeddah
21413
Kingdom of Saudi Arabia
Tel +966 (2) 665 4616
Fax +966 (2) 660 7864
E-mail: hkurkjian@aol.com
LT A Cappella Ltd.
Ausros Vartu 5, Pasazo skg.
01129 Vilnius, Lithuania
Tel +370 - 52 12 22 96
Fax +370 - 52 62 66 81
E-mail: info@loewe.h
LV Loewe, service center
Brivibas gatve 332,
Riga, Latvia, LV-1006
Tel +371 673 105 68
E-mail: dom332@dom332.lv
M Doneo Co. Ltd
34/36 Danny Cremona Street
Hamrun, HMR1514, Malta
Tel +356 - 21 - 22 53 81
Fax +356 - 21 - 23 07 35
E-mail: service@doneo.com.mt
MA Somara S.A.
377, Rue Mustapha El Maani
20000 Casablanca, Morocco
Tel +212 - 22 22 03 08
Fax +212 - 22 26 00 06
E-mail: somara@somara.ma
N Premium Consumer Electronics as
∅stre Kullerød 5
NZ Audio Products Group Pty Ltd
67 O'Riordan St
Alexandria NSW 2015, Australia
Tel 0800 174 781
Fax +61 - 02 9578 0140
E-mail: help@audioproducts.com.au
P Mayro Magnetics Portugal, Lda.
105005 Moscow, Russia
Tel +7 - 499 940 42 32 (ext. 454)
Fax +7 - 495 730 78 01
E-mail: service@loewe-cis.ru
S Kjaerulff 1 AB
Ridbanegatan 4, Box 9076
UAE Dubai Audio Center
P.O. Box 32836, Sheikh Zayed Road
Dubai, UAE
Tel +971 - 4 343 14 41
Fax +971 - 4 343 77 48
E-mail: service@dubaiaudio.com
ZA The Soundlab (Pty) Ltd
P.O. Box 31952, Kyalami 1684
Gauteng, Republic of South Africa
Tel +27 - 1 14 66 47 00
Fax +27 - 1 14 66 42 85
E-mail: loewe@mad.co.za
LOEWE.


- Impressum
- Contents
- Thank you
- Scope of supply
- Loewe SoundBox, art. no. 51202-T/W00
- Cleaning
- For your safety
- Use for the intended purpose and ambient conditions
- Volume
- About these Instructions for Use
- Set-up
- Connection
- Inserting batteries
- Setting the remote control
- Other devices
- Operating other Loewe devices
- Connecting to the mains supply
- Switching on/off
- Setting time
- Setting the volume
- Setting the sound
- Dimming the display
- Setting radio stations
- Automatic preset
- Manual preset
- Listening to the radio
- Select saved radio station
- Set radio station manually
- Delete radio station
- CD/USB play
- Prerequisites for audio fi les
- Handling discs
- Inserting discs
- Ejecting the disc
- Playing the media
- Replay functions
- Playing from external audio sources
- iPod operation
- Connecting the iPod
- iPod audio play
- Wake-up function
- Setting the wake-up time
- BEEP SOURCE
- Activate/Deactivate wake-up function
- Snooze function
- Switch off alarm
- Sleep function
- Setting the run time
- Switch off automatically
- Technical Data
- General
- Electrical data
- Interfaces
- Media formats supported
- Apple devices supported - Made for
- Legal information
- Trademark rights
- Markenrechte
- Environmental protection
- Cardboard box and packaging
- The unit
- Remote control batteries
- Effacer la station radio
- Lecture des supports
- Mentions légales
- Diritti del marchio
- Made for
- Pie de imprenta
- Colofon
- LOEWE.
Brand : LOEWE
Model : SoundBox
Category : Loudspeaker