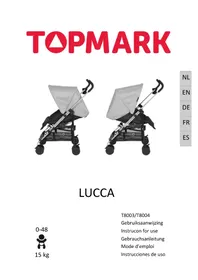
Pure T8050 - Stroller Topmark - Free user manual and instructions
Find the device manual for free Pure T8050 Topmark in PDF.

| Product type | Stroller |
| Brand | Topmark |
| Model | Pure T8050 |
| Use | From birth to 15 kg depending on configuration: carrycot (0-9 kg), stroller seat (6 months-15 kg), car seat (0-13 kg) |
| Maximum basket weight | 3 kg |
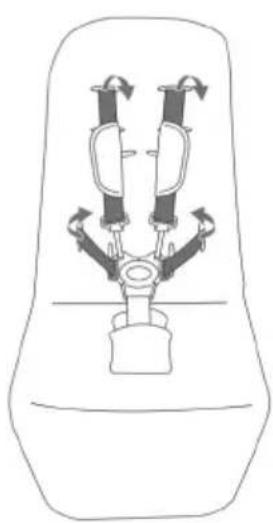
| Restraint system | 5-point harness with crotch strap |
| Brake | Parking brake on rear wheels |
| Front wheels | Swiveling with locking device |
| Folding | Compact folding mechanism (see manual) |
| Canopy | Sun canopy included |
| Included accessories | Carrycot (T8055) and car seat (T8056) optional |
| Car seat compatibility | Maxi Cosi Cabrio-Fix and Pebble (with MC adapter) |
| Care | Clean with warm water and mild soap; air dry |
| Lubrication | Silicone-free oil on hinges and axles every 4 weeks |
| Warranty | 2 years |
| Standard | EN1888 |
Frequently Asked Questions - Pure T8050 Topmark
User questions about Pure T8050 Topmark
0 question about this device. Answer the ones you know or ask your own.
Ask a new question about this device
Download the instructions for your Stroller in PDF format for free! Find your manual Pure T8050 - Topmark and take your electronic device back in hand. On this page are published all the documents necessary for the use of your device. Pure T8050 by Topmark.
USER MANUAL Pure T8050 Topmark
natural_image
Black and white baby stroller with silver frame and black bezel, no visible text or symbolsPURE
6-48

9 - 15 kg
T8050
Gebruiksaanwijzing
Instrucon manual
Gebrauchsanleitung
Manuel d'instrucons
text_image
Safety warning illustration showing pictograms of human walking and deflection with arrows indicating movementMONTEREN
natural_image
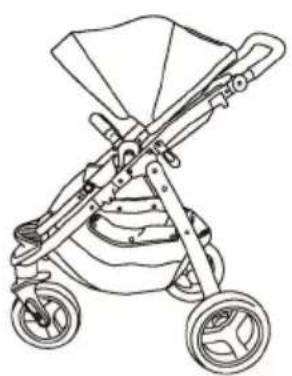
Line drawing of a baby stroller with handle and blanket (no text or symbols)
natural_image
Line drawing of a car seat with a strap and seatbelt (no text or symbols)
natural_image
Line drawing of two mechanical bracket components (no text or symbols)INDEX
text_image
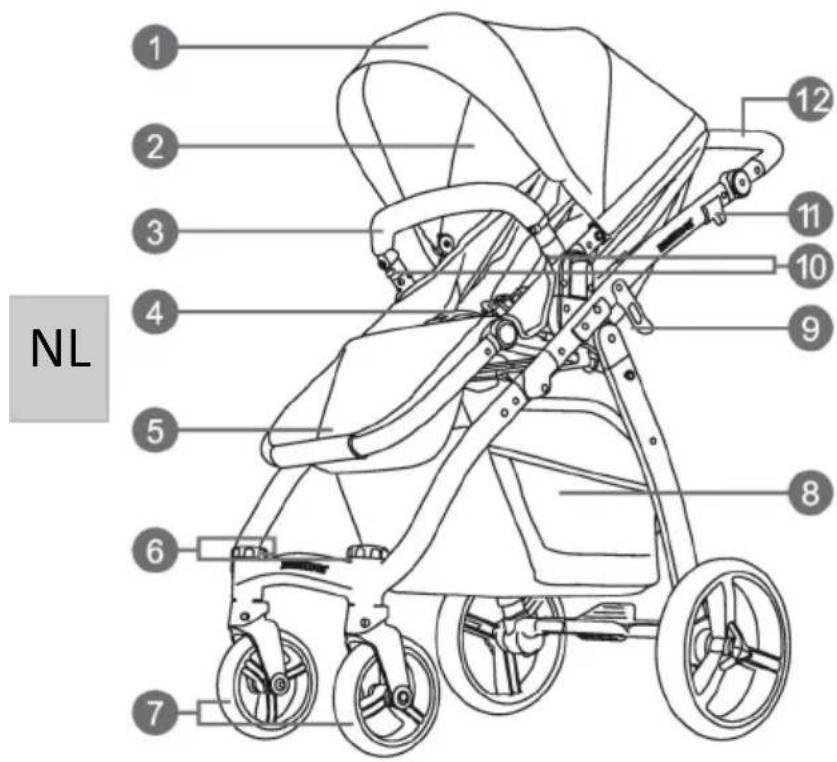
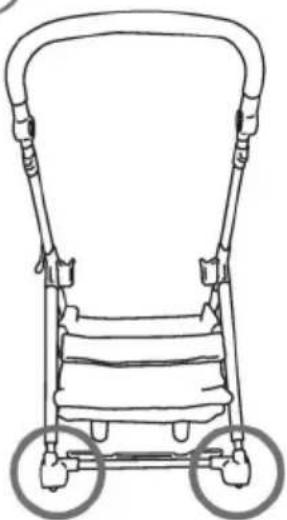
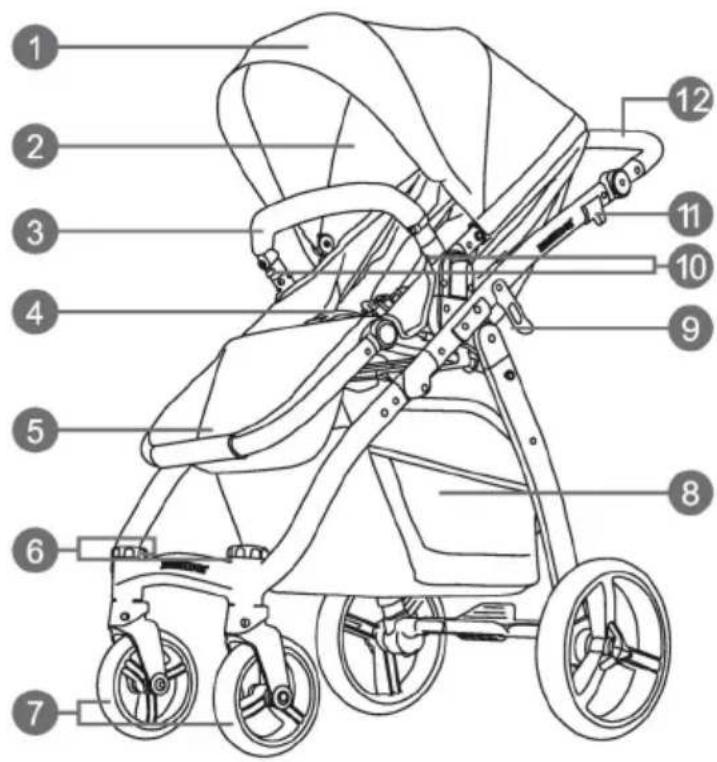
NL 1 2 3 4 5 6 7 8 9 10 11 12text_image
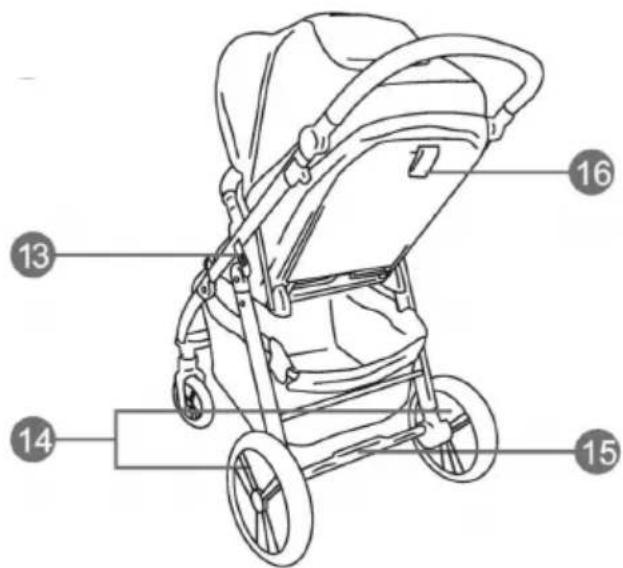
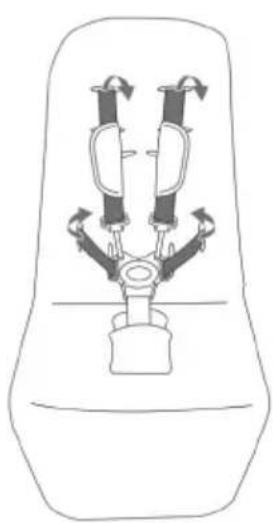
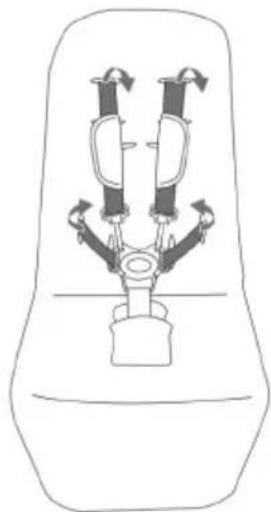
Diagram of a stroller with numbered parts labeled 13, 14, and 15 pointing to different body parts.- Vergrendelingmechanisme
- Achterwielen
- Rem
- Rugversteller
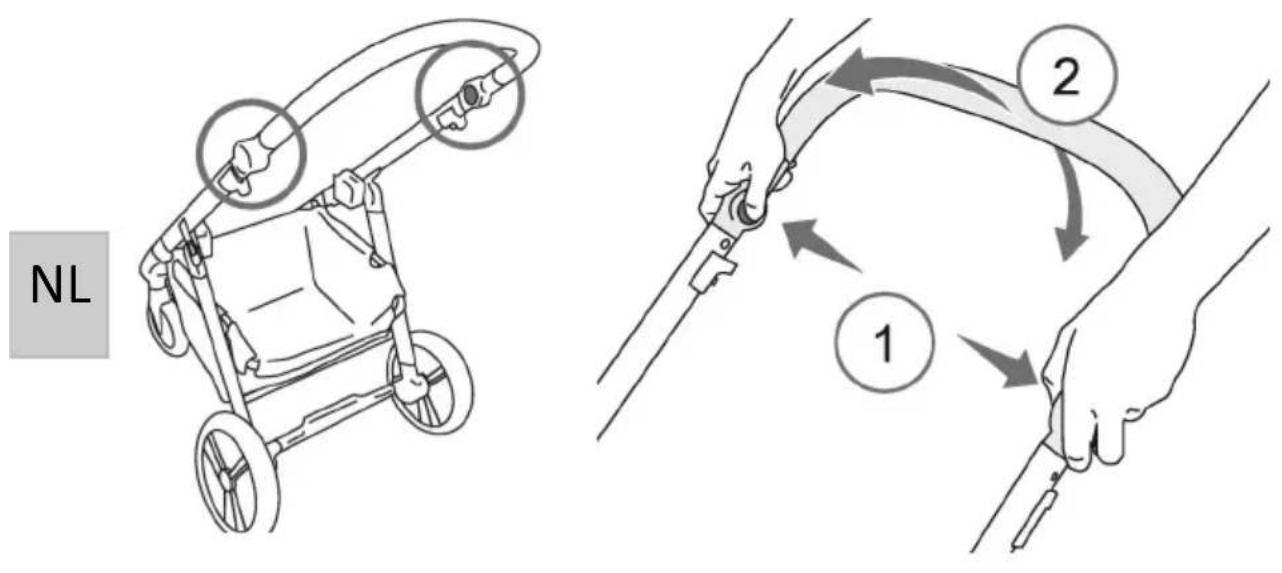
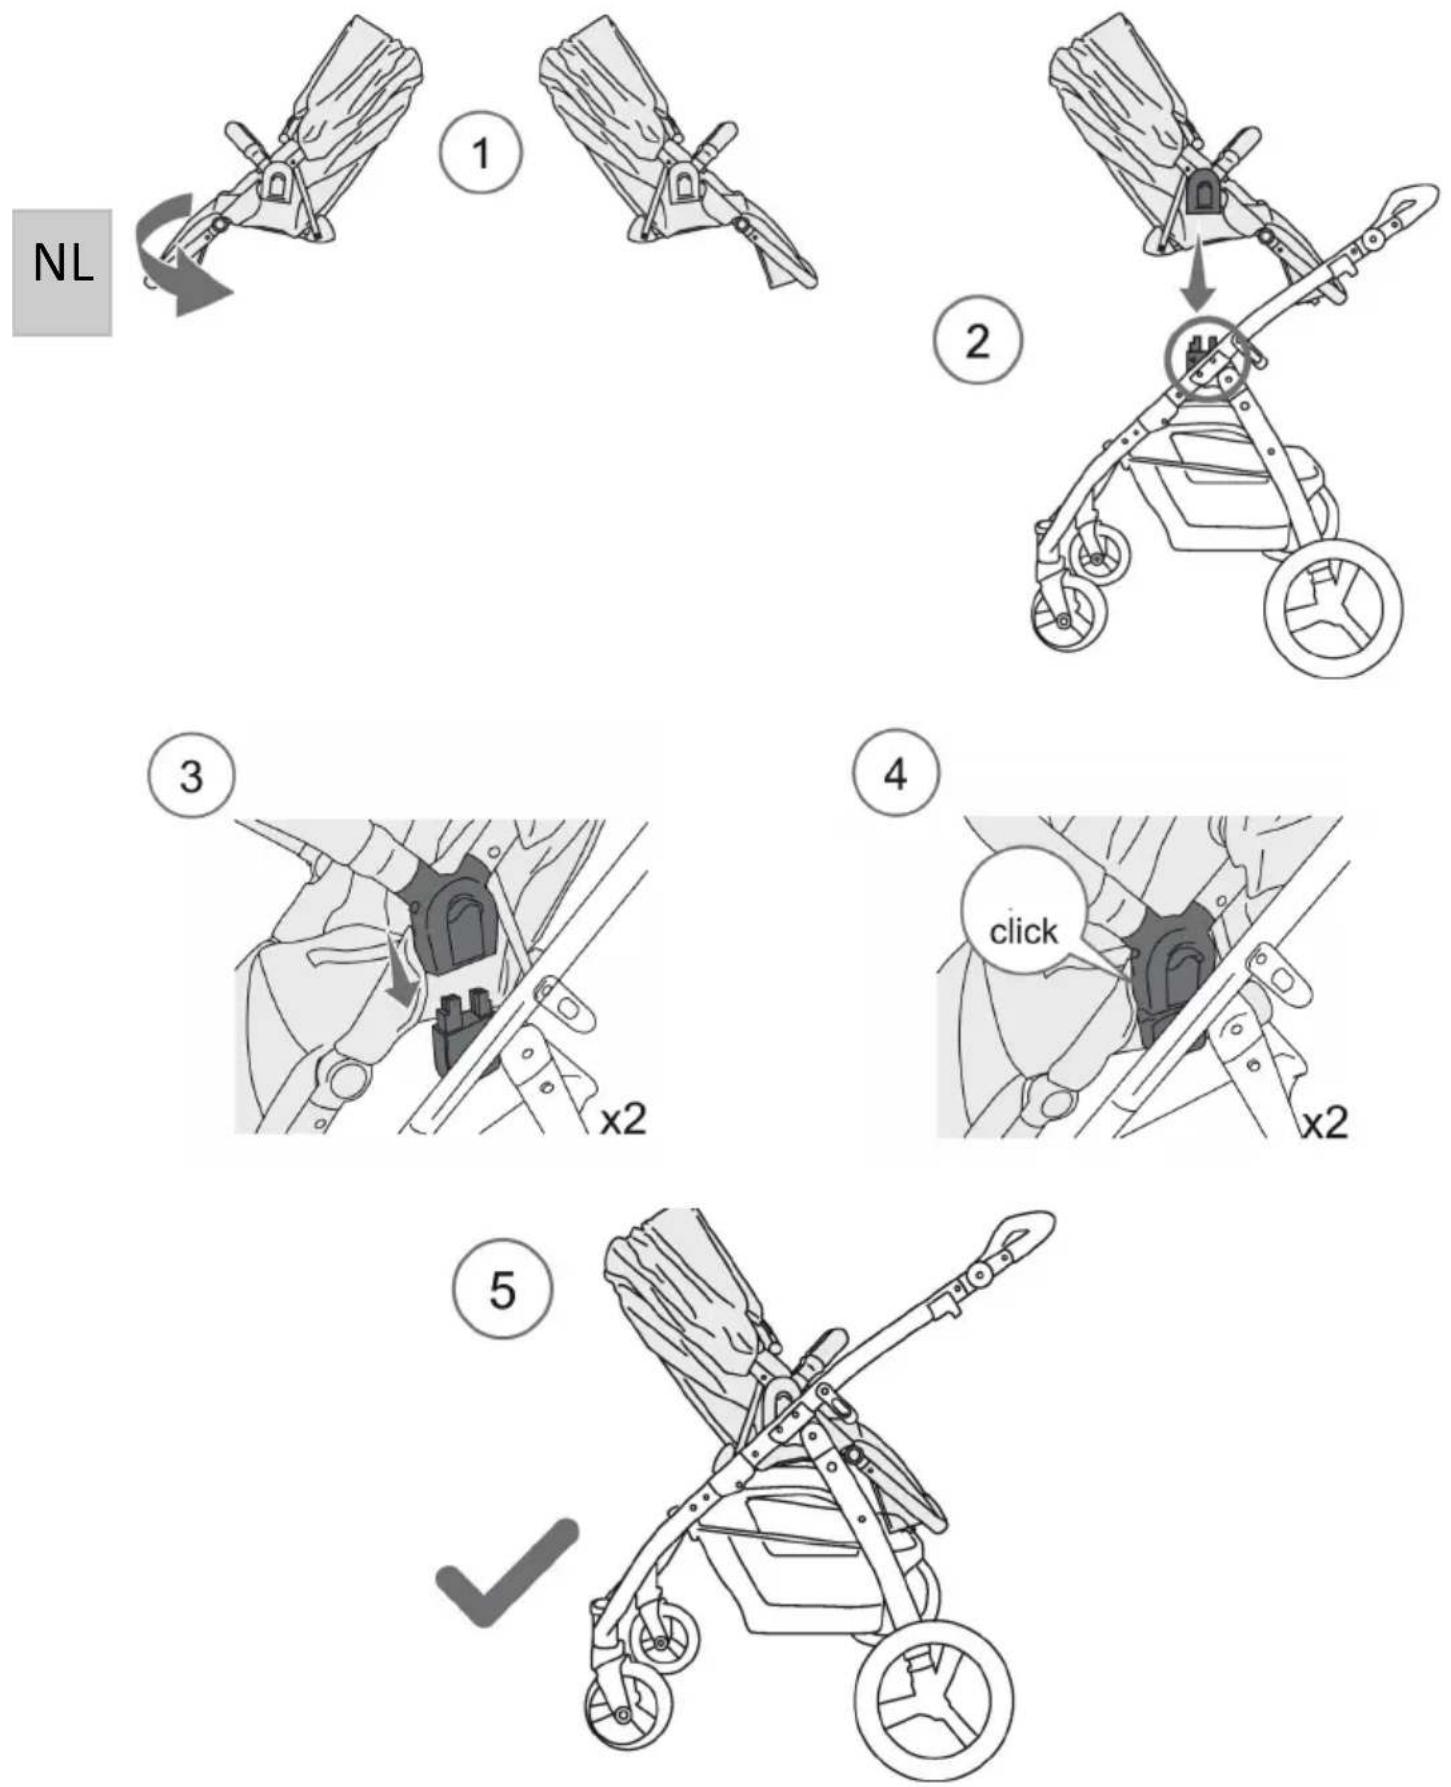
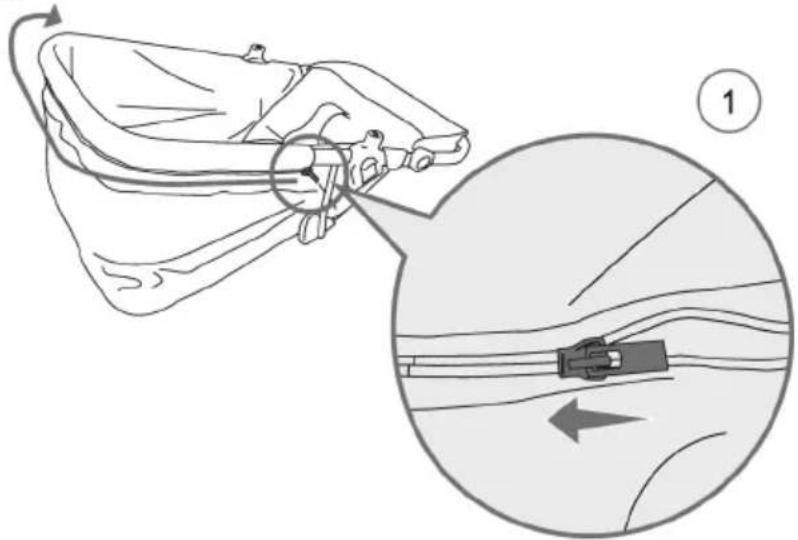
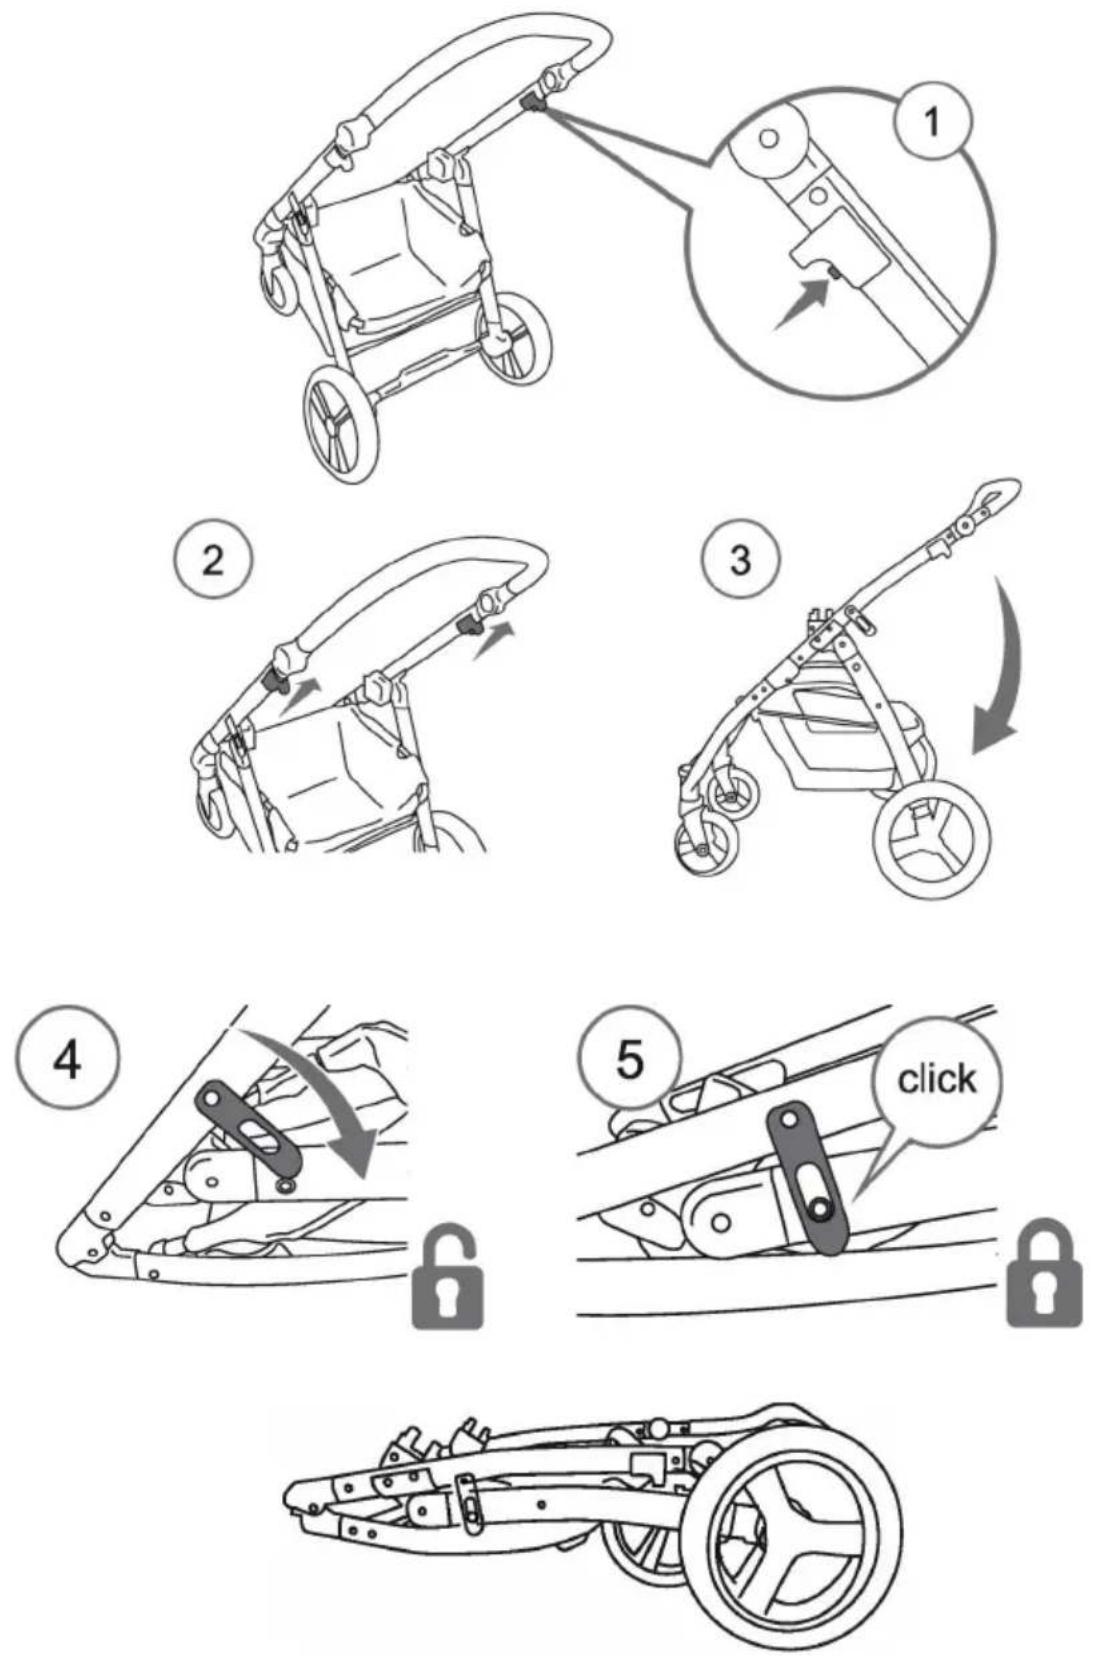
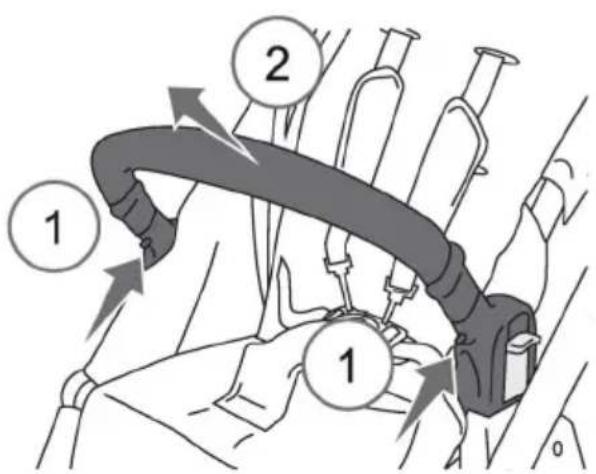
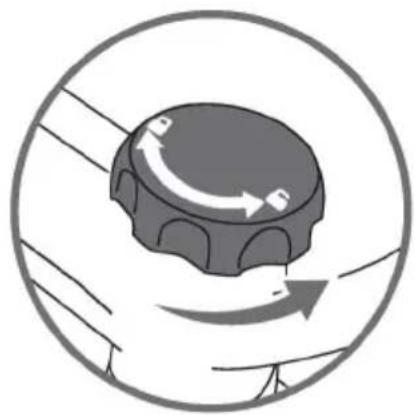
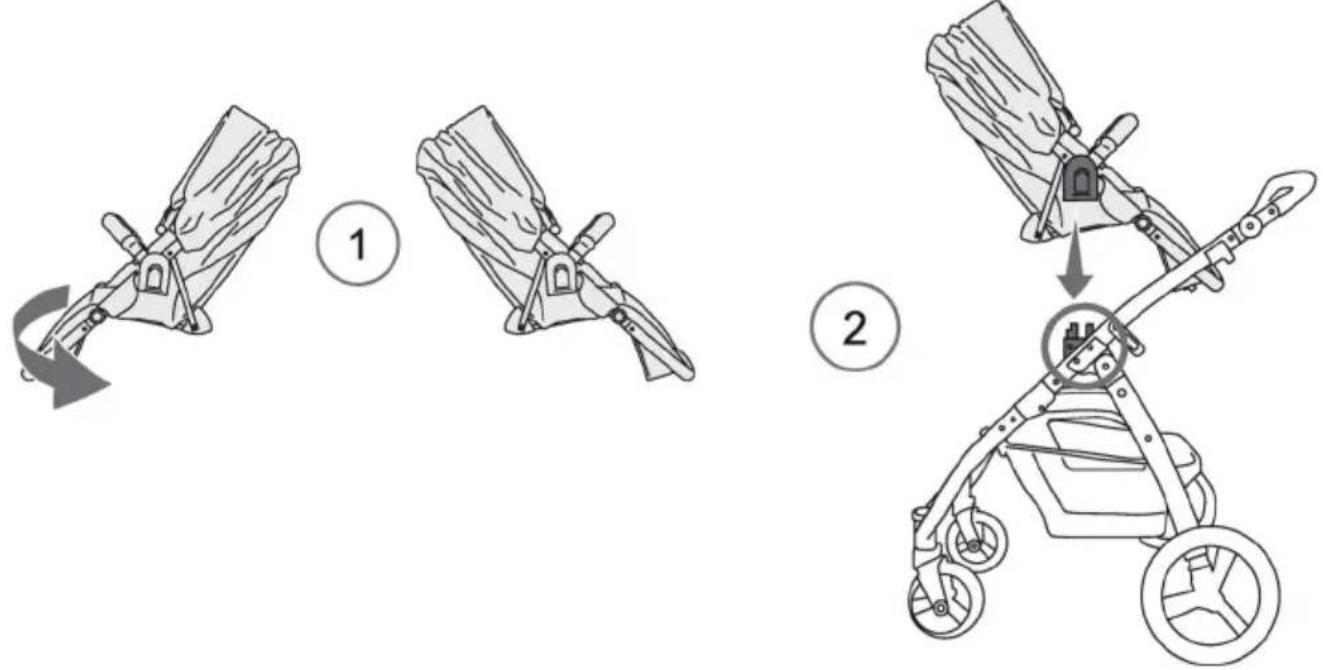
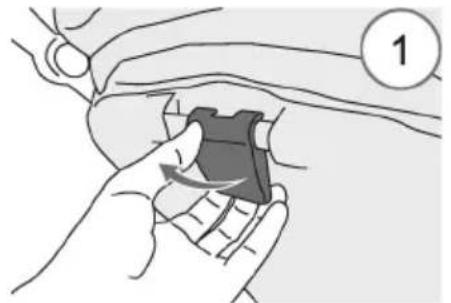
MONTEREN/IN GEBRUIK NEMEN
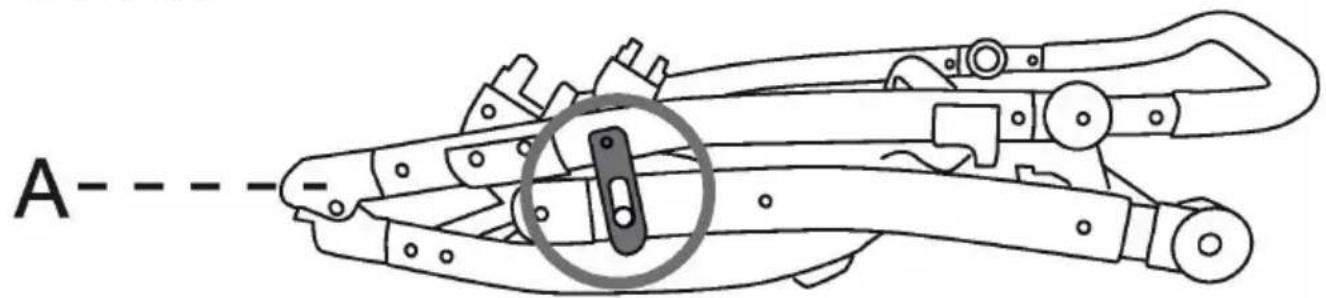
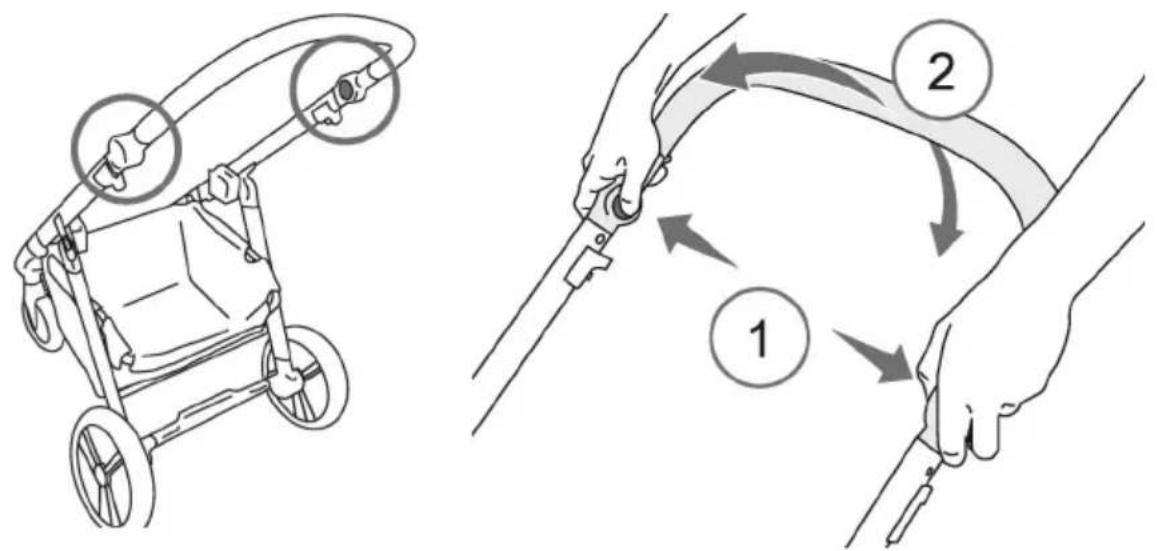
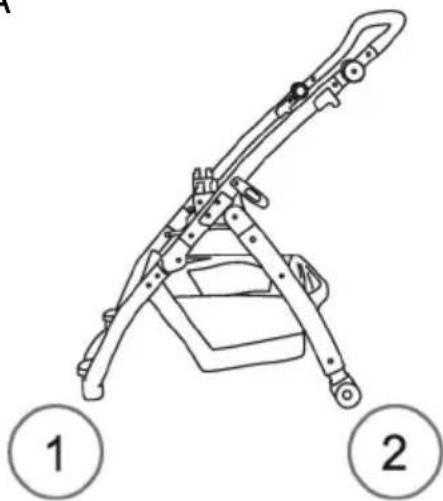
1. UITKLAPPEN
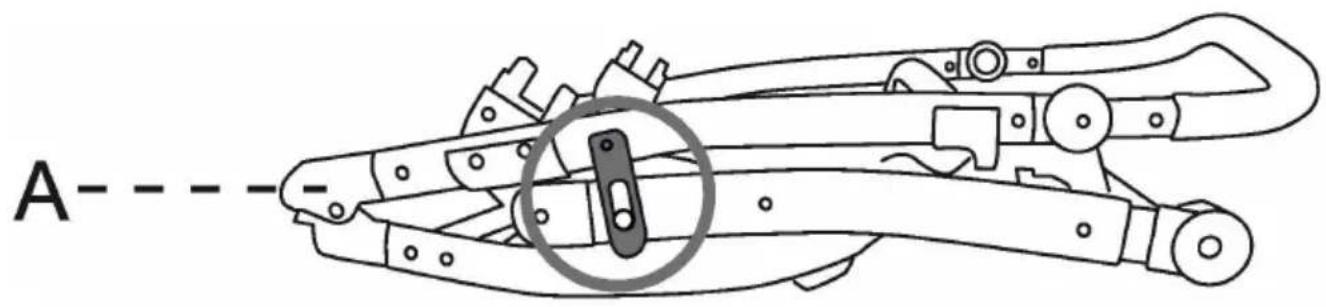
text_image
A- - - -NL
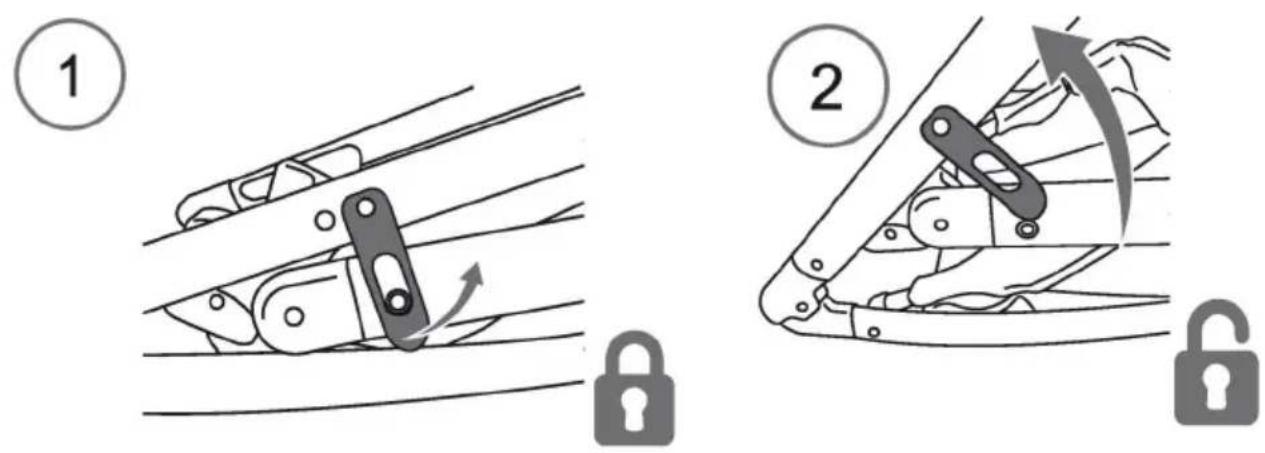
text_image
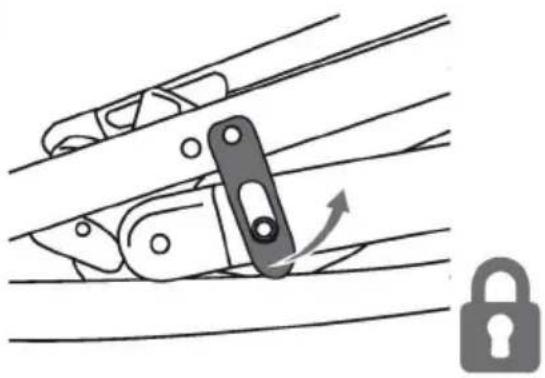
Diagram illustrating two mechanical or robotic device states: (1) linear movement and (2) gear shift mechanism with lock symbols.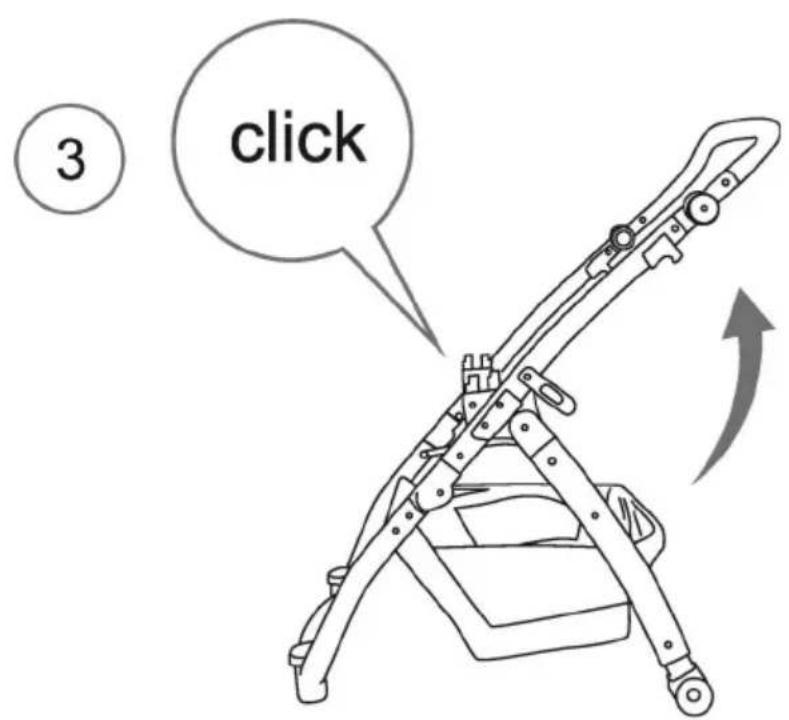
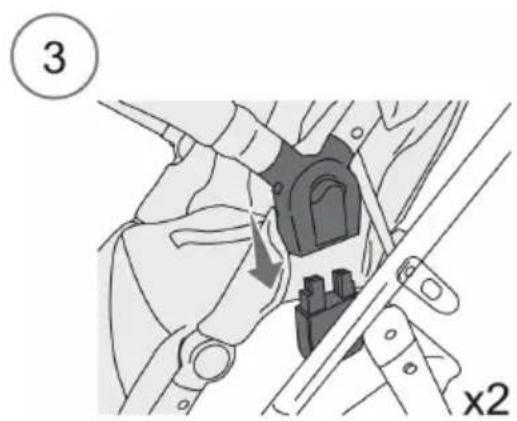
text_image
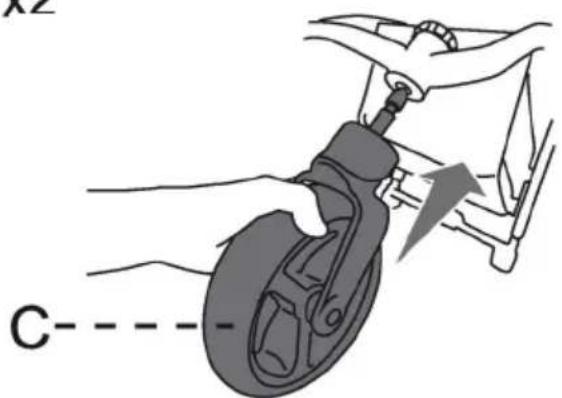
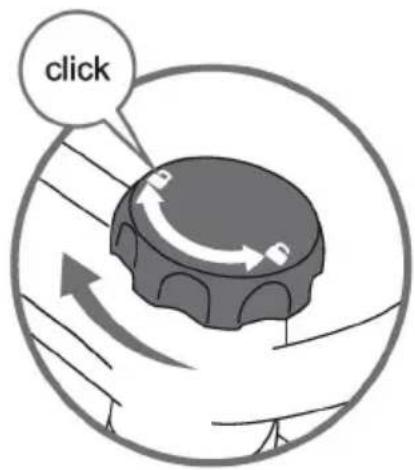
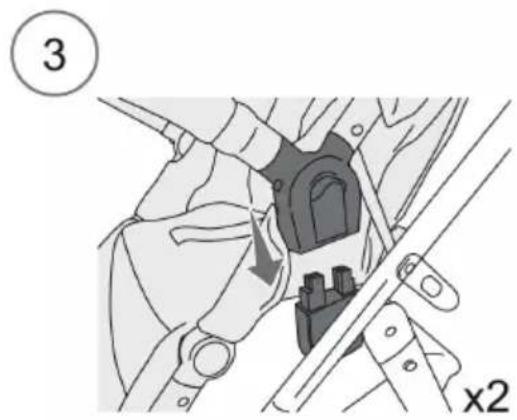
3 clickMONTEREN/IN GEBRUIK NEMEN
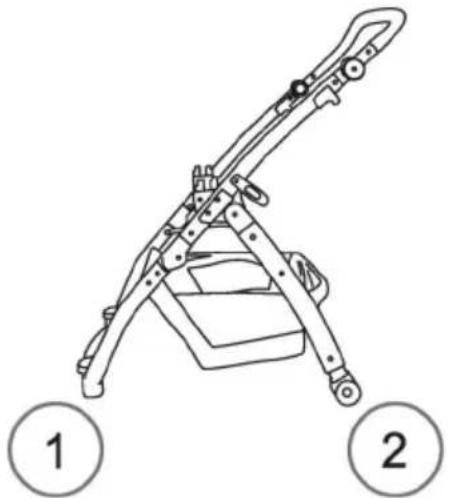
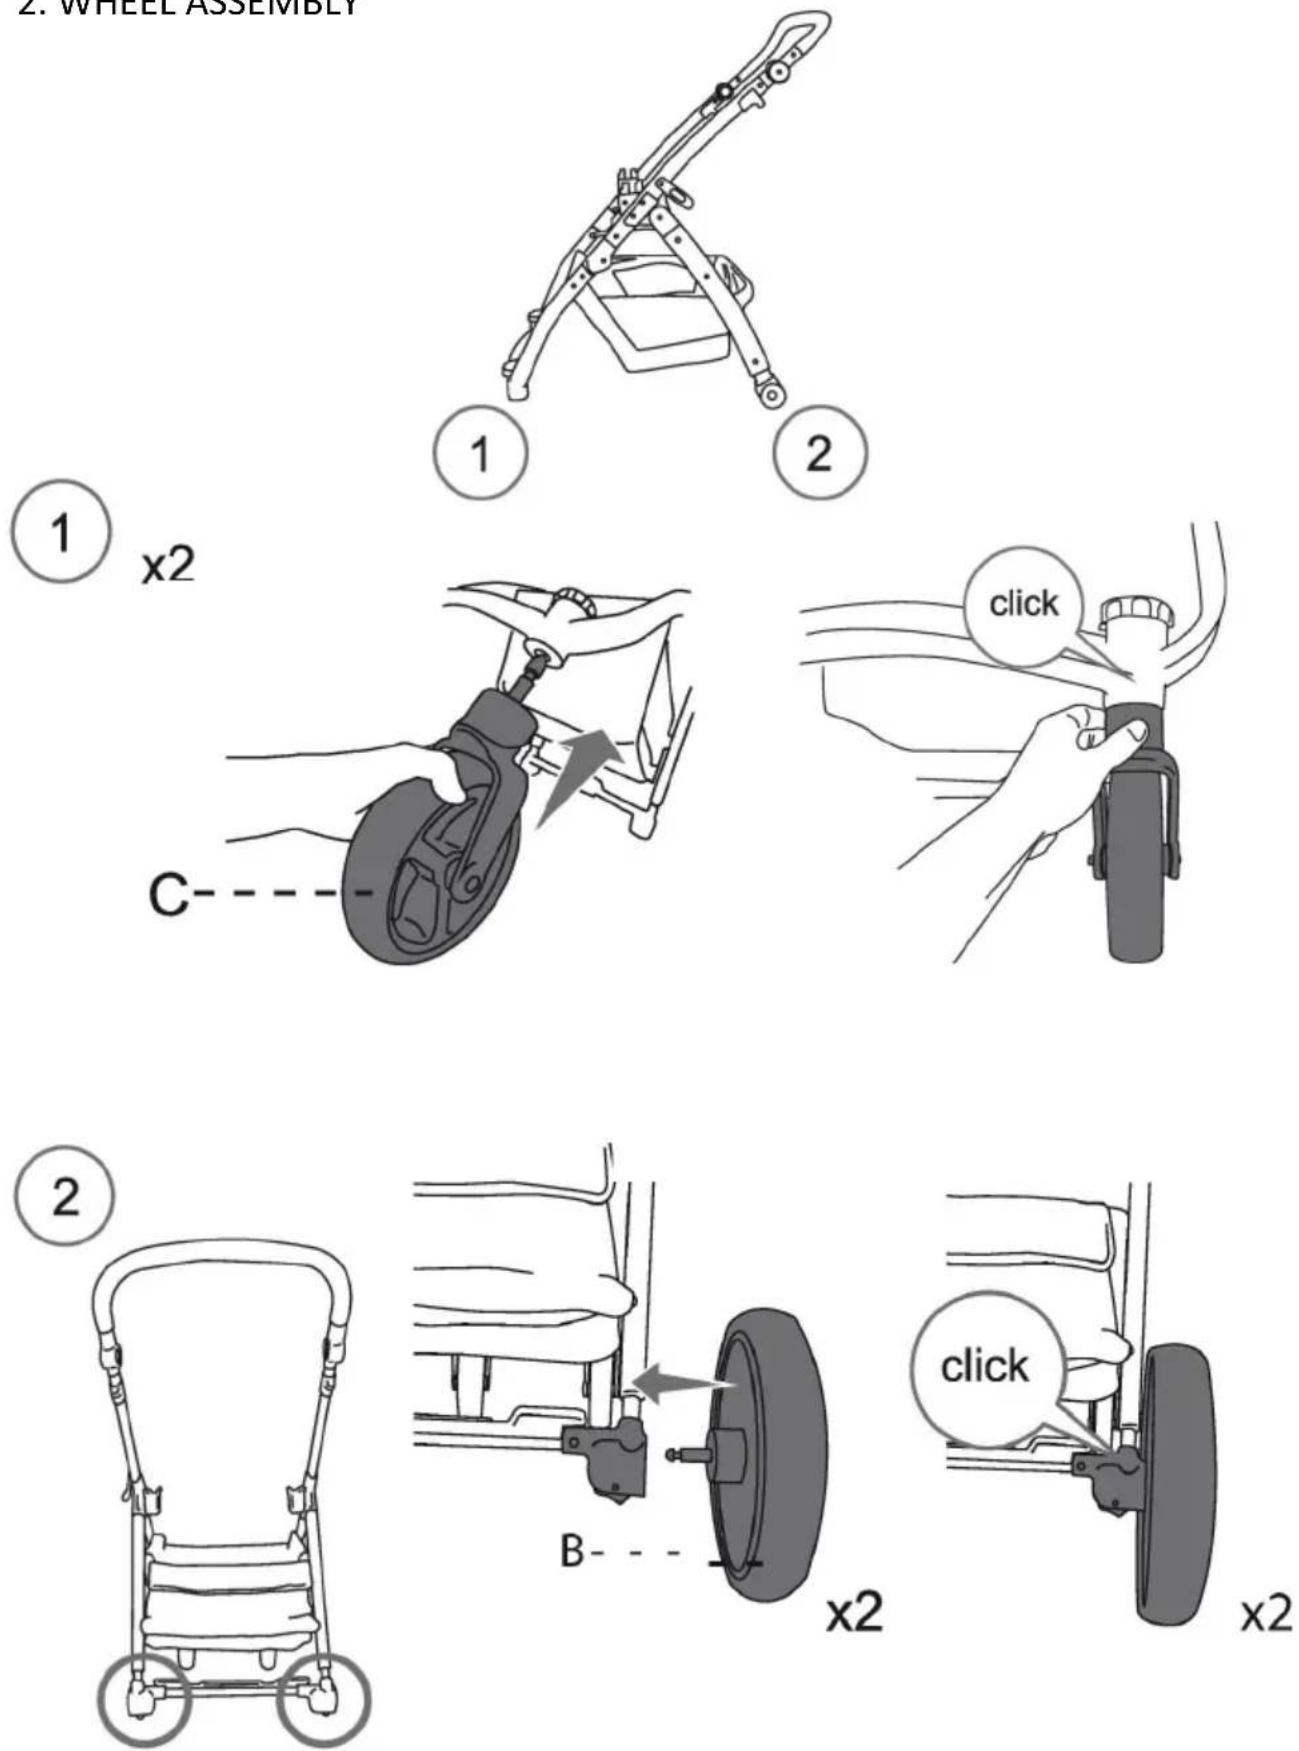
2. WIEL MONTAGE
NL
natural_image
Technical line drawing of a mechanical device with two circular annotations (1 and 2) indicating parts of the base, no text or symbols present.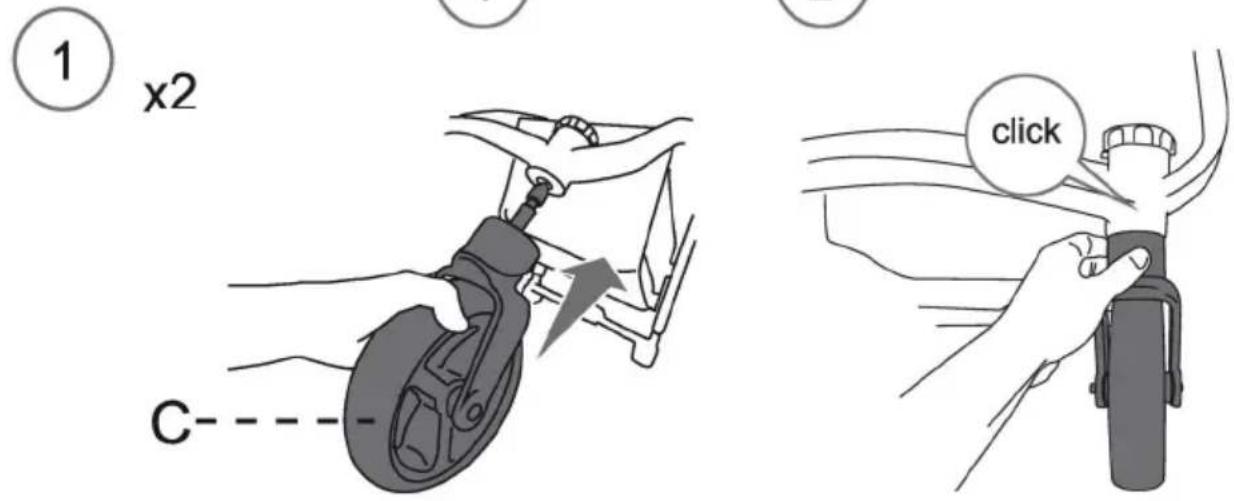
text_image
① x2 C click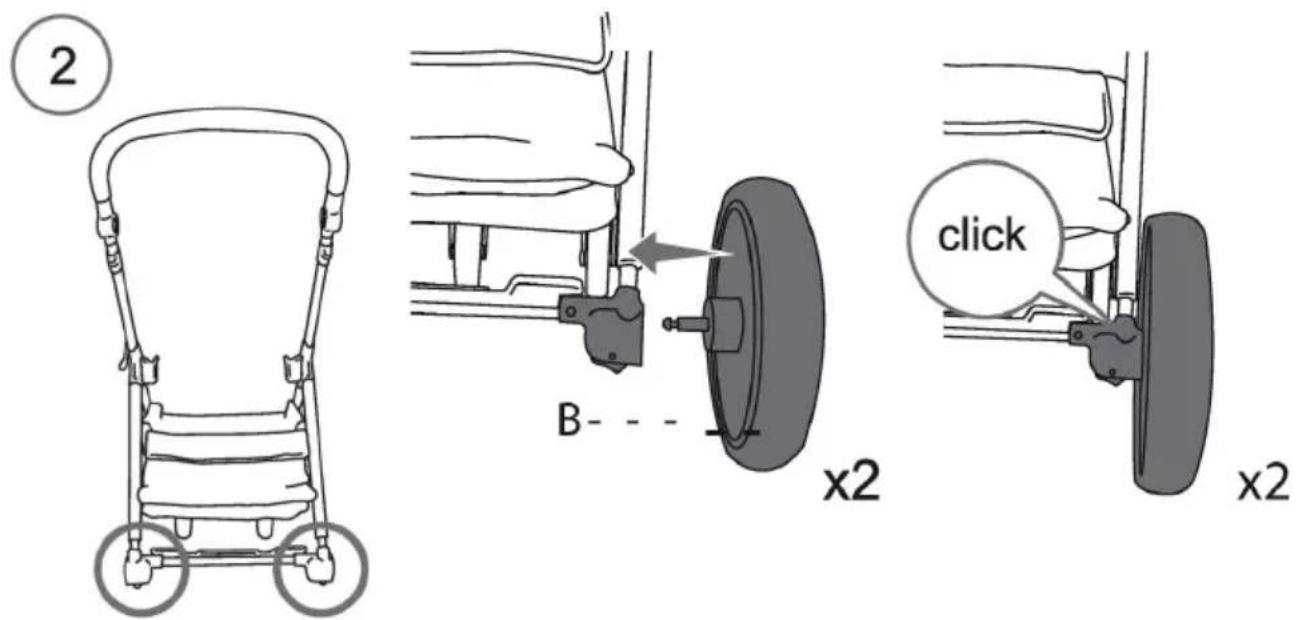
text_image
② B x2 click x2MONTEREN/IN GEBRUIK NEMEN
3. WIEL DEMONTAGE

natural_image
Line drawing of a stroller with two wheels and a handle, no text or symbols presentNL
natural_image
Line drawing of a stroller with two circular buttons labeled 1 and 2 (no text or symbols on the device itself)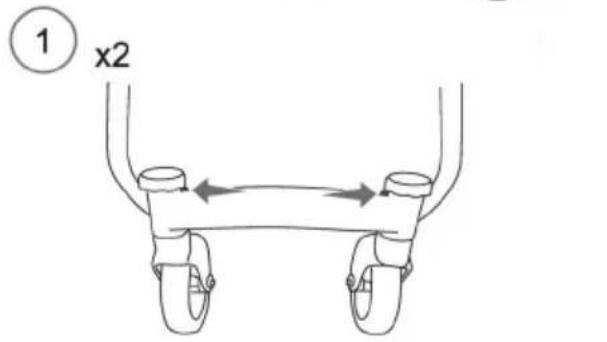
text_image
① x2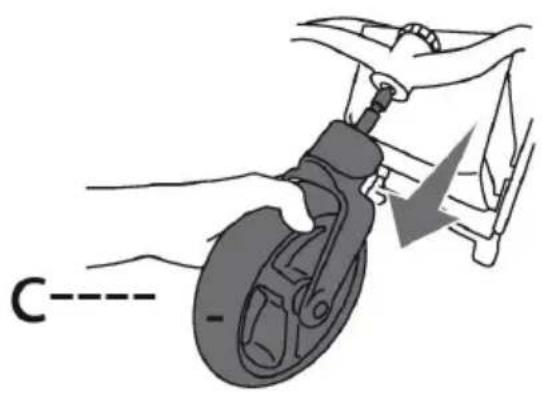
text_image
C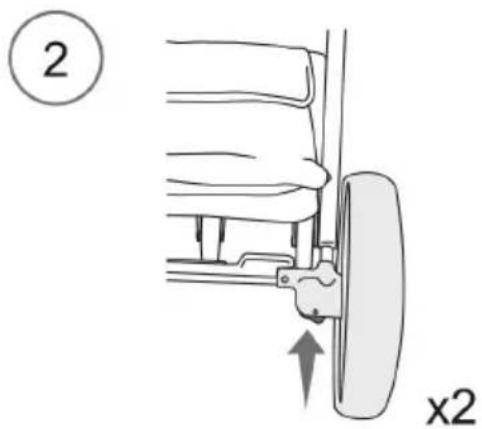
text_image
② x2
text_image
B x2MONTEREN/IN GEBRUIK NEMEN
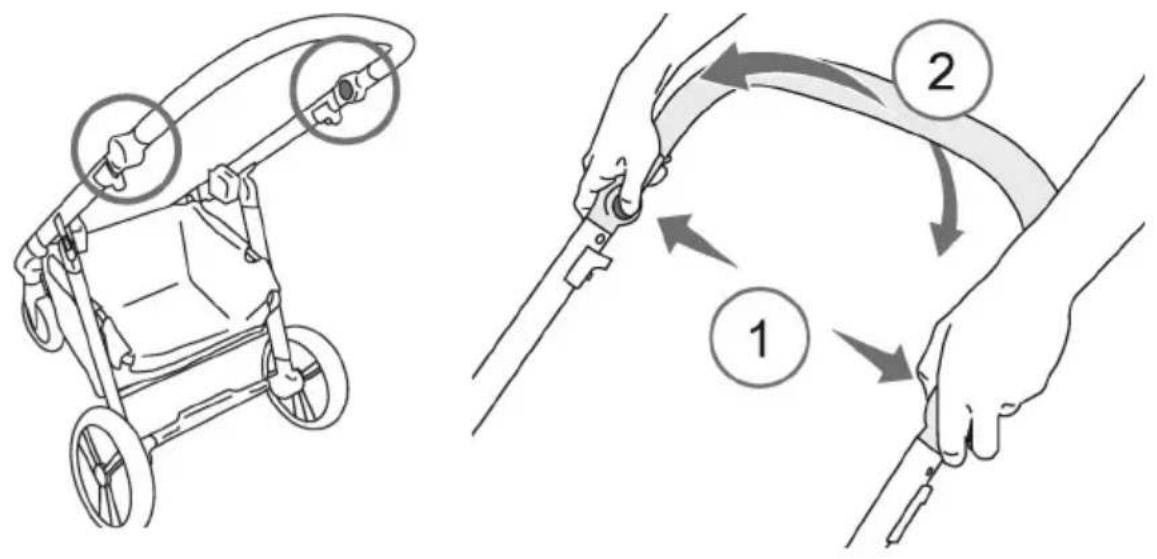
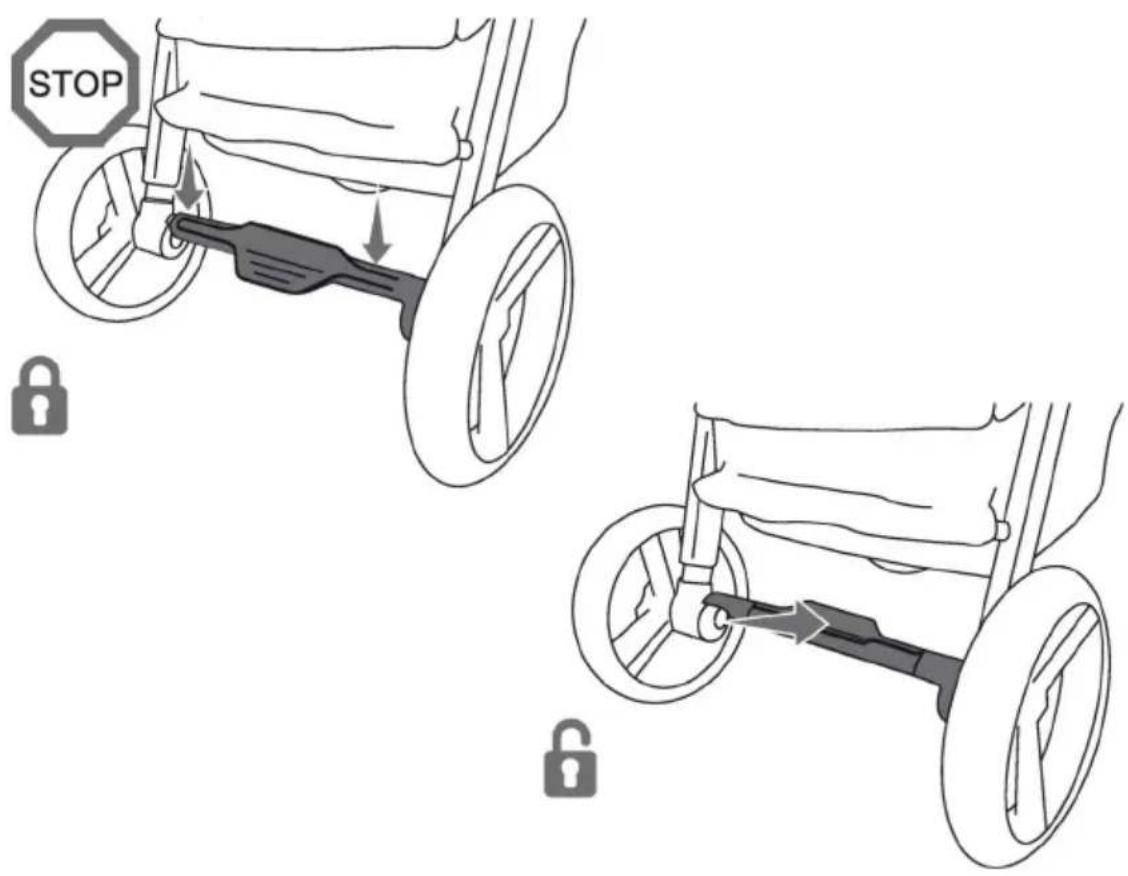
-
DUWBEUGEL
-
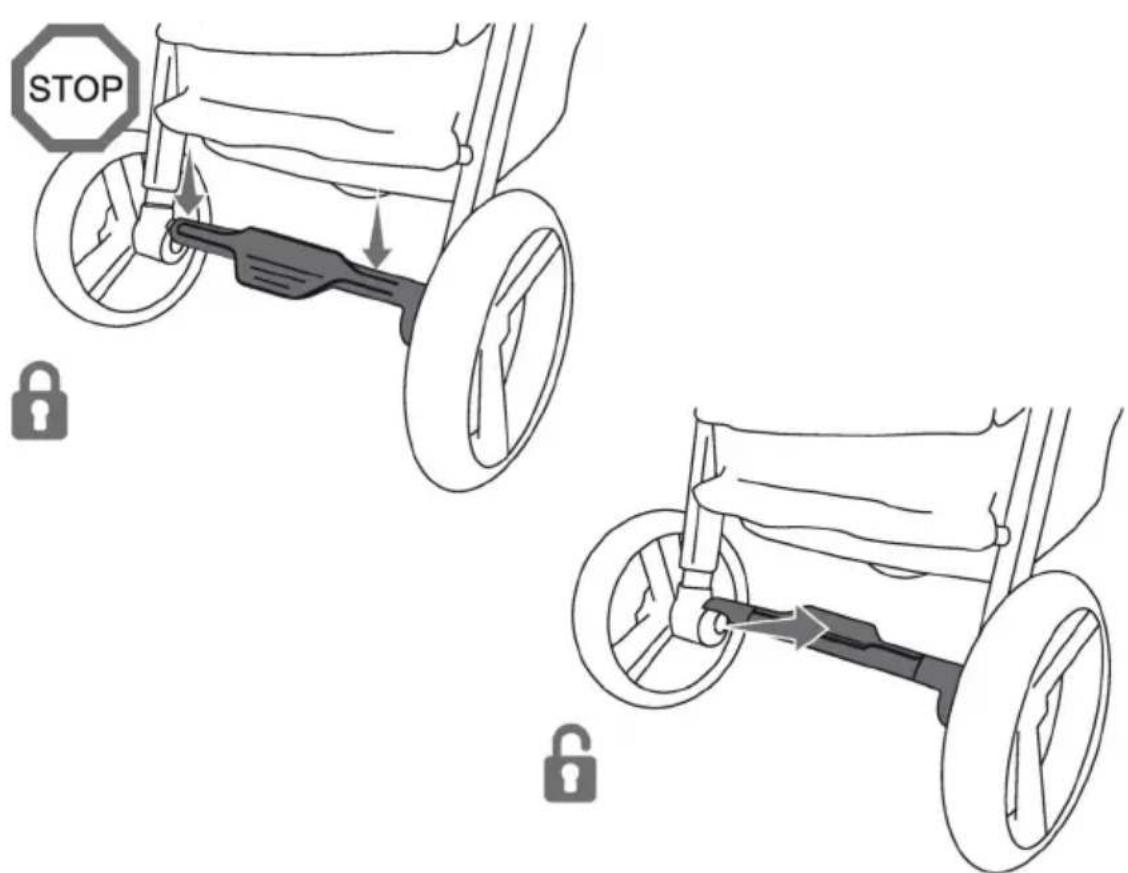
REM

text_image
STOP lock
natural_image
Line drawing of a stroller with a hand operating the wheel, showing no text or symbolsnatural_image
Diagram of a mechanical linkage system with two circular components and rotational arrows indicating motion (no text or symbols)
natural_image
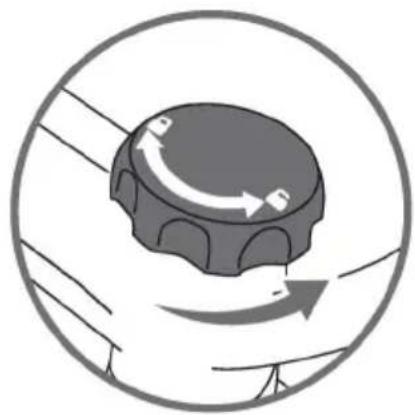
Diagram of a mechanical component with directional arrows indicating motion or rotation (no text or symbols)Zwenken
NL

natural_image
Diagram of a mechanical linkage system with two circular components and directional arrows indicating motion (no text or symbols)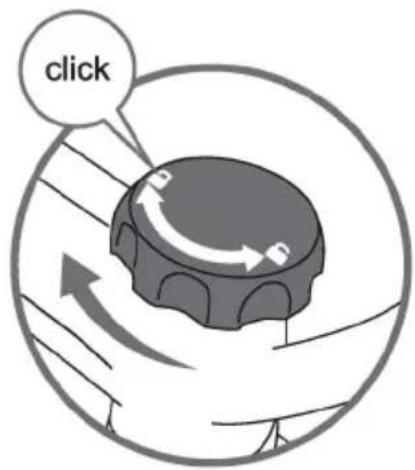
text_image
clickVastzeen
MONTEREN/IN GEBRUIK NEMEN
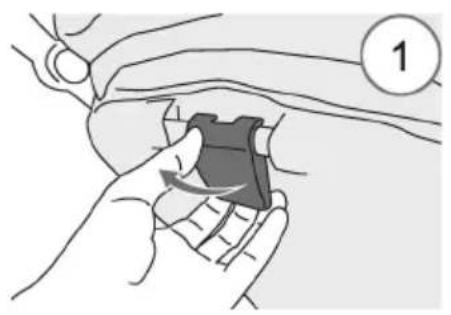
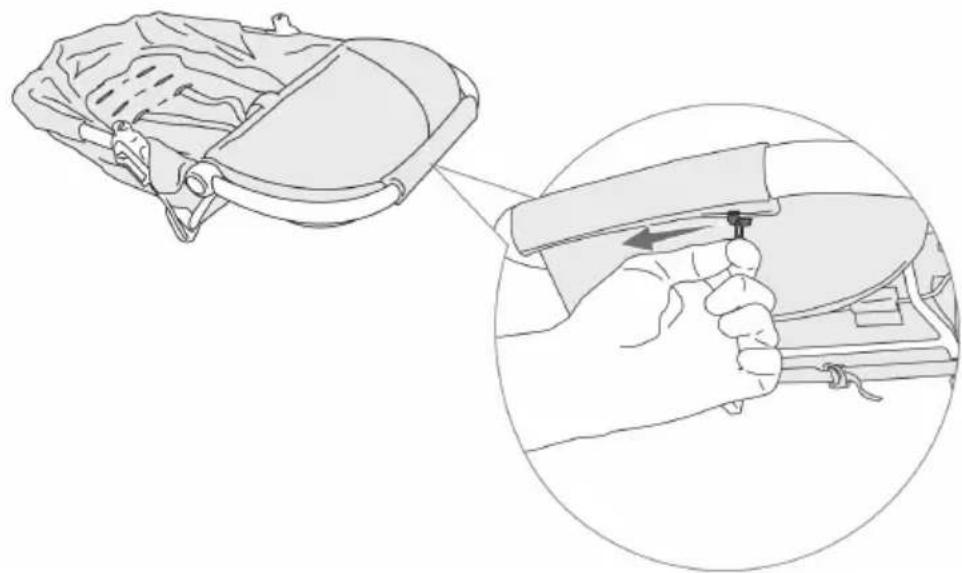
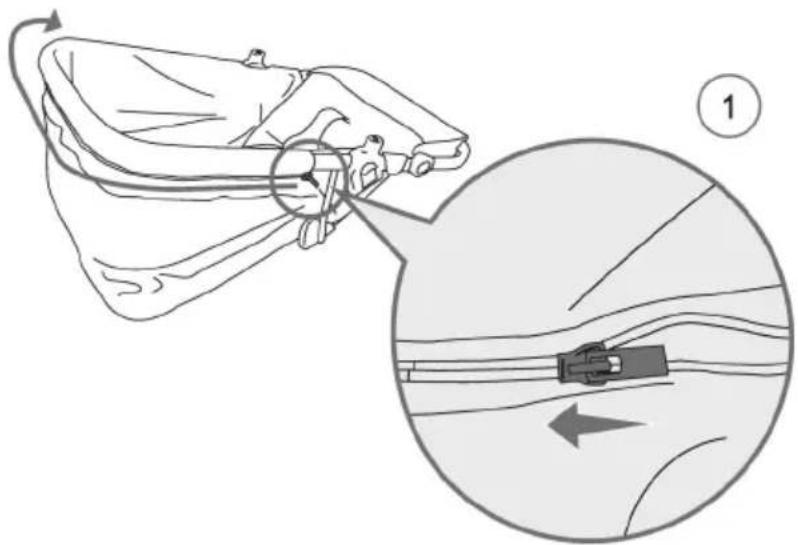
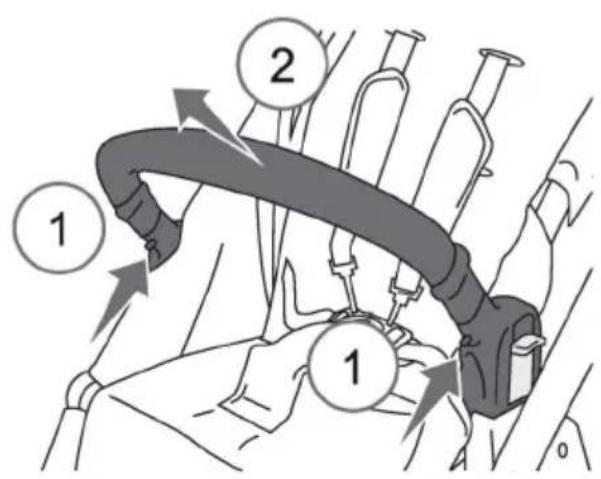
7. MONTAGE VOORBEUGEL

8. DEMONTAGE VOORBEUGEL
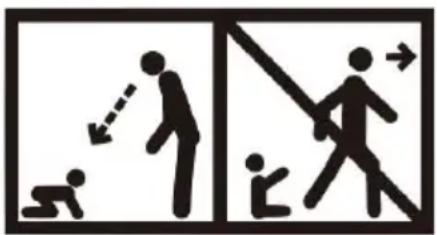
WAARSCHUWING:
natural_image
Illustration of a hand holding a small object with a tool, no text or symbols present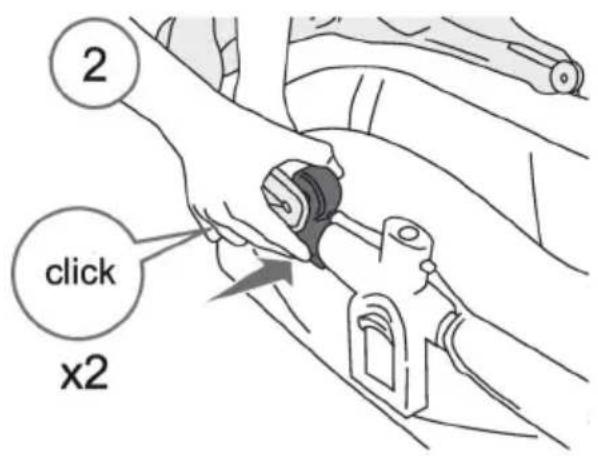
text_image
2 click x2
text_image
③MONTEREN/IN GEBRUIK NEMEN
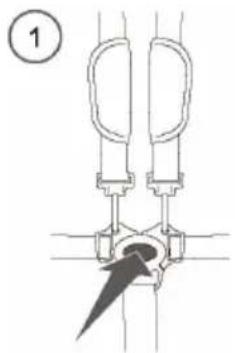
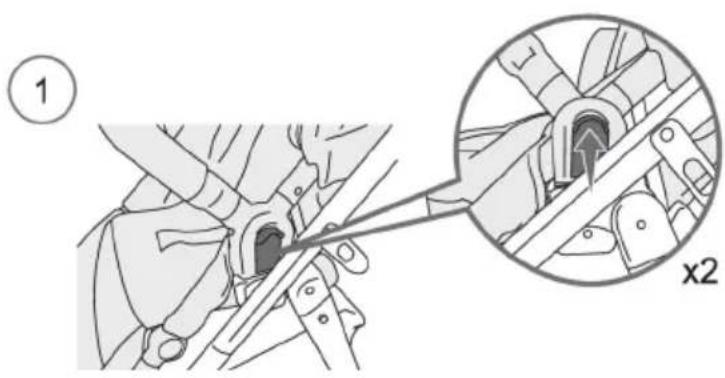
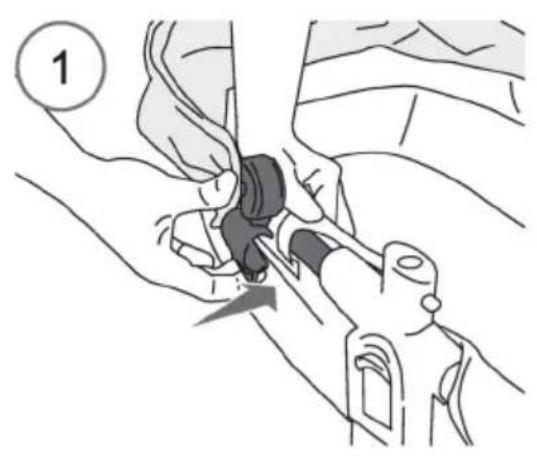
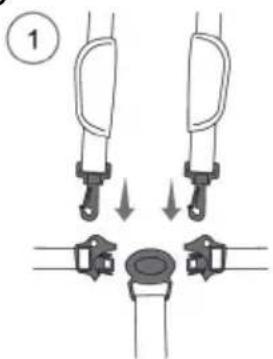
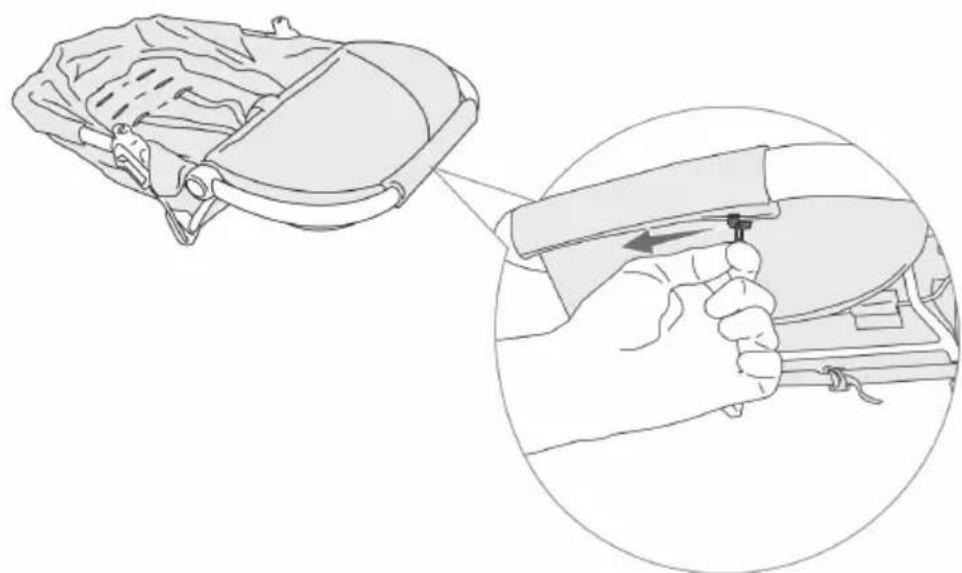
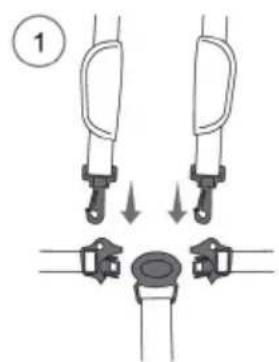
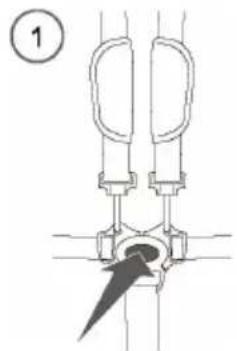
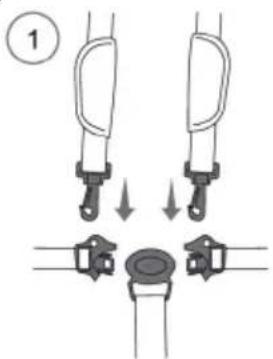
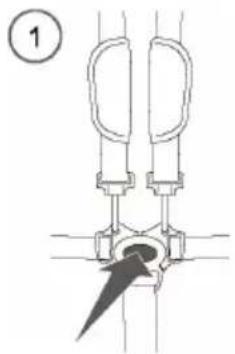
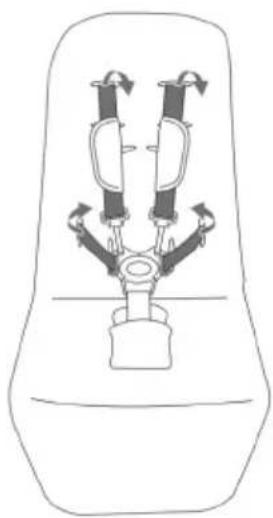
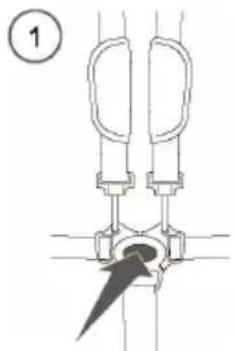
10. HARNASGORDEL
Vastmaken
text_image
①
natural_image
Diagram of a mechanical or electrical component with two vertical arms and a central circular component, no text or symbols present.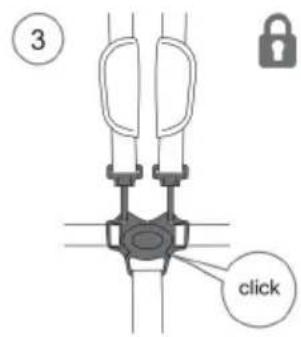
text_image
③ clickLosmaken
natural_image
Pure mechanical diagram showing a lever mechanism with no text or symbols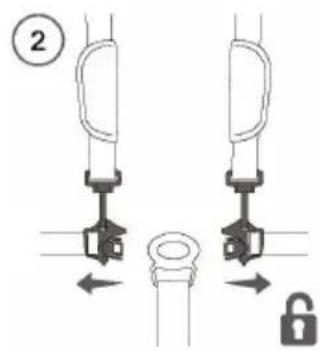
text_image
②11. MONTAGE HARNASGORDEL
natural_image
Diagram of a car seat with four arms and a central shaft, showing directional arrows (no text or labels)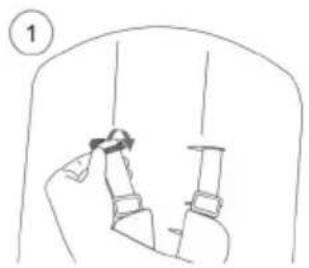
natural_image
Simple line drawing of a hand holding a small object, possibly a tool or device, inside a container (no text or symbols)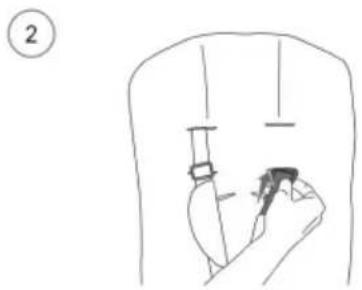
natural_image
Line drawing of a hand holding a tool, no text or symbols present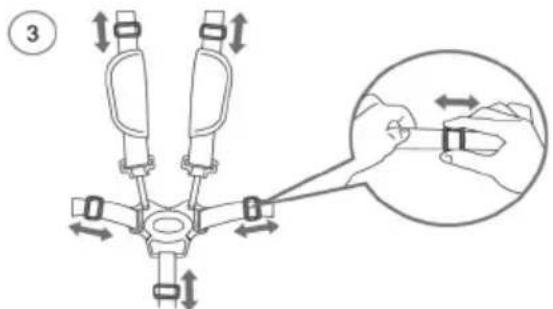
text_image
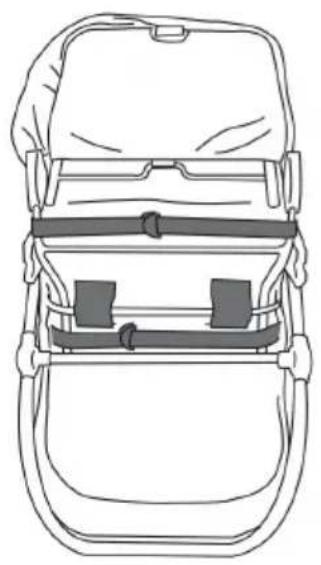
Diagram showing a mechanical assembly with directional arrows and a magnified detail of a hand holding a small component.WAARSCHUWING: GEBRUIK ALTIJD HET TUSSENBEENSTUK IN COMBINATIE MET DE HEUPGORDELS.
text_image
Technical diagram showing two stages of a stroller with labeled parts and directional arrows indicating movement or assembly.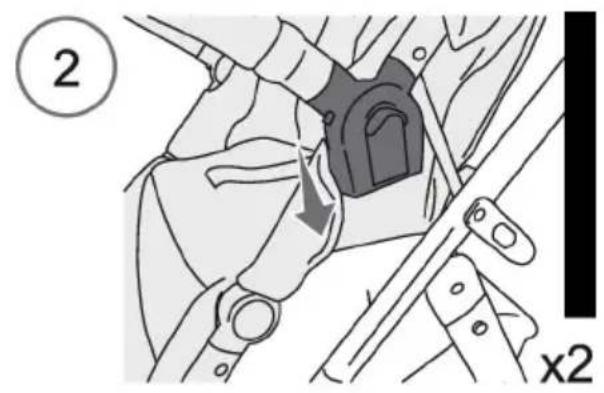
text_image
② x2
text_image
click x2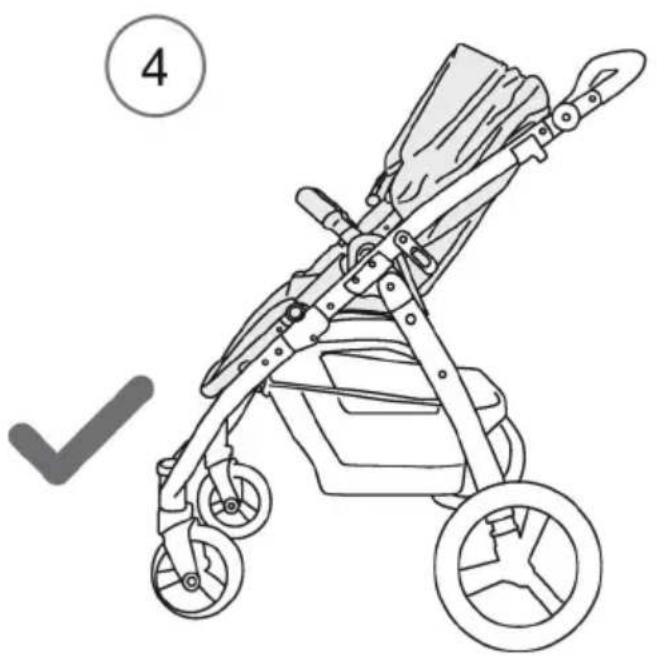
natural_image
Line drawing of a stroller with two wheels and a handle, marked with a checkmark (no text or symbols on the diagram itself)MONTEREN/IN GEBRUIK NEMEN
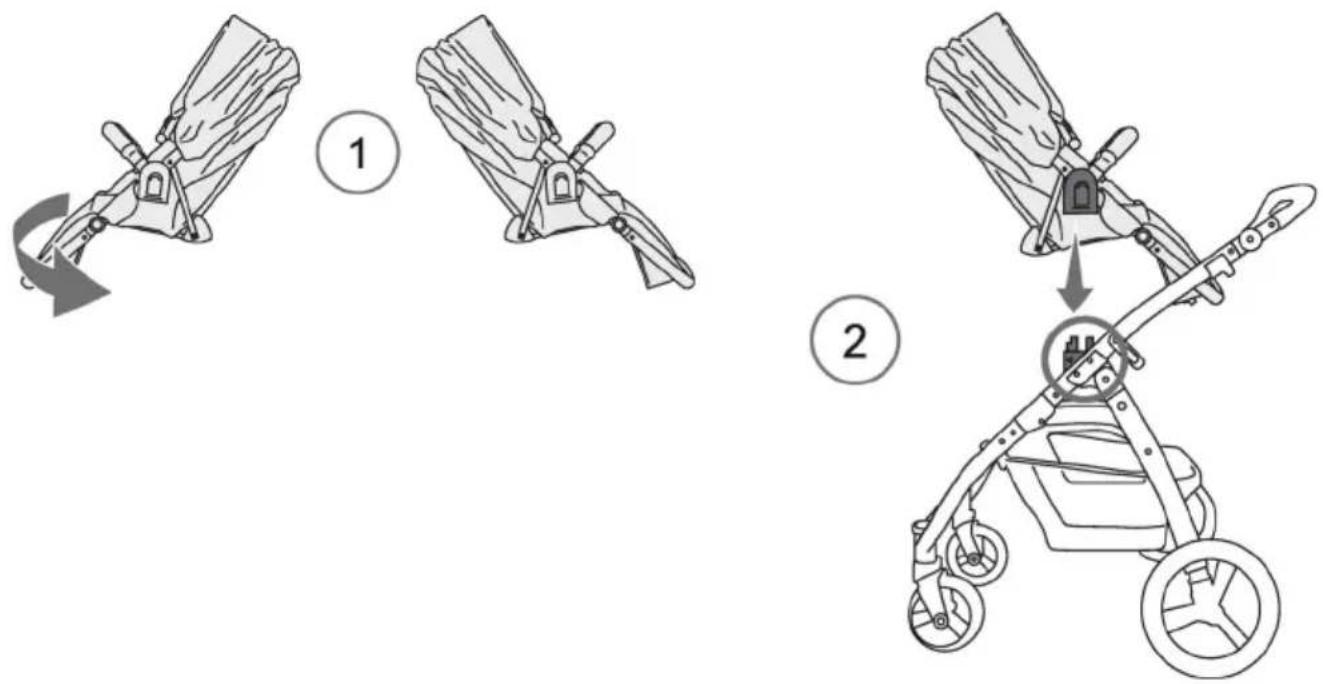
13. OMKEERBARE ZITTING NAAR ACHTEREN GERICHT BEVESTIGEN
MONTEREN/ INKLAPPEN
- VERSTELLING ZITTING
natural_image
Illustration of a hand holding a device with a numbered circle marker (no text or symbols on the device itself)
natural_image
Illustration of a hand holding a medical device with a numbered circle (2) and arrow indicating motion or force, no text or symbols present.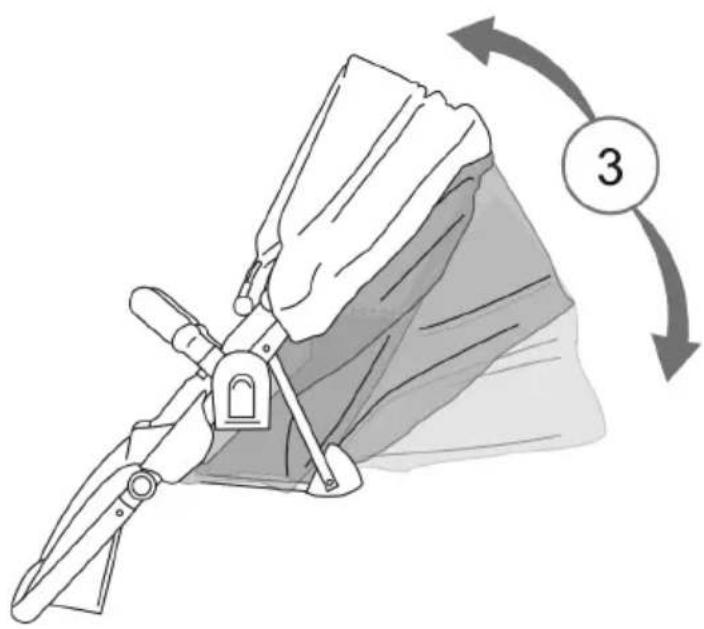
natural_image
Illustration of a mechanical device with a numbered label '3' indicating rotation or sequence (no text or symbols on the device itself)- DEMONTAGE ZITTING
text_image
① x2
natural_image
Mechanical assembly diagram showing a hand holding a component with a numbered label (2), no readable text or symbols present.
text_image
Diagram illustrating a mechanical device being lifted by a spring, showing the process from lifting to mounting a stroller.MONTEREN/IN GEBRUIK NEMEN
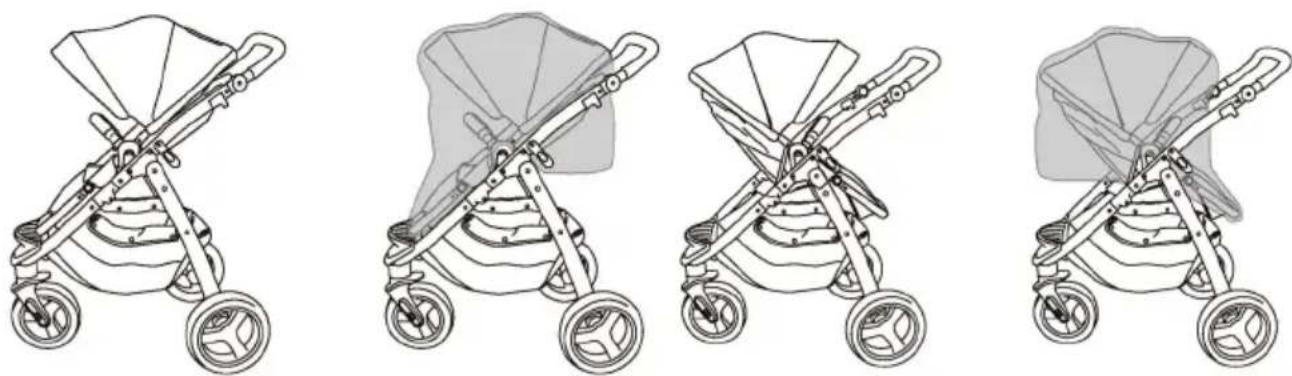
16. REGENSCHERM
NL
natural_image
Line drawing of a baby stroller with four wheels and a canopy cover (no text or symbols)
natural_image
Line drawing of a baby stroller with two wheels and a canopy cover (no text or symbols)
natural_image
Line drawing of a baby stroller with four wheels and handlebars (no text or symbols)
natural_image
Line drawing of a baby stroller with a canopy and wheels (no text or symbols)WAARSCHUWING:
text_image
Technical diagram of a stroller with an inset showing the insertion point of the device labeled '1'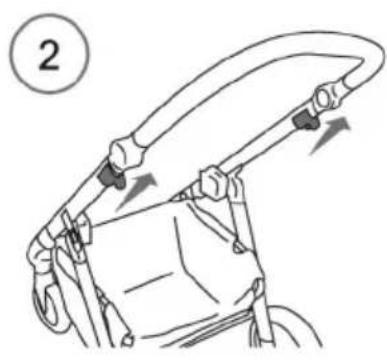
natural_image
Line drawing of a person wearing a seatbelt, holding a curved object with arrows indicating motion (no text or symbols)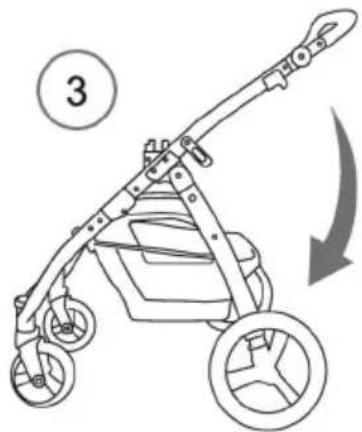
text_image
3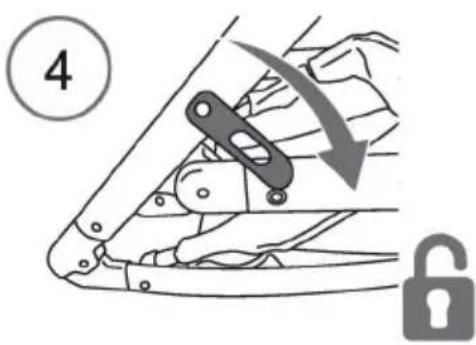
text_image
4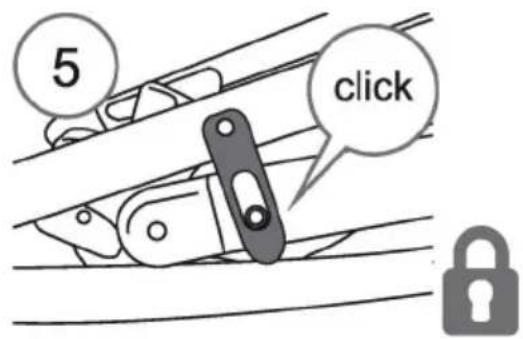
text_image
5 click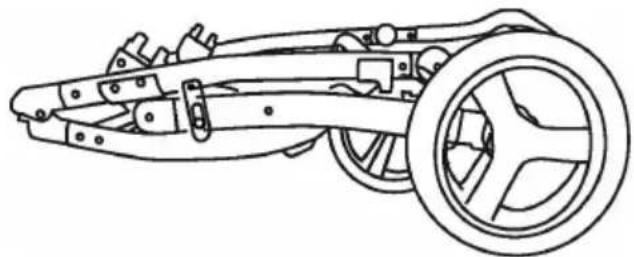
natural_image
Line drawing of a vehicle chassis frame with wheel and suspension components (no text or symbols)DEMONTEREN
18. DEMONTAGE BEKLEDING
NL
natural_image
Diagram showing a mechanical component being inserted into a device, with an inset close-up highlighting the internal structure (no text or symbols present)
natural_image
Illustration of a hand adjusting a mechanical component with a curved arrow indicating motion (no text or symbols)3
natural_image
Diagram showing a hand holding a tool inside a car seatbelt, with an inset close-up of the handle (no text or symbols present)DEMONTEREN
4

natural_image
Line drawing of a backpack seat with straps and front panel (no text or symbols)
natural_image
Line drawing of a hand using a tool to adjust or install a mechanical component (no text or symbols visible)
natural_image
Diagram showing two car seatbelt buckle designs with a directional arrow indicating movement (no text or symbols)5

natural_image
Line drawing of a medical procedure with syringe placement and tubing (no text or symbols)
natural_image
Line drawing of a bicycle steering wheel (no text or symbols)VERZORGING EN ONDERHOUD
text_image
Image displaying five distinct symbols: a hand holding a magnifying glass, an asterisk, an exclamation mark, a crossed-out circle, and a square.GARANTIE
IMPORTANT: KEEP FOR FUTURE REFERENCE.
- Read this instrucons carefully before use and keep for future reference.
- Your child's safety may be aected if you do not follow these instrucons.
- Use only spare parts delivered by importer for replacing parts or reparaon.
- Damages caused by overloading or wrong folding are not granted.
- Prolonged exposure to sunshine may cause changes in the colour of materials and fabrics.
- Do not expose this product to extreme temperatures. Extreme sunshine or temperatures may cause colour changes or bent parts.
WARNING
- Never leave you child unaended. It might be dangerous.
- This chassis is compatible with carry cot T8055 and/or seat unit of PURE and/or car seat for FLAIR & PURE/T8056 by Top Mark B.V. This chassis is also compatible with car seat Maxi Cosi Cabrio-Fix or Maxi Cosi Pebbles with adapter.
- The seat unit is not suitable for children under 6 months.
- Conguraon with stroller seats is from 6 months to 15kg .
- Conguraon with carrycot is from birth to 9 kg.
- Conguraon with car seat is from birth to 13 kg.
- FOR CAR SEAT USED IN CONJUNCTION WITH A CHASSIS: this vehicle does not replace a cot or a bed. Should our child need to sleep, then it should be placed in a suitable pram body, cot or bed.
- Always use the restraint system.
- Any goods carried in the basket are not to exceed 3 kg.
- Do not overload as stroller may become un stable.
-
This product is not suitable for running or skang.
-
Do not carry additional children, bags, goods or accessories in stroller except as recommended in the manufacturer's instrucons.
- To avoid serious injury from falling or sliding out always use the 5 point safety harness.
• Always use the crotch strap in combinaon with the waist belt. - This vehicle has been designed for maximum of 1 child per seat, per carry cot or per car seat.
- Any load aached to the handle and/or on the back of the backrest and/or on the sides of the stroller aects the stability of the stroller. The stroller may become unstable and p over and can injure you child.
- Pay special aenon when manoeuvring the stroller up or down the pavement, it is best to do it backwards.
- Be aware of the risk of open re and other sources of strong heat, such as electric bar res, gas res, etc. in the near vicinity of the stroller.
- Avoid hot liquids, power cables and other possible dangers may come within range of a child.
- Check that the pram body or seat unit or car seat aachment devices are correctly engaged.
- Do not use this stroller if any screws, nuts, bolts, etc. are missing or any component is damaged or missing.
- Ensure stroller is completely erected and check all locks are engaged before placing child in stroller.
- Before making adjustments to stroller ensure that child's body is clear of any moving parts.
- Do not use on stairs or escalators, fold stroller and carry.
- Put on all the brakes whenever you park the stroller.
- Do not let your child play with this product.
- Do not allow child to stand on seat extender or footrest.
- Parking device shall be engaged when placing and removing the children.
-
Do not allow objects on top of canopy as this stroller may become unstable.
-
Keep plasc rain cover away from children to avoid suocaon.
Do not use the rain cover if the stroller is not ed with the hood or sun canopy to prevent the risk of suocaon. To prevent the risk of suocaon, never leave the stroller with child in it under the sun, with the rain cover ed to it. - Do not use accessories or replacement parts other than the ones recommended by instrucon manual.
- Accessories which are not approved by the manufacturer shall not be used.
- Only replacement parts supplied or recommended by the manufacturer/distributor shall be used.
- To avoid injury ensure that your child is kept away when unfolding and folding this product.
- Never put stroller near steps or stairs.
- Please ensure that you complete regular roune inspecons, maintenance, cleaning of this stroller.
- Regularly care of all metal parts on the stroller is necessary to keep the premium looking. The ends of the axle have to be cleared and oiled, around all 4 weeks.
- Do not place the stroller on parquets—laminate-, linoleum—or carpet oors. The wheels may cause stains on the oor, which cannot be removed.
- Keep this product away from children when not in use.


WARNING
text_image
Safety warning illustration showing pictograms of human walking and deflection with arrows indicating movementASSEMBLING
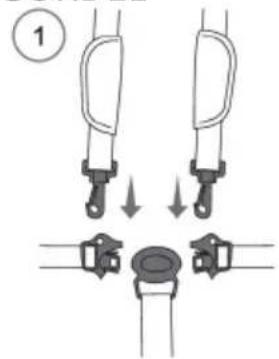
Check if following spare parts are in the box:
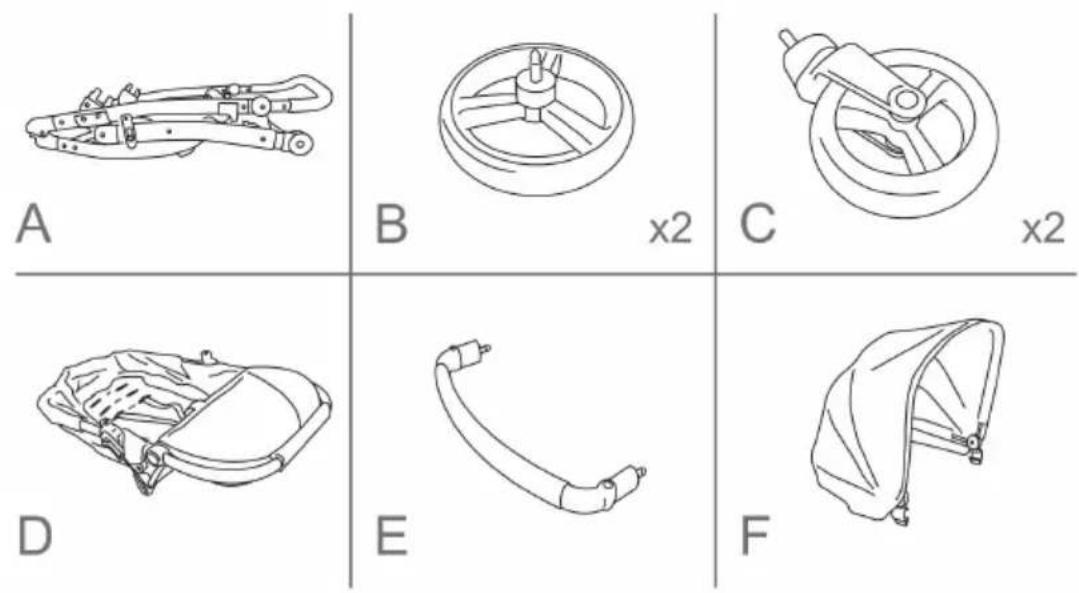
A. Chassis
Colour Pack
B. Rear wheels
E. Front bumper
C. Front wheels
F. Canopy
D. Seat
Note that the fabric paerns, colour pictures and stroller accessories on this product in this instrucon manual may vary from that of the product that you have purchased.
If one or more of the above menoned spare parts are missing or broken, please contact the store where you bought the product, before using.
WARNING
Please keep all packaging material away from babies and children, to prevent suocaon.
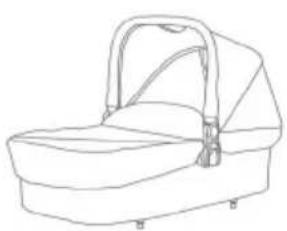
Oponal:
T8055
T8056
M8056
Carry cot
Car seat 0+
Adapter MC
natural_image
Line drawing of a baby stroller with handle and blanket (no text or symbols)
natural_image
Line drawing of a car seat with a strap and seatbelt (no text or symbols)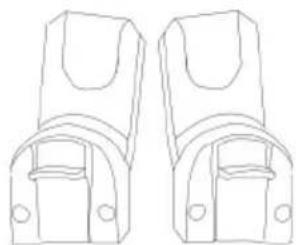
natural_image
Line drawing of two identical mechanical components with mounting holes and brackets (no text or symbols)INDEX
text_image
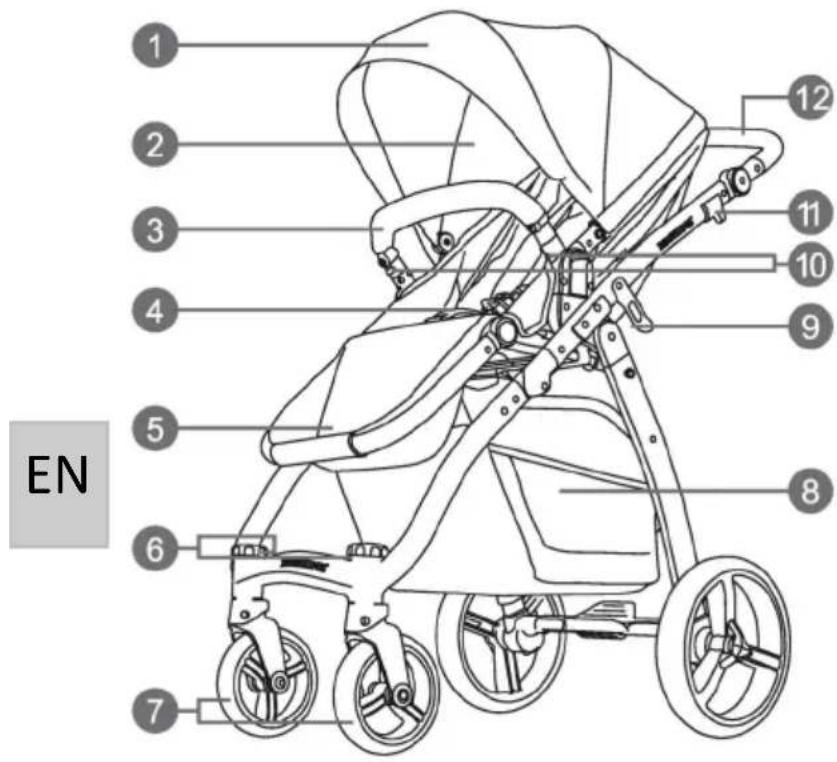
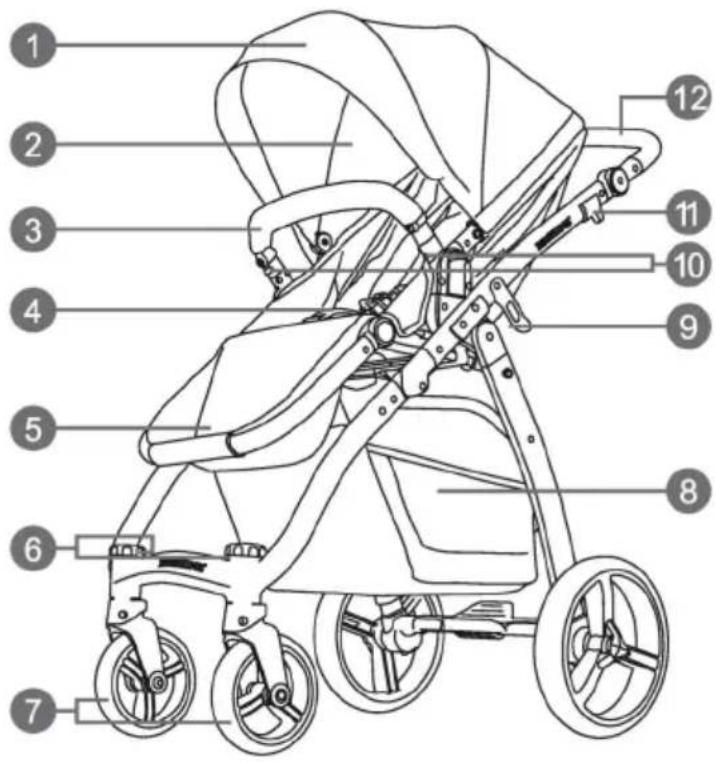
1 2 3 4 5 6 7 8 9 10 11 12 EN- Canopy
- Seat
- Front bumper
- Harness
- Footrest
- Front wheel locking mechanism
- Front wheel
- Basket
- Locking mechanism
- Front bumper release mechanism
- Folding mechanism
- Handle bar
text_image
Technical diagram of a stroller with numbered parts labeled 13, 14, and 15- Locking mechanism
- Rear wheels
- Brake
- Recline mechanism
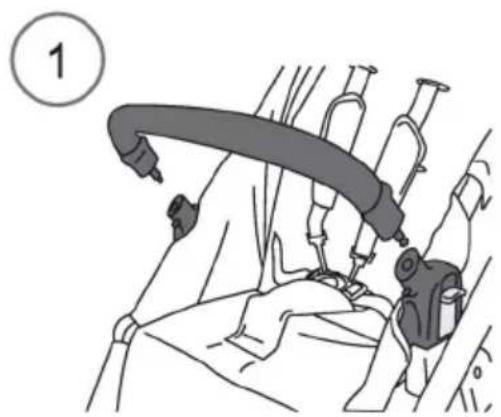
ASSEMBLING/USING
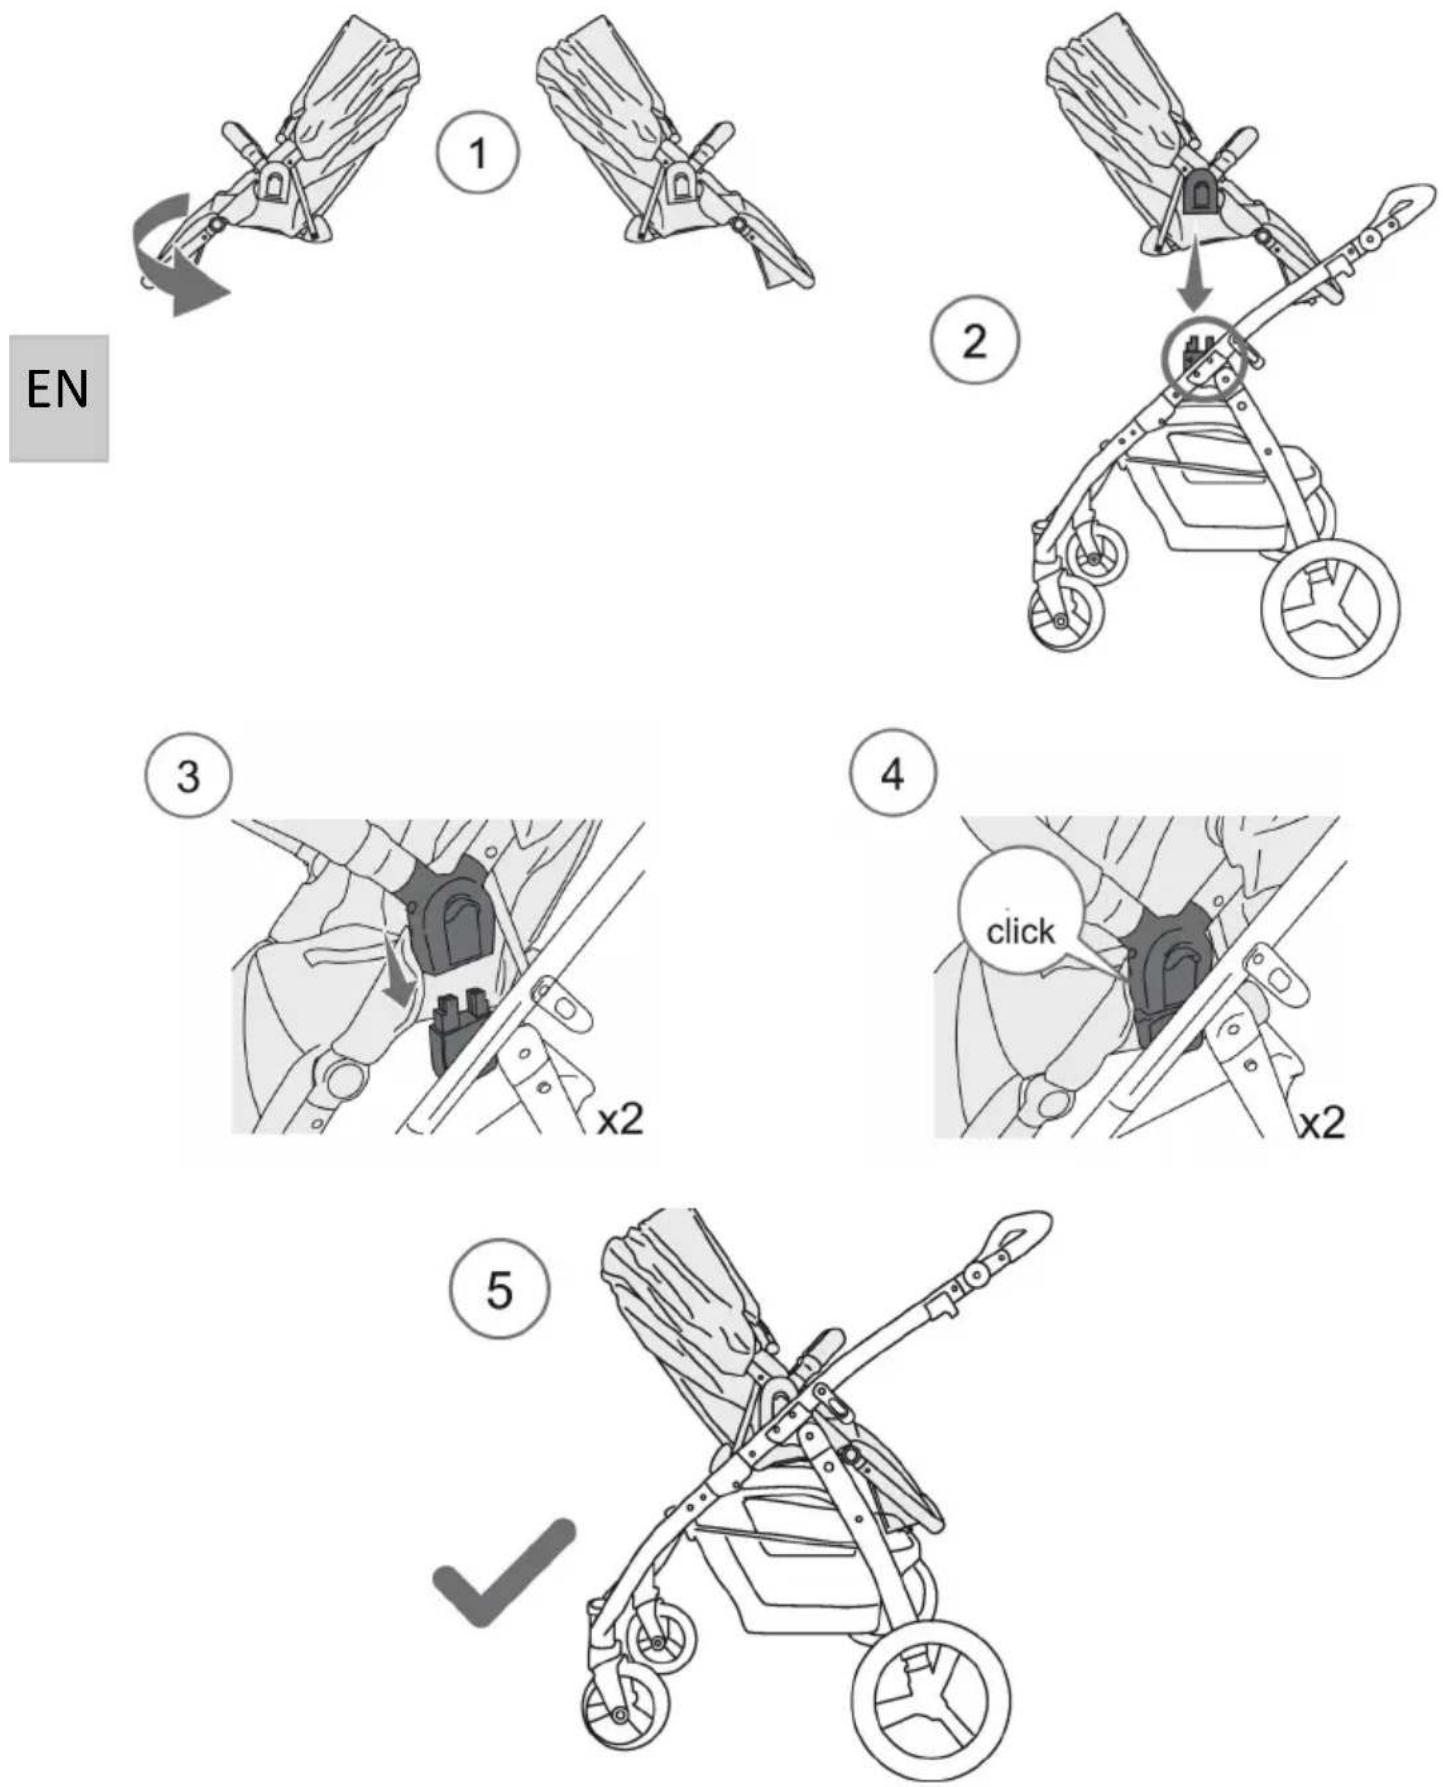
1. UNFOLD
text_image
A- - - - -EN
1
natural_image
Diagram of a mechanical device with a lock mechanism, showing motion and rotation (no text or symbols)
text_image
2
text_image
3 clickASSEMBLING/USING
2. WHEEL ASSEMBLY
EN
ASSEMBLING/USING
3. WHEEL REMOVAL
natural_image
Line drawing of a stroller with two wheels and a handle, no text or symbols presentEN

natural_image
Line drawing of a stroller with two circular buttons labeled 1 and 2 (no text or symbols on the device itself)
text_image
① x2
text_image
C
text_image
② x2
text_image
B x2ASSEMBLING/USING
- HANDLEBAR
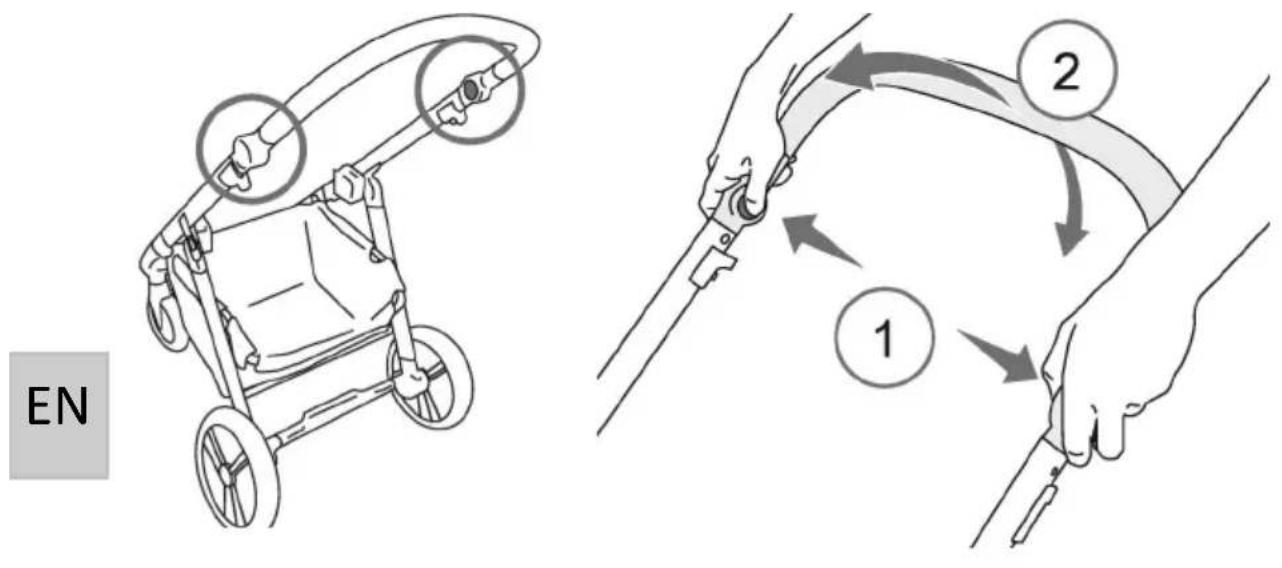
EN
- BRAKE
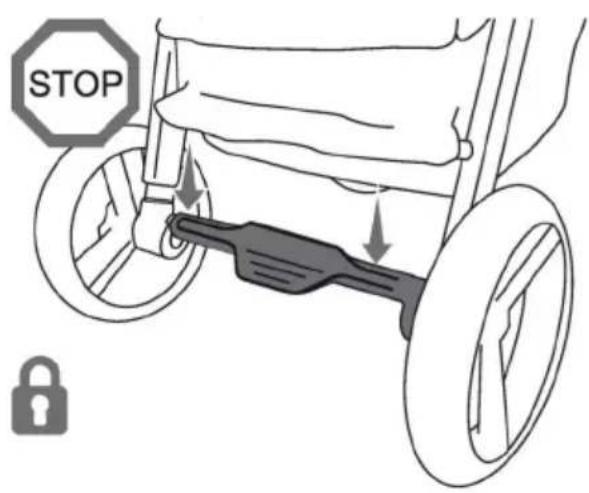
text_image
STOP LOCK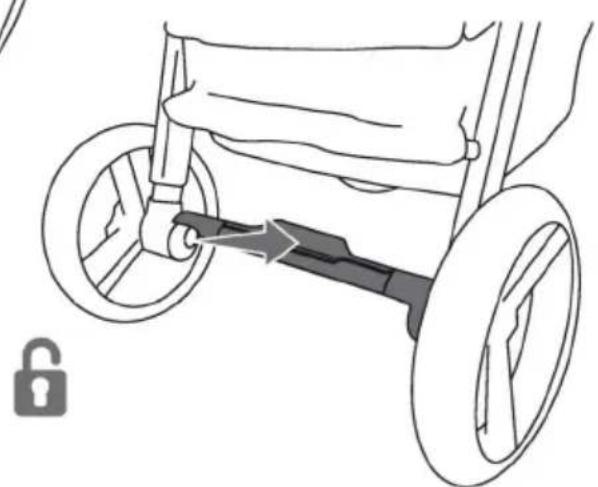
natural_image
Line drawing of a stroller with wheels and a key inserted, no text or symbols presentWARNING: The parking device shall be engaged when placing and removing the child.
ASSEMBLING/USING
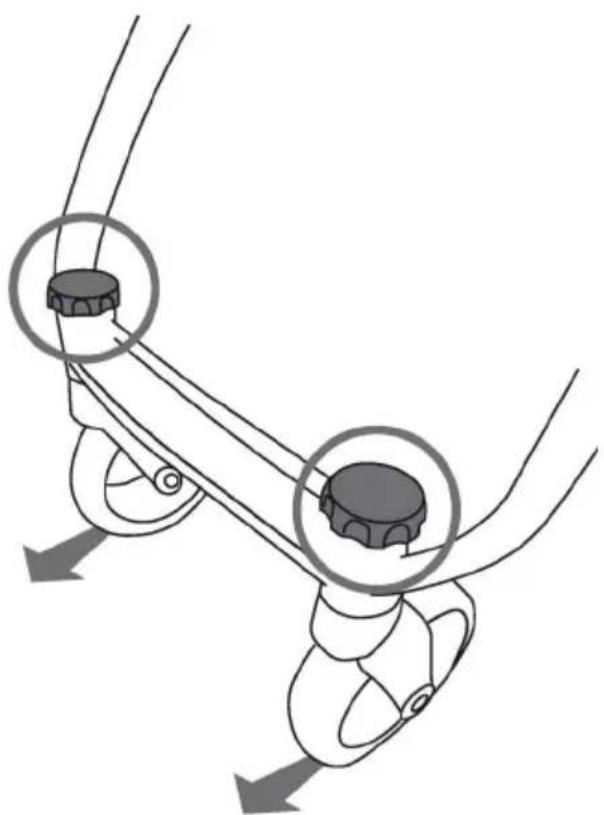
- LOCKING FRONT WHEEL
natural_image
Diagram of a mechanical linkage mechanism with two circular components and rotational arrows indicating motion (no text or symbols)Swivel

natural_image
Diagram of a mechanical component with rotational arrows indicating motion (no text or symbols)EN
natural_image
Diagram of a mechanical linkage system with two circular components and directional arrows indicating motion (no text or symbols)Fix

text_image
clickASSEMBLING/USING
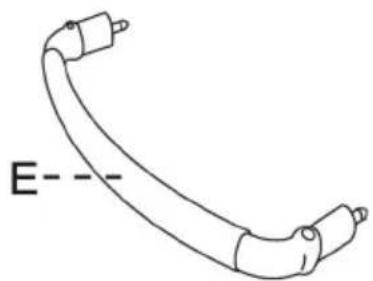
7. FITTING FRONT BUMPER
natural_image
Simple line drawing of a curved mechanical component with labeled point E (no text or symbols beyond label)EN
natural_image
Medical illustration showing a patient undergoing a medical procedure with tubing and equipment (no text or symbols)- FRONT BUMPER REMOVAL

text_image
2 click click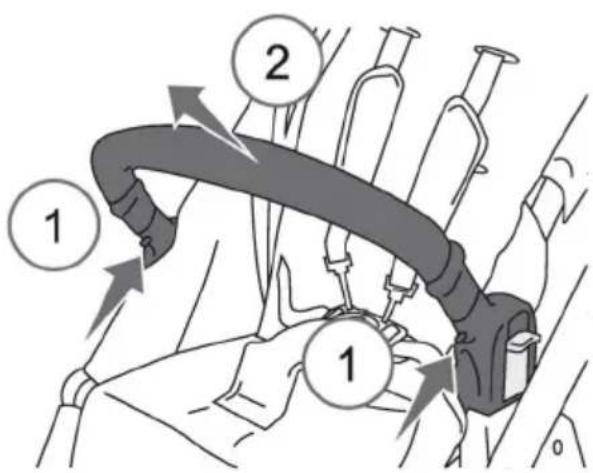
text_image
Diagram showing a mechanical assembly with numbered components and directional arrows indicating motion or force.
natural_image
Illustration of a medical or anatomical structure inside a circular frame, showing no visible text or symbols.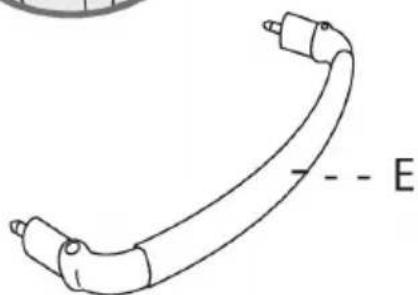
natural_image
Simple line drawing of a curved mechanical or electrical component with labeled point E (no text or symbols beyond label)WARNING:
Always secure your child with the seat belt. The front bumper is not a restraint device. DO NOT li the stroller by the bumper. Use care when aaching the bumper on the stroller with a child in the stroller.
ASSEMBLING/USING
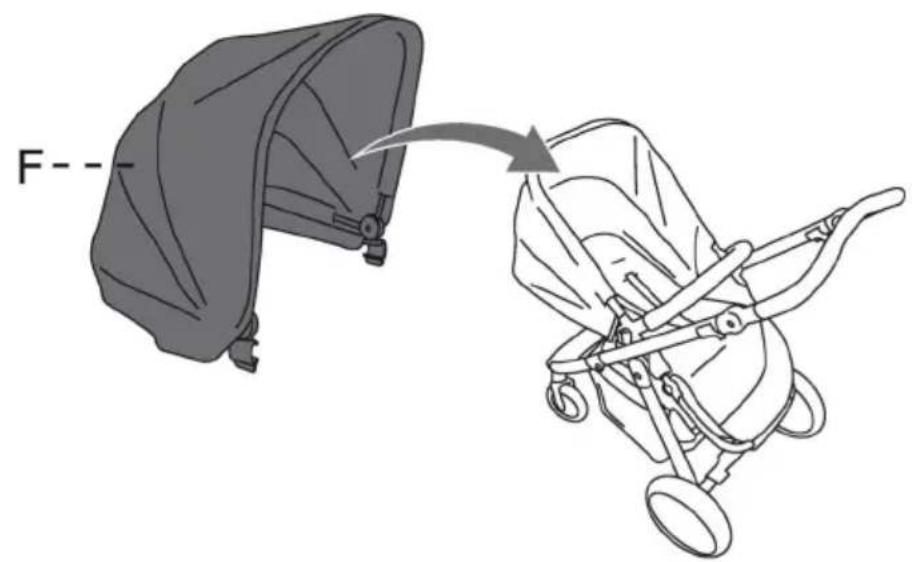
- FITTING CANOPY
text_image
F--EN
natural_image
Illustration of a hand adjusting a small object with a tool, no text or symbols present
text_image
2 click x2
text_image
③ASSEMBLING/USING
10. HARNESS
Close
text_image
①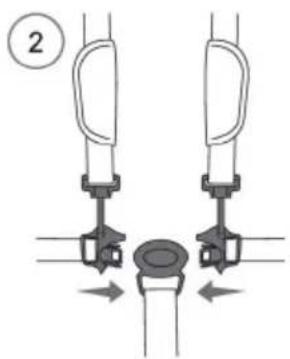
natural_image
Diagram of a mechanical or electrical component with two vertical arms and a central circular component, no text or symbols present.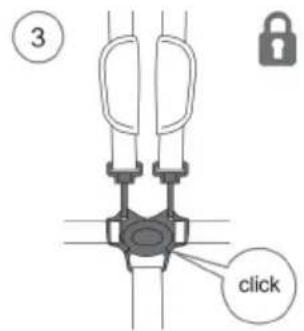
text_image
③ clickEN
Open

natural_image
Pure mechanical diagram showing a lever mechanism with a pointed tool and shaft (no text or symbols)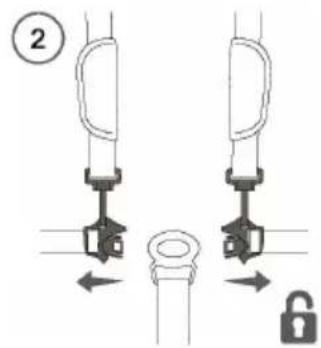
text_image
②11. HARNESS FITTING
natural_image
Diagram of a mechanical device with three arms and a central shaft, no text or symbols present
natural_image
Line drawing of a hand holding a small object, possibly a tool or device, against a plain background (no text or symbols)
natural_image
Line drawing of a hand holding a tool, no text or symbols present
text_image
Diagram showing a mechanical assembly with directional arrows and a magnified view of the component being inserted.WARNING: ALWAYS USE THE CROTCH STRAP WITH SAFETY BELTS.
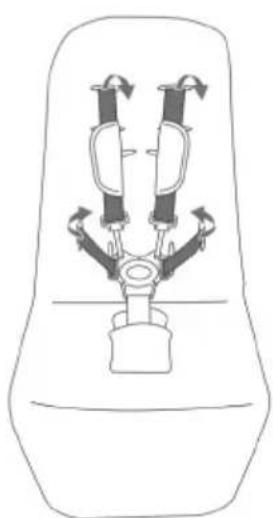
Ensure shoulder straps are clipped to hip safety belts.
Lock buckle parts of hip belts together into the cross belt (belt between the legs) unl secure click is heard. Adjust shoulder, hip and crotch belt in right length to t your child. To release belt just press the buon.
ASSEMBLING/USING
12. FITTING THE REVERSIBLE SEAT FORWARDS

text_image
1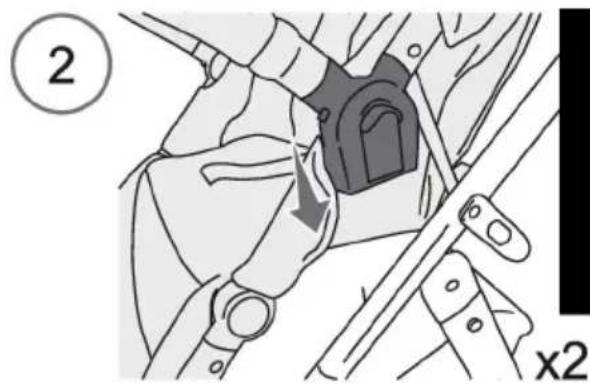
text_image
② x2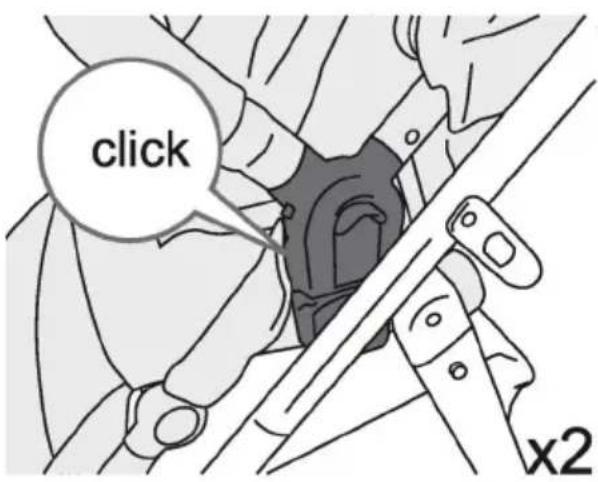
text_image
click x2
natural_image
Line drawing of a stroller with wheels and seat, no text or symbols presentASSEMBLING/USING
13. FITTING THE REVERSIBAL SEAT REARWARDS
EN
ASSEMBLING/USING
14. ADJUSTING THE BACKREST

natural_image
Illustration of a hand holding a device with a numbered circle marker (no text or symbols on the device itself)
natural_image
Illustration of a hand holding a medical device with a numbered circle (2) and arrow indicating motion or force, no text or symbols present.
natural_image
Illustration of a mechanical device with a numbered label '3' indicating rotation or sequence (no text or symbols on the device itself)15. SEAT REMOVAL

text_image
① x2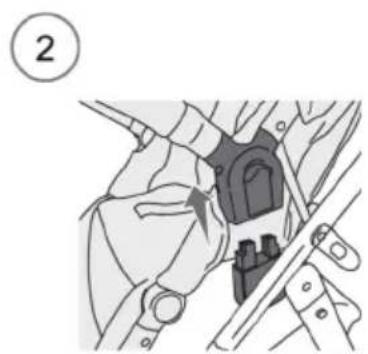
natural_image
Mechanical assembly diagram showing a hand holding a component with a valve and lever mechanism (no text or symbols)
natural_image
Illustration of a stroller with a blade being lifted, showing the motion from the blade to the chassis (no text or symbols present)ASSEMBLING/USING
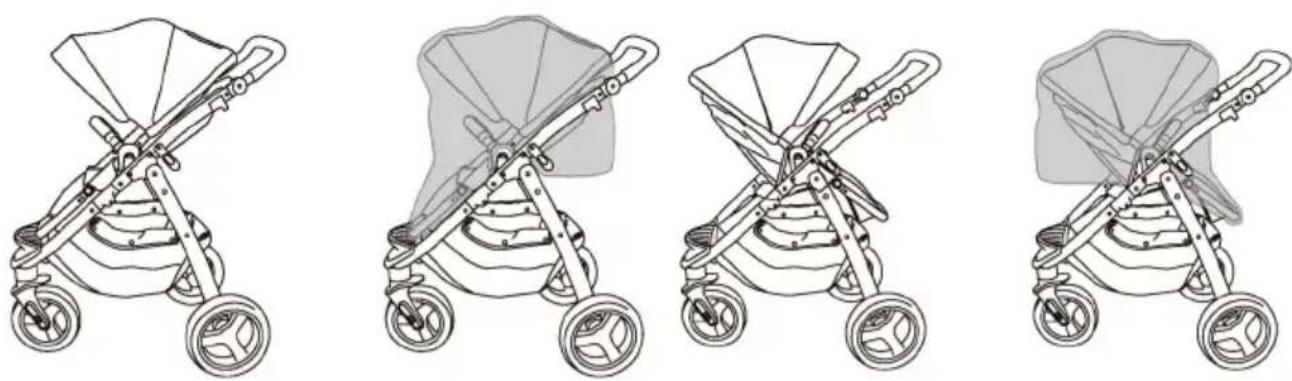
16. RAINCOVER
EN
natural_image
Line drawing of a baby stroller with two wheels and canopy (no text or symbols)
natural_image
Line drawing of a baby stroller with two wheels and a canopy cover (no text or symbols)
natural_image
Line drawing of a baby stroller with four wheels and handlebars (no text or symbols)
natural_image
Line drawing of a baby stroller with a canopy and wheels (no text or symbols)WARNING:
Be extremely careful when using the rain cover. Store away from children when not in use. To be used under adult's supervision. Do not use the rain cover if the stroller is not ed with the hood or sun canopy to prevent the risk of suocaon.
To prevent the risk of suocaon, never leave the stroller with child in it under the sun, with the rain covered to it. To prevent your child from overheang, always remove the rain cover when indoor or in warm environments.
FOLDING
17. FOLDING
REMOVAL
18. UPHOLSTERY REMOVAL
natural_image
Medical illustration showing a laparoscopic procedure with an inset close-up of the laparoscopic cable (no text or symbols present)
natural_image
Illustration of a hand adjusting a car seatbelt with a curved arrow indicating motion (no text or symbols)3
natural_image
Diagram showing a car seat being adjusted for a tool, with a magnified inset illustrating the process (no text or symbols present)EN
REMOVAL
4
natural_image
Line drawing of a backpack seat with straps and front panel (no text or symbols)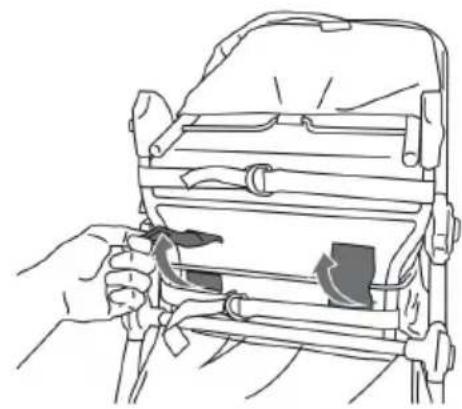
natural_image
Line drawing of a hand using a tool to adjust or install a mechanical component (no text or symbols visible)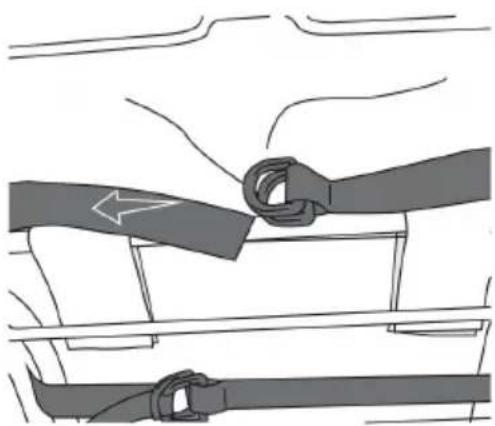
natural_image
Diagram showing two car seatbelt buckle designs with a directional arrow indicating movement (no text or symbols)5
natural_image
Line drawing of a medical procedure with syringe placement and tubing (no text or symbols)
natural_image
Line drawing of a bicycle steering wheel (no text or symbols)CARE AND MAINTENANCE
Before starng operaon, please apply some lubricant silicone free oil Vaseline onto the hinges and joints to ensure smooth funcon.
To prolong the life of your nursery product, keep it clean and do not leave in the direct sunlight for extended periods of me.
Check the wheels regularly for wear and make sure that there is no dust and sand between the axles and wheels.
Removable fabric covers and trims may be cleaned using warm water with a household soap or a mild detergent. Allow it to dry fully in the air, preferably away from direct sunlight.
Do not allow the stroller to come in contact with salt water, this causes the formaon of rust.
Check your stroller regularly. If any parts like bolts, screws, fabric pieces or stching, are found to be loose, broken or damaged, always repair or replace them.
Where damage or dysfuncon occurs, stop using the stroller and contact your dealer. Check and oil caster bolts and wheel axles periodically and replace any damaged parts immediately.
Helpful hints
If the wheels squeak, use a silicon based spray ensuring it penetrates the wheel and axles assembly.
Do not dry clean or use bleach.
Do not machine wash, tumble or spin dry, unless the care labelling on the product permits these methods.
Non removable fabric covers and trims may be cleaned using a damp sponge with soap or mild detergent. Allow it to dry completely before folding or storing it away. In some climates the covers and trims may be aected by mould and mildew. To help prevent this occurring, do not fold or store the product if it is damp or wet. Always store the product in a well venlated area.
Always check parts regularly for ghtness of screws, nuts and other fasteners, ghten if required. To maintain the safety of your nursery product, seek prompt repairs for bent, torn, worn or broken parts.
Use only parts and accessories approved by the supplier.
GUARANTEE
We grant 2 year guarantee on this product commencing on the date of purchase. Within the guarantee period we will eliminate, free of charge, any defects in the appliance resulting from faults in materials or workmanship, either by repairing or replacing the complete product.
This guarantee does not cover: damage due to improper use, normal wear or use as well as defects that have a negligible effect on the value or operation of the product.
Damages caused by overloading or wrong folding are not granted.
To obtain service within the guarantee period, hand in the complete product with your sales receipt to the store where the product has been bought.
The warranty applies only to the rst owner and is not transferable.
Top Mark B.V.
Postbus 308
8200 AH Lelystad
NETHERLANDS
service@topmark.nl
www.topmark.nl
EN 1888
text_image
Diagram illustrating human walking and deflection rules with labeled figures and directional arrowsMONTIEREN/GEBRAUCH
natural_image
Line drawing of a baby stroller with handle and blanket (no text or symbols)M8056
Autositz 0+

natural_image
Line drawing of a car seat with a strap and seatbelt (no text or symbols)natural_image
Line drawing of two mechanical bracket components (no text or symbols)INDEX
DE
text_image
Labeled diagram of a stroller with numbered parts for identificationtext_image
Technical diagram of a stroller with numbered parts labeled 13, 14, and 15natural_image
Diagram of a mechanical device with a lock mechanism, showing motion and rotation (no text or symbols)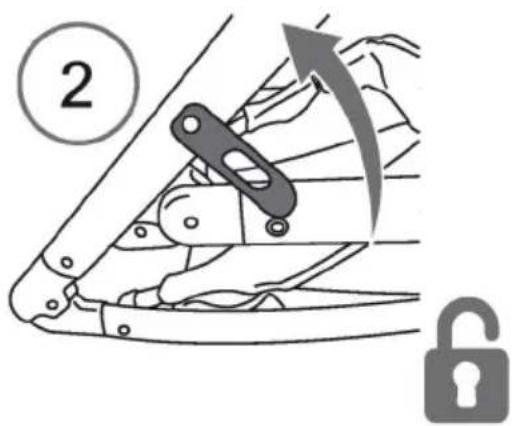
text_image
2DE

text_image
3 clickMONTIEREN/GEBRAUCH
2. RAD-BAUGRUPPE

natural_image
Technical line drawing of a mechanical device with two circular annotations (1 and 2) indicating parts of the base, no text or symbols present.DE
1
x2
text_image
C-
text_image
click2
natural_image
Line drawing of a baby stroller with four wheels and handle (no text or symbols)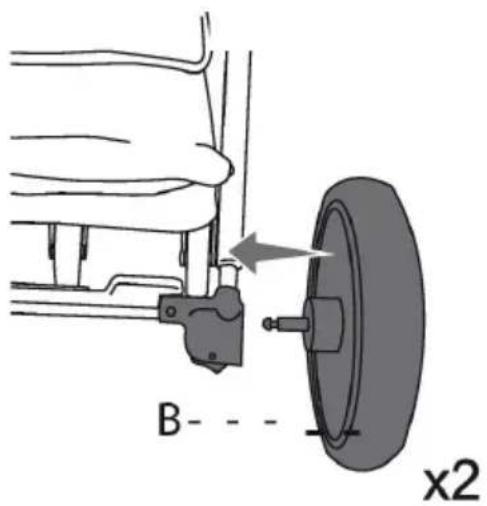
text_image
B x2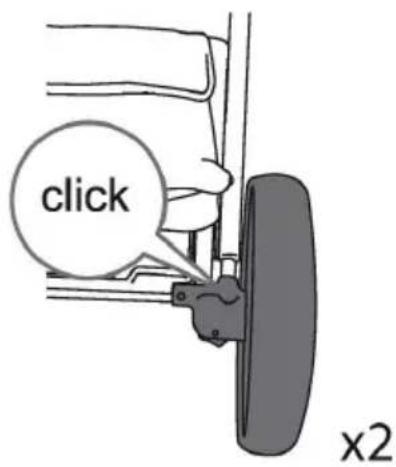
text_image
click x2MONTIEREN/GEBRAUCH
3. RAD ENTFERNEN

natural_image
Line drawing of a stroller with wheels and a checkmark indicating selection (no text or symbols)DE

natural_image
Line drawing of a stroller with two circular buttons labeled 1 and 2 (no text or symbols on the device itself)
text_image
① x2
text_image
C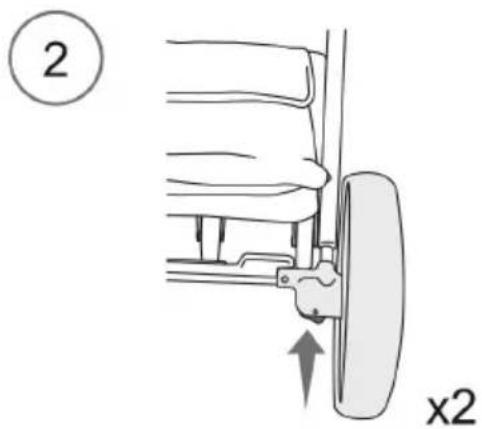
text_image
② x2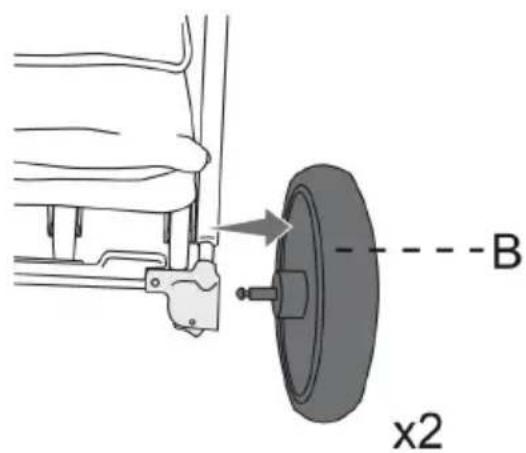
text_image
B x2MONTIEREN/GEBRAUCH
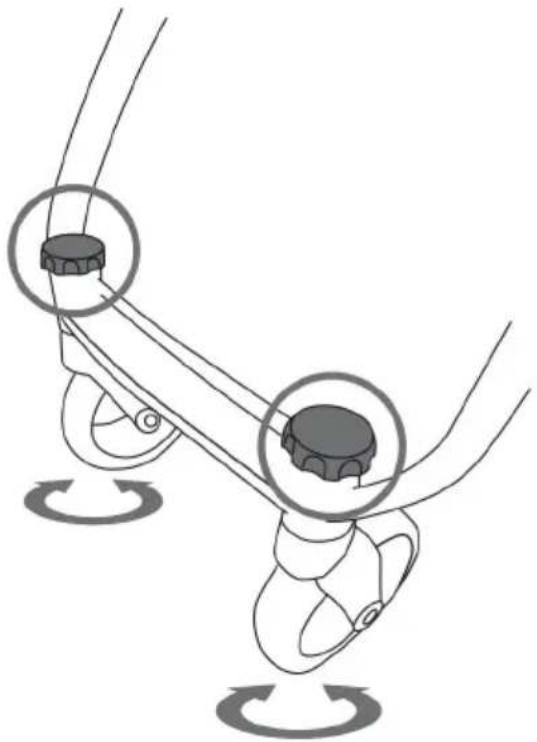
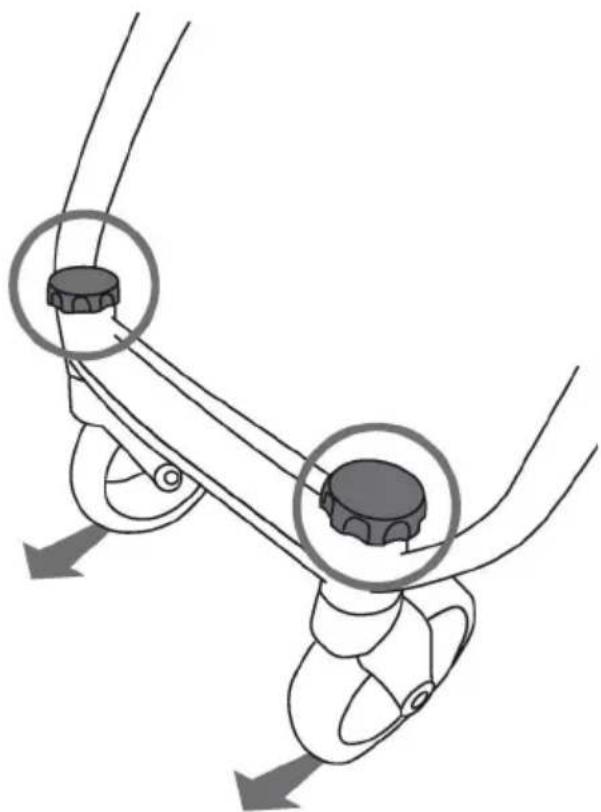
- LENKSTANGE
text_image
Diagram illustrating two steps of a baby stroller: one with grip and end, and another with hand positioning and control mechanism.natural_image
Diagram of a mechanical linkage mechanism with two circular components and rotational arrows indicating motion (no text or symbols)
natural_image
Diagram of a mechanical component with rotational arrows indicating motion (no text or symbols)Schwenken
DE

natural_image
Diagram of a mechanical linkage system with two circular components and directional arrows indicating motion (no text or symbols)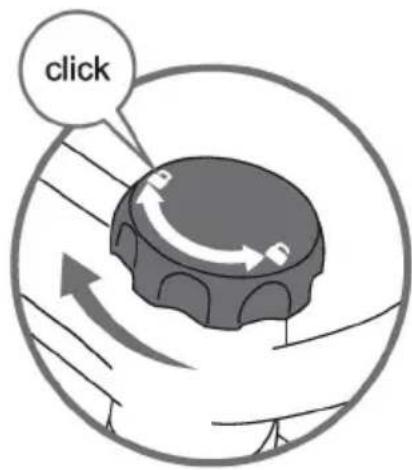
text_image
clickBefesgen
MONTIEREN/GEBRAUCH
7. MONTAGE DER ARMLEHNE
natural_image
Simple line drawing of a curved pipe or conduit with two ends and a labeled point 'E' (no text or symbols beyond the label)DE
natural_image
Medical procedure illustration showing a patient undergoing a medical procedure with tubing and a device (no text or symbols present)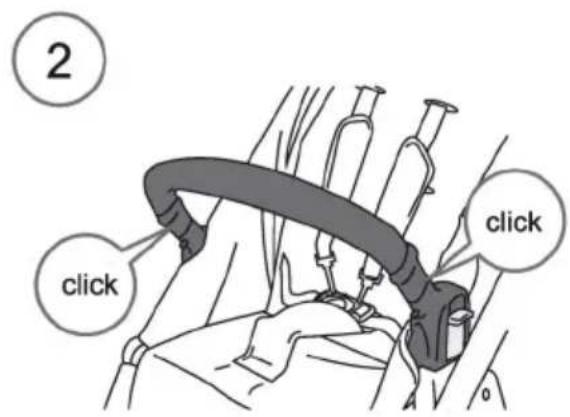
text_image
2 click click8. ARMLEHNE ABMONTIEREN
text_image
Diagram showing a mechanical assembly with numbered components and directional arrows indicating motion or force.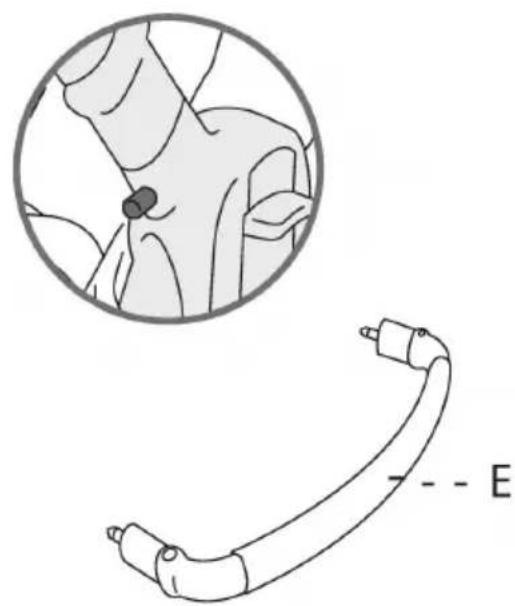
natural_image
Medical illustration showing a surgical instrument with a labeled end (E), alongside a circular anatomical view of internal organs (no text or symbols beyond label)ACHTUNG:
natural_image
Illustration of hands adjusting a mechanical component with a numbered label (1), no text or symbols present.
text_image
2 click x2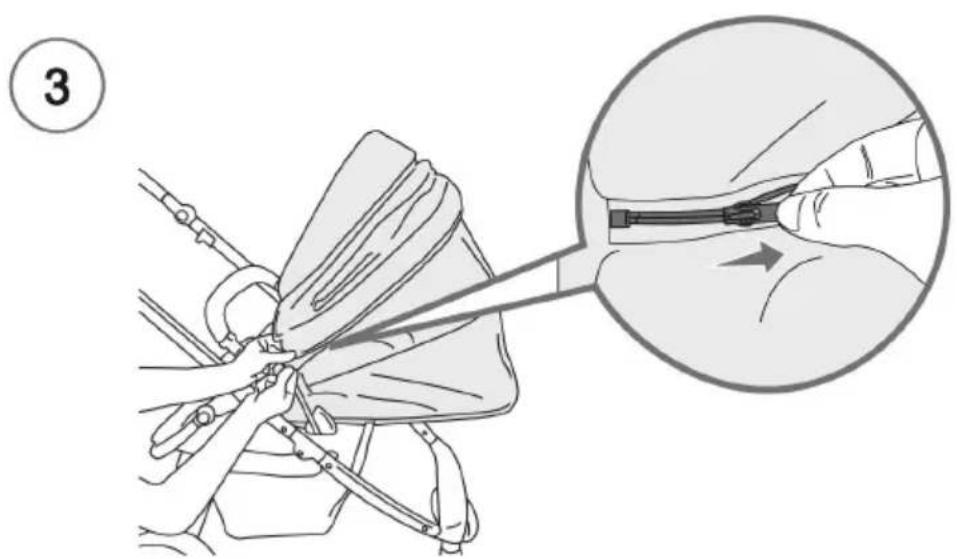
text_image
3MONTIEREN/GEBRAUCH
10. GURT
Schließen
text_image
1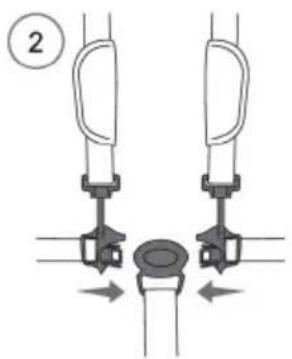
natural_image
Diagram of a mechanical device with two vertical supports and a central circular component, no text or symbols present.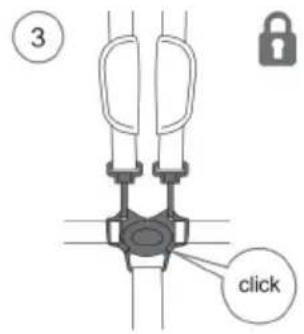
text_image
③ clickÖnen
natural_image
Pure mechanical diagram showing a lever mechanism with a pointed tool and pivot point, no text or symbols present.
text_image
②11. GURT ABMONTIEREN
natural_image
Diagram of a mechanical device with two arms and a central hub, no text or symbols present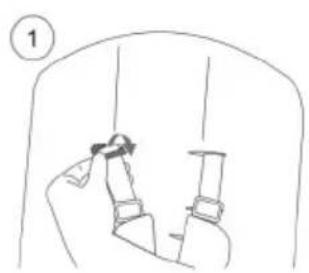
natural_image
Simple line drawing of a hand holding a small object, possibly a tool or device, inside a vehicle (no text or symbols)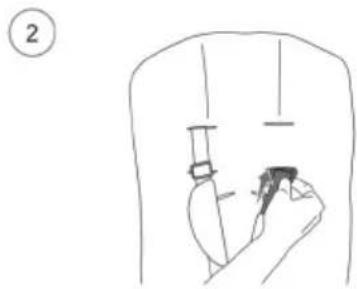
natural_image
Line drawing of a hand holding a small object, possibly a device or tool, with no visible text or symbols.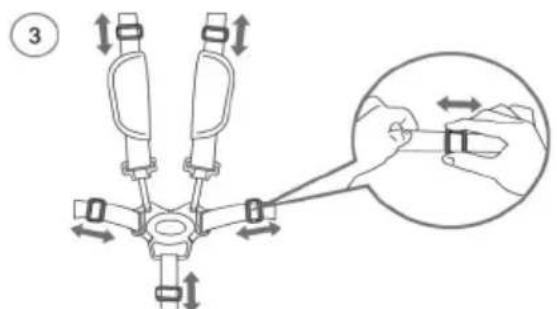
text_image
Diagram showing a mechanical assembly with labeled parts and directional arrows, including a magnified inset of hand positioning.natural_image
Mechanical assembly diagram showing a gear mechanism with a highlighted section and directional arrow (no text or symbols)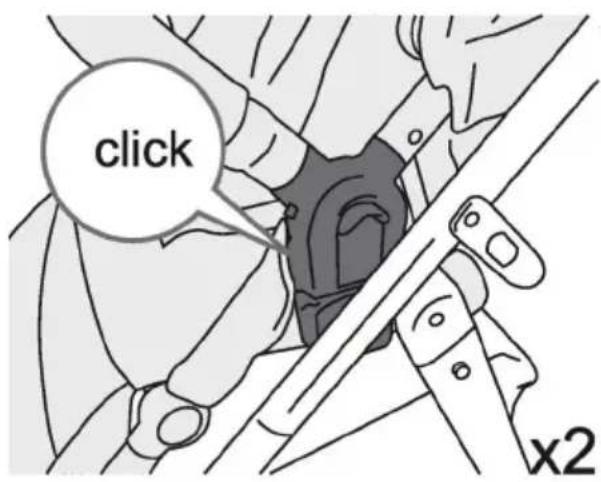
text_image
click x2
natural_image
Line drawing of a stroller with wheels and seat, marked with number 4 (no text or symbols on the diagram itself)MONTIEREN/GEBRAUCH
13. MONTAGE DES UMKEHRBARER SITZES HINTENWÄRTS GERICHTET

DE
text_image
③ x2
text_image
4 click x2
natural_image
Line drawing of a stroller with wheels and handle, no text or symbols presentMONTIEREN/GEBRAUCH
natural_image
Illustration of a hand holding a mechanical component with a numbered circle (1) in the corner, no text or symbols present.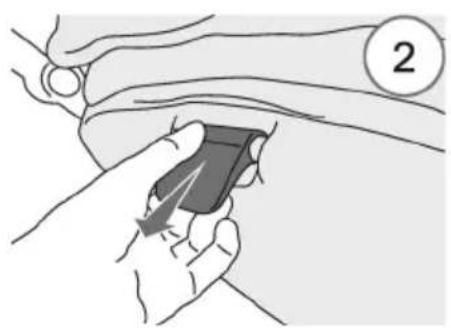
natural_image
Illustration of a hand holding a medical device with a numbered circle (2) and arrow indicating motion or force, no text or symbols present.
natural_image
Illustration of a mechanical device with a numbered label '3' indicating rotation or sequence (no text or symbols on the device itself)natural_image
Mechanical assembly diagram showing a valve inserted into a housing (no text or symbols visible)
text_image
Diagram illustrating a mechanical device with labeled parts and an arrow indicating assembly or transformation.MONTIEREN/GEBRAUCH
16. REGENSCHUTZ

DE
ACHTUNG:
text_image
Diagram illustrating a mechanical or fluidic device with labeled parts and directional arrows, including a magnified inset showing internal flow or movement.
natural_image
Illustration of a hand using a belt switch to adjust the seat area (no text or symbols present)3

natural_image
Diagram showing a car interior with a hand holding a tool, and a close-up of the handle (no text or symbols present)ENTFERNUNG
4

natural_image
Line drawing of a backpack seatbelt with straps and front panel (no text or symbols)
natural_image
Line drawing of a hand using a tool to adjust or install a mechanical component (no text or symbols visible)
natural_image
Diagram showing two car seatbelt buckle clips in a vehicle (no text or symbols)5

natural_image
Line drawing of a medical or surgical device with attached tubing and internal components (no text or symbols)
natural_image
Line drawing of a bicycle steering wheel (no text or symbols)PFLEGE
text_image
Image displaying five distinct symbols: a hand holding a magnifying glass, an asterisk, an crossed-out circle, and a square with an internal cross.GARANTIE
text_image
Diagram illustrating human walking and movement with labeled actions: one to sit down, another to walk away with a diagonal arrowMONTAGE
text_image
A B x2 C x2 D E FA. Châssis
Colour Pack
B. Roues arrière
E. Accoudoirs
C. Roues avant
F. Capote
D. Siège
natural_image
Line drawing of a baby stroller with handle and seat (no text or symbols)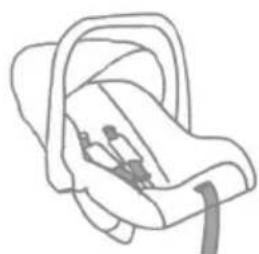
natural_image
Line drawing of a car seat with no text or symbols
natural_image
Line drawing of two identical mechanical components with mounting holes and curved brackets (no text or symbols)INDEX
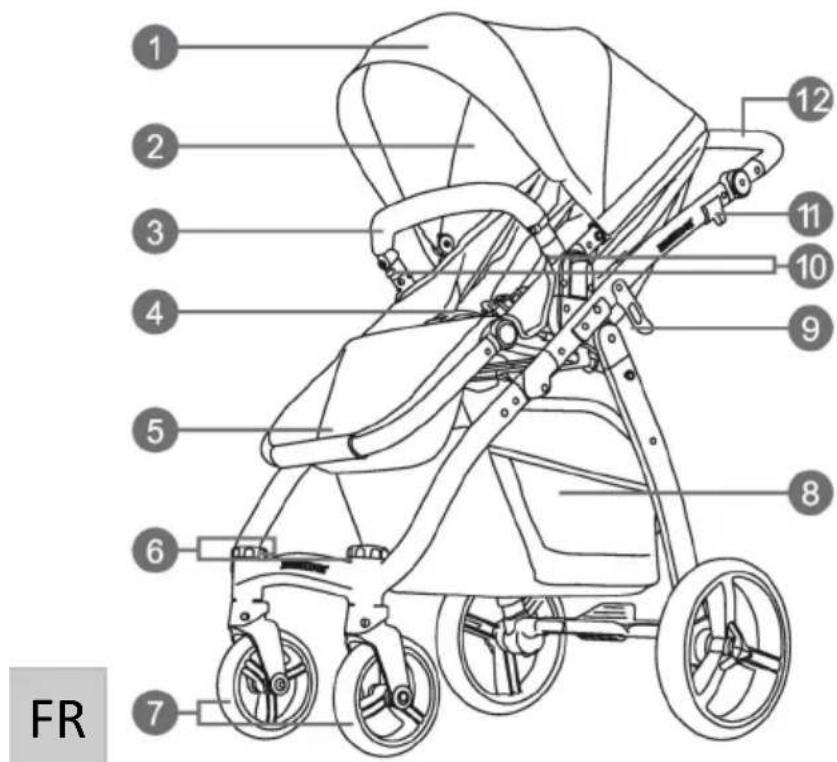
text_image
1 2 3 4 5 6 7 8 9 10 11 12 FRtext_image
Diagram of a stroller with numbered parts labeled 13, 14, and 15 pointing to different body parts.natural_image
Diagram of a mechanical device with a lock mechanism, showing motion and rotation (no text or symbols)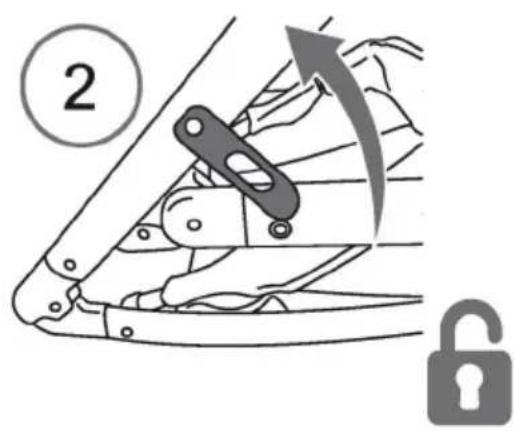
text_image
2FR

text_image
3 clickMONTAGE/UTILISATION
2. ASSEMBLAGE DE ROUE

text_image
1 2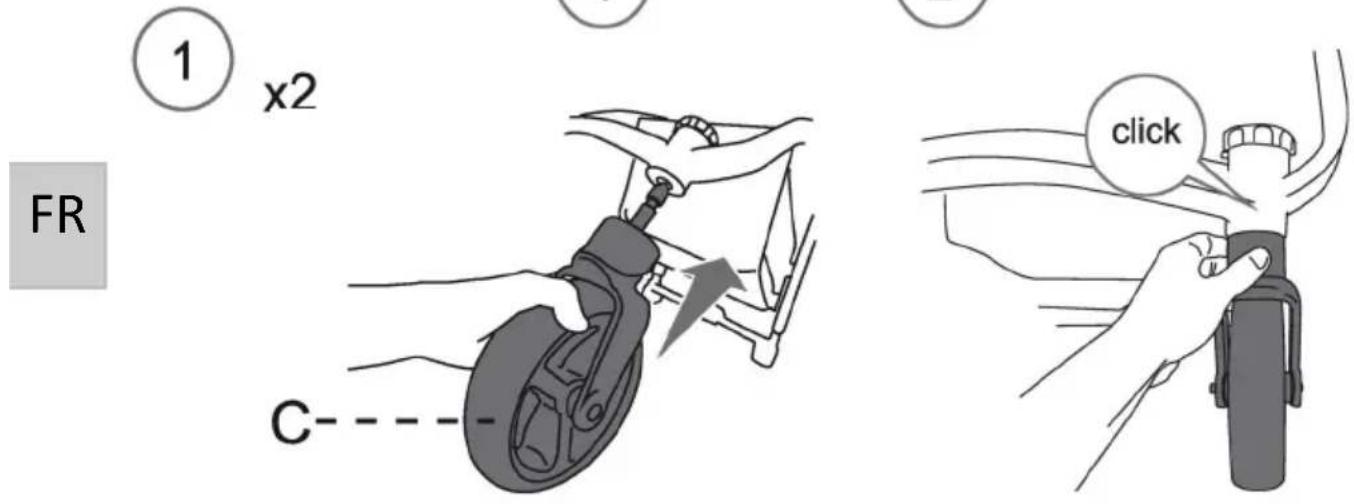
text_image
FR ① x2 C click
text_image
② B-- click x2 x2MONTAGE/UTILISATION
3. DÉMONTAGE DE ROUE
natural_image
Line drawing of a stroller with wheels and a handle, no text or symbols present
natural_image
Line drawing of a stroller with two circular buttons labeled 1 and 2 (no text or symbols on the device itself)
text_image
① x2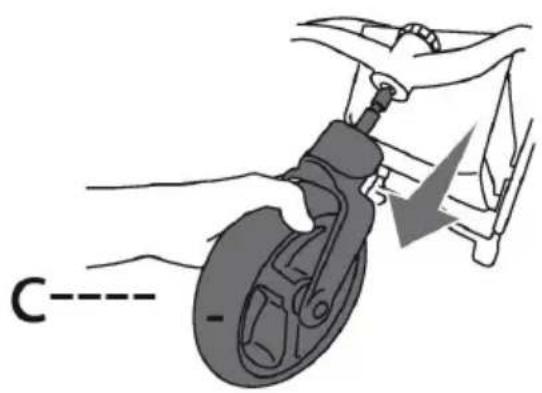
text_image
C
text_image
② x2
text_image
B x2MONTAGE/UTILISATION
- GUIDON
text_image
Diagram illustrating two steps of a baby stroller: one with circular components and the other with curved arrows labeled 1 and 2.FR
- FREIN DE STATIONNEMENT
text_image
STOP OK OKnatural_image
Diagram of a mechanical linkage system with two circular components and rotational arrows indicating motion (no text or symbols)Pivot
natural_image
Diagram of a mechanical component with curved arrows indicating motion, enclosed in a circular frame (no text or symbols)FR
natural_image
Diagram of a mechanical linkage system with two circular components and directional arrows indicating motion (no text or symbols)Fixer
text_image
clickMONTAGE/UTILISATION
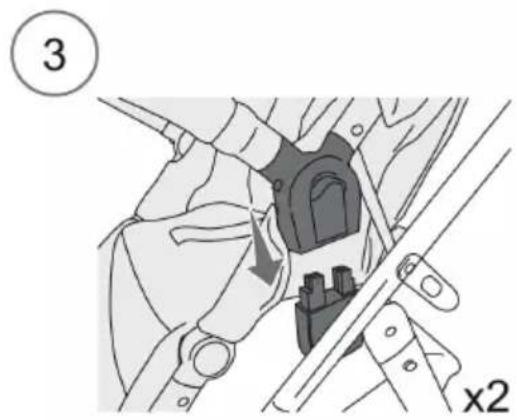
7. MONTAGE ACCOUDOIRS

text_image
E--
natural_image
Medical illustration showing a surgical procedure on a patient's arm with tubing and instruments (no text or labels)
text_image
2 click click8. DÉMONTAGE ACCOUDOIRS
text_image
Diagram showing a mechanical or fluid system with numbered components, likely illustrating a valve or pipe connection.
natural_image
Medical illustration showing a catheter attached to a device with a magnified view of internal anatomy (no text or labels)AVERTISSEMENT:
natural_image
Illustration of a hand adjusting a small object with a numbered label (1), no text or symbols present.
text_image
2 click x2
text_image
③FR
MONTAGE/UTILISATION
10. HARNAIS
Pour fermer
text_image
①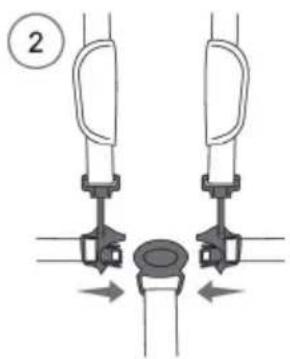
natural_image
Diagram of a mechanical or electrical component with two vertical arms and a central circular component, no text or symbols present.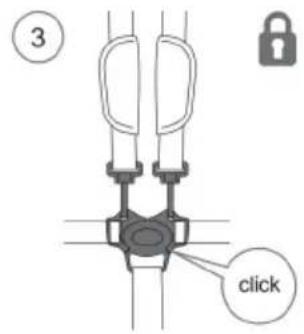
text_image
③ clickPour ouvrir
natural_image
Pure mechanical diagram showing a lever mechanism with a pointed tool, no text or symbols present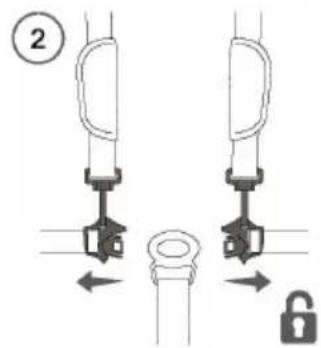
text_image
②11. MONTAGE HARNAIS
natural_image
Diagram of a car seat with four arms and a central seat, showing directional arrows (no text or labels)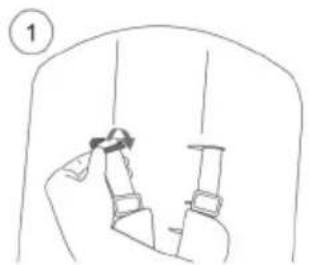
natural_image
Simple line drawing of a person adjusting a small object inside a vehicle (no text or symbols)
natural_image
Line drawing of a hand holding a tool, no text or symbols present
text_image
Diagram showing a mechanical assembly with directional arrows and a magnified view of the component being inserted.AVERTISSEMENT: UTILISEZ TOUJOURS LA CEINTURE. NE JAMAIS UTILISER L'ENTREJAMBE SANS LA CEINTURE DE MAINTIEN.
text_image
Technical diagram showing two stages of a stroller with labeled parts and directional arrows indicating movement or assembly.
natural_image
Mechanical assembly diagram showing a gear shift mechanism with no visible text or symbols
text_image
click x2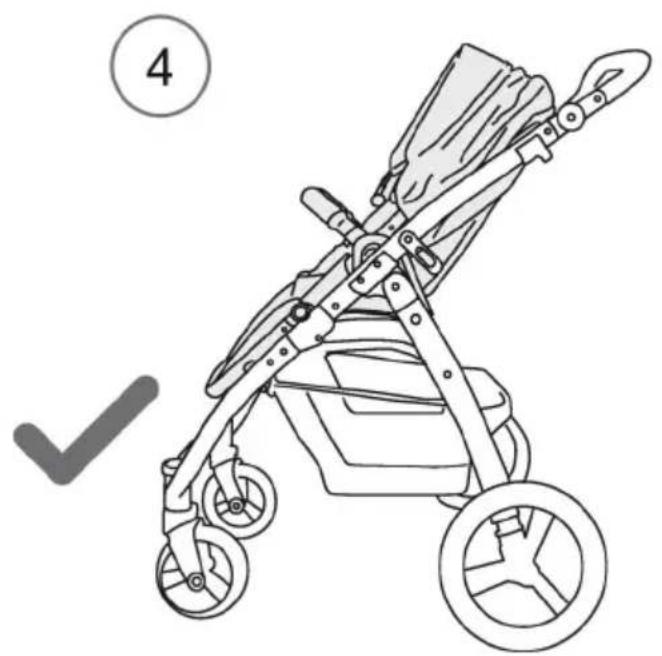
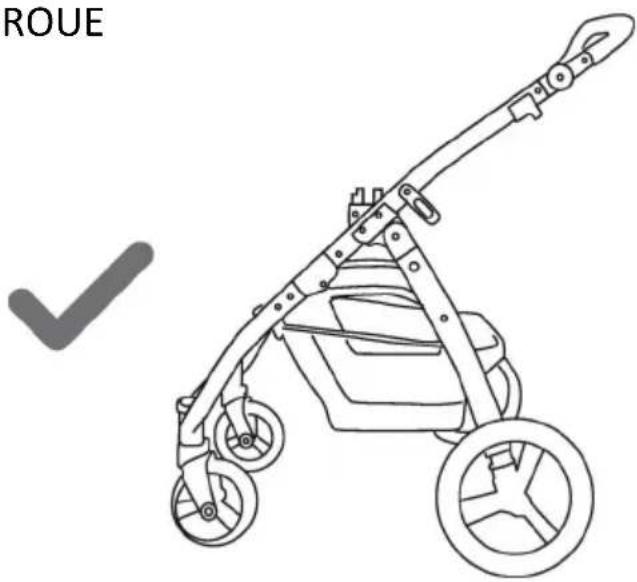
natural_image
Line drawing of a stroller with two wheels and a handle, marked with a checkmark (no text or symbols on the diagram itself)MONTAGE/UTILISATION
13. MONTAGE DU SIÈGE RÉVERSIBLE AU FACE PARENTS
FR
text_image
③ x2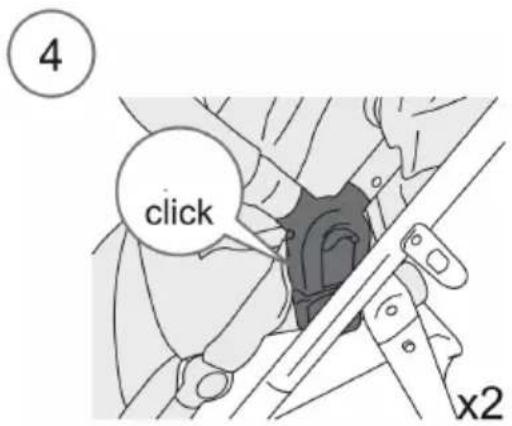
text_image
4 click x2
natural_image
Line drawing of a stroller with wheels and handle, no text or symbols presentMONTAGE/UTILISATION
14. AJUSTEMENT DU SIÈGE
natural_image
Illustration of a hand holding a device with a numbered circle marker (no text or symbols on the device itself)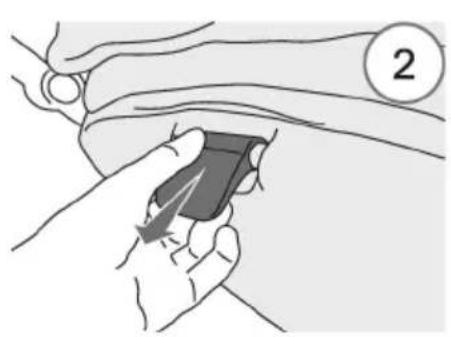
natural_image
Illustration of a hand holding a small object with an arrow, next to a circular number 2 (no text or symbols on the object itself)
natural_image
Illustration of a mechanical device with a numbered label '3' indicating rotation or sequence (no text or symbols on the device itself)15. ENLEVER SIÈGE

text_image
① x2
natural_image
Mechanical assembly diagram showing a hand holding a component with a valve and lever mechanism (no text or labels)
text_image
Diagram illustrating a stroller with a handle and a handbag, labeled with step 3MONTAGE/UTILISATION
16. L'HABILLAGE DE PLUIE
FR
AVERTISSEMENT
natural_image
Diagram showing a mechanical device with a close-up inset illustrating the internal structure (no text or symbols present)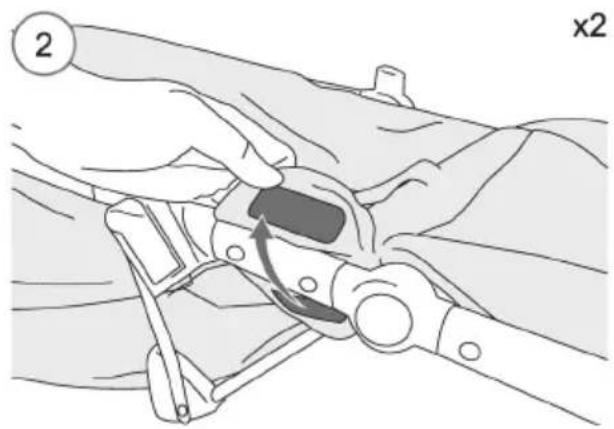
natural_image
Illustration of a mechanical device with a belt switch and lever mechanism (no text or symbols)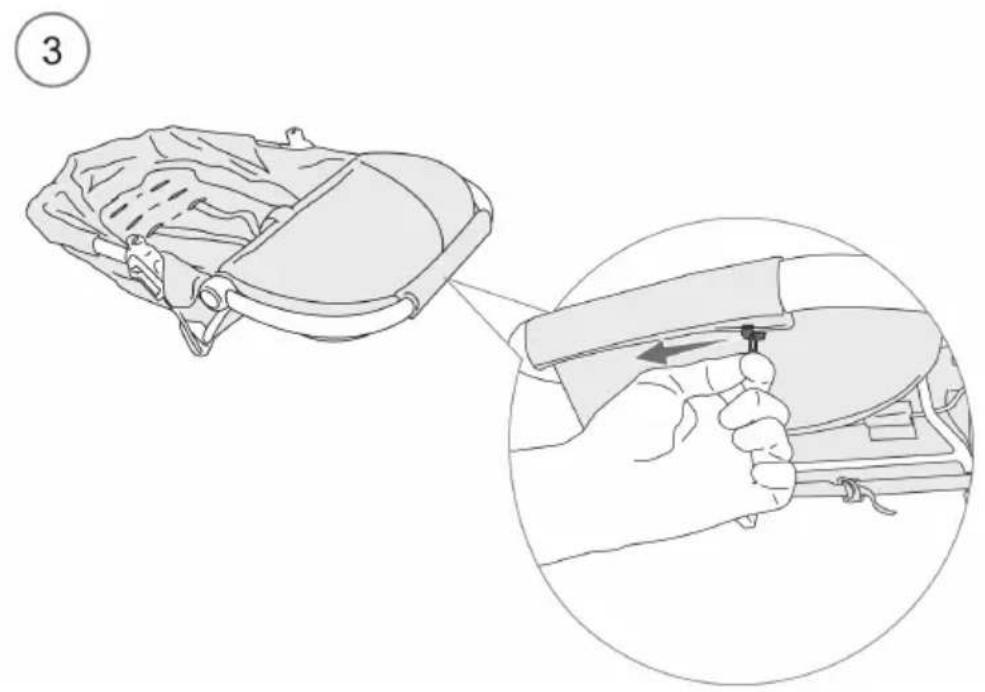
text_image
Diagram showing a hand holding a tool inside a vehicle's seat, with a magnified inset highlighting the component's adjustment.FR
ENLÈVEMENT
4

natural_image
Line drawing of a backpack seat with straps and front panel (no text or symbols)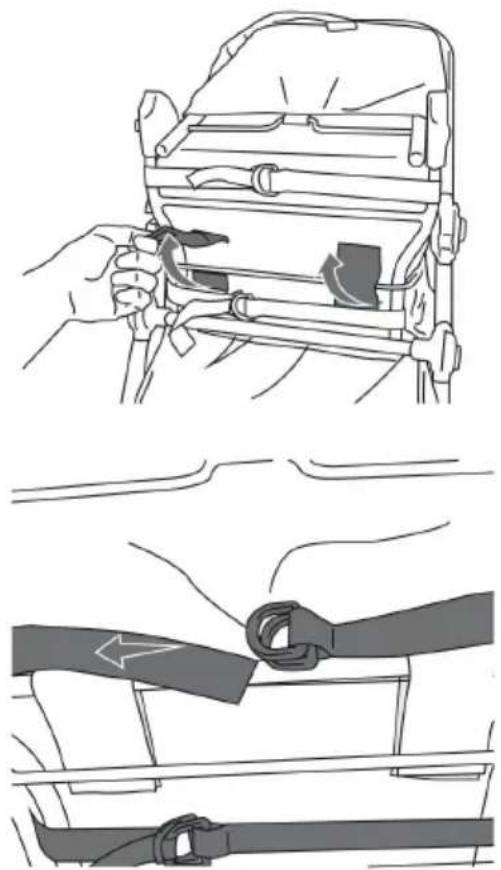
natural_image
Technical illustration showing a car interior with hand positioning and belt buckle assembly (no text or symbols)FR
5

natural_image
Line drawing of a medical procedure with syringe placement and tubing (no text or symbols)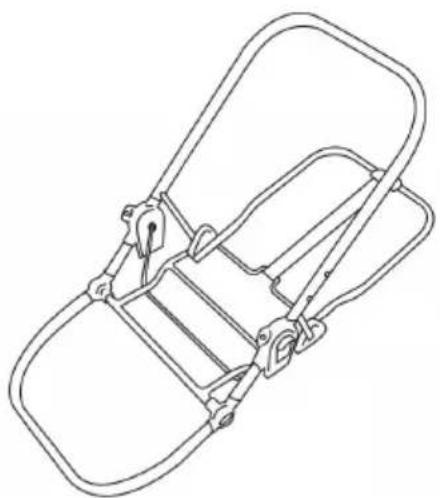
natural_image
Line drawing of a bicycle steering wheel (no text or symbols)SOIN ET ENTRETIEN
text_image
Diagram showing two scenarios of human walking and deflection, with arrows indicating movement direction.INSTALACION
natural_image
Line drawing of a baby stroller with handle and seat (no text or symbols)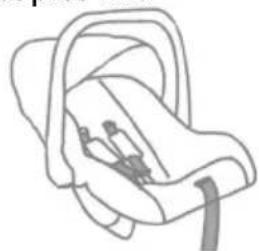
natural_image
Line drawing of a car seat with straps and handle (no text or symbols)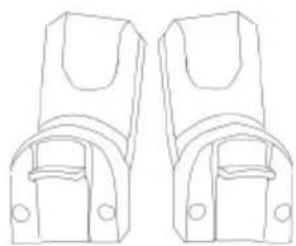
natural_image
Line drawing of two identical mechanical clamps or brackets (no text or symbols)INDEX
text_image
Labeled diagram of a stroller with numbered parts for identificationtext_image
Diagram of a stroller with numbered parts labeled 13, 14, and 15 pointing to different body parts.natural_image
Diagram of a mechanical device with a lock mechanism, showing motion lines and a curved arrow (no text or symbols)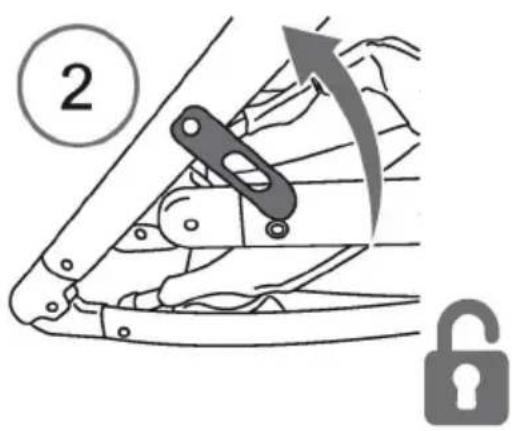
text_image
2ES

text_image
3 clickINSTALACION/USO
2. MONTAJE DE RUEDA
natural_image
Technical line drawing of a mechanical device with two circular annotations (1 and 2) indicating parts of the base, no text or symbols present.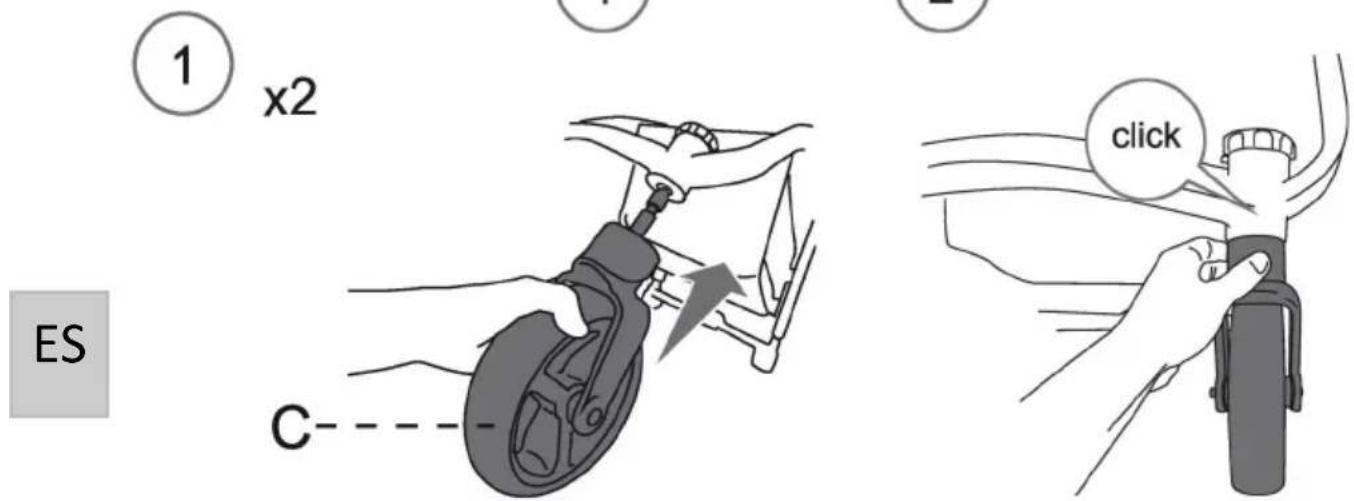
text_image
① x2 C click ES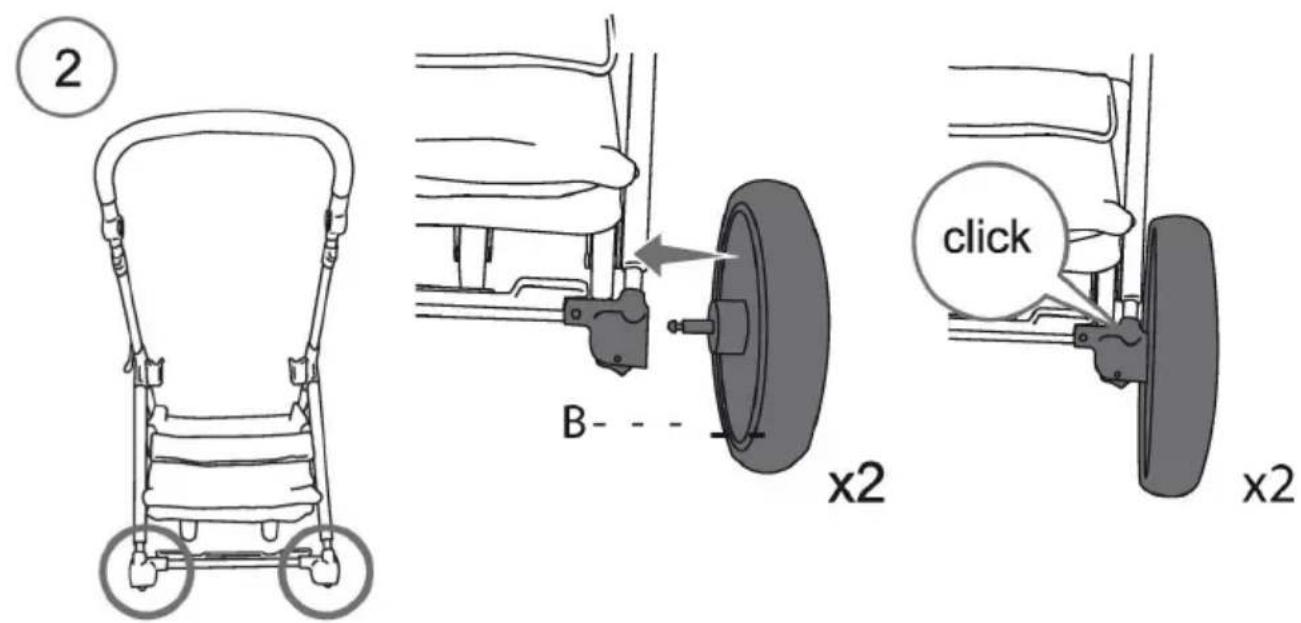
text_image
② B-- click x2 x2INSTALACION/USO
3. DESMONTAJE DE RUEDA

natural_image
Line drawing of a stroller with wheels and a checkmark indicator (no text or symbols on the diagram itself)
natural_image
Line drawing of a stroller with two circular buttons labeled 1 and 2 (no text or symbols on the device itself)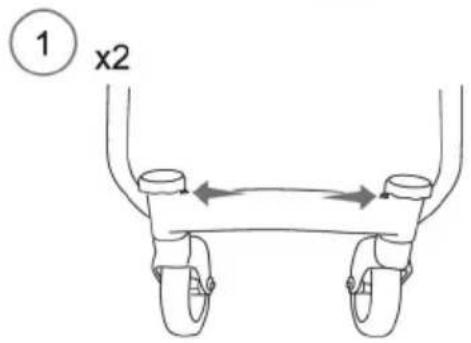
text_image
① x2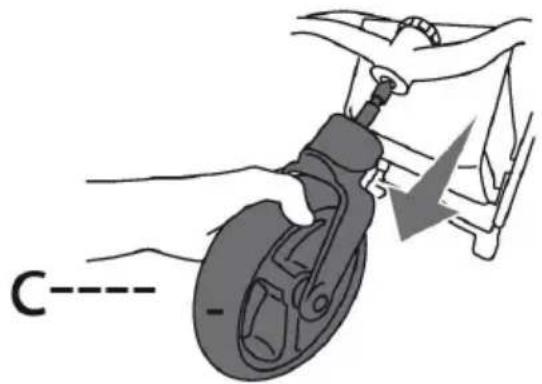
text_image
C---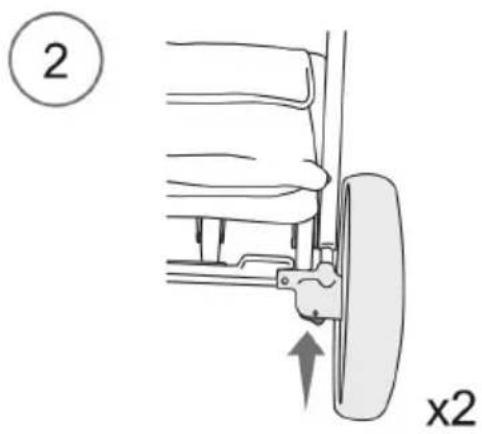
text_image
② x2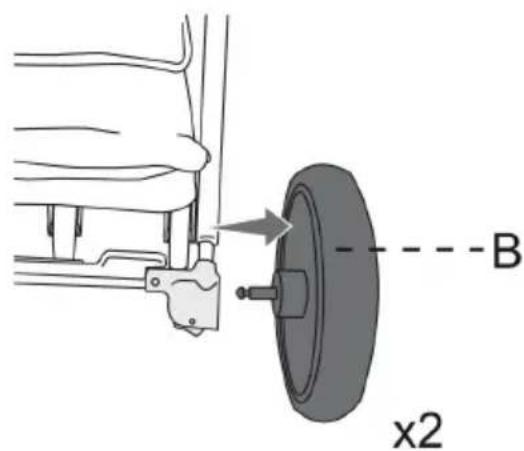
text_image
B x2INSTALACION/USO
- APOYABRAZOS

text_image
Diagram illustrating two steps of a baby stroller: one with hand placement and one with finger placement, labeled with numbered instructions.- FRENO
ES
text_image
STOP OK OKINSTALACION/USO
natural_image
Diagram of a mechanical linkage mechanism with two circular components and rotational arrows indicating motion (no text or symbols)Rotar
natural_image
Diagram of a mechanical component with rotational arrows indicating motion, enclosed in a circular frame (no text or symbols)ES

natural_image
Diagram of a mechanical linkage system with two circular components and directional arrows indicating motion (no text or symbols)Bloquear

text_image
clickINSTALACION/USO
natural_image
Medical illustration showing a surgical procedure on a patient's arm with tubing and a device (no text or symbols)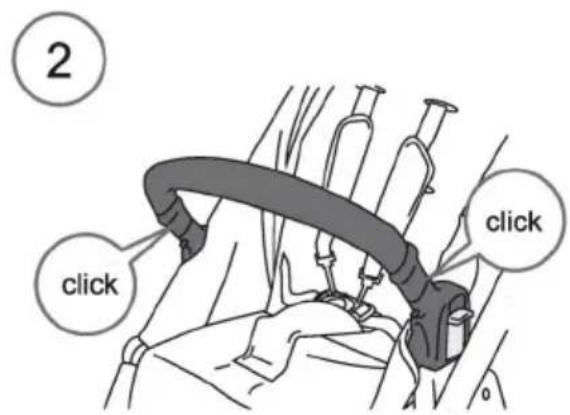
text_image
2 click clickES
text_image
Diagram showing a mechanical or fluid system with numbered components and directional arrows indicating flow or movement.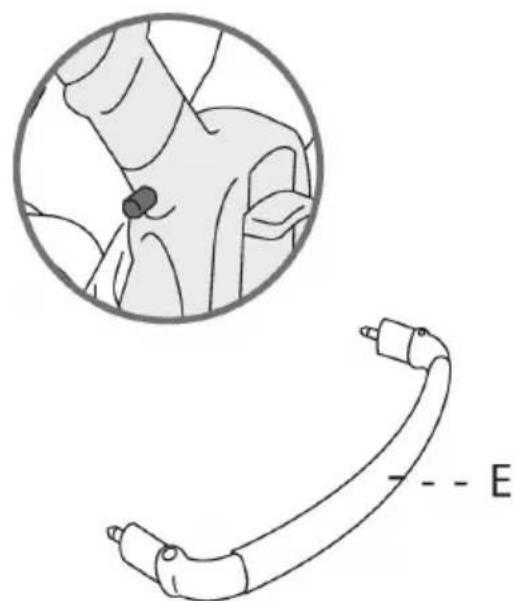
natural_image
Medical illustration showing a cross-sectional view of a joint with a labeled end (E), no text or symbols present.ADVERTENCIA:
natural_image
Illustration of a hand adjusting a small object with a tool, no text or symbols present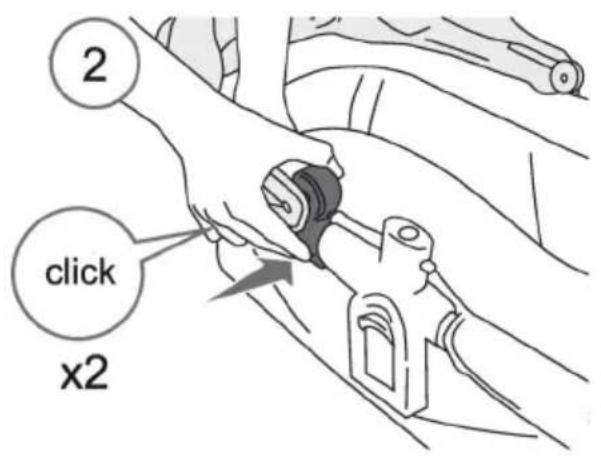
text_image
2 click x2
text_image
③INSTALACION/USO
10. LOS CINTURONES
Para cerrar

text_image
①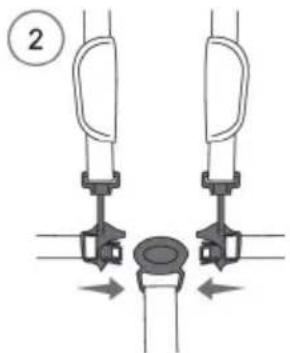
natural_image
Diagram of a mechanical device with two vertical supports and a central circular component, no text or symbols present.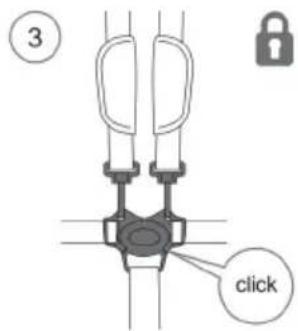
text_image
③ clickPara abrir
natural_image
Pure mechanical diagram showing a lever mechanism with a pointed tool and shaft (no text or symbols)
text_image
②11. MONTAJE LOS CINTURONES
natural_image
Diagram of a car seat with four vertical arms and a central seat, showing no text or symbols.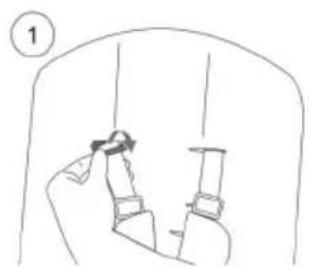
natural_image
Simple line drawing of a person adjusting a device inside a vehicle (no text or symbols)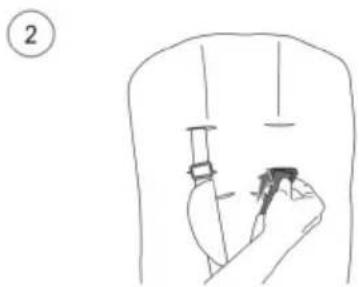
natural_image
Line drawing of a hand holding a small object, possibly a tool or device, inside a container (no text or symbols)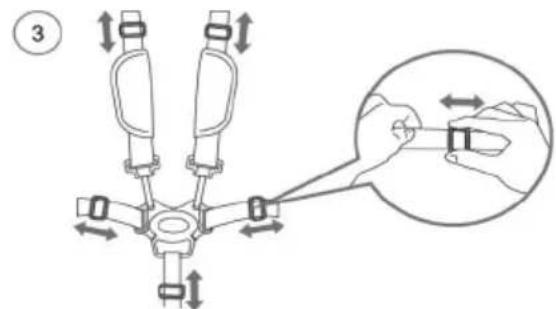
text_image
Diagram showing a mechanical assembly with directional arrows and a magnified inset highlighting a specific component.text_image
Technical diagram showing two stages of a stroller with labeled parts and directional arrows indicating movement or assembly.
natural_image
Mechanical assembly diagram showing a gear shift mechanism with no visible text or symbols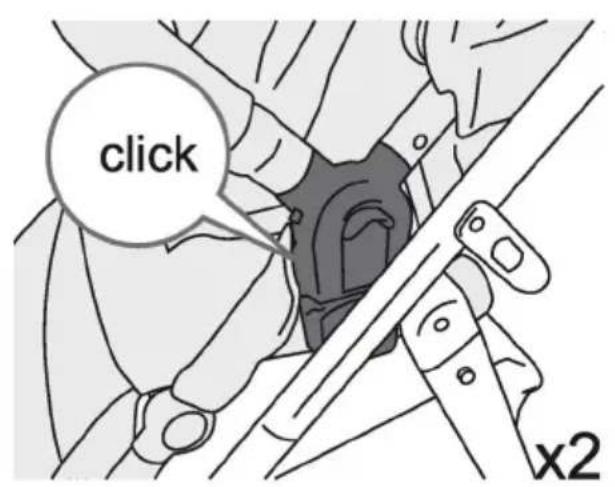
text_image
click x2
natural_image
Line drawing of a stroller with wheels and seat, no text or symbols presentES
INSTALACION/USO
13. MONTAJE DEL ASIENTO REVERSIBLE A LOS PADRES
text_image
Diagram illustrating the step-by-step assembly of a stroller, showing how to move from a flat blade to a multi-stage cart.ES
text_image
③ x2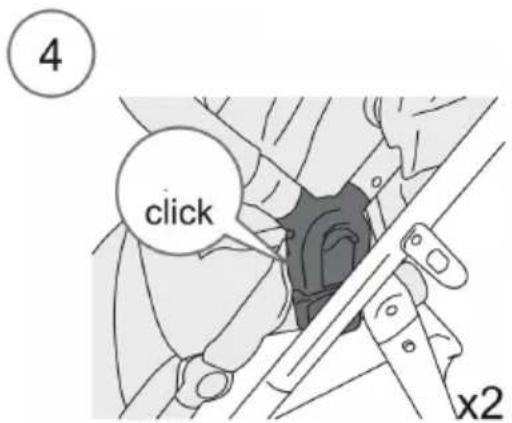
text_image
4 click x2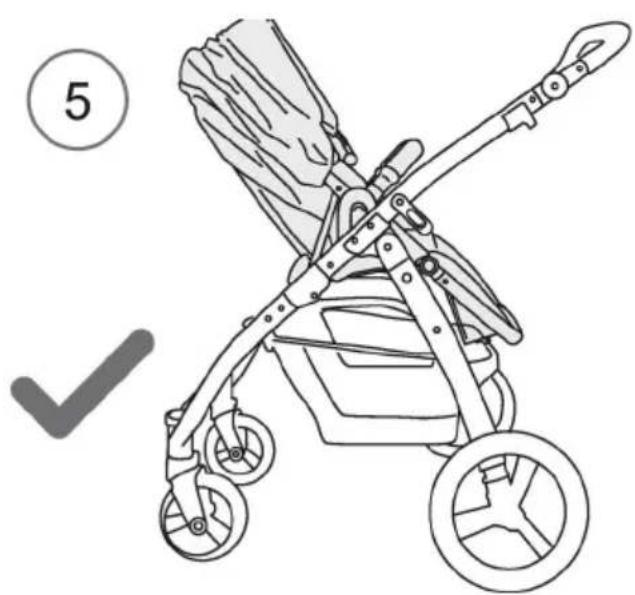
natural_image
Line drawing of a stroller with wheels and handle, no text or symbols presentINSTALACION/USO
14. PARA CAMBIAR LA POSITION DEL ASIENTO
natural_image
Illustration of a hand holding a device with a numbered circle marker (no text or symbols on the device itself)
natural_image
Illustration of a hand holding a medical device with a numbered circle (2) and arrow indicating motion or force, no text or symbols present.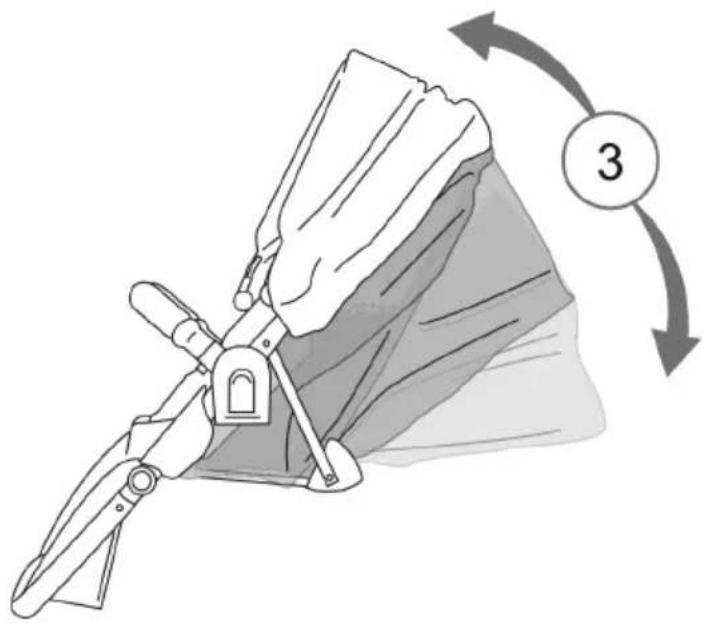
natural_image
Illustration of a mechanical device with a numbered label '3' indicating rotation or sequence (no text or symbols on the device itself)15. PARA LIBERAR EL ASIENTO

text_image
① x2
natural_image
Mechanical assembly diagram showing a lever mechanism with no visible text or symbols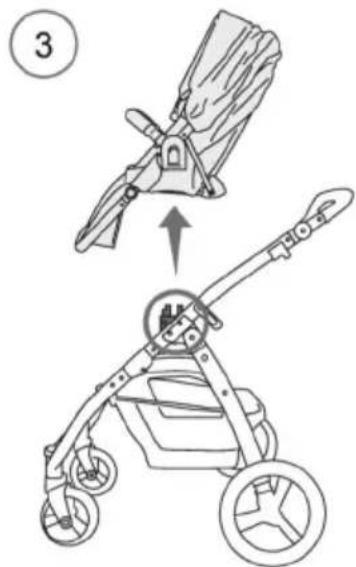
text_image
Diagram illustrating a mechanical assembly process with labeled parts and directional arrowsINSTALACION/USO
15. LA CUBIERTA PARA LA LLUVIA
ES
ADVERTENCIA:
natural_image
Technical line drawing of a vehicle chassis frame with wheel and suspension components (no text or symbols)DESMONTAJE
text_image
Diagram illustrating a mechanical or fluidic device with labeled parts and directional arrows, including a magnified inset showing internal flow or movement.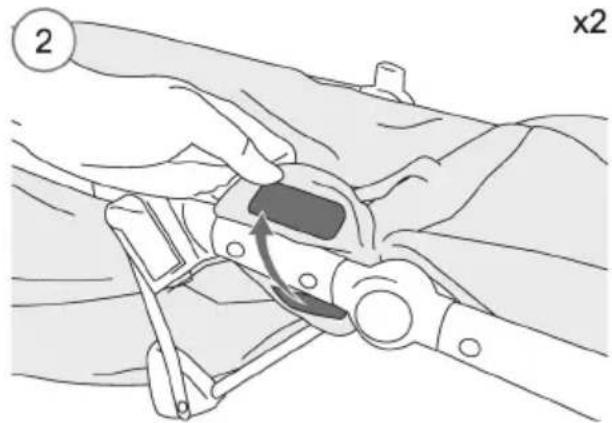
natural_image
Illustration of a hand using a belt switch to adjust the seat area (no text or symbols present)
text_image
Diagram showing a hand holding a tool inside a vehicle's seat, with an inset close-up highlighting the component.ES
DESMONTAJE
4

natural_image
Line drawing of a backpack seatbelt with straps and front panel (no text or symbols)
natural_image
Technical illustration showing a hand adjusting a seatbelt mechanism inside a vehicle (no text or symbols present)ES
5
natural_image
Line drawing of a medical procedure with syringe placement and tubing (no text or symbols)