Oneliner 100 - Receiver HQ Power - Free user manual and instructions
Find the device manual for free Oneliner 100 HQ Power in PDF.

| Product type | Professional stereo amplifier |
| Brand | HQ Power |
| Model | Oneliner 100 |
| Power supply | 230 VAC / 50 Hz or 115 VAC / 60 Hz (selectable) |
| Output power (stereo 8 Ω) | 70 W RMS |
| Output power (stereo 4 Ω) | 100 W RMS |
| Frequency response | 25 Hz ~ 25 kHz (±1 dB ~ ±3 dB) |
| Signal-to-noise ratio | > 100 dB |
| Input sensitivity | 0.77 V |
| Input impedance | 10 kΩ unbalanced |
| Input connectors | 2 x 6.35 mm jack |
| Output connectors | 2 x Speakon® (stereo) |
| Protection circuits | Short circuit, DC current, overload, limiter, silent power on/off |
| LED indicators | Power (blue), Signal (green), Limit (red), Protect (red) |
| Dimensions (W x D x H) | 483 x 320 x 45 mm |
| Weight | 8 kg |
| Rack mounting | 19 inches, 1U |
| Cleaning and maintenance | Wipe with a non-linting damp cloth; avoid alcohol and solvents. No user-serviceable parts. |
| Safety | Protection class I (mandatory grounding). Use only indoors. Ambient temperature: -5 °C to +45 °C, humidity < 50 %. |
| Spare parts and repairability | No user-serviceable parts. Contact the dealer for any spare parts. |
Frequently Asked Questions - Oneliner 100 HQ Power
User questions about Oneliner 100 HQ Power
0 question about this device. Answer the ones you know or ask your own.
Ask a new question about this device
Download the instructions for your Receiver in PDF format for free! Find your manual Oneliner 100 - HQ Power and take your electronic device back in hand. On this page are published all the documents necessary for the use of your device. Oneliner 100 by HQ Power.
USER MANUAL Oneliner 100 HQ Power
To all residents of the European Union
Important environmental information about this product

This symbol on the device or the package indicates that disposal of the device after its lifecycle could harm the environment. Do not dispose of the unit (or batteries) as unsorted municipal waste; it should be taken to a specialized company for recycling. This device should be returned to your distributor or to a k cal recycling service. Respect the local environmental rules.
If in doubt, contact your local waste disposal authorities.
Thank you for buying the VPA2100U1 power amplifier. You have bought a single-unit professional stereo amplifier with a superior performance. Please read the manual thoroughly before bringing this device into service. If the device was damaged in transit, don't install or use it and contact your dealer.
For more info concerning this product and the latest version of this manual, please visit our website www.hqpower.eu.
2. Safet y Instructions
| Be very careful during the installation: touching live wires can cause life-threatening electroshocks. | |
| Indoor use only. Keep this device away from rain, moisture, splashing and dripping liquids. Never put objects filled with liquid on top of or close to the device. | |
| Always disconnect mains power when device not in use or when servicing or maintenance activities are performed. Handle the power cord by the plug only. | |
| Keep this device away from children and unauthorized users. | |
| There are no user-serviceable parts inside the device. Refer to an authorized dealer for service and/or spare parts. |
- Damage caused by disregard of certain guidelines in this manual is not covered by the warranty and the dealer will not accept responsibility for any ensuing defects or problems.
- A qualified technician should install and service this device.
- Do not switch the device on immediately after it has been exposed to changes in temperature. Protect the device against damage by leaving it switched off until it has reached room temperature.
- This device falls under protection class I. It is therefore essential that the device be earthed. Have a qualified person carry out the electric connection.
- Make sure that the available voltage does not exceed the voltage stated in the specifications of this manual.
- Do not crimp the power cord and protect it against damage. Have an authorised dealer replace it if necessary.
3. Safet y labels
Respect the prescriptions on the safety labels!
| Read the manual attentively before bringing the device into service. Only qualified personnel should use this device. Have a qualified technician service the device and connect it to the mains. Beware of the high voltage at the screw connection. Turn off the amplifier before connecting the device. Loud noise hazard. Protect your ears. |
4. General Guidelines
Refer to the Velleman® Service and Quality Warranty on the last pages of this manual.

Keep this device away from dust and extreme heat. Make sure the ventilation openings are clear at all times. For sufficient air circulation, leave at least 1" (± 2.5 cm) in front of the openings.
Protect this device from shocks and abuse. Avoid brute force when operating the device.
- Familiarise yourself with the functions of the device before actually using it. Do not allow operation by unqualified people. Any damage that may occur will most probably be due to unprofessional use of the device.
- All modifications of the device are forbidden for safety reasons. Damage caused by user modifications to the device is not covered by the warranty.
- Only use the device for its intended purpose. All other uses may lead to short circuits, burns, electroshocks, lamp explosion, crash, etc. Using the device in an unauthorised way will void the warranty.
- Damage caused by disregard of certain guidelines in this manual is not covered by the warranty and the dealer will not accept responsibility for any ensuing defects or problems.
- A qualified technician should install and service this device.
- Do not switch the device on immediately after it has been exposed to changes in temperature. Protect the device against damage by leaving it switched off until it has reached room temperature.
- This device is a professional audio amplifier for amplifying audio signals. This product is allowed to be operated with an alternating current of 230VAC / 50Hz or 115VAC / 60Hz and was designed for indoor use only.
- Important remark: the operation of an amplification system in public or industrial areas is subject to specific safety instructions. Contact the proper authorities for more information.
- Choose an installation spot where the device will not be exposed to extreme heat, moisture or dust. Don't leave cables lying around. They only endanger your own safety and that of others.
- Only use the device in an ambient temperature of -5^ to +45^ . Keep away from direct insulation and heaters.
- The relative humidity must not exceed 50% .
- Always disconnect the device from the mains during thunderstorms as overvoltage could destroy the device.
- Never use solvents or aggressive detergents in order to clean the device. Use a soft and damp cloth.
- Removing the serial bar code from the device will void the warranty.
- The figures in this manual describe the VPA2100U1. Other models and their features are comparable with the VPA2100U1.
- Use the original packaging if the device is to be transported.
- Keep this manual for future reference.
5. Legal Provisions
- Operating an amplification system can produce extremely high noise levels that may cause permanent hearing loss. The legal instructions for using an amplification system vary from country to country. The user is responsible for respecting the legal provisions applicable in his country.
- Always monitor the sound pressure level when operating an amplification system in discos, concerts etc. Never exceed the permissible noise level as specified by the law.
- Hearing damage caused by high noise levels can be regarded as a physical injury and may lead to criminal prosecution.
- Please note that the organiser is responsible for respecting maximum noise levels.
6. Information on Hearing Loss
- More and more younger people suffer from hearing loss of 25dB or more, mainly caused by listening to loud music. Every person operating amplification systems should know to what sound pressure levels he is exposed to. In a discotheque, average levels of 75dB to 105dB are reached. At a rock concert, the sound pressure levels can rise from 95dB up to 115dB. Individual peaks can exceed the 130dB pain level. Such levels are typical for e.g. motor chain saws.
An Overview on the Different Noise Levels
10dB-Heartbeat
25dB - Whisper
40dB-Average home
50dB - Light traffic
60dB - Normal conversation
70dB - Vacuum cleaner
80dB - Telephone ringing
90dB - Pneumatic drill
100dB - Power mov
120dB - Boom box in car
130dB - Pain level
140dB - Jet plane 30m overhead
- It is important to know that a 3dB increase will double the sound level. The human hearing only recognises a doubling of the sound level when the noise level is increased by 10dB. Hearing loss does not depend on the sound level but on the noise level and starts way before than the pain level.
- Many a one deceives himself by thinking that noise is something you can get accustomed to. Nothing is further form the truth!
- The reason why some people have got accustomed to a certain noise level and are no longer disturbed, is that they have already suffered hearing loss. The damage makes the hearing insensitive to the frequencies forming the loudest part of the noise. Getting accustomed to noise does not mean anything other than trying to get along with hearing loss in everyday life. Hearing loss cannot be recovered and can only be compensated with hearing aids. Subjectively, hearing loss feels like having dampened ears. This effect weakens with time but loss in hearing sensitivity is permanent.
- In order to relax your hearing sufficiently, the noise level should not exceed 70dB for 10 hours. Higher noise levels during this relaxing period can prevent relaxation and promote permanent hearing damage or hearing loss.
WARNING: Protect your ears if you want to prevent hearing damage!
7. Features
outstanding tone
- original appearance and precise manufacturing
- protection circuits
- limiter to prevent speaker damage when the amplifier is overloaded
high audio frequency performance
- amplifier-on time delay and amplifier-off mute protection protect the speaker from transients
8. Description
Refer to the illustrations on page 2 of this manual.
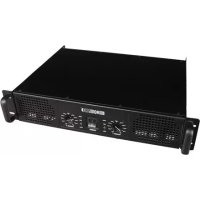
a. Front panel (fig. 1)
- Power switch
To turn the unit ON or OFF, press this button. Before turning ON the amplifier check all connections and turn down the level control. A momentary muting is normal when turning the amplifier ON or OFF.
CAUTION: Always turn on your amplifier last, after all your other connected equipment, and always turn OFF your power amplifier before your other connected equipment.
- Power LED indicators
These LEDs illuminate when the power is turned ON.
- Limit LED indicators
These LEDs illuminate if any section of the power amplifier's input are within 3dB of clipping. Occasional blinking of the LEDs are acceptable, but if they remain on more than intermittently you should turn down the level on the amplifier or reduce the output level of the preceding component to avoid audible distortion.
- Signal LED indicators
These LEDs illuminate to confirm the presence of an input signal greater than 100mV at that channel of the amplifier.
5. Protect LED indicators
These LEDs illuminate if the power amplifier's output connection is shorted or the load impedance is too low. When either of these LEDs is lighting up, turn OFF the power and check the output connection to verify that it is correct, then turn ON the power again.
6. Level Controls
These control the level of signal coming into each channel. The actual voltage gain of the amplifier is shown in dB. Turn these controls counter clockwise if the peak LEDs illuminate steadily (indicating too strong input signal).
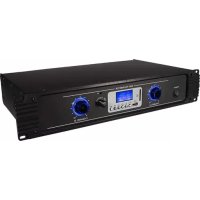
b. Rear panel (fig. 2)
7. Power connector
The power connection is used to connect the AC power source to your power amplifier. CAUTION: Do not remove the grounding pin.
8. Fuse holder
When the fuse has been blow up always replace by a fuse of the same range. If these fuse continuously blow, shut down the amplifier and ask a qualified person to check the unit.
9. AC volt age selector or switch
Before plugging the power cord, check to see that the unit is set for the proper voltage for your area, i.e. 115VAC / 60Hz or 230VAC / 50Hz.
10. Input connector
Connect your input signal to these unbalanced 14 input jacks.
11. Left / Right channel output connectors
Connect these to your left and right speaker box with a Speakon® connection.
12. Fans
The fan speed is varied continuously and automatically to maintain the proper internal operating temperature.
9. Insta Ilation
a. Rack Installation
- This amplifier is built for 19" racks. The rack should be fitted with a cooling fan. When mounting the amplifier, make sure there is enough free space around the device for the evacuation of hot air. Continuous overheating will damage your device.
Fix the amplifier with four screws M6. - Be careful when mounting the amplifier. Put the heaviest device in the lower part of the rack. Note that fastening the amplifier with four screws on the front panel is not enough. Use additional metal bars to support the sides and the ground panel of the device.
- Attach the rear bracket to the ground or side bars when the device is to be transported. This keeps the amplifier from being pushed backwards.
b. Inputs
- A good cable run improves the sound quality remarkably. Input cables should be short and direct, since high frequencies will mostly be absorbed if the cables are unnecessarily long. Besides that, a longer may lead to humming and noise trouble. If long cable runs are unavoidable, you should use balanced cables.
Profess ionals are recommended to connect the input cables via balanced XLR jacks.
c. Outputs
- The hig h damping factor of your amplifier ensures a clear sound reproduction. Unnecessarily long and thin cables will influence the damping factor and thus the low frequencies in a negative way. In order to sae guard good sound cuality, the damping factor should be around 50. The longer a cable, the thicker it should be.
- Conne ct your speaker systems via the speaker plugs or the banana / screw combination (red+, black-).

Be careful of the high voltage at the screw terminal. Switch off the amplifier before connecting the device.
d. Speaker - Socket
- Your a n plifier is equipped with 4-pole, lockable speaker sockets. Turn the plug to the right to lock the connection. To unlock: pull the unlock button, turn to the left and pull the plug out of the socket.
| PIN | ||
| 1+ | 2 | + |
| 1- | 2 | - |
e. Choosing Appropriate Connection Cables
- Use sufficiently thick cables to connect the speaker system. Thin cables may heat up and cause significant power loss and loss in sound quality.
- For all speaker systems up to 400W, we recommend a cable diameter of 2.5mm^2 ; for all other speaker cables it's 4mm^2 .
- The hig h damping factor of your amplifier ensures a clear sound reproduction. Unnecessarily long and thin cables will influence the damping factor and thus the low frequencies in a negative way. In order to saieguard good sound quality, the damping factor should be around 50. The longer a cable, the thicker it should be.
Example: A damping factor of 200 is reduced to 47 (8 ohms) when using a diameter of 2.5mm^2 speaker cable of 10m in length. The power loss at 8 ohms is 1.63% , at 4 ohms it's 3.25% and at 2 ohms it's as much as 6.5% .
- The maximum cable length is 30m
f. Installing the Speaker Cables
- Conne ct the cable of the first speaker system with speaker outputs CH-1 and output CH-2 of the amplifier. The signal will be transmitted to the individual speaker systems.
- Always handle the cables with care and protect them from damage in transit.
- Make sure no one can trip over the cables. Always fix them with an appropriate tape.
- Both c ables should be of the same type and length.
- Do not loop the cables.
- Always install the cables far away from power cables (never alongside them).
- Never put heavy objects like speaker systems, flight cases etc. on cables.
- Always roll cables loosely round the elbow.
g. Connection with the Mains

Have a qualified technician carry out the electric connection!
The wiring of the connection cables is as follows:
| Cable | PIN | International |
| Brown | Live | L |
| Blue | Neutral | N |
| Yellow / green | Earth | ⊕ |
The device must be earthed!
10. Operation
- After connecting your amplifier to the mains, turn both gain controls in an anticlockwise direction to the minimum position. The last device to be switched on is the amplifier. The ON and PROTECT LED light up now. If not, check if the amplifier is properly connected to the mains.
After the activation celay the speakers are activated (PROTECT LED is off). - After setting the volume controls of the pre-amplifier in the minimum position, turn the gain controls of your amplifier to the midpoint position. If there is any humming, check the connection cables between the pre-amplifier and your amplifier (switch off components first). Now adjust the volume with gain controls CH-1 and CH-2.
CAUTION! Never set the level of the individual channel's so high that the LIMIT LED remains lit continuously. Make sure the output signal isn't distorted to avoid damage to your speakers.
All important operating modes of the amplifier can be monitored on the front panel.
| SIGNAL | output level |
| LIMIT | short circuit or impedance too low or signal distorted |
| PROTECT | activated m cmentarily w hen switching on or when one of the protective circuits is activated. |
- When operating the amplifier system, make sure the sound quality of the loudspeakers is OK. Distortion indicates that either the amplifier or the loudspeaker is overloaded. Overloads can quickly lead to amplifier or speaker damage.
- Reduce the volume immediately to avoid damage. The warranty becomes void when the speaker systems are damaged by overload.
-
Always check the sound pressure level with a meter in order not to surpass threshold values.
-
If you want to switch off the system, switch off the amplifier first and then the pre-amplifiers in order to avoid transients on the speaker.
11. Troubleshooting
| PROBLEM | POSSIBLE | CAUSE |
| No power. | ·The power cord is not connected. | ·Check the power cord and any extension cables. |
| No sound. | ·The power cord of the respective device is not connected properly or not connected at all. ·The connection socket or the plug is dirty. | ·Check if the power cord and the plugs are tightly connected with the sockets. ·Clean the socket and/or the plug. |
| Noise. | ·The input signal is too strong. | ·Reduce the input signal with the gain control. |
| Fan does not work; LEDs do not light. | ·The power cord is not connected. | ·Connect the power cord. |
| PROTECT LED stays lit. | ·Inputs receive DC voltage. ·Overheating due to clogged fan grille. ·Impedance of speakers too low. ·Short circuit in speaker connection or in speaker. ·Technical default of amplifier | ·Switch amplifier off and have the device checked by a service technician. ·Clean the fan grille. ·Connect other speakers. ·Check speakers. ·Switch amplifier off and have the device by a service technician. |
SOLU
12. Cleaning and maintenance
- All screws should be tightened and free of corrosion.
- The housing, visible parts, mounting supports and the installation location (e.g. ceiling, suspension, trussing) should not be deformed, modified or tampered with e.g. do not drill extra holes in mounting supports, do not change the location of the connections.
- Moving mechanic parts must not show any signs of wear and tear.
- The electric power supply cables must not show any damage. Have a qualified technician maintain the device.
- Disconnect the device from the mains prior to maintenance activities.
- Wipe the device regularly with a moist, lint-free cloth. Do not use alcohol or solvents.
- There are no user-serviceable parts.
- Contact your dealer for spare parts if necessary.
13. Technical Specifications
| Power Supply 230VAC / 50Hz or 115VAC / 60Hz selectable | ||
| Fuse | 230VAC T2A (order code: FF2.5N) | |
| 115VAC T4A (order code: FF4N) | ||
| Power Output Stereo | 8 ohms 70W | |
| Stereo 4 ohms 100W | ||
| Frequency Range 25Hz ~ 25KHz, ± 1dB ~ 3dB | ||
| S/N Ratio > 100dB | ||
| Input Sensitivity | 0.77V | |
| Input Impedance | 10K ohms unbalanced | |
| Input Connectors 2 x ¼" jack (6.3mm) | ||
| Output Connectors | 2 x Speakon® (stereo) | |
| Protection Circuits | full short-circuit, DC and terminal overload protection; noise-free ON/OFF; current limiter | |
| Controls | power switch, input level control for each channel | |
| LED Indicators | SIGNAL | 2 x green LED |
| LIMIT | 2 x red LED | |
| POWER | 1 x blue LED | |
| PROTECT | 1 x red LED | |
| Dimensions | 483 x 320 x 45mm | |
| Weight | 8kg | |
Use this device with original accessories only. Velleman nv cannot be held responsible in the event of damage or injury resulted from (incorrect) use of this device.
For more info concerning this product and the latest version of this manual, please visit our website www.hqpower.eu.
The information in this manual is subject to change without prior notice.
© COPYRIGHT NOTICE
The copyright to this manual is owned by Velleman nv. All worldwide rights reserved.
No part of this manual or may be copied, reproduced, translated or reduced to any electronic medium or otherwise without the prior written consent of the copyright holder.
4. Norm as generales
Velleman® Service and Quality Warranty
Velleman® has over 35 years of experience in the electronics world and distributes its products in more than 85 countries. All our products fulfil strict quality requirements and legal stipulations in the EU. In order to ensure the quality, our products regularly go through an extra quality check, both by an internal quality department and by specialized external organisations. If, all precautionary measures notwithstanding, problems should occur, please make appeal to our warranty (see guarantee conditions).
General Warranty Conditions Concerning Consumer Products (for EU):
- All consumer products are subject to a 24-month warranty on production flaws and defective material as from the original date of purchase.
- Velleman® can decide to replace an article with an equivalent article, or to refund the retail value totally or partially when the complaint is valid and a free repair or replacement of the article is impossible, or if the expenses are out of proportion. You will be delivered a replacing article or a refund at the value of 100% of the purchase price in case of a flaw occurred in the first year after the date of purchase and delivery, or a replacing article at 50% of the purchase price or a refund at the value of 50% of the retail value in case of a flaw occurred in the second year after the date of purchase and delivery.
Not covered by warranty:
- all direct or indirect damage caused after delivery to the article (e.g. by oxidation, shocks, falls, dust, dirt, humidity...), and by the article, as well as its contents (e.g. data loss), compensation for loss of profits;
- frequently replaced consumable goods, parts or accessories such as batteries, lamps, rubber parts, drive belts... (unlimited list);
- flaws resulting from fire, water damage, lightning, accident, natural disaster, etc. ...
- flaws caused deliberately, negligently or resulting from improper handling, negligent maintenance, abusive use or use contrary to the manufacturer's instructions;
- damage caused by a commercial, professional or collective use of the article (the warranty validity will be reduced to six (6) months when the article is used professionally);
- damage resulting from an inappropriate packing and shipping of the article;
- all damage caused by modification, repair or alteration performed by a third party without written permission by Velleman®.
- Articles to be repaired must be delivered to your Velleman® dealer, solidly packed (preferably in the original packaging), and be completed with the original receipt of purchase and a clear flaw description.
- Hint: In order to save on cost and time, please reread the manual and check if the flaw is caused by obvious causes prior to presenting the article for repair. Note that returning a non-defective article can also involve handling costs.
- Repairs occurring after warranty expiration are subject to shipping costs.
- The above conditions are without prejudice to all commercial warranties.
The above enumeration is subject to modification according to the article (see article's manual).
NL
-性和 costs for the period of guarantía, including the cost of a new or revised legal document, professional fees, and other costs.
- costs for the period of guarantía, professional fees, and other costs for the period of a new or revised legal document, professional fees, and other costs.