ACM 723 - Cooker WHIRLPOOL - Free user manual and instructions
Find the device manual for free ACM 723 WHIRLPOOL in PDF.
User questions about ACM 723 WHIRLPOOL
0 question about this device. Answer the ones you know or ask your own.
Ask a new question about this device
Download the instructions for your Cooker in PDF format for free! Find your manual ACM 723 - WHIRLPOOL and take your electronic device back in hand. On this page are published all the documents necessary for the use of your device. ACM 723 by WHIRLPOOL.
USER MANUAL ACM 723 WHIRLPOOL
ENGLISH Installation Page 2 Instructions for use Page 5
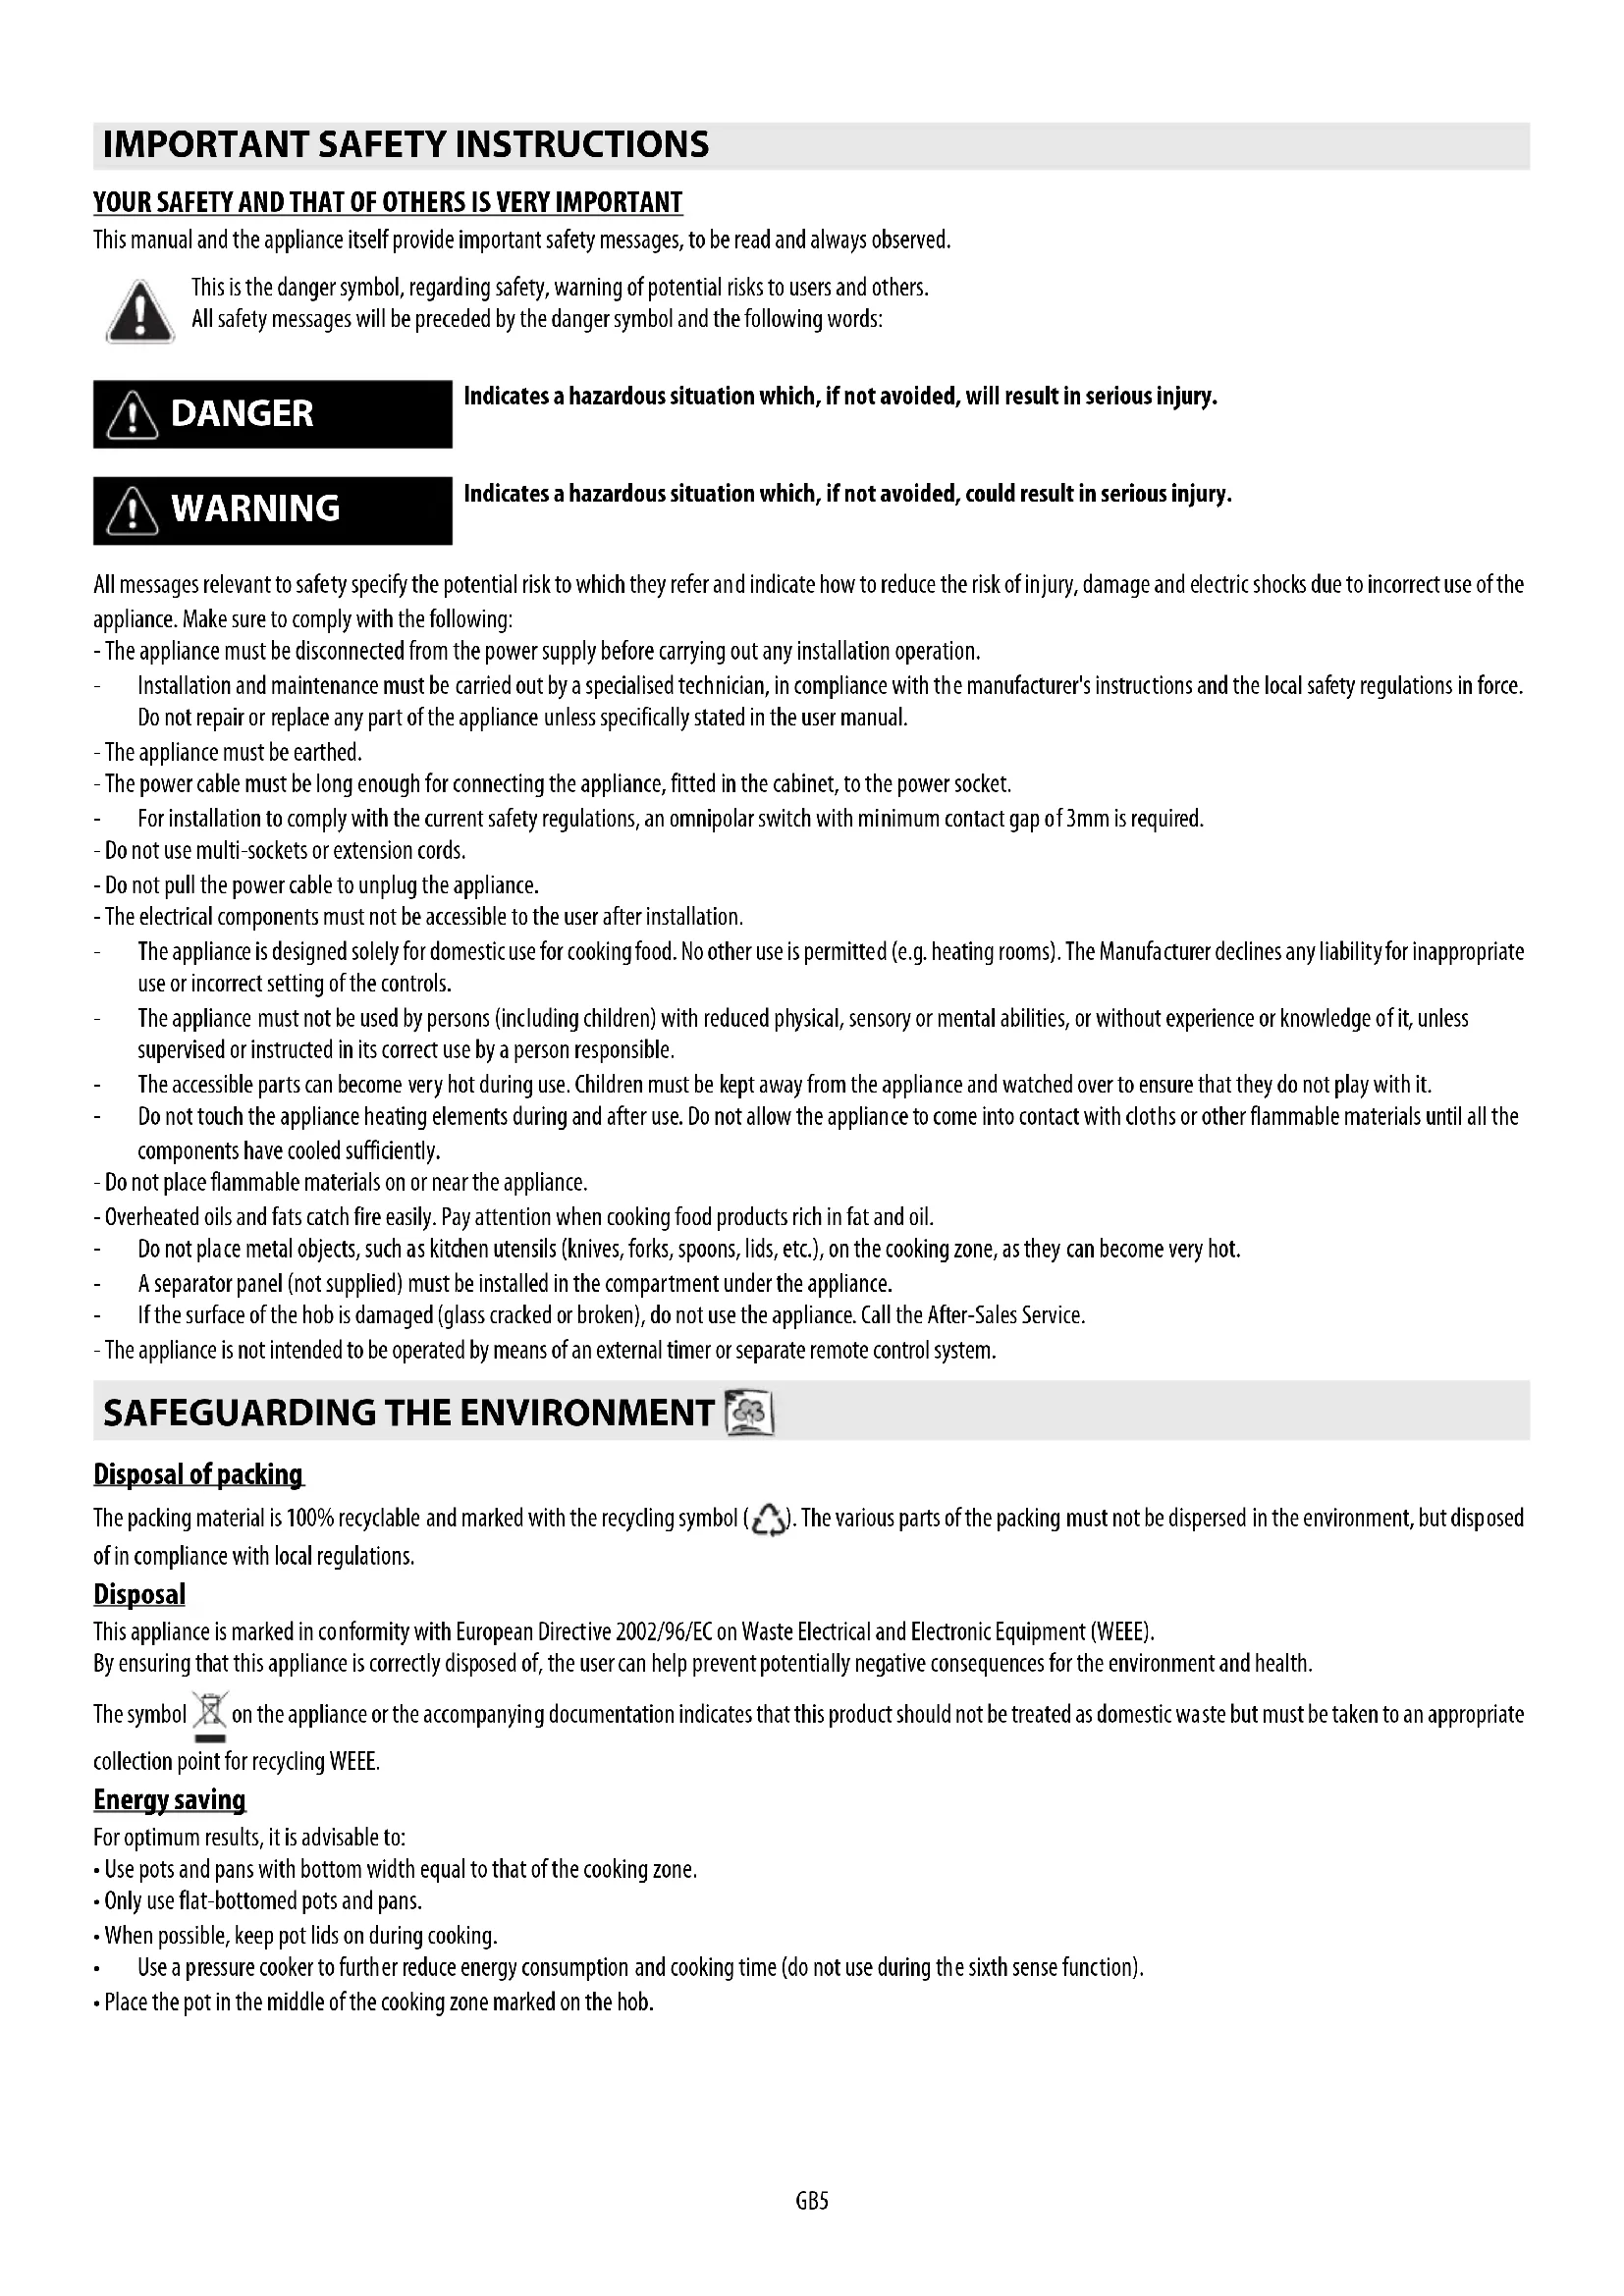
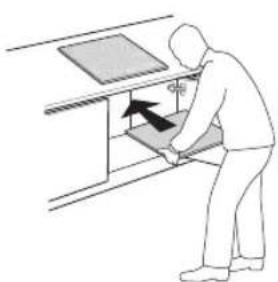
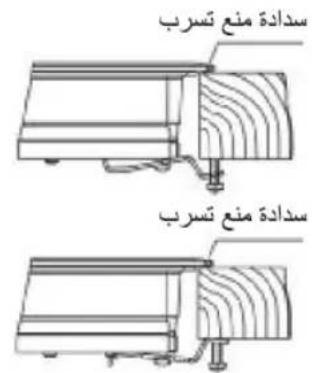
After suitably adapting the size of the hole, apply the seal on the underside of the glass. Do not apply silicone between the glass and the worktop, otherwise the glass could crack if the hob has to be removed.
To fit the hob in the cabinet, several brackets are provided (as standard) for fixing to the holes in the bottom part of the frame. The brackets can be fitted in two positions, as shown in the following figure.
Depending on the thickness of the cabinet, it may be necessary to use the self-threading screws provided for fixing; fit them in the round holes of the bracket. The hole thread is created on inserting the screw.
Threading must be done before fixing the bracket to the hob.
IMPORTANT SAFETY INSTRUCTIONS
YOUR SAFETY AND THAT OF OTHERS IS VERY IMPORTANT
This manual and the appliance itself provide important safety messages, to be read and always observed.

This is the danger symbol, regarding safety, warning of potential risks to users and others. All safety messages will be preceded by the danger symbol and the following words:

DANGER

WARNING
Indicates a hazardous situation which, if not avoided, will result in serious injury.
Indicates a hazardous situation which, if not avoided, could result in serious injury.
All messages relevant to safety specify the potential risk to which they refer and indicate how to reduce the risk of injury, damage and electric shocks due to incorrect use of the appliance. Make sure to comply with the following:
- The appliance must be disconnected from the power supply before carrying out any installation operation.
Installation and maintenance must be carried out by a specialised technician, in compliance with the manufacturer's instructions and the local safety regulations in force. Do not repair or replace any part of the appliance unless specifically stated in the user manual. - The appliance must be earthed.
- The power cable must be long enough for connecting the appliance, fitted in the cabinet, to the power socket.
- For installation to comply with the current safety regulations, an omnipolar switch with minimum contact gap of 3mm is required.
- Do not use multi-sockets or extension cords.
- Do not pull the power cable to unplug the appliance.
- The electrical components must not be accessible to the user after installation.
The appliance is designed solely for domestic use for cooking food. No other use is permitted (e.g. heating rooms). The Manufacturer declines any liability for inappropriate use or incorrect setting of the controls.
The appliance must not be used by persons (including children) with reduced physical, sensory or mental abilities, or without experience or knowledge of it, unless supervised or instructed in its correct use by a person responsible.
The accessible parts can become very hot during use. Children must be kept away from the appliance and watched over to ensure that they do not play with it.
- Do not touch the appliance heating elements during and after use. Do not allow the appliance to come into contact with cloths or other flammable materials until all the components have cooled sufficiently.
- Do not place flammable materials on or near the appliance.
- Overheated oils and fats catch fire easily. Pay attention when cooking food products rich in fat and oil.
Do not place metal objects, such as kitchen utensils (knives, forks, spoons, lids, etc.), on the cooking zone, as they can become very hot.
- A separator panel (not supplied) must be installed in the compartment under the appliance.
If the surface of the hob is damaged (glass cracked or broken), do not use the appliance. Call the After-Sales Service.
- The appliance is not intended to be operated by means of an external timer or separate remote control system.
SAFEGUARDING THE ENVIRONMENT

Disposal of packing
The packing material is 100% recyclable and marked with the recycling symbol ( ). The various parts of the packing must not be dispersed in the environment, but disposed of in compliance with local regulations.
Disposal
This appliance is marked in conformity with European Directive 2002/96/EC on Waste Electrical and Electronic Equipment (WEEE).
By ensuring that this appliance is correctly disposed of, the user can help prevent potentially negative consequences for the environment and health.
The symbol on the appliance or the accompanying documentation indicates that this product should not be treated as domestic waste but must be taken to an appropriate collection point for recycling WEEE.
Energy saving
For optimum results, it is advisable to:
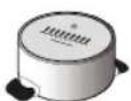
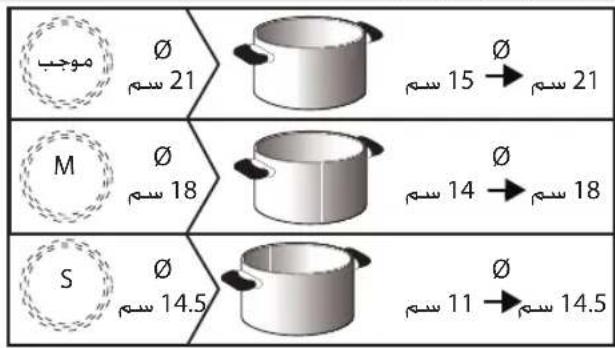
- Use pots and pans with bottom width equal to that of the cooking zone.
- Only use flat-bottomed pots and pans.
- When possible, keep pot lids on during cooking.
Use a pressure cooker to further reduce energy consumption and cooking time (do not use during the sixth sense function).
- Place the pot in the middle of the cooking zone marked on the hob.
DECLARATION OF CONFORMITY (C)
This appliance, intended to come into contact with food products, complies with Regulation (C E) no. 1935/2004, and has been designed, manufactured and marketed in conformity with the safety requirements of "Low Voltage" Directive 2006/95/EC (replacing 73/23/EEC as amended) and protection requirements of "EMC" Directive 2004/108/EC.
BEFORE USE
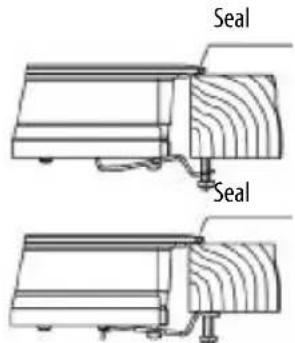
IMPORTANT: The cooking zones will not switch on if pots are not the right size. Only use pots bearing the symbol "INDUCTION SYSTEM" (Figure opposite). Place the pot on the required cooking zone before switching the hob on.
EXISTING POTS AND PANS

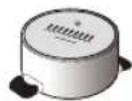
Use a magnet to check if the pot is suitable for the induction hob: pots and pans are unsuitable if not magnetically detectable.
- Make sure pots have a smooth bottom, otherwise they could scratch the hob. Check dishes.
- Never place hot pots or pans on the surface of the hob's control panel. This could result in damage.
RECOMMENDED POT BOTTOM WIDTHS
INSTALLATION
After unpacking the product, check for any damage during transport. In case of problems, contact the dealer or the After-Sales Service.
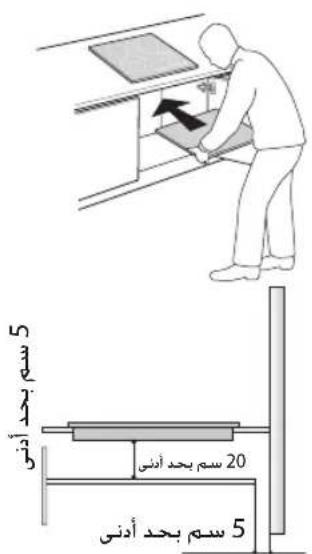
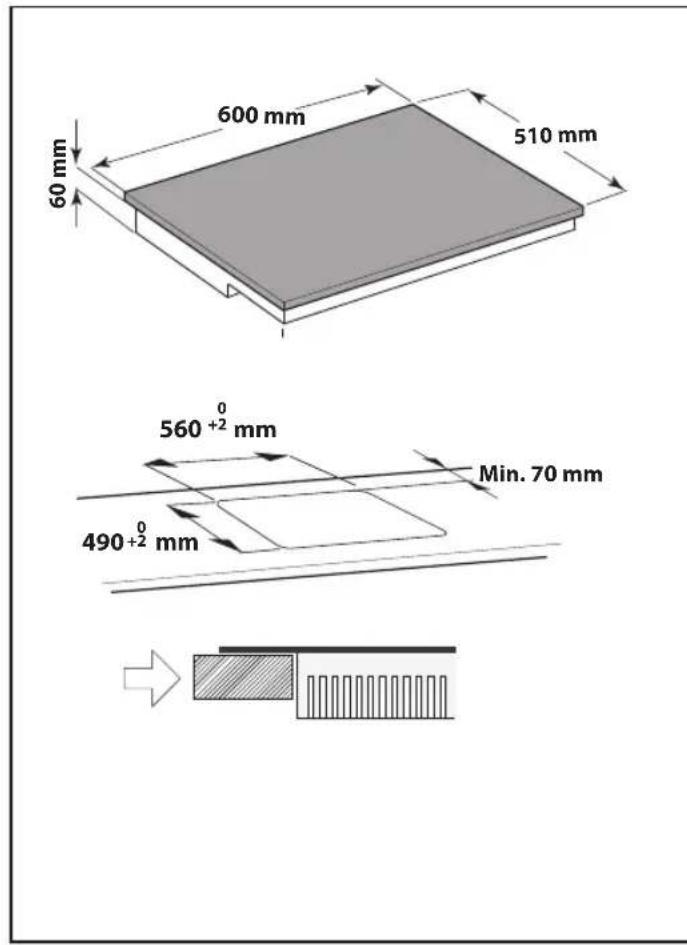
PREPARING THE CABINET FOR FITTING

WARNING
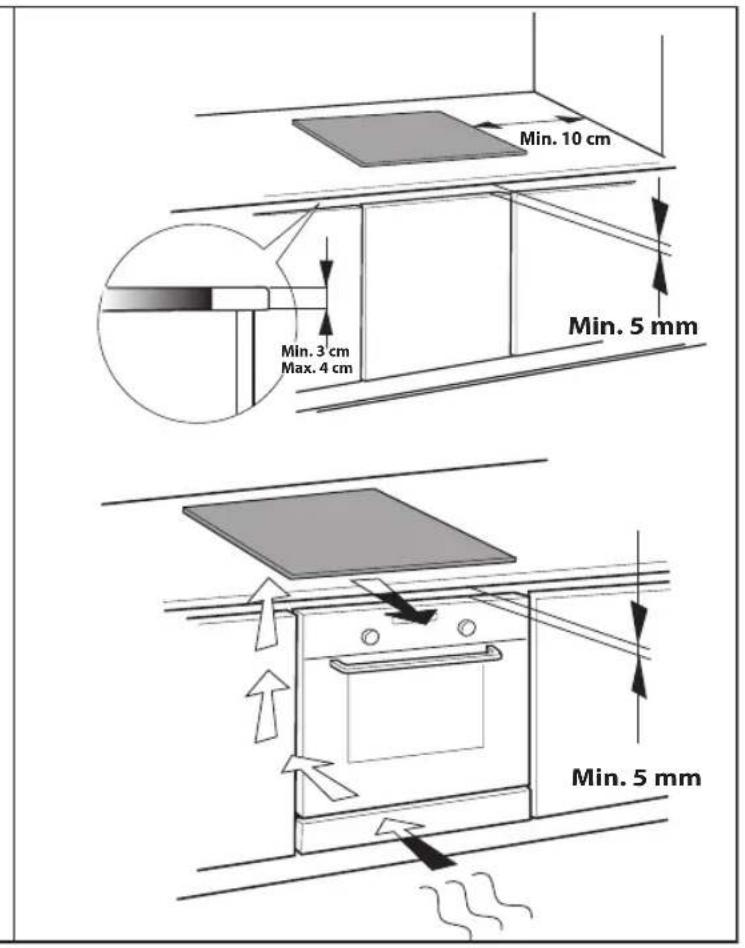
Install a separator panel under the hob.
- The lower part of the product must not be accessible after installation.
-In case of installation of an undertop oven, do not interpose the separator panel.
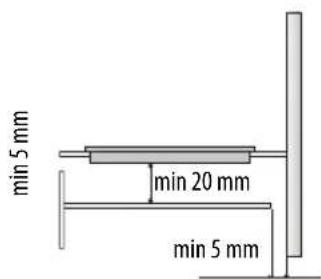
The distance between the underside of the appliance and the separator panel must respect the dimensions given in the figure.
For correct operation of the product, do not obstruct the minimum opening between the worktop and the top of the cabinet (min.5 mm).
- Do all cabinet cutting work before fitting the hob, and carefully remove any shavings or sawdust.
- In case of installation of an undertop oven, make sure the oven has a cooling system.
Do not install the hob above a dishwasher or washing-machine, so that the electronic circuits do not come into contact with steam or moisture which could damage them.
ELECTRICAL CONNECTION

WARNING
-
Disconnect the appliance from the power supply.
-
Installation must be carried out by qualified personnel who know the current safety and installation regulations.
The manufacturer declines any liability for injury to persons and animals or damage in case of failure to comply with the instructions provided in this section.
- The power cable must be long enough to allow the hob to be removed from the worktop.
- Make sure the voltage specified on the dataplate located on the bottom of the appliance is the same as that of the home.
- Do not use extension cords.
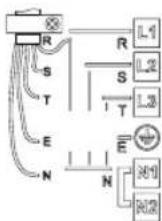
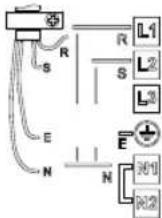
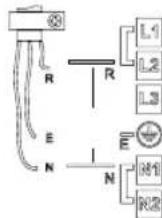
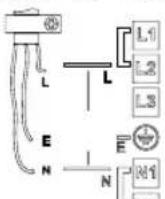
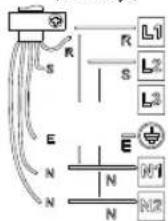
Connection to the terminal block
For the electrical connection, use an H05RR-F cable as specified in the table below.
| Wires Number x size | |
| 230 V ~ + ① | 3 x 4 mm2 |
| 230-240 V ~ + ① | 3 X 4 mm2 (Australia only) |
| 230 V 3 ~ + ① | 4 x 1.5 mm2 |
| 400 V 3N ~ + ① | 5 x 1.5 mm2 |
| 400 V 2N ~ + ① | 4 x 1.5 mm2 |
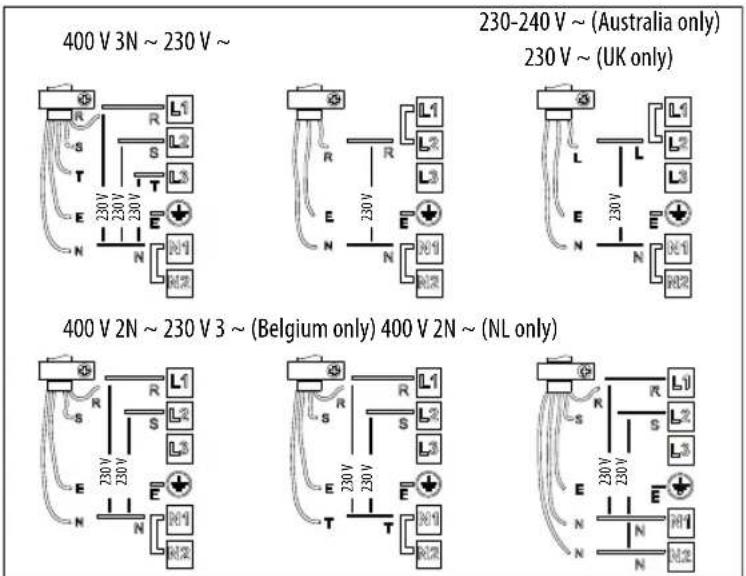
Connect the yellow/green earth wire to the terminal with the symbol
This wire must be longer than the other wires.
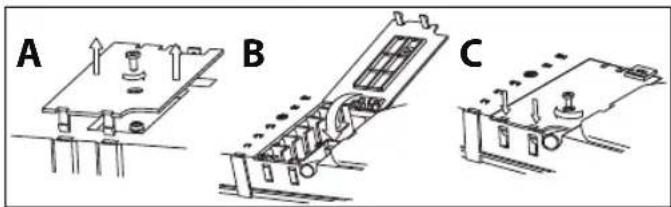
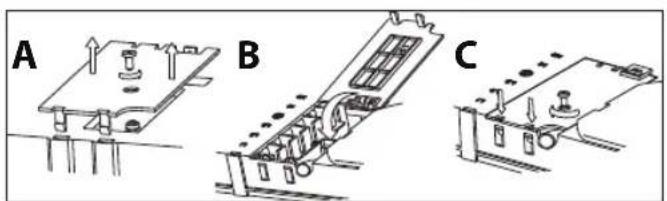
- Remove the terminal block cover (A), undoing the screw and inserting the cover in the terminal block hinge (B).
- Insert the power cable in the cable clamp and connect the wires to the terminal block as indicated in the connection diagram located near it.
- Secure the power cable with the cable clamp.
- Close the cover (C) and screw it on the terminal block with the removed screw - point (1).
Each time the power is connected, the hob performs an automatic check for a few seconds.
If the hob already has a power cable, follow the instructions attached to the cable. Connect the appliance to the power supply by means of a multipole switch with minimum contact gap of 3mm.
NOTE: When using the hob for the first time, please take care not to have powerful halogen lights, like those of a hood, shining over the sensor button area of the hob. These lights may interfere with the starting of the system.
INSTRUCTIONS FOR USE
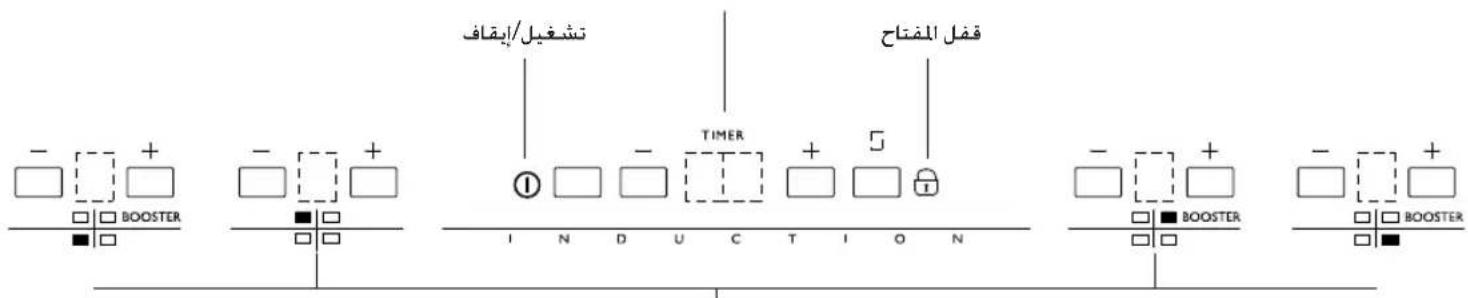
Control Panel Description
The panel has touch controls: to use them, just press the corresponding symbol (a light touch is sufficient).
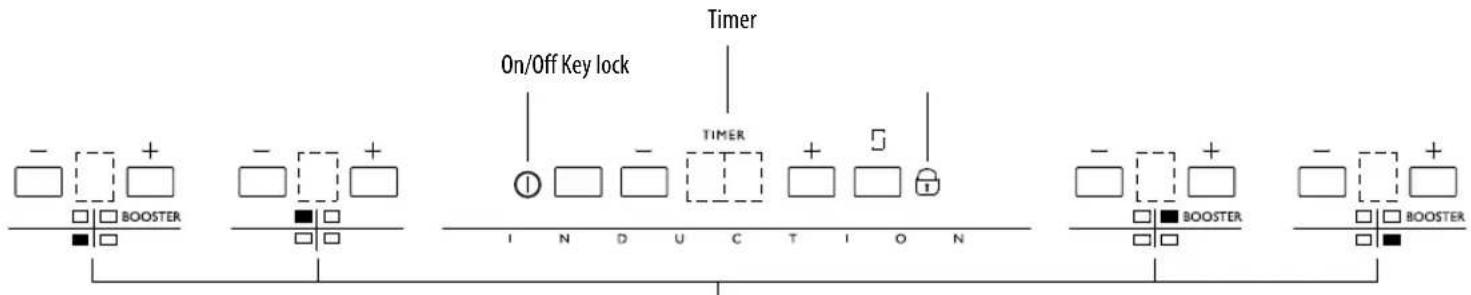
Cooking zone buttons and corresponding display
Switching the hob On/Off
Touch the On sensor 1 for at least 1 second. The touch control panel switches on, an acoustic signal sounds and the displays light up. If one of the cooking zones is hot, the characters "H" and "0" alternate on the corresponding display.
To switch off, press the same button until the hob switches off. All the cooking zones are deactivated

The hob automatically switches off if no function is selected within 10 seconds of switching on.
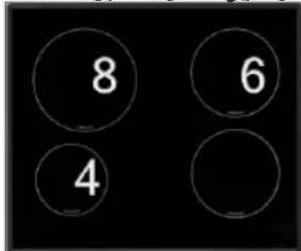
Activation and adjusting cooking zones
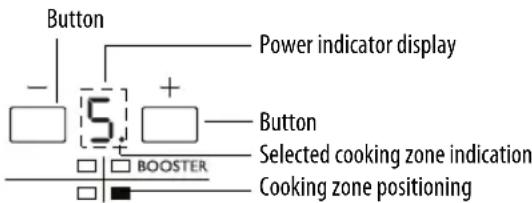
After switching the hob on and placing the pot on the chosen cooking zone, adjust the power level using the + button. Upon activation, the display shows level 5. Each cooking zone has various power levels, adjustable with the +/- buttons, going from "1": min. power level, to "9": max. power level. Some cooking zones have a fast boil function (Booster), shown on the display with the letter "P".
For quick activation at max. power: with the cooking zone set to 0, touch the - button once.
The cooking zone switches on directly at level 9. If one of the two + or - buttons is kept pressed, the action is repeated every half a second, without having to press repeatedly.
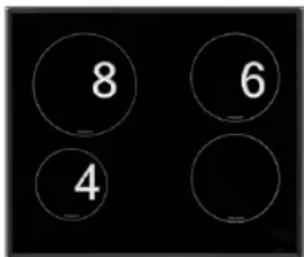
Power limitation
This hob model has a max. power limitation carried out by means of software. Therefore, to activate a cooking zone at a power higher than that allowed, the system emits an acoustic signal and automatically adjusts the power to the max. permissible.
E.g. Assuming the user has set the following levels, utilising all the permissible power:
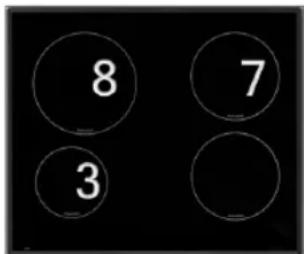
If the ^+ button is pressed to increase the power level of the diam. 145 zone, the system emits an acoustic signal and will not increase the power level.
By reducing the power level of one of the other zones, the diam. 145 zone can be adjusted, increasing the power.
Deactivation of cooking zones
Press the " - " button of the cooking zone to be switched off, until bringing the level to "0". The cooking zone can also be switched off by touching the "+" and "-" buttons at the same time. The cooking zone is deactivated.
Switching off the hob
The hob can be switched off by pressing the button ①. An acoustic signal sounds and the power level indicators go off, with the possible exception of the residual heat indicator "H", which remains on if the cooking zone is hot.

The cooking zone switches off and, if the zone is still hot, the letter "H" appears in the circle.
"H" is the residual heat indicator. The hob has such an indicator for each cooking zone; it signals which zones are still hot. When the cooking zone cools down, the display goes off.
Clock
The hob has a clock which can be used for two functions: as a timer for switching off the hotplate or as a countdown timer.
Countdown timer
This function allows the setting of a time period, at the end of which an acoustic signal sounds.
To activate this function, proceed as follows:
- With the touch panel on and the switch-off timer function deactivated for all the hotplates, touch one of the + or - buttons corresponding to the clock.
- The display switches on and shows 00.
- Touch the + or - buttons again to set the required time. After a few seconds the decimal point of the clock starts blinking to indicate that the countdown has begun.
Be careful not to touch any other button different from + or - as this could stop the switch-off timer of a hotplate instead of programming the countdown timer.
Several beeps sound when the countdown reaches zero. To silence the buzzer, touch either of the clock's + or - buttons.
If, during clock operation as a countdown timer, the induction plates are at power level 0, the touch panel switches off after a few seconds, but th timer will continue working until completing the countdown or until cancellation of the setting.
To cancel the countdown timer setting, set the remaining time to 00.
Switch-off timer function
This function is very handy since the individual cooking zones can be programmed to switch off automatically when the specified time has elapsed. The appliance offers the possibility of timing each cooking zone separately.
The function is controlled by means of the increase/decrease + and - buttons associated with the clock.
Timer for single hotplate
To activate the timer for a single hotplate, proceed as follows:
- With the hotplate on and the clock off, touch one of the + or - buttons corresponding to the clock.
- The display switches on and shows 00. At the same time, a blinking appears for each of the activated hotplates.
- Within the next 5 seconds, touch one of the + or - buttons corresponding to the hotplate for which the timer is to be activated. The is set on the display of that hotplate and the digits on the clock display start blinking.
- Within the next 2 seconds, select the required time by means of the clock's + or - buttons. After a few seconds the digits stop blinking on the clock display. The decimal point of the clock and the timed hotplate start blinking to indicate that the countdown has begun.
After setting the required time, make sure not to activate other buttons, as this could cancel the timer function. When the digits of the clock blink, the value can be modified using only the + or - buttons without touching other buttons.
At the end of the countdown, the timed hotplate switches off and several beeps sound. To silence them, touch either of the + and - buttons associated with the clock.
Setting the timer for more than one hotplate / Modifying the programmed time
During the countdown it is possible to modify the remaining time or set the timer for another hotplate.
- With the touch panel activated and a hotplate timed, touch one of the + and - buttons corresponding to the clock.
- The countdown stops and 00 appears on the display. A blinking appears on the display of each activated hotplate.
- It is now possible to time another hotplate or modify the remaining time of a previously timed hotplate. To identify them, observe the decimal point appearing at the bottom right on the display, which appears only if the hotplate is timed. Within the next 5 seconds, touch one of + or - buttons corresponding to the hotplate for which timer activation or modification is required. The stops blinking on the display of that hotplate and all the digits on the clock display start blinking.
- Touch the + or - buttons again to set the required time. After a few seconds the decimal point starts blinking on the display, to confirm that the countdown has begun.
To cancel an already set time, set the required time in step 4 to 00, or switch off the corresponding hotplate.
When more than one hotplate is timed, by default setting the time display blinks. The time corresponds to the hotplate on whose display the decimal point is blinking.
The decimal point on a powered display indicates that the hotplate is timed. If the decimal point blinks concurrently with a on the hotplate display, it means the countdown time remaining for that specific hotplate is shown on the clock display (at that precise moment).
Remember, the countdown is cancelled if the touch panel is deactivated with the on/off sensor button during the countdown.
Control panel lock
This function locks the hob controls to prevent accidental switching on (e.g. during cleaning operations).
Press the button for three seconds: a beep sounds and an indicator lights up above the padlock button to signal activation. The control panel is locked except for the deactivation function. To deactivate the control lock, repeat the activation procedure. The luminous dot goes off and the hob is active again. In case of hob deactivation with the control panel lock activated (luminous dot above the padlock button lit) the hob can be switched on again only after deactivating the control lock function.
IMPORTANT: The presence of water, liquid spilled from pots or any kind of objects resting on the button under the symbol can accidentally activate or deactivate the control panel lock function.
Melting function
The melting function maintains a low and even temperature in the cooking zone. After placing the pot/accessory on the chosen zone, switch the hob on and select the required cooking zone, setting power level 1. Press the - button; the indicator will show the symbol . Just press the - button to deactivate the function.
Max. operation time
If the user forgets to switch the hob off, it switches off automatically after a given period of time from when the last hotplate was switched on. See the following table.
| Selected power | Max. operation time (in hours) |
| 0 | 8 |
| 1 | 8 |
| 2 | 5 |
| 3 | 4 |
| 4 | 4 |
| 5 | 3 |
| Selected power | Max. operation time (in hours) |
| 6 | |
| 7 | |
| 8 | |
| 9 | |
| P | 1 0 |
When this occurs, if the glass is hot enough, the residual heat indicator "H" appears on the corresponding zone power display.
CLEANING

WARNING
- Do not use steam cleaners.
Before cleaning, make sure the cooking zones are switched off and that the residual heat indicator ("H") is not displayed.
IMPORTANT: Do not use abrasive sponges or scouring pads. Their use could eventually ruin the glass.
- After each use, clean the hob (when it is cool) to remove any deposits and stains due to food residuals.
- Sugar or foods with a high sugar content damage the hob and must be immediately removed.
Salt, sugar and sand could scratch the glass surface.
Use a soft cloth, absorbent kitchen paper or a specific hob cleaner (follow the Manufacturer's instructions).
TROUBLESHOOTING GUIDE
- Read and follow the instructions given in the section "Instructions for use".
- Make sure there is not a power outage.
- Dry the hob thoroughly after cleaning it.
- If the hob cannot be switched off after using it, disconnect it from the power supply.
| ERROR CODE DESCRIPTION | POSSIBLE CAUSES ERROR ELIMINATION | ||
| The hob switches off and after 30 seconds emits an acoustic signal every 10 seconds. | Permanent pressure on the control zone. | Water or kitchen utensils on the control zone. | Clean the control zone. |
| A zone switches off and the indicator shows the message“C82”. | Overtemperature. | The internal temperature of electronic parts is too high. | Wait for the hob to cool down before using it again. |
AFTER-SALES SERVICE
Before contacting the After-sales Service:
- See if you can solve the problem yourself with the help of the "Troubleshooting guide".
- Switch the appliance off and then on again it to see if the problem has been eliminated.
If the problem persists after the above checks, contact the nearest After-Sales Service.
Always specify:
- a brief description of the fault;
- the product type and exact model;
the Service number (the number after the word Service on the rating plate), located under the appliance (on the metal plate). The Service number is also given in the warranty booklet; - your full address;
- your telephone number.
SERVICE

If any repairs are required, contact an authorised After-Sales Service Centre (to ensure the use of original spare parts and correct repairs). Spare parts are available for 10 years.
CONSIGNES IMPORTANTES POUR LA SÉCURITÉ
VOTRE SECURITE ET CELLE DE VOTRE ENTOURAGE MÉRITENT Toute VOitre ATTENTION
DECLARATION DE CONFORMITE (C)
GUIDA RICERCA GUASTI
cilllll lalccnllllllllllllllllll
JooJI 5 00
aI aegio Jell g. (aannn aagaae aalil jlll gla Jlaai) aaii eel aee ae aaie jiae jiae
10
ailll 145 aaiiaai aiall gaaas + jll iiaai all
gbl gblio jzj zj
jla 15ab!
"H" 151 g h b a i s L jj x aabill cils 1g y abia biai i hii y aibio s; Iosic. ai S L jj x gblll l y aai y gbaabio JSL wgo ayagll ayabill oJy dgo "H" 151

-1gjglj
Lgaii i 1
aLg jJb


aaii iie 82jgl laoe jll pji 10 aia jn nnnn nnnn nnnn nnnn nnnn nnnn nnnn nnnn nnnn nnnn nnnn nnnn nnnn nnnn nnnn nnnn nnnn nnnn nnnn nnnn nnnn nnnn nnnn nnnn nnnn nnnn nnnn nnnn nnnn nnnn nnnn nnnn nnnn nnn
Jauu Jauu Jauu Jauu Jauu Jauu Jauu Jauu
Jj 1
-211b10s
1
JgdsI gLoS H05RR-F-F egso a d Js s aalagj
\~3NJ400
\~2N 400
_CJ_g 230
()\~3230

(20 (JabLJbJc) ab 240-230
()\~230
\~2N 400
(120261.1w)
| اللهutron | |
| 2,4×3 | +~230 |
| (,)2,4×4 3 | +~230-240 |
| 2,1,5×4 | +~3230 |
| 2,1,5×5 | +~3N 400 |
| 2,1,5×4 | +~2N 400 |
0jll 1
J 1
.(B) alj b21 acgozo aIauo jy slzJI JxJgJgJL Jowil (A) alj b21 acgozo sIac 1
Lgio yjy ggl g jy gLo5 jyB21 aogly JSLJg 2
JSLboloabwglgssll
.(1)abaiI-aelciuogilgulllalagaoaCabglg(C)
g 10000000000000000000000000000000000000
3 0jdo jolol Jnss jg jgs jg jgs jgs jgs jgs jgs jgs jgs jgs jgs
J
a 100000000000000000000000000000000000000000000000
pIbll Jie Ws y 0o Jlsui sglw

JLQeW81CLaJe
aannnnae
.(jai aai aiw)i wll joi jil lc Iniai lgolssw:woLL Jao ci Ldo gai sill ao
aegil aclw
awlil awljgl gbll abio jj
J) INDUCTION SYSTEM j0, J3 18g21 gsspsss 2. wlll pclly lglg21 c1s5 1j eaiy y gblg blio :po
a1g 2

111 111 111 111 111 111 111 111 111 111 111 111 111 111 11
1g 1g8x1
5
J 10000000000000000000000000000000000000000
- 15gll JaaW alaia aagb y b
y 111 111 111 111 111 111 111 111 111 111 111 1

JLLI 1
5) 5)
Laiy 11juiuie aag aegal Jaa jia jia jia jia jia jao
jLg1g jyagj g aLc g aawg aale (JLaB21 1s L) yas
L 10000000000000000000000000000000000000000
pss no sall agle lgljg jie jie jie jie jie jie jie jie jie jie jie jie jie jie jie jie jie jie jie jie jie jie jie jie jie jie jie jie jie jie jie jie jie jie jie jie jie jie jie jie jie jie
jL
aL a 1000000000000000000000000000000000000000000
Aio Ljg jgl JLeu uauuul gui
gjgl g jgdl g jgl pbl lgl g b ic aai jlg w jll lg jw
aicu cai d gixi aabio lcll alilal yg xylgl aia xylgl (Lagcgc gcuu. gnuuSL) cull yg jia aee
1
jIgJl Jaiwi jll aai all g (joo y) Jolal cJ 5ji
Lo aouu Jai jgai pssw 8 (jagao) gaae oLJI) LJIa aegll
a 1

aai 1 aLod ciLi
Lagg gao jiai jie jiai jiai jiai jiai jiai jiai jiai jiai jiai jiai jiai jiai jiai jiai jiai jiai jiai jiai jiai jiai jiai jiai jiai jiai jiai jiai jiai jiai jiai jiai jiai jiai jiai jiai
1
ciill 10yol
.(WEEE) 124567890101101101101101101101101101101101101101101101101101101101
aalgl aillg lcl aoao aow gilai g no ayagllgc sclw paaanl gl aanall aaybllg iio no yalsll no asll Jls
区
a.1g.3≤1y.3a.1y.3≤1
aLJI
Lc
a aabio jao gglw yll jaeall gglg jagll Jqai w
aowill oocall ci gylg jywl bs Jozwi
ai = 12( ai - 1)
(aawwll a wth aag o aoswi x) gall aagg aall lng wi Jlaa Ibaia Jaoi j
aaii aaiiaiaiaiaiaiaaaagaaiaaa
C∈gaggagagagagagagagagagagagagagagagagagagagagagagagagagagagagagagagagagagagagag
a 1935/2004 (C) a
EC/2004/108,EMC,EMC (EEC/73/23,8,8) EC/2006/95 "a a a a a a
gall
a 1 1 1 1 1 1 1 1 1 1 1 1 1 1 1 1 1 1 1 1 1 1 1 1 1 1 1 1 1 1 1 1 1 1 1