ACM 854 - Cooker WHIRLPOOL - Free user manual and instructions
Find the device manual for free ACM 854 WHIRLPOOL in PDF.
Download the instructions for your Cooker in PDF format for free! Find your manual ACM 854 - WHIRLPOOL and take your electronic device back in hand. On this page are published all the documents necessary for the use of your device. ACM 854 by WHIRLPOOL.
USER MANUAL ACM 854 WHIRLPOOL
ENGLISH Instructions for use Page
Instructions for use Page
CARE AND CLEANING INSTRUCTIONS
DECLARATION OF CONFORMITY CE
- Before performing any repair or other work, disconnect the appliance from the electrical power supply.
- The appliance must be correctly installed by a qualified technician in accordance with the applicable safety standards.
- It is essential that this appliance is earthed.
- The manufacturer cannot accept any liability for personal injury or damage to property resulting from a failure to comply with the above-mentioned standards.
- Remove the cardboard protections from inside the oven.
- Fit the accessories.
- The sides of furniture or appliances located next to the cooker must be capable of withstanding temperatures which can reach 80°C.
- This appliance complies to CLASS X (protection against fire hazard). Electrical connection Before connecting the appliance, it is necessary to ensure that:
1. The nominal voltage of the electrical power
supply to the dwelling is the same as that of the appliance, as stated on the rating plate.
2. The power supply line to which the appliance
is to be connected is of a sufficient power, relative to the maximum power consumed by the appliance, as stated on the rating plate.
3. The electrical power installation of the
dwelling is correctly earthed.
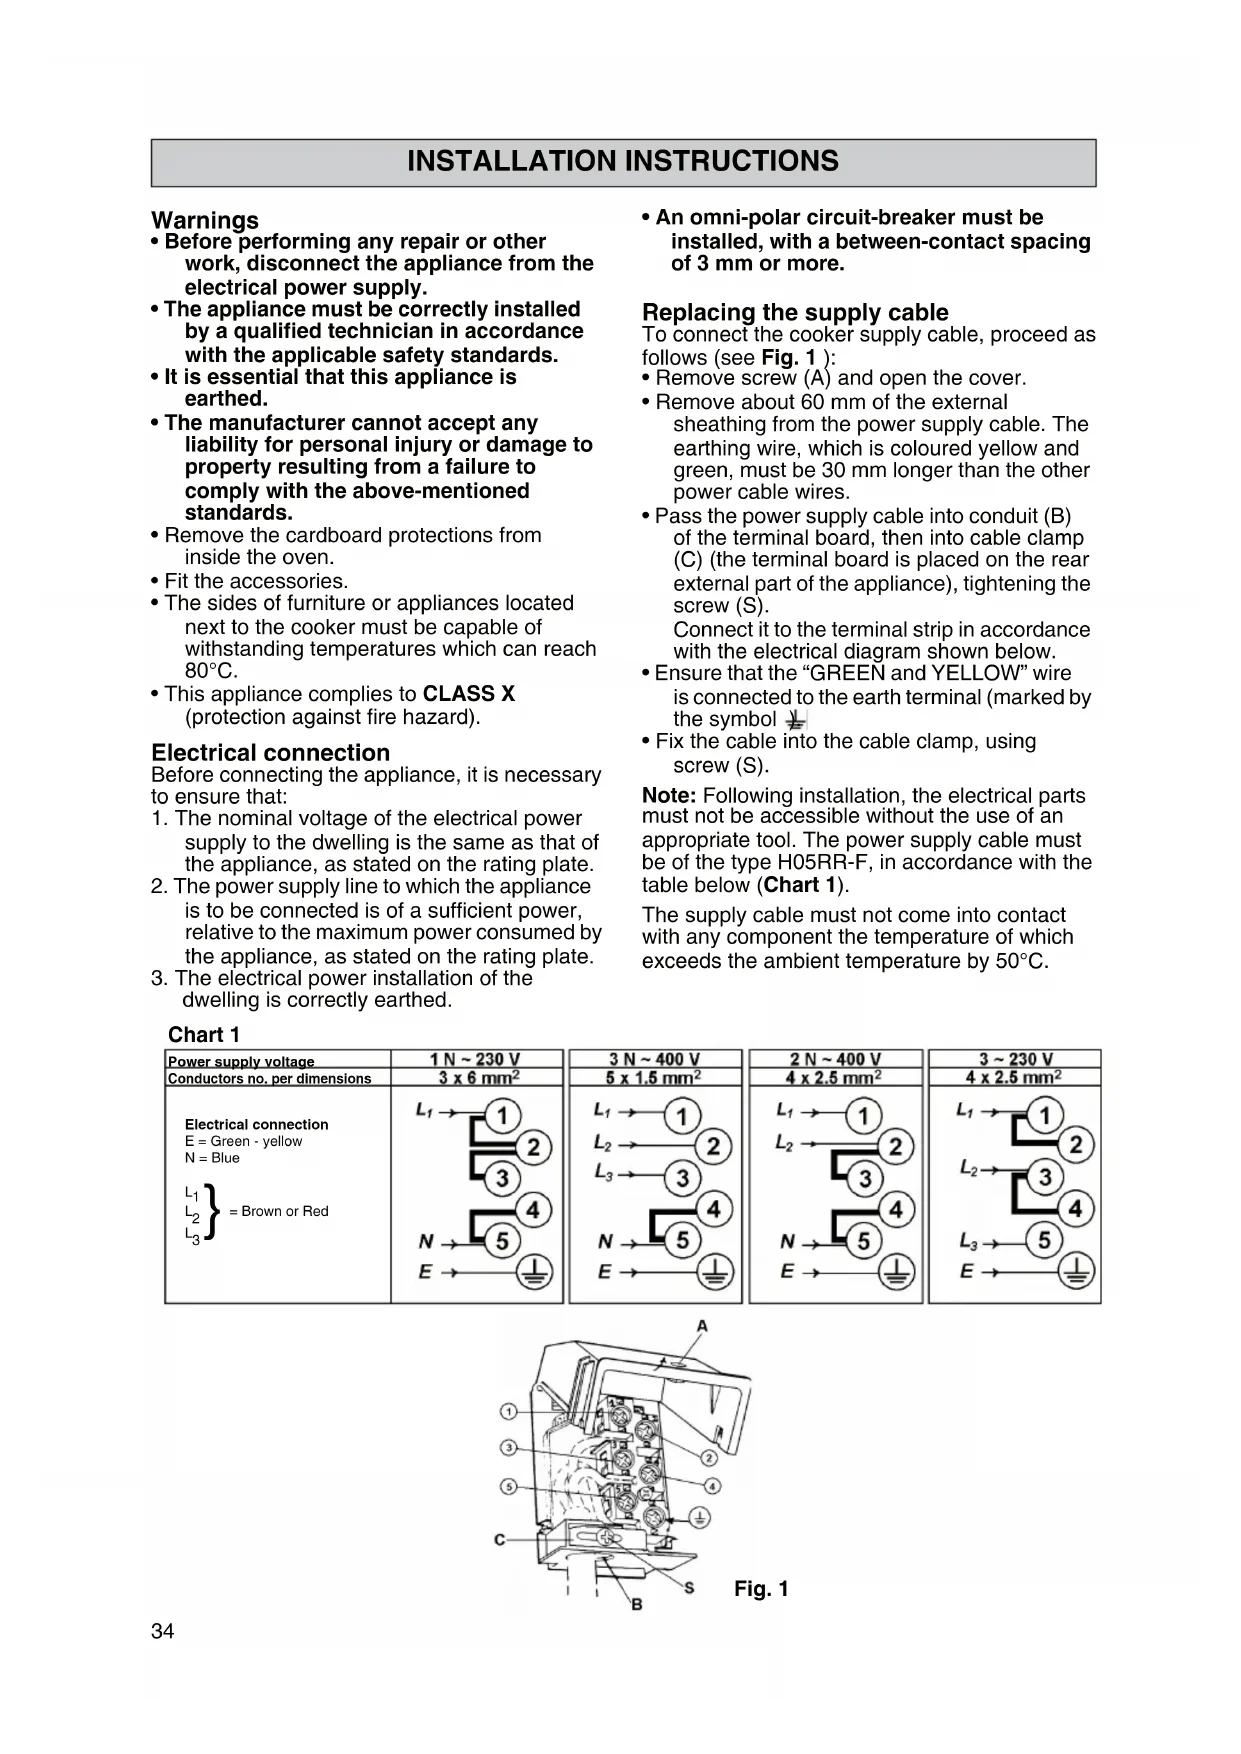
- An omni-polar circuit-breaker must be installed, with a between-contact spacing of 3 mm or more. Replacing the supply cable To connect the cooker supply cable, proceed as follows (see Fig. 1 ):
- Remove screw (A) and open the cover.
- Remove about 60 mm of the external sheathing from the power supply cable. The earthing wire, which is coloured yellow and green, must be 30 mm longer than the other power cable wires.
- Pass the power supply cable into conduit (B) of the terminal board, then into cable clamp (C) (the terminal board is placed on the rear external part of the appliance), tightening the screw (S). Connect it to the terminal strip in accordance with the electrical diagram shown below.
- Ensure that the “GREEN and YELLOW” wire is connected to the earth terminal (marked by the symbol ).
- Fix the cable into the cable clamp, using screw (S). Note: Following installation, the electrical parts must not be accessible without the use of an appropriate tool. The power supply cable must be of the type H05RR-F, in accordance with the table below (Chart 1). The supply cable must not come into contact with any component the temperature of which exceeds the ambient temperature by 50°C. INSTALLATION INSTRUCTIONS Power supply voltage Chart 1 Electrical connection E = Green - yellow N = Blue
Warning This appliance must be earthed. Electrical connections for appliances supplied without mains cable fitted The appliance must be connected to a socket- outlet having a rated current exceeding 13 Amp BS 1363 plug is therefore not suitable. An all pole switch with contact separation of at least 3 mm, must be provided no further than 2 metres from the appliance as a means of isolation. The supply cable must be of type: H 05 RR-F in accordance with Chart 1. This product must be earthed and fused in accordance with current rating of the appliance. Check the efficiency of earth connection of the appliance and that the earth connector is never interrupted by any switch. INSTALLATION INSTRUCTIONS The cooker has 4 feet which can be used to match the height of the kitchen furniture (see Fig. 2). The cooker must be installed as indicated in Fig. 1. In case of installation next to column units that exceed the height of the hob, always leave at least 100 mm between the appliance and the column unit. Fig. 1 Fig. 236
Packaging materials (plastic bags, polystyrene, etc.) are potentially dangerous and must be kept out of reach of children.
The packaging is recyclable, as indicated by the recycling label.
Check that the cooker is not damaged, and that the oven door closes properly.
The installation and electrical connection of the appliance must be performed by a qualified technician according to the manufacturer’s instructions and in compliance with the applicable local safety standards.
Remove the card protectors and plastic film from inside the oven, and remove all the fittings.
Heat the oven to 200°C for about one hour. This will result in some unpleasant odours from the protective greases used on the oven elements and from the insulating material. These fumes are not harmful. Attention
Before any maintenance on the appliance disconnect it from the electrical power supply.
Keep children away from the appliances when they are in use.
The appliances must be repaired or adjusted exclusively by a qualified technician.
Make sure that the electrical wires of other electrical appliances near the cooker do not come into contact with hot parts.
5. Do not switch on the hotplates/cooking zones
when there is no pan in position.
The cooktop features different size hotplates/ cooking zones. Use pans whose base diameter is the same as or slightly larger than the diameter of the hotplate/cooking zone. Use flat bottomed pans. The use of pans with concave or convex bottoms may damage the cooktop.
Do not use the top as a work surface or a support surface.
Do not leave the appliance unattended when frying food - risk of fire.
If the glass ceramic surface should break or crack due to violent impact (falling objects, etc...) do not use it and call After-Sales Service immediately.
Do not place food wrapped in aluminium foil, plastic containers or cloths on the hot cooking zones.
Do not drag pans across the glass-ceramic surface - risk of scratches.
Avoid spilling sugar and similar substances on the cooktop. If necessary clean the cooktop carefully following the care and maintenance instructions in this handbook.
Use protective oven gloves to remove hot dishes or plates from the oven.
Do not store flammable items in the oven. They could catch fire when the oven is switched on. When the oven is in use the interior walls of the accessory drawer and the metal accessories will heat up. The accessory drawer should only be used to store the accessories supplied with the appliance; do not use it to store flammable materials or pressurized containers (spray canisters, etc. and plastic utensils).
Do not cook food on the dripping pan at the bottom of the oven.
Before opening the lid, remove all spilled liquids. Do not shut the lid before the cooking zones are cold.
The manufacturer can accept no liability for any personal injury or damage to property caused by improper use of the cooker.
The cooker has been manufactured from recyclable materials. It must be disposed of in accordance with local waste disposal regulations. Before disposing of the appliance, cut the power supply cable to make it unusable.
Do not use aluminium foils to protect the oven walls or bottom. This appliance has been designed, constructed and marketed in compliance with:
- safety requirements of EEC Directive “Low voltage” 73/23;
- protection requirements of EEC Directive “EMC” 89/336 modified by the EEC Directive 93/68 classification; - This appliance complies to “Class X” regulations. - This appliance is suitable for contact with foodstuffs, and complies with EEC Directive 89/109. - This appliance has been designed to be used only for home cooking. Any other use such as heating a room is improper and dangerous.
BEFORE USING THE APPLIANCE
Keep this booklet for future reference.
GENERAL PRECAUTIONS AND RECOMMENDATIONS
DECLARATION OF CONFORMITY CE37
- When using the oven keep the lid open to allow fumes exhaustion.
- When using the oven, we recommend you remove the accessories which you are not using for cooking (wire shelf, drip tray or baking tray).
- To get best results always use appropriate cooking accessories (i.e. aluminium utensils, heat resistant glass cookery).
HOTPLATES /COOKING ZONES
Hotplates/Cooking zones Turn the knob corresponding to the hotplate/ cooking zone to the desired position (1 to 6) (max. position). Each position represents a different level. The highest number corresponds to the highest temperature. Important Never use the hotplates/cooking zones without pans. For cooking, use thick-based, flat pans which are specially designed for electric hobs and have a diameter at least equal to that of the hotplate. Never use utensils with a concave or rounded base. MULTIFUNCTION OVEN (dependent on model) ATTENTION : When the oven is in use, the accessible parts can become hot. Small children must be kept away. Your oven is provided with: - a thermostat knob to set the desired temperature; - a functions selector knob to set the function suitable to the type of cooking. For detailed information please see the separate Product Description Sheet.
- To start the oven switch on both thermostat knob and functions selector knob. STATIC OVEN (dependent on model) Your oven is provided with one knob: Oven light 50-250 Temperature range Bottom heating element Top heating element Grill Grill/turnspit For detailed information please see the separate Product Description Sheet.
- To start the oven turn the knob to the desired position.
1. Open the oven door.
2. Place the heat shield under the control panel
3. Turn the selector knob to the Grill position
and select the maximum temperature. Note : For appliances with one oven control knob only, turn the knob to the grill position.
4. Close the oven door until the heat shield is in
contact with the cooker (Fig. 2). Accessory drawer To open the accessory drawer, pull it forwards at both sides as illustrated. Turns
Place the food on the spit (A) and secure it using the two forks (B), making sure that it is well balanced to avoid excessive strain on the turnspit (C) motor.
Put the two spit supports into the holes (F) of the tray.
Then put the tray into the 1
level from the bottom fitting the square end of the spit into the motor axis (E).
4. Remove the spit handle (G).
5. We suggest that you pour some water into
the bottom of the tray to reduce smoke and splashes of fat.
6. Start the turnspit turning the oven control
knob to the symbol .
7. Leave the oven door open during cooking
and fit the heat shield to protect the control buttons against excessive heat. Fig. 1 Fig. 239
CARE AND CLEANING INSTRUCTIONS
Before any cleaning operation disconnect the appliance from the mains. Hotplates Clean the hotplates when they are warm (not hot!). Use a cloth moistened with water and salt. Dry and clean with a cloth moistened with cooking oil. Glass ceramic cooking zones Clean the cooking zones when they are cool, after each use. This will prevent the build-up of dirt and make cleaning easier.
- Use a clean cloth, absorbent kitchen wipes and washing up liquid or a specific glass ceramic hob cleaner.
- Remove baked-on dirt with a suitable scraper, which can be bought by specialized shops, and specific cleaning products.
- Food spills should be cleaned off before they bake onto the glass ceramic surface.
- Do not use abrasive products, bleach, oven cleaner spray or pan scourers.
- The hob should be treated periodically with a proprietary brand of protective wax for glass ceramic hobs.
- Do not spill sugar or similar substances on the cooktop to avoid damaging the surface. If necessary, clean it immediately. Enamelled surfaces
- Clean with a damp sponge using soap and water. Grease can be removed easily using hot water or a specific product for cleaning enamelled surfaces. Do not use scouring powder. Do not clean hot surfaces. Do not leave any acid or alkaline substances (lemon juice, vinegar, salt, etc.) on the enamel.
- Clean the parts in stainless steel with specific cleansers for stainless steel surfaces. Oven Clean the walls of the oven with hot water and soap. Dissolve any food residues with a specific oven cleaner, then rinse and dry thoroughly. When the oven is cold, clean the outside glass parts. Do not scouring powder or abrasive pads. Oven light If it is necessary to replace the oven light bulb, switch off the main power supply. Bulb: 15 W / 230 V, type E14, heat-resistant to 300°C. Removing the oven door Open the oven door completely. Grasp hook (A) and insert it into the catch above it. Close the door about half way and gently pull in the direction of the arrow. To reassemble, perform the same operations in reverse order.40 COOKING TABLES
Note : Cooking temperatures and times are given as an indication only. Food Function Preheating
- Put the food on the centre of the grid, leave • Turn the meat halfway through cooking. at least four centimetres from the back of • Fit the heat shield when using the grill. the oven.
Note : Cooking temperatures and times are given as an indication only. Type of food Functions Preheating time (5 minutes) Runner position (from bottom) shelf Temperature (°C) Cooking time (minutes) MEAT Entrecotes Extra grill X 4 max. 20-30 Pork chops Extra grill X 4 max. 15-20 Sausage Extra grill X 4 max. 20-30 Fish Extra grill X 4 max. 15-25 Chicken thighs Grill X 3 max. 20-30 Kebabs Grill X 3 max. 20-30 Spare ribs Grill X 4 max. 30-40 1/2 chicken Grill X 3 max. 40-50 COOKING TABLES42 AFTER-SALES SERVICE This appliance is constructed to the highest standards of workmanship utilising advanced technology to ensure it will provide lasting and trouble-free operation. If you should notice any malfunction, first check to make sure you have followed the instructions in this handbook correctly. The incorrect operations is often the result of minor problems. If, after consulting the handbook and checking the electrical connections, you are still unable to find the cause of the problem, call After-Sales Service, specifying:
- The nature of the fault.
- The exact model and type of your appliance.
- Your phone number and area code.
- The service number which is indicated on the rating plate placed at the rear of the appliance or at the accessory space right side.
- The service numbers are also indicated on the guarantee booklet.5019 100 70147/A
Ecological Paper D GB F NL Printed in Italy 2/07/00