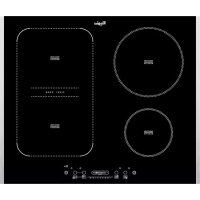
ACM 810 LX - Cooker WHIRLPOOL - Free user manual and instructions
Find the device manual for free ACM 810 LX WHIRLPOOL in PDF.



| Product type | Induction hob |
| Brand | Whirlpool |
| Model | ACM 810 LX |
| Number of cooking zones | 4 (including 1 Flexi Cook zone) |
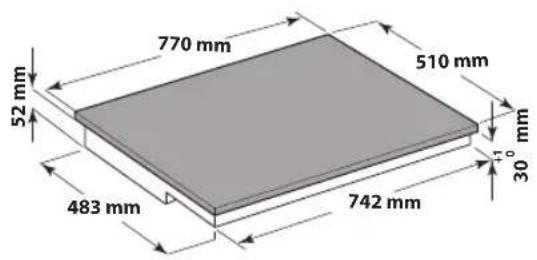
| Estimated dimensions (W x D x H) | 77 x 51 x 5 cm (built-in) |
| Estimated weight | 12 kg |
| Power supply | 230 V ~ / 400 V 3N ~ depending on connection |
| Maximum total power | 7.4 kW (approximate) |
| Main functions | Booster (rapid boil), Flexi Cook (expandable zone), Timer, Control panel lock, Demo mode |
| Control type | Touch slider with + and - keys |
| Display | LED for power and timer |
| Pan detection | Yes, automatic shut-off after 60s without pan |
| Residual heat indicator | Yes (H symbol) |
| Child safety | Control panel lock |
| Safety shut-off | Yes, after 10s without selection, or overheating |
| Pan compatibility | Ferromagnetic base (magnetic), appropriate diameter (min 10 cm depending on zone) |
| Cleaning | Ceramic glass surface, specific cleaning products, soft cloth |
| Spare parts | Available for 10 years after purchase |
| Repairability | Whirlpool authorized after-sales service |
| Accessories included | User manual, installation guide (cable not included) |
| Standards | CE, WEEE compliance |
Frequently Asked Questions - ACM 810 LX WHIRLPOOL
User questions about ACM 810 LX WHIRLPOOL
0 question about this device. Answer the ones you know or ask your own.
Ask a new question about this device
Download the instructions for your Cooker in PDF format for free! Find your manual ACM 810 LX - WHIRLPOOL and take your electronic device back in hand. On this page are published all the documents necessary for the use of your device. ACM 810 LX by WHIRLPOOL.
USER MANUAL ACM 810 LX WHIRLPOOL
SENSING THE DIFFERENCE
DEUTSCH Installation Seite 2 Bedienungsanleitung Seite 4
ENGLISH Installation Page 2 Instructions for use Page 13
FRANÇAIS Installation Page 2 Mode d'emploi Page 21
NEDERLANDS Installatie Pagina 2 Gebruiksaanwijzing Pagina 30
| ESPAÑOL | Instalación | Página | 2 | Instrucciones de uso | Página | 39 |
| PORTUGUÊS | Instalação | Página | 2 | Instruções de utilização | Página | 48 |
| ITALIANO | Installazione | Pagina | 2 | Istruzioni per l’uso | Pagina | 57 |
| ΕΛΛΗΝΙΚΑ | Εγκατάσταση | Σελίδα | 2 | Οδηγίες χρήσης | Σελίδα | 65 |
| SVENSKA | Installation | Sidan | 2 | Bruksanvisning | Sidan | 74 |
| NORSK | Installasjon | Side | 2 | Bruksanvisning | Side | 82 |
| DANSK | Installation | Side | 2 | Brugervejledning | Side | 90 |
| SUOMI | Asennus | Sivu | 2 | Käyttöohje | Sivu | 99 |
| POLSKI | Instalacja | Strona | 2 | Instrukcja obsługi | Strona | 107 |
| ČESKY | Instalace | Strana | 2 | Návod k použití | Strana | 116 |
| SLOVENSKY | Inštalácia | Strana | 2 | Návod na používanie | Strana | 124 |
| MAGYAR | Üzembe helyezés | Oldal | 2 | Használati útmutató | Oldal | 133 |
| РУССКИЙ | Установка | Стр. | 2 | Инструкции по пользованию прибором | Стр | 142 |
| БЪЛГАРСКИ | Инсталиране | Страница | 2 | Инструкции за употреба | Страница | 151 |
| ROMÂNÄ | Instalarea Pagina 2 | Instrucțiuni de utilizare Pagina 160 | ||||
A
B


natural_image
Two abstract diagrams showing branching structures with arrows, no text or symbols present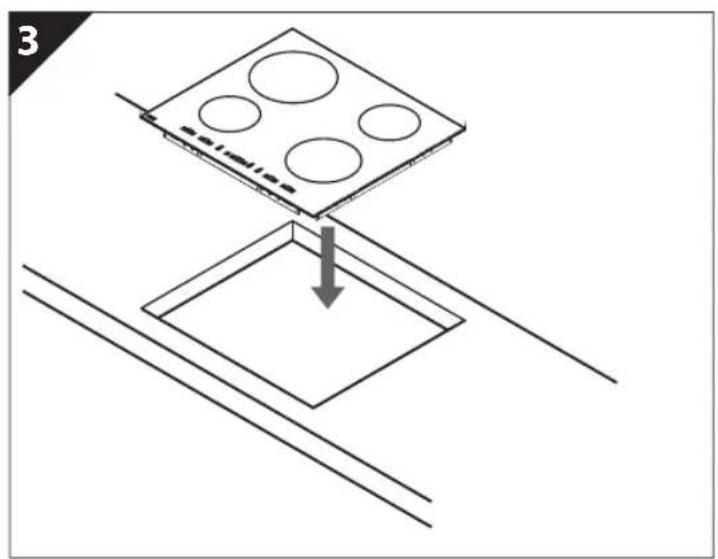
natural_image
Diagram showing a layered structure with circular elements and an arrow indicating downward motion (no text or symbols)natural_image
Three technical diagrams labeled A, B, and C showing mechanical or electronic components with no visible text or symbols.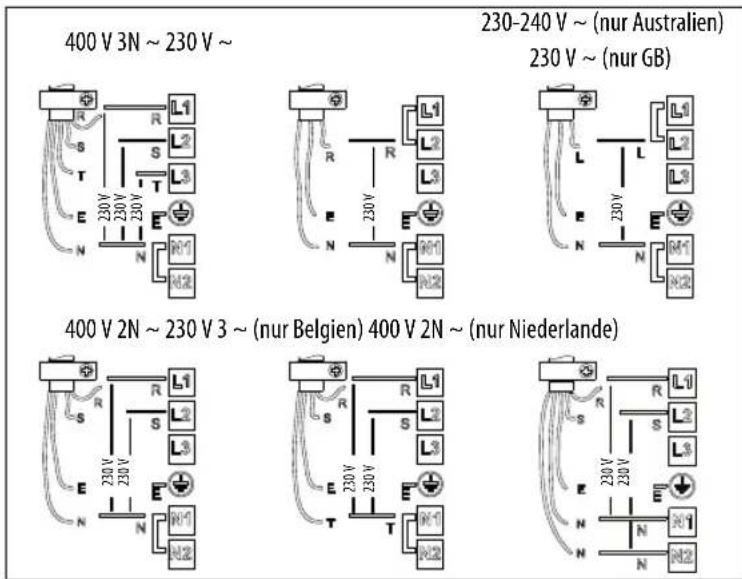
IMPORTANT SAFETY INSTRUCTIONS
YOUR SAFETY AND THAT OF OTHERS IS VERY IMPORTANT
This manual and the appliance itself provide important safety messages, to be read and always observed.

This is the danger symbol, regarding safety, warning of potential risks to users and others.
All safety messages will be preceded by the danger symbol and the following words:

DANGER
Indicates a hazardous situation which, if not avoided, will result in serious injury.

WARNING
Indicates a hazardous situation which, if not avoided, could cause serious injury.
All messages relevant to safety specify the potential risk to which they refer and indicate how to reduce the risk of injury, damage and electric shocks due to incorrect use of the appliance. Make sure to comply with the following:
- The appliance must be disconnected from the power supply before carrying out any installation operation.
- Installation and maintenance must be carried out by a specialised technician, in compliance with the manufacturer's instructions and the local safety regulations in force. Do not repair or replace any part of the appliance unless specifically stated in the user manual.
- The appliance must be earthed.
- The power cable must be long enough for connecting the appliance, fitted in the cabinet, to the power supply.
- For installation to comply with the current safety regulations, an omnipolar switch with minimum contact gap of 3mm is required.
- Do not use multi-sockets or extension cords.
- Do not pull the appliance's power cable.
- The electrical parts must not be accessible to the user after installation.
- The appliance is designed solely for domestic use for cooking food. No other use is permitted (e.g. heating rooms). The Manufacturer declines any liability for inappropriate use or incorrect setting of the controls.
- The appliance and its accessible parts become hot during use. Care should be taken to avoid touching heating elements. Children less than 8 years old shall be kept away unless continuously supervised.
- The accessible parts can become very hot during use. Children must be kept away from the appliance and watched over to ensure they do not play with it.
- Do not touch the appliance heating elements during and after use. Do not allow the appliance to come into contact with cloths or other flammable materials until all the components have cooled sufficiently.
- Do not place flammable materials on or near the appliance.
- Overheated oils and fats catch fire easily. Pay attention when cooking food products rich in fat and oil.
- This appliance can be used by children aged from 8 years and above and persons with reduced physical, sensory or mental capabilities or lack of experience and knowledge if they have been given supervision or instruction concerning use of the appliance in a safe way and understand hazards involved. Children shall not play with the appliance. Cleaning and user maintenance shall not be made by children without supervision.
- A separator panel (not supplied) must be installed in the compartment under the appliance.
- If the surface is cracked, switch off the appliance to avoid the possibility of electric shock.
- The appliance is not intended to be operated by means of an external timer or separate remote control system.
- Unattended cooking on a hob with fat or oil can be dangerous and may result in fire. NEVER try to extinguish a fire with water, but switch off the appliance and then cover flame e.g. with a lid or a fire blanket.
Danger of fire: do not store items on the cooking surfaces.
- Do not use steam cleaners.
- Metallic objects such as knives, forks, spoons and lids should not be placed on the hob surface since they can get hot.
- After use, switch off the hob element by its control and do not rely on the pan detector.
SAFEGUARDING THE ENVIRONMENT

Disposal of packing
The packing material is 100% recyclable and marked with the recycling symbol (☐). The various parts of the packing must not be dispersed in the environment, but disposed of in compliance with local regulations.
Disposal
This appliance is marked in conformity with European Directive 2002/96/EC on Waste Electrical and Electronic Equipment (WEEE).
By ensuring that this appliance is correctly disposed of, the user can help prevent potentially negative consequences for the environment and the health of people.
The symbol 📄 on the appliance or the accompanying documentation indicates that this product should not be treated as domestic waste but must be taken to an appropriate collection point for recycling WEEE.
Energy saving
For optimum results, it is advisable to:
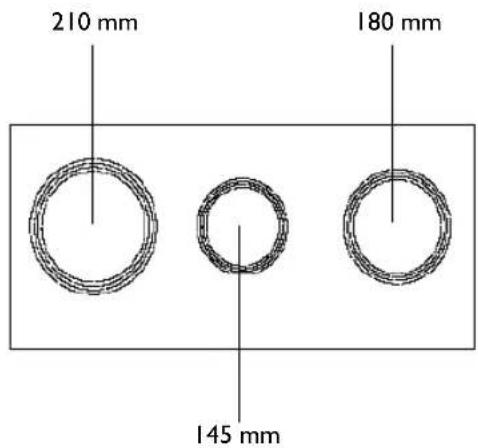
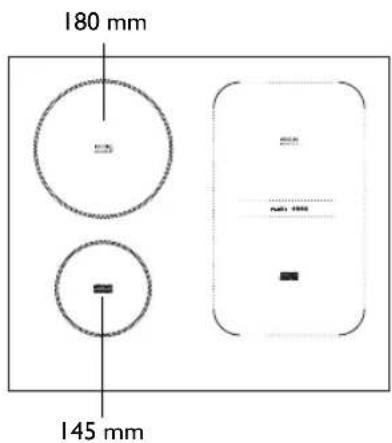
- Use pots and pans with bottom width equal to that of the cooking zone.
- Only use flat-bottomed pots and pans.
- When possible, keep pot lids on during cooking.
- Use a pressure cooker to to save even more energy and time.
- Place the pot in the middle of the cooking zone marked on the hob.
DECLARATION OF CONFORMITY (€)
- This appliance, intended to come into contact with food products, complies with Regulation (C €) no. 1935/2004, and has been designed, manufactured and marketed in conformity with the safety requirements of "Low Voltage" Directive 2006/95/EC (replacing 73/23/EEC as amended) and protection requirements of "EMC" Directive 2004/108/EC.
BEFORE USE
IMPORTANT: The cooking zones will not switch on if pots are not the right size. Only use pots bearing the symbol "INDUCTION SYSTEM" (Figure opposite). Place the pot on the required cooking zone before switching the hob on.
EXISTING POTS AND PANS

Use a magnet to check if the pot is suitable for the induction hob: pots and pans are unsuitable if not magnetically detectable.
- Make sure pots have a smooth bottom, otherwise they could scratch the hob. Check dishes.
- Never place hot pots or pans on the surface of the hob's control panel. This could result in damage.
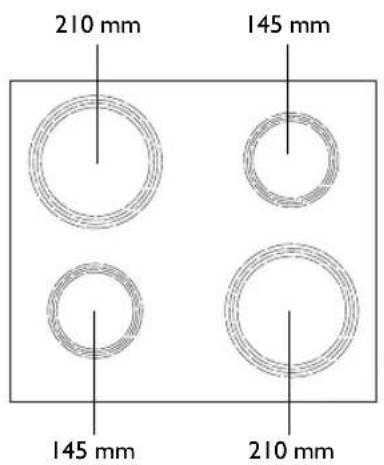
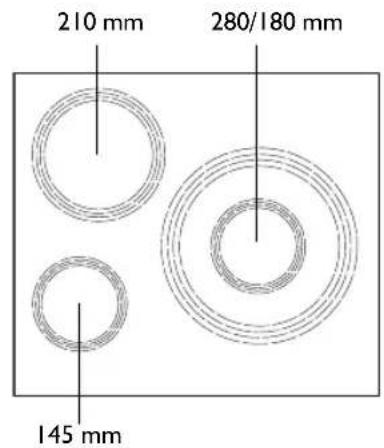
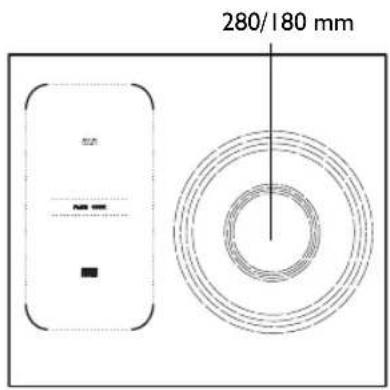
RECOMMENDED POT BOTTOM WIDTHS


INSTALLATION
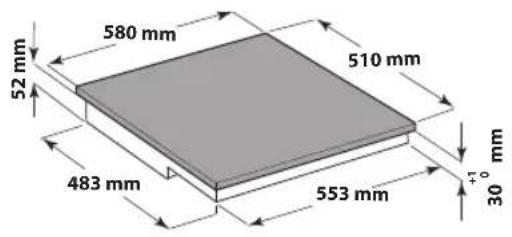
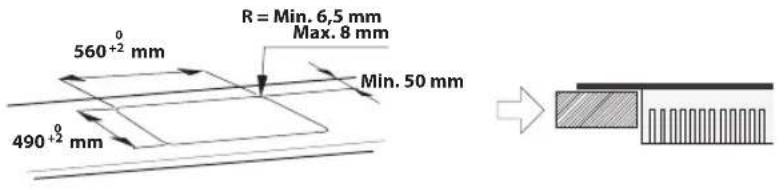
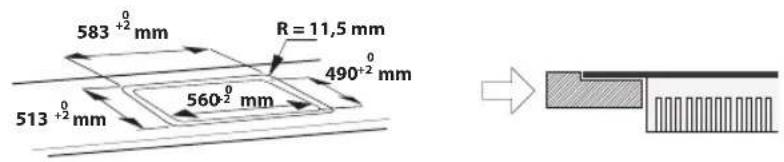
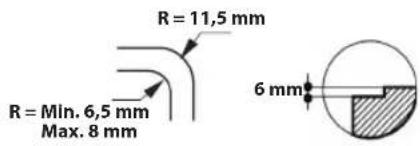
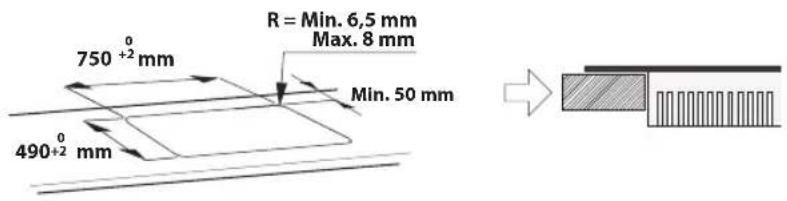
After unpacking the product, check for any damage during transport. In case of problems, contact the dealer or the After-Sales Service. For built-in dimensions and installation instruction, see the pictures in page 2.
PREPARING THE CABINET FOR FITTING

WARNING
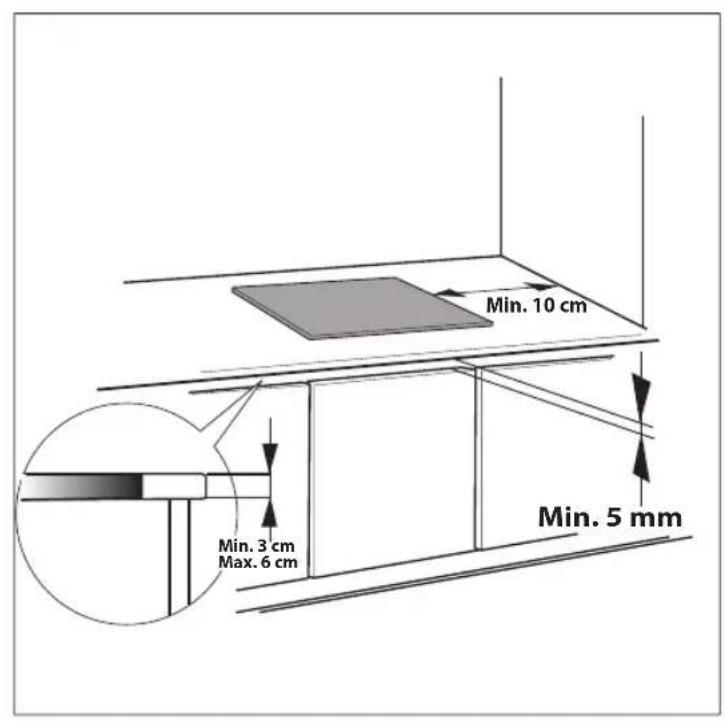
- Install a separator panel under the hob.
- The lower part of the product must not be accessible after installation.
- Do not fit the separator panel if an undertop oven is installed.
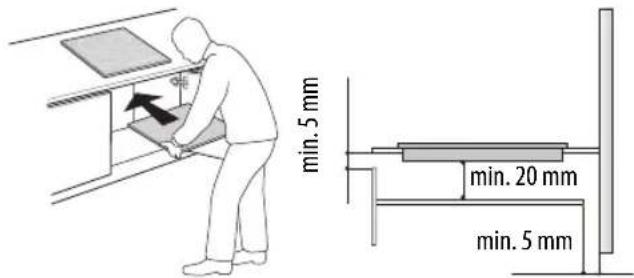
• The distance between the underside of the appliance and the separator panel must respect the dimensions given in the figure.
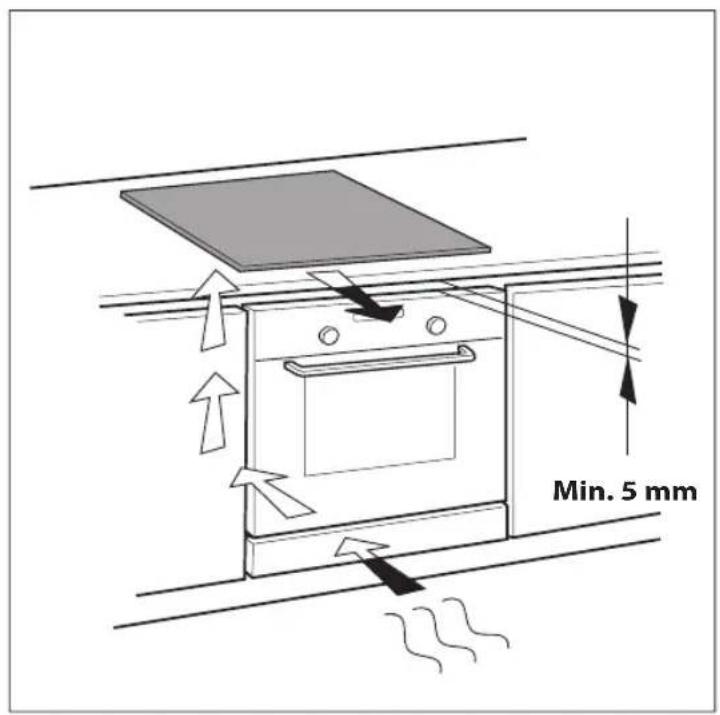
• In order to ensure the correct operation of the product, do not obstruct the minimum required clearance between the hob and the top of the unit (min. 5 mm).
- If an undertop oven is installed, make sure the oven is equipped with a cooling system.
• Do not install the hob above a dishwasher or washing-machine, so that the electronic circuits do not come into contact with steam or moisture which could damage them.
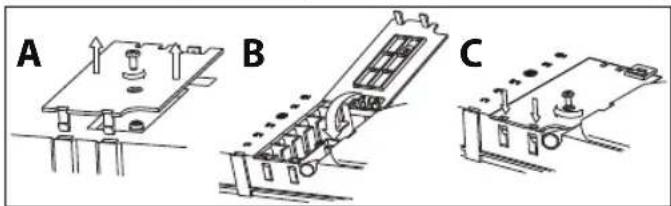
• In the case of flush-mounted installation, call the After-Sales Service to request assembly of screws kit 4801 211 00112.
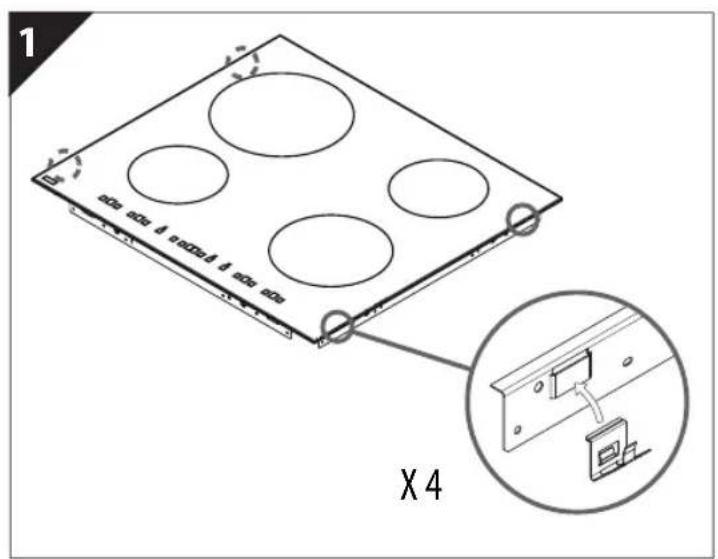
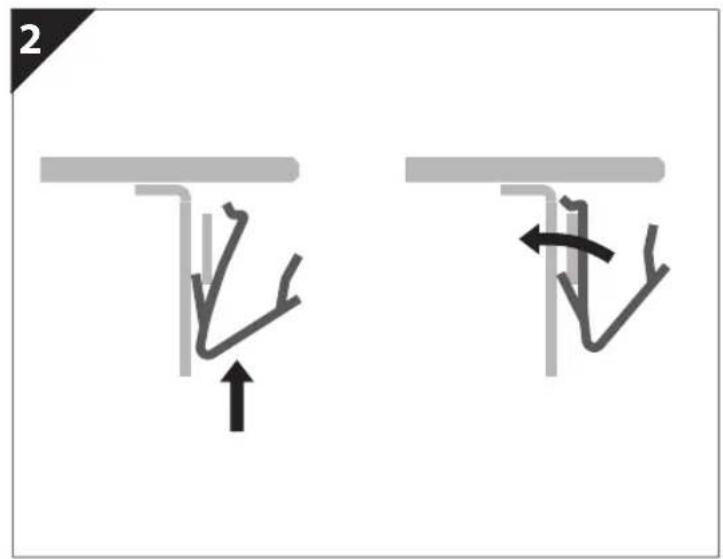
• To remove the hob, use a screwdriver (not provided) to prise off the perimeter clips on the underside of the appliance.
ELECTRICAL CONNECTION

WARNING
- Disconnect the appliance from the power supply.
- Installation must be carried out by qualified personnel who know the current safety and installation regulations.
- The manufacturer declines all liability for injury to persons or animals and for damage to property resulting from failure to observe the regulations provided in this chapter.
- The power cable must be long enough to allow the hob to be removed from the worktop.
- Make sure the voltage specified on the dataplate located on the bottom of the appliance is the same as that of the home.
Connection to the terminal block
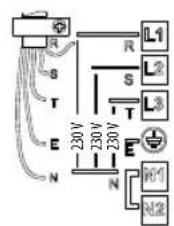
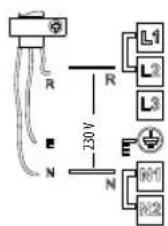
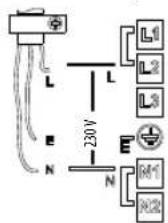
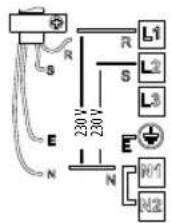
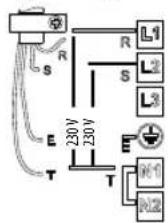
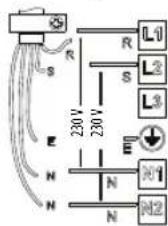
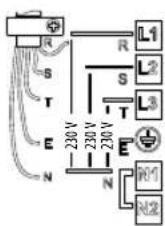
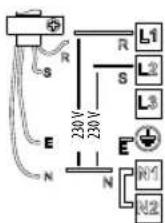
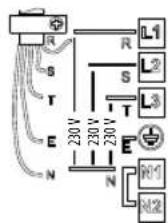
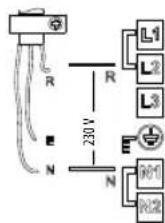
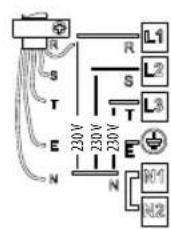
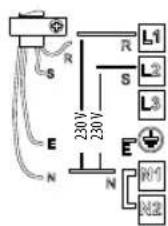
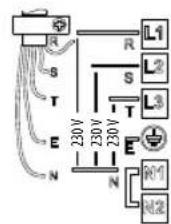
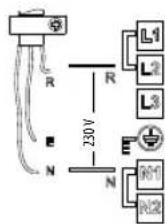
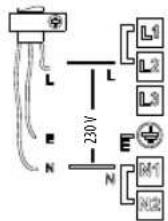
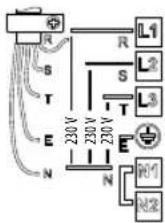
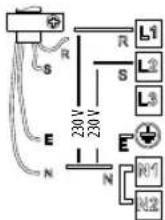
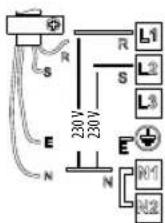
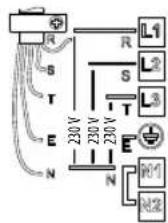
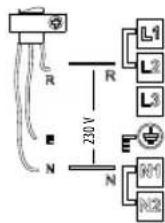
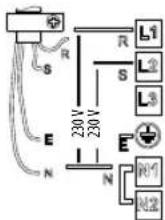
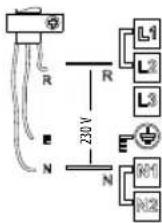
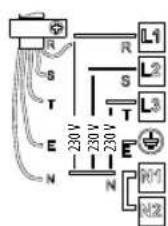
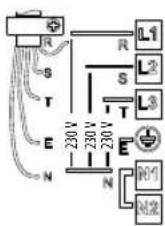
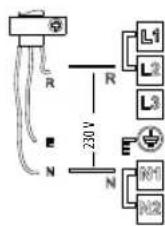
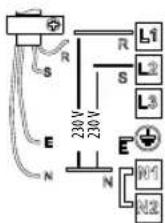
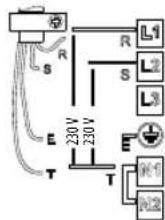
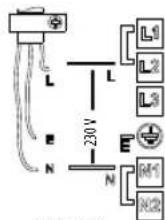
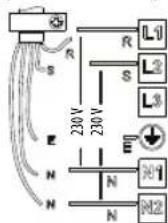
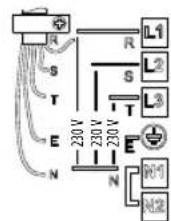
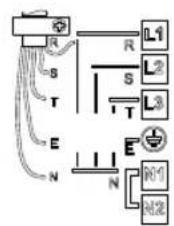
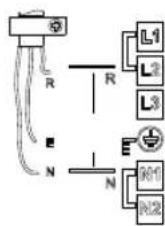
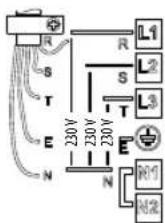
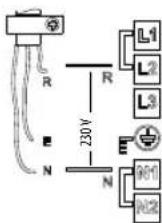
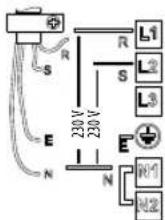
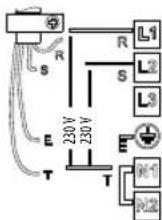
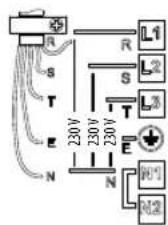
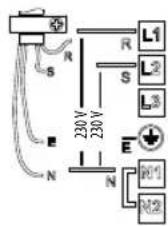
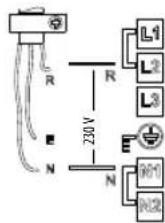
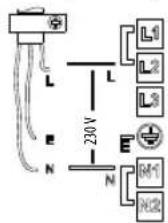
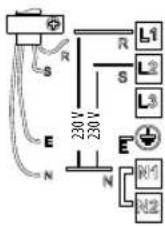
For the electrical connection, use an H05RR-F cable as specified in the table below.
| Wires Number x size | |
| 230 V ~ + | 3 × 4 mm^2 |
| 230-240 V ~ + | 3 × 4 mm^2 (Australia only) |
| 230 V 3 ~ + | 4 × 1.5 mm^2 |
| 400 V 3N ~ + | 5 × 1.5 mm^2 |
| 400 V 2N ~ + | 4 × 1.5 mm^2 |
natural_image
Three technical diagrams labeled A, B, and C showing mechanical assembly or assembly steps (no text or symbols present)400 V 3N \~ 230 V \~
230-240 V \~ (Australia only)
230 V \~ (UK only)
400 V 2N \~ 230 V 3 \~ (Belgium only) 400 V 2N \~ (Holland only)
Important:
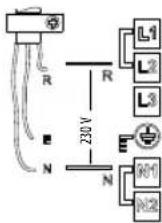
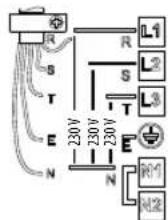
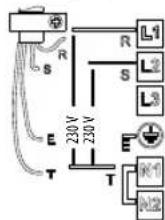
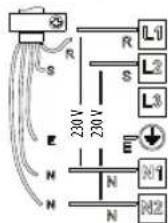
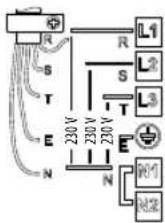
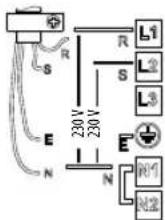
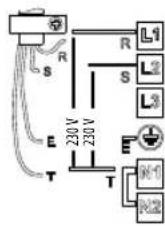
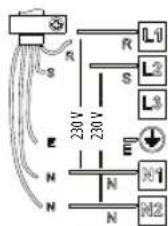
- Based on the wiring diagram (see figure) either keep or remove the metal jumpers between the screws on the terminal block L1-L2 and N1-N2.
- If the cable is provided, see the connection instructions attached to the cable.
- Make sure all six screws on the terminal block are tightened after connecting the cables.
Example of jumper present (left) or removed (right). See the wiring diagram for details (the jumpers can be between L1-L2 and between N1-N2).
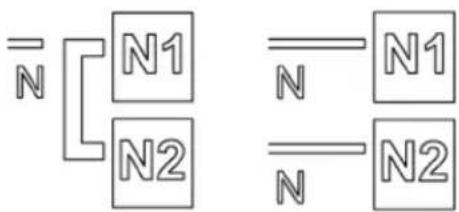
flowchart
graph TD
    A["¬N"] --> B["N1"]
    A --> C["N2"]
    D["¬N"] --> E["N1"]
    D --> F["N2"]
INSTRUCTIONS FOR USE
Control Panel Description
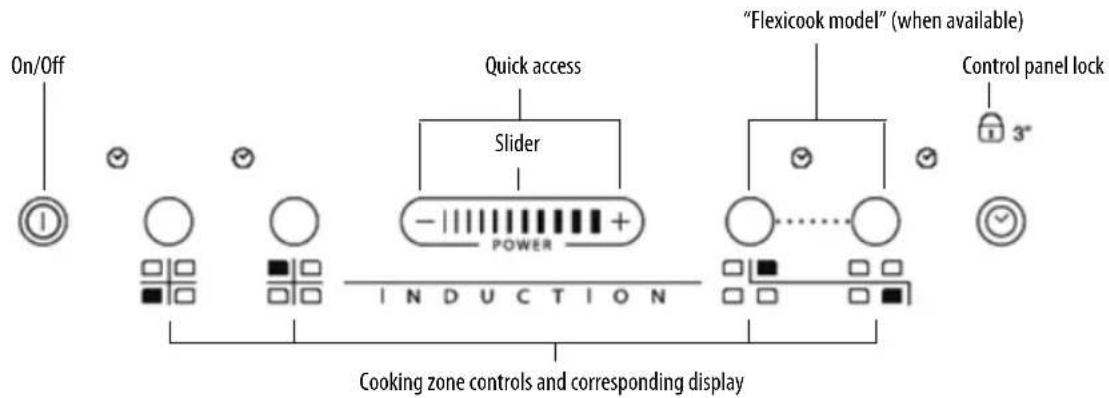
Control panel
Switching the hob ON/OFF
To switch the hob on, press the ⏻ button for approx. 2 seconds until the cooking zone displays light up. To switch off, press the same button until the displays switch off. All the cooking zones are deactivated
If the hob has been in use, the residual heat indicator "H" remains lit until the cooking zones have cooled down.
If within 10 seconds of switching on, no function is selected, the hob switches off automatically.
Switching on and adjusting cooking zones

After switching the hob on, activate the required cooking zone by pressing the corresponding circular button and place the pot on the zone. With the Slider control it is possible to select the required power level, from min. 0 to max. 9, or booster "P" if available.
To increase the power level, slide your finger on the slider from left to right several times; to decrease it, slide in the opposite direction. Alternatively the "+" and "-" quick access buttons can be used.
Deactivation of cooking zones
To switch off the cooking zone, press the corresponding button for more than 3 seconds.
The cooking zone switches off and, if still hot, the letter "H" appears on the zone display.
Control panel lock
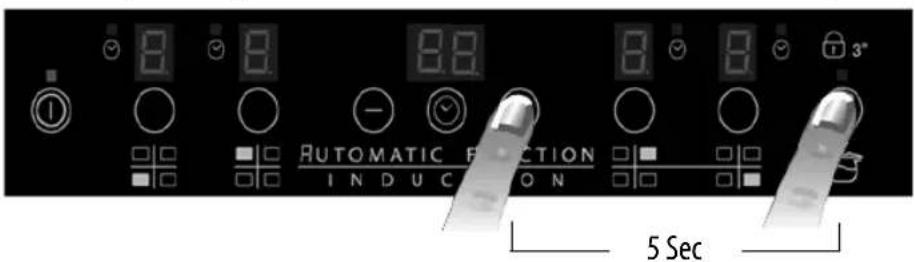
This function locks the controls to prevent accidental activation of the hob. To activate the control panel lock, switch the hob on and press the Timer button for three seconds; an acoustic signal and a luminous indicator near the padlock symbol signal activation. The control panel is locked except for the switching off function. To deactivate the control lock, repeat the activation procedure. The luminous dot goes off and the hob is active again.
The presence of water, liquid spilled from pots or any objects resting on the button below the symbol can accidentally activate or deactivate the control panel lock.
Timer
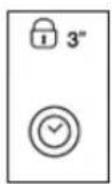
The timer can be used to set the cooking time for a maximum of 99 minutes (1 hour and 39 minutes) for all the cooking zones.
Select the cooking zone to be used with the timer, press the timer and a beep signals the function (see figure). The display shows "00" and the LED indication comes on. The Timer value can be decreased and increased by keeping the slider function "+" and "-" buttons pressed. When the set time has elapsed, an acoustic signal sounds and the cooking zone switches off automatically. To deactivate the timer, keep the Timer button pressed for at least 3 seconds.
To set the timer for another zone, repeat the above steps. The timer display always shows the timer for the selected zone or the shortest timer.
To modify or deactivate the timer, press the cooking zone selection button for the timer in question.
Control panel warnings.
Residual heat indicator.

The hob is fitted with a residual heat indicator for each cooking zone. These indicators alert the user when cooking zones are still hot.
If the display shows H, the cooking zone is still hot. If the residual heat indicator of a given cooking zone is lit, that zone can be used, for example, to keep a dish warm or to melt butter.
When the cooking zone cools down, the display goes off.
Incorrect or missing pot indicator.

If you are using a pot that is not suitable, not correctly positioned or not of the correct dimensions for your induction hob, the message "no pot" will appear in the display (see figure at side). If no pot is detected within 60 seconds, the hob switches off.
Fast boil function (Booster)
This function, only present on some cooking zones, makes it possible to exploit the hob's maximum power (for example to bring water to the boil very quickly). To activate the function, press the "+" button until "P" appears on the display. After 10 minutes' use of the booster function, the appliance automatically sets the zone to level 9.
Flexi cook
Where present, this function allows the cooking zone to be used as two separate zones or as a single extra large zone.
It is perfect for oval, rectangular and elongated pans (with maximum base dimensions of 38x23 cm) or more than one standard pan in the same time. In order to activate the flexicook function, switch on the hob, press simultaneously the 2 selecting buttons of the zones as shown in the picture below: the two cooking zone displays show level "5"; both dots next to the level number are lit, indicating that the Flexi cook is activated.

To change the power level (from 1 to max. 9) press the -/+ buttons or slide your finger horizontally on the slider. To deactivate the Flexi cook function, press simultaneously the 2 selecting buttons of the zones. To switch off the zones instantly, hold one of the zone selection button for 3 seconds.

The message "no pot" will appear on the display of the zone that is not able to detect any pot (because of missing pot, or misplaced or not suitable for
induction hob). This message remains active for 60 seconds: in this time you can add or slide pots within the flexicook area as you prefer.
After 60 seconds if no pan is placed on the zone, the system stops "searching" pots on that zone, the symbol remains visible on the display to remind that the zone is disabled.
To reactivate the Flexicook function, press one of the 2 buttons

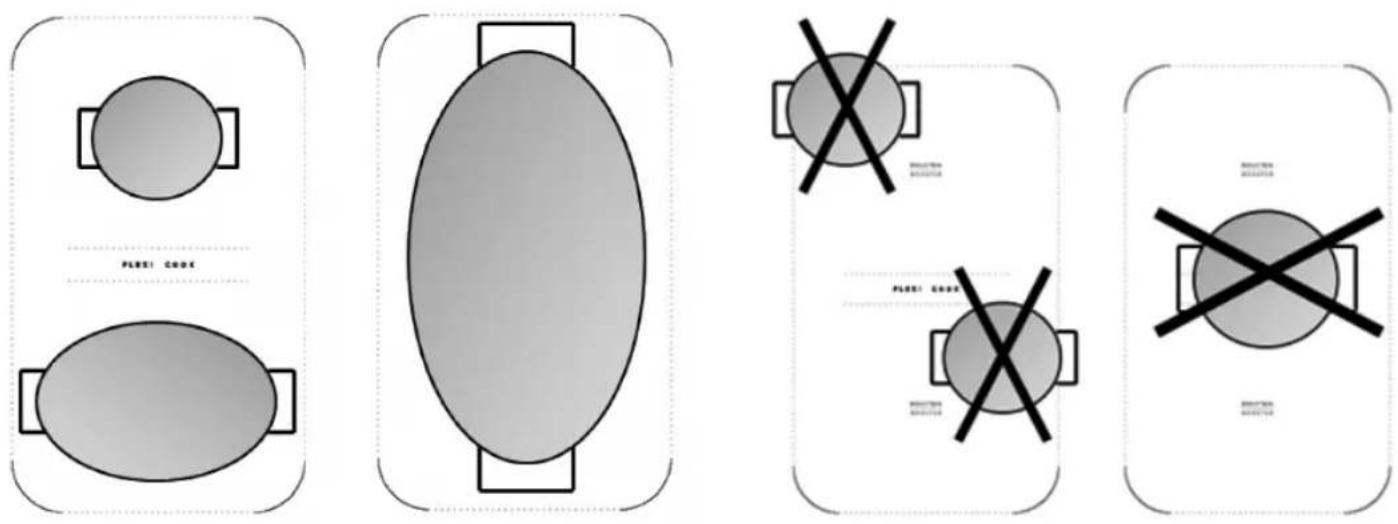
The Flexi cook function is also able to detect when a pot is moved from one zone to the other one within the flexi cook area keeping the same power level of the zone where the pan originally was placed (see the example in the figure below: if the pot is moved from the front heater to the rear heater, the power level will be shown on the display corresponding to the zone where the pot is placed).
It is also possible to operate the Flexi cook area as two independent cooking zones, using the corresponding button of the single zone. Place the pot in the center of the single zone and adjust the power level with the slide touchscreen.

Important: make sure to place the pans centered on the cooking zone in the way to cover the logo INDUCTION BOOSTER placed in the center of the single cooking zone.
In case of big pot, oval, rectangular and elongated pans make sure to place the pans centered on the cooking zone covering both INDUCTION BOOSTER logos.
Examples of good pot placement and bad pot placement :
Demo Mode
This hob is equipped with a demo mode which allows you to interact with the control panel without activating the corresponding cooking zones. The activation and deactivation procedure must be carried out within 60 seconds of the appliance being connected to the power supply in the home.
To activate the demo mode, hold the two external cooking zone selection buttons at the same time for at least 5 seconds: "dE" appears on the central display. You can now explore the control panel functions. The Lock and Unlock function is active also in Demo Mode.
To deactivate Demo mode, repeat the procedure, remembering first of all to disconnect the hob from the mains and then reconnect it, carrying out the procedure within 60 seconds of connection.

Activation/deactivation of the acoustic signal
After switching the hob on, press and hold the "+" button and the outermost button on the right simultaneously for at least five seconds ("control panel lock").
CLEANING

WARNING
- Do not use steam cleaners.
Before cleaning, make sure the cooking zones are switched off and that the residual heat indicator ("H") is not displayed.
IMPORTANT: Do not use abrasive sponges or scouring pads. Their use could eventually ruin the glass.
• After each use, clean the hob (when it is cool) to remove any deposits and stains due to food residuals.
- Sugar or foods with a high sugar content damage the hob and must be immediately removed.
- Salt, sugar and sand could scratch the glass surface.
• Use a soft cloth, absorbent kitchen paper or a specific hob cleaner (follow the Manufacturer's instructions).
TROUBLESHOOTING GUIDE
- Read and follow the instructions given in the section "Instructions for use".
- Check that the electricity supply has not been shut off.
- Dry the hob thoroughly after cleaning it.
• If, when the hob is switched on, alphanumeric codes appear on the display, consult the following table for instructions. - If the hob cannot be switched off after using it, disconnect it from the power supply.
| ERROR CODE DESCRIPTION | POSSIBLE CAUSES ERROR ELIMINATION | |
| C81, C82 | The control panel switches off because of excessively high temperatures | The internal temperature of electronic parts is too high |
| F42 or F43 The connection voltage is wrong | The sensor detects a discrepancy between the appliance voltage and that of the mains supply | Disconnect the hob from the mains and check the electrical connection |
| F12, F21, F25, F36, F37, F40, F47, F56, F58, F60 | Call the After-Sales Service and specify the error code | |
NOISES MADE BY THE HOB
Induction hobs can make whistling or crackling sounds during normal operation, these actually come from the pots and pans as a result of the characteristics of the bottoms (for example, bottoms made of several layers of material, or uneven bottoms). These noises vary depending on the pots and pans used and the amount of food they contain, and are not indicative of a defect of any kind.
In addition, the induction hob is equipped with an internal cooling system to control the temperature of electronic parts; as a result, during operation and for several minutes after the hob has been switched off, the noise of the cooling fan will be audible. This is perfectly normal and indeed essential for proper functioning of the appliance.
AFTER-SALES SERVICE
Before contacting the After-sales Service:
- See if you can solve the problem yourself with the help of the "Troubleshooting guide".
- Switch the appliance off and then on again it to see if the problem has been eliminated.
If the problem persists after the above checks, contact the nearest After-Sales Service.
Always specify:
- a brief description of the fault;
• the product type and exact model;
• the Service number (the number after the word Service on the rating plate), located under the appliance (on the metal plate). - your full address;
- your telephone number.
SERVICE
0000 000 00000

If any repairs are required, contact an authorised After-Sales Service Centre (to ensure the use of original spare parts and correct repairs). Spare parts are available for 10 years.
POWER LEVEL TABLE
| Power level Type of cooking Level use | (indicating cooking experience and habits) | ||
| Max. power | Boost Fast heating | Ideal for rapidly increasing the temperature of food to fast boiling in the case of water or rapidly heating cooking liquids | |
| 8-9 Frying - boiling | Ideal for browning, starting to cook, frying deep frozen products, fast boiling | ||
| High power | 7-8 | Browning - sautéing - boiling - grilling | Ideal for sautéing, maintaining a lively boil, cooking and grilling (for a short period of time, 5-10 minutes) |
| 6-7 | Browning - cooking - stewing - sautéing - grilling | Ideal for sautéing, maintaining a light boil, cooking and grilling (for a medium period of time, 10-20 minutes), preheating accessories | |
| Medium power | 4-5 | Cooking - stewing - sautéing - grilling | Ideal for stewing, maintaining a gentle boil, cooking (for a long period of time). Creaming pasta |
| 3-4 | Cooking - simmering - thickening - creaming | Ideal for long-cooking recipes (rice, sauces, roasts, fish) with liquids (e.g. water, wines, broth, milk), creaming pasta | |
| 2-3 | Ideal for long-cooking recipes (less than a litre in volume: rice, sauces, roasts, fish) with liquids (e.g. water, wines, broth, milk) | ||
| Low power | 1-2 | Melting - defrosting - keeping food warm - creaming | Ideal for softening butter, gently melting chocolate, thawing small products and keeping just-cooked food warm (e.g. sauces, soups, minestrone) |
| 1 | Ideal for keeping just-cooked food warm, for creaming risottos and for keeping serving dishes warm (with induction-suitable accessory) | ||
| OFF | Zero power | Support surface | Hob in stand-by or off mode (possible end-of-cooking residual heat, indicated by an “H”) |
NOTE:
When making quick-cook foods that require perfect heat distribution (e.g. pancakes) on the 28 cm double cooking zone (where present), use pans no greater than 24 cm in diameter. For delicate cooking (for example, melting chocolate or butter) use the smaller diameter single zones.
CONSIGNES DE SÉCURITÉ IMPORTANTES
VOTRE SÉCURITÉ ET CELLE DE VOTRE ENTOURAGE MÉRITENT TOUTE VOTRE ATTENTION
natural_image
Three technical diagrams labeled A, B, and C showing mechanical or electrical components with no visible text or symbols.400 V 3N \~ 230 V \~
400 V 2N \~
natural_image
Three technical diagrams labeled A, B, and C showing mechanical components with no visible text or symbols.400 V 3N \~ 230 V \~

WAARSCHUWING
natural_image
Three technical diagrams labeled A, B, and C showing mechanical or electronic components with no visible text or symbols.400 V 3N \~ 230 V \~
400 V 2N \~
natural_image
Three technical diagrams labeled A, B, and C showing mechanical or electronic components with no visible text or symbols.400 V 3N \~ 230 V \~
230-240 V \~ (apenas Austrália)
230 V \~ (apenas UK)
natural_image
Three technical diagrams labeled A, B, and C showing mechanical or electrical components with no visible text or symbols.400 V 3N \~ 230 V \~
400 V 2N \~
natural_image
Two oval shapes with rectangular handles, one large and one small, both enclosed in rounded corners (no text or symbols)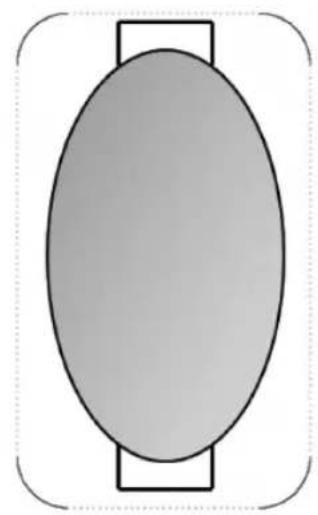
natural_image
Simple diagram of an oval shape with a rectangular top and bottom, no text or symbols present.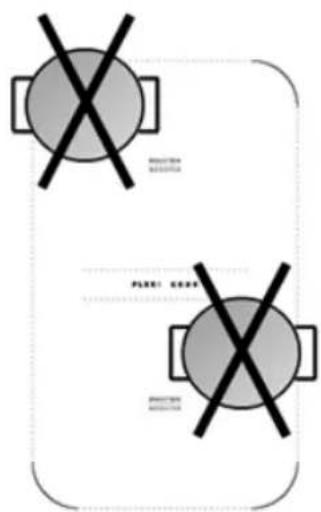
GUIDA RICERCA GUASTI
natural_image
Three technical diagrams labeled A, B, and C showing mechanical or electrical components with no visible text or symbols.400 V 3N \~ 230 V \~
400 V 2N \~
ATT FÖRBEREDA INBYGGNADSUTRYMMET

WARNING
natural_image
Three technical diagrams labeled A, B, and C showing mechanical or electronic components with no visible text or symbols.400 V 3N \~ 230 V \~
230-240V \~ (endast Australien)
230 V \~ (endast UK)

400 V 2N \~ 230 V 3 \~ (endast Belgien) 400 V 2N \~ (endast Holland)
Observera:
natural_image
Three technical diagrams labeled A, B, and C showing mechanical or electrical components with no visible text or symbols.400 V 3N \~ 230 V \~
400 V 2N \~
OPLYSNINGER OM MILJ∅HENSYN

natural_image
Three technical diagrams labeled A, B, and C showing mechanical or electrical components with no visible text or symbols.400 V 3N \~ 230 V \~

230-240 V \~ (kun Australien)
230 V \~ (kun UK)

natural_image
Three technical diagrams labeled A, B, and C showing mechanical assembly or assembly steps (no text or symbols present)400 V 3N \~ 230 V \~
400 V 2N \~ 230 V 3 \~ (vain Belgia)
230-240 V \~ (vain Australia)
230 V \~ (vain Iso-Britannia)
400 V 2N \~ (vain Alankomaat)
Tärkeää:
natural_image
Three technical diagrams labeled A, B, and C showing mechanical assembly or assembly steps (no text or symbols present)400 V 3N \~ 230 V \~
400 V 2N \~
natural_image
Illustration of a person using a lift tool to lift a table, with an arrow indicating the motion direction (no text or symbols present)natural_image
Three technical diagrams labeled A, B, and C showing mechanical components with no visible text or symbols.400 V 3N \~ 230 V \~
HLUK ZAPNUTÉ VARNÉ DESKY
DÔLEŽITÉ BEZPEČNOSTNÉ POKYNY
VAŠA BEZPEČNOST A BEZPEČNOST INÝCH OSÔB JE VEĽMI DÔLEŽITÁ
natural_image
Three technical diagrams labeled A, B, and C showing mechanical or electronic components with no visible text or symbols.400 V 3N \~ 230 V \~
400 V 2N \~ 230 V 3 \~ (iba pre Belgicko)
natural_image
Three technical diagrams labeled A, B, and C showing mechanical or electrical components with no visible text or symbols.natural_image
Three technical diagrams labeled A, B, and C showing mechanical components with arrows indicating motion (no text or symbols beyond labels)natural_image
Three technical diagrams labeled A, B, and C showing mechanical or electronic components with no visible text or symbols.400 V 3N \~ 230 V \~
400 V 2N \~
natural_image
Three technical diagrams labeled A, B, and C showing mechanical assembly or assembly steps (no text or symbols present)400 V 3N \~ 230 V \~

230-240 V \~ (numai Australia)
230 V \~ (numai UK)
400 V 2N \~ 230 V 3 \~ (numai Belgia) 400 V 2N \~ (numai Olanda)
Important:

AVERTIZARE
- SENSING THE DIFFERENCE
- IMPORTANT SAFETY INSTRUCTIONS
- YOUR SAFETY AND THAT OF OTHERS IS VERY IMPORTANT
- DANGER
- WARNING
- SAFEGUARDING THE ENVIRONMENT
- Disposal of packing
- Disposal
- Energy saving
- DECLARATION OF CONFORMITY (€)
- BEFORE USE
- EXISTING POTS AND PANS
- RECOMMENDED POT BOTTOM WIDTHS
- INSTALLATION
- PREPARING THE CABINET FOR FITTING
- ELECTRICAL CONNECTION
- Connection to the terminal block
- Important:
- INSTRUCTIONS FOR USE
- Control Panel Description
- Control panel
- Switching the hob ON/OFF
- Switching on and adjusting cooking zones
- Deactivation of cooking zones
- Control panel lock
- Timer
- Control panel warnings.
- Residual heat indicator.
- Incorrect or missing pot indicator.
- Fast boil function (Booster)
- Flexi cook
- Demo Mode
- Activation/deactivation of the acoustic signal
- CLEANING
- TROUBLESHOOTING GUIDE
- NOISES MADE BY THE HOB
- AFTER-SALES SERVICE
- Before contacting the After-sales Service:
- SERVICE
- 000 00000
- CONSIGNES DE SÉCURITÉ IMPORTANTES
- VOTRE SÉCURITÉ ET CELLE DE VOTRE ENTOURAGE MÉRITENT TOUTE VOTRE ATTENTION
- WAARSCHUWING
- GUIDA RICERCA GUASTI
- ATT FÖRBEREDA INBYGGNADSUTRYMMET
- Observera:
- OPLYSNINGER OM MILJ∅HENSYN
- Tärkeää:
- HLUK ZAPNUTÉ VARNÉ DESKY
- DÔLEŽITÉ BEZPEČNOSTNÉ POKYNY
- VAŠA BEZPEČNOST A BEZPEČNOST INÝCH OSÔB JE VEĽMI DÔLEŽITÁ
- AVERTIZARE
Brand : WHIRLPOOL
Model : ACM 810 LX
Category : Cooker