MPC Fly 30 - Hi-fi system AKAI - Free user manual and instructions
Find the device manual for free MPC Fly 30 AKAI in PDF.
User questions about MPC Fly 30 AKAI
0 question about this device. Answer the ones you know or ask your own.
Ask a new question about this device
Download the instructions for your Hi-fi system in PDF format for free! Find your manual MPC Fly 30 - AKAI and take your electronic device back in hand. On this page are published all the documents necessary for the use of your device. MPC Fly 30 by AKAI.
USER MANUAL MPC Fly 30 AKAI
User Guide (English)
Introduction
MPC Fly merges unmatched Akai Professional technology with the power of your iPad, embodying legendary capabilities that have made the MPC an industry standard like real MPC pads, MPC Note Repeat and MPC Swing. Its multifunctional, double-hinged design gives you the flexibility to produce tracks anywhere, while also acting as a protective case between sessions and giving you total access to your iPad for normal uses.
Box Contents
- MPC Fly
Power Adapter - User Guide
- Safety & Warranty Manual
Quick Setup / Connection Diagram
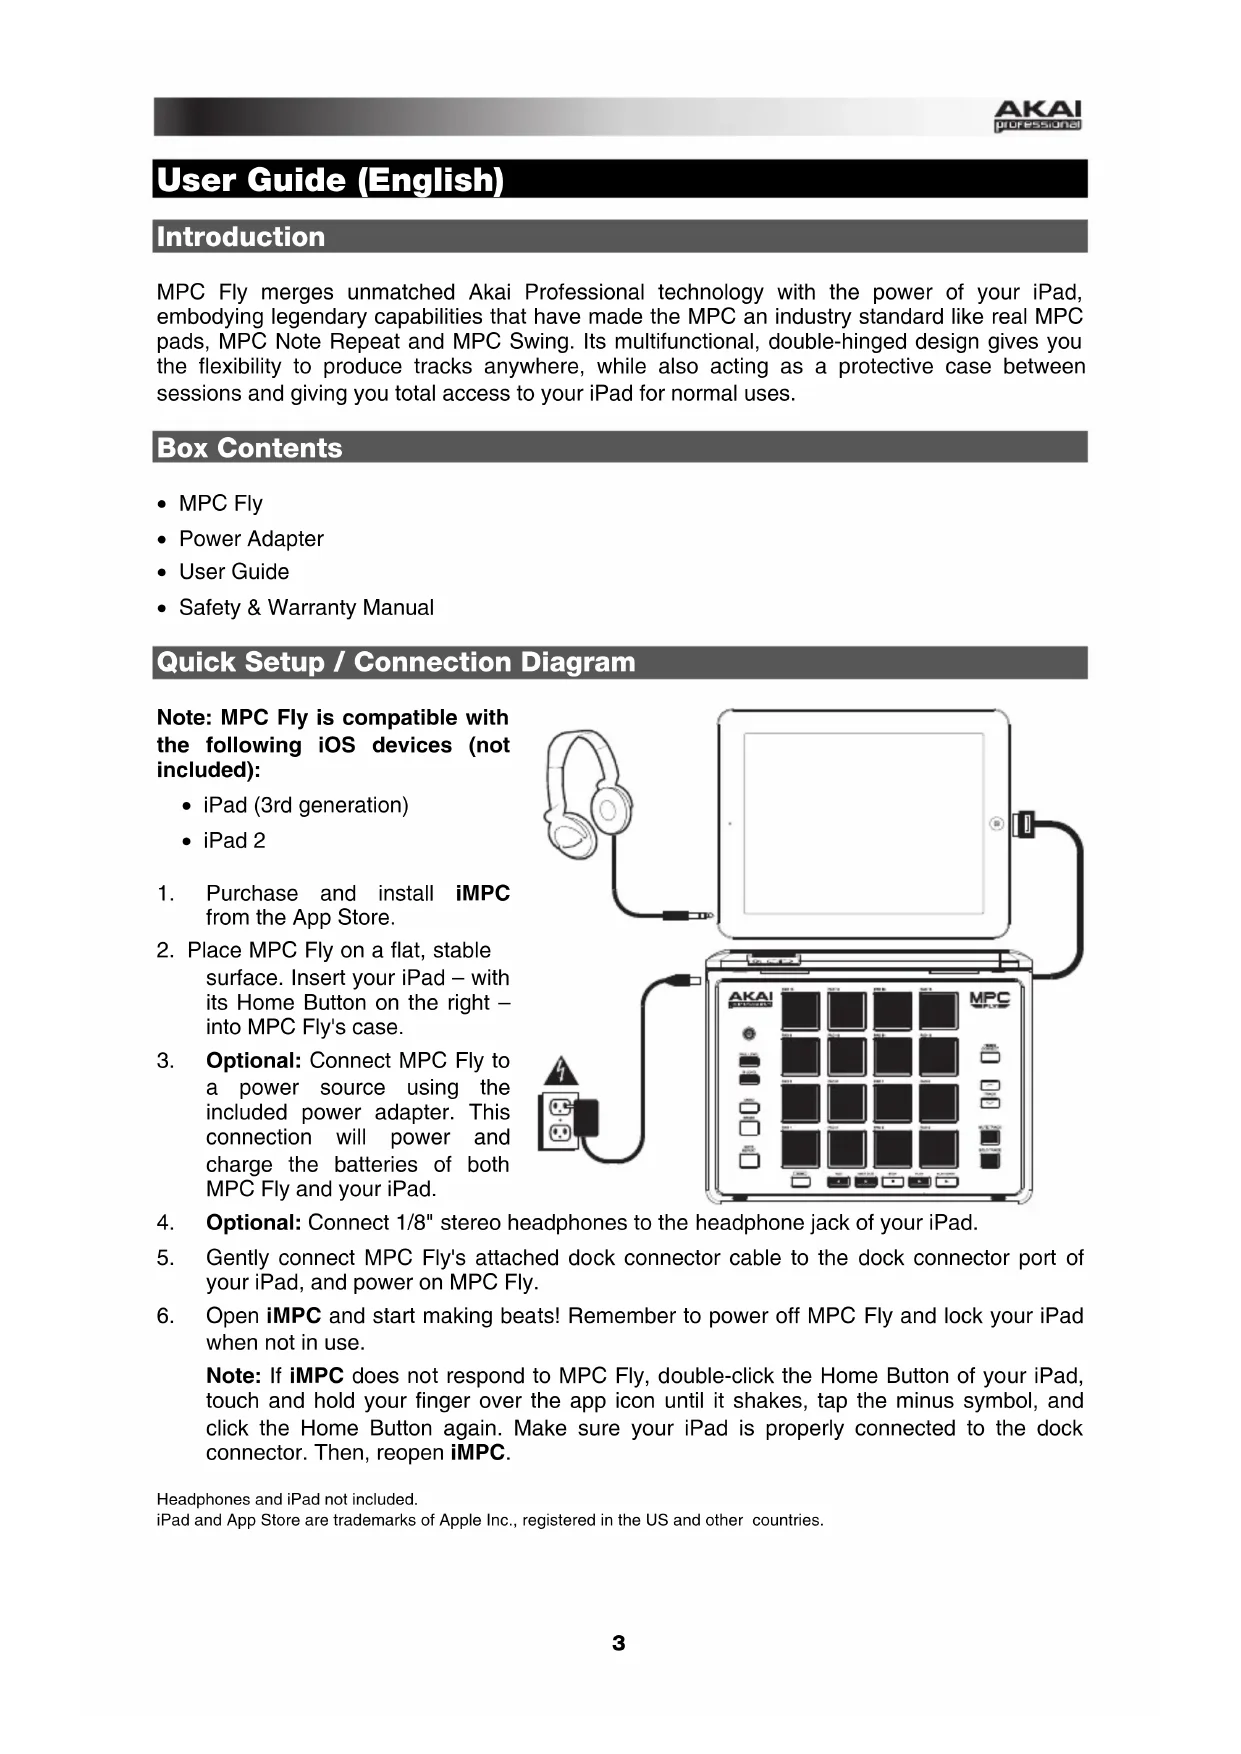
Note: MPC Fly is compatible with the following iOS devices (not included):
- iPad (3rd generation)
-
iPad 2
-
Purchase and install iMPC from the App Store.
- Place MPC Fly on a flat, stable surface. Insert your iPad - with its Home Button on the right - into MPC Fly's case.
- Optional: Connect MPC Fly to a power source using the included power adapter. This connection will power and charge the batteries of both MPC Fly and your iPad.
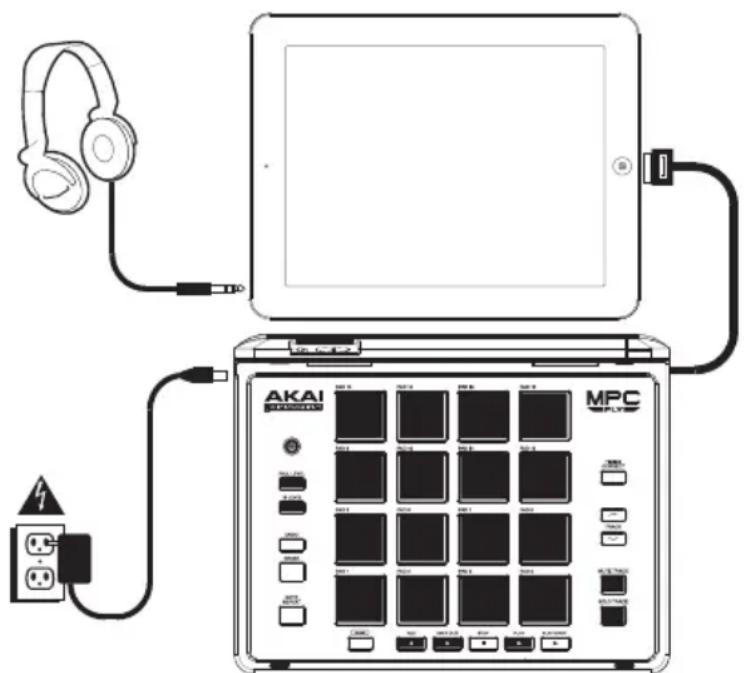
- Optional: Connect 1/8" stereo headphones to the headphone jack of your iPad.
- Gently connect MPC Fly's attached dock connector cable to the dock connector port of your iPad, and power on MPC Fly.
- Open iMPC and start making beats! Remember to power off MPC Fly and lock your iPad when not in use.
Note: If iMPC does not respond to MPC Fly, double-click the Home Button of your iPad, touch and hold your finger over the app icon until it shakes, tap the minus symbol, and click the Home Button again. Make sure your iPad is properly connected to the dock connector. Then, reopen iMPC.
Top Panel
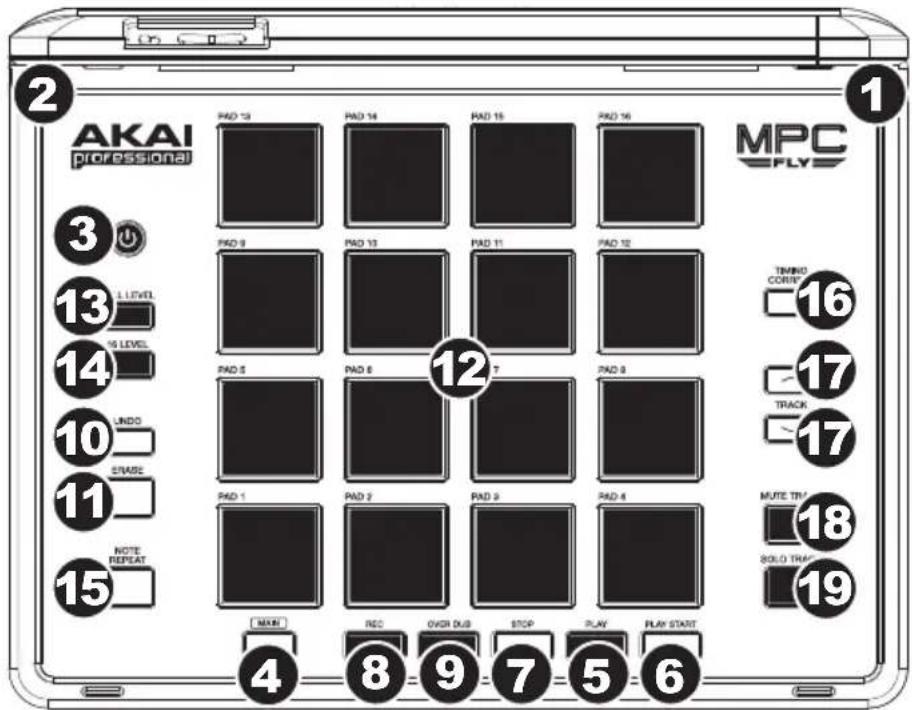
- DOCK CONNECTOR CABLE - Gently connect this attached cable to the dock connector port of your iPad.
- POWER INPUT - Use the included power adapter to connect the unit to a power outlet. This connection will power and charge the batteries of both MPC Fly and your iPad.
- POWER BUTTON - Turns MPC Fly's power on/off. You can also use it to determine how much power MPC Fly's battery has:
The button will light up different colors to indicate approximately how much power is remaining:
- Green means it has 30 - 100% remaining.
- Amber means it has approximately 10-30% remaining.
Red means it has 10% or less remaining.
You can press and hold the button for 2 seconds to view a more precise indication, represented by the leftmost column of 4 pads. Each pad represents a "battery cell."
A green pad means that "cell" is fully charged.
An amber pad means that "cell" is partially charged.
An unlit pad means that "cell" has no charge.
With a full battery, all 4 pads will be green. With a nearly empty battery, the top 3 pads will be unlit, and the bottom pad will be red.
Release the button to return to normal operation.
The button will flash when:
- MPC Fly starts charging
- MPC Fly is about to enter Sleep Mode (if it has not been used in 15 minutes)
After MPC Fly has not been used for 30 minutes, it will automatically turn off.
- MAIN - Press this button to view the Main screen in the display and software.
- PLAY - Press this button to play the Sequence from the audio pointer's current position.
- PLAY START - Press this button to play the Sequence from its start point.
- STOP - Press this button to stop playback.
- REC - To start recording a Sequence, press this button and simultaneously press PLAY or PLAY START. Recording in this way (rather than using OVERDUB) erases the events of the current Sequence. After the Sequence plays through once while recording, Overdub will be enabled.
- OVERDUB - Press this button and simultaneously press PLAY or PLAY START to enable Overdub. This allows you to record note events in a Sequence without overwriting any previously recorded note events. You can enable Overdub either before or during recording.
- UNDO - Press this button to undo your last action.
- ERASE - As a Sequence is playing, hold this button down and press a pad to delete the note event for that pad at the current playback position. This is a quick way to delete note events from your Sequence without having to stop playback.
- PADS - Use these pads to trigger drum hits or other samples in your software. The pads are velocity-sensitive and pressure-sensitive, which makes them very responsive and intuitive to play. The pads will light up different colors, depending on how hard you play them (ranging from yellow at a low velocity to red at the highest velocity).
- FULL LEVEL - Press this button to activate/deactivate Full Level. When activated, the pads always play back at a maximum velocity (127), no matter how hard or soft you hit them.
- 16 LEVEL - Press this button to activate/deactivate 16 Level. When activated, the last pad that was hit will be temporarily copied to all 16 pads. The pads will now output the same note number as the initial pad, but a selectable parameter will be fixed at the values shown in the diagram on the right, regardless of how hard you hit them. The available parameters are velocity, tuning, filter, layer, attack or decay.
- NOTE REPEAT - Hold this button down and press a pad to retrigger that pad's sample at a rate based on the current Tempo and Time Correct settings. Vary the pressure on the pad to increase or decrease the velocity of the notes being played.
- TIMING CORRECT - Press this button to switch through the available Timing Correct (quantization) settings.
- TRACK UP / DOWN - Use these buttons to move to move to the next or previous track.
- MUTE TRACK - Press this button to mute the current track.
- SOLO TRACK - Press this button to solo the current track.