XHM26D - Audio System PIONEER - Free user manual and instructions
Find the device manual for free XHM26D PIONEER in PDF.

| Product type | Audio system - Compact hi-fi system |
| Brand and model | Pioneer X-HM26D |
| Dimensions (main unit) | 130 mm (W) x 212 mm (H) x 228.5 mm (D) |
| Weight | Not specified |
| Power supply | 220-240 V ~ 50/60 Hz (European model) |
| Power consumption | 20 W operation, 0.5 W standby |
| Main functions | CD/CD-R/RW/MP3 player, FM/AM/DAB+ tuner, USB Audio, Bluetooth, auxiliary Audio In, headphone |
| Output power | 2 x 15 W RMS (1 kHz, 10% THD, 8 Ω) |
| Readable disc types | CD audio, CD-R/RW, CD-ROM in CD-DA or MP3 format |
| Supported audio formats | MP3 (32-48 kHz, 8-320 kbps), CD-DA |
| Bluetooth | Version 2.4 GHz, profiles A2DP/AVRCP, codec SBC, range ~10 m |
| Built-in tuner | FM (87.5-108 MHz), AM (530-1710 kHz North American models), DAB+ (band III, 174-240 MHz) |
| Included accessories | Remote control, AAA batteries x2, power cord, AM loop antenna, FM wire antenna, DAB/FM antenna, warranty card, user manual |
| Maintenance and cleaning | Clean with a soft dry cloth. Do not use solvents or abrasive products. Clean the laser lens only by a qualified professional. |
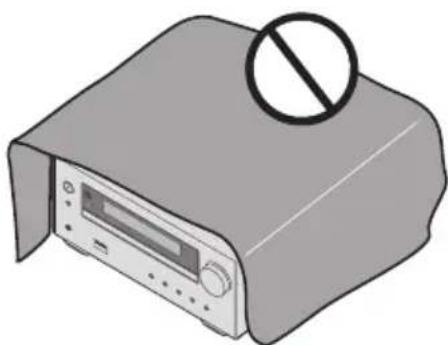
| Safety | Do not expose to water or moisture. Leave at least 25 cm clearance above, 10 cm behind, and 5 cm on the sides. Disconnect during storms or prolonged non-use. Class 1 laser product. |
| Warranty | Household use only. Any commercial use voids the warranty. |
| Repairability | Contact Pioneer after-sales service or an authorized dealer. Do not open the device. |
Frequently Asked Questions - XHM26D PIONEER
User questions about XHM26D PIONEER
0 question about this device. Answer the ones you know or ask your own.
Ask a new question about this device
Download the instructions for your Audio System in PDF format for free! Find your manual XHM26D - PIONEER and take your electronic device back in hand. On this page are published all the documents necessary for the use of your device. XHM26D by PIONEER.
USER MANUAL XHM26D PIONEER
This equipment is not waterproof. To prevent a fire or shock hazard, do not place any container filled with liquid near this equipment (such as a vase or flower pot) or expose it to dripping, splashing, rain or moisture.
D3-4-2-1-3_A1_En
WARNING
To prevent a fire hazard, do not place any naked flame sources (such as a lighted candle) on the equipment.
D3-4-2-1-7a_A1_En
VENTILATION CAUTION
When installing this unit, make sure to leave space around the unit for ventilation to improve heat radiation (at least 25cm at top, 10cm at rear, and 5cm at each side).
WARNING
Slots and openings in the cabinet are provided for ventilation to ensure reliable operation of the product, and to protect it from overheating. To prevent fire hazard, the openings should never be blocked or covered with items (such as newspapers, table-cloths, curtains) or by operating the equipment on thick carpet or a bed.
D3-4-2-1-7b*A1_EN
Operating Environment
Operating environment temperature and humidity: +5^ to +35^(+41^ to +95^) less than 85% RH (cooling vents not blocked)
Do not install this unit in a poorly ventilated area, or in locations exposed to high humidity or direct sunlight (or strong artificial light) D3-4-2-1-7c'_A1_En
CAUTION
The STANDBY/ON switch on this unit will not completely shut off all power from the AC outlet. Since the power cord serves as the main disconnect device for the unit, you will need to unplug it from the AC outlet to shut down all power. Therefore, make sure the unit has been installed so that the power cord can be easily unplugged from the AC outlet in case of an accident. To avoid fire hazard, the power cord should also be unplugged from the AC outlet when left unused for a long period of time (for example, when on vacation).
D3-4-2-2-2a*A1_En
CAUTION
This product is a class 1 laser product classified under the Safety of laser products, IEC 60825-1:2007.
CLASS 1 LASER PRODUCT
D58-5-2-a_A1_En
This product is for general household purposes. Any failure due to use for other than household purposes (such as long-term use for business purposes in a restaurant or use in a car or ship) and which requires repair will be charged for even during the warranty period.
POWER-CORD CAUTION
Handle the power cord by the plug. Do not pull out the plug by tugging the cord and never touch the power cord when your hands are wet as this could cause a short circuit or electric shock. Do not place the unit, a piece of furniture, etc., on the power cord, or pinch the cord. Never make a knot in the cord or tie it with other cords. The power cords should be routed such that they are not likely to be stepped on. A damaged power cord can cause a fire or give you an electrical shock. Check the power cord once in a while. When you find it damaged, ask your nearest our authorized service center or your dealer for a replacement.
S002*A1En
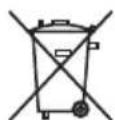
Information for users on collection and disposal of old equipment and used batteries
(Symbol for equipment)


Symbol examples for batteries

Pb
These symbols on the products, packaging, and/or accompanying documents mean that used electrical and electronic products and batteries should not be mixed with general household waste.
For proper treatment, recovery and recycling of old products and used batteries, please take them to applicable collection points in accordance with your national legislation.
By disposing of these products and batteries correctly, you will help to save valuable resources and prevent any potential negative effects on human health and the environment which could otherwise arise from inappropriate waste handling.
For more information about collection and recycling of old products and batteries, please contact your local municipality, your waste disposal service or the point of sale where you purchased the items.
These symbols are only valid in the European Union.
For countries outside the European Union:
If you wish to discard these items, please contact your local authorities or dealer and ask for the correct method of disposal.
K058a_A1_En
Radio wave caution
This unit uses a 2.4 GHz radio wave frequency, which is a band used by other wireless systems (Microwave ovens and Cordless phones, etc.). In this event noise appears in your television image, there is the possibility this unit (including products supported by this unit) is causing signal interference with the antenna input connector of your television, video, satellite tuner, etc. In this event, increase the distance between the antenna input connector and this unit (including products supported by this unit).
-
We are not responsible for any malfunction of the compatible product due to communication error/malfunctions associated with your network connection and/or your connected equipment. Please contact your Internet service provider or network device manufacturer.
-
A separate contract with payment to an Internet service provider is required to use the Internet.
WARNING
Store small parts out of the reach of children and infants. If accidentally swallowed, contact a doctor immediately.
Thank you for buying this Pioneer product.
Please read through these operating instructions so that you will know how to operate your model properly. After you have finished reading the instructions, put them in a safe place for future reference.
Contents
01 Before you start
What's in the box 5
Loading the batteries in the remote control 5
Using the remote control 5
02 Part names and functions
Remote control 6
Front panel 7
Display 8
Speaker system 8
03 Connections
Speaker connection 9
Connecting antennas 10
Using external antennas 10
Plugging in 11
04 Getting started
To turn the power on 12
Setting the clock 12
General control 12
Input function 12
Display brightness control 12
Volume auto set-in. 12
Volume control. 12
Muting 12
Sound controls 13
Equalizer 13
P.BASS control 13
BASS/TREBLE control. 13
Setting the wake-up timer 13
Calling the wake-up timer 14
Cancelling the wake-up timer. 14
Using the wake-up timer 14
Using the sleep timer 14
Using Headphones 14
05 Disc playback
Playing discs or files 15
Load the disc 15
Play tracks on a CD 15
Play MP3 music files 15
Advanced CD or MP3 disc playback 16
Repeat play 16
Random play 16
Programmed play (CD) 17
About downloading MP3 17
Switch the display contents 17
06 USB playback
Playing USB storage devices 18
Repeat play 19
Random play 19
Switch the display contents 19
07 Using the tuner
Listening to FM (For European models)/Listening to FM or
AM (For North American models) 20
Tuning. 20
Saving station presets. 20
Using the Radio Data System (RDS)
(for European models only) 21
Listening to the DAB+ (X-HM26D only) 23
About DAB+ (Digital Audio Broadcasting) 23
Tuning. 23
Changing the information display 24
Memorising a station. 24
DAB Frequency table (BAND III) 24
08 Other connections
Connecting auxiliary components 25
Automatic switching to Audio In input (For North American
models only) 25
09 Bluetooth® Audio playback
Music playback using Bluetooth wireless technology . . . 26
Remote control operation 26
Pairing with the unit (Initial registration) 26
Listen to music on the unit
from a Bluetooth capable device. 27
BT STANDBY 27
Radio wave caution 28
Scope of operation 28
Radio wave caution. 28
Precautions regarding connections
to products supported by this unit 28
10 Additional information
Troubleshooting 29
Playable discs and formats 31
Regarding copy protected CDs. 32
Supported audio file formats. 32
Cautions on use 32
When moving this unit. 32
Place of installation. 32
Do not place objects on this unit. 32
About condensation 32
Cleaning the product. 33
Cleaning the lens 33
Handling discs 33
Storing. 33
Cleaning discs. 33
About specially shaped discs 33
Auto power off setting 33
Restoring all the settings to the defaults 33
Specifications 34
Chapter 1:
Before you start
What's in the box
Please confirm that the following accessories are in the box when you open it.
Remote Control
- AAA batteries (R03) x 2
Power cord
AM antenna cable1
FM wire antenna*2
DAB/FM wire antenna*3
Warranty card4
- Operating instructions (this document)
1 North American models only
2 X-HM16/X-HM26 only
3 X-HM26D only
4 European models only
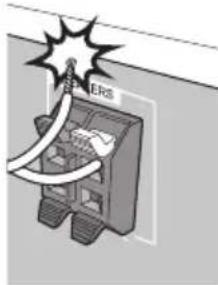
Loading the batteries in the remote control
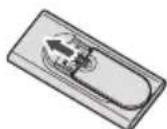
1 Open the rear lid and load the batteries as illustrated below.
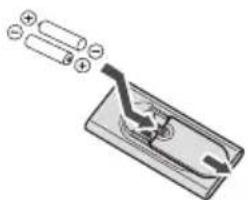
2 Close the rear lid.

CAUTION
- Do not use any batteries other than the ones specified. Also, do not use a new battery together with an old one.
- When inserting the batteries, make sure not to damage the springs on the battery's terminals. This can cause batteries to leak or over heat.
-
When loading the batteries into the remote control, set them in the proper direction, as indicated by the polarity marks ( and ).
-
Do not heat batteries, disassemble them, or throw them into flames or water.
- Batteries may have different voltages, even if they are the same size and shape. Do not use different types of batteries together.
- To prevent leakage of battery fluid, remove the batteries if you do not plan to use the remote control for a long period of time (1 month or more). If the fluid should leak, wipe it carefully off the inside of the case, then insert new batteries. If a battery should leak and the fluid should get on your skin, flush it off with large quantities of water.
- When disposing of used batteries, please comply with governmental regulations or environmental public institution's rules that apply in your country/area.

WARNING
- Do not use or store batteries in direct sunlight or other excessively hot place, such as inside a car or near a heater. This can cause batteries to leak, overheat, explode or catch fire. It can also reduce the life or performance of batteries.
Using the remote control
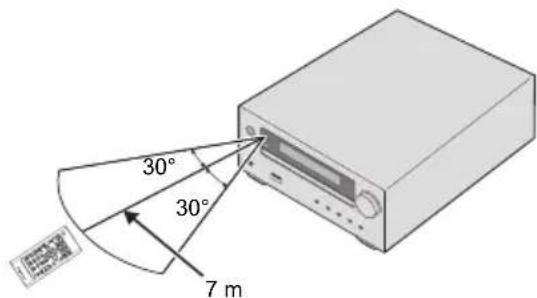
The remote has a range of about 7m at an angle of about 30^ from the remote sensor.
Keep in mind the following when using the remote control:
Make sure that there are no obstacles between the remote and the remote sensor on the unit.
- Remote operation may become unreliable if strong sunlight or fluorescent light is shining on the unit's remote sensor.
- Remote controllers for different devices can interfere with each other. Avoid using remotes for other equipment located close to this unit.
- Replace the batteries when you notice a fall off in the operating range of the remote.
Chapter 2:
Part names and functions
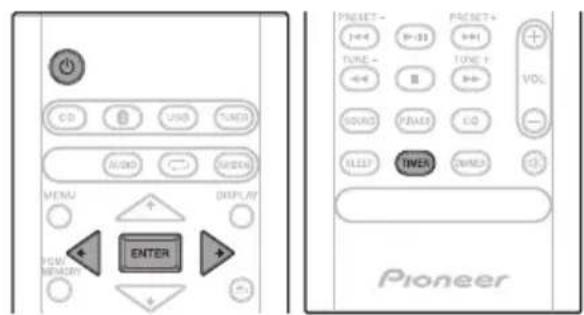
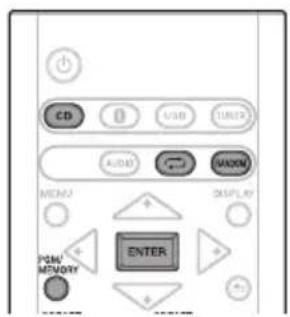
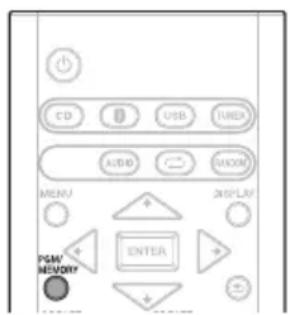
Remote control

10
Switches the receiver between standby and on (page 12).
2 Input function buttons
Use to select the input source to this receiver (page 12).
#
Use to set up or play the audio file using the Bluetooth network (page 26).
3 M E N U
Use to access the menu.
4 / / / , ENTER
Use to select/switch system settings and modes, and to confirm actions.
5 PGM/MEMORY
-
Use to memory or program the CD (page 17).
-
Use to store FM/AM (page 20) or DAB (page 24)
stations in memory.
6Playback control buttons
Use to control each function after you have selected it using the input function buttons (page 16).
TUNE +/-
Use to find radio frequencies (page 20).
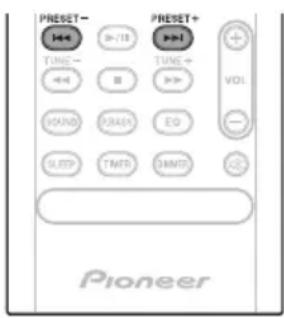
PRESET +/-
Use to select preset radio stations (page 20).
7 Sound control buttons
Adjust the sound quality (page 13).
8 S L E E P
See Using the sleep timer on page 14.
9 T I M E R
Use for setting the clock, as well as for setting and checking the timers (page 12).

Press to change the repeat play setting from a CD (page 16) or USB (page 19).
11 RANDOM
Press to randomize order play setting from a CD (page 16) or USB (page 19).
12 DISPLAY
Press to change the display for MP3 (page 17), RDS (page 21) or DAB (page 24) information.

Press to return to the previous display.
14 Volume control buttons
Use to set the listening volume (page 12).

Mutes/unmates the sound (page 12).
16 DIMMER
Dims or brightens the display. The brightness can be controlled in four steps (page 12).
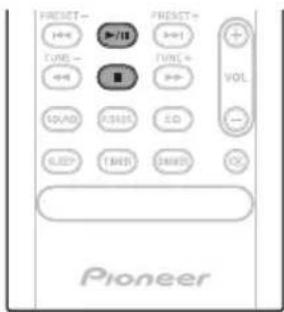
Front panel
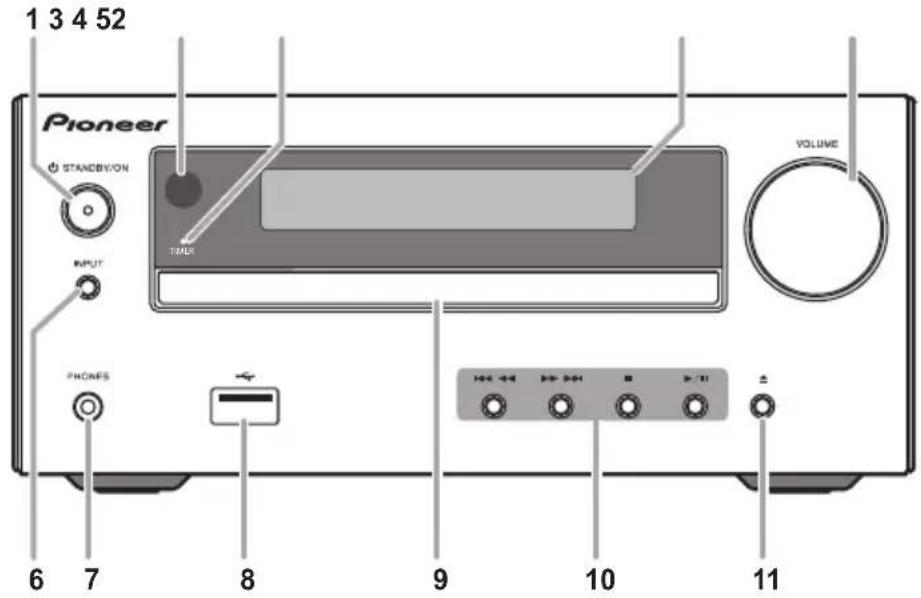
1 STANDBY/ON
Switches the receiver between standby and on (page 12).
2 Remote sensor
Receives the signals from the remote control.
3 TIMER indicator
Lights when the receiver is power off with timer setting.
4 Main display
See Display on page 8.
5 Volume control
Use to set the listening volume (page 12).
6 IN P U T
Selects the input source.
7 Headphone socket
Use to connect headphones. When the headphones are connected, there is no sound output from the speakers.
8 US B t e r m i n a l
Use to connect your USB mass storage device as an audio source (page 18).
9 Disc tray
Place the disc, label side up (page 15).
10Playbackcontrolbuttons
Selects the desired track or file to be played back. Use to stop the playback. Stops playback or resumes playback from the pause point.
11 Disc tray open/close button
Use to open or close the disc tray (page 15).
Display
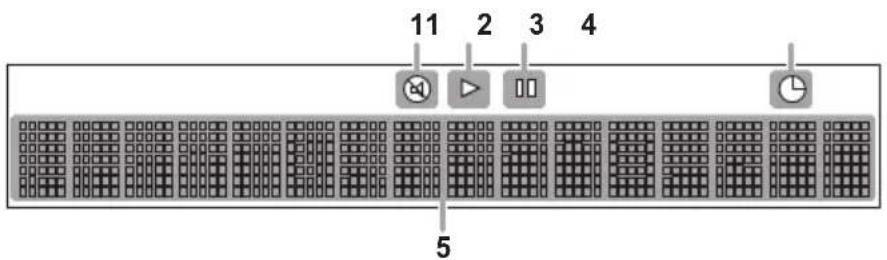
1
Lights when the sound is muted.

Note
- The mute icon will be displayed in red.
2
Start playback.
3 II
Pause playback.
4 G
Timer function is set.
5 Character display
Displays various system information.
Speaker system

1 Tweeter
2 Woofer
3 Bass Reflex Duct
Important
- Speaker grille cannot be removed.
- Both speakers can be used on either the right or the left side.
Chapter 3: Connections

CAUTION
- Be sure to turn off the power and unplug the power cord from the power outlet whenever making or changing connections.
- Connect the power cord after all the connections between devices have been completed.
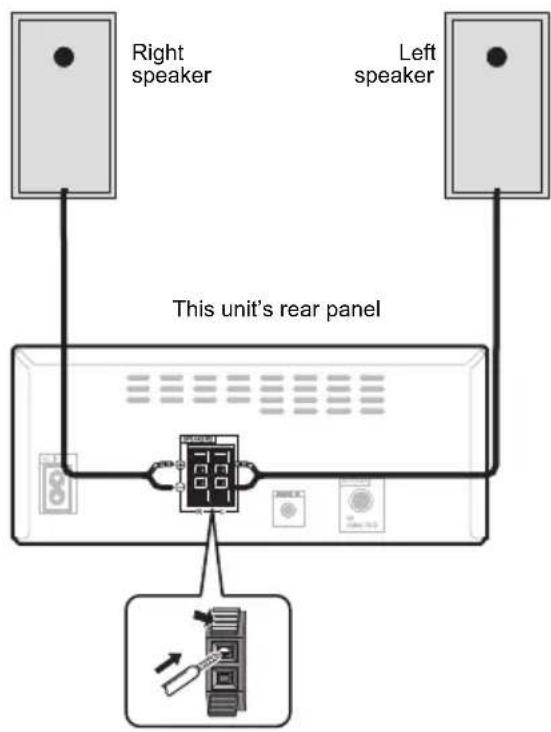
Speaker connection
- Push open the tabs and insert exposed wire.
- Connect the black wire to (-) terminal, and the red wire to the (+) terminal.

CAUTION
- These speaker terminals carry HAZARDOUS LIVE voltage. To prevent the risk of electric shock when connecting or disconnecting the speaker cables, disconnect the power cord before touching any uninsulated parts.
- Do not connect any speakers other than those supplied to this system.
- Do not connect the supplied speakers to any amplifier other than the one supplied with this system. Connection to any other amplifier may result in malfunction or fire.
- Do not attach these speakers to the wall or ceiling. They may fall off and cause injury.
- These speakers are magnetically shielded. However, depending on the installation location, color distortion may occur if the speaker system is installed extremely close to the screen of a television set. If this happens, turn off the television set, and then turn it on after 15 to 30 minutes. If the problem persists, move the speaker system away from the television set.
Make sure that the speaker cable cores do not become exposed and make contact with other cable cores. This may cause malfunction of the product. - Do not allow the speaker cable core to come into contact with the receiver body.
- If the speaker cable core comes into contact with any metal portion of the receiver's body, it may damage the speakers and cause smoke and fire. Insert speaker cables securely into the terminals and check that the cable does not come out of easily.

Note
There is no difference between L and R speakers.
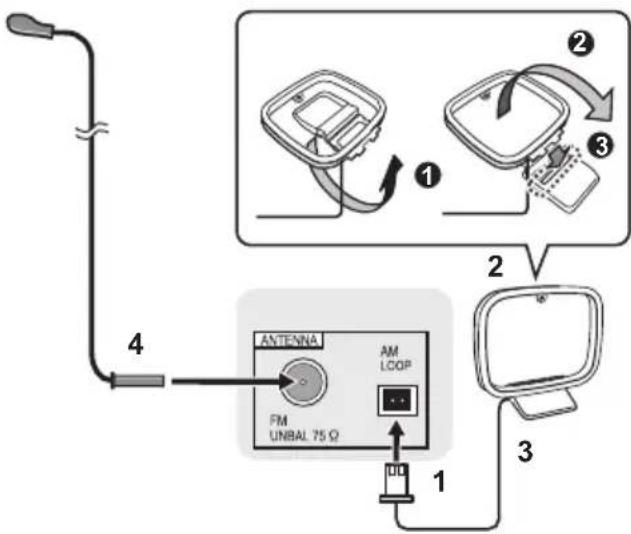
Connecting antennas
- Connect the AM loop antenna and the FM (DAB/FM) wire antenna as shown below.
To improve reception and sound quality, connect external antennas (see Using external antennas).
For North American models only
For European models
1 Connect the AM antenna wires.
Holding the connector to connect.
2 Fix the AM loop antenna to the attached stand.
Set up as illustrated above.
3 Place the AM antenna on a flat surface and in a direction giving the best reception.
- Place the antenna near a window, etc. for the best reception.
- Do not place the antenna near a computer or TV. It may result in noise.
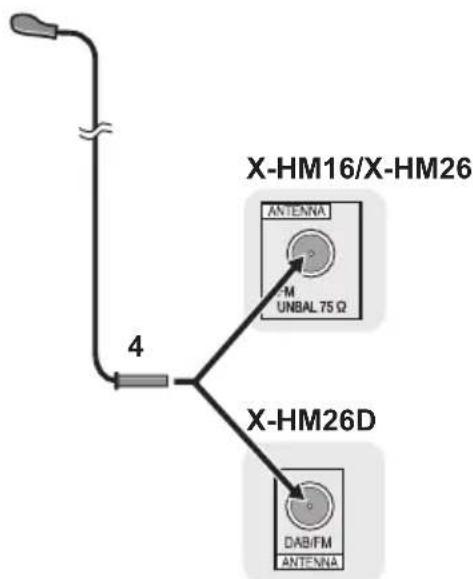
4 Connect the FM (DAB/FM) wire antenna into the FM antenna socket.
For best results, extend the FM (DAB/FM) antenna fully and fix to a wall or door frame. Don't drape loosely or leave coiled up.
Using external antennas
To improve FM reception
Use a PAL connector (not supplied) to connect an external FM (DAB/FM) antenna.

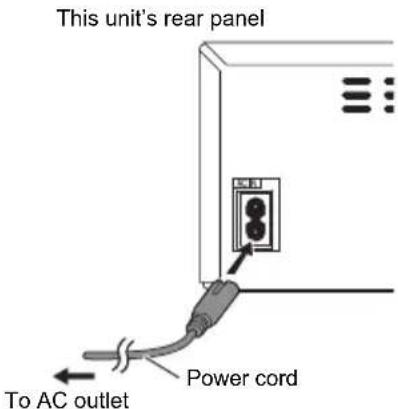
Plugging in
Before making or changing the connections, switch off the power and disconnect the power cord from the AC outlet. After you've finished making all connections, plug the unit into an AC outlet.

CAUTION
- Do not use any power cord other than the one supplied with this unit.
- Do not use the supplied power cord for any purpose other than that described above.
Chapter 4:
Getting started
To turn the power on
Press the to turn the power on.
After use:
Press the to enter the power stand-by mode.
Setting the clock
1 Press to turn the power on.
2 Press TIMER on the remote control.
"CLOCK" is shown on the main display.
3 Press ENTER.
4 Press / to set the day, then press ENTER.
5 Press / to set the hour, then press ENTER.
6 Press / to set the minute, then press ENTER to confirm.
7 Press ENTER.
To confirm the time display:
Press the TIMER. The time display will appear for about 10 seconds.
To readjust the clock:
Perform "Setting the clock" from step 1.

Note
- When power supply is restored after unit is plugged in again or after a power failure, reset the clock.
General control
Input function
When the INPUT on main unit is pressed, the current function will change to different mode. Press the INPUT repeatedly to select desired function.
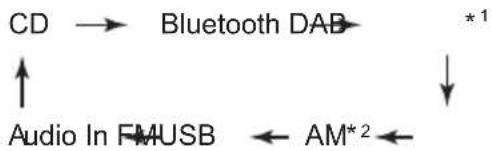
1 X-HM26D only
2 North American models only
Display brightness control
Press DIMMER to dims the display brightness. The brightness can be controlled in four steps.
Volume auto set-in
If you turn off and on the main unit with the volume set to 31 or higher, the volume starts at 30 and sets in to the last set level.
Volume control
Turn the volume knob towards VOLUME (on main unit) or press VOL +(- (on remote control) to increase or decrease the volume.
CAUTION
- The sound level at a given volume setting depends on speaker efficiency, location, and various other factors. It is advisable to avoid exposure to high volume levels. Do not turn the volume on to full at switch on. Listen to music at moderate levels. Excessive sound pressure from earphones and headphones can cause hearing loss.
Muting
The volume is muted temporarily when pressing the on the remote control. Press again to restore the volume.
Sound controls
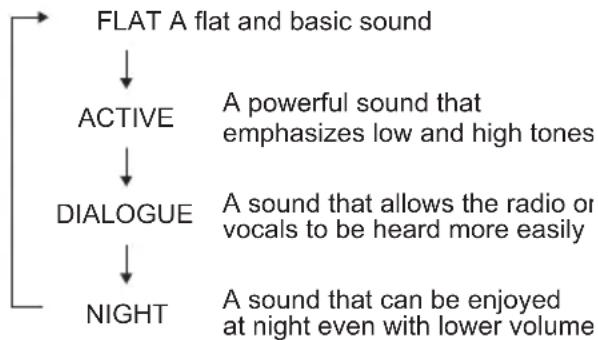
Equalizer
When the EQ is pressed, the current mode setting will be displayed. To change to a different mode, press the EQ repeatedly until the desired sound mode appears.
P.BASS control
When the power is first turned on, the unit will enter the P.bass mode which emphasises the bass frequencies. To cancel the P.bass mode, press the P.BASS on the remote control.
BASS/TREBLE control
Press the SOUND to select "BASS" or "TREBLE", then press to adjust the bass or treble.

Note
The EQ and P.BASS cannot operate simultaneously. The most recently selected of these two functions will be the one used.
- SOUND can operate alongside either the EQ or P.BASS.
When one of the above two functions is selected, the function that is not selected will be displayed as follows.
1 When P.BASS setting (ON/OFF) is changed
- EQ:FLAT
2 When EQ setting is changed
P.BASS:OFF
Setting the wake-up timer
Used to change the existing timer setting, or to set a new timer.
1 Press to turn the power on.
2 Press and hold TIMER on the remote control.
3 Press / to select "ONCE" or "DAILY", then press ENTER.
ONCE - Once timer play works for one time only at a preset time.
DAILY - Daily timer play works at the same preset time and days of week.
4 Press / to select "TIMER SET", then press ENTER.
5 Press / to select the timer playback source, then press ENTER.
CD, DAB (X-HM26D only), FM, AM (North American models only) and USB can be selected as the playback source.
6 Press / to select the timer day, then press ENTER.
7 Press / to set the hour, then press ENTER.
8 Press / to set the minute, then press ENTER.
Set the time to finish as in steps 7 and 8 above.
9 Adjust the volume press VOL + / - , then press ENTER.
"appears on the display.
10 Press to enter the power standby mode.
The TIMER indicator lights up.
Getting started
Calling the wake-up timer
It can be used to re-use an existing timer setting.
1 As well as steps 1 through 3 in "Setting the wake-up timer".
2 Press / to select "TIMER ON", then press ENTER.
Cancelling the wake-up timer
It can be used to turn off the timer setting.
1 As well as steps 1 through 3 in "Setting the wake-up timer".
2 Press / to select "TIMER OFF", then press ENTER.
Using the wake-up timer
1 Press to turn the power off.
2 At the wake-up time, this unit will turn on automatically and play the selected input function.

Note
- If at the wake-up time the USB storage device is not connected to this unit or a disc is not inserted, this unit will be turned to on and not play back the track.
- Some discs may not be played automatically at the wake-up time.
If you set the timer, take one minute or more between the start and end time.
Using the sleep timer
The sleep timer switches off the unit after a specified time so you can fall asleep without worrying about it.
1 Press SLEEP repeatedly to select a switch off time.
Choose between 10 min, 20 min, 30 min, 60 min, 90 min, 120 min, 150 min, 180 min or OFF. The newly set value displays for 3 seconds, and then the setting is completed.

Note
The sleep timer can be set by pressing SLEEP while the remaining time is displayed.
Using Headphones
Connect to the jack plug of the headphones.
When the headphones are connected, there is no sound output from the speakers.
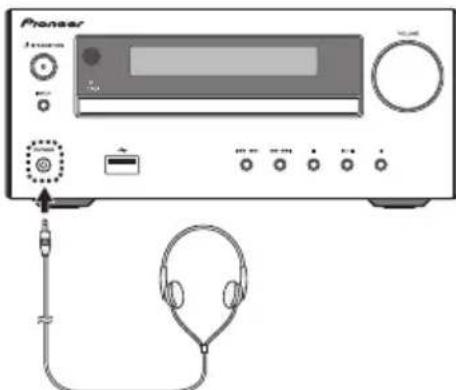
- Do not turn the volume on to full at switch on and listen to music at moderate levels. Excessive sound pressure from earphones and headphones can cause hearing loss.
- Before plugging in or unplugging the headphone, reduce the volume.
- Be sure your headphone has a 3.5mm diameter plug and impedance between 16 Ω and 50 Ω. The recommended impedance is 32 Ω.
Chapter 5:
Disc playback
This system can play back a standard CD, CD-R/RW in the CD format and CD-R/RW with MP3 files, but cannot record on them. Some audio CD-R and CD-RW discs may not be playable due to the state of the disc or the device that was used for recording.
- For details about MP3, see page 31.
Playing discs or files
Load the disc
1 Press to turn the power on.
2 Press CD on the remote control or INPUT repeatedly on the main unit to select CD input.
3 Press on the main unit to open the disc tray.
4 Place the disc on the disc tray, label side up.
5 Press on the main unit to close the disc tray.
Play tracks on a CD
1 When the recognition is completed, press II.
After the last track is played, the unit will stop automatically.
Play MP3 music files
MP3 track data is called "music file" and the location they are stored is called a "folder" in this document.
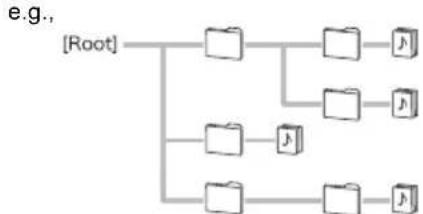
1 When the recognition is completed, press / to select the folder where the music file is stored ([], then press or ENTER.
- Repeat this step if there are other folders inside the selected folder.
To return to the previous folder, press or
2 Press / to select the music file ([p]), and then press or ENTER.
- Once play starts, only music files inside the same folder can be played continuously.
CAUTION
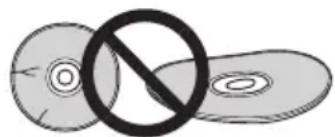
- Do not place two discs in one disc tray.
- Do not play discs of special shapes (heart, octagon, etc). It may cause malfunctions.
- Do not push the disc tray whilst it is moving.
- If the power fails whilst the tray is open, wait until the power is restored.
- Be sure to place 8cm disc in the middle of the disc tray.
Note
- Due to the structure of the disc information, it takes longer to read an MP3 disc than a normal CD (approximately 20 to 90 seconds).
- When the beginning of the first track is reached during fast reverse, the unit will enter the playback mode (only for CD).
If TV or radio interference occurs during CD operation, move the unit away from the TV or radio.
Tip
- When no operation has done in CD mode and the audio file is not played for more than 20 minutes, the power will automatically turn off. In this case it is required that the Auto power off is switched to ON.
- Auto power off can be switched to ON/OFF (page 33).
Basic operations
| Function Main unit Remote control | Operation | ||
| Play | Press in the stop mode. | ||
| Stop | Press in the playback mode. (when playing a CD) “RESUME” is displayed and the place where you stopped play is memorized. Press again and the memorized position is cleared. | ||
| Pause | Press in the playback mode. Press▶■ to resume playback from the paused point. | ||
| Track up/down | Press in the playback or stop mode. If you press the button in the stop mode, press▶■ to start the desired track. (when playing MP3) You can only skip forward or back to music files inside the same folder. | ||
| Fast forward/reverse | Press and hold down in the playback mode. Release the button to resume playback. | ||
Advanced CD or MP3 disc playback
Repeat play
Repeat play can play one track, all tracks or a programmed sequence continuously.
To repeat one track:
Press repeatedly until "REPEAT ONE" appears. Press ENTER.
To repeat all tracks:
Press repeatedly until "REPEAT ALL" appears. Press ENTER.
To repeat desired tracks:
Perform steps 1 - 5 in "Programmed play (CD)" section (page 17) and then press repeatedly until "REPEAT ALL" appears. Press ENTER.
To cancel repeat play:
Press repeatedly until "REPEAT OFF" appears. Press ENTER.

Note
After performing repeat play, be sure to press Otherwise, the disc will play continuously.
- During repeat play, random play is not possible.
Random play
The tracks on the disc can be played in random order automatically.
To random play all tracks:
Press RANDOM repeatedly until "RANDOM ON" appears. Press ENTER.
To cancel random play:
Press RANDOM repeatedly until "RANDOM OFF" appears. Press ENTER.

Note
- If you press the during random play, you can move to the track selected next by the random operation.
- In random play, the unit will select and play tracks automatically. (You cannot select the order of the tracks.)
- During random play, repeat play is not possible.
Programmed play (CD)
You can choose up to 24 selections for playback in the order you like.
1 Whilst in the stop mode, press PGM/ MEMORY on the remote control to enter the programming save mode.
2 Press to select the desired tracks.
3 Press ENTER to save track number.
4 Repeat steps 2 - 3 for other tracks. Up to 24 tracks can be programmed.
- If you want to check the programmed tracks, press PGM/MEMORY.
- If you make a mistake, the last programmed tracks will be canceled by pressing
5 Press to start playback.
To cancel the programmed play mode:
To cancel the programmed play, press twice on the remote control. The display will show "PRG CLEAR" and all the programmed contents will be cleared.
Adding tracks to the program:
Press the PGM/MEMORY. Then follow steps 2 - 3 to add tracks.

Note
- When a disc is ejected, the program is automatically cancelled.
- If you press the to enter the standby mode or change the function from CD to another, the programmed selections will be cleared.
- During the program operation, random play is not possible.
About downloading MP3
There are many music sites on the internet that you can download MP3 music files. Follow the instructions from the website on how to download the music files. You can then play back these downloaded music files by burning them to a CD-R/RW disc.
- Your downloaded song/files are for personal use only. Any other usage of the song without owner's permission, is against the law.
Switch the display contents
1 Press DISPLAY during playback.
If the title, artist and album name has been written to the file, that information will be displayed. (You can view this unit is only alphanumeric characters. Non-alphanumeric character are displayed in the "■".)
Number of the track, title Title display display
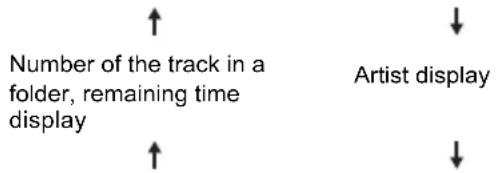
Number of the track in a folder, playback time display

Note
Not supported playback file can not be playback. In this case, will be skipped automatically.
- There may be cases where no information can be displayed.
- Displaying title, artist, and albums is only supported with ID3 Version 1 (1.0 or 1.1).
Chapter 6:
USB playback
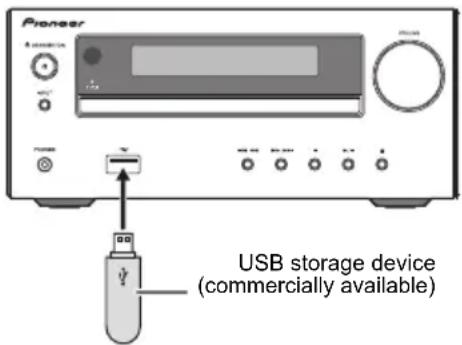
Playing USB storage devices
It is possible to listen to two-channel audio using the USB interface with MP3 files on the front of this receiver.
- Pioneer does not guarantee that any file recorded on a USB storage device will play or that power will be supplied to a USB storage device. Also note that Pioneer will accept no responsibility whatsoever for loss of files on USB storage devices caused by connection to this unit.
- For details about MP3, see page 31.
1 Press USB as the input source.
"USB" is shown on the main display.
2 Connect the USB storage device.
- This receiver does not support a USB hub.
3 When the recognition is completed, press / to select the folder where the music file is stored ([1], then press or ENTER.
- MP3 track data is called "music file" and the location they are stored is called a "folder" in this document.
- Repeat this step if there are other folders inside the selected folder.
To return to the previous folder, press or
4 Press / to select the music file (P), and then press or ENTER.
- Once play starts, only music files inside the same folder can be played continuously.
- For details about the basic operations, see page 16.
- When changing to a different input source, stop the USB memory playback first, before changing.
- Turn the power off before removing the USB storage device.

Note
- This unit may not recognize a USB storage device, play files or supply power to a USB storage device. For details, see When a USB storage device is connected on page 30.
- When a USB storage device is not playing and the unit has not been operated for 20 minutes or more, the power will automatically turn off. In this case it is required that the Auto power off is switched to ON (page 33).
Repeat play
Repeat play can play one track, all tracks or a programmed sequence continuously.
To repeat one track:
Press repeatedly until "REPEAT ONE" appears. Press ENTER.
To repeat all tracks:
Press repeatedly until "REPEAT ALL" appears. Press ENTER.
To cancel repeat play:
Press repeatedly until "REPEAT OFF" appears. Press ENTER.

Note
After performing repeat play, be sure to press. Otherwise, the file of USB storage device will play continuously.
- During repeat play, random play is not possible.
Random play
The file of USB storage device can be played in random order automatically.
To random play all tracks:
Press RANDOM repeatedly until "RANDOM ON" appears. Press ENTER.
To cancel random play:
Press RANDOM repeatedly until "RANDOM OFF" appears. Press ENTER.

Note
- If you press the during random play, you can move to the track selected next by the random operation.
- In random play, the unit will select and play tracks automatically. (You cannot select the order of the tracks.)
- During random play, repeat play is not possible.
Switch the display contents
This unit can switch the information recorded in the USB storage device. For details, see Switch the display contents on page 17.
Chapter 7:
Using the tuner
Listening to FM (For European models)/Listening to FM or AM (For North American models)
The following steps show you how to tune in to FM and AM radio broadcasts using the automatic (search) and manual (step) tuning functions. Once you are tuned to a station you can memorize the frequency for recall later. See Saving station presets below for more on how to do this.
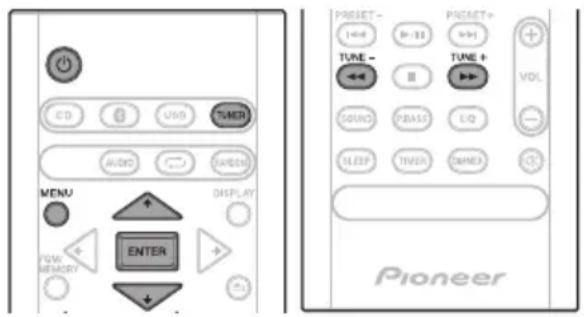
Tuning
1 Press the to turn the power on.
2 Press TUNER repeatedly to select desired frequency band (FM or AM).
- (X-HM26D) You can select "FM" and "DAB". For details about "DAB", see page 23.
3 Press TUNE +/- on the remote control to tune in to the desired station.
Automatic tuning:
Press and hold TUNE +/- , scanning will start automatically and the tuner will stop at the first receivable broadcast station.
Manual tuning:
Press the TUNE +/- repeatedly to tune in to the desired station.

Note
- When radio interference occurs, automatic tuning may stop automatically at that point.
Automatic tuning will skip weak signal stations. - To stop the automatic tuning, press
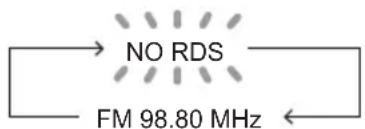
- When an RDS (Radio Data System) station is tuned in, the frequency will be displayed first. Finally, the station name will appear.
Full auto tuning can be achieved for RDS stations using Auto Station Program Memory (ASPM) mode, see page 22.
To receive an FM stereo transmission:
1 Press TUNER until "FM" appears on the display.
2 Press MENU and then press / until "FM STEREO/MONO" appears on the display.
3 Press ENTER and then press / until "AUTO" appears on the display.
Improving poor FM reception:
After performing the above steps 1 - 2, press ENTER and then press / until "MONO" appears on the display.
This will change the tuner from stereo to mono and usually improve the reception.
Saving station presets
If you often listen to a particular radio station, it's convenient to have the receiver store the frequency for easy recall whenever you want to listen to that station (Preset tuning). This saves the effort of manually tuning in each time. This unit can memorize up to 45 stations.
(FM 30 stations/AM 15 stations)
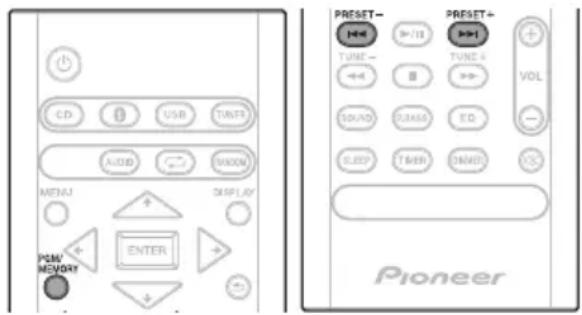
1 Tune to a station you want to memorize.
See Tuning above for more on this.
2 Press PGM/MEMORY.
The preset number will flash.
3 Press PRESET +/- to select the preset channel number.
4 Press PGM/MEMORY to store that station in memory.
If the preset number has changed from flashing to lighting, before the station is memorised, repeat the operation from step 2.
- Repeat steps 1 - 4 to set other stations, or to change a preset station. When a new station is stored in the memory, the station previously memorised for that preset channel number will be erased.

Note
- The backup function protects the memorised stations for a few hours should there be a power failure or the AC power cord become disconnected.
To recall a memorised station
Press PRESET +1- to select the desired station.
To scan the preset stations
The stations saved in the memory can be scanned automatically. (Preset memory scan)
1 Press and hold PRESET +/- . The preset number will appear and the programmed stations will be tuned in sequentially, for 5 seconds each.
2 Press PRESET +1- again when the desired station is located.
To erase entire preset memory
1 Press TUNER on the remote control.
2 Press and hold until "MEMORY CLEAR" appears.

Note
- All stations will be erased.
Using the Radio Data System (RDS)
(for European models only)
Radio Data System (RDS) is a system used by most FM radio stations to provide listeners with various kinds of information—the name of the station and the kind of show they're broadcasting, for example.
One feature of RDS is that you can search by type of program. For example, you can search for a station that's broadcasting a show with the program type, Jazz Music.
Information provided by RDS
1 Press TUNER until "FM" appears on the display.
2 Press DISPLAY repeatedly.
Each time the DISPLAY is pressed, the display will switch as follows:

- When tuning in to a station other than an RDS station or to an RDS station which sends weak signal, the display will change in the following order:
Search for stations by Program Type
1 P r e s s TUNER until "FM" appears
2 Press MENU and then press / until "FM RDS" appears on the display.
3 Press ENTER and then press / until "PTY" appears on the display.
4 P r e s s ENTER. "SELECT" will appear for about 5 seconds.
5 Press to select the program type you want to hear. Each time the button is pressed, the program type will appear. If the button is held down, the program type will appear continuously.
6 Whilst the selected program type is displayed (within 5 seconds), press ENTER.
After the selected program type has been lit for 2 seconds, "SEARCH" will appear, and the search operation will start.
The Program Types displayed are as follows:
News - News
Current Affairs - Current Affairs
Information - General Information
Sport - Sport
Education-Educational
Drama - Radio plays, etc.
Cultures - National or regional culture, theater, etc.
Science - Science and technology
Varied Speech - Usually talk-based material, such as quiz shows or interviews.
Pop Music-Pop music
Rock Music - Rock music
Easy Listening - Easy listening
Light Classics M - 'Light classical music
Serious Classics - 'Serious' classical music
Other Music - Music not fitting above categories
Weather & Metr - Weather reports
Finance - Stock market reports, commerce, trading, etc.
Children's Progs - Programs for children
Social Affairs - Social affairs Religion-Programs concerning religion
Phone In - Public expressing their views by Phone
Travel & Touring-Holiday-type travel rather than traffic announcements
Leisure & Hobby - Leisure interests and hobbies Jazz Music - Jazz
Country Music-Country music
National Music- Popular music in a language other than English
Oldies Music- Popular music from the 50s and 60s Folk Music-Folk music
Documentary - Documentary Alarm Test - Broadcasting when testing emergency broadcast equipment or receivers.
Alarm - Alarm! - Emergency announcement made under exceptional circumstances to give warning of events causing danger of a general nature.
- If the display has stopped flashing, start again from step 2. If the unit finds a desired program type, the corresponding channel number will lit for about 8 seconds, and then the station name will remain it.
- If you want to listen to the same program type of another station, repeat steps 2 - 6. The unit will look for the next station.
- If no station can be found, "NOT FOUND" will appear for 4 seconds.
Using the Auto Station program Memory (ASPM)
Whilst in the ASPM operation mode, the tuner will automatically search for new RDS stations. Up to 30 stations can be stored.
If you have already stored some stations in memory, the number of new stations you can store will be less.
1 Press TUNER until "FM" appears on the display.
2 Press MENU and then press / until "FM RDS" appears on the display.
3 Press ENTER and then press / until "ASPM" appears on the display.
4 Press ENTER.
After "ASPM" has flashed for about 4 seconds, scanning will start (87.5 - 108 MHz).
After scanning, the number of stations stored in memory will be displayed for 4 seconds, and then "END" will appear for 4 seconds.
- To stop the ASPM operation before it is complete: Press whilst it is scanning for stations. The stations which are already stored in memory will be kept there.
- If the same station is broadcasting on different frequencies, the strongest frequency will be stored in memory.
- Any station which has the same frequency as the one stored in memory will not be stored.
- If 30 stations have already been stored in memory, the scan will be aborted. If you want to redo the ASPM operation, erase the preset memory.
- If no station have been stored in memory, "NOT FOUND" will appear for about 5 seconds.
- If the RDS signals are very weak, station names may not be stored in memory.
- The same station name can be stored in different channels.
- In a certain area or during certain time periods, the station names may temporarily be different.

Note
-
If any of the following events occur, it does not mean that the unit is faulty:
-
"PS", "NO PS" and a station name appear alternately, and properly.
- If a particular station is not broadcasting properly or a station is conducting tests, the RDS reception function may not work properly.
- When you receive an RDS station whose signal is too weak, information like the station name may not be displayed.
- "NO PS", "NO PTY" or "NO RT" will flash for about 5 seconds, and then the frequency will be displayed.
Notes for radio text:
- The first 8 characters of the radio text will appear and then they will scroll across the display.
- If you tune in to an RDS station which is not broadcasting any radio text, "NO RT" will be displayed when you switch to the radio text position.
- Whilst radio text data is received or when the text contents change, "RT" will be displayed.
Listening to the DAB+ (X-HM26D only)
About DAB+ (Digital Audio Broadcasting)
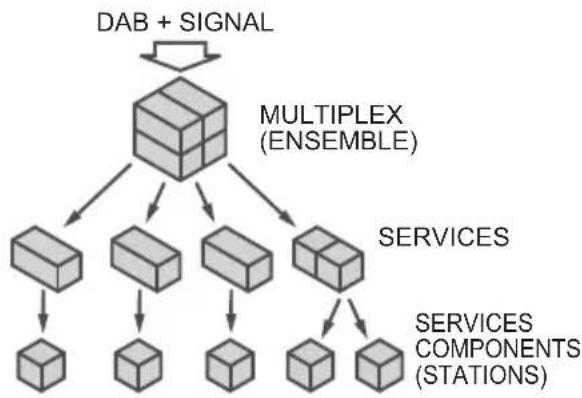
Digital Audio Broadcasting is a digital transmission system where audio signals are converted to digital signals for broadcasting. DAB+ is broadcast as a group of data called multiplex (ensemble) which may contain one or more stations (services). Each station contains a primary service and there may be one or more secondary services. This allows several programmes or services to be transmitted on a single frequency.
Tuning
1 Press the TUNER until "DAB" appears on the display.
When turned on for the first time, the unit scans radio stations automatically to create a station list.
The stations will be stored in alphanumeric order and the first station on the list will be selected and you will hear it through the speakers.
2 Press the TUNE + / - to select the desired station.
3 Within 10 seconds, press the ENTER on the remote control to tune into the desired station.
-
If no station is found, "NO SIGNAL" appears.
-
Up to 100 appears for total received stations.
Auto Scan
You can make the auto scan again when you move the unit to other areas or add multiplex channels to the station list.
1 Press the TUNER until "DAB" appears on the display.
2 Press MENU and then press / until "DAB SCAN" appears on the display.
3 Press ENTER and then press / until "AUTO" appears on the display.
4 P r e s s ENTER. Auto Scan scanning begins.
After the scanning process is complete, the first station that was detected is selected.
Manual tune
You can manually store stations which Auto Scan cannot find. If reception is poor, you can adjust the sensitivity. Manual tune is only available after Auto tune. Perform Auto Scan first.
1 Press the TUNER until "DAB" appears on the display.
2 Press MENU and then press / until "DAB SCAN" appears on the display.
3 Press ENTER and then press / until "MANUAL" appears on the display.
4 P r e s s ENTER.
5 Within 10 seconds, press the TUNE +l- to select the DAB+ frequency.
6 Within 10 seconds, press the ENTER. If the level is too low, move the aerial or unit to improve reception.
Changing the information display
You can switch DAB+ display information.
Press the DISPLAY button.
Each time the button is pressed, the information display changes in the following order.
When "NO SIGNAL" appears, the DISPLAY button does not allow you to change the display.
[Programme Name]
Station name is displayed. (set by default)
[Scrolling text]
Information scrolls across the display when sent from the station.
[Program type]
A description of the type of content being broadcast by the station.
[Multiplex name]
The name of the multiplex (ensemble) which provides the current service.
[Frequency]
The DAB+ frequency for the station.
[Stereo mode]
Display stereo mode.
[Transfer speed]
The data transfer speed.
[Signal quality]
The signal quality is displayed as a number (0 - 100).
[85-100: Good, 70-84: Fair, 0-69: Poor]
Memorising a station
You can store 10 DAB stations in memory and recall them at the push of a button. (Preset tuning)
1 Tune to the desired DAB station.
2 Press the PGM/MEMORY.
The preset number will flash.
3 Within 10 seconds, press the PRESET + / - to select the preset channel number.
Store the stations in memory, in order, starting with preset channel 1.
4 Within 10 seconds, press the PGM/ MEMORY to store that station in men
If the preset number indicators disappear before the station is memorised, repeat the operation from step 2.
5 Repeat steps 1 - 4 to set other stations, or to change a preset station.
When a new station is stored in the memory, the station previously memorised for that preset channel number will be erased.
DAB Frequency table (BAND III)
| Frequency Label Frequency Label | |||
| 174.928 MHz | 5A 208.064 | MHz 9D | |
| 176.640 MHz | 5B 209.936 | MHz 10A | |
| 178.352 MHz | 5C 211.648 | MHz 10B | |
| 180.064 MHz | 5D 213.360 | MHz 10C | |
| 181.936 MHz | 6A 215.072 | MHz 10D | |
| 183.648 MHz | 6B 216.928 | MHz 11A | |
| 185.360 MHz | 6C 218.640 | MHz 11B | |
| 187.072 MHz | 6D 220.352 | MHz 11C | |
| 188.928 MHz | 7A 222.064 | MHz 11D | |
| 190.640 MHz | 7B 223.936 | MHz 12A | |
| 192.352 MHz | 7C 225.648 | MHz 12B | |
| 194.064 MHz | 7D 227.360 | MHz 12C | |
| 195.936 MHz | 8A 229.072 | MHz 12D | |
| 197.648 MHz | 8B 230.784 | MHz 13A | |
| 199.360 MHz | 8C 232.496 | MHz 13B | |
| 201.072 MHz | 8D 234.208 | MHz 13C | |
| 202.928 MHz | 9A 235.776 | MHz 13D | |
| 204.640 MHz | 9B 237.488 | MHz 13E | |
| 206.352 MHz | 9C 239.200 | MHz 13F | |
Chapter 8:
Other connections

CAUTION
- Before making or changing the connections, switch off the power and disconnect the power cord from the AC outlet.
- We will not accept responsibility for damage arising from the connection of equipment manufactured by other companies.
Connecting auxiliary components
Connect your auxiliary playback component using the AUDIO IN input on the rear panel.
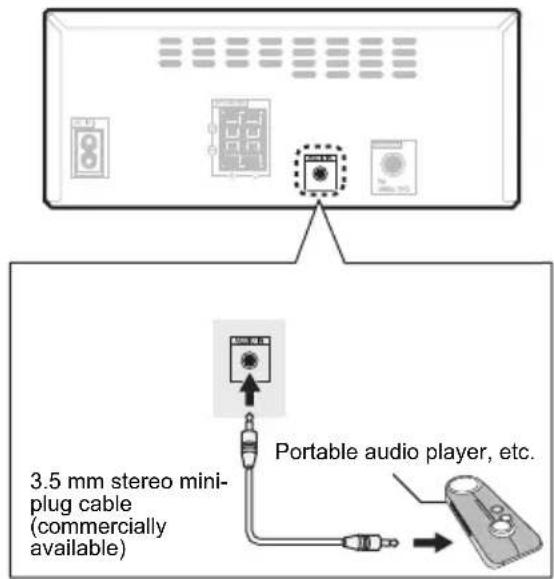
1 Press AUDIO as the input source.
When AUDIO IN is selected, "Audio In" is displayed on the main display.

Note
- If the AUDIO IN mini Plug jack is connected to auxiliary phones jack, the volume of the unit will be adjusted by the volume on the playback component. If the sound is distorted after you lower the volume of the unit, try lowering the volume on the auxiliary playback component.
Automatic switching to Audio In input
(For North American models only)
This function automatically switches to "AUDIO IN" when there is audio input to the AUDIO IN jack.
1 Press MENU and then press / until "Audio In detect" appears on the display.
2 Press ENTER and then press / to switch Audio In detect ON/OFF.
- It is set to OFF in the factory setting.

Note
- When the Audio In detect is ON, "Audio In Det ON" is displayed on the main display.
- When the Audio In detect is OFF, "Audio In Det OFF" is displayed on the main display.
Chapter 9:
Bluetooth® Audio playback
X-HM26/26D only
Music playback using Bluetooth wireless technology
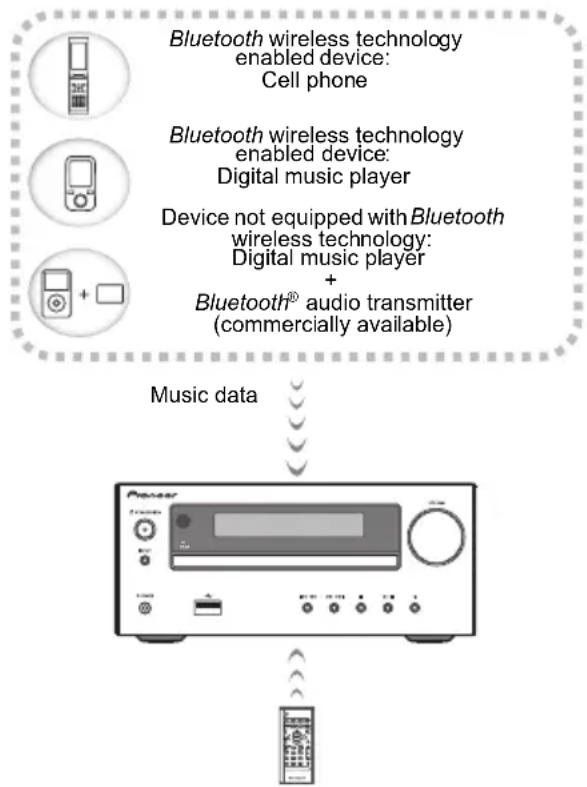
The unit is capable of playing back music stored on Bluetooth capable devices (cell phones, digital music players etc.) wirelessly. You can also use a Bluetooth audio transmitter (sold separately) to enjoy music from devices that do not have Bluetooth functionality. Please refer to the user's manual for your Bluetooth capable device for more details.

Note
- The Bluetooth ® word mark and logos are registered trademarks owned by the Bluetooth SIG, Inc.
- The Bluetooth wireless technology enabled device must support A2DP profiles.
- Connection is not always guaranteed with all Bluetooth-enabled devices.
Remote control operation
The remote control supplied with this unit allows you to play and stop media, and perform other operations.

Note
- The Bluetooth wireless technology enabled device must support AVRCP profiles.
- Remote control operations cannot be guaranteed for all Bluetooth wireless technology enabled devices.
Pairing with the unit (Initial registration)
In order for the unit to playback music stored on a Bluetooth capable device, pairing must first be performed. Pairing should be performed when first using the unit with the Bluetooth capable device, or when the pairing data on the device has been erased for any reason. Pairing is a step required to allow communication using Bluetooth wireless technology to be carried out.
- Pairing is only performed the first time that you use the unit and the Bluetooth capable device together.
- In order to allow communication using Bluetooth wireless technology to take place, pairing must be performed on both the unit and the Bluetooth capable device.
After pressing the and switching to Bluetooth input, perform the pairing procedure on the Bluetooth capable device. If pairing has been performed correctly, you will not need to perform the pairing procedures for the unit as shown below.
Please refer to the user's manual for your Bluetooth capable device for more details.
1 Press the and turn the power to the unit on.
2 Press the

The unit switches to Bluetooth and "Pairing" will be displayed.
3 Turn on the power to the Bluetooth capable device that you wish to pair with, and perform pairing procedure on it.

Note
- This unit will be displayed as "Pioneer X-HM26" on all Bluetooth capable devices that you have.
Pairing will start.
- Place the Bluetooth capable device close to the unit.
- Please refer to the user's manual for your Bluetooth capable device for details on when pairing can be performed and the procedures required for pairing.
- When PIN code entry is requested, enter "0000." (This unit does not accept any PIN code setting other than "0000.")
4 Confirm on the Bluetooth capable device that pairing has been completed.
If pairing with the Bluetooth capable device has been completed correctly, the name of the Bluetooth capable device will be displayed on the front panel of the unit. (Only single-byte alphanumeric characters can be displayed. Any character that cannot be displayed will be indicated by a "■".)
Listen to music on the unit from a Bluetooth capable device
1 Press the .
The unit will switch to Bluetooth input.
2 A Bluetooth connection will be created between the Bluetooth capable device and the unit.
Procedures for connecting to the unit should be performed from the Bluetooth capable device.
- Please refer to the user's manual for your Bluetooth capable device for details of the connection procedures.
3 Playback music from the Bluetooth capable device.

Note
- When Bluetooth capable devise is not connected and no operations have been performed for more than 20 minutes, the unit will automatically power off. In this case it is required that the Auto power off is switched to ON.
- Auto power off can be switched to ON/OFF (page 33).
BT STANDBY
- The following can be done when the unit is on standby with the BT STANDBY switched ON.
- By selecting a Bluetooth capable device that already has a connection history (pairing has already been conducted) with this unit, this unit will automatically turn on with the Bluetooth function.
BT STANDBY settings
1 Press the .
2 Press MENU and then press / until "BT STANDBY" appears on the display.
3 Press ENTER and then press / to switch BT STANDBY ON/OFF.
- It is set to OFF in the factory setting.

Note
- When the BT STANDBY is ON, "BT STANDBY ON" is displayed on the main display.
- When the BT STANDBY is OFF, "BT STANDBY OFF" is displayed on the main display.
Connection while in BT STANDBY mode with Bluetooth capable device
When connection history (pairing has already been conducted) with a Bluetooth capable device exists for the unit during BT STANDBY, the unit can receive a connection request directly from the connection history.
The unit will start using the Bluetooth function, and connect with a Bluetooth capable device.
Even devices that have already been paired with this unit will not connect during BT STANDBY in the following cases. In such cases, delete pairing history from the Bluetooth wireless technology device and perform pairing again.
- This unit can store a maximum of 8 units in the pairing history.
- If the settings are reset to the factory setting, all pairing history will be deleted.
Radio wave caution
This unit uses a 2.4 GHz radio wave frequency, which is a band used by other wireless systems (see list below). To prevent noise or interrupted communication, do not use this unit nearby such devices, or make sure these devices are switched off during use.
- Cordless phones
- Cordless facsimiles
- Microwave ovens
Wireless LAN devices (IEEE802.11b/g) - Wireless AV equipment
- Wireless controllers for game systems
- Microwave-based health aids
- Some baby monitors
Other, less common, equipment that may operate on the same frequency:
- Anti-theft systems
- Amateur radio stations (HAM)
- Warehouse logistic management systems
- Discrimination systems for train or emergency vehicles

Note
- In the event noise appears in your television image, there is the possibility that a Bluetooth wireless technology enabled device or this unit (including products supported by this unit) are causing signal interference with the antenna input connector of your television, video, satellite tuner, etc. In this event, increase the distance between the antenna input connector and the Bluetooth wireless technology enabled device or this unit (including products supported by this unit).
- If there is something obstructing the path between this unit (including devices supported by this unit) and the device equipped with Bluetooth wireless technology (such as a metal door, concrete wall, or insulation containing tinfoil), you may need to change the location of your system to prevent signal noise and interruptions.
Scope of operation
Use of this unit is limited to home use. (Transmission distances may be reduced depending on communication environment).
In the following locations, poor condition or inability to receive radio waves may cause the audio to be interrupted or stopped:
- In reinforced concrete buildings or steel framed or iron-framed buildings.
- Near large metallic furniture.
- In a crowd of people or near a building or obstacle.
- In a location exposed to the magnetic field, static electricity or radio wave interference from radio communication equipment using the same frequency band (2.4 GHz) as this unit, such as a 2.4 GHz wireless LAN device (IEEE802.11b/g) or microwave oven.
- If you live in a heavily populated residential area (apartment, townhouse, etc.) and if your neighbor's microwave is placed near your system, you may experience radio wave interference. If this occurs, move your unit to a different place. When the microwave is not in use, there will be no radio wave interference.
Radio wave reflections
The radio waves received by this unit include the radio wave coming directly from the device equipped with Bluetooth wireless technology (direct wave) and waves coming from various directions due to reflections by walls, furniture and building (reflected waves). The reflected waves (due to obstacles and reflecting objects) further produce a variety of reflected waves as well as variation in reception condition depending on locations. If the audio cannot be received properly due to this phenomenon, try moving the location of the device equipped with Bluetooth wireless technology a little. Also note that audio may be interrupted due to the reflected waves when a person crosses or approaches the space between this unit and the device equipped with Bluetooth wireless technology.
Precautions regarding connections to products supported by this unit
- Complete connections for all devices supported by this unit, including all audio cords and power cables before connecting them to this unit.
- After completing connections to this unit, check the audio and power cables to confirm that they not twisted together.
- When disconnecting this unit, confirm that you have sufficient working space in the surrounding area.
- When changing connections of audio or other cables for products supported by this unit, confirm that you have sufficient working space in the surrounding area.
Chapter 10:
Additional information
Troubleshooting
Incorrect operations are often mistaken for trouble and malfunctions. If you think that there is something wrong with this component, check the points below. Sometimes the trouble may lie in another component. Investigate the other components and electrical appliances being used. If the trouble cannot be rectified even after exercising the checks listed below, ask your nearest Pioneer authorized service center or your dealer to carry out repair work.
- If the unit does not operate normally due to external effects such as static electricity disconnect the power plug from the outlet and insert again to return to normal operating conditions.
General problem
| Problem Check Remedy | ||
| Settings you have made have been cleared. | Was the power cord unplugged? When power cord is unplugged, the settings you have made is cleared. Please set the clock again. If you do not want to clear the settings, do not unplug the power cord. | |
| Difference in volume between CDs, MP3, Tuner, and AUDIO IN. | This is not a problem with this unit. | The volume may sound differently depending on the input source and recording format. |
| When using an analogue player with this unit, connect a device equipped with phono equalizer. | ||
| This unit cannot be operated with the remote control. | Are you operating from far away? | Operate within 7 m, 30° of the remote sensor on the front panel (page 5). |
| Is the remote control sensor exposed to direct sunlight or strong artificial light from a fluorescent bulb, etc.? | The remote control signals may not be received properly if the remote control sensor is exposed to direct sunlight or strong artificial light from a fluorescent bulb, etc. | |
| Are the batteries dead? Replace the batteries (page 5). | ||
| Disc cannot be played or disc is ejected automatically. | Is the disc scratched? Scratched discs may not play. | |
| Is the disc dirty? Wipe the dirt off the disc (page 33). | ||
| Is this unit placed in a humid location? | There could be condensation inside. Wait a while for the condensation to evaporate. Do not place this unit near an air-conditioner, etc. (page 32). | |
| Folder or file names are not recognized. | Have you exceeded the maximum number of folder or file names this unit can recognize? | The unit can recognize up to 999 files on a single disc or on a single USB memory device. The number of folders is up to 255. Depending on the folder structure, there may be folders or files that the unit cannot recognize. |
| The unit turns off automatically. | If no play back and no operation has done for 20 minutes or more, the unit turns off automatically. In this case it is required that the Auto power off is switched to ON (page 33). | |
When a USB storage device is connected
| Problem Check Remedy | ||
| USB storage device is not recognized. | Is the USB storage device properly connected? | Connect the device securely (all the way in). |
| Is the USB storage device connected via a USB hub? | This unit does not support USB hubs. Connect the USB storage device directly. | |
| This unit only supports USB mass storage class devices. | ||
| This unit supports portable flash memory and digital audio playback devices. | ||
| Only the FAT16 and FAT32 file systems are supported. Other file systems (exFAT, NTFS, HFS etc.) are not supported. | ||
| This device does not support the use of external hard disc drives. | ||
| This is not a problem with this unit. Turn the power off then back on. | ||
| Some USB storage devices may not be recognized properly. | ||
| File cannot be played. Is the file copyright-protected (by DRM)? | Copyright-protected files cannot be played. | |
| This is not a problem with this unit. Files stored on a computer cannot be played. | ||
| It may not be possible to play some files. | ||
| Folder or file names are not displayed or are not properly displayed. | Do the folder of file names contain more than 30 characters? | The maximum number of characters displayable for the folder and file names is 30. |
| Folder or file names are not displayed in alphabetical order. | This is not a problem with this unit. | The order of the folder and file names displayed depends on the order in which the folders or files were recorded on the USB storage device. |
| Much time is required to recognize the USB storage device. | What is the USB storage devices capacity? | Some time may be required to load the data when large capacity USB storage devices are connected (this could take several minutes). |
When the Bluetooth wireless technology device is connected or operated
X-HM26/26D only
Problem Remedy
The Bluetooth wireless technology device cannot be connected or operated.
Sound from the Bluetooth wireless technology device is not emitted or the sound is interrupted.
Check that no object that emits electromagnetic waves in the 2.4 GHz band (microwave oven, wireless LAN device or Bluetooth wireless technology apparatus) is near the unit. If such an object is near the unit, set the unit far from it. Or, stop using the object emitting the electromagnetic waves.
Check that the Bluetooth wireless technology device is not too far from the unit and that obstructions are not set between the Bluetooth wireless technology device and the unit. Set the Bluetooth wireless technology device and the unit so that the distance between them is less than about 10m^* and no obstructions exist between them.
- The distance given is to be used as a rough guide. The actual allowable distance between devices may vary depending on conditions in the surrounding environment.
The Bluetooth wireless technology device may not be set to the communication mode supporting the Bluetooth wireless technology. Check the setting of the Bluetooth wireless technology device.
Check if this unit is connected with a Bluetooth wireless technology device with an input source other than Bluetooth selected. Perform paring procedure after selecting Bluetooth as the input source.
Playable discs and formats
| Audio CD | • Commercially available audio CDs • CD-R/ -RW/ -ROM discs containing music recorded in the CD-DA format |
| MP3 | MP3 files recorded on CD-R/ -RW/ -ROM discs or USB storage devices |
- Only the discs that have been finalized can be played.
- Discs recorded in packet write mode (UDF format) are not compatible with this unit.
- Corporation and product names mentioned herein are trademarks or registered trademarks of the respective corporations.
- Only discs recorded in ISO9660 Level 1, Level 2 and Joliet can be played.
- Files protected by DRM (Digital Rights Management) cannot be played.
MP3:
MP3 is a form of compression. It is an acronym which stands for MPEG Audio Layer 3. MP3 is a type of audio code which is processed by significant compression from the original audio source with very little loss in sound quality.
-
This system supports MPEG-1/2 Audio Layer 3 (Sampling rates: 32kHz to 48kHz ; Bit rates: 8 kbps to 320 kbps).
-
During VBR file playback, time counter in the display may differ from its actual playback time.
- The folder and file order information which is recorded on the media depends on the writing software. There may be possibilities that this unit will playback the files not according to our expected playback order.
- From a media with MP3 files up to 255 folders and 999 files (including non playable files) can be read.

Note
- This unit does not support multisession discs or multiborder recording.
- Multisession/multiborder recording is a method in which data is recorded on a single disc in two or more sessions/borders. A "session" or "border" is one recording unit, consisting of a complete set of data from lead-in to lead-out.
Regarding copy protected CDs
This unit is designed to conform to the specifications of the audio CD format. This unit does not support the playback or function of discs that do not conform to these specifications.
Supported audio file formats
This unit does not support lossless encoding.
Cautions on use
When moving this unit
When moving this unit, be sure to first check that there is no disc loaded and disconnect the USB storage device. Then press , wait for "STAND BY" disappears on main display to turn off, then unplug the power cord. Damage may occur if the unit is transported or moved with a disc inserted, or when another device is connected to the USB terminal, or AUDIO IN mini-plug jack.
Place of installation
- Choose a stable place near the TV or stereo system being used with this unit.
- Do not place this unit on top of a TV or color monitor. Also install it away from cassette decks and other devices easily affected by magnetic forces.
Avoid the following locations:
- Places exposed to direct sunlight
- Humid or poorly ventilated places
- Extremely hot places
- Places exposed to vibrations
- Places in which there is much dust or cigarette smoke
- Places exposed to soot, steam or heat (kitchens, etc.)
Do not place objects on this unit
Do not place any objects on top of this unit.
Do not obstruct the ventilation holes.
Do not use this unit on shaggy rugs, beds, sofas, etc., or wrapped in cloth, etc. Doing so will prevent the heat from dispersing, leading to damage.
Do not expose to heat.
Do not place this unit on top of an amplifier or other component that generates heat. When rack mounting it, to avoid the heat given off by the amplifier or other audio component, place it on a shelf below the amplifier.
- Turn off the unit's power when not using it.
- Depending on signal conditions, striped patterns may appear on a TV screen and noise may enter the sound of radio broadcasts when the unit's power is on. If this happens, turn the unit's power off.
About condensation
If this unit is moved suddenly from a cold place into a warm room (in winter, for example) or if the temperature in the room in which this unit is installed rises suddenly due to heater operation, etc., water droplets (condensation) may form inside (on operating parts and the lens). When condensation is present, this unit will not operate properly and playback is not possible. Let this unit stand at room temperature for 1 or 2 hours with the power turned on (the time depends on the extent of condensation). The water droplets will dissipate and playback will become possible. Condensation can also occur in the summer if this unit is directly exposed to the air flow from an air-conditioner. If this happens, move this unit to a different place.
Cleaning the product
- Unplug the power cord from the power outlet when cleaning this unit.
- Clean this unit using a soft cloth. For tough dirt, apply some neutral detergent diluted in 5 to 6 parts water to a soft cloth, wring out thoroughly, wipe off the dirt, then wipe again with a soft, dry cloth.
- Alcohol, thinner, benzene, insecticides, etc., could cause the print or paint to peel off. Also, leaving rubber or vinyl products in contact with this unit for long periods of time could mar the cabinet.
- When using chemical-impregnated wipes, etc., read the cautions included with the wipes carefully.
Cleaning the lens
This unit's lens should not become dirty in normal use, but if for some reason it should malfunction due to dust or dirt, consult your nearest Pioneer authorized service center. Although lens cleaners for players are commercially available, we advise against using them since some may damage the lens.
Handling discs
Storing
- Always place discs in their cases and store them vertically, avoiding hot, humid places, places exposed to direct sunlight and extremely cold places.
- Be sure to read the cautions included with the disc.
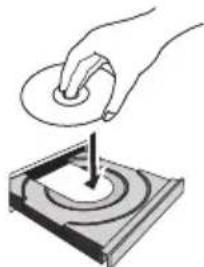
Cleaning discs
- Discs may not play if there are fingerprints or dust on them. In this case, use a cleaning cloth, etc., to gently wipe the disc from the inside towards the outside. Do not use dirty cleaning cloths.

- Do not use benzene, thinner or other volatile chemicals. Also do not use record spray or antistatic agents.
- For tough dirt, apply some water to a soft cloth, wring out thoroughly, wipe off the dirt, then wipe off the moisture with a dry cloth.
- Do not use damaged (cracked or warped) discs.
-
Do not let the signal surface of discs get scratched or dirty.
-
Do not attach pieces of paper or stickers to discs. Doing so could warp discs, making it impossible to play them. Also note that rental discs often have labels attached to them, and the label's glue may have oozed out. Check that there is no glue around the edges of such labels before using rented discs.
About specially shaped discs
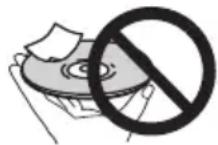
Specially shaped discs (heart-shaped, hexagonal, etc.) cannot be played on this unit. Do not attempt to play such discs, as they could damage this unit.

Auto power off setting
1 Press MENU on the remote control.
"Auto Power Down" will be displayed on the main display.
2 Press ENTER on the remote control.
3 Press / to switch auto power off setting ON/OFF.
- Initial setting is set to ON.

Note
- When the auto power off is set to ON, "APD ON" will be displayed on the main display.
- When the auto power off is set to OFF, "APD OFF" will be displayed on the main display.
Restoring all the settings to the defaults
Use the steps below to restore the all settings to their defaults.
1 Press to turn the power on.
2 Press MENU and then press until "Factory Reset" appears on the display.
3 Press ENTER.
"OK?" will appear.
4 Press ENTER.
- "Resetting" is displayed while the settings are being restored. Power is turned off.
Specifications
- Amplifier section
RMS Power Output: 15 W + 15 W (1 kHz, 10 %, T.H.D., 8 Ω)
Tuner section
Frequency Range (FM) .87.5 MHz to 108.0 MHz Antenna Input (FM). 75Ω unbalanced Frequency Range (AM) (For North American models) 530kHz to 1710kHz Antenna (AM). Loop antenna
- Bluetooth (X-HM26/26D only)
Version .Bluetooth Specification Ver.4.1
OutputBluetooth Specification Class 2
Estimated line-of-sight transmission distance* About 10m Frequency range 2.4 GHz
Modulation FH-SS (Frequency Hopping Spread Spectrum)
Supported Bluetooth profiles .A2DP, AVRCP
Supported Codec SBC (Subband Codec)
Supported contents protection .SCMS-T
PIN code .0000
- The line-of-sight transmission distance is an estimate. Actual transmission distances supported may differ depending on surrounding conditions.
Miscellaneous
USB terminal .5V,500mA
Power source (For European models) AC 220 V to 240 V,50 Hz/60 Hz (For North American models) AC 120 V,60 Hz
Power consumption Power on 20 W Power stand-by .0.5W or less Power stand-by (BT STANDBY ON) .0.5W or less Dimensions. 215mm W × 95 mm H × 315 mm D Weight (without package) .2.0 kg
- Speaker
Enclosure Bass-reflex, book-shelf type (Magnetically shielded)
Configuration 2-way
Tweeter .2 cm dome
Woofer 10 cm cone
Maximum input power 15 W
Impedance .8Ω
Dimensions. 130~mm W × 212 mm H × 228.5 mm D)
Weight 2.0 kg/each
- Accessories
Remote control 1
AAA batteries (R03) 2
AM antenna cable1 1
FM wire antenna2 1
DAB/FM wire antenna3 1
Power cord 1
Warranty card4 1
Operating instructions (This document) 1
1 North American models only
2 X-HM16/HM26 only
3 X-HM26D only
4 European models only

Note
- The specifications are applicable when the power supply is 230V .
- Specifications and the design are subject to possible modifications without notice, due to improvements.
"Pioneer" is a trademark of Pioneer Corporation, and is used under license.
© 2016 Onkyo & Pioneer Corporation. All rights reserved
ATTENTION
POUR ÉVITER TOUT RISQUE D'ÉLECTROCUTION, NE PAS ENLEVER LE COUVERCLE (NI LE PANNEAU ARRÊRÉ). AUCUNE PIECE RÉPARABLE PAR L'UTILISATEUR NE SE TROUVE À L'INTÉRIEUR. CONFIER TOUT ENTRETIEN À UN PERSONNEL QUALIFIÉ UNIQUEMENT.
D3-4-2-1-1_B1_Fr
AVERTISSEMENT
A propos de DAB+ (Digital Audio Broadcasting, radio
numérique) 23
Tuner. 23
Pourmettrelalectureenpause.
4 ②
(30 stations FM / 15 stations AM)
Education - Education
Version.......Bluetooth Specifications Ver. 4.1
Sortie .Bluetooth Specifications Classe 2
215 mm (L) × 95 mm (H) × 315 mm (P)
Poids (sans emballage) 2,0 kg
- Enceintes
Poids. 2,0 kg (chacune)
- Accessoires
© 2016 Onkyo & Pioneer Corporation.
4 Repita los pasos 2 - 3 para除外 pistas. SeSEOSEOSEOSEOSEOSEOSEOSEOSEOSEOSEOSEOSEOSEOSEOSEOSEOSEOSEOSEOSEOSEOSEOSEOSEOSEOSEOSEOSEOSEOSEOSEOSEOSEOSEOSEOSEOSEOSEOSEOSEOSEOSEOSEOSEOSEOSEOSEOSEOSEOSEOSEOSEOSEOSEOSEOSEOSEOSEOSEOSEOSEOSEOSEOSEOSEOSEOSEOSEOSEOSEOSEOSEOSEOSEOSEOSEOSEOSEOSEOSEOSEOSEOSEOSEOSEOSEOSEOSEOSEOSEOSEOSEOSEOSEOSEOSEOSEOSEOSEO SEO
- Si desea comprobar las pistas programadas, pulse PGM/MEMORY.
- Si comete un error, pode cancelar las ultimas pistas programadas pulsando
Education - Material educativo
Drama - Radionovelas, etc.
Cultures - Cultura nacional o regional, teatro, etc.
Children's Progs - Programas infants
Social Affairs - Asuntos sociales
3 Pu I s e E N T E R .
"OK?" aparecerá.
4 P u I s e E N T E R .
FH-SS (Frequency Hopping Spread Spectrum)
Perfiles compatibles con Bluetooth . . . . . . . . . . . . . . . . . . . . . . . . . . . . . . . . . . . . . . . . . . . . . . . . . . . . . . . . . . . . . . . . . . . . . . . . . . . . . . . . . . . . A2DP, AVRCP
© 2016 Onkyo & Pioneer Corporation.
Education - Programmi educativi
Uber DAB+ (Digital Audio Broadcasting) 23
Sendersuche. 23
Children's Progs- Kindersendungen
Social Affairs - Soziale Themen
Uber DAB+ (Digital Audio Broadcasting)
© 2016 Onkyo & Pioneer Corporation.
KLASSE 1 LASERPRODUCT
D58-5-2-2a_A1_NI
WAARSCHUWING NETSNOER
(FM 30 stations/AM 15 stations)
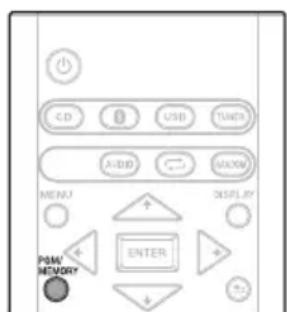
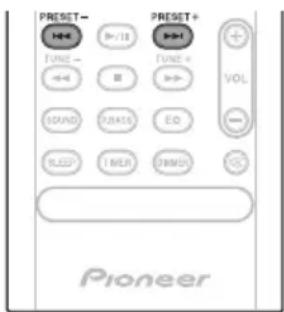
2 D r u k o p P G M / M
Children's Progs - Kinderprogramma's
Social affairs - 'Human interest', programme's over sociale aangelegenheden
Religion - Religieuze programme's
Phone In -Programma's waarin mensen Telefonisch hun munching kunnen setzen
- De fabrieksinstelling is OFF.
Opmerking
Auto Power Off-installing
© 2016 Onkyo & Pioneer Corporation.
Ia CtpaH, KOtOpbIe He BxOaT B coCTaB EbPoneckoro Co1o3a:
EcBbJxJaTe yTnHn3nPoBaTaDaHbIe n3dEHH, o6paTntecb B COOTBeCTByUOuine MeCTHbIe yUpeKdEHHN IIN K DInIepaM dIra NOnyueHHN IHOpMaun O npabNlbHbIX cnocobax yTnHn3aun.
K058a A1 Ru
PpeynpeKdHne no paINOBOJHaM
DaHHb annapaT nCNOJb3yET paHIOBOJIHOByo qactoty 2,4 Tg, yBnIauOyUcO DaIana3OHom, nCNoIb3yeMbIM dpYIMN BcnpoBOHbIMN CNTeMAMN (MnKPOBOJIHOBbIMN neamn npaoTepeohAmn, np.). B cnyae noRbIeHnRAckaeHn Ha N3O6paXeHNn Ha TeLeBn3ope, cyEcTByET BO3MOxHOCtB TORO, YTO DaHHOe yCTpoiCTBO (BKIIouy I3JeINr, NOpeKINBaEMble daHHbIM yCTpOiCTBOM) CO3daOT INHTepΦepeHcuIO CnIHANOB C BXOHBIM pa3BeMOM aHTeHHbl TEJIeBn3OpA, BVdeOeKN, cNYTHIKOBOrTo TIOhepa nT. n. B TakOM cnyae yBEInuBte pacCToRHe MEXdy BXoHbIM rHe3Dm aHTeHHbl IN daHHbIM annapaTOM (BKIIouy I3JeINr, NOpeKINBaEMble daHHbIM annapaTOM).
Pioneer He Hecet OTBETCTBeHHocTHaJIIO6bIe c60H a coBmectmbix N3dEINx Pioneer no npuHHe OUn6OK/c6oEB CBA3N, CBA3aHHbIX C NOKIIIOueHnEM K CETn I/INI NODKNIOHcEHNBIM 6OpyDObAHnEM. IoxaJyIcTA, CBXITcB c npOBaIepOM INTepHET ycIyI INI pON3BOIDTeJIem CeTEBOrO yCTpOiCTBa.
-ДяИСПОЛБ3OBAHINИНТЕРНET trpe6yeTc coCTaBNTb OTdJIbHbI KOHTpaKT/IpOu3BecTu ONnAry npoBaIepy INTHEPHTycnyr.
PNEyPPEKDEHNE
XpaHnte MaHbKne DeTaIN B HeIOCTyINHom IJnI
Tei MeTe. B cnyuae cnyaHoro nporNaTbIBaHn
HEMeDInHo 6paNTecb K BpaCy.
Благорадим за покуку зтою идениkomпанн Pioneer.
ДяТOrOчTo6bI npaBnJIbHOобpaUaTbCЯпno6peTeHHoМоDEЛьюуCTpoIcTBA,IpOHTne,NoXaIyIcTa, BHIMaTeIbHo DaHHyIO INHCTpyKciuIO.ПocNe TOrO KaK Bbl O3HaKOMITecb C INHCTpyKciuEi,COxpaHInTe ee B HaDeJxHOM MecTeДЯOBpaUeHINKaH B6yduIeM.
CopepkHne
01пегнаналом pa6oТы
KOMnJIeKT noCTaBKn 5
YctaHObKa 6ataapeek B nylt dncTaHUNOHoro
ynpabnene .5
IcnoJb3OBaHne NylbTa DnCTaHOnHOHorO
ynpabnene 5
02 Ha3BaHnHa cTeH nФyHKcHn
IyIbT IY 6
IpeednnaheIb 7
Ducnnei 8
Akyctnuecka cnTeMa 8
03 Pookkyehn
IopKJIueHne rpoMKorOBOpnteNei 9
IopKnHueHne aHTeHH 10
NcnoB3OBaHHe BHeuHX aHTeHH. 10
IopknquHne 11
04 Hauano pa6oTbI
ДяВКЛIOUeHnI NITaHnI 12
HacrpoKa yacob 12
O6ueynpaBnene 12
Функцьвбдд.. 12
PerynpoBaHne npKocT nCnpe. 12
ABTomatueckar yCTaHOBka rPOMKoCTn 12
PerynipoBaHne rpomKocTn 12
PnurnyuweHne 3Byka 12
UnpaBneHne 3ByKOM 13
3Kbana3ep 13
PernynpoBaHne Hn3KxuactOT (peKmP.bass) 13
PerynnpOBka Tem6pa Hn3kX/ BbICOKx YactOT 13
HacpoKa TaMepa BKnIOUeHnA 13
Bb3OB TaMepa BKnHoueHHa 14
OTmeHa TaMepa BkIIOueHn 14
IcnoJIb3OBAHne TaIMepa BKIOUeHn. 14
IcnoB3ObaHne TaIMepa OTKIOUeHnA. 14
IcnoB3ObaHne HayuHkoB 14
05 BocnpoN3BedeHne ncka
Bocnpoun3BeDHeNE DnCKOB nnn paInOB 15
3arpyka dncka 15
Bocnpo3BeDeHne KOMno3nHa
KOMnakT-DnCKe 15
Bocnpo3BOOnTe My3bKaJIbHbIe faaJIbI MP3. 15
YcoBepueHCTBOBaHHoe BOCnpon3BeDeHne DnCKOB CD nI
MP3 16
Iobtophoe Bocnpon3BedeHne 16
Bocnpo3BeDeHne B cnyaHoi
noCneDobatEnbHOCTN 16
3anporpammmpoBaHHoe Bocpon3BeHne (CD) 17
O 3arpy3ke caiioB MP3. 17
Ipeeknuehne coedeepKmoro dncnner 17
06 Bocnpon3BedeHne c USB
Bocnpo3BeHHe 3anomHaohux yctpoCTB USB .18
Tobtophoe Bocnpon3BedeHne 19
Bocnpon3BeDHeNbCnyaHoi
noCneDobatEnbHocTn 19
IpeeknueHne coepxMoro dncnner 19
07 IcnoJb3ObaHne TIOhepa
IpocnyuBaHne nepeauch FM-dnana3oHa (ToIbko dnyeBPOneiCKnx moJeNe)/PiocnyuBaHne nepeauch FM- nAM-dnana3oHa (ToIbKO dnaMoJeNe dny CeBepHOJ
Ameprn) 20
HacrpoKa 20
CoxpaHHeHne 3aIporpaMMnpoBaHHbIX
paiaoctaun 20
IcnoIb3OBAHHe CnCTeMbI npepaN daHHbIX no paINO (RDS)
(Tonbko dna moedene nEbponbl). 21
PpocnyuBbAHe paAnocTaHcN DAB+
(Tonbko X-HM26D) 23
O DAB+ (Digital Audio Broadcasting, undpoboe
ayndnoBeeuahne) 23
Hactpoia 23
IpeeknoueHne pexmOB nHOpMaOnHOHorO
dncnnn 23
3anomnHaHne cTaHcun 24
Ta6JIua qacToT DAB (IINAPA3OH III) 24
08 Dpyrne noKluueHnra
IoDCoeHHeHne DonOHHTeBhIX KOMnHOHeHToB 25
ABTomatueckoe nepeKIOUeHne Ha BXoA Audio In
(TonbkoДЯМоDEeNДЯ CeBepHOn AmepnK) 25
09 Bocnpon3BedeHne Bluetooth Audio
Bocnpon3BeDHeHne My3bIKN C NOMOu6eCnpoBOHO
TexHONORn Bluetooth 26
IcnoJIb3OBAHne dncTaHcNOHHOro ynpaBHeHH 26
CnapuBaHne c annapaTOM (IepBnHna
pernctpauy) 26
PpocnyuBaHne My3bIKHa annapaTe c yCTpoCTBOM C
noepkoi Bluetooth 27
BT STANDBY 27
IpeoocepexeHne no paIOBOJHAM 28
Pamkn DeiCTBn 28
OtpaxeHpaIOBOH 28
MepbI npedocTopoKHOCTn, kacaOuimec coeHHeHc c
aannapaTAMN,NOIDepKINBaEMbIM DaHHbIM
yCTPOINCTBOM. 28
10DOnonHnteJIbHaNΦopMaun
YcTpaHHe HEnoJaOK 29
Bocnpon3BOIDMbIe DnCKN n opMaTbI 31
OTHOCHTeJIbHO KOMnAaKT-ДИСКOB C 3aUHTOJ OT
KoHPOBaHn. 32
IopdepxnBaemble opMaTbaynoaioB. 32
Mepb npedoctopoxHoctn npn 3Kcnpyaataun . 32
Pn nepemeuehen yctpoNCTBa 32
MecTo yCTaHOBKn 32
He pa3MeaainTe npedMeTbHa yctpoiCTBe 32
OKoHdEHCaCm. 32
YnCTka n3dEJIa 32
Ynctka nnH3bl 33
06paueHne c dncKaMn 33
Xpahene 33
YnCTka DnCKOB 33
O dnckax cneuaaHbH oopmbi 33
HactpoKa aBtOMaTnueCKOrO OTKJIoueHnIITaHnI 33
C6poc Bcex Hactpoek Ha 3HaueHnno yMOnuHaHnO 33
Texnueckne xapaKTepcntKN 34
Глава 1:
UcnoIb3yETcTn yCTaHOBKn YacOB, a TaKke nIyCTaHOBKn I npOBepKn yCTaHOBOK TaIMepa (cTp. 12).

HaxmteIIN3MeHeHHnHaCTpoekpeKIMaNOBTOPOBOCpOun3BeDeHHn C KOMNaKT-DnCKOB (cTp.16) nnn USB(ctp.19).
11 RANDOM
HaxmTeIaI3MeHeHnHaCTpoeKpeXIMAbocnpOn3BeHnB CnyaHOMnopAKeCkOMNaKT-dNcKBoCtP.16)uNUSB (ctp.19).
12 DISPLAY
Haxmte nIu I3meHeNn OTo6paKeHn INΦopMaun MP3 (ctp. 17), RDS (ctp. 21) nn DAB (ctp. 24).

HaxmTe DnBa Bo3Bpata K npeIbIyUeMy 3KpaHy.
14 Khonkn ynpablennra Volume
IcnoB3yTe IpyerpynIOBKn yOoBHa rpoMkOCTn npocnyuBaHnA (Ctp.12).

OTKIOUOHeHNE/BKIOUOHeHne 3Byka (CTp.12).
16 DIMMER
PerynpOBKa npKocTn dncnnner. NMeetcyaTeblpe ypoBna 3meHnry npKocTn (ctp.12).
PepednnaHeIb
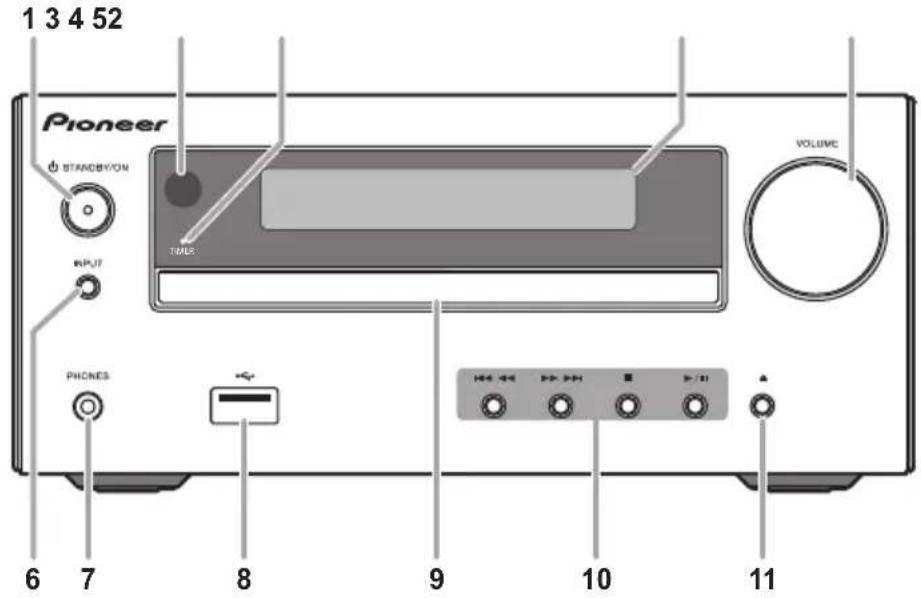
1 STANDBY/ON
IcnoB3yETcT dnn BkHIOUeHnpeCnBepa nn er nopeKIOUeHn B pexm OxndaHn (ctp. 12).
PpHMaet CnHaJIbI OT nyNbTa DY.
3 Ию К пор T I
3aropaertc, kOrda oTKIOHaeTcNITAHHe pecHBepa npu yCTaHOBKe TaMepa.
4IaBbI JnCn
CM. Ducnneu Ha ctp. 8.
5 PerynnpoBaHne rpomKocTn
IcnoB3yIte dIe peryIINPOBKn yPOBn rPOMKoCTn npocnyuBaHn (ctp. 12).
6 INPUT
UcnnoIb3yetydЯnBbIbopaNCTOCHNkaBXOda.
7Ihe3doJnHayuHnKOB
IcnoIb3yIte IJIIOKIIIOUeHn HAYUHKnOB.Ipn IOIKNIOUeHn HAYUHKnOB 3ByK He 6yJeT BOCpON3BOJNTbcAYepe3 rPOMKOROBOpTeJI.
8 P a 3 b e M U S B
NcnoB3yTcraIgNoKlOHeHn yCTpoCTBa namrtn USB B KaTcTBNCTOUHnKa 3Byka (CTp.18).
9IToKdIaNcKOB
IomeCTnTe, nCK, CTopoHOc C 3TtKeTKoBBepx (ctp.15).
10 Khonkn ynpabJeHn BocnpOn3BeDeHnem
IcnoJIb3yETc dIy BblOpa Tpe6yEmoI dopoxKn nI
faiJa IJN BOCpON3BeDEHn. IcnoJIb3yETc dIy
OCTaHOBKn BOCpON3BeDEHn. OCTaHaBJIbAeT nI
BO3O6HOBJIaET BOCpON3BeDEHnE C TOKn NaY3bl.
11 Khonka OTKpbITn/3akpbITn JOTKa dny DnCKOB
IcnoJIb3yIe TnO OTKpbITnN 3aKpItnN IOTKa DnA DnCKOB (CTP.15).
Ducnnei
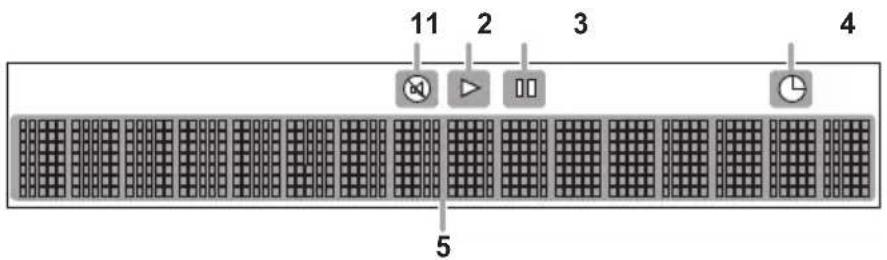
1 ⑧
BbCBeuBaetc npn npnrnyeHnn 3Byka.

PpmeaHne
3NaOK nprrnyuweHn 3Byka 6ydet OTo6paKaTbcKpachbIM UBeTOM.
2
3anyckBocnpoun3BeDeHn.
3 II
Pay3a B BoCpOn3BedeHn.
4 ②
3 H a x M n T e E N T E
4 Ha M m /T, 06bI yCTaHOBTb n DeHb, 3aTeM HaxMTe ENTER.
5 Ha M m /T, 06bI yCTaHOBTb n acbl, 3atem haxmnte ENTER.
6 H a x M n/1, yO6bI yCTaHOBt b mHyTbI, 3aTeM haxmnte ENTER dna IOdTBePxKeHn.
7 H a x M n T e E N T E
PerynpoBka Tem6pa Hn3Knx/ByICOKNX
HactOT
Haxmte SOUND nBbIbopa «BASS» nIN «TREBLE», 3aTeM Haxmte / nIN peRyInpOBKn Hn3Knx INn BblCOKx YactOT.

PpimmeaHne
Функи EQи P.BASS He Moryt pa6oTaB OДнOBpeMeHNo. Pa6oTaB 6yJeT nocJIeHЯ BbIbpaHHaN 3 tnx dByxФунки.
- SOUND MoXeT pa6oTaTb npaJIpeJIbHo c cyHKcneE EQ nnP.BASS.
PpN Bbl6ope OndHn H3 3TNX FyHKcHn HeBbI6paHHa FyHKcHn 6yDeT OTo6paXaTbcSneDyUoMm 6pa3OM.
1 Korda n3meHa hacTpoiKa P.BASS (ON/ OFF).
- EQ:FLAT
2 Korda n3MeHeHa hAcTpoKa EQ.
P.BASS:OFF
HacTroPka TaMepa BkIIOUeHnA
NcnoB3yETcraI IN3MeHEnrTeKyuEYcTaHOBKn TaMepa ININ DnY yCTaHOBKn HOBOrTO TaMepa.
1 Ha x(),MTO6bI BKLHeHTb NITaHHe.
2 Haxmte n ydepknaite TIMER ha npIbTe dNCTaHcNOHOrO ynpaBHeHH.
3 Haxmte KhoKn / ,yTo6bI Bbl6paTb napamTp «ONCE» nIIu «DAILY», 3aTeM haxmte ENTER.
ONCE - Ondopao3OBbI TaMep cpa6aTbIbAe TOnH pa3 ToJIbKO B 3aDaHHoe Bpem.
DAILY - EgeHHeBHy TaMep Cpa6aTbIaE T OdHO n To Jze 3aDaHHoe BpeMn Hn HeJeN.
4 Haxmnte KhoNkn / ,yTo6bI Bbl6paTbnapametp «TIMER SET», 3aTeM HaxmnteENTER.
5 Haxmnte KhoNk / ,yTo6bI Bbl6paTb HCTOuHnk BOCpON3BeDeHnA C TaMepOM, 3aTeM Haxmnte ENTER.
CD, DAB (ToIbKO X-HM26D), FM, AM (ToIbKO MOeJI NДЯ CeBepHOJ AmepKN) n USB MoKHO BbIbpaTb B KaueCTBe nCTOuHnKa BOCnpOn3BedeHn.
6 Ha M n/↑, 4to6bl yctaHOBt b K n DeHb Ha TaMepe, 3aTeM HaxMnte ENTER.
7 Ha M m /↑, 406bI yCTaHOBtB n K n Yacbl, 3atem Haxmnte ENTER.
8 Ha x M n/↑, 406bl yCTaHOBbI K mHyTbI, 3aTeM HaxMnte ENTER.
YCTAHOBNTe OKOHyATEbHO BpEMr, KAK ONICAHO Bwarax 7 n8Bblie.
9 OtperynpyTe rpoMkoctb HaxkTneM VOL + / - , 3aTeM haxmnte ENTER.
BbI3OB TaMepa BkIIOUeHnA
Moket nCNoB3OBAtbcraIIOBTOpIMHeHnTekyueyyCTaHOKn TaMepa.
1 TaKxe BbINOHnTe 7arn c 1 do 3 B pa3dene «HaCtpoNka TaMepa BKnUoyenna».
2 Ha M N</T, 06bl Bb16paTio n napametp «TIMER ON», 3atem haxmTe ENTER.
OTMeHa TaIMepa BKNIOUeHnA
Moket nCnOJb3OBaTbCra dIa OTKnIOUeHna yCTaHOBkn TaMepa.
1 TaKxe BbInOpHnTe WaHc 1 Do 3 B pa3deJe «HaCtpoKa TaMepa BkIIOUeHnra
2 H a x M n, vTo6bI BbI6paTio nnapametp «TIMER OFF», 3aTeM haxmnte ENTER.
IcnoJb3OBaHne TaMepa BKnUoyeHnA
1 Ha X(),MTObI EblkBHOHTb NNTaHHe.
2Пин acTyPJIeHn BpeMeHn BKIIOueHn DaHHoe yCTpoiCTBO aBTOMaTHueCKn BKIOuHTcN HaChET BOCpON3BeDEHne Ha BBb6paHHoФyHKUIN BXOJa.
Приимеанно
- ECnHa MOMeHT BKNIOHcHnY cTPOINCTBO NAMrTu USB He 6yET NOKNIIOeHO K annapaTy INN He 6yDet BCTABJIeH DNCK, annapaT BKNIOuHTCn H He 6yET BOCPON3BOOINTb KOMIO3NUHO.
HeKOTOpBIE NsCKH He MoYr BOCpOn3BODnTbcABTOMaTnueckn npn HAcTyPnEHN BpeMeHN BKJIOUeHn. - Pnp yctanOBke TaMepa 3aDaBaTe He MeHee OHOH MNHyTbI MEKdy BpeMeHem HaHaJa N OKOHaHn.
IcnoJb3ObaHne TaMepa
OTKJIIOUcHnIa
TaimepotKIOHnOtKIOHaETyCTPOCTBOyepe3 3aHaHHnIePNOBVPMeHN,IO3BOJRAcKOHO3acbNaTb, He6ecNOKoRcBoHeo6xOUMOCTN BbIKIOHEnyycTPOCTBa.
1 HaKmTe SLEEP HeckoIbko pa3, YTo6bl BbI6paTb BpeM OTKIOUeHn.
Bb6epnte MeKdy 3aueHnMa B MHytax 10 min, 20 min, 30 min, 60 min, 90 min, 120 min, 150 min, 180 min nN OFF (BbIK). BHObB 3aDaHHe 3aueHne OTo6paXaetcB TeueHne 3 cekyHd, nocne Yero BblONHeHne HacTpoKn 3aBepeHo.
Приимechаиме
TaimepOTKJIUOHeHMOXHOyCTaHOBnTBHaKaTNEM SLEEP BO Bpem OTo6paKeHnOcTaBWeOcR BpemEH.
McnoJb3ObaHne HayuHnKOB
IopoceHnHTe WTeKepe HayuHKnOB K rHe3dy.
Pn noKluueHHayuHKnOB 3Byk He 6ydet BOCppon3BODHTbcA Hepe3 rpomkoBOpnten.
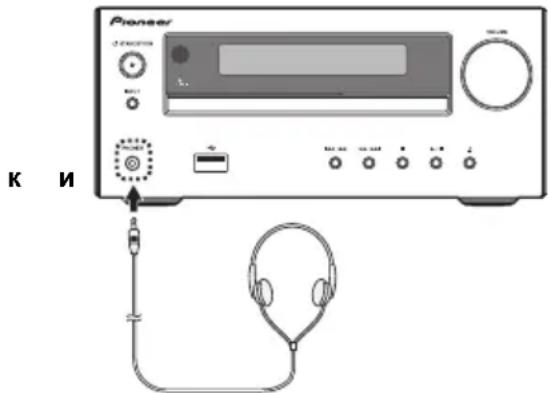
He BkHouaIte rpoMKoCTb Ha noJHyIO MoUHocTb npi BKIOueHN annapata n CnywaTe My3bIKy npn cpeHNx ypOBHx rpoMKoCTn. N36bItoHoe 3ByKOBoe DaBHeHne HAYuHNKOB I rOONHBIX TeNeΦoHOB MOKeT Bb3BaTb NOTepIO Cnyxa.
- Ipeed noKJIIOHcHEm nIIN OTKJIIOHcHEm HayuHnKOb yMeHbWnte rPOMKoCTb.
- Y6eIITecb,TO BaUN HayuHnKn HMeOT WTekep dAmETpOM 3,5 MM NmpeHaC oT 16 do 50 OM. PeKoMeHdyEmbIMneHaC coCTaBnAeT 32 OM.
Глaba 5:
Bocnpon3BedeHne dincka
3Ta CnCTema N03BOJRAET BOCPON3BODNTb CTaHApTHe bKOMnAKT-DnCKN, CD-R/RW BΦopMaTe CD n CD-R/RW cФaIamn MP3, 3aNNCb Ha DnCKn He npedyCMOTpeHa. HeKoTOpBle My3bIKaJIbHbIe DnCKn CD-R n CD-RW MOryt He BOCpON3BODNTCBra B Cnyae IN NIOXORO COCTOHN HIN mCNoJIb3OBAHn Prn INx 3aNNcH HeCOBMecTMORO yCTpoCTBa.
-ПодрбнуинфорmaциоМР3-файхс.Настp.31.
Bocnpon3BeDeHne dNcKOB nIe paJIOB
3arpyka dncka
1 H a K, MToGbI BkJIeHHTb NITaHHe.
2 HaXMMTe CD Ha nyIbTe Dy nn HeCKoJIbKO pa3 KhoNky INPUT Ha OCHOBHom 6JIOke, YTO6bl BbIbpaTb FyHKcHIO CD.
3 H a X ▲ Ma aannapTaee YTo6bl OTKpbITb JNOTOK KOMNaKT-ДИСКOB.
4 NomeCTnTe DnCK B JIoTOK IJNA DNCKOB, CTOpOH C 3TNKeTkoB BBepX.
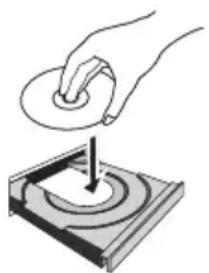
5 Ha XMa aannapatee YTo6bI 3aKpbITb JNOTOK KOMNaKT-DnCKOB.
Bocnpon3BeDeHne KOMnO3nH na KOMnAKT-DnCKe
1 NocJe 3aBepseHnpaCno3HaBaHnHaXMMTe
Nocne BOCnpOn3BeDeHnna NocJeDHeN dopoxKn yCTpOJCTBO ABTomatueckn OCTaHOBNTc.
Bocnpon3BODnte My3bikaIbHbIe faJIbI MP3
B 3TOM DOKyMeHTe DaHHbIe KOMN03nUIN BΦoPMaTe MP3 Ha3bIaIOTCa «My3bIaJIbHbIM daiNoM», a MeCTO ee XpaHeHnra — «NaIKoJ».
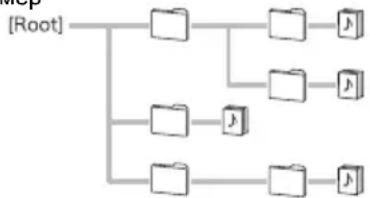
Pnpme
1 Nocne 3aBepseHnpaCno3HaBaHnna HaxMnte 十 /十 ,YTo6bI Bbl6paTb NaKy XpaHeHH My3bKaIbHorO paJNa ([ ]3aTeM HaxMnte nENTER.
- Ecni BNYtpn Bb6paHHo nankn mHeOTc npyrne nankn, noBtOpnte 3T0T war.
- UTo6bI BepHyTbc8 B npdebldyuyn nanky, HaxMnTe nn
2HaX4/MyT06bBb6paTb My3bIkaJIbHbIΦaJn([]),3aTeM HaxMITE nIENTER.
- Pocne 3anycka Bocnpo3BeHn6 6yUr HenpepbIBHO BOCpOu3BOuNTbCra TOnbKO My3bKaIbHbIe paJIbI, XpaHraIueCe BHyTpN ODNH N TOI Ke NaKN.
BHIMAHHE
- He nomeuaiTe Dba DNCKa B OINH NOTOK Ia NICKOB.
He Bocnpo3B0DnTe DnCK CnEuaJIbHbIX IpOΦnJIeI (BΦOpMe cepIa, BOCbMIRpaHHNka nT.I.). 3TO MOKeT BbI3BaTb HEnCnPaBHOCHTN. - He daBnte Ha NotOK dJa DCNCKOB npn erO dBXKeHN.
- Ecnn npn OTkpbTNI JOTka npOxCODNT abapnHoe OTKnIOUeHne NITaHn, NOoKdTe Do BO306HOBHeHn NITaHn.
-Помшаite ДИСК ДИМЕТРО 8 CM TOnько NOцHTpy NOTkaДЯДИСКOB.
Ппимеуне
- 13-3a ctpykTpyb HnHOpMaun Ha nncke, Tpe6yeTc8 60JIbwe BpemeHH dIyTeHH dNcKa MP3 no cpabHeHHIO C o6bUHbIM dNcKOM CD (npu6Jn3HTeJbHo ot 20 do 90 ceKyHd).
- EcIN Haayano nepBoi DOpOxKn DoCTnraeTcB O Bpem 6bICTPOIpePMOTKn Ha3aD, YCTPOnCTBO BoNDet B pexm BOcnpOn3BeDeHnA (ToIbKO dIg CD).
- Ecnn npn pa60Te KOMNAKT-DINCKa BO3HnKaIOT TeJIeBn3NOnHHbIe NII paJIONONOMEXN, OTOBnHBTe YcTPOINCTBO NOdaJIbWe OT TEJIeBn3Opa NII paJIO.
COBET
- EcInB pexime CD He BbINOJIHraIOb HnKaKoI Onpaun, n ayDIOpaJn He BocpOu3BOJNTcB TeueHne 60Jee 20 MmHyT, npou3OuJTe ABToMaTuHeCKoe OTKIOUeHne NITaHn. B 3tOM cIyuae Tpe6yEtca NepeKIOUHTb ABToMaTuHeCKoe OTKIOUeHne Ha ON.
- ABTomatnuyeckoe OTKnHouyehne NHTaHnMoXeT 6bITb HactpoeHo Ha ON/OFF (cTp. 33).
OchOBhble onepaun
4 H a k/My 4706bRbb6paTb
My3bIkaJIbHbI ΦaIη ([J), 3aTeM HaxMnTe I I nn ENTER.
- Pocne 3anycka BOCPON3BeDHeN6 ByyT HenpepbBHO BOCPON3BONDTCOToJbKO My3bIkaJIbHbe qaJIbI, XpaHraUncEe BHyTpN ODHOn N Toi Ke NaKN.
-Подрбуюифорmaцио6ochOBhix onepaunx cm. Na cTp. 16.
-Пипенихуени на дугов BXODнй Источни СачANA ocTahOBnTE BOCnpO3BeDeHne C yCTpoIcTBa NamrTN USB.
-ПередиЗВLEЧЕНМЕЗАПOMMHAOJO经уctpoиCTBA USBOTKJIIOUHTeПИТAHIE.

PpmeaHne
-Данhoe yctpoCTBO MOKET He pacno3HaBaTb 3anomnHaIOoee yctpoIcTBo USB, He BocnpOn3BOOHTb faINbI INN He noDaBaTb NITaHHe Ha 3anOMnHaOoee yctpoIcTBo USB. NoDpO6hee, CM. Ko2da NODKnOyeho 3anomnHaIOoee ycmpouCMeo USB Hc Tp. 30.
Korda He ndet Bocnpo3BeHHe C 3anOMnHaouero yctpoiCTBa USB,ecnnB TeueHne 20 MNHyT n Donbwe C yctpoiCTBOM He BBINONHReTC HNKAKNX onepaun, nHTAHne ABTomatNueeCKn OTKnIOuayeTc. B 3tOM cnyae Tpe6yEtCn peeknOHTb ABtomATNueeckoe OTKnIOUeHne Ha ON (CTp.33).
Повторhoe Bocnpon3BedeHne
PnIOBTOPHOM BOCPON3BeDEHNN MOJHO HENpepbIBHO BOCPON3BOIDMbODHy DOpOKKBy, BCE DOpOKKN NIN DOpOKKN B 3aNPoRpaMMNPOBaHHOn NOcJIeOBAteJBHoCTN.
CnyaHNoI NOcneDoBateNbHOCTN:
Haxmnte HeckoIbko pa3 RANDOM, noka He noBtca HnDkaun «RANDOM ON». Haxmnte ENTER.
ДлЯ OTMeHbI BOCnpon3BedeHnB CJIyauHOn NocJeDoBaTeJbHoCTN:
Haxmnte HeckoIbko pa3 RANDOM, noka He noBtCn Hndkaun «RANDOM OFF». Haxmnte ENTER.

Ppmeuahne
- EcnKn KhoNka HaxkmaetcBO BpeMBOCnpo3BedeHnB CnyaHHO NocJeIOBaTebHOCTNMOxHO IepeHTn Ha CneIyUOyU BbIbpaHHyIO DOpOxKyB peXIMBoCnpo3BedeHnB CnyaHHO NocJeIOBaTebHOCTN.
- PnBocnpoan3BeDenHn B CnyaHOn nocJeIOBaTeNbHOCTNu yCtpoCTBO 6ydt BbIbpaTb I npOirpbyBaTb DOpOxKn ATOMaTNUeCKN. (HeJb3r BbIbpaTb NocJeIOBaTeNbHOCTb DOpOKe.)
- Bo Bpemr pexmHa Bocnpoun3BeDeHnB CcIyauHnO HocJIeIOBaTeNbHOCTN NOBTOphoe BOCnpoun3BeDeHne HeBO3MOxHO.
IpeeknoueHne coedepxmoro dncnn
AnHHn annapat MOKET NOBTOPO BOCNPOINb NaKN, coXpaHHe Ha 3anOMHaOHiem yCTpoIcTBe USB.
PnoDpOHeE, CM. IpeKJIIOueHue codepkum02o duCnner Ha cTp. 17.
Глaba7:
ИспOLTбоване ТюHEpa
1 Ha KTObI BkHeuHb NHTaHHe.
2 HaxmTe KhoNky TUNER HeckoJbKO pa3, YTO6bl BbIbpaTb XeJaembl YacToTHbl dHaana30H (FM nJn AM).
(X-HM26D) MoXHo Bbl6paTb «FM» n «DAB». Подpo6HyIO INHΦopMaUIO OpeXIme «DAB» CM. Ha cTp. 23.
3 Haxmnte KhoNky TUNE + / - Ha nyIbTe Ny, YTO6bHaCTpOHTbcra HaKeJaemyo CtaHcNo.
ABTomatnuecka HacTpOka:
Haxmnte n ydepKnBaTe KhONkY TUNE + / - ABTomatueckn 3aynCTNTcR cKaHnpOBaHne, n THOhe OCTaHOBtCnHa nepBoi npHHMaemoi paAnocTaHcnn.
Puchna Hactpoika:
Haxmnte KhONky TUNE + / - HeckoNko pa3, YTo6bI HacTpontbcn Ha XeNaemyIO CTaHcNIO.

PpimueaHne
-Пи NOВЛЕнpaДиОмEx aBtOMaTnuecka HAcTpoIka MoKet aBtOMaTnueckn OCTaHOBnTBcR B 3Tom MeCTe.
- ABTomatuecka Hactpoka 6ydt nponyckaTb CTAHUN CO Cna6bIM CNHANOM.
-ДЯ OCTaHOBKn ABTomATnueCKo HAcTpOuKN HaKMnTe
-Пин acpoKe Ha cTaHunRDS (CnCTema paNoaHbIX) Chayana 6ydet OTo6paKaTbcra Yactota.HakoHeu, NOBtca Ha3BaHne cTaHUn.
-Полнов abTOMaTHueCKO HAcTpoKn MoXHO DoCTuBdЯ cTaHcRDS, nCNoIb3yra peXIM aTOMaTHueCKoHacTPOKnHa npEaBapTeNbHO 3aONMeHHbIe npOrpAmMbI (paDIOCTaHcUIN) (ASPM), cm. cTp. 22.
CTaHcH, coXpaHeHHbIe B nAmrTn, MOryT cKaHnpoBaTbcABTOMaTuYeCKn. (CkaHnpoBaHne npedyctaHOBNeHHoI naMaTn)
1 Haxmte u ydepknaBae KhoNky PRESET +/- OTo6pa3ntc3aIporpamMnpoBaHHbH homep, 3aIporpamMnpoBAHbIe CTAuHN 6ydyT HaCTpanBaTbcN oocJeIOBaTeNbHO, Ha 5 cekyHd kKaJda.
2 NObTOpHO HaxMnTe KhoNky PRESET +/- npu 6bHapyKeHH JKeJaemO CTaHcHm.
Children's Progs -nporpammbi dny detey
Social Affairs -
06BcCTBeHHaJXn3Hb
Religion - nporpaMMbI o peHnN
Phone In - nporpaMMbl, npedymatpnaBouOuNe 06cukdHeNKe KaKoI-NbO TeMb N oBSeHne Co CnUaTeJIaMn NO TeneDFOH
Travel & Touring- NYTeUeCTBnI N OITbIX
Leisure & Hobby - CBO60dHoe Bpem, INTepecbn Xo66n
Jazz Music -Джаэбая Музьika Country Music -Музьika «КаHTрИ»
National Music - NORYLAPHA My3bIka He Ha aHRTIMCKOM 83bIke
Oldies Music -пулгнaya My3bika 1950-x 1960-x rodoB Folk Music -Нароннaya My3bika
Documentary -ny6bnncntnne nporpaammbI Alarm Test - TpaHcnaa npTeTnpoBaHn nabapnHoroBeeataeIbHoro o6opyDobAHnNnnpnEMhX YCTpOCTB.
Alarm - Alarm! - TpeBOXHoe OONObeUeHHe, CdeIaHHe B NCKJIOnuTEnbHbIX o6ctOReTcBax dnn PnepDynpKxeJHxOco6bITnx, PnepCTabNHOUsx ONaCHoctb 6oIero xapaKTepa.
- EcIn INHnkaun Ha DnCnnee nepectana MnraTb, 3anyCTne Oepaunio Choba c wara 2. EcIn yCTpoiCTBO HaxoINT JKeNaEMbl TIN nporpaMMbl, TO npimepHO Ha 8 CekyHd 3arOpHTcOOTBETCTBYUuH NHomep KaHJIa, N 3ATem OCTaHETc H3BaHHe CTaHUn.
- EcnBbI JxenaTe npocnywathpepaTy TaKOrO Je Tnna, TpaHcnpyEmyo Dpyroi paNIOCTaHnei, NOBToprte warr 2 -6. Annapat BbINOHIT nonck CJeNyUoSei paNIOCTaHm.
- EcJH He HauJeHO HnKaOJ CTaHcIM, Ha 4 cekyHdbI NOBNTC HnDnKaUra «NOT FOUND».
IcnoJIb3OBAHHe aBTOMaTHueCKo HAcTpoKn Ha npEiBapHTeJIbHO 3aONMeHHbIe npOrpaMMbl (paNocTaHcUN) (ASPM)
Bo Bpempa6oerypeKIma ASPM TIOHEp 6ydet ABToMaTnueeCKN BbINOJIHrTB NOnCK HOBbIX CTaHcN RDS. MoXHo CoXpaHtB b NaMrtn Do 30 cTaHcN.
EcnHekOTOpbIe cTahuynyKe COxpaHehblnamrtn, HcNO HOBbIX cTahuynKOTOpbIE MOXHO COxpaHHTb, 6yTe MeHbWe.
1 HaxmMaTe TUNER Do Tex nop, noka Ha dncnnee He oTo6pa3ntc8 «FM».
2 HaxmTe MEnu 3aTeM HaxmMaTe / Do Tex nop, noka Ha DnCnnee He OTo6pa3ntc4 FM RDS
3 HaxMMTe ENTER 3aTEM HaxMMaMTe 一 /一 Do Tex NOP, NOKa Ha DCNnnee He OTO6pa3NTcA《ASPM》.
4 H a k M n T e ENTER.
Iocne MrrnnaHnndnkaunn «ASPM» B TeueHne npmepno 4 cekyHd,3aynctntcraHnpoBaHne (87,5-108,00MfU).
Iocne cKaHnpoBaHnHa,Ha DCNJIeB TeueHHe 4 cKeYHd 6ydet OTo6paKaTbCra YNCIO CTaHcI, COxpaHeHHbX B nAmrTn, H3aTeM Ha 4 cKeYHdbI NOBNTcR NIDnKauHg «END».
- UTo6bI BbIyTN I3 cyHKUIN ASPM do 3aBepueHna ee pa6oTbI:
Hakmte KhONky B npOceCE noncKa paNIOCTaHcN. CoXpaHeHHbIe Ha 3TOT MOMHT paNIOCTaHcN octAHyTCB NAMrTN.
He 6ydtcoxpaHbCBA namTnCTaHnna,meoua Takyu Xe yactOty,Kak yke coxpaHenHa CTaHnna.
He 6ydtcoxpaHbCBAamrCTaHn,mmeoTAYKyoKeYacToTy,Kak yke coxpaHeHHa CTaHn. - EcInyIe coXpaHeHb I NamTn 30 cTahm, cKaHINPOBaHne 6yDet npeKpaUeHO. EcIn Heo6xOaMBOpeHyTbC K pexkmy ASPM,coTpnte npDeYCTaHOBNeHHyIO naMaTb.
- Ecnn HnkaKoI cTaHcHm He coXpaHeHO B nAmrTn, npImepHo Ha 5 cekyHdbI NOBNTcHnDnKaunr «NOT FOUND».
- Ecnn CnHnBb RDS OeHb CnaBle, H3BaHnA CTaHmMOrYT He COxpaHrTbC B NAmrTn.
Ha3baHHe OndH N ToH Je CTAHcN MoKet 6bITb coXpaHEHO Ha pa3HbIX KaHaJax.
B onpeJenEHNo 3OHe nIN B onpeJenHbIe nepnoDbI BpeMeHn Ha3BaHnCtAHcN MOryT BpeMeHH OToNHaTaBCr.
Приимechаиме
- Ecni npoCxoDHT NIO6oe H3 CneDyUOxNco6bTiH, 3TO He O3HaHaET, YTO yCTpOJCTBO HEnCnpaBHO:
-ПочeredиноявлгостаиндИкauи«PS》,「NOPS」Ha3BaHne CTAHU,IN B YcTaHOBNeHHOM nopdke.
-EcInOnpeIeHnA CTaHnHe BeaetdoJXhBIM 6pa3OM IN HA CTaHnIN PPOBOrTcN CbItAHn, fHKu npema RDS moKet pa6oTa b HnpabunbHo.
- Ecnn npHHMaetc tAHnRDS co cHnkom Cna5bIM CNHaIOM, MoKeT He OTo6paXaTbcra TakaH NOpMaun, KaK Ha3BaHHe CTaHn.
- INHnkaun «NO PS», «NO PYT» nIN «NO RT» 6yUT MInaTB B TeueHne npImepHo 5 cekyH, n 3aTeM 6yDet OTobpaKaTaBcra Yactota.
-Пгимechаши no paDNIOTeKCTY:
-ПОЯВТСЕпьБЕ 8СИМВОЛБ paДиOTeKCTa N 3aTeM OHI 6уДуT npOKpyuBaTbCЯ NOДиСнLEJO.
-Пин Habтpoиke Na CTaHцИRO RDS,КOTOPан He nepedaet paIIOTeKCT,6yET OTObpaKaTbCnIHnIkaUЯ《NO RT》прппeркliouehen HaNo3uIIO paIIOTeKCTa.
- Ecnn npHHMaHOTc daHHbIe paHnOteKCTa nIN n3MeHReTc coepKaHne TeKCTa, Ha dncnlee 6ydet OTo6paKaTbc INnkaCuaNRA RT
Послшване paадиocтан DAB+ (ToIbko X-HM26D)
O DAB+ (Digital Audio Broadcasting, cnФровoe aydnoBeeцанne)
Digital Audio Broadcasting — 3TO cnCTema unfpoboi nepeaun daHbIX, B KOtopoay aynocnHaJIb IJNE peepaun npeo6pa0BbIAHO Tc B uOFPoBbIe ciHaJIb. DAB+ TpaHCnnpyETc B BVNe rpynnbl DaHHbIX, KOTOPa Ha3bIbaETc (MylbTnINKeK) (rpynnbl) m MoKet CoepKaTa b OndHy NnHeCKoNbKO cTaHcuN (Cnyk6). KaKdA cTaHcuN coepKNT OCHOBHy O Cnyk6y M MoKet CoepKaTa b OndHy Nn HeCKoNbKO dOnONHInTeJbHbIX Cnyk6. 3TO No3BOJaR e H oDHO YAcTOTE TpaHCnnpoBaTb HeckoNbKO nporpamm nn Cnyk6.
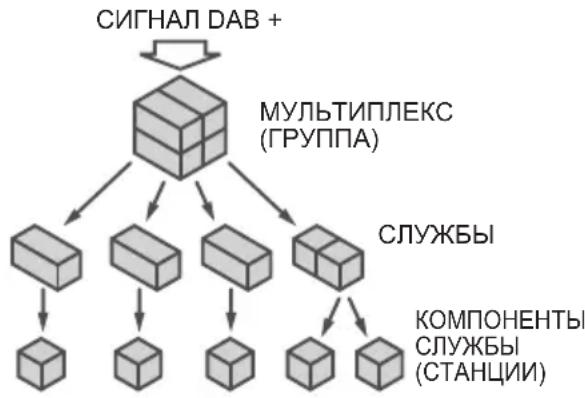
Hactpoika
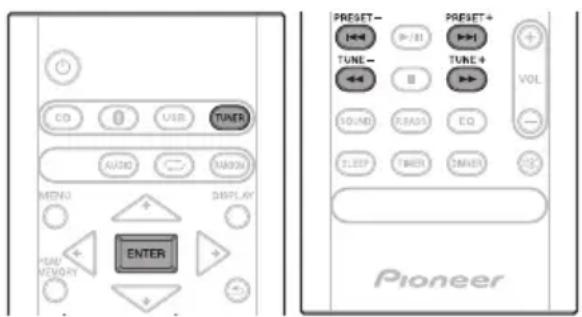
1 HaxnmaTe KhoNky TUNER do noBHeHna dncJIee nHdNkaCUn «DAB».
Pn nepBoHaayalbHoi HactpoKe annapat ABTomuYeckn cKaHpyeT paNIOCTaHcUNI CO3daET INCNCOK.
PaioctauncoxpaHOTcB aIpaHTHom npRKe, npn 3TOM Bb6npaETcNEpBaar paioctaunB cNcKe, KOtopa NaHaAeTOBCPON3BOuNTbcyepe3 AC.
2 HaxmTe KhoNky TUNE + / - ,yTo6bI BbIpaTb JKeJaemyo CTaHcNIO.
3 B TeueHne 10 cekyHn Haxmnte KhoNky ENTER Ha npIbTe DnCTaHcNoHHoro ynpaBHeHn, YTO6bHaCtPOnTbcra Ha nHTepecyUOuyo CTAHcNIO.
- Ecni cTahuH He o6HapyKeHbI, NoBHTcR INDnkaCuaNRA NO SIGNAL>.
-ⅡIaHnkaunKoJIueCTBa npHnMaembIX CTaHcN 6ydeT oTo6paKaTbcra YncNo do 100.
ABTomatnuecknNONCK
B cnyuae nepemeueHHa annapata B pyroH pernoH nIIN Do6abHeHnB CnCOK paNIOCTAHm C MHOROKAHaJIbHbIM 3BykOM aBTOMaTHueeCKoe cKaHNPOBaHne MOKHO NOBTOPTb.
1 Haxmamte KhONky TUNER do NOBHeHna Da nCnnee Hndkaun «DAB».
2 HaxmTe MEnu 3aTeM HaxmMaTe / do Tex nop, noka Ha DCnPlee He OTo6pa3ntcR «DAB SCAN».
3 HaxmTe ENTER n 3aTeHaxmMaTe 一 /一 DoTex np, noka Ha dncnnee He oTo6pa3ntcA «AUTO».
4 H a k M n T e ENTER. HauhetaaTOMaTHueckn nonck.
Iocne 3aBepuHnna Ipocecca cKaHnpOBaHnBaBbIpaetc npBbaObHApXeHHa paNocTAnu.
Pуная HabТpoКа
BpyHyIO MOxHO HAcTpoNTb CTaHcIM, He 6bHapyKeHHbIe
abTomatueckm NOnCKOM. B Cnyae NIOXOro npneMa
MOxHO HAcTPONTb YyBCTBnTEbHOCTb.
PyHra HAcTPOka DoCTynHa TOnbKO Nocne
abTomatueckO HAcTpoKu. Chayana BbINOHNITE
abTomatueckn NOnCK.
1 HaximamTe TUNER do Tex nop, noka Ha dinCnnee He oTo6pa3ntc4 «DAB».
2 HaxmTe MEnu 3aTeM HaxmMaTe / Do Tex nOp, Noka Ha DnCnlee He OTo6pa3ntcR «DAB SCAN».
3 HaxMnte ENTER 3aTeHaxMmaTe 一 /一 DoTexnop, noka Ha DCnCnlee He OTo6pa3ntcR «MANUAL».
4 H a x M n T e ENTER.
5B TeueHne 10ceKyHn HaxMnte TUNE + / - ,YTo6bI BbIpaTb YactOty DAB+.
6 B TeueHne 10 cekyHn Haxmnte ENTER.
Bcnyae cHnKOM Hn3KOrO ypoBH npema nepenecnte aHTeHHy nIn yCTpOCTBO BdpYrOe MeTo dnyuYUWeHn npema.
IpeKJIIOUeHne pexIMOB HOpMaOnOHOrO nCnJeA
OTo6paKaemU HOpMaunDAB+ MoKHO nepeKIOuHaTb.
HaxmTe KhoIky DISPLAY.
Pn KaKdom HaxKaTm KHOpKn Bn INHOpMaunHOHor DncnEe 6ydt MeHrTaBc B CJeDyUoIeM NopRKe. Ecnn OTo6paXaetcN HInkauZna NO SIGNAL》,KhOnKa DISPLAY He No3BoJareMeHrTppeKIM OTo6paXeHHa.
[Programme Name]
OTo6paKaTaTcH3BaHHe CTAHcHm. (yCTaHOBNeHo nO yMOJUHaHIO)
[Scrolling text]
HOpMaI npOJIncTbIBaETcI NO DnCIIeIO npN ee noJTyHeHn CO cTAHCn.
[Programme type]
OncanHe Tnna coedeKIMoTo, TpaHcInpnyeMoTo cTaHnei.
[Multiplex name]
Ha3BaHne MybTnIeKca (rpynnbl), npedocTabnaioero TekyuO cnyX6y.
[Frequency]
Yactota DAB+ cTahm.
[Stereo mode]
OTo6paKeHHe cTepeoΦoHueckoro peKIma.
[Transfer speed]
CkopoocbI nepeaun daHHbIX.
[Signal quality]
KaueCTBO CnHana OTo6paJaeTcB BInde YncJa (0-100). [85-100: xopoOee, 70-84: yIOBneTBOpntJIbHoe, 0-69: nnoxoe]
3anomnHaHne cTaHcnn
B namrBo MoXHo 3aIncatb do 10 cTahn DAB, KOtopbie 3aTeM MoXHO BbI3bBaTb HaxaTHem KHONK (npedbaruTeNbHa NaCTpOka).
1 HactpoTecb Ha nHTepecyUOuyo cTaHcNIO DAB.
2 HaKmTe KhONkY PGM/MEMORY.
Homep npedBapntbHn HacTpoKn 6ydt MraTb.
3 B TeueHne 10 cekynd haxmnte KhoNky PRESET + / - ,YTO6bI BBi6paTb Homep KaHaJa npedycTaHOBHeHHoH HaCTpoKn.
3aHcBbAte cTaHcun B nAmrTb no nopRky, HauHna C KaHaja c Homepom 1.
4 B TeueHne 10 cekyHd haxMnte KhoNky PGM/ MEMORY, yTo6bI 3aHncatb CtaHcHIOB namrTb.
Ecnn HndkaTOpbl HmepoB npedBaPnteHbHOHacTPOKn nOrachyTdo3aNCN cTaHcN, NOBTOPe DeICTBna, NaHHaC s wara 2.
JaHHe yCToPiCTBO He NoDiepKnBaET MHOroCeAHCObBie DNCKN JINM HMOrOKpaTHyO nocJeDoBaTeNbHyO (multi-border) 3aNNcB.
MHorocaehcoBa/MHorokpaTHaNoCneObaTeIbHa 3aNcB-3TO MeTOp,PNKOTOPMaHHbIE 3aNcBlaBIOCTHa OINH N TOJXe DnCK B DBA INN6OJIeceAHCa/ceCcN.《CeAHC》NN《CECCN》PpeCTabIReT co60I eHNHcy 3aNCS,COCToUyIO IONHO H6opa DaHbIX OT HaayalbHOI 3aNCSdo KOHeuHOI 3aNCS.
OTHOCHTeJIbHO KOMnakT-DnCKOB C 3aUNTOI OT KOINPOBaHn
DaHHoe ycTpoiCTBO cOKHcTppyuPoBaHO B COOTBeTCTBm CO CneuΦnKaUmaMnΦopMaTa 3ByKObIx KOMnAaT-ДNCKOB (Audio CD). DaHHoe ycTpoiCTBO He noDpeKnBaet BOCpOun3BeDeHne Hn pa6Ory DnCKOB, He COOTBeTCTByUoIx N TIm CneuΦnKaUmaM.
IopdxnBaembIe opMaTbI aynoopaIOB
DaanHoe yctpoiCTBO He noDaePknBaET KOINPOBAnHe 6e3 nOtepb.
Mepbl npedoctopoXHocTn npn 3KcnpyaTaun
Pn nepemeuen yctpoCTBa
Ipeid nepemeueHnem annapata Heo6xOIMO cchaana y6eHTbCB B OTCyTCTBn 3aRpyKeHHoro DNCKa n OTcoeHNHTb ycPoIcTBo naMra NT USB. 3aTe m HaxMnte 已 DOXdntecb Ncye3HOBeHnna CNoBa "STAND BY" Ha rNaBHOM dncJIee n OTcoeHNHTe uHyp nITaHn. TpaHCnOpTnpOBka nn nepemeueHne annapaTa C 3aRpyKeHHbIM DnCKom nn coeHNHeHHoro c pyrUm ycPoIcTBom uepe3 USB nn rHe3do AUDIO IN noJ ka6eJIb MmHnTekepOM moKet npNBecTN K erO nobpeKJeHHIO.
MeCTO yCTaHOBKn
Bb6epTe yctOuHBOe MeTO BO3Je TeJIeBu3Opa NIN CTpeofoHnueckO CNCTeMbI, KOTOpBIE NcNOJb3yIOTCa COBMeCTHO DaHHbIM yCTPOINCTBOM.
- He pa3meaIte daHoe yctpoNCTBO cBepxHa TeJIeBn3ope nIIu CBETHOM MOHtOpe. TaKke YcTaHaBnBaIte peCnBep DaJIbIe OT KACCETbIX MaHHToFOHOB INHbIX yCTPOINCTB, Ha KOtOpbie MOXe IOBJIyraTb MaHHTHOE NOJe.
№36eraIte cneyuOuX MeCT:
-MecTa, noDbepraemble npamomy coJIneHOMy CBety
Cbpiie nnnnnoxo BeHTnnpyembe Mecta
-MecTa CO cINuKOM BbICOKO TeMnepaTypon
-MecTa,noDBePraeMbIe Bn6paunm
-MecTa C6oNbUIM COepeXaHHeM nbIIN nnCnrapetHO Dbima
- MecTa, noDBepraEmbIe BO3DeIcTBnIO caKn, npa nnTENIIa (kyxHn n T.n.)
He pa3MeaIte npedMeTbI ha yctpoiCTBe
He pa3MeaTe KaKe-Im6 npEaMeTbHa yCTpoiCTBe CBepxy.
He 3aKpbBaIe BeHTnJIaCIOHHbIe OTBepCTnI.
He nCnOJb3yIte DaHHe OYCTPOINCTBO Ha BOPcNCTbIX KObPax, KpOBaTJx, DnBaHaX N T. D. INN 3aBepHyTBIM B TKAHb N T. D. ΘTO MOKeT NOMeWAtb paccenBaHHIO TeIINa, YTO MOKeT PnPBecTI K NOJOMKe.
He noBBepraTe pecnBep Bo3eNCTBnIO Tena.
He pa3MeaIte yctpoCTBO CBepxHa ycInnte ne IIN dpYROM KOMnoHEnTe, rHepePuyOuem TenNo. Ppi ycTaHOBKe B cToKy, YTO6bI N36ExKaTb BO3DeNCTBnA TENJa, OTBOUMOROTYCInNTeI INI INHO ayDNOKOMNOHEnTA, ycTaHABnBaIte pecNBep Ha NOkY HNKe ycInnteJIA.
Korda yctpoiCTBO He nCnOJb3yETc,OTKJIouaIte ero NITaHne.
B 3aBnCmOCTn OT yCNoBn CnHana,Ha TeJIeBn3IOHOM 3KpaHe MOrYt OTo6paKaTbCn NOOCbl, n MOxET NOnaDaTb Wym B 3ByuHne paINOTpaHCnAun, KOrDa NITaHne yCTpoiCTBa BKIOUHeHO. B TAKOM Cnyae OTKIOUHTe NITaHne yCTpoiCTBa.
OKoHdEHaCuN
Ipn6bICTpom nepemeuen HaHHoro yctpoNCTBa n3 XoIOHOrO MeCTa B TeNIOe NOMEueHne (HaNPIMep, 3MOn) IINn Pn pe3KOM NOBILHEHN IOB03deJCTBHeM pa6oTbI O6OrpeBaTeJI IN. IN. Tempepatypbl B NOMEueHnn, B KOtOpom yCTaHOBNEHO yCTPOICTBO, BHYTpnu yCTPOICTBA (Ha pa6OuHX DetAIAx ININH3e) MOYrOBpa3OBbIBaTcR KaIIIN BOdI (KOHDeHcaU).Pn HAIINH KONDeHcaUIN DaHHoe ycTPOIcTBHO He 6yDet pa6oTaHB NaINEXKaUIM o6p3OM, IN BOCpON3BeDEHne 6yDet HEBO3MOXHO. OctabTe yCTPOIcTBPO pN KOMHaTHoI TEMpepatye Ha 1 INN 2 Yaca C BKIOUeHHbIM NITAHmE (BPEMa 3aBUCNT OT CTeneH N KOHDeHcaUN). KaIIIN BObl ICnapaTcR, IN BOCpON3BeDEHne cTAHET BO3MOXHbIM. KOHDeHcaUN MoKeT TAKKe OBpa3OBbIBaTcR NEtOM, ECNI yCTPOIcTB OTKpbTO BO3DeIcTBNUO PPMAIX NOTOKOB BO3dyxa OT KOHNIOHepa BO3dyxa.ECNI 3TO npOn3OJeT, IpeMeCTIne daHHoe yCTPOIcTBBO Dpyroe MeCTO.
Ynctka n3dJIINr
-Перед Tem Кадпсчтгь Кочтke Данногуctpoиста,OTcoeDHHHTe KaebЛпТаннг ot po3ETK.
-ДячNTKDAHOROyCTPOIcTBaNCOJb3yIteMRAKYIO TKAHB.ДЯпPnININIeNПБIIMCMOHTeMRAKYIOTKAHb HEKOtOpbIM KONUYeCTBOM HeITpaNBHOROMOUeRo cpeDCTBa,pa36abNHeHOro5do6caTAMNBObl, TuaTeNbHO BbIXMNTeTKaHb,COTpNTe NblbN3aTEM BblPTNe NOBepXHOCTbMRAKoi,CyXOI TKaHbHO.
CnnpT,paCTBOpnteNb,6eH3IN,HNcKTuUdbI N.T. MOryt Bbl3BaTb paCCnlaNBaHne Neaytn KpackN. TaKe I36eraTe dInTeBHOrO KOHTaPe3HOBbIX INu BNHNOBbIX n3denn C daHHbIM yCTpoiCTBOM,TAK KaK 3TO MOKeT NCnOpTnTB Kopnyc.
-Пи ИСПОЛБ3OBAHИ NИСТЯЦИХ TKAHeI,СMOЧЕНБIX XIMpeAKTUBaMn I.T.IN.,BHNMaTeNBHO npOчтnte INHCTpyKcIIIN NO IX pIpIMeHEnIO.
YnCTKaIHH3bl
Pn HopMaJIbHbIX ycIOBnx 3KcIpyaTcIN IINH3a O6bIyHO He 3arp3HReTcR, HO ecIn OHa IO KAKOI-TO npuHHe NaHET pa6oTaB HnpaBnIbHo N3-3a rpa3N ININ IIIN, O6paTntEcB B 6JnxAun ABTopn3ObaHHb CepBncbY cHTp Pioneer. XOTB npoJaKe IMeIoTcR cpeDCTBa ONUCTKN INH3 dI npOnrpbIbATEne, INCNOb3OBaTb INx HE peKOMeHdyETcR, TAK KAK HeKOTOpBle CpeDCTBA MOrT NOBpeDNTb IINH3y.
06paueHne c dnckamn
XpaHeHne
Bcerda nomeaute DNCKN B INK Kopo6Kn XpaHnTe INX B BepTNkAblHom NOJIOKeHN, N36eRa TropaNX, CbipbIX MecT, NODBepXeHHbIX BO3DeIcTBNUO npMbIX COJIHeuHBIX JNyEe N CNIuKOM Hn3KNX TEMpepAtyp.
-ПочNTаITE МерblпpeДОCTOPOKHOCTN,ВLOЖЕHHbI E BmecTe CДИСКOM.
UncTkA DNCKOB
-IMCKN MOrYT He BOCnPOn3BOoNTbCRA,ecHn Ha HIX octaIOTcR OTneuATKn PAnbueB Nn Nblb.B 3TOM Cnyae,NCNoJIb3yIte YIcTReYIO TkaHb N.T.I.,YTO6bl OCTopoXHO BbIepeTB DnCK OT BHyTpEHHEn CTOpOHbIK HapyKHO.HepnB3yITeCB Ipr3HbIMN UcTReUIMM TkaHMyN.
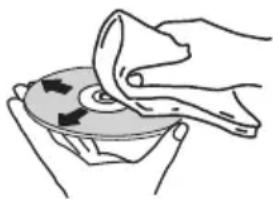
He nCnoNb3yIte 6eH3nH, pactBOpTeJIb nn INHbIe IeTyuIe XUMKATbl. TaKke He nCNoNb3yIte cpeIcTBa DnA YnCTKn BHNJNa Nn aHTnCTaTNK.
-Дяплишей nbiIN CMOUte MЯкTu TkaHb BDOI, TцATEJbHO BbIXMITE ee, COTPUte nbIb N 3aTeM BblTPTE BJIary CyXOJ TKAHbIO.
He nCnoB3yIte noBpeXeHHbIe (TpeChyBmne nn nokopo6JIeHHbIe) DNCKN.
- He donyckaTe cepanahnna nJIn 3arp3HeHnpa6ooye IOBepxHOCTn DnCKOB.
- He npinienyte Kycouk6ymar nn CTnkepbHa dnCKN. 3TO MOKeT NOBpeNTb DNCKn TAK, yTO INx HEBO3MOXHO 6yET BOCnpOn3BecTN. TaKKe yUTnTe, yTO Ha B3aTBix HAnpOKaT DnCKax YacTo KNeAeT 3TNKeTKu, a KNei C 3TNKeTKM MoKet npocauBaTcBcHapKy. IpePe nCNoIb3OBAHNem B3aTBix HAnpOKaT DNCKOB npOBepbTe, He BBICTynaeT JIn KNeI No Kpaam TAKNX 3TNKeTOK.


Odnckax cneuaNbHOn oOpMbI
NCKNOC60BΦOpMbI(BBnDE cepDua,ueCTnyrOblHnKa n T.I.)HE MOrYT BOCnPOUNBOIDTcR Ha DaHHOM yCTpOINCTBe. He nbTaIaTeCb BOCnPOUN3BecTN TaKne DnCKn,TAK KaK OH N MOrYT NOBpeuNTb DAHHoe yCTpOINCTBO.

HactpoKa aBTomatnueckoro OTKIOUChENI NITAHN
1 HaxmTe MNU ha nyIbTe dY.
Ha IraBHom DnCnJee OTo6pa3ntc coo6ueHne «Auto Power Down》(ABTomatueckoe BbIKNoueHne nTaHna)
2 HaxmTe ENTER Ha nyIbTe y.
3 Haxmaite IJnepeKIOueHm MEXy peXmAmN ON/OFF.
- Haayabha yctahOBka HactpoeHa Ha ON.
Приимецнип.
- Ecni nABTomaTnueckoe OTKJIIOUeHHe NITAHnHaCTpoEHO HA ON, Ha INaBHOM DnCnIe 6yDet OTo6paKaTbCn APD ON
- Ecni aBToMaTnueCeOe OTKIIOUeHne NITaHnHaCTpoEHO Ha OFF,Ha rIaNbHOM dNcPnnee 6yJeTO6paKaTbcra «APD OFF»
C6poc Bcex HacTpoek Ha 3HaueHnnaNo yMOnuHaHIO
IINBOCCTAHOBJIeHnBCEX HAcTpoE KNo yMOJUaHmBO BbINOHNTE DeICTBn,ONNCaHHbIe HNKe.
1 Ha X M n T e ①, yTo6bI BklnOHTn
2 HaxmTe MENU n 3aTem haxmMaTe / Do Tex nop, noka Ha dncnnee He oTo6pa3ntcA «Factory Reset».
3 H a x M n T e E N T E R OTo6pa3ntcra 3anpoc «OK?».
4 Hαχ Mι NT e E N T E R
Cekn T H
UactotbI dnaanaOH (FM) .87,5 Mf. do 108,0 Mf
Bxod aHTehHbI (FM) .75 OM He6baHcnpoBaHHbI
UactotbI dnaanaOH (AM)
(TonbKO dny moJeNei dny CeBepHOJ AmePKN) 530-1710 Kf
AHTeHHa (AM). PAmOyHa aHTeHHa
- Bluetooth (monbko X-HM26/26D)
Bercn TaHdapt Bluetooth Bep.4.1
BbIXoT CtaHdapt Bluetooth knacc 2
Pn6n3ntelhna DaIbHoCTb nepeaun no IINHN npAmoB
BnuIMocTn* PnpMepno 10 M
Dnana3OH qactot .2,4 Tc
Moynra 3ByuHa
FH-SS (Frequency Hopping Spread Spectrum)
PiodepKNaemble KOHpypaunn Bluetooth A2DP,AVRCP
PiodepKNaembl KoeK SBC (Subband Codec)
PiodepKNaemar 3auNTa MaTepnla SCMS-T
PIIH-KoJ .0000
* DaIbHocTb nepeDaun no IINn nprMoB BuIMOCtU yka3aHa npnbN3nteJbHo. PeaIbHbIe noIDepKbNAeMbIe paCCToHnnapeDaun MOrTy pa3NuYaTbcra B 3aBcIMOCtN OT ycNoBNI OKpyKaIOuSe Cpebl.
- OctaJIbHoe
Pa3bEM USB .5V,500mA
IcToUHk nHTaHnra(MoJIeN dJa EbpOnbl) 220Bdo240B nepemehHoro ToKa,50T/60T(ToJbKO dJa moJeNe dJa CeBepHoAmepnu) .OT120B nepemehHoro ToKa,60T
Iotppe6JIeMaMoHocTb BKnIOueHne NHTaHn 20BT MoHocTbBpeKmE OxNdaHn .0,5BTnnMeNbSe PekmOxNdaHn(BT STANDBY ON) 0,5BTnnMeNbse Pa3mepbI.215MM(II)x95MM(B)x315MM(Γ) Bec (6e3 ynaKOBkn). 2,0Kr
-Грмогоровптуль
Kopnyc .Bac-otpaxaoum, nIyctaHOBN Ha noJIke (MarHHTHO-3KpaHnpoBaHHbI) KoHpyaun. 2-nOOnchA BblcokoyactOThBI 2cm,KynonbHbH Hn3koyactOThBI 10 cm, KOHyc MaKcmaJbHaBxOHaMaMOUHOCTB 15BT ConpoTnBJIeHne 8OM Pa3Mepbl. 130 MM (II) x 212 MM (B) x 228,5 MM (F) Bec 2,0 kR/kakdBi
-Пинадлжноctи
IyltDanctaHOnHoro ynpaBHeHn 1
BaatapeKn AAA (R03). 2
Ka6JIb aHTeHHb AM*1 1
IpoBOIoUHn aHTeHHa FM*2 1
IpoBOIoUHn aHTeHHa DAB/FM*3 1
Ka6JIb nHTAHn 1
IapaHTmHbI cepTnФHKaT*4 1
VCTpyuIN no EKcnPyatauIN (daHbI DOkymeHT) 1
*1 ToJIbKO MoDEIn dJa CeBepHOJ AmePkn
*2 ToJIbKO X-HM16/HM26
*3 ToJIbKO X-HM26D
*4 ToJIbKO MoDeIn dJa EBpOnbl
Приимechаиме
- TexHnueckne xapaKTepeNCTnKn yKa3aHbI nJa HapJxKeHH 230 B.
B CB3n C NOCTOHHbIM COBepHcTBOBaHHeM ⅢdJIy TeXHueCKHe XapaKTePNCtIKN I KOHcTpyKcIy MOY T 6bITb N3MeHeHbI 6e3 npedBapntbHoro yBeDOMneHn.
© 2016 Onkyo & Pioneer Corporation.
Bce npaba zaunuenebl.
IaTy n3roTOBneHnO bOpUdOBaHn moXHo onpeJeNTb no cepuHOMy Homepy, KOTOpbI cOePjNT uHΦopMaunO MeCae N rOde npOn3BOODCTBa.
CepnHbI Homep

P1 P2
ДаТа n3ROTOBJIeHЯOBOpyDoBaHЯ
P1 - Гд n3roTOBNeHЯ
| Год 200 | 2002 | 2003 | 2004 | 2005 | 2006 | 2007 | 2008 | 2009 | 2010 | |
| Символ | A | B | C | D | E | F | G | H | I | J |
| Год 201 | 2012 | 2013 | 2014 | 2015 | 2016 | 2017 | 2018 | 2019 | 2020 | |
| Симboл | К | L | M | N | O | P | Q | R | S | T |
P2-Mecya n3roTOBJeHna
| Месац 1 | 2 | 3 | 4 | 5 | 6 | 7 | 8 | 9 | 10 | 11 | 12 | |
| Символ | A | B | C | D | E | F | G | H | I | J | K | L |
Declaration of Conformity with regard to the R&TTE Directive 1999/5/EC
Manufacturer:
O&P Corporation
2-3-12, Yaesu, Chuo-Ku, Tokyo
104-0028, Japan
EU
Pioneer Europe NV
Haven 1087, Keetberglaan 1,
9120 Melsele, Belgium
http://www.pioneer.eu
Representativ
C E
[ ] X-HM26/X-HM26D
English:
Hereby, O&P, declares that this [] is in compliance with the essential requirements and other relevant provisions of Directive 1999/5/EC.
Suomi:
C HacToaIeTo, O&P DeKnapnpa, Ye To3n [ ] OTROBapra Ha OCHOBHHTe N3NCKBaHnI nDpyrN CbOTBETHN NOCTaHOBJIeHnHa DInpeKTINBa 1999/5/EC.
Polski:
Anteros Building, Odyssey Business Park, West End Road, South Ruislip, Middlesex, HA4 6QQ United Kingdom
Tel: +44(0)208 836 3612
6, Avenue de Marais F - 95816 Argenteuil Cedex FRANCE
Tel:+33(0)969368050
Kopnpaia O 3Hn
2-3-12, J3cy, Cy-o-Ky, r. Tokno, 104-0028, RIOHnA
© 2016 Onkyo & Pioneer Corporation. All rights reserved.