USB 1392 - Car stereo US Blaster - Free user manual and instructions
Find the device manual for free USB 1392 US Blaster in PDF.
| Product type | Vehicle audio amplifier |
| Brand | US Blaster |
| Model | USB 1392 |
| Dimensions (L x W x H) | 183 x 244 x 53 mm |
| Power supply | 12 V DC (vehicle battery) |
| Recommended fuse | 30 A |
| Power cable gauge | 8 AWG |
| RMS Power (4 Ω, 14.4 V) | 90 W x 4 |
| RMS Power (2 Ω, 14.4 V) | 110 W x 4 |
| Max Power (4 Ω bridged) | 180 W x 2 |
| Input level | 0.2 ~ 5 V |
| Frequency response | 10 ~ 25,000 Hz |
| Total Harmonic Distortion (THD) | < 0.05% |
| Signal-to-noise ratio | > 90 dB |
| Channel separation | > 89 dB |
| Minimum impedance | 2 Ω |
| Crossover filters | Low-pass, high-pass, full range (adjustable 50-500 Hz) |
| Protections | Overload, short circuit, overheating (80°C), voltage drop |
| Connectivity | Gold-plated RCA input/output, speaker terminal block |
| Mode switch | 4CH / 2CH (bridging) |
| Maintenance | Clean with a slightly damp anti-dust cloth; do not use cleaning products |
| Warranty | 1 year if installed by an authorized dealer, otherwise 90 days |
| Repairability | No user-serviceable parts; repair by authorized professional |
Frequently Asked Questions - USB 1392 US Blaster
User questions about USB 1392 US Blaster
0 question about this device. Answer the ones you know or ask your own.
Ask a new question about this device
Download the instructions for your Car stereo in PDF format for free! Find your manual USB 1392 - US Blaster and take your electronic device back in hand. On this page are published all the documents necessary for the use of your device. USB 1392 by US Blaster.
USER MANUAL USB 1392 US Blaster
GENERAL SAFETY INSTRUCTIONS
- Always read the user guide before using the equipment.
- Keep the user guide in a place where everyone can read it.
- Use the equipment indoors and not in humid environments.
- Never remove or insert a plug from or into a wall socket with wet hands.
- If the plug and/or cable and/or cable input of the equipment is damaged it must be repaired by a professional.
- Always take the plug out of the wall socket in the event of a thunderstorm, and also when the equipment is not being used for a while.
- Never remove the plug from the power socket by pulling on its cable.
- Install the equipment in such a way that sufficient cooling is possible.
- Never use the appliance in the vicinity of heat sources and/or in direct sunlight.
- Make sure that no small objects or liquids can get in to the appliance.
- Only clean the appliance with a slightly moist dust-free cloth. Do not use cleaning products or solutions!
- The appliance contains no components, other than those mentioned in the user guide that can be repaired or replaced by the user.
- If the appliance is defective, it must be repaired by a US Blaster qualified repairs company.
- Keep the equipment out of the reach of children.
Do not carry out any repairs on the equipment yourself; doing so will invalidate the guarantee. The equipment may also not be modified; doing so will also invalidate the guarantee. The guarantee is also invalidated if accidents and damage of any form are caused as a result of improper use and/or not heeding the warnings in general as laid out in this user guide. US Blaster Europe accepts no responsibility for any personal accidents as a consequence of not following the safety instructions and warnings. This is also the case for consequential loss in any form.
Keep the packaging safe so that, if the equipment is defective, you can send it back in its original packaging and so avoid any damage.
INTRODUCTION
Thank you for purchasing this US BLASTER Class AB full range amplifier for your car audio system. Now you own an amplifier of uncompromising design and engineering incorporating the latest advanced circuit technology.
You will soon discover the amplifiers' optimum sound and reliable performance.
US BLASTER amplifiers are adopted by advanced craftsmanship using the highest quality components and strict quality control system. In order to provide you with long and pleasurable listening, we recommend that you have your amplifier installed by an authorized US BLASTER dealer. It will ensure installing your product properly and will also increase the warranty to one year. (please see the warranty section for more details.)
Please read this manual thoroughly to ensure you get the maximum benefit from this amplifier. When installed properly, this unit will provide you years of trouble-free performance.
DESIGN FEATURES
SMD Hi-Fi audio components.
FR-4 heavy duty double side PCB.
Low ESR high capacitance filter capacitor.
Super noise rejection circuit.
Smart protection system against overload, short circuit, overheat and low voltage.
Gold plated heavyduty connectors.
Integrated high performance filters.
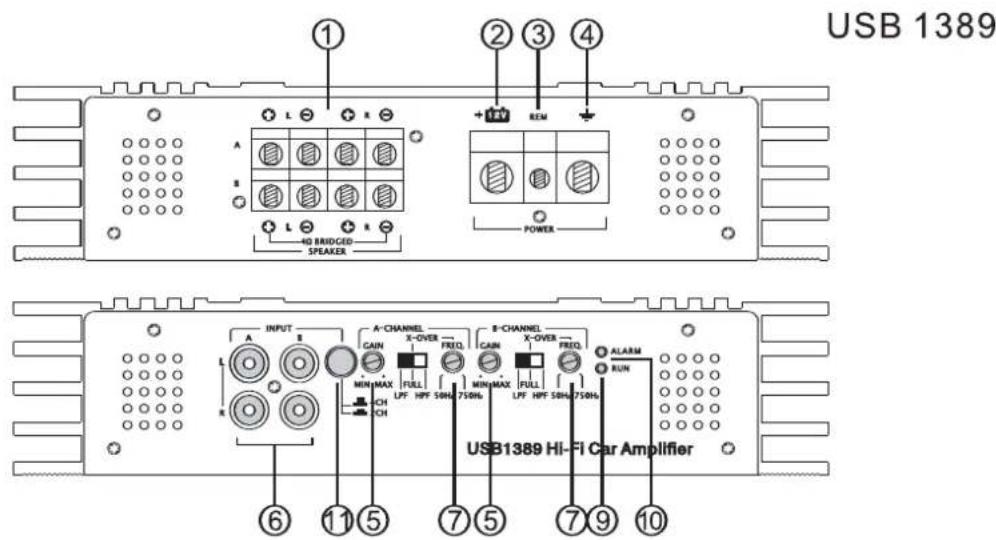
AMPLIFIER FUNCTIONS
-
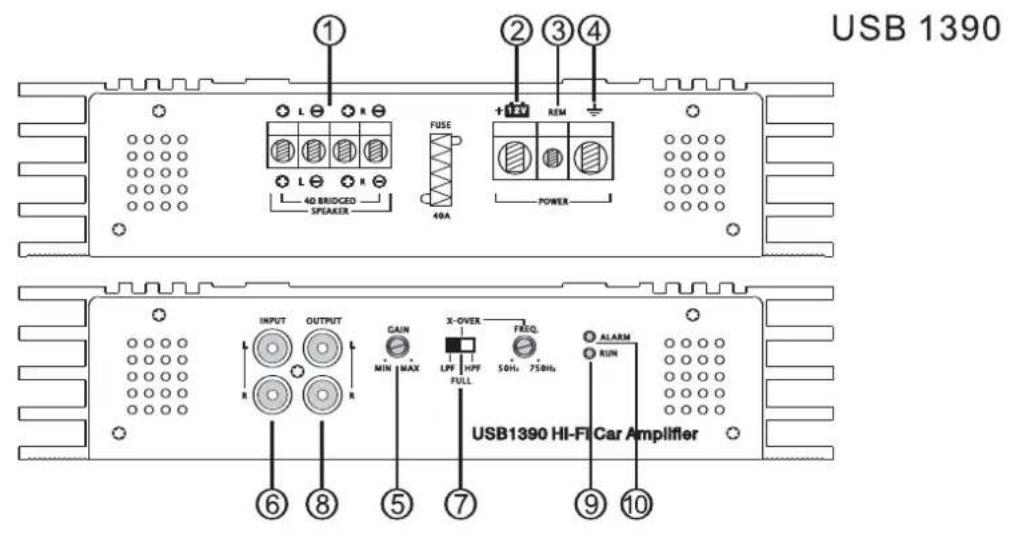
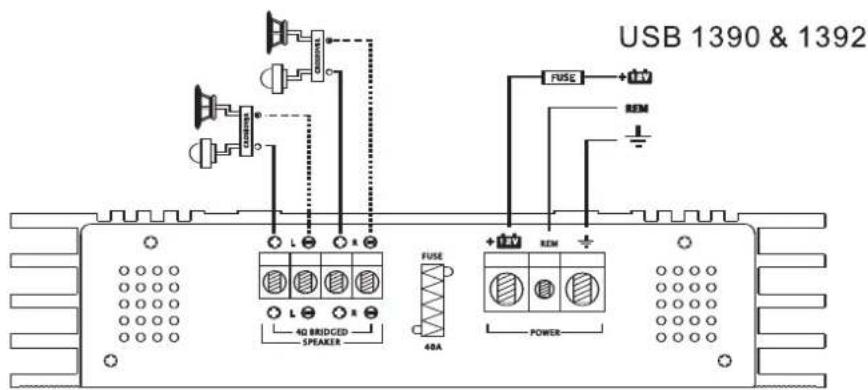
Speaker connection
-
Never connect the speaker cables with the chassis ground. This could destroy your amplifier.
- Check that your speakers are connected correctly which means plus to plus and minus to minus.
We recommend speaker cable from 16 Gauge or up. Other connection ways are shown in the attachment.
- BATT+
Battery + (plus) terminal. The + (plus) 12 Volt power cable must be connected with a fuse on the battery + (plus) terminal. We recommend a fuse listed on pre-installation a 12 feet copper cable with 8 Gauge thickness or up.
- REM
Remote terminal. The remote cable must be connected with the radio remote output terminal so that the amplifier will switch on and off automatically with the radio. If there are two or more amplifiers connected to this antenna terminal it might be necessary to add an additional relay. Please consult your dealer.
- GND
Chassis ground terminal. The chassis ground cable must be connected very tight on a nearby massive and electric conductive place.
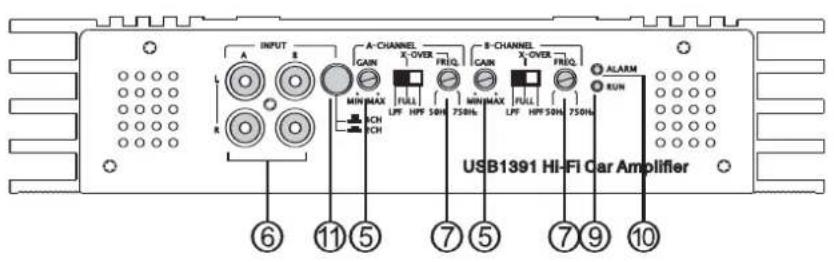
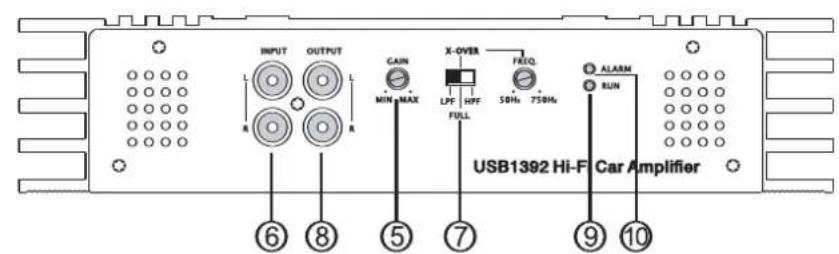
5. Gain
Gain control regulates the sensitivity of the amplifier to match the signal output voltage of your source unit. The gain control is not a volume adjustment. Use high quality CD music and increase the volume of your source unit to 75% . Put the gain at the minimum and then slowly increase gain (clockwise). Stop at the first sign of distortion, then lower the gain a little (counter clockwise) to achieve clear undistorted music at the maximum level.
6. RCA audio-input
These RCA inputs connected with your radio preamp RCA outputs. Please use car audio RCA cables otherwise they could be disturbed. Keep these cables as short as possible. To avoid disturbances from your car electronics, please do not close the existing car cables when you install the RCA cables. If your radio has only one preamp output, please use a suitable Y-RCA adaptor. If your radio has only one speaker output you must use a HIGH-LOW-LEVEL adaptor.
7. CROSSOVER SELECTOR
The switch and knob control the low-pass filter, high-pass filter and full-pass function. When set to LPF or HPF, the cut-off frequency can be adjusted by the frequency knob.
8. RCA Audio Output
These RCA outputs connect with other amplifier inputs. This buffered output signal is easy to use for daisy-link amplifiers.
9. RUN LED
It will light up when the amplifier is switched on. It will shut down when there is a malfunction.
10. ALARM LED
Indicates if the amplifier is in self-checking or malfunction.
11. 4CH/2CH switch
This switch can adjust 2-channel / 4-channel input function, when at 4ch position, the amplifier works as 4-channel separate input. When at 2ch position, CH-B input will be paralleled to CH-A, CH-B input jack will be the dummy at same time.

PRE-INSTALLATION
We recommend you have the installation done by an Authorized US BLASTER dealer. Required power, ground wire and proper external fuse as below:
Model Fuse Wire
USB 1392 30AMP 8 Gauge
USB 1391 40AMP 4-8Gauge
USB 1390 40AMP 4-8Gauge
USB 1389 60AMP 4-6Gauge
We recommend the fuse should be installed away less than 15 inches from the battery. The ground wire should be connected directly with the chassis of your vehicle which should be metal to metal ground point connection. The amplifier must be mounted securely at a solid, dry and low vibration surface in the trunk or passenger area. Fix the amplifier in an open-air area to insure proper heat dissipation. Fix the amplifier in a place where you can easily access to set the input controllers. Install all amplifier cables as far as possible from car electrical cables such as the car ignition cable.
WIRING CONFIGURATION

TROUBLESHOOTING
Power LED doesn't light up
- check all fuses on the amplifier
- check main fuse near the battery
- check plus and minus battery cables
- check remote voltage
Power LED is on but no sound
- check volume control on the radio
- check GAIN regulator on the amplifier
- check RCA cables and connections
- check speaker cables and connections
Bass response is low
- one speaker cable could be disconnected
the bass control on the radio is set on low - an active crossover unit is adjusted wrong
the amplifier switches - bad chassis ground connection with amplifier
The amplifier switches on and off
- cable terminals and battery term inals are oxidized
- low voltage from the battery
remote wire is connected wrong
One channel has no function
- check RCA connections of this channel
- check speaker connections of this channel
- balance regulator to the radio don't set in the middle
- check speakers for this channel
SPECIFICATIONS
| MODEL | USB 1389 | USB 1390 | USB 1391 | USB 1392 |
| 4Ohm RMS power at 14.4V | 160 Watt | 160 Watt | 90 Watt | 90 Watt |
| 2Ohm Load RMS power at 14.4V | 190 Watt | 190 Watt | 110 Watt | 110 Watt |
| 4Ohm Bridged RMS power at 14.4V | 350 Watt | 350 Watt | 180 Watt | 180 Watt |
| Input Level | 0.2~5V | 0.2~5V | 0.2~5V | 0.2~5V |
| High Level Input | NA | NA | NA | NA |
| Two Channel Input mode | YES | YES | YES | NA |
| CH-A filter mode | HP-FULL-LP | HP-FULL-LP | HP-FULL-LP | HP-FULL-LP |
| CH-B filter mode | HP-FULL-LP | HP-FULL-LP | HP-FULL-LP | NA |
| CH-A LPF | 50~500 Hz | 50~500 Hz | 50~500 Hz | 50~500 Hz |
| CH-A HPF | 50~500 Hz | 50~500 Hz | 50~500 Hz | 50~500 Hz |
| CH-B LPF | 50~500 Hz | NA | 50~500 Hz | NA |
| CH-B HPF | 50~500 Hz | NA | 50~500 Hz | NA |
| Frequency Response | 10Hz~25 KHz | 10Hz~25 KHz | 10Hz~25 KHz | 10Hz~25 KHz |
| THD at 4Ohm load - 30% Rated Power | <0.02% | <0.02% | <0.05% | <0.05% |
| S/N Ratio | >90 dB | >90 dB | >90 dB | >90 dB |
| Channel Separation | >89 dB | >89 dB | >89 dB | >89 dB |
| Minimum Load | 2 Ohm | 2 Ohm | 2 Ohm | 2 Ohm |
| Overload protect System | YES | YES | YES | YES |
| Overheat protect temperature | 80 °C / 176 °F | 80 °C / 176 °F | 80 °C / 176 °F | 80 °C / 176 °F |
| Hi-END Design | YES | YES | YES | NA |
| Components & PCB | SMT & Double side board | SMT & Double side board | SMT & Double side board | SMT & Double side board |
| Dimensions | 318 x 244 x 53 mm | 215 x 244 x 53 mm | 263 x 244 x 53 mm | 183 x 244 x 53 mm |
WARRANTY
US BLASTER Inc. warrants all products not to exceed ONE YEAR* from the date of original purchase which installed by an authorized US BLASTER dealer. Units that are not installed by an authorized US BLASTER dealer maintain a warranty not to exceed 90 days from the original purchase date. Product that displays abuse such as power deficiency, over driving the amplifier or clipping the input is required to purchase a new PCB for replacement. US BLASTER obligates to repair or replace base on its own sole option for defective products. This warranty does not fit for equipment that has been damaged by accidents, negligence or misapplication or has been altered or modified in anyway. This warranty applies only to the original purchaser who registers the product properly within 10 days after purchase. Except as provided herein, US BLASTER makes no warranties or representations, express or implied, including any warranty implied by law, whether for merchantability or fitness for a particular purpose.
DUE TO CONSTANT IMPROVEMENT, PRICES AND SPECIFICATIONS ARE SUBJECT TO CHANGE WITHOUT PRIOR NOTIFICATION.

OWNERS MANUAL
CLASS-AB POWER AMPLIFIER
USB 1389 - 1390 - 1391 - 1392
ALGEMENE VEILIGHEIDSVOORSCHRIFTEN
Low ESR high capacitance filter capacitor.
Super noise rejection circuit.
Smart protection system against overload, short circuit, overheat and low voltage.
Gold plated heavyduty connectors.
Intergrated high performance filters.