
EM7180 - Media player Eminent - Free user manual and instructions
Find the device manual for free EM7180 Eminent in PDF.

User questions about EM7180 Eminent
0 question about this device. Answer the ones you know or ask your own.
Ask a new question about this device
Download the instructions for your Media player in PDF format for free! Find your manual EM7180 - Eminent and take your electronic device back in hand. On this page are published all the documents necessary for the use of your device. EM7180 by Eminent.
USER MANUAL EM7180 Eminent
Trademarks: all brand names are trademarks and/or registered trademarks of their respective holders. The information contained in this document has been created with the utmost care. No legal rights can be derived from these contents. Eminent cannot be held responsible, nor liable for the information contained in this document.
Eminent is a member of the Intronics Group

EM7180 hdMEDIA RT HD Media Player
Table of contents
1.0 Introduction 23
1.1 Functions and features 23
1.2 Packing contents 23
2.0 Mounting a SATA hard disk 24
3.0 Connecting the EM7180 to your television 25
3.1 Connect the EM7180 to you television using HDMI (recommended) 25
3.2 Connect the EM7180 to your television using component (Y/Pb/Pr)............25
3.3 Connect the EM7180 to your television using composite AV 25
4.0 Audio connections 26
4.1 HDMI connection on the television 26
4.2 HDMI connection (digital receiver) 26
4.3 Toslink (SPDIF) 26
5.0 Connecting the EM7180 to your network 26
6.0 Setting up the media player 26
6.1 The first usage of the EM7180 27
6.2 Formatting the hard disk 27
6.3 Video settings 27
6.4 Sound settings 27
6.6 Network Settings (wired) 28
6.7 Network settings (wireless) 28
6.8 Photo Settings (slide show) 29
7.0 Copying files to the internal hard disk 29
7.1 Copying files using USB 29
7.2 Copying files using your network (Samba) 30
7.3 File Copy 30
8.0 Playing Media 31
8.1Blu-Ray ISO 31
8.2 DVD playback 32
8.3 DVD ISO 32
8.4 DVDVIDEO_TS 32
8.5 Playing other video formats 32
8.6 Playing music and other audio files 33
8.7 Playing photos and other images 33
9.0 Play Media through your network 33
9.1 Turning your computer into a UPnP server using Windows media player 11....33
9.2 Turning your computer into a UPnP server using Windows media player 12....35
9.3 Play media through your network (UPnP) 35
9.4 Play media through your network (Samba) 35
10.0 Downloading using the EM7180 35
10.1 Setup the NZBget module 36
10.2 Using the NZB module 36
10.3 Using the Transmission module 36
11.0 Other functions 37
12.0 Frequently Asked Questions 38
13.0 Service and support 38
14.0 Warning and points of attention 39
15.0 Warranty conditions 40
16.0 Declaration of Conformity 40
1.0 Introduction
Congratulations with the purchase of this high-quality Eminent product! This product has undergone extensive testing by Eminent's technical experts. Should you experience any problems with this product, you are covered by a five-year Eminent warranty. Please keep this manual and the receipt in a safe place.
Register your product now on www.eminent-online.com and receive product updates!
1.1 Functions and features
The Eminent EM7180 hdMEDIA RT turns your living room into a movie theatre. Thanks to the HDMI 1.3 support, you can not only enjoy your movies in crystal clear Full HD, but the sound experience is also state-of-the-art: The EM7180 supports stereo, AC3, WMA, AAC, and DTS. Sound experts can also be delighted since the EM7180 supports True-HD and DTS-HD pass-through by HDMI. A SPDIF output is also present on the EM7180, so it's easy to connect a digital receiver.
Because the EM7180 is very user friendly, it is fun and easy to watch your movies in Full HD!
You can build a 3,5 " SATA hard disk into the unit so that you have more than enough disk space for all your media files. And, in case you do run out of space, simply connect a USB memory stick, USB hard disk or external (e)SATA hard disk for even more storage space! Use other USB devices like digital camera's, camcorders and (most) portable music players to enjoy the EM7180.
But there is more: The EM7180 is equipped with a USB 2.0 client port for fast data transfers between the EM7180 and your computer, an extra eSATA port for even more storage capacity and two USB host ports. The EM7180 also has the capability to download from the internet using a NZBget and Torrent module.
1.2 Packing contents
The following parts need to be present in the packing:
- EM7180 hdMEDIA RT media player
Remote control
HDMI cable
CVBS cable
- Y/Pb/Pr cable
Power Adapter
- EU/EK power Cables
- Optical cable
- USB A-B cable
- Manual
- Batteries
- Bag with screws
2.0 Mounting a SATA hard disk
It is not necessary to mount a SATA hard disk into the media player because you can select many sources for media files. If you want to make full use of all the possibilities of the media player you will however need to mount a hard disk. Follow the instructions below to mount a hard disk:
Note: The packing contains a small transparent bag of screws. You will need the two large screws contained inside, as well a Philips head (+) screwdriver. It is best to perform the operation on a soft surface, to avoid any scratches to the unit.
- Take your EM7180 and remove the screws on all four corners on the bottom of the device.
- Gently remove the lid. Be careful, the fan is connected to main board!
- Disconnect the fan from the fan connector. Note the orientation of the connector.
- Place the lid safely out of the way for now.
- Lower the SATA hard disk into the media player.
- Note the grey SATA connector on the main board, and slide the disk into it.
- Push the SATA hard disk towards the SATA connector until the connection is locked down tight.
- The hard disk will now be resting on two pins that will hold the hard disk in place if it is aligned correctly. Do not hold the device upside down from this point!
- Put the EM7180 on its side, and screw in the two larger screws to hold the hard disk in place.
- Put the EM7180 back on its feet, and place the lid back in closed position.
- You can now safely flip over the EM7180 and screw back the four small screws in all four corners of the device.
- You're done, the EM7180 is now ready to use the internal hard disk.
- If you are using a new hard disk, then use the steps in chapter 6.2 to prepare the hard disk for usage.
Note: The disk must be formatted once, before you can use all features of your EM7180. This format must be done using the menu inside the player as shown in
chapter 6.2. If you do not format the disk, options such as P2P downloads (BitTorrent, NZBget) will be unavailable.
3.0 Connecting the EM7180 to your television
3.1 Connect the EM7180 to you television using HDMI (recommended)
The best image quality can be obtained by connecting the EM7180 to you television using the supplied HDMI cable.
Note! Make sure you media player and television are both turned off before connecting your cables. This way, you can prevent any possible damage to your devices.
- Connect the HDMI cable to the HDMI output of the EM7180.
- Connect the other side of the HDMI cable to an available HDMI input of your television.
3.2 Connect the EM7180 to your television using component (Y/Pb/Pr)
If your television is not equipped with HDMI connections, of there are no HDMI connections available, but your television has component connections, you can use a component cable to connect your EM7180 to your television. Using component, you can use high definition resolutions too.
- Connect the component cables to the corresponding cinch connections on the EM7180.
- Connect the other side of the component cables to the corresponding cinch connections on your television.
3.3 Connect the EM7180 to your television using composite AV
If your television is not equipped with HDMI or component connections, you can use the composite connection of both EM7180 and your television.
- Plug in the yellow plug to the yellow cinch connection of the EM7180.
- Connect the other side to the corresponding cinch connection of your television.
Note: The composite AV cable offers only low-resolution standard-definition output. For optimal results, you should use the Component or HDMI connection.
4.0 Audio connections
The EM7180 has several connections for audio. During the following chapter we will explain these connections.
4.1 HDMI connection on the television
If your television has HDMI audio support, you can make use of the HDMI cable in order to receive both image and digital sound on your television, in stereo only.
4.2 HDMI connection (digital receiver)
If you have a digital HDMI receiver, then you can enjoy the true digital sound by connecting the player over HDMI 1.3 to a HDMI input on your digital receiver.
4.3 Toslink (SPDIF)
If you have a digital receiver with a Toslink (SPDIF), then you can enjoy the media player's digital sound during movie and music playback. Connect the Toslink cable to the Toslink connection on your digital receiver and media player.
5.0 Connecting the EM7180 to your network
Since the media player can also be used to stream your media, you can use the media player's 100Mbps network connection. Doing so, you can retrieve media from your networked computers or your NAS (For example: The Eminent NAS type EM4071 or EM4072) and play these media files through the network on your television.
- Connect a network cable to the media player's network connection.
- Connect the other side of the connection cable to a network connection of your router, modem or switch.
In order to use the media player's networking capabilities you have to setup the media player for network usage. These steps can be found in chapter 'Network setup'.
6.0 Setting up the media player
- Turn on your television and set the television to the correct video source.
- Connect the power supply of the EM7180 to a wall outlet.
- Connect the other side of the power supply to the 'DC IN' of the EM7180.
- Set the On/Off switch on the back of the unit to position 'I' after which the media player will start.
6.1 The first usage of the EM7180
- Once the EM7180 has completed booting, a wizard appears.
- Choose you language at 'Menu Language' and press the 'OK' button.
- At 'Time', you can set the current time. You can select the 'Time Zone', or you can setup the time manually at 'Manual'.
- At 'Wired Lan Setup', network settings can be made. If a DHCP server is available in your network, select 'DHCP IP (Auto)' and press the 'OK' button to receive an IP-Address from the DHCP server. Select 'Fix IP (Manual)' and press the 'OK' button if there is no DHCP server active or in case you want to setup the IP-settings manually. If the manual option is chosen, please make sure the IP-Address data is in range with the current network.
6.2 Formatting the hard disk
- Go to 'Setup'.
- Go to 'System' and press the 'OK' button.
- Go to 'HDD format' and press the 'OK' button.
- Select 'HDD1' and press the 'OK' button.
- Follow the instructions shown on screen to format the hard disk.
6.3 Video settings
- Go to 'Setup'.
- Select 'Video' and press the 'OK' button.
- Select the 'Aspect Ratio'. Choose 16:9 if you are using a wide-screen television.
- Go to 'Video System' and press the 'OK' button.
- By default, HDMI auto is selected. But, if you want, you can select the resolution you want. For example: Choose '1080P 60Hz' if you are using a Full HD television. Press the 'OK' button.
- Go to 'SD Video System' and select the region. PAL is commonly used in the main part of Europe, NTSC is commonly used in North-America and Japan. Press the 'OK' button.
- Go to '1080P 24HZ'. Select 'ON' if you have video material which contains the original specifications of 24 frames per seconds. This will usually result in smother playback of this specific video contents. Press the 'OK' button.
- The other video options are usually satisfying by default, and therefore will not be explained in detail.
- Press the 'Return' button.
6.4 Sound settings
- Select 'Audio' and press the 'OK' button.
-
'Night Mode' is set to 'Off' by default. This can be switched to 'On'. This is ideal when the EM7180 will be used during night time. This setting makes the overall sound experience a bit softer.
-
Go to 'HDMI Output' and press the 'OK' button. Select 'Raw' if the HDMI cable is connected to a digital HDMI receiver which can decode all audio CODECs. Select 'LPCM Dual CH' if the HDMI cable is connected to your television. Select 'LPCM Multi CH' if the EM7180 is connected to a HDMI receiver which can not decode all audio CODECs.
- Go to 'SPDIF Output' and press the 'OK' button. Select 'Raw' if the SPDIF cable is connected to a SPDIF digital receiver which can decode all audio CODEs. Select LPCM Dual CH' if your digital receiver can not decode all audio CODEs.
- Press the 'Return' button.
Note: All devices can play back (L)PCM audio. RAW audio is intended for an external receiver, and required for a full theatre set up with 5.1 speakers. If you only use a TV, simply set PCM Dual Channel audio.
6.6 Network Settings (wired)
If you have skipped the network settings during the initial setup, or you want to change the network settings, you can use the following steps.
- Go to 'Network' and press the 'OK' button.
- Select 'Wired Lan Setup' if you have connected the EM7180 using a network cable. If a DHCP server is available in your network, select 'DHCP IP (Auto)' and press the 'OK' button to receive an IP-Address from the DHCP server.
- Select 'Fix IP (Manual)' and press the 'OK' button if there is no DHCP server active or in case you want to setup the IP-settings manually. If the manual option is chosen, please make sure the IP-Address data is in range with the current network.
- Press the 'Return' button.
Note: If the wired or wireless network is not connected, it is normal for a message 'DHCP NOT READY' to appear in this menu.
6.7 Network settings (wireless)
The EM7180 can also be used wirelessly. In order to be able to use the wireless connection, a wireless USB stick needs to be used. This wireless USB stick is not supplied.
- Insert the wireless USB stick. A notification saying the WIFI adapter has been found appears.
- Go to 'Network' and press the 'OK' button.
- Select 'Wireless Setup' and press the 'OK' button.
- Select 'Connection1' and press the 'OK' button.
- Select 'Infrastructure (AP) and press the 'OK' button.
-
The EM7180 starts searching for wireless networks within range. The network(s) will be shown.
-
Select you own network and press the 'OK' button.
- If secured, you need to fill in the security key of your network. Enter the security key and select the 'OK' button on the on screen keyboard. The select the 'OK' button on the remote control.
- The EM7180 tries to make a connection with your wireless network. If correct, a overview with network settings appears.
- Press the 'OK' button.
- Press the 'Home' button to return to the main menu.
Note: If the wired or wireless network is not connected, it is normal for a message 'DHCP NOT READY' to appear in this menu.
6.8 Photo Settings (slide show)
- Go to 'Misc' and press the 'OK' button.
- Go to 'Slide Show Timing' and press the 'OK' button. Select the time interval between the images, for example, 5 seconds and press the 'OK' button. This means a new image will appear every 5 seconds.
- Go to 'Transition Effect'. Select the desired visual effect you want to see the moment the media player displays a new image and press the 'OK' button. Choose 'All Effect Shuffle' if you want all available effects to be displayed randomly the moment the media player displays a new image.
- Go to 'Ken Burns' and press the 'OK' button. Select 'On' and then the 'OK' button if you want to enable the 'Ken Burns' option. Ken Burns is a name for a specific type of panning and zooming during photo display.
- Press the 'Home' button to return to the main menu.
7.0 Copying files to the internal hard disk
Now that you have successfully setup the EM7180, you can fill the internal hard disk with your media files. The EM7180 had a fast USB 2.0 connection which allows you to copy data from your computer using the USB connection of your computer. Also, you can use your local area network connections to copy files to the hard disk of the EM7180 using the Samba server of the EM7180.
7.1 Copying files using USB
- Connect the supplied USB 2.0 cable to the USB port on the back of the EM7180.
- Connect the other side of the USB cable to a free USB connection of your computer.
- The EM7180 displays a notification on tv it is entering USB mode. Press the 'OK' button. (See note below.)
- After a short while, your computer finds new hardware and detects the hard disk of the EM7180.
- Now you can easily copy and paste you media from your computer to the hard disk of the EM7180. It is recommended to place your video files in the 'movie'
directory on the hard disk of the EM7180 and to place your audio files in the 'music' directory on the hard disk of the EM7180.
- When you have finished copying files, disconnect the USB cable. The EM7180 will restart automatically.
Note: If you do not have a TV present, simply wait for 30-60 seconds and the EM7180 will automatically enter USB copy mode if it is connected to the computer by USB.
7.2 Copying files using your network (Samba)
The moment the hard disk of the EM7180 has been formatted, a Samba server will be installed automatically on the EM7180. This Samba server allows you to easily access the EM7180 and copy data to the internal hard disk of the EM7180.
- Make sure you know your EM7180's IP-Address. This IP-Address can be found using the 'Setup' and then 'Network' option.
- Then open the computer's webbrowser or Windows Explorer.
- Empty the address bar and fill in \IP-adres, for example: \192.168.1.25 and then press the 'Enter' key.
- Double-click 'HDD'.
- The folders on the hard disk of the EM7180's will be shown. You can now easily transfer media files from your computer to the hard disk of the EM7180.
7.3 File Copy
The EM7180 has the possibility to copy data from USB devices, memory cards, external devices and your network to the built-in hard disk. Also, copying from the internal hard disk to other devices is possible. This way, there is no need to connect the hard disk to your computer in order to copy media files to your hard disk. Use the following steps to copy data to your hard disk.
- Go to 'Document'.
- 'File Copy' is selected by default press the 'OK' button
- You will see a 'Source' and a 'Destination'. Here, you can select the source (left panel) you want to copy media files from, and the destination (right panel) you want to copy media files to.
- In this example we will explain how to copy data from your external USB device to the internal hard disk.
- Select 'USB' at the 'Source' field and press the 'OK' button.
- You will automatically be directed to the 'Destination' field. Select the destination, in this case, the hard disk, or 'HDD' and press the 'OK' button.
- Select the source drive at 'Source' and press the 'OK' button.
- At the source field, select the folder you want to copy. Press the red button on the remote control to mark files.
- Press the right arrow key, you will be directed to the 'Destination' field.
-
Press the 'OK' button.
-
You can now select the folder you want to copy to and press the 'OK' button, or you can select 'NEW-DIRECTORY' and press the 'OK' button.
- If you have selected 'NEW-DIRECTORY', you can now give a name to the folder using the remote control. Once you have given the folder the correct name, press the right-arrow key.
- You will be asked to 'Copy', 'Move' or 'Cancel'. Select 'COPY' and press the 'OK' button
- The notification 'FileCopy Completed!' will appear. Press the 'HOME' button to return to the main menu.
Note: The steps above can also be used if you want to copy from the network, USB, or eSATA disk to the internal hard disk. You can also use 'File Copy' to copy media files from the internal hard disk to an external USB and eSATA hard disk.
8.0 Playing Media
If you have finished setting up the media player, and you have filled the hard disk with media files, you can start to playback these files and your movies en audio files. You can also play files from attached USB devices.
One of the main features of the media player is the ability to playback many sorts of video files. 'Regular' video files like .MOV, .MKV, .AVI and DVD ISO's, VIDEO_TS files are supported. Even Blu-Ray files can be handled by the EM7180.
We will explain how to play the different media types.
8.1 Blu-Ray ISO
The EM7180 is able to play unprotected Blu-Ray ISO's / AVCHD ISO. Use the following steps to playback these ISO files.
- Make sure the EM7180 is completely started and the main menu is shown.
- Go to 'Movies' and select the source you want to play from, for example, the hard disk. Select 'HDD' and press the 'OK' button.
- Go to 'System (HDD:) and press the 'OK' button.
- Go to the 'movie' folder and press the 'OK' button.
- Select the folder where the Blu-Ray ISO is located and press the 'OK' button.
- The ISO file will be displayed. Select the Blu-Ray ISO and press the 'OK' button. The playback of the ISO file will start.
The EM7180 will not be using the original BD JAVA menu's. Instead, the EM7180 uses it's own menus for audio and subtitles.
8.2 DVD playback
The EM7180 is able to playback DVD files and DVD ISO's. DVD files made by yourself, can be played back without any problems. Also, the EM7180 has full DVD menu support.
The EM7180 does not play commercial DVD's which have CSS security. However, DVD backups without security can be played.
8.3 DVD ISO
- Make sure the EM7180 is completely started and the main menu is shown.
- Go to 'Movies' and select the source you want to play from, for example, the hard disk: Select 'HDD' and press the 'OK' button.
- Go to 'System (HDD:) and press the 'OK' button.
- Go to the 'movie' folder and press the 'OK' button.
- Browse to the DVD ISO you want to play. Select the ISO and press the 'Play' button.
- The ISO will be played. If menu support is available in the ISO, the ISO will be shown with full menu support.
8.4 DVDVIDEO_TS
- Make sure the EM7180 is completely started and the main menu is shown.
- Go to 'Movies' and select the source you want to play from, for example, the hard disk. Select 'HDD' and press the 'OK' button.
- Go to 'System (HDD:) and press the 'OK' button.
- Go to the 'movie' folder and press the 'OK' button.
- Browse to the DVD you want to play and press the 'OK' button.
- If menu support is available, the EM7180 will show a 'Play Folder' notification. Press the 'OK' button after which the DVD starts to play with full menu support.
8.5 Playing other video formats
The EM7180 has the ability to play almost all other video formats like .MKV, .mov, .AVI (MPEG2), etc. Use the following steps to play these video files.
- Make sure the EM7180 is completely started and the main menu is shown.
- Go to 'Movies' and select the source you want to play from, for example, the hard disk. Select 'HDD' and press the 'OK' button.
- Go to 'System (HDD:) and press the 'OK' button.
- Go to the 'movie' folder and press the 'OK' button.
- Browse to the video file you want to play and press the 'OK' button.
- The video file starts to play.
Note: Some MKV files do have subtitles in the MKV file itself. It is possible to add a SRT subtitle file, but then, the MKV file must not have a subtitle in the MKV itself. SRT
subtitles can only be used without having the subtitles in the MKV itself. You can always put the SRT file into the MKV container using programs like 'MKVMERGE' which you can download from the internet. However, Eminent can not supports these programs.
8.6 Playing music and other audio files
- Make sure the EM7180 is completely started and the main menu is shown.
- Go to 'Music' and select the source you want to play from, for example, the hard disk. Select 'HDD' and press the 'OK' button.
- Go to 'System (HDD:) and press the 'OK' button.
- Go to 'music' and press the 'OK' button.
- Go to the folder where the audio files are located and press the 'OK' button.
- Select the file you want to play and press the 'OK' button.
- The music file starts to play.
Hint: You can start an audio file and then use the menu of the EM7180. The selected music or audio file will be heard as background music.
8.7 Playing photos and other images
- Make sure the EM7180 is completely started and the main menu is shown.
- Go to 'Photo' and select the source you want to play from, for example, the hard disk.
- Select 'HDD' and press the 'OK' button.
- Go to 'System (HDD:) and press the 'OK' button
- Go to the 'image' folder and press the 'OK' button.
- Select the image you want to play and press the 'Play' button.
- The selected image will be shown. If you have set slideshow settings in the chapter 'Photo settings', the slideshow and corresponding visual effects will start automatically.
9.0 Play Media through your network
Since the EM7180 is equipped with a Samba and UPnP client, you are able to stream media through the network.
If you want to share media files on your computer in order to let the media player play these files, you have to setup your computer as a UPnP server. We will explain how to setup your computer as a UPnP server using the following steps.
9.1 Turning your computer into a UPnP server using Windows media player 11
Your computer does not share media by default. You will have to install a UPnP media server on your computer to add this functionality. When using Media Player 11, you can use the built-in UPnP media service of this program. If you enable this option,
your media player can access the music library on your computer. Follow the steps below to enable this option:
- Click 'Start'.
- Click 'Programs'.
- Click 'Windows Media Player'.
- Click 'Tools', then click 'Options'. The following screen will be displayed:
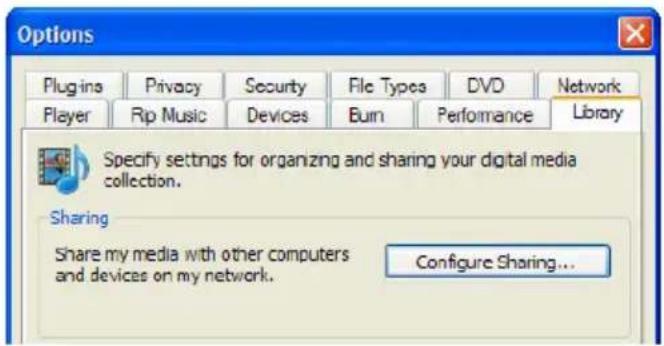
- Go to the 'Library' tab in the left upper corner of the options window.
- Now click 'Configure sharing'.
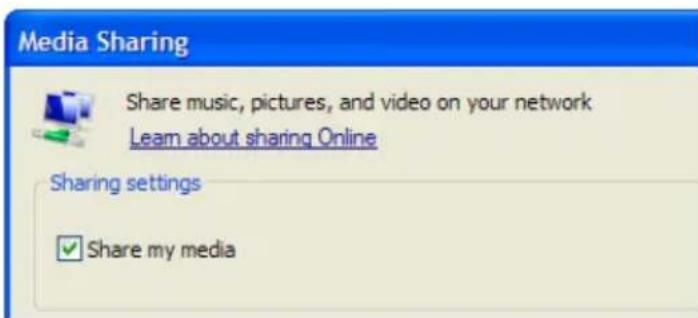
- Check the "Share my media" checkbox and click OK.
- A list with detected devices will appear within a few seconds.
- Click the name of your media player.
- Click 'Allow'.
- Click 'Ok'.
- Click 'Ok'.
- All files in the media library of Windows Media Player will be shared with your media player from now on. The media library will be accessible using the remote control and display of the media player.
Note: Steps above are taken with Windows Media Player 11, available for download at http://www.microsoft.com/windows/windowsmedia/player/.
9.2 Turning your computer into a UPnP server using Windows media player 12
Windows 7 is usually equipped with Windows Media Player 12. Although the steps mentioned for Windows Media Player 11 are not completely the same as in Windows Media Player 12, they are mostly useable. If streaming does not succeed directly, you can refer to the help function in Windows Media Player 12. Windows Media Player 12 has an extensive help function which can be used as a guide to setup your computer as a UPnP media server.
Hint: Multiple other programs can turn your computer into a UPnP media server. Some of these programs are available for download, like tversity (www.tversity.com) or Twonkymedia (www.twonkyvision.de).
9.3 Play media through your network (UPnP)
- Make sure the media player is turned on and is completely started.
- Go to 'Movies', select 'UPNP' and press the 'OK' button.
- Now you will see a list of available (media) servers in your network. Select the desired UPnP (media) server and press the 'OK' button on the remote control. The available media folder and files will now be displayed.
- Select the media folder or file you want play and press the 'OK' button on the remote control to start the playback of the file.
Note: Although UPnP is easy to use, it has some flaws. If your video files are not recognized or you want to play DVD's, or video files with separate subtitles files, it is recommended to make use of Samba, also known as shared folders.
9.4 Play media through your network (Samba)
- Make sure your media player is turned on and is completely started.
- Go to 'Movies', select 'SAMBA' and press the 'OK' button.
- Now you will see a list of available SAMBA and/or file servers. Select the desired SAMBA or file server and press the 'OK' button on the remote control. The available media folders or files will be displayed.
- Select the media folder or file you want to play and press the 'OK' button on the remote control to start the playback of the file.
10.0 Downloading using the EM7180
The EM7180 is equipped with a NZB and a Torrent module, called Transmission. Using one of these modules, you are able to download files from the internet. These modules require an internal hard disk drive, which has to have been formatted using the EM7180's internal format option.
Note: Your EM7180 should not be powered off when the system is active and downloading files as this may lead to data loss. Always stop all active downloads, before powering off the EM7180!
10.1 Setup the NZBget module
- Make sure you know your EM7180's IP-Address. This IP-Address can be found using the 'Setup' and then 'Network' option.
- Open you computers web browser.
- Fill in the IP-address of the EM7180 using the web browsers address bar following :8080. For example: http://192.168.1.25:8080.
- The NZB module will open.
- Click 'Config'.
- Fill in the name of your news server at 'Server1.Host'. For example: news.provider.com.
- Fill in the username of your news server if required at 'Server1.Username'.
- Fill in the password of your news server if required at 'Server1.Password'.
- Click 'Save Changes'.
- Click 'Back to Main Page'.
- Then click 'Shutdown' and wait a few seconds. Then click 'Start'.
- The NZB module is now ready to be used.
If you want to use a secured news server, you need to fill in port number '563' at 'Server1.Port'. Also, 'Server1.Encryption' needs to be set to 'Yes'.
10.2 Using the NZB module
- Make sure the NZB module has been setup and you are in the main menu. Also, make sure you have a NZB file on your computer.
- Click 'Browse' at 'Add NZB file' and browse to your NZB file.
- Double-click the NZB file you want to use.
- Click 'Submit File' after which the NZB file will be transferred from your computer to the EM7180.
- The EM7180 will automatically start to download.
10.3 Using the Transmission module
- Make sure you know your EM7180's IP-Address. This IP-Address can be found using the 'Setup' and then 'Network' option.
- Open you computers web browser.
- Fill in the IP-address of the EM7180 using the web browsers address bar following :9090. For example: http://192.168.1.25:9090.
- Click 'Open'.
- Then click 'Browse' and browse to your torrent file.
-
Double-click the torrent file you want to use.
-
Click 'Upload' after which the torrent file will be transferred from your computer to the EM7180.
- The download will start automatically. If not, select the torrent which will be displayed in the menu and click 'Start'.
Down at the left of the menu, you will see a sprocket. Click this sprocket to go the settings page of Transmission. Here you can alter settings like your maximum download speed. There is no limit to this download speed by default, so your network and internet connection may experience a sluggish performance. For this reason we recommend you to set a maximum to this download speed.
Although Transmission has UPnP support, it is possible you have to open the Transmission port manually on your modem or router in case your modem or router does not support UPnP functions. The used port can be found at the settings page and can also be changed. Refer to the manual of your modem or router how to open ports if necessary.
11.0 Other functions
The EM7180 has many other functions. Some of these functions will be explained.
Internet Media Service: This function is located at 'Internet'. When used, a variety of internet services will be available.
RC Power Key function: This function is located at 'System'. When 'Safe PowerOff' is selected, the EM7180 makes sure the NZB and Torrent modules are closed properly in order to prevent data loss.
System Update: This function is located at 'System'. Using this function, the firmware of the EM7180 can be upgraded.
Dynamic Noise Reduction: This function is located at 'Video'. This function removes artifacts and noise for a clearer image.
Resume Play: This function is located at 'MISC'. Allows you to resume the media file where you left off. This is handy, in case you are not able to view the entire movie at once.
Movie Preview: Allows you to see a preview of the movie in a small screen.
Theme Setting: This function is located at 'Home'. This function allows you to alter the skin or theme of the EM7180.
12.0 Frequently Asked Questions
Q: The hdMEDIA HD Media Player let's you built-in a hard disk. Is there a limitation to the size of the hard disk, and is SATA II supported?
A: The EM7180 has been tested with hard disks up to 2TB. Both SATA and SATA II disks are supported.
Q: The manual mentions the media player's ability to play almost all media. What formats and codec's are supported by the EM7180?
A: The EM7180 supports the following formats and codec's:
Video codec's: WMVHD, AVCHD, H.264, X.264, VC-1, MPEG 1/2/3/4, MKV, M2TS, TS, ISO, AVI, MOV and many other formats.
Picture formats: HD JPEG, BMP, GIF, TIF, and PNG.
Audio formats: AAC, PCM, DOLBY AC3, DTS, DTS-HD (Pass thru), Dolby True-HD (Pass thru), AC3 and DTS stereo down mix.
Q: AVI is supported by the media player. However, AVI files, made by my digital/DV camera can not be played. Why is this?
A: AVI files made by digital/DV cameras usually have codecs which are licensed or protected by the camera manufacturer. A media player does not have these codecs and therefore does not play these type of AVI files. This means the AVI files need to be converted to AVI files with regular codecs. Conversion programs can be found using the internet.
Q: I have some Blu-Ray ISO's with DTS-HD or True-HD sound. Can the EM7180 handle these streams?
A: The EM7180 has DTS-HD and True-HD audio pass-through capabilities through HDMI. An external receiver is required for full theatre sound.
Q: What file systems are supported?
A: The EM7180 formats the internal hard disk using the NTFS file system. The EM7180 can read from NTFS and FAT32 file systems.
13.0 Service and support
This users manual has been carefully written by Eminent's technical experts. If you have problems installing or using the product, please fill out the support form at the website www.eminent-online.com/support.
You can also contact us by phone. Below you will find a list with phone numbers for each supported country.
Country Phone number Rate per minute*
Belgium (Dutch) 070 277 286 €0.30
Belgium (French) 070 277 286 €0.30
Denmark +45 69918565 Local Costs Finland +35 8942415826 Local Costs Germany 1805 982 234 €0.14 Italy +39 0240042016 Local Costs Norway +47 21075033 Local Costs Spain 807 080 042 €0.41 Sweden +46 840 309985 Local Costs The Netherlands 0900-3646368 €0.45 UK 905 871 0013 £0.30
- Rates mentioned in this table do not include cell phone charges.
14.0 Warning and points of attention

Due to laws, directives and regulations set out by the European parliament, some (wireless) devices could be subject to limitations concerning its use in certain European member states. In certain European member states the use of such devices could be prohibited. Contact your (local) government for more information about this limitations.
Always follow up the instructions in the manual, especially where it concerns devices which need to be assembled.
Warning: In most cases this concerns an electronic device. Wrong/improper use may lead to (severe) injuries!
Repairing of the device should be done by qualified Eminent staff. The warranty immediately voids when products have undergone self repair and/or by misuse. For extended warranty conditions, please visit our website at www.eminentonline.com/warranty.
15.0 Warranty conditions
The five-year Eminent warranty applies to all Eminent products unless mentioned otherwise before or during the moment of purchase. When having bought a second-hand Eminent product the remaining period of warranty is measured from the moment of purchase by the product's first owner. The Eminent warranty applies to all Eminent products and parts inextricably connected to and/or mounted on the main product. Power supply adapters, batteries, antennas and all other products not integrated in or directly connected to the main product and/or products of which, without reasonable doubt, can be assumed that wear and tear show a different pattern than the main product are not covered by the Eminent warranty. Products are not covered by the Eminent warranty when subjected to incorrect/improper use, external influences and/or when opened by parties other than Eminent.
16.0 Declaration of Conformity
To ensure your safety and compliance of the product with the directives and laws created by the European Commission you can obtain a copy of the Declaration of Conformity concerning your product by sending an e-mail message to: info@eminentonline.com. You can also send a letter to:
Eminent Computer Supplies
P.O. Box 276
6160 AG Geleen
The Netherlands
Clearly state 'Declaration of Conformity' and the article code of the product of which you would like to obtain a copy of the Declaration of Conformity.

Trademarks: all brand names are trademarks and/or registered trademarks of their respective holders. The information contained in this document has been created with the utmost care. No legal rights can be derived from these contents. Eminent cannot be held responsible, nor liable for the information contained in this document.
Eminent is a member of the Intronics Group

13.0 Service et support
Eminent Computer Supplies
P.O.Box 276
6160 AG Geleen
Pays-Bas
Trademarks: all brand names are trademarks and/or registered trademarks of their respective holders.
The information contained in this document has been created with the utmost care. No legal rights can be derived from these contents. Eminent cannot be held responsible, nor liable for the information contained in this document.

Eminent is a member of the Intronics Group
Reproducor multimedia HD EM7180 hdMEDIA
Índice
1.0 Introduccion 63
1.1Funcionesycharacteristicas 63
1.2 Contenido del paquete 64
2.0 Montar un disco duro SATA 64
3.0 Conectar el dispositivo EM7180 al televator 65
Eminent Computer Supplies
P.O.Box 276
6160 AG Geleen
Paises Bajos
Trademarks: all brand names are trademarks and/or registered trademarks of their respective holders.
The information contained in this document has been created with the utmost care. No legal rights can be derived from these contents. Eminent cannot be held responsible, nor liable for the information contained in this document.
Eminent is a member of the Intronics Group

Lettore multimediae HD EM7180 hdMEDIA
Contenuti
1.0 Introduzione 85
4.0 Concessioni audio 88
4.0 Concessioni audio
6.6 Impostazioni rete (wireless)
Share music, pictures, and video on your network
Learn about sharing Online
Sharing settings
Share my media
Eminent Computer Supplies
P.O.Box 276
6160 AG Geleen
Paesi Bassi
Trademarks: all brand names are trademarks and/or registered trademarks of their respective holders.
The information contained in this document has been created with the utmost care. No legal rights can be derived from these contents.
Eminent cannot be held responsible, nor liable for the information contained in this document.
Eminent is a member of the Intronics Group

EM7180- hdMEDIA RT HD-mediaplayer
Inhalt
1.0 Einleitung 106
Eminent Computer Supplies
P.O.Box 276
6160 AG Geleen
Niederlande
Trademarks: all brand names are trademarks and/or registered trademarks of their respective holders.
The information contained in this document has been created with the utmost care. No legal rights can be derived from these contents.
Eminent cannot be held responsible, nor liable for the information contained in this document.
Eminent is a member of the Intronics Group
CE
