PT01USB - Mixer NUMARK - Free user manual and instructions
Find the device manual for free PT01USB NUMARK in PDF.
User questions about PT01USB NUMARK
0 question about this device. Answer the ones you know or ask your own.
Ask a new question about this device
Download the instructions for your Mixer in PDF format for free! Find your manual PT01USB - NUMARK and take your electronic device back in hand. On this page are published all the documents necessary for the use of your device. PT01USB by NUMARK.
USER MANUAL PT01USB NUMARK
EZ VINYL / TAPE CONVERTER EZ AUDIO CONVERTER
MiMeister
QUICKSTART GUIDE
ENGLISH (1-5)
GUIA DE INICIO RAPIDO
ESPANOL ( 6 - 10 )
GUIDE D'UTILISATION SIMPLIFIÉ
FRANÇAIS (11-15)
GUIDA RAPIDA
ITALIANO (16-20)
KURZANLEITUNG
DEUTSCH (21-25)
SNELSTARTGIDS
NEDERLANDS (26-30)
INTRODUCTION
Welcome to EZ Vinyl Converter and EZ Audio Converter - the easiest way to transfer your recordings to your computer. This software works seamlessly with iTunes® allowing you to burn your recordings to CD or to transfer them to any portable digital media device. We hope that you enjoy using this product as much as we enjoyed designing it for you!
SOFTWARE INSTALLATION - PC
To install EZ Vinyl/Tape Converter:
- Insert the included CD into your computer's CD drive.
- A pop-up screen should appear automatically. Please select your language.
- Click on the EZ VINYL/TAPE CONVERTER button to begin the installation process.
- Follow the on-screen instructions to install EZ Vinyl/Tape Converter.
- Once EZ Vinyl/Tape Converter has been successfully installed, click on the iTunes button to install iTunes.
Please note: EZ Vinyl/Tape Converter uses iTunes to import your recordings and needs to be installed on your computer before starting the EZ Vinyl/Tape Converter software.
- Follow the on-screen instructions to install iTunes.
- Once the iTunes installation has successfully completed, click the EXIT button to quit.
- EZ Vinyl/Tape Converter and iTunes are now successfully installed on your computer!
SOFTWARE INSTALLATION - MAC
To install EZ Audio Converter:
- Insert the included CD into your computer's CD drive.
- Open the CD contents and double-click on the EZ Audio Converter.Installer pkg file to begin the installation process.
- Follow the on-screen instructions to install the EZ Audio Converter.
-
Once the installation process has completed, you can find the EZ Audio Converter application in your Applications folder.
-
iTunes and iPod are trademarks of Apple, Inc., registered in the U.S.A. and other countries.
TRANSFERRING YOUR MUSIC TO YOUR COMPUTER
Once you have installed the software, you can start recording. Open EZ Vinyl/Tape Converter by going to Start All Programs MixMeister EZ Vinyl Converter or open EZ Audio Converter by accessing your Applications menu.
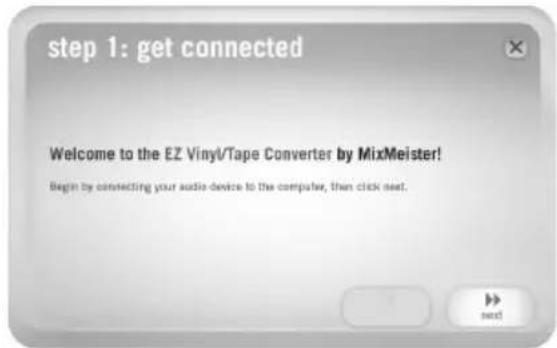
STEP1
Once you start the software, you will see the screen shown on the right.
Connect a USB cable from the USB device to an available USB port on your computer.
Once the USB device is connected, click Next.
Note: If you are prompted to select your playback device (Turntable or Tape Player), check the appropriate box and click Next. If you selected Tape Player, you will be prompted to select the tape format, Normal or Chrome. (Normal tapes are the most common, including store-bought tapes and home recording tapes.)
STEP2
You will see the screen shown on the right.
Locate the beginning of the section you would like to record. We recommend checking your levels before you begin recording and adjust the gain level control on your device accordingly. The loudest part of the music should be in the orange section of the meter without entering the red section (which indicates distortion).
Note to Mac users: If you feel your recording level is still too low, even with all your volume controls turned up:
- Click the "apple" icon in the upper left-hand corner of your screen and select System Preferences.
- Click Sound.
- Click the Input tab and adjust the Input volume slider as desired.
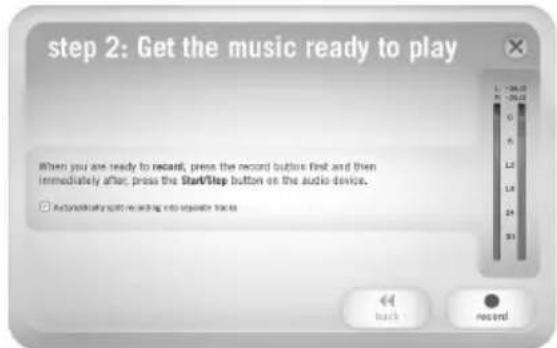
The software will split tracks automatically when it detects silence in the music. This can have unexpected results depending on the music. To split the tracks manually, uncheck the box labeled "Automatically split recording into separate tracks." (Note: This auto-track feature is only available for PC users.)
When you are ready to start recording, click Record and immediately play your music.
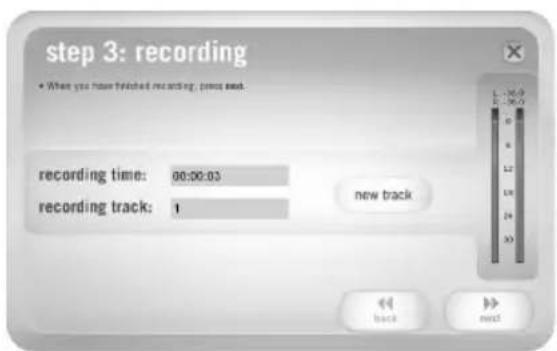
STEP3
You are now recording. You should be hearing the audio from the device through your computer's speakers and seeing the audio meters move.
If you chose to manually split your recording into tracks, you will see a "New Track" button. You can use this button to demarcate the beginning of a new track.
When you have finished recording, click Next to proceed to the next step.
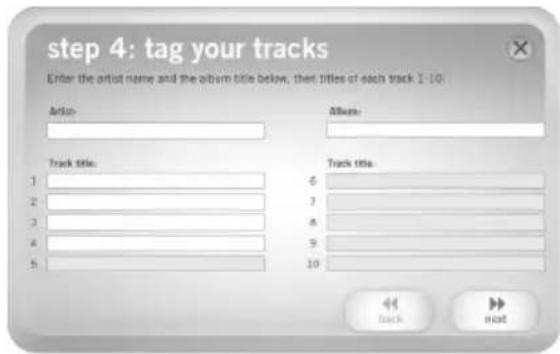
STEP4
Once you have finished recording, please enter the Artist, Album and Track titles by clicking and typing into the corresponding fields.
Please note: if you have recorded more than 10 tracks, you can access the information for tracks 11-20 by clicking Next.
When you are finished labeling your recording, click Next.
STEP5
The software will now export your recording to iTunes. Please allow the exporting process to complete.
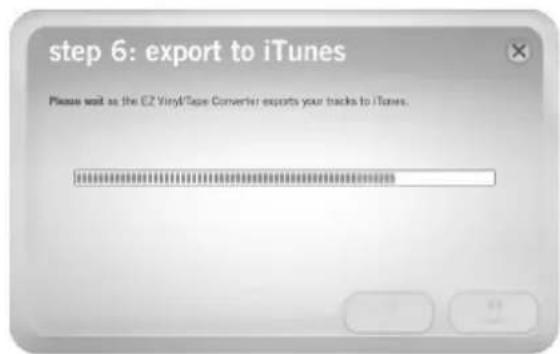
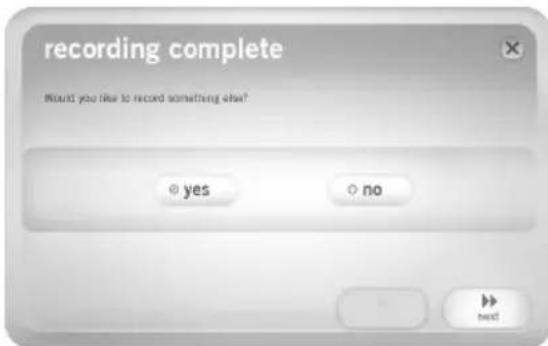
STEP6
Once the software has exported your recordings to iTunes, you will see the screen on the right.
Choose Yes if you would like to record again.
Choose No if you do not wish to record more.
When you have made your selection, click Next to record again (Steps 2-6) or exit the application.
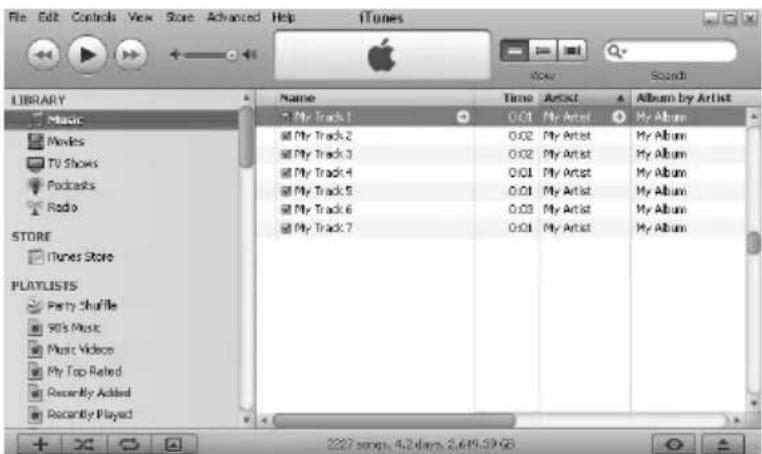
STEP7
You will now be able to access your recordings through your iTunes library. Simply start up iTunes by going to Start All Programs iTunes. Click on the Music library tab on the left and navigate to the Artist, Album and Track titles which you entered for your recording. From iTunes, you can even burn your recordings straight to a CD or load them onto your iPod. Please consult the iTunes Help menu for more information on using iTunes.
Note that after transferring music to your computer, you may need to
reselect your computer's soundcard as the playback device. Otherwise, you may not hear any sound when playing audio from your computer. For more information, see the Troubleshooting section.
TROUBLESHOOTING
Please refer to the following troubleshooting scenarios if you experience difficulty recording your music.
| PROBLEM CAUSE SOLUTION | ||
| I am not hearing any audio when I am recording and I do not see the audio meters moving. | USB device not powered. Please make sure that the USB device is powered on. | |
| USB device not connected to the computer. | Make sure the USB device is connected to a working USB port on your computer. If already connected, try reconnecting the device and restarting the software. | |
| Bad USB cable or bad USB port. | Try using a different USB cable. Also, try connecting the USB device to a different USB port on your computer. | |
| The music is playing and I see the audio meters moving but I am not hearing any audio. | Audio output not set correctly. | Make sure that your computer's soundcard is selected as your playback device. In Windows, go to Start ▶ Settings ▶ Control Panel ▶ Sounds and Audio Devices (on Windows XP) or Start ▶ Settings ▶ Control Panel ▶ Sound (on Windows Vista) and make sure that your computer's audio card is selected as the Sound Playback device under the Audio tab. |
| Computer speakers are muted. | Turn up the volume on your computer speakers. | |
| Computer speakers are not connected. | If using external speakers, make sure that they are connected to your computer's soundcard. | |
| I am experiencing poor sound quality. | Cartridge connection is not secure. | If using a USB turntable, cartridge must be securely connected to the tonearm whenever you are using the turntable. |
| Vinyl record is dirty or scratched. | If transferring vinyl, try dusting off and gently wiping the surface of the record before playing it. | |
| Other software applications are interfering with EZ Vinyl/Tape/Audio Converter. | Close all applications, restart the computer, and only run EZ Vinyl/Tape/Audio Converter while recording. | |
| The recording sounds loud and distorted. | The USB device Gain level is too high. | If your USB device is equipped with a Gain knob, turn it down. |
| The recording is barely audible. | The USB device Gain level is too low. | If your USB device is equipped with a Gain knob, turn it up. |
| I cannot hear my recordings once I have transferred them and try to play them on my computer. | Computer audio output not set correctly. | Make sure that your computer's soundcard is selected as your playback device. In Windows, go to Start ▶ Settings ▶ Control Panel ▶ Sounds and Audio Devices (on Windows XP) or Start ▶ Settings ▶ Control Panel ▶ Sound (on Windows Vista) and make sure that your computer's audio card is selected as the Sound Playback device under the Audio tab. Please note: Depending on your computer, the playback device will be different but should not say "USB Audio Codec". |
| While the USB device is connected, I cannot listen to any music from my computer. | ||
| On Windows Vista, my recordings are mono instead of stereo. | Recording input properties in Vista not set to "stereo". | In Vista, you may need to manually specify "stereo" for the recording input. Go to Start ▶ Control Panel ▶ Sound (in Classic View). Then, click on the Recording tab and highlight the Microphone input (USB Audio Codec). Click on Properties to bring up the input settings. Next, click on the Advanced tab and select "2 channel, 16 bit, 44100 Hz (CD quality)" in the Default Format pull-down menu. Lastly, click Apply to accept the settings. |
| On my Mac, after recording a file, it appears as "EZACT Temp" in iTunes and does not play. | iTunes settings need to be adjusted. | In iTunes, click the iTunes menu in the upper-left and click Preferences. Click the General tab then the Import Settings button and set Import Using to MP3 Encoder. Then click the Playback tab and uncheck Sound Check, Sound Enhancer, and Crossfade Songs. Close the window when finished. |
Frequently ASKED QUESTIONS
Please refer to the following list of frequently asked questions for more information on transferring your music.
Question: What operating systems are the EZ Vinyl/Tape Converter and EZ Audio Converter applications compatible with?
Answer: EZ Vinyl/Tape Converter is currently compatible with Windows XP, Vista, and 7 operating systems. EZ Audio Converter is compatible with the Mac OS X operating system.
Question: What digital format are my recordings converted to?
Answer: On Windows OS, the recordings are encoded as 192kbps MP3 files. This ensures superb audio quality, small file size, and compatibility with virtually all portable media devices and software media players. On Mac OS, the recordings are encoded according to the settings selected in iTunes' Preferences Advanced Importing.
Question: Where are my recordings stored on my computer?
Answer: Your recordings will be stored in the iTunes Music folder. By default, this folder is located in My Documents My Music iTunes Music on Windows OS, or in Music iTunes Music on Mac OS and the contents are organized by Artist name.
Question: How do I burn my recordings onto a CD?
Answer: There are several different ways to burn your recording onto a CD. You can either use iTunes or another CD-burning application. Please consult the Help menu of iTunes or your alternative application for more information.
Question: Can I listen to the music through my computer while recording?
Answer: Yes, EZ Vinyl/Tape Converter and EZ Audio Converter will automatically monitor incoming audio through your computer as your music is being transferred. If you are using multiple audio devices, we recommend that you disable any devices which you do not wish to use for monitoring. For most users, however, this will not be an issue.