CDN450 - Mixer NUMARK - Free user manual and instructions
Find the device manual for free CDN450 NUMARK in PDF.
User questions about CDN450 NUMARK
0 question about this device. Answer the ones you know or ask your own.
Ask a new question about this device
Download the instructions for your Mixer in PDF format for free! Find your manual CDN450 - NUMARK and take your electronic device back in hand. On this page are published all the documents necessary for the use of your device. CDN450 by NUMARK.
USER MANUAL CDN450 NUMARK
Please go to http://www.numark.com to register your CDN450. Registering your product ensures that we can keep you up-to-date with any new product developments and provide you with world-class technical support, should you run into any problems.
GROUND RULES
- Make sure all items listed in the BOX CONTENTS section are included in the box.
- READ SAFETY & WARRANTY INFORMATION BOOKLET BEFORE USING THE PRODUCT.
- Study the connection diagram in this guide.
- Place mixer in an appropriate position for operation.
- Make sure all devices are turned off and all faders and gain knobs are set to "zero."
- Connect all stereo input sources as indicated in the diagram.
- Connect the stereo outputs to power amplifier(s), tape decks, and/or other audio sources.
-
Plug all devices into AC power.
-
Switch everything on in the following order:
• Audio input sources (i.e. turntables, CD players, etc.)
- Mixer
- Last, any amplifiers or output devices
-
When turning off, always reverse this operation by turning off:
-
Amplifiers
- Mixer
- Last, any input devices
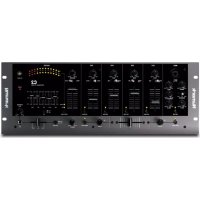
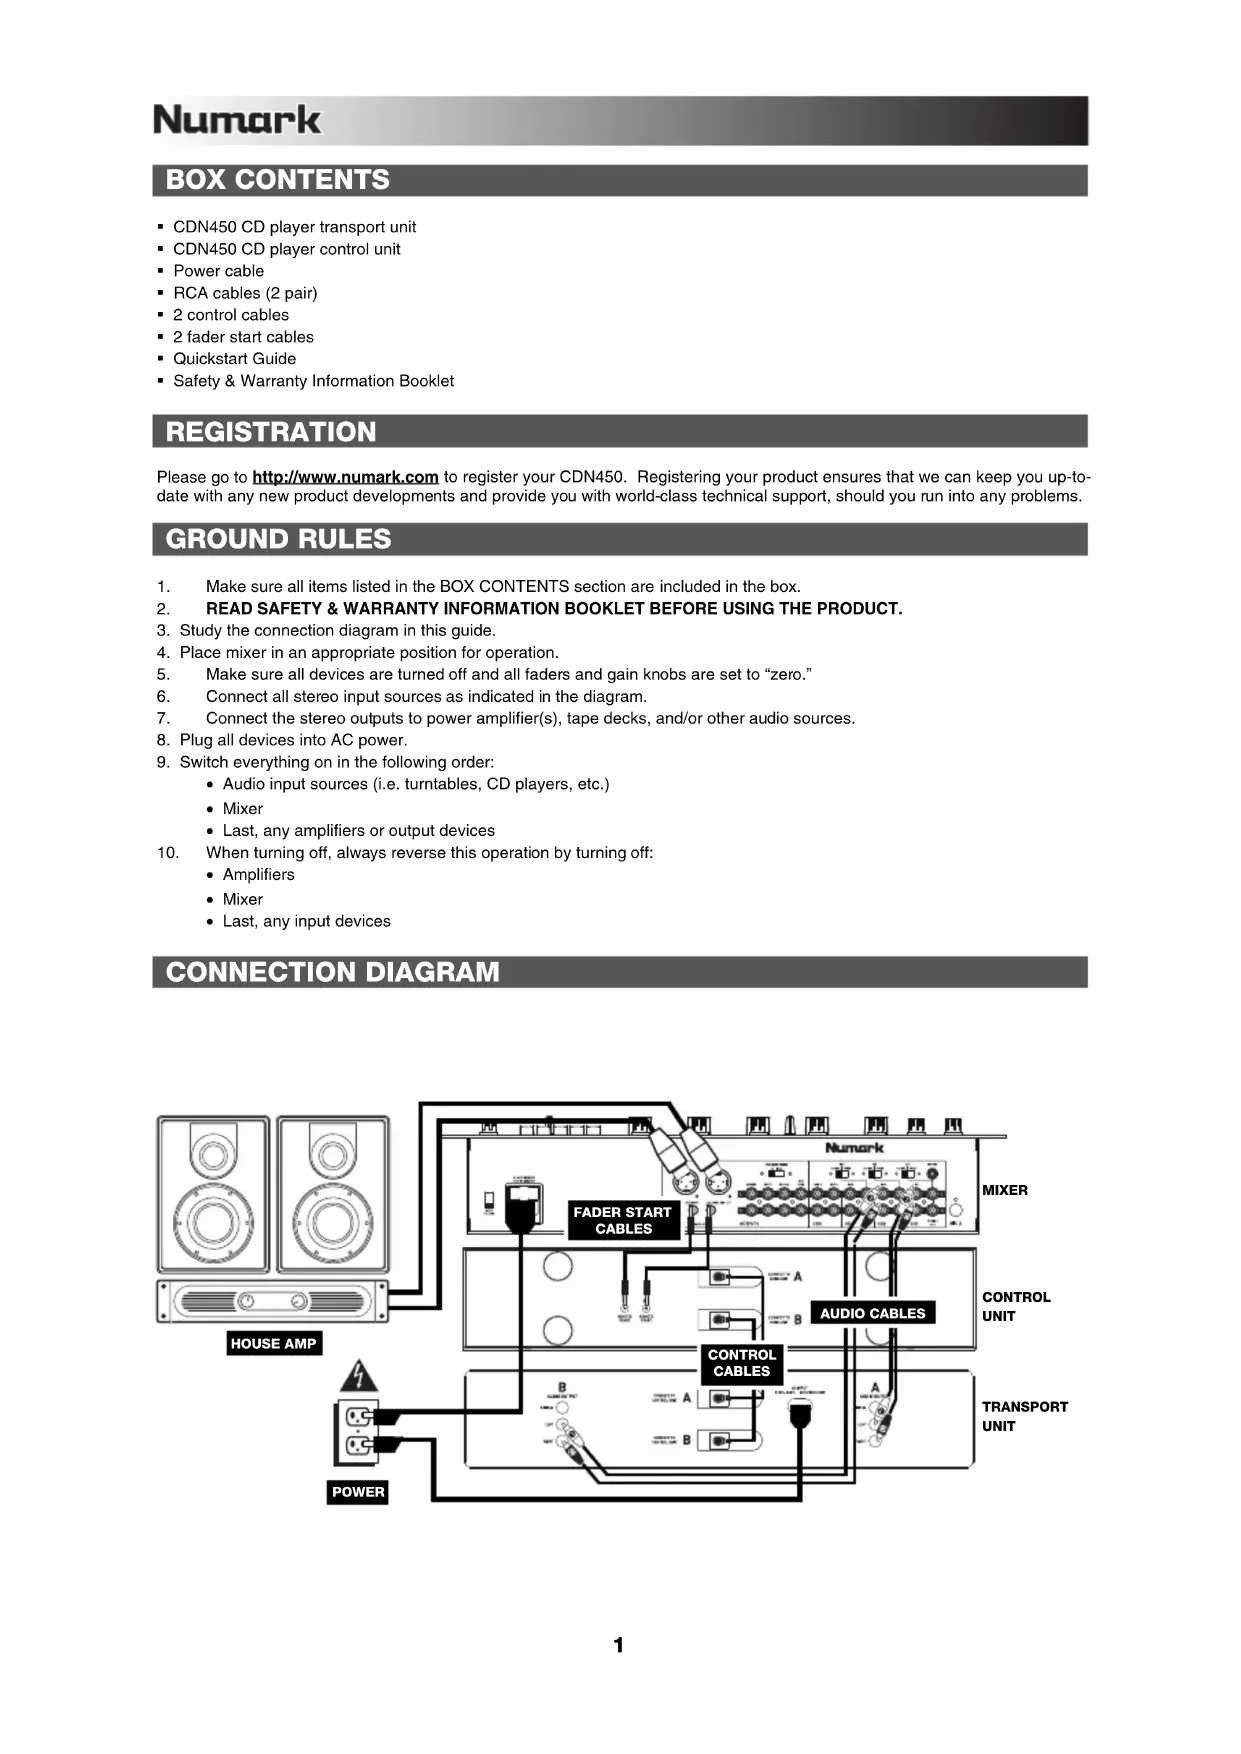
CONNECTION DIAGRAM
text_image
HOUSE AMP POWER FADER START CABLES Numark MIXER AUDIO CABLES CONTROL CABLES A B A B CONTROL UNIT TRANSPORT UNITFRONT PANEL FEATURES
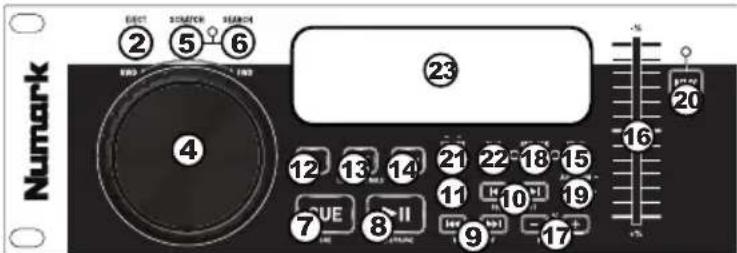
-
JOG WHEEL – The jog wheel serves many functions depending on its current mode.
-
POWER SWITCH - Turn the machine on and off with this button. The unit should always be shut down with this button first before any external power is removed. Typically it is recommended that the CD player is powered on before amplifiers and powered off after amplifiers.
- EJECT – Pressing will open or close the disc tray on the transport.
- CD DRAWER - Place your CDs you wish to play in here. This unit is designed to play commercially available CDs, MP3 CDs and properly burned and finalized CD-Rs. Due to variances on the specification of certain CD burners and CDs, some homemade CDs may not play properly. We recommend burning CDs at the minimum speed possible for the best performance.
a) If a track is not playing, the JOG WHEEL will search slowly through a track's frames. To set a new cue point, rotate the JOG WHEEL then begin playback when you have determined the proper position. Press CUE to return to that cue point.
b) If a track is playing, the JOG WHEEL will temporarily bend the pitch of the track. Rotating the JOG WHEEL clockwise temporarily speeds it up while rotating it counterclockwise slows it down. This is a useful tool for beat-matching (see MATCHING TEMPOS & BEATS).
c) When the SEARCH button has been activated, rotating the JOG WHEEL will scan rapidly through the track.
d) When the SCRATCH button has been activated, rotating the JOG WHEEL will "scratch" over the audio of the track, like a needle on a record.
- SCRATCH – Activates or deactivates Scratch Mode. While activated, rotating the JOG WHEEL creates a 'scratch' effect. The LED indicator will be blue when Scratch Mode is active. (Note: This feature is not optimal for searching through long audio passages. For longer searches, activate the SEARCH function.)
- SEARCH – Pressing this button allows you to use the JOG WHEEL to rapidly scan through the music. The LED indicator will be red when Search Mode is active.
- CUE – During playback, pressing CUE will return to the most recent point where playback was started and will pause the track. Holding down CUE will start playback from this point, and releasing CUE will cause it to return to that point and will pause the track. Also, if the track is paused, you can use the JOG WHEEL to locate a new cue point.
- PLAY / PAUSE – Plays or pauses the track. (Note: When paused, pressing PLAY will only set a new cue point if the JOG WHEEL has been moved.)
- TRACK SELECT – Used to select the track to be played.
- FOLDER SELECT – Used to navigate folders on an MP3 disc.
- FOLDER / +10 - Toggles between Folder and Track Mode. When in Folder Mode, you can use the FOLDER SELECT buttons to navigate the folders of an MP3 disc. When in Track Mode, you can use the TRACK SELECT buttons to skip forward or backward 10 tracks at a time.
- LOOP IN – Sets a new cue point or the start point of a loop (a "Loop In" point) during playback.
- LOOP OUT - Sets the end point of a loop (a "Loop Out" point) and starts playing the loop. While playing a loop, press LOOP OUT to release it from the loop and continue normal playback.
- RELOOP – Plays the track immediately from the beginning of a loop (and reactivates the loop).
- PITCH – Activates or deactivates the PITCH FADER. You can also hold down this button and press the PITCH BEND -/+ buttons to adjust the range of the PITCH FADER (±4%, 8%, and 16%). The current range will be indicated on the LCD and by different LED colors.
- PITCH FADER – The pitch can be changed by pressing the PITCH button so a PITCH LED is lit, then moving the sliding fader. The pitch will not be changed if the PITCH LED is off.
- PITCH BEND -/+ - You can use these two pitch bend buttons to temporarily adjust the pitch and tempo of the music.
- KEY LOCK – While Key Lock is enabled, adjusting the pitch of the music playing on the deck will only influence its tempo independent of its musical pitch.
- TAP – Tap this button in time with the beats of the music on that deck. This will enter a new BPM ("beats per minute") reading for that track, which will be shown on the LCD. You can allow the automatic beat-counter to read the track's BPMs by holding it down until "AUTOBPM" is shown on the LCD.
- RELAY – Press this button to activate or deactivate Relay Play. When activated, relay play will cause the opposite deck to start playing whenever the currently playing deck stops. Playback will alternate between the two decks until one of the decks reaches the end of its disc or until Relay Play is deactivated.
- TIME – Switches the time display between "ELAPSED" playing time, "REMAINING" time on the track, and "TOTAL" remaining time on the entire CD. Hold the button down to toggle between Single Play (the deck will stop at the end of each track) or Continuous Play (the entire disc will be played without interruption).
- ID-3 TAG – Press this button to display additional MP3 information. Pressing it more than once will toggle through all the available information, including the track title, artist name, name of the current folder, and file name.
- LCD – Indicates all the functions, as they are occurring, with the CD.
text_image
Nunark ② ⑤ ⑥ ④ ②3 16 20 12 13 14 21 22 18 15 ⑦ VE ⑧ II ⑨ ⑩ ⑪ ⑫ ⑬ -5 +5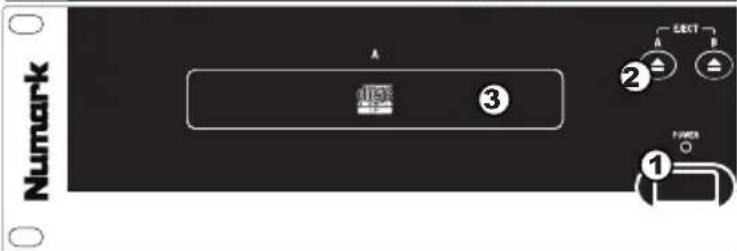
text_image
Numark A ③ ② ERET POWER ①REAR PANEL FEATURES

text_image
CONNECT TO HABINET A B 5 RESET START COMPLETE START 2 2 CONNECT TO HABINET B
text_image
A AUSED OUTPUT DITAL 4 LIFT 3 RIGHT CONNECT TO CONTROL UNIT A 2 AC INPUT 10V - DATA 10V/50Hz 10W ① AUDIO OUTPUT EBITIAL 4 LEFT 3 RIGHT- POWER PLUG CONNECTOR – Plug your supplied power cord in here.
- CONTROL CABLE CONNECTOR – Plug in the 8-pin cable included in here to connect the control unit and transport unit together.
- RCA AUDIO CONNECTORS – Connect your CD player to your mixer from this line level output.
- DIGITAL AUDIO OUTPUT – The format is type 2, form 1, also known as S/PDIF (Sony/Phillips Digital Interface Format). In order to use the digital output you should not use variable pitch slider and the pitch bend buttons. If you adjust the pitch, other devices may not read the digital output properly because the sampling rate changes.
- REMOTE START CONNECTOR – To use this connector for fader start, connect a fader start cable to a fader start-compatible mixer. Every time you move the crossfader on the mixer over to the side that the unit is on, it will automatically start playing. When you move the fader away from that side, the unit will stop. Moving the fader back to the unit side will start play again.
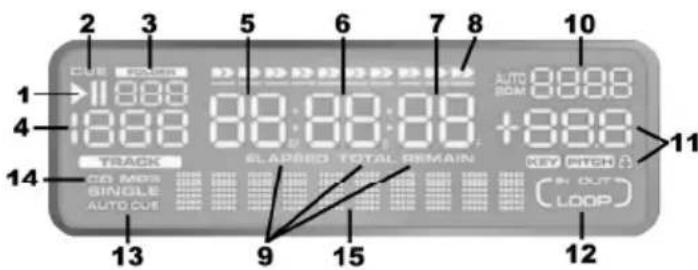
LCD FEATURES
- PLAY / PAUSE – This shows when the unit is playing or paused.
- CUE – Flashing when the unit is setting a cue point. Lit continuously when the unit is paused at a cue point.
- FOLDER NUMBER – Shows the number of the current folder.
- TRACK NUMBER - Shows the current track number.
-
MINUTES – Shows the minutes elapsed or remaining depending on mode setting.
-
SECONDS – Shows the seconds elapsed or remaining depending on mode setting.
-
FRAMES – The CD player breaks down a second into 75 frames for accurate cueing. This shows the frames elapsed or remaining depending on mode setting.
-
TIME BAR – Shows either time remaining or elapsed depending on the setting of the TIME button.
-
TIME MODE – Indicates whether the time shown on the LCD is the elapsed time for the track, remaining time for the track, or total remaining time for the entire CD.
Note: When playing MP3 files, the total remaining time of the CD cannot be shown.
-
BPM - The tempo, which is indicated in BPM (beats per minute). When the automatic beat-counter is on, this indicator will read "AUTOBPM."
-
PITCH – Shows the percentage change in pitch. When the lock icon is lit, the KEY LOCK button is engaged.
-
LOOP – Indicates when a loop is programmed. When the indicator is flashing, a loop is currently playing. When "IN / OUT" is shown, a loop is programmed but not currently playing.
-
SINGLE – Shows when the unit is set to play just one track at a time (Single Play Mode). When this is not lit, the CD will play continuously through all tracks (Continuous Play Mode). This function is controlled by the TIME button.
Note: When in Single Play Mode, "AUTOCUE" will also be shown. When cueing up a new track, playback will start when the actual audio of the track starts, eliminating the silence at the beginning of the track.
-
CD / MP3 – Shows when unit is playing an audio CD or an MP3 file.
-
MATRIX DISPLAY – Displays folder names and MP3 tag information. (For MP3s recorded in CBR, the bitrate will be shown. For VBR-recorded MP3 tracks, the display will show "VBR.")
text_image
2 3 5 6 7 8 10 1 → 11:00:00 4 18:00:00 +8:00:00 14 TRACK ELAPRIO TOTAL REMAIN AUTO 8888 ROM 8888 KEY SWITCH CO MRS SINGLE AUTO CUT 9 15 12 LOOPMP3 FOLDER NAVIGATION
When making an MP3 disc to use with the CDN450, we recommend placing the MP3 files in separate folders on the disc by genre, BPM, artist name, etc. Press the FOLDER / +10 button so "FOLDER" appears on the LCD to enter Folder Mode and use the FOLDER SELECT buttons to browse through the files in each folder.
Or, instead of using Folder Mode, you can press FOLDER / +10 so "FOLDER" is not shown on the LCD to enter Track Mode. In this mode, an MP3 disc's tracks will be displayed in one long list.
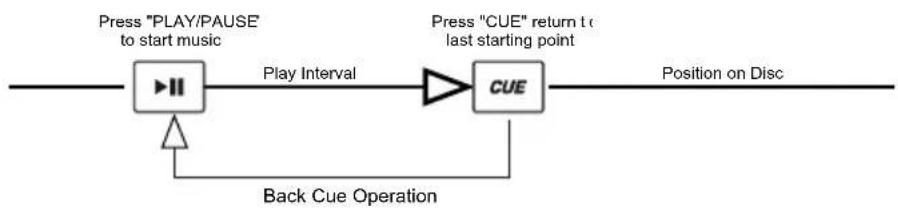
PLAY, PAUSE & CUE OPERATIONS
PLAY & CUE
Pressing the PLAY / PAUSE button starts the disc. Pressing the CUE button will reset the disc to the last place where the disc was started. This is called the cue point. By alternately pressing the PLAY / PAUSE button and the CUE button, the disc may be returned and played from the cue point any number of times. This function is called back cue.
flowchart
graph LR
    A["Press "PLAY/PAUSE" to start music"] --> B["Play Interval"]
    B --> C["CUE"]
    C --> D["Position on Disc"]
    E["Back Cue Operation"] --> B
    F["Press "CUE" return to last starting point"] --> C
PLAY, PAUSE & CUE
When play has been paused and then started again, the return position for the back cue will be updated to this new position.

flowchart
graph LR
    A["Press 'PLAY/PAUSE' to start music"] --> B["Play Interval Play Interval"]
    B --> C["Press 'PLAY/PAUSE' to pause music"]
    C --> D["Press 'PLAY/PAUSE' to start music"]
    D --> E["CUE"]
    E --> F["Position on Disc"]
    G["Back Cue Operation"] --> D
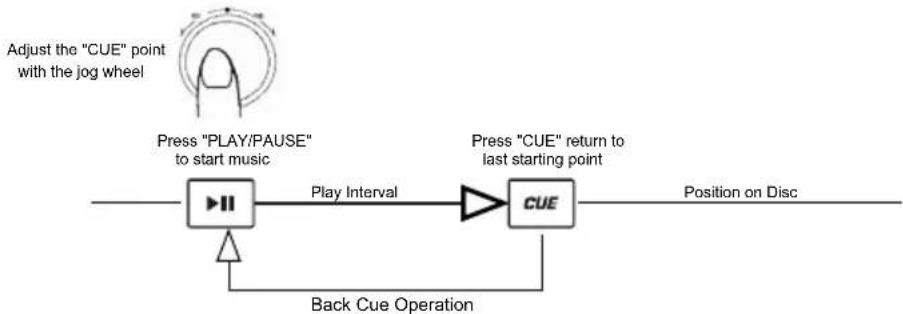
EDITING CUE POINT
When the JOG WHEEL is turned while paused, it will move the cue point. You will hear the track's audio as the player "scrubs" through the track until you find where you want to set your new cue point. Press PLAY / PAUSE then CUE to confirm the new cue point.
flowchart
graph LR
    A["Adjust the "CUE" point with the jog wheel"] --> B["Press "PLAY/PAUSE" to start music"]
    B --> C["Play Interval"]
    C --> D["Press "CUE" return to last starting point"]
    D --> E["CUE"]
    E --> F["Position on Disc"]
    G["Back Cue Operation"] --> H["Play Interval"]
    H --> I["Press "CUE" point to start music"]
MATCHING TEMPOS & BEATS
You can match your tracks' tempos by monitoring the music of both PLAYER 1 and PLAYER 2 by ear and adjusting the pitch. If the tempo of the music on one CD player is slower the other, move the slider to the (+) side to match the tempo. If it is faster, move the pitch slider to the (-) side. The following instructions give an example of how to do this.
- Press PLAY/PAUSE to start PLAYER 1. PLAYER 1 will begin playback.
- Press PLAY/PAUSE to start PLAYER 2. Now, both decks should be playing.
- Listen to PLAYER 2 in your headphones. If its tempo (in the headphones) is faster than that of PLAYER 1, slow down PLAYER 2's tempo using the pitch control.
If PLAYER 2' tempo (in the headphones) is faster than that of PLAYER 1, speed up PLAYER 2's tempo using the pitch control.
natural_image
Pure electrical circuit lines without any symbolsBEAT MATCHING USING PITCH BEND
Once you have matched the tracks' tempos, you may still need to match their downbeats to create a smooth mix. You can do this by temporarily changing the pitch with the JOG WHEEL or PITCH BEND +/- buttons.
After matching the tempos adjust the pitch temporarily as follows:
When a track is ahead, rotate the jog wheel counterclockwise or press the PITCH BEND – button to temporarily slow it down.
When a track is behind, rotate the jog wheel clockwise or press the PITCH BEND + button to temporarily speed it up.

The pitch will change while the JOG WHEEL is rotated or the PITCH BEND +/- button is pressed. (The faster you rotate the wheel the greater the shift in pitch.) Release the wheel or stop pressing the PITCH BEND +/- buttons when the downbeats are aligned the way you want them and the track will return to its original tempo/pitch.
EXAMPLE OF MIXING USING BOTH PLAYERS OF YOUR CD PLAYER
While playing a disc on PLAYER 1, load a disc into PLAYER 2 and select your next track, match its pitch to the track playing on PLAYER1 and when you are ready use the crossfader on your mixer to fade from PLAYER 1 to PLAYER 2.
| Load a disc in PLAYER 1 and select the track and press PLAY. | PLAYER 1 Load a disc and press the OPEN/CLOSE button. | PLAYER 1 TRACK Select the track to be played. | PLAYER 1 Press the PLAY button |
| Load a disc in PLAYER 2 and select the track then play. | PLAYER 2 Load a disc and press the OPEN/CLOSE button. | PLAYER 2 TRACK Select the track to be played. | PLAYER 2 Press the PLAY button |
| Set and edit a start cue point on PLAYER 2 | PLAYER 2 Press the Pause button of PLAYER 2. | PLAYER 2 Rapidly search for a cue point using the wheel | PLAYER 2 Slowly set the right cue point using the wheel |
| Check your new cue point | PLAYER 2 Listen with the monitor and press the play button. | PLAYER 2 Press the cue button then play to be sure of the set cue point | PLAYER 2 Reset the player to the Cue point by pressing Cue |
| Do a MIX! | PLAYER 2 With a matching downbeat from Player 1 press the play button. | PLAYER 2 PITCH PITCH If you are beat mixing, turn on your Pitch adjust and follow the directions for beat matching. | MIXER When you are happy with your mix move the crossfader accordingly |
CONTENIDO DE LA CAJA
CÓMO IGUALAR TEMPOS Y BEATS
natural_image
Pure electrical circuit lines without any symbolsUSO DEI COMMANDI PLAY/PAUSE E CUE
PLAY E CUE
natural_image
Two schematic diagrams showing downward and upward arrows with internal vertical bars, no text or symbols present.ABBINAMENTO DEL BEAT SERVENDOSI DEL COMANDO DI BEND DEL PITCH
natural_image
Two abstract diagrams showing downward and upward arrows with internal vertical bars (no text or symbols)ANGLEICHEN VON BEATS UNTER VERWENDUNG DER PITCH-BEND-FUNKTION
TIME DISPLAY: Track Elapsed, Track Remaining, Total Remaining
FREQ RESPONSE: 20 Hz – 20 kHz
THD+N: 0.015%
SNR (IHF-A): > 92 dB
OUTPUT LEVEL: 2.0 V RMS
PITCH CONTROL RANGE: ± 4, 8, or 16%
MP3 FORMATS: MPEG1 Layer3 (ISO/IEC11172-3)
Mono/Stereo samples at 32, 44.1, & 48 kHz
| Bitrate: | 32 | - | 320 | KBps |
| CBR (Constant Bitrate) or VBR (Variable Bitrate) | ||||
MPEG2
Layer3
(ISO/IEC13818-3)
Mono/Stereo
samples
at 16,
Bitrate: 32
- 160
KBps
CBR (Constant Bitrate) or VBR (Variable Bitrate)
MPEG2.5 Layer3
Mono/Stereo samples at 8, 11.025, & 12 kHz
Bitrate: 32
- 160
KBps
CBR (Constant Bitrate) or VBR (Variable Bitrate)
DIMENSIONS: Control Unit: 482 mm x 88.8 mm x 76.5 mm
Transport Unit: 482 mm x 88.8 mm x 246 mm
WEIGHT: Control Unit: 1.5 kg
Transport Unit: 3.2 kg
POWER SUPPLY: 100-240 V AC, 50/60 Hz
POWER CONSUMPTION: 30 W
* Specifications are subject to change
www.numark.com