
SMX1 - Mixer SynQ - Free user manual and instructions
Find the device manual for free SMX1 SynQ in PDF.

| Brand | SynQ |
| Model | SMX1 |
| Product type | DJ Mixer |
| Dimensions (W x D x H) | 482 x 221 x 87.5 mm |
| Weight | 5.25 kg |
| Power supply | 230 V~ 50 Hz, 34 W |
| Number of inputs | 13 inputs on 6 channels (2 mic + 4 line) |
| Outputs | Balanced XLR Master, Zone (unbalanced RCA), Headphones (1/4" jack), Coaxial digital output, Record output |
| Tone control | 3-band (Bass 70 Hz, Mid 1 kHz, Treble 13 kHz) with -30 dB kill function |
| Crossfader | VCA, replaceable, adjustable curve (smooth fade to sharp cut) |
| Built-in effects | 8 Beat synced effects: Echo, Auto Pan, Flanger, Manual filter, Auto filter, Reverb, Trans, Pitch shifter |
| Special functions | Fader start, Talk-over, Split cue, Cue mixing, Automatic BPM counter with Tap |
| Display | Backlit LCD screen for effects and BPM |
| VU meter | LED with peak level memory, L/R or CUE/PGM selection |
| User-replaceable parts | Channel faders and crossfader |
| Maintenance | Clean with a slightly damp soft cloth. Do not use abrasive products. |
| Safety | Do not open the device. Disconnect before maintenance. Use indoors only. |
| Included accessories | Power cable, user manual |
| Intended use | DJ mixing for clubs, events, and home studio |
Frequently Asked Questions - SMX1 SynQ
User questions about SMX1 SynQ
0 question about this device. Answer the ones you know or ask your own.
Ask a new question about this device
Download the instructions for your Mixer in PDF format for free! Find your manual SMX1 - SynQ and take your electronic device back in hand. On this page are published all the documents necessary for the use of your device. SMX1 by SynQ.
USER MANUAL SMX1 SynQ
natural_image
Close-up of a metallic electronic component with pins and a rectangular housing (no visible text or symbols)
AUDIO RESEARCH
WWW.SYNQ-AUDIO.COM
Copyright © 2003-2007 by BEGLEC cva.
Reproduction or publication of the content, even portions, in any manner, without express permission of the publisher, is prohibited.
L. X E H
AUDIO MIXER
DIGITAL EFFECTS
P 1 ... 13 English
P 14 ... 27 Français
Dispose of the unit and used batteries in an environment friendly manner according to your country regulations.
FR - DÉCLASSER L'APPAREIL
Congratulations and thank you for buying this SYNQ ^* product. Please read these operating instructions carefully so you will know how to operate this product properly. After you have finished reading the instructions, put them in a safe place for future reference.
DON'T FORGET TO REGISTER YOUR SMX-1. YOU WILL AUTOMATICALLY RECEIVE A REMINDER WHEN IMPORTANT PRODUCT INFORMATION IS AVAILABLE! → SURF TO: WWW.SYNQ-AUDIO.COM/REGISTER/ ←
FEATURES
• 13inputs on 6 Channels (2mic + 4channels on fader)
• 2 Master outputs:
- Master with signal trimming (XLR, balanced)
- Zone output "master 2" (cinch, unbalanced)
• 3-band tone controls with kill function -30dB on all channels
• Special, user replaceable, high quality faders
- User replaceable VCA controlled cross fader
- Easy A/B channel selection for cross fader
• Cross fader start control for compatible CD-players
• 3 Beat synchronized Cross fader mixing effects
- Adjustable Cross fader curve (soft → sharp cutoff)
• Full automatic beat counters
• 8 Beat synchronized digital effects:
- Echo
c Autopan - Flanger
c. Manual filter
Auto filter - Reverb
- Trapo
- Pitch Shifter
• Preprogrammed effect presets
• LCD display with back-light for effects and beat counters
• Effect Cue function
• Coaxial digital out for recording
- Microphone talk-over function
- High power Phones output with "split cue" and "cue/pgm mixing" possibility
- Selectable (cue/pgm) LED VU-meter with peak memory.
• Very compact design.
SYNQ 1/82 SMX-1 DJ-Mixer
ENGLISH USER MANUAL
BEFORE USE
Check that the following parts are included in the package with the main unit:
- SMX-1 mixer
- Mains cable
- Operating instructions
CAUTIONS REGARDING HANDLING
SAFETY INSTRUCTIONS:

CAUTION
OF ELECTRIC S
DO NOT OPEN

CAUTION: To reduce the risk of electric shock, do not remove the top cover. No user-serviceable parts inside. Refer servicing to qualified service personnel only.

The lightning flash with arrowhead symbol within the equilateral triangle is
intended to alert the use or the presence of un-insulated “dangerous voltage” within the product’s enclosure that may be of sufficient magnitude to constitute a risk of electric shock.

The exclamation point within the equilateral triangle is intended to alert the user to the presence of important operation and maintenance (servicing) instructions in the literature accompanying this appliance.

This symbol means: indoor use only.
This symbol means: Read instructions.
• To prevent fire or shock hazard, do not expose this appliance to rain or moisture.
- To avoid condensation to be formed inside, allow the unit to adapt to the surrounding temperatures when bringing it into a warm room after transport. Condense sometimes prevents the unit from working at full performance or may even cause damages.
- This unit is for indoor use only.
- Don't place metal objects or spill liquid inside the unit. No objects filled with liquids, such as vases, shall be placed on this appliance. Electric shock or malfunction may result. If a foreign object enters the unit, immediately disconnect the mains power.
- No naked flame sources, such as lighted candles, should be placed on the appliance.
- Don't cover any ventilation openings as this may result in overheating.
- Prevent use in dusty environments and clean the unit regularly.
- Keep the unit away from children.
• Inexperienced persons should not operate this device.
- Maximum save ambient temperature is 45^ . Don't use this unit at higher ambient temperatures.
- Minimum distances around the apparatus for sufficient ventilation is 3cm.
• Always unplug the unit when it is not used for a longer time or before you start servicing.
- The electrical installation should be carried out by qualified personal only, according to the regulations for electrical and mechanical safety in your country.
- Check that the available voltage is not higher than the one stated on the rear panel of the unit.
- The socket inlet shall remain operable for disconnection from the mains.
- The power cord should always be in perfect condition: switch the unit immediately off when the power cord is squashed or damaged.
- Never let the power-cord come into contact with other cables!
SYNQ 2/82 SMX-1 DJ-Mixer
ENGLISH USER MANUAL
- When the power switch is in OFF position, this unit is not completely disconnected from the mains!
- This appliance must be earthed to in order comply with safety regulations.
- In order to prevent electric shock, do not open the cover. Apart from the mains fuse there are no user serviceable parts inside.
- Never repair a fuse or bypass the fuse holder. Always replace a damaged fuse with a fuse of the same type and electrical specifications!
- In the event of serious operating problems, stop using the appliance and contact your dealer immediately.
- Please use the original packing when the device is to be transported.
- Due to safety reasons it is prohibited to make unauthorized modifications to the unit.
INSTALLATION GUIDELINES:
- Install the unit in a well-ventilated location where it will not be exposed to high temperatures or humidity.
- Placing and using the unit for long periods near heat-generating sources such as amplifiers, spotlights, etc. will affect its performance and may even damage the unit.
- The unit can be mounted in 19-inch racks. Attach the unit using the 4 screw holes on the front panel. Be sure to use screws of the appropriate size. (screws not provided) Take care to minimize shocks and vibrations during transport.
- When installed in a booth or flight case, please make sure to have good ventilation to improve heat evacuation of the unit.
- To avoid condensation to be formed inside, allow the unit to adapt to the surrounding temperatures when bringing it into a warm room after transport. Condense sometimes prevents the unit from working at full performance.
CLEANING THE MIXER:
Clean by wiping with a polished cloth slightly dipped with water. Avoid getting water inside the unit. Do not use volatile liquids such as benzene or thinner which will damage the unit.
ENGLISH USER MANUAL
CONTROLS AND FUNCTIONS
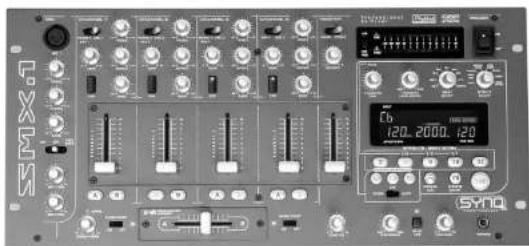
CONTROLS ON THE BACK:
- MAINS INPUT: Use the supplied mains cable to connect this input to the mains.
- MASTER1 BALANCED OUTPUT: The XLR-connectors can be used to connect the SMX-1 to the PA, using special balanced signal cables.
- TRIM OUTPUT: This potentiometer is used to reduce the output level of the mixer to protect the connected amplifiers and speaker cabinets. (Attention: the output level can be reduced to zero. If you don't have any signal on the master output, first check if this potentiometer is accidentally put to zero.)
- DIGITAL OUTPUT: This digital output makes it possible to make digital recordings on any connected digital recorder. The output is not affected by the master fader.
- FADER CONTROL: When connected to these inputs, compatible CD-players can be controlled by the fader starts and cross fader effects of the SMX-1.
- MASTER1 UNBALANCED OUTPUT: The same output signal as on the balanced master output(2) but unbalanced. Can be used to connect unbalanced amplifiers.
- ZONE OUTPUT: Also called master2 with separate level control, used to connect extra amplifiers.
- RECORD OUTPUT: Carries the same signal as the master outputs but is not influenced by the master level, balance and mono/stereo controls. Used to connect analog recording equipment.
- LINE INPUT: Used to connect any line level unit you have (CD, tuner, MD, ...)
- PHONO/AUX INPUT: Normally used to connect a turntable but, when you put the "phono/aux" switch(11) in the right position, you can also connect any line level unit.
- PHONE/AUX SWITCH: Used to choose the input level of the "phono/aux input"(10).
- GROUND (GND) CONNECTION: Many Turntables have a GND-connection. It is preferable to connect this signal ground to the GND-connector.
- MIC 2&3 INPUTS: Used to connect 2 extra unbalanced microphones.
ENGLISH USER MANUAL
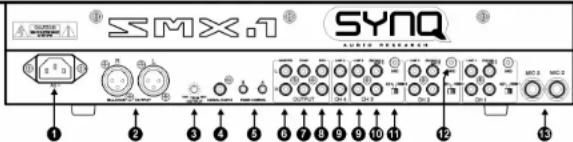
CONTROLS ON THE FRONT:
- MIC INPUT JACK: Combo jack. Accepts either a balanced microphone with an XLR connector or an unbalanced microphone with 1/4" mono jack. This input is mainly used as DJ-microphone. The talk over does not affect the signal level of this input.
- 3-BAND TONE CONTROL: The frequency of both Mic1 & Mic2 can be controlled over a +/-12dB range; Treble@13kHz \~ Middle@1kHz \~ Bass@70Hz.
- CHANNEL FADERS: Used to control the level of each channel. These high quality faders can be changed by the user, even when the mixer is working! (on another channel of course Ⓐ) For instructions, please read the "Changing the faders" section.
- MIC ON/OFF/TALK OVER SWITCH: Used to switch the microphones:
• OFF: Both mic1 & mic2 are switched off.
• ON: Both mic1 & mic2 are switched on
- TALK OVER: mic1 & 2 are switched on; the sound level of all the other channels will decrease to around -14dB.
- MIC1 VOL: Used to adjust the input level of micro 1.
- MIC2 VOL: Used to adjust the input level of micro 2.
- CROSS FADER: Adjusts the curve of the cross fader:
- LEFT POSITION: you can make a nice, smooth cross fade between 2 channels. Excellent for beat mixing.
- RIGHT POSITION: you can make very sharp "switch like" cuts. Excellent for scratching and other aggressive mixing techniques.
-
POSITIONS INBETWEEN: you can adjust the cross fader curve to your taste. Any curve between the 2 extremities can be selected.
-
FADER START ON/OFF SWITCH: When you have a compatible CD-player connected to the fader control connectors, you can control its start/stop (re-cue) functions with the cross fader of your SMX-1. With this switch you can turn the fader start control on and off.
-
FADER START INDICATORS: During the Effect mix mode the indicators display the output of sounds from the channels selected with the CROSS FADER ASSIGN A OR B buttons.(10)
SYNQ 5/82 SMX-1 DJ-Mixer
ENGLISH USER MANUAL
- CROSS FADER ASSIGN BUTTONS: The left side of the cross fader is named "A", the right side is named "B". Every input channel has 2 assign buttons, also named "A" and "B". You can easily determine if the signal of a certain channel will be routed to the left or right side of the cross fader, just by pushing the assign button with the corresponding name: "A" or "B". The selected button will be lit.
- CROSS FADER: Used to mix the signals from the 2 channels assigned to A and B by the cross fader assign buttons.(10)
- MASTER OUTPUT FADER: Adjusts the output level of the master output. (Attention: the "trim output" on the back of the mixer can reduce the maximum output level of the master output fader. Check this trimmer if the maximum output level is below normal. In this case please also check if the talk over is switched off)
- ZONE LEVEL: Used to adjust the level of the ZONE output on the rear panel. Its level is not affected by the master volume (12) and master balance (38). This output can be used as a second master.
- CROSSOVER EFFECTS UNIT: To take full advantage of the crossover effects it is absolutely necessary to connect a compatible CD-player to the fader output connectors (see previous chapter n°5). The 3 effects give you additional possibilities for perfect, beat synchronized mixing! Please read the text below to be sure you fully understand how it works!
IMPORTANT:
- You must put the "fader start on/off switches" (8) In ON-position.
-
You must assign two channels to A and B with the assign buttons (10)
-
CROSSOVER EFFECT MODE SWITCH: Used to select the desired crossover effect mode:
-
FADER: In this mode you can use the cross fader to control the crossover effects and perform start/stop (recue) functions.
• OFF: Crossover effects are disabled. -
AUTO: In this mode you don't have to use the cross fader: simply push one of the buttons and the mix will be done automatically in full beat sync!
-
CROSSOVER EFFECT SELECT/START BUTTONS: Used to select the type of Effect Mix desired, 3 functions (Echo, Zip and Roll) are available:
ECHO EFFECT: This effect can be used in FADER and AUTO mode:

- FADER MODE: Press the echo effect button and move the cross fader from one end to the other. A part of the music is sampled and constantly looped while the volume decreases until the other player starts automatically. The echo effect is fully beat synchronized. The length of the loop can be adapted with the "Preset" buttons (24). You can use the following presets: 14 12 1/1 2 4 8 beats. The effects display shows the length of the sampled loop.
Hint: If you just move the cross fader a little from the end position, you can repeat a small portion of the music to the rhythm of the beat. (Depending on the preset you choose) You can move the cross fader back to the same end position to stop the repeated sounds without actually mixing two channels.
- AUTO MODE: While the music is playing, press the "echo effect" button. The music starts playing in a loop while the volume decreases automatically until the other player starts. The length of the complete fade over is shown on the effects display. It can be adapted with the "preset" buttons (24) and/or the "time parameter knob" (33).
SYNQ 6/82 SMX-1 DJ-Mixer
ENGLISH USER MANUAL
- ZIP EFFECT: This effect can be used in FADER and AUTO mode:

FADER MODE: Press the Zip effect button and move the cross fader from one end to the other. The pitch of the music will lower until it becomes distorted. When the cross fader lever reaches the other side, the other player starts automatically. Depending on the position of the cross fader lever, the effects display shows a number from 0 to 99.
- AUTO MODE: While the music is playing, press the "Zip effect" button. The pitch of the music lowers automatically to zero until the other player starts. The length of the complete fade over is shown on the effects display. It can be adapted with the "preset" buttons (24) and/or the "time parameter knob"(33).
- ROLL EFFECT: This effect can be used in FADER and AUTO mode:

- FADER MODE: Press the Roll effect button and move the cross fader from one end to the other. First the music will be looped in 1/1beats (effects display shows "1") after this the loop is reduced to 12 beats (display shows "2") until it finally becomes a loop with a length of 1/8beats (display shows "4"). When the cross fader lever reaches the other side, the volume decreases and the other player starts playing. Note that the "presets" and "time parameter knob" are not accessible!
- AUTO MODE: While the music is playing, press the "Roll effect" button. The music starts playing in a beat synchronized loop until the other player starts. The length of the complete fade over is shown on the effects display. It can be adapted with the "preset" buttons (24) and/or the "time parameter knob" (33). Depending on the length of the fade over you selected, the roll pattern will be adapted and divided in 1/1, ½, ¼ and 1/8 beat loops.
17.CUE MIXING KNOB: With this control you can mix the master output with the cue signals from the different channels and the effect unit. Turn this control complete to the right if only want to hear the master output. Turn it completely to the left and you will only hear the cue signals that are selected with the cue buttons (21, 39). At any position in between you will hear a mix of both signals.
- SPLIT CUE BUTTON: Normally you hear a stereo signal in your headphones. When you press this button, you will hear 2 different mono signals:
- LEFT: Cue signals, selected with the cue buttons (21, 39).
• RIGHT: Signal on the master output.
Note that the Cue mixing knob must be in the center position!
-
CUE LEVEL: Used to adjust the output level of the Headphones. Note that, due to the high output power, you can permanently damage your ears! Do not play at high volume!
-
HEADPHONES OUTPUT: Used to connect any headphones with 1/4" jack plug.
21.EFFECTS CUE: This is the cue button for the effects unit. When switched on you can check the effect before it is mixed in your master mix.
-
EFFECTS ON/OFF BUTTON: This button switches the output of the effects unit on and off.
-
TAP BUTTON: Almost all effects are beat synchronized. Therefore the SMX-1 has a full automatic built-in beat counter. In some rare cases the automatic beat counter doesn't count as it should do (beats are out of the normal range or there's simply no beat to detect). In these cases you can help the beat counter by manually tapping this button to the rhythm of the beat. When you use this button it starts flashing to indicate that the automatic beat counter is shut off. If you want the automatic beat
ENGLISH USER MANUAL
counter to take over again, simply push for some seconds on the TAP button until it stops flashing.
- PRESET BUTTONS: These buttons are used as presets for the different effects. Depending on the selected effect, these presets can be settings related to the beat, filter frequencies, percentage of pitch change, etc... Each button has one of the following inscriptions: 2 - 4 - 8 - 16 - 32. These digits are related to the measured beat. Once the preset is selected, it lights up. You can also select the additional presets by pushing the "lime parameter knob" (33) while you select the presets 4 - 8 or 16. In that case the preset button starts flashing to indicate that the indication above the button (1/4 - 1/2 or 1/1) is selected. It's good to know that the presets are preserved when you change to another effect.
Example: if the "echo" effect is selected and you choose for preset "2", you will notice that the sound is repeated every 2 beats. If you choose "4", the sound repeats every 4 beats. Select the 1/2 -preset if you want the music to be repeated every half beat.
-
EFFECTS BPM DISPLAY: Indicates the BPM (Beats Per Minute) of the effects unit. When the beat counter is unable to count the beats, the BPM display starts flashing until the BPM counter is able to continue.
-
TIME (X) PARAMETER: for certain effects the display shows time information (mSec) for other effects the display shows percents (%) or cutoff frequencies (kHz). You can change these parameters with the preset buttons (24) and with the "time parameter knob"(33) if you need fine tuning.
-
CUE BPM / DEPTH (Y) PARAMETER DISPLAY: Displays the BPM value for the cue signals coming from one of the 4 input channels, (CH-1 to CH-4) selected using one of the CUE-buttons (39). When you adjust the depth (Y) parameter knob(32), the new value will be displayed (%).
-
EFFECTS DISPLAY: Shows which effect you selected.
29.EFFECTS INPUT DISPLAY: Shows which signal you selected using the "input select knob"(30).
- INPUT SELECT KNOB: Used to select which signal goes to the input of the effects unit. This can be one of the following:
• One of the input channels.
- One of the channels you selected with the "cross fader assign buttons"(10). This can be the left side "A" or the right side "B" of the cross fader.
- If you select master, the effects will be used on the mixed master sound.
- EFFECTS SELECTOR: Used to select the desired effect:
IMPORTANT!
The crossover effects and the multi-effects unit cannot be used together! Before you can use the multi effects, you have to switch the crossover effects off (see n°:15 for more information)
- ECHO: produces repeated sounds. You can easily mix beat synchronized echoes while selecting the desired "preset"(24). These presets can be tuned with the "Time parameter knob"(33) in a range from 2mSec up to 2Sec. With the "Level parameter knob"(32) you can change the balance between the original and the delayed sound.
- AUTO PAN: Sweeps the music from left to right and back to the rhythm of the beat. With the "presets"(24) you can choose how fast the music sweeps from one side to the other. (example: With preset "2" it will take 2beats to go from left to right and back) The presets can be tuned with the "Time parameter knob"(33) in a range from 30mSec up to 16Sec. With the "Level
ENGLISH USER MANUAL
parameter knob"(32) you can adjust how quick the music will be panned to the opposite side: you can choose for a gently pan or an aggressive one.
- FLANGER: This effect is best described as "putting a jet engine in the music". It's as if the music turns around due to phase shifting. You can easily change the flanger time (cycle) with the "presets"(24). These presets can be tuned with the "Time parameter knob"(33) in a range from 100mSec up to 16Sec. With the "Level parameter knob"(32) you can change the flanger feedback level.
Hint: Every time you push the same preset button(24) you will restart the flanger cycle. This gives a nice "extra touch" to the effect.
- MANUAL FILTER: This is a very effective digital frequency cutter. You can easily change the cutoff frequency of the filter with the "presets"(24):
o Preset "2" (LPF @ 50Hz) → All frequencies above 50Hz are
filtered. You will only hear the very deep sub bass.
o Preset "4" (LPF @ 2030Hz) → All frequencies above 2030Hz
are filtered. Sounds like an old AM radio.
o Preset "8" (LPF @ 20000Hz) → All frequencies above 20kHz
are filtered. Music sounds normal
o Preset "16" (HPF @ 210Hz) → All frequencies below 210Hz
are filtered. All the deep bass sounds are filtered, sounds like a
small FM transistor radio.
o Preset "32" (HPF @ 510Hz) → All frequencies below 510Hz
are filtered. The same as preset "16" but the FM transistor radio
seems to be a lot smaller.
The presets(24) can be tuned with the "Time parameter knob"(33) in a range from low pass filter (LPF) @ 50Hz (display shows: L 0.05kHz) up to high pass filter (HPF) @ 21.1kHz (display shows: H 21.1kHz). With the "Level parameter knob"(32) you can change the filter resonance level. (This is the Q-factor of the filter, it changes the impact of the filter on a selected frequency)
- AUTO FILTER: This is an automatic low pass filter (LPF). The cutoff frequency varies in cycles from 20kHz down to 50Hz. With the preset buttons(24) you can select filter cycles that are beat synchronized. (example: press the preset called "9" → it will take 8beats for the filter to change its cutoff frequency from 20kHz to 50Hz and back) The presets can be tuned with the "Time parameter knob"(33) in a range from 100mSec up to 16Sec. With the "Level parameter knob"(32) you can change the filter resonance level. (This is the Q-factor of the filter, it changes the impact of the filter on a selected frequency)
- REVERB: This effect is best described as the "church effect". Imagine you play music in a church or in a very big, empty hall: the reverb you get from all kinds of reflections against the walls is digitally simulated with this effect. With the preset buttons(24) you can select 5 predefined reverb times. These reverb times can be tuned with the "Time parameter knob"(33) in a range from 0% to 100% in steps of 1% . With the "Level parameter knob"(32) you can change the balance between the original and the reverb sound.
- TRANS: Automatically cuts the sound to the rhythm of the beat. With the "presets"(24) you can choose the length of the cutting cycles. (example: With preset "1/4" (remember to push the "time parameter knob"(33) while you select the preset button called "4") the music will be cut in ¼beat slices) The presets can be tuned with the "Time parameter knob"(33) in a
ENGLISH USER MANUAL
range from 25mSec up to 16Sec. With the "Level parameter knob"(32) you can adjust the "cutting time". When completely turned to the left (display reads 0%) cutting time is zero so no cutting effect will be heard. Turn the "level parameter knob to the right, the cutting time becomes bigger until you only hear very small slices of the original sound.
Hint: this effect needs some practice! You obtain the best results with constant beats, very small cutting cycles (1/4 and 1/2beats) and larger cutting times of 50% and more.
- PITCH SHIFTER: Shifts the pitch of the sound up or down while the beat stays unchanged. (in fact this is the opposite of what the "master tempo" on certain CD-players tries to obtain: same pitch with changing speed/beat) With the preset buttons(24) you can select 5 predefined pitch shifts. (preset "B" is 0%, the music stays unchanged) With the "Time parameter knob"(33) you can change the pitch in a range from -100% to +100% in steps of 1%. With the "Level parameter knob"(32) you can change the balance between the original and the shifted sound. Hint: use the pitch shifter on a micro and you have a voice changer. (with pitch at -100% you obtain voices from the "dark side of this world")
-
LEVEL (Y) PARAMETER KNOB: Used to adjust the "Y" parameter of the effects. Please read section 31 while its function is different for each effect.
-
TIME (X) PARAMETER KNOB: Used to adjust the "X" parameter of the effects. Mostly this is the time parameter but please read section 31 for more information.
This knob has an integrated push button that can be used in two ways:
- Push the knob while you select one of the "presets"(24) to obtain extra presets: 1/4beat - 1/2beat - 1/1beat.
- Push the knob while turning it: in most cases you will be able to change the time parameter of the effects more rapidly.
-
POWER SWITCH: Used to switch the mixer on and off.
-
LED VU METER: Accurate level meter with peak level memory: peak levels stay on the display for a short time. Very important: If you want a nice and clean sound, please pay attention the VU-meter. Most DJs use this important instrument as a "flashy light effect". They try to push the meter constantly to its maximum. Let's be clear: a good DJ wants a clean, undistorted sound. Levels over 0dB mean "distortion" so please keep an eye on the meter!
-
VU METER SELECTOR SWITCH: Used to select the working mode of the VU-meter(35).
- L/R-mode: the VU-meter shows the stereo master signal on both led bars. - CUE/PGM-mode: the VU-meter shows the master signal on one led bar and a selected CUE-signal(39) on the other led bar. This makes it possible to compare both signals.
-
MONO/STEREO SWITCH: Used to switch the master output in mono or stereo.
-
MASTER BALANCE: Adjusts the left-right balance of the master output.
-
CUE / BPM COUNTER SELECTOR: Used to select the source (CH-1 to CH-4) to be monitored via the headphones output. Pressing multiple Cue-buttons makes it possible to derive a mixed sound from the selected sources. The BPM of the selected channel (CH-1 to CH-4) is displayed on the CUE BPM display (27). Attention: the BPM will not be displayed correctly if 2 or more channels have been selected!
40.3-BAND TONE CONTROLS: The frequency of each channel can be controlled separately over a range from -30dB to +10dB: Treble@13kHz \~ Middle@1kHz \~ Bass@70Hz. In the center position the tone control is flat. (switched off)
ENGLISH USER MANUAL
- INPUT SOURCE SELECTOR: Used to select the correct input on each channel: Phono, line, aux or mlc. On some channels there are additional input selectors on the back, near the input connectors!
Hint: Line, Aux. CD, Tuner, etc... are different names for inputs with almost the same signal levels. 42.GAIN LEVEL: Adjusts the input level on each channel, range goes from zero to maximum. Use this control to adjust the level on the VU-meter at about 0dB.
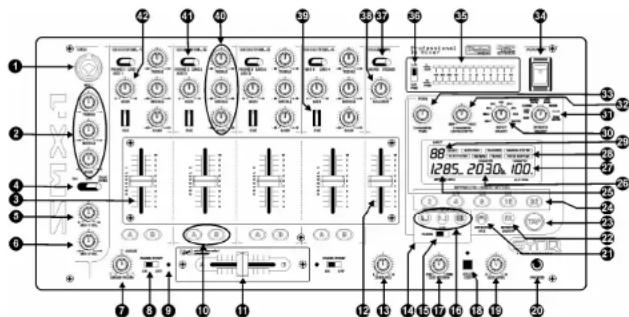
CONNECTIONS
When connecting or changing connections, always turn off the units before.
This connection diagram is just an example of what is possible. Many other connections are possible. Just keep the following remarks in mind:
• Always connect cinch cables in the same way:
white or black cinch connector → left channel
- red cinch connector → right channel
ENGLISH USER MANUAL
- When you connect a CD-player, Cassette deck, MD-player, tuner, video recorder etc. to one of the inputs, don't forget to put the source selector of that channel to "LINE" or "AUX".
- When connecting a microphone to channel 4, switch the source selector to "MIC".
- When you connect a turntable to one of the inputs, don't forget to put the source selector of that channel to "PHONO". (attention: newer turntables may have a line output, read the user manual of your turntable to be sure)
- Many Turntables have a GND-connection. It is preferable to connect this signal ground to the SMX-1. Use the GND-connections, close to the signal input connectors.
- The Record input of an analog recording device can be connected to the record output of the SMX-1 to make analog recordings.
- If you have a digital recorder, connect it to the coaxial digital output of the mixer. You can obtain outstanding digital recordings.
- To ensure the best possible sound quality, short-circuit pins are installed on all unused phone inputs. When connecting a turntable to the SMX-1, first remove the short-circuit pins of the input you want to use. Keep these short-circuit pins in a safe place for eventual later use.
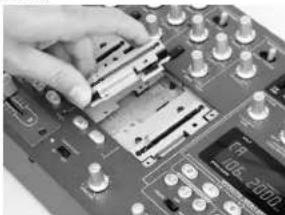
CHANGING THE FADERS
One of the big advantages of this mixer is the possibility to change the channel faders, even while the mixer is in use.
This is what you must do to change a channel fader;
- Remove the fader knobs from the faders.
- Remove the 4 screws that hold the small front panel around the faders.
- Remove the 3 screws of the fader you want to change.
• Gently remove the fader from its position. - Put the new fader gently in place. Be sure to fit the contacts into the connector on the mixer PCB-board.
- Put the 3 screws from the fader back in place
- Put the small front plate back in place with the 4 screws.
natural_image
Close-up of a hand inserting electronic components into a circuit board (no visible text or symbols)Done!
This is what you must do to change the cross fader:
- Remove the fader knob from the cross fader
- Remove the 2 screws that keep the cross fader in place.
• Gently remove the fader and the cover plate from their position. - Unplug the cross fader from the cable (unplug the cable by pulling the connector, NOT the cable!)
- Press the new cross fader on the cable.
- Put the cross fader back in place with the small cover plate and the 2 screws.
Done!
ENGLISH USER MANUAL
SPECIFICATIONS
Input/output impedance & sensitivity (EQ flat, max. gain, level meter = 0dB)
| Line Input: 340mV @ 20kΩ (max = +4dBV) | |||
| Aux Input: 340mV @ 47kΩ (max = +4dBV) | |||
| Phono Input: | 3,4mV | @ 47kΩ | (max = -40dBV) |
| Mic inputs: | 1,7mV | @ 2,2kΩ | (max = -42dBV) |
| Record output: | 775mV @ 1kΩ | ||
| Master unbalanced: | 1,55V | @ 100Ω | |
| Master balanced: | 3,00V | @ 200Ω | |
| Zone output: | 1,55V | @ 100Ω | |
| Headphones: | 3,00V | @ 33Ω | |
| Digital output | 1,00V | @ 75Ω | |
Maximum output (EQ flat, max. gain, FX off, THD=1%, load is 100kΩ)
| Master: | More than +18dBV (8,0V) |
| Zone: | More than +18dBV (8,0V) |
| Phones: | More than + 9,5dBV (3V) @ 32Ω |
Frequency response (EQ flat, max. gain, level meter = 0dB, load is 100kΩ)
| Line + aux: | 25 - 20.000Hz | +/-1dB |
| Phono: | 25 - 20.000Hz | +1/-1.5dB (RIAA) |
| Mlc : | 25 - 20.000Hz | +1/-1.5dB |
THD + Noise (EQ flat, max. gain, level meter = 0dB, load is 100kΩ)
| Line + aux: | less than 0,05% | (25 - 20.000Hz) |
Channel Crosstalk (EQ flat, max. gain, Master = 0dBV)
| More than 75dB @ 1kHz |
Tone controls:
| Mic: | -12dB / +12dB | @ 70Hz - 1kHz - 13kHz. |
| Input channels: | -30dB / +10dB | @ 70Hz - 1kHz - 13kHz. |
General specs:
| Power supply: | 230V~50Hz. |
| Power consumption: | 34Watts |
| Dimensions: | 482 x 221 x 87.5mm (WxDxH) |
| Weight : | 5.25kg. |
Every information is subject to change without prior notice
You can download the latest version of the firmware / this user manual on our website:
www.synq-audio.com
FRANCAIS
MODE D'EMPLOI
MODE D'EMPLOI
INTRODUCTION
natural_image
Close-up of a hand placing a component onto a circuit board (no visible text or symbols)| Line Input: 340mV @ 20kΩ (max = +4dBV) | |||
| Aux Input: 340mV @ 47kΩ (max = +4dBV) | |||
| Phono Input: | 3,4mV | @ 47kΩ | (max = -40dBV) |
| Mic Inputs: | 1,7mV | @ 2,2kΩ | (max = -42dBV) |
| Record output: | 775mV @ 1kΩ | ||
| Master unbalanced: | 1,55V | @ 100Ω | |
| Master balanced: | 3,00V | @ 200Ω | |
| Zone output: | 1,55V | @ 100Ω | |
| Casques: | 3,00V | @ 33Ω | |
| Digital output | 1,00V | @ 75Ω | |
Sortie maximum (EQ flat, max. gain, FX off, THD=1%, load is 100kΩ)
| Master: | Plus de +18dBV (8,0V) |
| Zone: | Plus de +18dBV (8,0V) |
| Casques: | Plus de + 9,5dBV (3V) @ 32Ω |
Réponse en fréquence (EQ flat, max. gain, level meter = 0dB, load is 100kΩ)
| Line + aux: | 25 - 20.000Hz | +/-1dB |
| Phono: | 25 - 20.000Hz | +1/-1.5dB (RIAA) |
| Mic : | 25 - 20.000Hz | +1/-1.5dB |
THD + Bruit (EQ flat, max. gain, level meter = 0dB, load is 100kΩ)
| Line + aux: | moins de 0,05% | (25 - 20.000Hz) |
Crosstalk Canal (EQ flat, max. gain, Master = 0dBV)
| Plus de 75dB @ 1kHz |
natural_image
Close-up of a hand inserting a component into a computer motherboard (no visible text or symbols)Aux Inging. 540mV @ 47KΩ (max = +4dBV)
Phono ingang: 3.4mV @ 47kΩ (max = -40dBV)
Mic Ingang: 1.7mV @ 2.2kΩ (max = -42dBV)
Record uItgang: 775mV @ 1kΩ
Master asymmetrisch: 1.55V @ 1000
Master asymmetrisch. 1,55V @ 100Ω
Master symmetrisch: 3,00V @ 200Ω
Zone: More than -18dBV (9.0V)
Zone. More than +18dBV (6,0V)
Phones: More than + 9,5dBV (3V) @ 32Ω
Frequentie bereik (EQ op 0, max. gain, level meter = 0dB, belasting = 100kΩ)
Line + aux: 25 - 20.000Hz +/-1dB
Phone: 25 20 000Hz -1/1 EdR (PIAA)
Phone: 25-20.000Hz +17-1.5dB (RIAA)
Mic : 25 - 20.000Hz +1/-1.5dB
THD + Ruis (EQ = 0, max. gain, level meter = 0dB, belasting = 100kΩ)
Line + aux: minder dan 0.05% (25 - 20.000Hz)
Kanaal overspraak (EQ = 0, max. gain, Master = 0dBV)
Meer dan 75dB @ 1kHz
Toonregelingen:
Mic: -12dB / +12dB @ 70Hz - 1kHz - 13kHz.
Ingangskanalen: -30dB / +10dB @ 70Hz – 1kHz – 13kHz
ingangshanalem 000D / 1100B Q TONE THIE TORRE
Algemene specificaties:
Voeding: 230V\~50Hz.
Verbruik: 34Watts
Afmetingen: 482 x 221 x 87.5mm (WxDyH)
Annetingen. 462 x 221 x 87.5mm (WxDxH)
Gewicht: 5.25kg.
natural_image
Close-up of a hand inserting electronic components into a circuit board (no visible text or symbols)natural_image
Close-up of a hand pressing into a circuit board with electronic components (no visible text or symbols)Maximo de Salida (EQ flat, max. gain, FX off, THD=1%, load is 100kΩ)
| Master: | Plus de +18dBV (8,0V) |
| Zone: | Plus de +18dBV (8,0V) |
| Cascos: | Plus de + 9,5dBV (3V) @ 32Ω |
THD + Ruido (EQ flat, max. gain, level meter = 0dB, load is 100kΩ)
| Line + aux: | menos de 0,05% | (25 - 20.000Hz) |
Crosstalk Canal (EQ flat, max. gain, Master = 0dBV)
| Mas de 75dB @ 1kHz |
- Autopan
c. Flanger - Manual filter
o. Auto filter
c. Beverb - Trans
c. Trans c. Pitch Shifter
natural_image
Close-up of a hand inserting a component into a computer motherboard (no visible text or symbols)Channel Crosstalk (EQ flat, max. gain, Master = 0dBV)
Mais de 75dB @ 1kHz