
ProLite E2200WS - Monitor IIYAMA - Free user manual and instructions
Find the device manual for free ProLite E2200WS IIYAMA in PDF.
| Product Type | 22-inch (55.9 cm) TFT Color LCD Monitor |
| Brand | Iiyama |
| Model | ProLite E2200WS |
| Panel Type | a-Si TFT Active Matrix |
| Maximum Resolution | 1680 × 1050 (1.8 Megapixel) |
| Brightness | 300 cd/m² (typical) |
| Contrast Ratio | 1000:1 (typical) |
| Response Time | 5 ms (black, white, black) |
| Viewing Angles (horizontal/vertical) | 85°/85° (left/right), 85° (up), 75° (down) |
| Display Colors | 16.7 million (6-bit + 2-bit FRC) |
| Synchronization Frequencies | Horizontal: 31-83 kHz, Vertical: 56-75 Hz |
| Input Connectors | D-Sub 15-pin, DVI-D 24-pin (E2200WS), 3.5mm audio (stereo) |
| Speakers | 2 × 1 W (stereo) |
| Power Supply | 100-240 V AC, 50/60 Hz, 1.3 A; max power consumption 60 W, standby < 2 W |
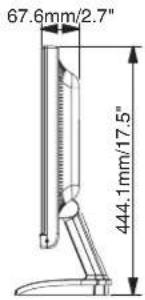
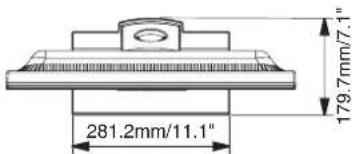
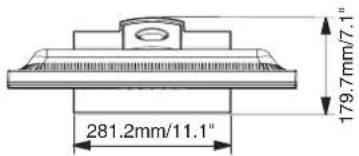
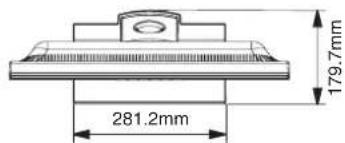
| Dimensions (W × H × D) | 517.1 × 444.1 × 179.7 mm |
| Net Weight | 5.8 kg |
| Tilt Angle | Forward: 5°, Backward: 20° |
| Standards and Certifications | TCO '03, CE, TÜV-GS/MPR III, FCC-B, UL/C-UL, VCCI-B, GOST-R |
| Wall Mount Compatibility | VESA 100 × 100 mm |
| Power Saving Features | ENERGY STAR, VESA DPMS |
| Screen Care | Soft dry cloth; do not use abrasive products or solvents |
| Housing Care | Slightly damp cloth with mild detergent, then wipe with a dry cloth |
| Safety | Do not open the housing, avoid water, use specified voltage, unplug before cleaning |
| Included Accessories | Power cable, D-Sub cable, audio cable, stand, user manual |
Frequently Asked Questions - ProLite E2200WS IIYAMA
User questions about ProLite E2200WS IIYAMA
0 question about this device. Answer the ones you know or ask your own.
Ask a new question about this device
Download the instructions for your Monitor in PDF format for free! Find your manual ProLite E2200WS - IIYAMA and take your electronic device back in hand. On this page are published all the documents necessary for the use of your device. ProLite E2200WS by IIYAMA.
USER MANUAL ProLite E2200WS IIYAMA
natural_image
Color palette bar with grayscale shades and a crosshair for selection (no text or symbols)iiyama Visual&Technology
USER MANUAL
ProLite
LCD Monitor
TCODevelopment
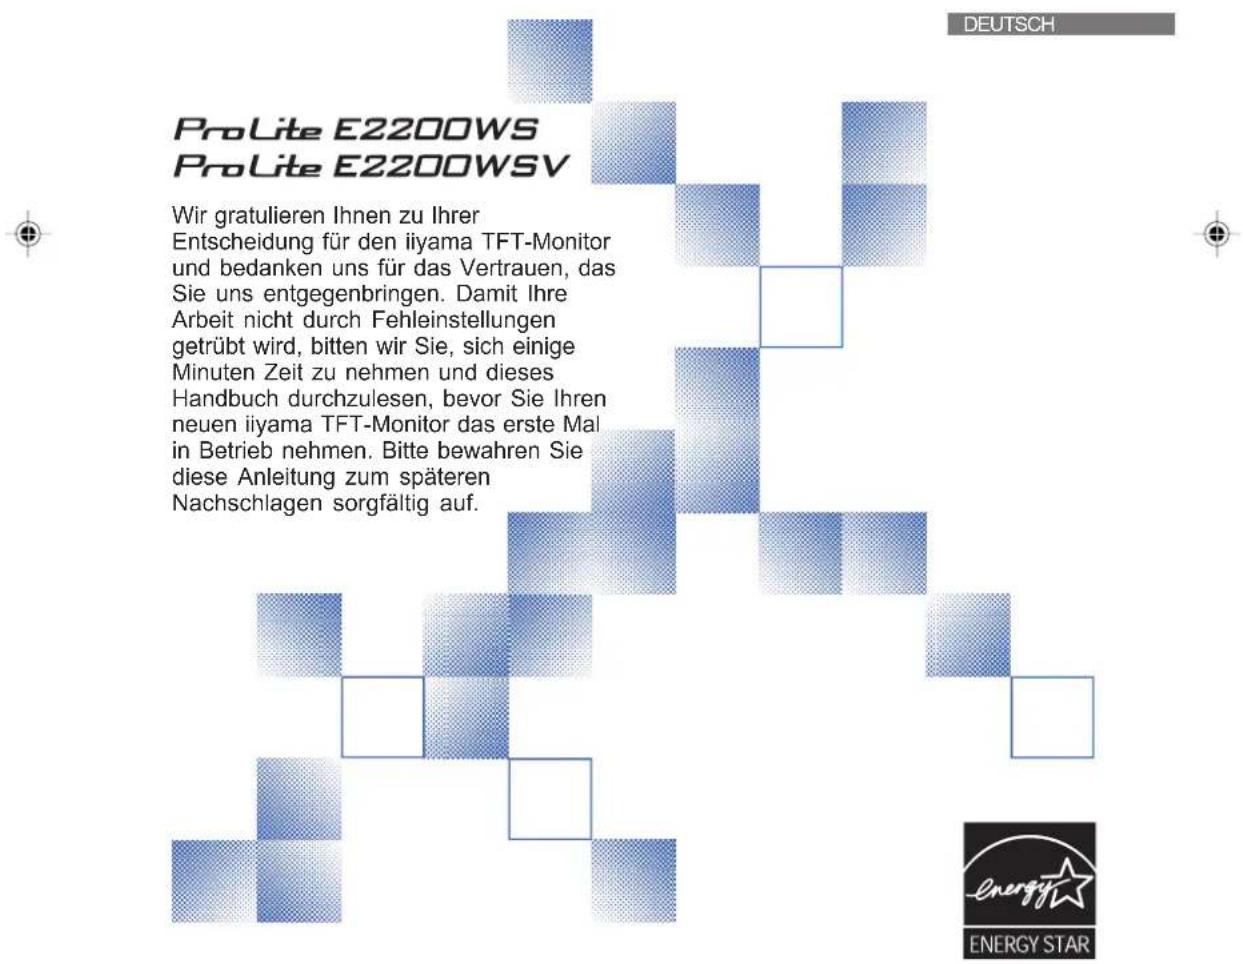
Congratulations!

The display you have just purchased carries the TCO'03 Displays label. This means that your display is designed, manufactured and tested according to some of the strictest quality and environmental requirements in the world. This makes for a high performance product, designed with the user in focus that also minimizes the impact on our natural environment.
Some of the features of the TCO'03 Display requirements:
Ergonomics
- Good visual ergonomics and image quality in order to improve the working environment for the user and to reduce sight and strain problems. Important parameters are luminance, contrast, resolution, reflectance, colour rendition and image stability.
Energy
- Energy-saving mode after a certain time – beneficial both for the user and the environment
- Electrical safety
Emissions
• Electromagnetic fields
- Noise emissions
Ecology
- The product must be prepared for recycling and the manufacturer must have a certified environmental management system such as EMAS or ISO 14 001
- Restrictions on o chlorinated and brominated flame retardants and polymers o heavy metals such as cadmium, mercury and lead.
The requirements included in this label have been developed by TCO Development in cooperation with scientists, experts, users as well as manufacturers all over the world. Since the end of the 1980s TCO has been involved in influencing the development of IT equipment in a more user-friendly direction. Our labelling system started with displays in 1992 and is now requested by users and IT-manufacturers all over the world.
For more information, please visit
www.tcodevelopment.com
FCC DECLARATION OF CONFORMITY
Model Number:
PL2200
Trade Name: iiyama
Responsible party: Ampronix Inc.
Address: 8697 Research Dr. Irvine, CA.92618 U.S.A.
Telephone number: 949-788-9930
This device complies with Part 15 of the FCC Rules. Operation is subject to the following two conditions: (1) This device may not cause harmful interference, and (2) this device must accept any interference received, including interference that may cause undesired operation.
This device has been tested and found to comply with the limits for Class B Personal Computers and peripherals, pursuant to Part 15 of the FCC Rules. These limits are designed to provide reasonable protection against harmful interference when the device is operated in a residential environment. This device generates, uses and can radiate radio frequency energy, and if not installed and used in accordance with the instructions, may cause harmful interference to radio communications. However, there is no guarantee that interference will not occur in a particular installation. If you determine the device does cause harmful interference to radio or television reception (this may be determined by monitoring the interference while turning the device off and on), you are encouraged to try to correct the interference by one of the following measures:
■ Reorient or relocate the receiving antenna.
■ Increase the separation between the device and receiver.
■ Connect the device into an outlet on a circuit different from that to which the receiver is connected.
■ Consult the dealer or an experienced radio or TV technician for help.
To meet the FCC requirements, you should use a signal cable with ferrite core at both ends.
CAUTION
Changes or modifications not expressly approved by IIYAMA could void the users authority to operate the device under FCC compliance regulations.
CANADIAN DEPARTMENT OF COMMUNICATIONS COMPLIANCE STATEMENT
This digital apparatus does not exceed the Class B limits for radio noise emissions from digital apparatus as set out in the radio interference regulation of the Canadian department of communications.
CE MARKING DECLARATION OF CONFORMITY
This LCD monitor complies with the requirements of the EC Directive 89/336/EEC "EMC Directive" and 73/23/EEC "Low Voltage Directive" as amended by Directive 93/68/EEC.
The electro-magnetic susceptibility has been chosen at a level that gives correct operation in residential areas, business and light industrial premises and small-scale enterprises, inside as well as outside of the buildings. All places of operation are characterised by their connection to the public low voltage power supply system.
■ We reserve the right to change specifications without notice.
■ All trademarks used in this user manual are the property of their respective owners.
As an ENERGY STAR®Partner, iiyama has determined that this product meets the ENERGY STAR®guidelines for energy efficiency.


TABLE OF CONTENTS
FOR YOUR SAFETY 1
SAFETY PRECAUTIONS 1
SPECIAL NOTES ON LCD MONITORS 3
CUSTOMER SERVICE 3
CLEANING 3
ADJUSTMENT MENU CONTENTS....10
SCREEN ADJUSTMENTS.... 14
POWER MANAGEMENT FEATURE 17
TROUBLE SHOOTING 18
RECYCLING INFORMATION 19
APPENDIX 20
SPECIFICATIONS 20
DIMENSIONS 22
COMPLIANT TIMING 22
CONNECTOR PIN ASSIGNMENT 23


FOR YOUR SAFETY
SAFETY PRECAUTIONS
WARNING
STOP OPERATING THE MONITOR WHEN YOU SENSE TROUBLE
If you notice any abnormal phenomena such as smoke, strange sounds or fumes, unplug the monitor and contact your dealer or iiyama service center immediately. Further use may be dangerous and can cause fire or electric shock.
NEVER REMOVE THE CABINET
High voltage circuits are inside the monitor. Removing the cabinet may expose you to the danger of fire or electric shock.
DO NOT PUT ANY OBJECT INTO THE MONITOR
Do not put any solid objects or liquids such as water into the monitor. In case of an accident, unplug your monitor immediately and contact your dealer or iiyama service center. Using the monitor with any object inside may cause fire, electric shock or damage.
INSTALL THE MONITOR ON A FLAT, STABLE SURFACE
The monitor may cause an injury if it falls or is dropped.
DO NOT USE THE MONITOR NEAR WATER
Do not use where water may be splashed or spilt onto the monitor as it may cause fire or electric shock.
OPERATE UNDER THE SPECIFIED POWER SUPPLY
Be sure to operate the monitor only with the specified power supply. Use of an incorrect voltage will cause malfunction and may cause fire or electric shock.
PROTECT THE CABLES
Do not pull or bend the power cable and signal cable. Do not place the monitor or any other heavy objects on the cables. If damaged, the cables may cause fire or electric shock.
ADVERSE WEATHER CONDITIONS
It is advisable not to operate the monitor during a heavy thunder storm as the continual breaks in power may cause malfunction. It is also advised not to touch the plug in these circumstances as it may cause electric shock.
CAUTION
INSTALLATION LOCATION
Do not install the monitor where sudden temperature changes may occur, or in humid, dusty or smoky areas as it may cause fire, electric shock or damage. You should also avoid areas where the sun shines directly on the monitor.
DO NOT PLACE THE MONITOR IN A HAZARDOUS POSITION
The monitor may topple and cause injury if not suitably located. Please also ensure that you do not place any heavy objects on the monitor, and that all cables are routed such that children may not pull the cables and possibly cause injury.
MAINTAIN GOOD VENTILATION
Ventilation slots are provided to keep the monitor from overheating. Covering the slots may cause fire. To allow adequate air circulation, place the monitor at least 10 cm (or 4 inches) from any walls. Do not remove the tilt stand when operating the monitor. Ventilation slots on the back of the cabinet will be blocked and the monitor may overheat if the stand is removed. This may cause fire or damage. Operating the monitor on its back, side, upside down or on a carpet or any other soft material may also cause damage.
DISCONNECT THE CABLES WHEN YOU MOVE THE MONITOR
When you move the monitor, turn off the power switch, unplug the monitor and be sure the signal cable is disconnected. If you do not disconnect them, it may cause fire or electric shock.
UNPLUG THE MONITOR
If the monitor is not in use for a long period of time it is recommended that it is left unplugged to avoid accidents.
HOLD THE PLUG WHEN DISCONNECTING
To disconnect the power cable or signal cable, always pull it by the plug. Never pull on the cable itself as this may cause fire or electric shock.
DO NOT TOUCH THE PLUG WITH WET HANDS
Pulling or inserting the plug with wet hands may cause electric shock.
WHEN YOU INSTALL THE MONITOR ON YOUR COMPUTER
Be sure the computer is strong enough to hold the weight of the monitor, otherwise, you may damage your computer.
DO NOT PUT FLOPPY DISKS NEAR THE SPEAKERS
Magnetically recorded data, such as on a floppy disk, may become corrupted by the magnetic field produced by the speakers if the disks are placed on or near the speakers.
OTHERS
ERGONOMIC RECOMMENDATIONS
To eliminate eye fatigue, do not operate the monitor against a bright background or in a dark room. For optimal viewing comfort, the monitor should be just below eye level and 40-60 cm (16-24 inches) away from your eyes. When using the monitor over a prolonged time, a ten minute break every hour is recommended as looking at the screen continuously can cause eye strain.
SPECIAL NOTES ON LCD MONITORS
The following symptoms are normal with LCD monitors and do not indicate a problem.
NOTE
■ When you first turn on the LCD monitor, the picture may not fit in the display area because of the type of computer that is used. In this case, adjust the picture position to the correct position.
■ Due to the nature of the backlight, the screen may flicker during initial use. Turn off the Power Switch and then turn it on again to make sure the flicker disappears.
■ You may find slightly uneven brightness on the screen depending on the desktop pattern you use.
Due to the nature of the LCD screen, an afterimage of the previous screen may remain after switching the image, when the same image is displayed for hours. In this case, the screen is recovered slowly by changing the image or turning off the Power Switch for hours.
■ Contact your dealer or iiyama service center for the backlight replacement when the screen is dark, flickering or not lighting up. Never attempt to replace it by yourself.
CUSTOMER SERVICE
NOTE
■ The fluorescent light used in the LCD monitor may have to be periodically replaced. For the warranty coverage on this component, please check with local iiyama service center.
If you have to return your unit for service and the original packaging has been discarded, please contact your dealer or iiyama service center for advice or replacement packaging.
CLEANING
WARNING
■ If you drop any materials or liquids such as water into the monitor when cleaning, unplug the power cable immediately and contact your dealer or iiyama service center.
■ For safety reasons, turn off the power switch and unplug the monitor before you clean it.
■ To protect the LCD panel, do not scratch or rub the screen with a hard object.
■ Never use any of the following strong solvents. These will damage the cabinet and the LCD screen.
CAUTION
NOTE
Thinner Spray-type cleaner
Benzine Wax
Abrasive cleaner Acid or Alkaline solvent
■ Touching the cabinet with any product made from rubber or plastic for a long time may cause degeneration or loss of paint on the cabinet.
CABINET
Stains can be removed with a cloth lightly moistened with a mild detergent solvent. Then wipe the cabinet with a soft dry cloth.
LCD
Periodic cleaning with a soft dry cloth is recommended.
SCREEN
Don't use tissue paper etc. because these will damage the LCD screen.
FOR YOUR SAFETY


◆ 55.9cm (22.0") TFT Color LCD Monitor
◆ Supports Resolutions up to 1680 × 1050
High Contrast 1000:1 / High Brightness 300cd/m/ Quick Response Time 5ms
Digital Character Smoothing
Automatic Set-up
◆ Stereo Speakers
2 × 1W Stereo Speakers
Plug & Play VESA DDC2B Compliant Windows® 95/98/2000/Me/XP Compliant
Power Management (ENERGY STAR® VESA DPMS Compliant)
Ergonomic Design: TCO '03 and MPR III Approved
Digital Input (DVI-D) for Clear Display : ProLite E2200WS
◆ VESA Mounting Standard (100mm×100mm) Compliant
CHEKING THE CONTENTS OF THE PACKAGE
The following accessories are included in your package. Check to see if they are enclosed with the monitor. If anything is missing or damaged, please contact your local iiyama dealer or regional iiyama office.
■ Power Cable*
■ D-Sub Signal Cable
■Audio Cable
■ Stand ■ User Manual
CAUTION
* The rating of the Power Cable enclosed in 120V area is 10A/125V. If you are using a power supply higher than this rating, then a power cable with a rating of 10A/250V must be used. However, all guarantees and warranties are void for any problems or damage caused by a power cable not supplied by iiyama.


HOW TO USE THE STAND
The monitor is shipped with the stand detached. Be sure to attach the stand before operating the display and remove if it is necessary to re-box.
CAUTION
■ Install the Stand on a stable surface. The monitor may cause injury or damage if it falls or is dropped.
■ Do not give a strong impact to the monitor. It may cause damage.
■ Unplug the monitor before installation to avoid electric shock or damage.
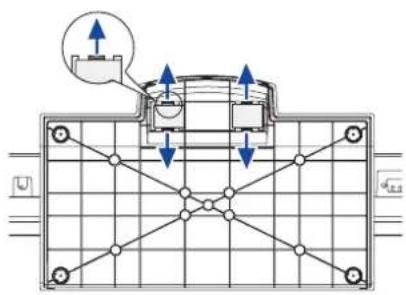
- Put a piece of soft cloth on the table beforehand to prevent the monitor from being scratched. Lay the monitor flat on a table with front face down.
- The Stand-Bottom is pulled up as shown in the figure.
- Install the Stand-Base to the Stand-Bottom.
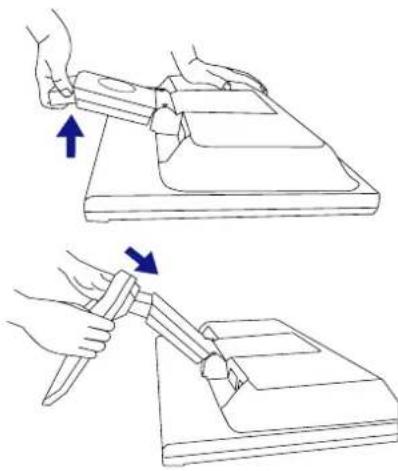

- Put a piece of soft cloth on the table beforehand to prevent the monitor from being scratched. Lay the monitor flat on a table with front face down.
- Hold down the hooks outside and pull the Stand-Base away from the Stand-Bottom.


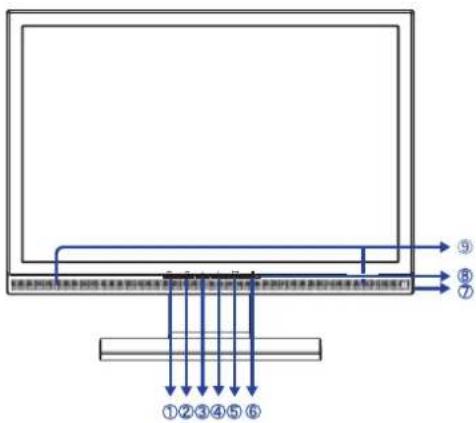
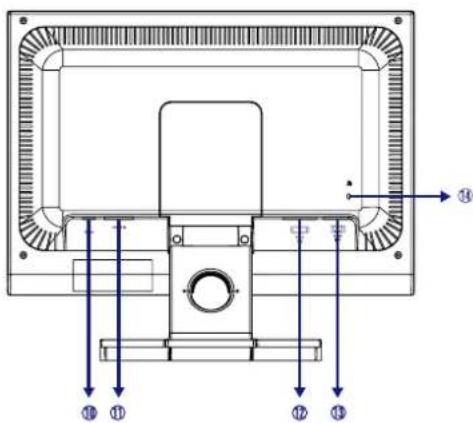
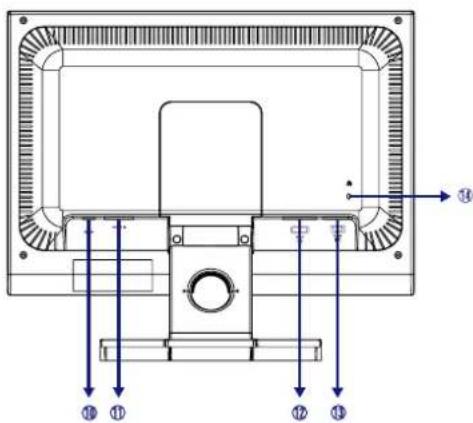
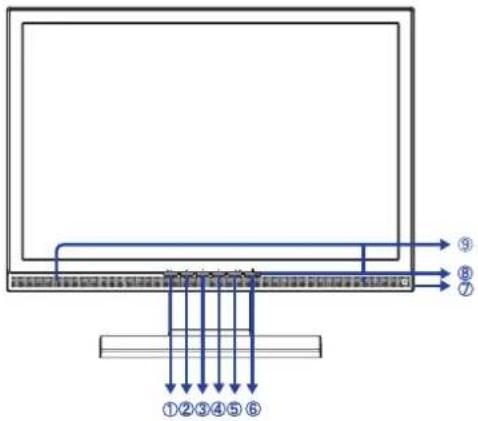
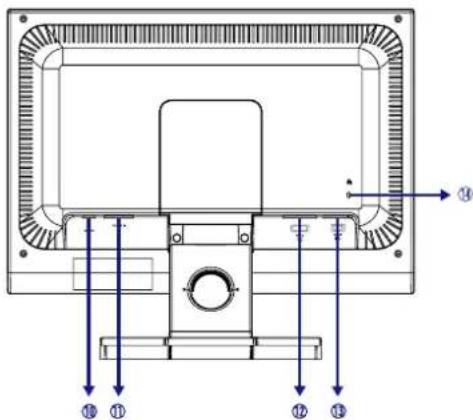
CONTROLS AND CONNECTORS
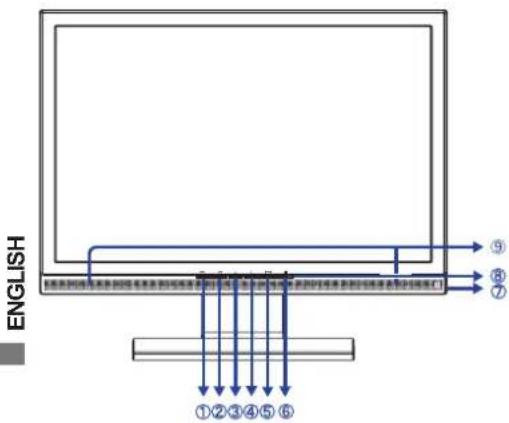
① Auto Button (AUTO)
② Exit / Volume Button (EXIT)
③ Scroll Down / Contrast Button (◀)
④ Scroll Up / Brightness Button (▶)
⑤ Menu / Select Button (ENTER)
⑥ Power Switch (⏻)
⑦ Headphone Connector
⑧ Power Indicator
NOTE Green: Normal operation
Orange: Power Management
The monitor enters into power management mode which reduces the power consumption to less than 2W when receiving no horizontal and/or vertical sync signal.
⑨ Speakers
⑩ Audio Connector (LINE IN)
⑪ AC Connector (POWER IN)
⑫ DVI-D 24pin Connector (DVI) *
⑬ D-SUB mini 15pin Connector (D-SUB)
⑭ Keyhole for Security Lock
NOTE You can fasten a security lock and cable to prevent the monitor from being removed without your permission.
* Available for ProLite E2200WS only.
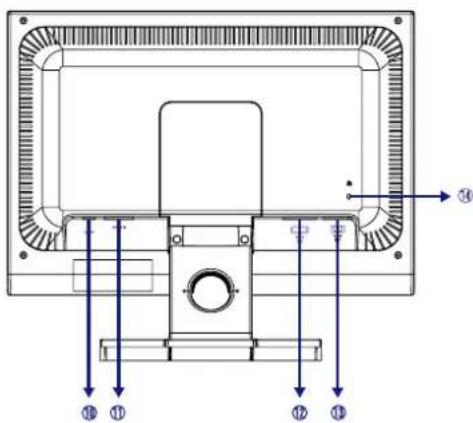
① Ensure that both the computer and the monitor are switched off.
② Connect the computer to the monitor with the signal cable.(See page 23 for CONNECTOR PIN ASSIGNMENT.)
③ Connect the monitor to the audio equipment with the Audio Cable for computer when using the audio features.
④ Connect the Power Cable to the monitor first and then to the power supply.
NOTE
■ The signal cables used for connecting the computer and monitor may vary with the type of computer used. An incorrect connection may cause serious damage to both the monitor and the computer. The cable supplied with the monitor is for a standard 15 pin D-Sub connector. If a special cable is required please contact your local iiyama dealer or regional iiyama office.
■ For connection to Macintosh computers, contact your local iiyama dealer or regional iiyama office for a suitable adaptor.
■ Make sure you tighten the finger screws at each end of the signal cable.
[Example of Connection]
* Available for ProLite E2200WS only.


COMPUTER SETTING
■ Signal Timing
Change to the desired signal timing listed on page 21: COMPLIANT TIMING.
Windows 95/98/2000/Me/XP Plug & Play
The iiyama LCD monitor complies with DDC2B of VESA standard. The Plug & Play function runs on Windows 95/98/2000/Me/XP by connecting the monitor to DDC2B compliant computer with the Signal Cable supplied.
For installation on Windows 95/98/2000/Me/XP: The monitor Information File for iiyama monitors may be necessary for your computer and obtained via the Internet, using the address:
http://www.iiyama.com
NOTE
■ For additional information on how to download the driver for your touch screen monitor, please access the internet site noted above.
■ Monitor Drivers are not required in most cases for Macintosh or Unix operating systems. For further information, please contact your computer dealer first for advice.
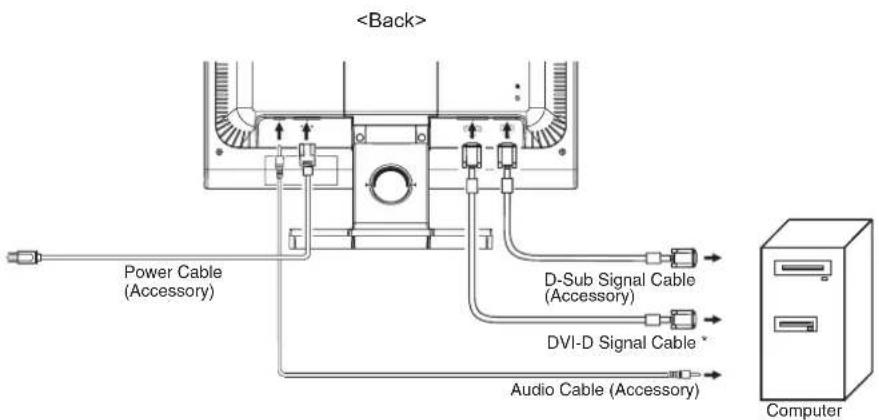
ADJUSTING THE VIEWING ANGLE
■ For optimal viewing it is recommended to look at the full face of the monitor.
- Hold the stand so that the monitor does not topple when you change the monitor's angle.
■ You are able to adjust the monitor's angle up to 5 degrees forward, 20 degrees backward.
In order to ensure a healthy and relaxed body position when using the monitor at visual display workstations, it is recommended that the adjusted tilt angle should not exceed 10 degrees. Adjust the monitor's angle to your own preference.
NOTE
■ Do not touch the LCD screen when you change the angle. It may cause damage or break the LCD screen.
■ Careful attention is required not to catch your fingers or hands when you change the angle.
■ Do not tilt the post beyond 20 degrees except when repacking the monitor in its box.
To do so may cause the monitor to fall over and break.

natural_image
Line drawing of a mechanical device with a pointer and lever mechanism (no text or symbols)


To create the best picture, your iiyama LCD monitor has been preset at the factory with the COMPLIANT TIMING shown on page 21. You are also able to adjust the picture by following the button operation shown below. For more detailed adjustments, see page 14 for SCREEN ADJUSTMENTS.
① Press the ENTER Button to start the On Screen Display feature. There are additional Menu items which can be switched by using the ◀/▶ Buttons.

② Select the Menu item which contains the adjustment icon relating to the adjustment you want to make. Press the ENTER Button. Then, use the ◀/▶ Buttons to highlight the desired adjustment icon.
③ Press the ENTER Button again. Use the ◀ / ▶ Buttons to make the appropriate adjustment or setting.
④ Press the EXIT Button to leave the menu, and the settings you just made would be automatically saved.
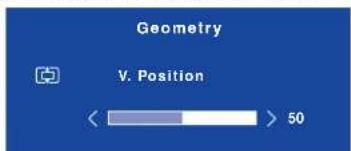
For example, to correct for vertical position, select Menu item of Geometry and then press the ENTER Button. Then, select (V.Position) by using the ▶/▶ Buttons.

An adjustment page appears after you press the ENTER Button. Then, use the ◀/▶ Buttons to change the vertical position settings. The vertical position of the overall display should be changing accordingly while you are doing this.
Press the EXIT Button lastly, it ends, any changes are saved in the memory.
NOTE
■ When button operations are aborted during adjustment, On-Screen Display disappears when the time set for the OSD Time has passed. Also, press the EXIT button to quickly turn off the On-Screen Display.
■ Any changes are automatically saved in the memory when the On Screen Display disappears. Turning off the power should be avoided while using the Menu.
■ Adjustments for H. / V. Position, Pixel Clock and Phase are saved for each signal timing. Except for these adjustments, all other adjustments have only one setting which applies to all signal timings.
| Auto Adjust Only Analog Input | ||
| Adjustment Item Problem / Option Button to Press | ||
| Auto Adjust * Direct | Adjust H. / V. Position, Pixel Clock and Phase automatically. | |
* For best results, use the Auto Adjust in conjunction with the adjustment pattern. See page 14 for SCREENADJUSTMENTS.
Direct
You can skip the Menu items and display an adjustment scale directly by using the following button operations.
● Auto Adjust: Press the Auto Button when the Menu is not displayed.
| Luminance | |||
| Adjustment Item Problem / Option Button to Press | |||
| Brightness * Direct | Too darkToo bright | ||
| Contrast Direct | Too dullToo intense | ||
* Adjust the Brightness when you are using the monitor in a dark room and feel the screen is too bright.
Direct
You can skip the Menu items and display an adjustment scale directly by using the following button operations.
- Contrast: Press the ◀ Button when the Menu is not displayed.
- Brightness: Press the ▶ Button when the Menu is not displayed.


| Geometry Only Analog Input | |
| Adjustment Item Problem / Option | Button to Press |
| H. Position | Too leftToo right |
| V. Position | Too lowToo high |
| Pixel Clock | Too narrowToo wide |
| Phase | To correct flickering text or lines |
| Adjustment Item Problem / Option | Button to Press | |
| H. Position | Too leftToo right | |
| V. Position | Too lowToo high | |
| Pixel Clock | Too narrowToo wide | |
| Phase | To correct flickering text or lines | |
ENGLISH
| Color | ||
| Adjustment Item Problem / Option Button to Press | ||
| 9300K | Bluish white | |
| 7500K Yellowish white | ||
| 6500K Reddish white | ||
| User Preset | Red | Too weakToo strong |
| Green | ||
| Blue | ||
| OSD | ||
| Adjustment Item Problem / Option Button to Press | ||
| H.Position | OSD is too leftOSD is too right | |
| V.Position | OSD is too lowOSD is too high | |
| OSD Time | You can set the OSD display duration time between 5 and 30 seconds. | |


| 37 Language | ||||
| Adjustment Item Problem | Option | Button to Press | ||
| Language | English | English | Español Spanish | |
| Français French | Nederlands Dutch | |||
| Deutsch | German | 日本語 | Japanese | |
| Italiano Italian | 简体中文 | Simplified Chinese | ||
| Recall | ||
| Adjustment Item Problem | Option | Button to Press |
| Recall All | Yes | Factory-preset data is restored. |
| No | Return to Menu. | |
| Miscellaneous | ||
| Adjustment Item Problem | Option | Button to Press |
| Sharpness | 1 2 3 4 5You can change the picture quality from 1 to 5 (sharp to soft).Press the ▶Button to change the picture quality in numerical order. Press the ◀Button to change the picture quality in reverse numerical order. | |
| DDC DDC/CI | On | DDC/CI is turned ON. |
| Off | DDC/CI is turned OFF. | |
| NOTE DDC/CI On and Off are switched as follows by pressing the ▶Button successively.→On→Off→ | ||
| i+ Display Information | Displays information regarding the current input signal coming from the graphic card in your computer.MiscellaneousDisplay Information1800x1050 @ 60 HzNOTE See your graphic card user guide for more information about changing the resolution and refresh. | |


| 12 Input Select Available for ProLite E2200WS only. | ||
| Adjustment Item Problem / Option Button to Press | ||
| 12 Input Select | D-sub | Select the Analog input. |
| DVI | Select the Digital input. | |
| NOTE When only one of the two signal inputs is connected to the signal source, the one connected is automatically selected. Input Select function is not available if there is no signal input from the selected connector or during the power management mode. | ||
| Audio | ||
| Adjustment Item Problem / Option Button to Press | ||
| Volume Direct | Too softToo loud | |
| Mute | On | Turn off the sound temporarily. |
| Off | Return the sound volume to the previous level. | |
| NOTE ▪ Mute On and Off are switched as follows by pressing the ▶ Button successively.→ On → Off —■ 📄 is displayed of AUDIO in the Main Menu while Mute is active.■ 🔺 is displayed of AUDIO in the Main Menu while Mute is not active. | ||
Direct
You can skip the Menu items and display an adjustment scale directly by using the following button operations.
● Volume: Press the Exit Button when the Menu is not displayed.
SCREEN ADJUSTMENTS
Adjust the image by following the procedure below to get the desired picture when selecting Analog input.
■ The screen adjustments described in this manual are designed to set image position and minimize flicker or blur for the particular computer in use.
■ The monitor is designed to provide the best performance at resolution of 1680 × 1050 , but can not provide the best at resolutions of less than 1680 × 1050 because the picture is automatically stretched to fit the full screen. It is recommended to operate at resolution of 1680 × 1050 in normal use.
■ Displayed text or lines will be blurred or irregular in thickness when the picture is stretched due to the screen enlargement process.
It is preferable to adjust the image position and frequency with the monitor controls, rather than the computer software or utilities.
■ Perform adjustments after a warm-up period of at least thirty minutes.
■ Additional adjustments may be required after the Auto Adjust depending on the resolution or signal timing.
■ The Auto Adjust may not work correctly when displaying the picture other than the screen adjustment pattern. In this case, manual adjustments are required.
There are two ways to adjust the screen. One way is automatic adjustment for Position, Pixel Clock and Phase. The other way is performing each adjustment manually.
Perform the Auto Adjust first when the monitor is connected to a new computer, or resolution is changed. If the screen has a flicker or blur, or the picture does not fit in the display area after performing the Auto Adjust, manual adjustments are required. Both adjustments should be made by using the screen adjustment pattern (Test.bmp) obtained via the IIYAMA web site (http://www.iiyama.com).
Adjust the image by following the procedure below to get the desired picture. This manual explains adjustment under Windows 95/98/2000/Me/XP.
① Display the picture at the optimum resolution.
② Enter the Test.bmp (screen adjustment pattern) to wallpaper.
NOTE
■ Consult the appropriate documentation for doing this.
■ Test.bmp is made at resolution of 1280 × 1024. Set the display position to center in the wallpaper setting dialogue box. If you use Microsoft® PLUS! 95/98 cancel the setting of "Stretch desktop wallpaper to fit the screen".
[Adjustment pattern]
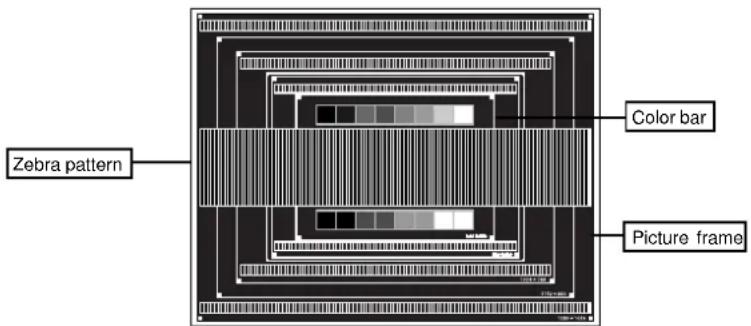
③ Press the Auto Button. (Auto Adjust)
④ Adjust the image manually by following procedure below when the screen has a flicker or blur, or the picture does not fit in the display area after performing the Auto Adjust.
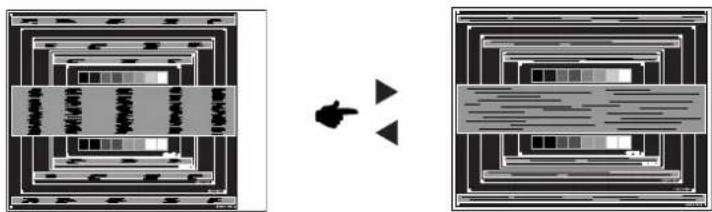
⑤ Adjust the V.Position so that the top and bottom of the picture frame will fit to the display area.
flowchart
graph TD
    A["Input Block 1"] --> B["Process Step 1"]
    B --> C["Output Block 2"]
    style A fill:#f9f,stroke:#333
    style C fill:#bbf,stroke:#333
HSITONE

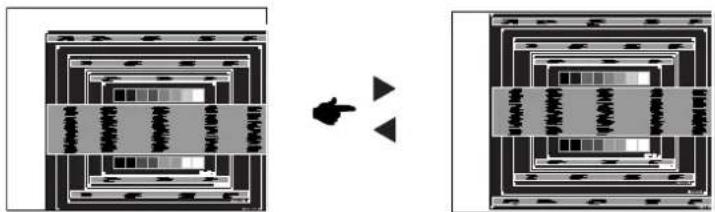
⑥ 1) Adjust the H.Position so that the left side of the picture frame will move to the left edge of the display area.
flowchart
graph TD
    A["Multi-layered Structure"] --> B["Transformation Arrow"]
    B --> C["Single-Layered Structure"]
2) Stretch the right side of the picture frame to the right edge of the display area by adjusting the Pixel Clock.
flowchart
graph TD
    A["Rectangular Structure"] --> B["Layered Layout"]
    B --> C["Arrow Left"]
    C --> D["Layered Layout"]
    D --> E["Arrow Right"]
NOTE
■ When the left side of the picture frame moves apart from the left edge of the display area during the Pixel Clock adjustment, adjust steps 1) and 2).
Another way to make the Pixel Clock adjustment is to correct the vertical wavy lines in the zebra pattern.
■ The picture may flicker during the Pixel Clock, H.Position and V.Position adjustment.
In case the picture frame is bigger or smaller than the data display area after the Pixel Clock adjustment, repeat steps from 1.


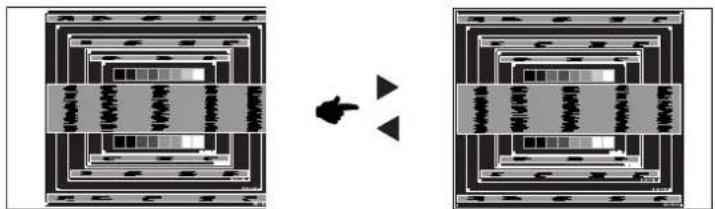
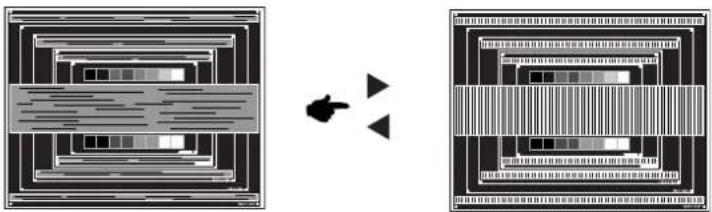
⑦ Adjust the Phase to correct horizontal wavy noise, flicker or blur in the zebra pattern.
natural_image
Two abstract diagrams showing layered rectangular structures with a central arrow pointing to a pair of triangular shapes (no text or symbols)ENGLISH
NOTE
In case the strong flicker or blurs remain on a part of the screen, repeat steps ⑥ and ⑦ because the Pixel Clock may not be adjusted correctly. If the flicker or blurs still remain, set the refresh rate of computer to low (60Hz) and repeat steps from ③ again.
■ Adjust the H.Position after the Phase adjustment if the horizontal position moves during the adjustment.
Adjust the Brightness and Color to get the desired picture after you complete the ⑧ Pixel Clock and Phase adjustments.
Put back your favorite wallpaper.


POWER MANAGEMENT FEATURE
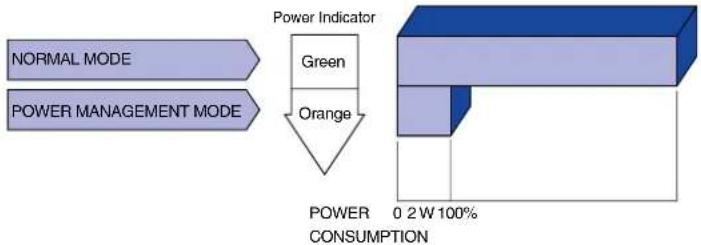
The power management feature of this product complies with power saving requirement of ENERGY STAR® and VESA DPMS. When activated, it automatically reduces unnecessary power consumption of the monitor when your computer is not in use.
To use the feature, the monitor needs to be connected to a VESA DPMS compliant computer. There is a power management step the monitor takes as described below. The power management function, including any timer settings is configured by the operating system. Check your operating system manual for information on how this can be configured.
■ Power Management Mode
When the H-sync signal / V-sync signal / H and V sync signals from the computer are off, the monitor enters into Power Management Mode which reduces the power consumption to less than 2W. The screen becomes dark, and the power indicator turns to orange. From Power Management Mode, the image reappears in several seconds when either the keyboard or the mouse are touched again.
flowchart
graph TD
    A["NORMAL MODE"] --> B["POWER MANAGEMENT MODE"]
    B --> C["Power Indicator"]
    C --> D["Green"]
    C --> E["Orange"]
    D --> F["POWER CONSUMPTION"]
    E --> F
    F --> G["0 2 W 100%"]
NOTE
■ Even when using the power management mode, the monitor consumes electricity. Turn off the Power Switch whenever the monitor is not in use, during the night and weekends, to avoid unnecessary power consumption.
It is possible that the video signal from the computer may be on while the H or V sync signal is missing. In this instance, the POWER MANAGEMENT feature may not work properly.

TROUBLE SHOOTING
If the monitor fails to operate correctly, please follow the steps below for a possible solution.
- Perform the adjustments described in OPERATING THE MONITOR, depending on the problem you have. If the monitor does not get a picture, skip to 2.
- Consult the following items if you cannot find an appropriate adjustment item in OPERATING THE MONITOR or if the problem persists.
- If you are experiencing a problem which is not described below or you cannot correct the problem, discontinue using the monitor and contact your dealer or iiyama service center for further assistance.
Problem Check
① The picture does not appear.
(Power indicator does not light up.)
The Power Cable is firmly seated in the socket.□
☐ The Power Switch is turned ON.
☐ The AC socket is live. Please check with another piece of equipment.
(Power indicator is green.)
☐ If the blank screen saver is in active mode, touch the keyboard or the mouse.
☐ Increase the Contrast and/or Brightness.
☐ The computer is ON.
☐ The Signal Cable is properly connected.
☐ The signal timing of the computer is within the specification of the monitor.
(Power indicator is orange.)
☐ If the monitor is in power management mode, touch the keyboard or the mouse.
□ The computer is ON.
☐ The Signal Cable is properly connected.
☐ The signal timing of the computer is within the specification of the monitor.
② The screen is not synchronized.
☐ The Signal Cable is properly connected.
☐ The signal timing of the computer is within the specification of the monitor.
☐ The video output level of the computer is within the specification of the monitor.
③ The screen position is not in the center.
☐ The signal timing of the computer is within the specification of the monitor.
④ The screen is too bright or too dark.
☐ The video output level of the computer is within the specification of the monitor.
⑤ The screen is shaking.
- The power voltage is within the specification of the monitor. - The signal timing of the computer is within the specification of the monitor.


Problem Check
⑥ No sound.
☐ The audio equipment (computer etc.) is ON.
☐ The Audio Cable is properly connected.
☐ The Volume is turned up.
□ The Mute is OFF.
☐ The audio output level of the audio equipment is within the specification of the monitor.
⑦ The sound is too loud or too quiet.
☐ The audio output level of the audio equipment is within the specification of the monitor.
⑧ A strange noise is heard.
☐ The Audio Cable is properly connected.
RECYCLING INFORMATION
For better environment protection please don't dispose your monitor.
Please visit our web site: www.iiyama.com/recycle for monitor recycling.


APPENDIX
SPECIFICATIONS
ENGLISH
| ProLite E2200WS | ||
| LCD Panel | Driving system | a-Si TFT Active Matrix |
| Size | Diagonal: 55.9cm / 22.0" | |
| Pixel pitch | 0.282mm H × 0.282mm V | |
| Brightness | 300cd/m2 (Typical) | |
| Contrast ratio | 1000 : 1 (Typical) | |
| Viewable angle | Right / Left : 85 degrees each, Up:85 degrees, Down: 75 degrees (Typical) | |
| Response time | 5ms (Black, white, black) | |
| Display Colors Approx.16.7M (6bit+2bit dithering) | ||
| Sync Frequency Horizontal: 31.0-83.0kHz, Vertical: 56-75Hz | ||
| Dot Clock 162MHz maximum | ||
| Maximum Resolution 1680 × 1050, 1.8 MegaPixels | ||
| Input Connector | D-Sub mini 15 pin, DVI-D 24 pin | |
| Plug & Play VESA DDC2B | TM | |
| Input Sync Signal | Separate sync: TTL, Positive or Negative | |
| Input Video Signal | Analog: 0.7Vp-p (Standard), 75Ω, PositiveDigital: DVI(Digital Visual Interface standard Rev.1.0)compliance | |
| Input Audio Connector | ø 3.5mm mini jack (Stereo) | |
| Input Audio Signal 0.5Vrms max | maximum | |
| Speakers | 1W × 2 (Stereo speakers) | |
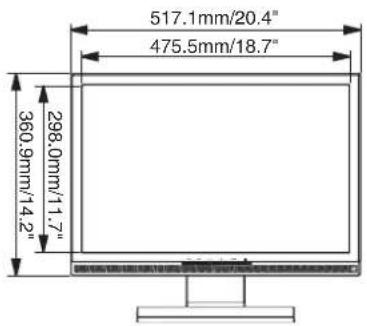
| Maximum Screen Size 475.5mm W × 298.0mm H / 18.7" W × 11.7" H | ||
| Power Source 100-240VAC, 50/60Hz, 1.3A | ||
| 60W maximum, Power management mode: 2W maximum*Power Co | ||
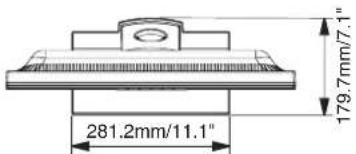
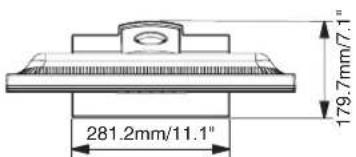
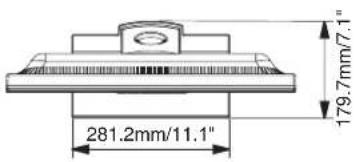
| Dimensions / Net Weight | 517.1× 444.1 × 179.7mm / 20.4 × 17.5 × 7.1" (W×H×D), 5.8kg / 12.8lbs | |
| Tilt Angle | Forward: 5 degrees Backward: 20 degrees | |
| Environmental Considerations | Operating: Temperature 5 to 35°C / 41 to 95°FHumidity 10 to 80% (No condensation)Storage: Temperature -20 to 60°C / -4 to 140°FHumidity 10 to 70% (No condensation) | |
| Approvals | TCO '03, CE, TÜV-GS / MPR III(prEN50279) / ISO 13406-2, FCC-B, UL/C-UL, VCCI-B, GOST-R | |
nsumption
NOTE
* Condition: Audio equipment is not connected.


| ProLite E2200WSV | ||
| LCD Panel | Driving system | a-Si TFT Active Matrix |
| Size | Diagonal: 55.9cm / 22.0" | |
| Pixel pitch | 0.282mm H × 0.282mm V | |
| Brightness | 300cd/m2 (Typical) | |
| Contrast ratio | 1000 : 1 (Typical) | |
| Viewable angle | Right / Left : 85 degrees each, Up:85 degrees, Down: 75 degrees (Typical) | |
| Response time | 5ms (Black, white, black) | |
| Display Colors Approx.16.7M (6bit+2bit dithering) | ||
| Sync Frequency Horizontal: 31.0-83.0kHz, Vertical: 56-75Hz | ||
| Dot Clock 162MHz maximum | ||
| Maximum Resolution 1680 × 1050, 1.8 MegaPixels | ||
| Input Connector | D-Sub mini 15 pin | |
| Plug & Play VESA DDC2B | TM | |
| Input Sync Signal | Separate sync: TTL, Positive or Negative | |
| Input Video Signal | Analog: 0.7Vp-p (Standard), 75Ω, Positive | |
| Input Audio Connector ø 3.5mm mini jack (Stereo) | ||
| Input Audio Signal 0.5Vrms maximum | ||
| Speakers 1W × 2 (Stereo speakers) | ||
| Maximum Screen Size 475.5mm W × 298.0mm H / 18.7" W × 11.7" H | ||
| Power Source 100-240VAC, 50/60Hz, 1.3A | ||
| 60W maximum, Power management mode: 2W maximum*Power Co | ||
| Dimensions / Net Weight | 517.1×444.1×179.7mm/20.4×17.5×7.1"(W×H×D), 5.8kg/12.8lbs | |
| Tilt Angle | Forward: 5 degrees Backward: 20 degrees | |
| Environmental Considerations | Operating: Temperature 5 to 35°C / 41 to 95°F Humidity 10 to 80% (No condensation) Storage: Temperature -20 to 60°C / -4 to 140°F Humidity 10 to 70% (No condensation) | |
| Approvals | TCO '03, CE, TÜV-GS / MPR III(prEN50279) / ISO 13406-2, FCC-B, UL/C-UL, VCCI-B, GOST-R | |
HSI75NE
nsumption
NOTE
* Condition: Audio equipment is not connected.
APPENDIX 21


DIMENSIONS
ENGLISH

COMPLIANT TIMING
| Video Mode | Horizontal Frequency | Vertical Frequency | Dot Clock | |
| VESA | VGA 640 × 480 | 31.468kHz | 59.941Hz | 25.175MHz |
| 37.500kHz | 74.997Hz | 31.500MHz | ||
| SVGA 800 × 600 | 37.878kHz | 60.317Hz | 40.000MHz | |
| 46.875kHz | 75.001Hz | 49.500MHz | ||
| XGA 1024 × 768 | 48.362kHz | 60.002Hz | 65.000MHz | |
| 60.024kHz | 75.039Hz | 78.750MHz | ||
| WXGA 1280 × 768 | 47.396kHz | 60.000Hz | 68.250MHz | |
| Quad-VGA 1280 × 960 | 60.000kHz | 60.000Hz | 108.000MHz | |
| SXGA 1280 × 1024 | 63.979kHz | 60.029Hz | 108.000MHz | |
| 79.974kHz | 75.024Hz | 135.000MHz | ||
| WXGA+ 1440 × 900 | 55.935kHz | 59.887Hz | 106.500MHz | |
| 1680 × 1050 | WSXGA200kHz | 60.000Hz | 146.250MHz | |
| VGA TEXT | 720 × 400 | 31.468kHz | 70.086Hz | 28.322MHz |
| Macintosh | 832 × 624 | 49.724kHz | 74.532Hz | 57.280MHz |
| 1152 × 870 | 68.680kHz | 75.060Hz | 100.000MHz | |
NOTE
* DVI input is not compliant.


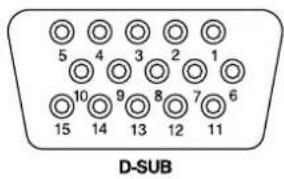
CONNECTOR PIN ASSIGNMENT
| Pin | Input Signal | Pin | Input Signal |
| 1 | Red video | 9 | +5V |
| 2 | Green video | 10 | Ground |
| 3 | Blue video | 11 | NC |
| 4 | NC | 12 | Data line (SDA)* |
| 5 | Ground | 13 | H-Sync |
| 6 | Red video ground | 14 | V-Sync |
| 7 | Green video ground | 15 | Clock line (SCL)* |
| 8 | Blue video ground | * Compliant to VESA DDC. | |
* Compliant to VESA DDC.
ENGLISH
■ DVI-D 24pin Connector *1

DVI-D
| Pin | Input Signal | Pin | Input Signal |
| 1 | T.M.D.S Data 2- | 13 | |
| 2 | T.M.D.S Data 2+ | 14 | +5V |
| 3 | T.M.D.S Data 2 Ground | 15 | Ground |
| 4 | 16 | Hot Plug Detect | |
| 5 | 17 | T.M.D.S Data 0- | |
| 6 | Clock line (SCL) * ^2 | 18 | T.M.D.S Data 0+ |
| 7 | Data line (SDA) * ^2 | 19 | T.M.D.S Data 0 Ground |
| 8 | V-Sync | 20 | |
| 9 | T.M.D.S Data 1- | 21 | |
| 10 | T.M.D.S Data 1+ | 22 | T.M.D.S Clock Ground |
| 11 | T.M.D.S Data 1 Ground | 23 | T.M.D.S Clock + |
| 12 | 24 | T.M.D.S Clock - |
*2 Compliant to VESA DDC.


natural_image
Color palette bar with grayscale shades and a crosshair for selection (no text or symbols)iiyama Visual&Technology
BEDIENUNGSANLEITUNG
ProLite
LCD Monitor
natural_image
Color palette bar with grayscale shades and a central crosshair (no text or symbols)natural_image
Color palette bar with grayscale and RGB swatches, no text or symbols presentINHALTSÜBERSICHT
FÜRIHRESICHERHEIT 1
INFORMATIONENZUM RECYCLING....19
ANHANG 20
natural_image
Line drawing of a mechanical device with a lever and pointer, no text or symbols present
natural_image
Two identical abstract diagrams showing layered rectangular structures with internal patterns, connected by a directional arrow (no text or symbols)flowchart
graph TD
    A["Rectangular Structure with internal components"] --> B["Layered Structure with directional arrows"]
    B --> C["Arrow pointing inward"]
HINWEIS
natural_image
Color palette bar with grayscale and RGB swatches, no text or symbols presentnatural_image
Two abstract diagrams showing layered structures with arrows indicating transformation or alignment (no text or symbols)HINWEIS
② The screen is not synchronized.
INFORMATIONEN ZUM RECYCLING
DEUTSCH
KONFORMES TIMING
| Videomodus | Horizontale Frequenz | Vertikale Frequenz | Dot Clock | |
| VESA | VGA 640 × 480 | 31.468kHz | 59.941Hz | 25.175MHz |
| 37.500kHz | 74.997Hz | 31.500MHz | ||
| SVGA 800 × 600 | 37.878kHz | 60.317Hz | 40.000MHz | |
| 46.875kHz | 75.001Hz | 49.500MHz | ||
| XGA 1024 × 768 | 48.362kHz | 60.002Hz | 65.000MHz | |
| 60.024kHz | 75.039Hz | 78.750MHz | ||
| WXGA 1280 × 768 | 47.396kHz | 60.000Hz | 68.250MHz | |
| Quad-VGA 1280 × 960 | 60.000kHz | 60.000Hz | 108.000MHz | |
| SXGA 1280 × 1024 | 63.979kHz | 60.029Hz | 108.000MHz | |
| 79.974kHz | 75.024Hz | 135.000MHz | ||
| WXGA+ 1440 × 900 | 55.935kHz | 59.887Hz | 106.500MHz | |
| 1680 × 1050 | WSXGA200kHz | 60.000Hz | 146.250MHz | |
| VGA TEXT | 720 × 400 | 31.468kHz | 70.086Hz | 28.322MHz |
| Macintosh | 832 × 624 | 49.724kHz | 74.532Hz | 57.280MHz |
| 1152 × 870 | 68.680kHz | 75.060Hz | 100.000MHz | |
HINWEIS
natural_image
Color palette bar with grayscale shades and a crosshair for selection (no text or symbols)iiyama Visual&Technology
MODE D'EMPLOI
ProLite
LCD Monitor
DECLARATION DE CONFORMITE AU MARQUAGE CE
natural_image
Color palette bar with grayscale and RGB swatches, no text or symbols presentTABLE DES MATIERES
POURVOTRESECURITE 1
CONSIGNESDESECURITE 1
REMARQUES SUR LES ECRANS A CRISTAUX LIQUIDES .... 3
SERVICECLIENT 3
ENTRETIEN 3
AVANT D'UTILISER LE MONITEUR 4
VÉRIFICATIONDU CONTENU DE L'EMBALLAGE 4
COMMENT UTILISERLEPIED 5
COMMANDESETCONNECTEURS....6
CONNEXION DE VOTRE 7
MISE EN ROUTE DE L'ORDINATEUR.... 8
RÉGLAGE DE L'ANGLE DE VISION....8
UTILISATIONDUMONITEUR 9
MENUDES PARAMÈTRESDE RÉGLAGE 10
AJUSTEMENTSDEL'ÉCRAN 14
SYSTÈMED'ÉCONOMIED'ÉNERGIE 17
DEPANNAGE 18
INFORMATIONS DE RECYCLAGE 19
ANNEXE 20
CARACTÉRISTIQUESTECHNIQUES.... 20
DIMENSIONS 22
FRÉQUENCESDESYNCHRONISATION 22
AFFECTATIONDES BROCHES 23

natural_image
Color palette bar with grayscale and solid squares, no text or symbols present

POUR VOTRE SECURITE
CONSIGNES DE SECURITE
AVERTISSEMENT
MISE HORS TENSION DU MONITEUR EN CAS DE FONCTIONNEMENT ANORMAL
natural_image
Two-step illustration showing hands using a tool to cut a rectangular object, with arrows indicating direction (no text or symbols)FRANÇAIS
AVANT D'UTILISER LE MONITEUR
FRANÇAIS


COMMANDES ET CONNECTEURS
natural_image
Line drawing of a mechanical device with a pointer and lever mechanism (no text or symbols)
8 AVANT D'UTILISER LE MONITEUR

UTILISATION DU MONITEUR
flowchart
graph TD
    A["Multi-layered Grid"] --> B["Transformation Process"]
    B --> C["Single Output"]
flowchart
graph TD
    A["Multi-layered Grid Structure"] --> B["Output"]
    style A fill:#f9f,stroke:#333
    style B fill:#bbf,stroke:#333
natural_image
Two abstract diagrams showing layered structures with arrows indicating transformation or alignment (no text or symbols)NOTE
FRÉQUENCES DE SYNCHRONISATION
FRANÇAIS
| Mode vidéo | Fréquence horizontale | Fréquence verticale | Horloge à points | |
| VESA | VGA 640 × 480 | 31.468kHz | 59.941Hz | 25.175MHz |
| 37.500kHz | 74.997Hz | 31.500MHz | ||
| SVGA 800 × 600 | 37.878kHz | 60.317Hz | 40.000MHz | |
| 46.875kHz | 75.001Hz | 49.500MHz | ||
| XGA 1024 × 768 | 48.362kHz | 60.002Hz | 65.000MHz | |
| 60.024kHz | 75.039Hz | 78.750MHz | ||
| WXGA 1280 × 768 | 47.396kHz | 60.000Hz | 68.250MHz | |
| Quad-VGA 1280 × 960 | 60.000kHz | 60.000Hz | 108.000MHz | |
| SXGA 1280 × 1024 | 63.979kHz | 60.029Hz | 108.000MHz | |
| 79.974kHz | 75.024Hz | 135.000MHz | ||
| WXGA+ 1440 × 900 | 55.935kHz | 59.887Hz | 106.500MHz | |
| 1680 × 1050 | WSXSA200kHz | 60.000Hz | 146.250MHz | |
| VGA TEXT | 720 × 400 | 31.468kHz | 70.086Hz | 28.322MHz |
| Macintosh | 832 × 624 | 49.724kHz | 74.532Hz | 57.280MHz |
| 1152 × 870 | 68.680kHz | 75.060Hz | 100.000MHz | |
NOTE
natural_image
Color palette bar with grayscale shades and a crosshair for selection (no text or symbols)iiyama Visual&Technology
GEBRUIKERSHANDLEIDING
ProLite
LCD Monitor
natural_image
Color palette bar with grayscale shades and a central crosshair (no text or symbols)INHOUDSOPGAVE
VEILIGHEIDSVOORSCHRIFTEN 1
VOORZORGSMAATREGELEN 1
SPECIALEOPMERKINGENOVERLCDMONITOREN....3
KLANTENSERVICE 3
REINIGING 3
VOORDATU DE MONITOR GEBRUIKT 4
DE INHOUD VAN HET PAKKET CONTROLEREN 4
RECYCLE-INFORMATIE....19
BIJLAGE 20
SPECIFICATIONS 20
AFMETINGEN 22
ONERSTEUNDE TIMING 22
natural_image
Color palette bar with grayscale and solid squares, no text or symbols present

VEILIGHEIDSVOORSCHRIFTEN
VOORZORGSMAATREGELEN
WAARSCHUWING
GEBRUIK DE MONITOR NIET ALS U PROBLEMEN VERMOEDT
natural_image
Illustration showing two-step instructions for using a knife to cut a rectangular object, with arrows indicating the process (no text or symbols present)NEDEBLANDS
VOORDAT U DE MONITOR GEBRUIKT


BESTURINGSELEMENTEN EN AANSLUITINGEN

natural_image
Diagram of a mechanical device with a lever and stand, showing no text or symbols
8 VOORDAT U DE MONITOR GEBRUIKT
DE MONITOR GEBRUIKEN
flowchart
graph TD
    A["Multi-layered Grid"] --> B["Transformation Process"]
    B --> C["Single Output"]
flowchart
graph TD
    A["Multi-layered Grid Structure"] --> B["Output"]
    style A fill:#f9f,stroke:#333
    style B fill:#bbf,stroke:#333
flowchart
graph TD
    A["Multi-layered Structure"] --> B["Transformation Arrow"]
    B --> C["Multi-layered Structure"]
Opmerking
natural_image
Two abstract diagrams showing layered rectangular structures with a central arrow and triangular shapes, no text or symbols present.Opmerking
(Power-indicator is oranje.)

ONERSTEUNDE TIMING
NEDERLANDS
| Videomodus | Horizontale frequentie | Verticale frequentie | Dot pitch | |
| VESA | VGA 640 × 480 | 31.468kHz | 59.941Hz | 25.175MHz |
| 37.500kHz | 74.997Hz | 31.500MHz | ||
| SVGA 800 × 600 | 37.878kHz | 60.317Hz | 40.000MHz | |
| 46.875kHz | 75.001Hz | 49.500MHz | ||
| XGA 1024 × 768 | 48.362kHz | 60.002Hz | 65.000MHz | |
| 60.024kHz | 75.039Hz | 78.750MHz | ||
| WXGA 1280 × 768 | 47.396kHz | 60.000Hz | 68.250MHz | |
| Quad-VGA 1280 × 960 | 60.000kHz | 60.000Hz | 108.000MHz | |
| SXGA 1280 × 1024 | 63.979kHz | 60.029Hz | 108.000MHz | |
| 79.974kHz | 75.024Hz | 135.000MHz | ||
| WXGA+ 1440 × 900 | 55.935kHz | 59.887Hz | 106.500MHz | |
| 1680 × 1050 | WSXGA200kHz | 60.000Hz | 146.250MHz | |
| VGA TEXT | 720 × 400 | 31.468kHz | 70.086Hz | 28.322MHz |
| Macintosh | 832 × 624 | 49.724kHz | 74.532Hz | 57.280MHz |
| 1152 × 870 | 68.680kHz | 75.060Hz | 100.000MHz | |
Opmerking
natural_image
Color palette bar with grayscale shades and a crosshair for selection (no text or symbols)iiyama Visual&Technology
MANUALE DELL'UTENTE
ProLite
LCD Monitor
natural_image
Color palette bar with grayscale and RGB swatches, no text or symbols presentINDICE
PER LA SUA SICUREZZA 1
PRECAUZIONI 1
NOTE SPECIALI RELATIVE AI MONITOR A CRISTALLI LIQUIDI (LCD) 3
SERVIZIOCLIENTI 3
PULIZIA 3
PRIMA DI METTERE IN FUNZIONE IL MONITOR.... 4
CONTROLLODEI MATERIALI CONTENUTINELL'IMBALLAGGIO .... 4
natural_image
Color palette bar with grayscale and solid squares, no text or symbols present

PER LA SUA SICUREZZA
PRECAUZIONI
AVVERTENZA
SPEGNERE IL MONITOR SE SI VERIFICANO DEI PROBLEMI
Stains can be removed with a cloth lightly moistened with a mild detergent solvent. Then wipe the cabinet with a soft dry cloth.
Schermo a
natural_image
Illustration showing two-step manual techniques for handling a knife, with arrows indicating direction (no text or symbols present)ITALIANO
①Tasto Auto (AUTO)
⑪Connettore CA (POWER IN)
⑫Connettore DVI-D a 24 pin (DVI)*
⑬Connettore D-SUB mini a 15pin (D-SUB)
natural_image
Line drawing of a mechanical device with a pointer and lever mechanism (no text or symbols)NOTA
flowchart
graph TD
    A["Multi-layered Grid Structure"] --> B["Transformation Arrow"]
    B --> C["Final Layout with Layer 1, Layer 2, Layer 3, Layer 4"]
flowchart
graph LR
    A["Layered Structure"] --> B["Transformation Arrow"]
    B --> C["Side-Section Structure"]
flowchart
graph TD
    A["Rectangular Layout"] --> B["Multi-layered Layout"]
    B --> C["Arrow Left"]
    B --> D["Arrow Right"]
NOTA
natural_image
Two abstract diagrams showing layered structures with arrows indicating transformation or mapping (no text or symbols)NOTA
*2 Compliant to VESA DDC.
natural_image
Color palette bar with grayscale shades and a crosshair for selection (no text or symbols)iiyama Visual&Technology
INSTRUKCJA OBSŁUGI
ProLite
LCD Monitor
W TROSCE O TWOJE BEZPIECZEŃSTWO 1
ZALECENIA DOTYCZĄCE BEZPIECZEŃSTWA 1
SPECJALNE UWAGI NA TEMAT MONITORÓW LCD 3
OBSŁUGA KLIENTA 3
CZYSZCZENIE 3
ZANIM URUCHOMISZ MONITOR 4
KONTROLA ZAWARTOŚCI OPAKOWANIA ....4
JAK KORZYSTAĆ ZE STOJAKA 5
ELEMENTY STERUJĄCE I ZŁĄCZA 6
PRZYŁĄCZANIE MONITORA 7
USTAWIENIA KOMPUTERA 8
DOSTOSOWANIE KATA WIDZENIA 8
OBSŁUGA MONITORA 9
ZAWARTOŚĆ MENU REGULACJA 10
REGULACJAPARAMETRÓW EKRANU 14
FUNKCJA ZARZADZANIA ENERGIA 17
ROZWIAZYWANIE PROBLEMÓW 18
NFORMACJE O ZAWROCIE DO PONOWNEGO WYKORZYSTANIA .... 19
DODATEK 20
DANE TECHNICZNE 20
WYMIARY 22
ZGODNE TAKTOWANIE SYGNAŁU 22
W TROSCE O TWOJE BEZPIECZEŃSTWO
ZALECENIA DOTYCZĄCE BEZPIECZEŃSTWA
OSTRZEŻENIE
ZAPRZESTAŃ UŻYTKOWANIA MONITORA, GDY CZUJESZ, ŻE WYSTĘPUJE JAKIŚ PROBLEM
NIE DOTYKAJ WTYCZEK WILGOTNYMI DŁONIAMI
W TROSCE O TWOJE BEZPIECZEŃSTWO


ZANIM URUCHOMISZ MONITOR
WŁAŚCIWOŚCI
natural_image
Line drawing of hands holding a tool over a flat surface, with a blue arrow indicating direction (no text or symbols)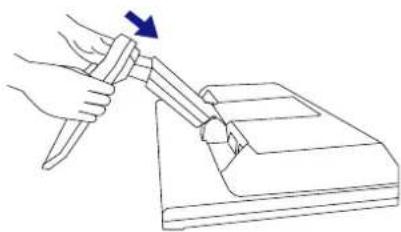
natural_image
Line drawing of a hand using a tool to cut or press a piece of paper (no text or symbols present)


ELEMENTY STERUJĄCE I ZŁĄCZA

natural_image
Line drawing of a simple mechanical device with a lever and base, no text or symbols presentUMAGA
flowchart
graph TD
    A["Multi-layered Structure"] --> B["Transformation Arrow"]
    B --> C["Single Layer Structure"]
flowchart
graph TD
    A["Rectangular Structure"] --> B["Arrow Left"]
    B --> C["Multi-layered System with Process Flow"]
    C --> D["Arrow Right"]
UWAGA
natural_image
Two abstract architectural diagrams showing floor layouts and structural elements, with no visible text or symbols.UWAGA
ZGODNE TAKTOWANIE SYGNAŁU
POLSKI
| Tryb wideo | Częstotliwość pozioma | Częstotliwość pionowa | Częstotliwość taktowania plamki | |
| VESA | VGA 640 × 480 | 31.468kHz | 59.941Hz | 25.175MHz |
| 37.500kHz | 74.997Hz | 31.500MHz | ||
| SVGA 800 × 600 | 37.878kHz | 60.317Hz | 40.000MHz | |
| 46.875kHz | 75.001Hz | 49.500MHz | ||
| XGA 1024 × 768 | 48.362kHz | 60.002Hz | 65.000MHz | |
| 60.024kHz | 75.039Hz | 78.750MHz | ||
| WXGA 1280 × 768 | 47.396kHz | 60.000Hz | 68.250MHz | |
| Quad-VGA 1280 × 960 | 60.000kHz | 60.000Hz | 108.000MHz | |
| SXGA 1280 × 1024 | 63.979kHz | 60.029Hz | 108.000MHz | |
| 79.974kHz | 75.024Hz | 135.000MHz | ||
| WXGA+ 1440 × 900 | 55.935kHz | 59.887Hz | 106.500MHz | |
| 1680 × 1050 | WSXGA 200kHz | 60.000Hz | 146.250MHz | |
| VGA TEXT | 720 × 400 | 31.468kHz | 70.086Hz | 28.322MHz |
| Macintosh | 832 × 624 | 49.724kHz | 74.532Hz | 57.280MHz |
| 1152 × 870 | 68.680kHz | 75.060Hz | 100.000MHz | |
UWAGA
natural_image
Color palette bar with grayscale shades and a crosshair for selection (no text or symbols)iiyama Visual&Technology
natural_image
Line drawing of hands holding a small object on a flat surface, with a blue arrow indicating direction (no text or symbols)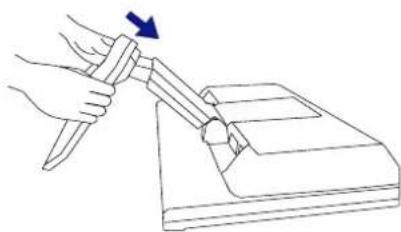
natural_image
Line drawing of a hand using a knife to cut a rectangular object, with a blue arrow indicating the motion (no text or symbols)<Снятие>


<Вид сзади>
natural_image
Simple line drawing of a mechanical device with a lever and base, no text or symbols present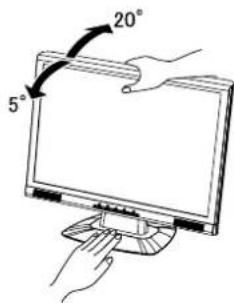
РАБОТА С МОНИТОРОМ
natural_image
Abstract geometric pattern with concentric rectangular bands and a central horizontal bar (no text or symbols)Контрольная
цветная полоска
Кадр изображения
flowchart
graph TD
    A["Multi-layered Grid"] --> B["Transformation Process"]
    B --> C["Single Output"]
natural_image
Two abstract diagrams showing a building interior and a grid-like structure with arrows indicating transformation or alignment (no text or symbols)ПРИМЕЧАНИЕ
natural_image
Color calibration bar and dot plot (no text or symbols)iiyama Visual&Technology
取扱説明書
ProLite
LCD Monitor
natural_image
Color palette bar with grayscale and RGB swatches, no text or symbols presentもくじ
安全にご使用いただくために……1
ご使用の前に 5
特長 5
標準付属品 5
スタンドの取り付け/取り外し 6
各部のなまえ……7
コンピュータとの接続 8
コンピュータの設定 9
パネルの角度調節 9
操作手順 10
調整メニューの内容 11
画面の調整 15
パワーマネージメント機能 17
故障かなと思ったら……18
クリーニング 20
アフターサービス 21
保証書/保証期間について 21
修理サービス 21
リサイクル/廃棄について……21
付録 22
一般仕様 22
外形寸法図 24
対応信号タイミング 24
信号入力コネクタのピン配列 25
安全にご使用いただくために
natural_image
Simple line drawing of a computer monitor, a hard drive, and a pair of shoes (no text or symbols)
キャビネットは外さない、改造しない
natural_image
Cartoon illustration of a child sitting on a computer with a thought bubble showing a broken object (no text or symbols present)
異物を入れない
natural_image
Simple line drawing of a cartoon-style computer monitor with a sad face on top, standing on a stand (no text or symbols)
禁止

プラグを
抜く
不安定な場所に置かない
natural_image
Cartoon illustration of a computer monitor with a showerhead spraying water, no text or symbols present
水場での
使用禁止
水のある場所で使わない
natural_image
Illustration of a hand holding a device under rain with lightning and smoke, no text or symbols present
接触禁止
雷が鳴りだしたら、電源プラグに触れない
感電の原因となります。

注意

natural_image
Illustration of a sun heating air with a steaming stove, a computer monitor, and a broom (no text or symbols)
置き場所を選ぶ

natural_image
Cartoon illustration of a smiling computer monitor and a small robot, no text or symbols presentnatural_image
Line drawing of a hand holding a tool over a tray with an arrow indicating upward motion (no text or symbols)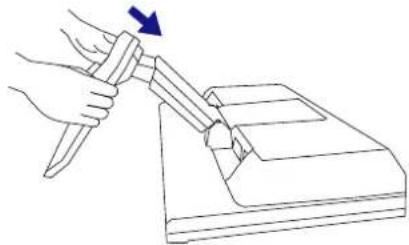
natural_image
Line drawing of a hand using a knife to cut a rectangular object with a blue arrow indicating direction (no text or symbols)<取り外し
日本語


各部のなまえ
前面
後面
9 ご使用の前に


操作手順
natural_image
Two side-by-side color swatches with vertical stripes and a small arrow pointing to a section of the right (no text or symbols)natural_image
Two black grid panels with a directional arrow pointing to the right panel (no text or symbols)補足
2006/08/28, 17:01 Adobe PageMaker 6.5J/Win
クリーニング

警告
natural_image
Color palette bar with grayscale and solid squares, no text or symbols present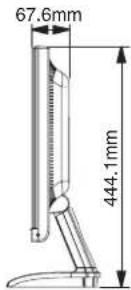
対応信号タイミング
| ビデオモード | 水平周波数 | 垂直周数 | ドットクロック | |
| VESA | VGA 640 × 480 | 31.468kHz | 59.941Hz | 25.175MHz |
| 37.500kHz | 74.997Hz | 31.500MHz | ||
| SVGA 800 × 600 | 37.878kHz | 60.317Hz | 40.000MHz | |
| 46.875kHz | 75.001Hz | 49.500MHz | ||
| XGA 1024 × 768 | 48.362kHz | 60.002Hz | 65.000MHz | |
| 60.024kHz | 75.039Hz | 78.750MHz | ||
| WXGA 1280 × 768 | 47.396kHz | 60.000Hz | 68.250MHz | |
| Quad-VGA 1280 × 960 | 60.000kHz | 60.000Hz | 108.000MHz | |
| SXGA 1280 × 1024 | 63.979kHz | 60.029Hz | 108.000MHz | |
| 79.974kHz | 75.024Hz | 135.000MHz | ||
| WXGA+ 1440 × 900 | 55.935kHz | 59.887Hz | 106.500MHz | |
| WSXGA+ 1680 × 1050 | 65.290kHz | 60.000Hz | 146.250MHz | |
| VGA TEXT | 720 × 400 | 31.468kHz | 70.086Hz | 28.322MHz |
| Macintosh | 832 × 624 | 49.724kHz | 74.532Hz | 57.280MHz |
| 1152 × 870 | 68.680kHz | 75.060Hz | 100.000MHz | |
日本語
補足 * DVIに対応しておりません。


信号入力コネクタのピン配列
■ D-SUBミ5 ピンコネクタ


- USER MANUAL
- ProLite
- LCD Monitor
- TCODevelopment
- Congratulations!
- Ergonomics
- Energy
- Emissions
- Ecology
- FCC DECLARATION OF CONFORMITY
- CAUTION
- CANADIAN DEPARTMENT OF COMMUNICATIONS COMPLIANCE STATEMENT
- CE MARKING DECLARATION OF CONFORMITY
- TABLE OF CONTENTS
- FOR YOUR SAFETY
- SAFETY PRECAUTIONS
- WARNING
- STOP OPERATING THE MONITOR WHEN YOU SENSE TROUBLE
- NEVER REMOVE THE CABINET
- DO NOT PUT ANY OBJECT INTO THE MONITOR
- INSTALL THE MONITOR ON A FLAT, STABLE SURFACE
- DO NOT USE THE MONITOR NEAR WATER
- OPERATE UNDER THE SPECIFIED POWER SUPPLY
- PROTECT THE CABLES
- ADVERSE WEATHER CONDITIONS
- INSTALLATION LOCATION
- DO NOT PLACE THE MONITOR IN A HAZARDOUS POSITION
- MAINTAIN GOOD VENTILATION
- DISCONNECT THE CABLES WHEN YOU MOVE THE MONITOR
- UNPLUG THE MONITOR
- HOLD THE PLUG WHEN DISCONNECTING
- DO NOT TOUCH THE PLUG WITH WET HANDS
- WHEN YOU INSTALL THE MONITOR ON YOUR COMPUTER
- DO NOT PUT FLOPPY DISKS NEAR THE SPEAKERS
- OTHERS
- ERGONOMIC RECOMMENDATIONS
- SPECIAL NOTES ON LCD MONITORS
- NOTE
- CUSTOMER SERVICE
- CLEANING
- CABINET
- LCD
- SCREEN
- CHEKING THE CONTENTS OF THE PACKAGE
- HOW TO USE THE STAND
- NOTE Green: Normal operation
- COMPUTER SETTING
- ADJUSTING THE VIEWING ANGLE
- Direct
- SCREEN ADJUSTMENTS
- POWER MANAGEMENT FEATURE
- ■ Power Management Mode
- TROUBLE SHOOTING
- Problem Check
- RECYCLING INFORMATION
- APPENDIX
- SPECIFICATIONS
- CONNECTOR PIN ASSIGNMENT
- BEDIENUNGSANLEITUNG
- INHALTSÜBERSICHT
- HINWEIS
- INFORMATIONEN ZUM RECYCLING
- MODE D'EMPLOI
- DECLARATION DE CONFORMITE AU MARQUAGE CE
- TABLE DES MATIERES
- POUR VOTRE SECURITE
- CONSIGNES DE SECURITE
- AVERTISSEMENT
- MISE HORS TENSION DU MONITEUR EN CAS DE FONCTIONNEMENT ANORMAL
- UTILISATION DU MONITEUR
- GEBRUIKERSHANDLEIDING
- INHOUDSOPGAVE
- VEILIGHEIDSVOORSCHRIFTEN
- VOORZORGSMAATREGELEN
- WAARSCHUWING
- GEBRUIK DE MONITOR NIET ALS U PROBLEMEN VERMOEDT
- DE MONITOR GEBRUIKEN
- Opmerking
- MANUALE DELL'UTENTE
- INDICE
- PER LA SUA SICUREZZA
- PRECAUZIONI
- AVVERTENZA
- SPEGNERE IL MONITOR SE SI VERIFICANO DEI PROBLEMI
- Schermo a
- NOTA
- INSTRUKCJA OBSŁUGI
- W TROSCE O TWOJE BEZPIECZEŃSTWO
- ZALECENIA DOTYCZĄCE BEZPIECZEŃSTWA
- OSTRZEŻENIE
- ZAPRZESTAŃ UŻYTKOWANIA MONITORA, GDY CZUJESZ, ŻE WYSTĘPUJE JAKIŚ PROBLEM
- NIE DOTYKAJ WTYCZEK WILGOTNYMI DŁONIAMI
- ZANIM URUCHOMISZ MONITOR
- WŁAŚCIWOŚCI
- UMAGA
- UWAGA
- <Снятие>
- РАБОТА С МОНИТОРОМ
- ПРИМЕЧАНИЕ
- 取扱説明書
- もくじ
- 安全にご使用いただくために
- キャビネットは外さない、改造しない
- 異物を入れない
- 不安定な場所に置かない
- 水のある場所で使わない
- 雷が鳴りだしたら、電源プラグに触れない
- 注意
- 置き場所を選ぶ
- <取り外し
- 各部のなまえ
- 操作手順
- 補足
- クリーニング
- 警告
- 信号入力コネクタのピン配列
Brand : IIYAMA
Model : ProLite E2200WS
Category : Monitor