CG241WBK - Monitor EIZO - Free user manual and instructions
Find the device manual for free CG241WBK EIZO in PDF.
User questions about CG241WBK EIZO
0 question about this device. Answer the ones you know or ask your own.
Ask a new question about this device
Download the instructions for your Monitor in PDF format for free! Find your manual CG241WBK - EIZO and take your electronic device back in hand. On this page are published all the documents necessary for the use of your device. CG241WBK by EIZO.
USER MANUAL CG241WBK EIZO
Calibration Color LCD Monitor
Setup Manual
Important: Please read this Setup Manual and the User's Manual stored on the CD-ROM carefully to familiarize yourself with safe and effective usage. Please retain this manual for future reference.
Installationshandbuch
The monitor supports the following resolutions
Copyright© 2007-2008 EIZO NANAO CORPORATION All rights reserved. No part of this manual may be reproduced, stored in a retrieval system, or transmitted, in any form or by any means, electronic, mechanical, or otherwise, without the prior written permission of EIZO NANAO CORPORATION.
EIZO NANAO CORPORATION is under no obligation to hold any submitted material or information confidential unless prior arrangements are made pursuant to EIZO NANAO CORPORATION's receipt of said information. Although every effort has been made to ensure that this manual provides up-to-date information, please note that EIZO monitor specifications are subject to change without notice.
ColorNavigator is a trademark of EIZO NANAO CORPORATION.
ScreenManager, ColorEdge and EIZO are registered trademarks of EIZO NANAO CORPORATION in Japan and other countries.
ColorEdge CG241W
Calibration Color LCD Monitor
SAFETY SYMBOLS
This manual uses the safety symbols below. They denote critical information. Please read them carefully.
| WARNING Failure to abide by the information in a WARNING may result in serious injury and can be life threatening. | CAUTION Failure to abide by the information in a CAUTION may result in moderate injury and/or property or product damage. | |
| Indicates a prohibited action. | ||
| Indicates a mandatory action that must be followed. | ||
PRECAUTIONS

WARNING
| If the unit begins to emit smoke, smells like something is burning, or makes strange noises, disconnect all power connections immediately and contact your dealer for advice. Attempting to use a malfunctioning unit may result in fire, electric shock, or equipment damage. | Use the enclosed power cord and connect to the standard power outlet of your country. Be sure to remain within the rated voltage of the power cord. Not doing so may result in fire or electric shock. "Power Supply: 100-120/200-240 Vac 50/60Hz" |
| Keep small objects or liquids away from the unit. Small objects accidentally falling through the ventilation slots into the cabinet or spillage into the cabinet may result in fire, electric shock, or equipment damage. If an object or liquid falls/spills into the cabinet, unplug the unit immediately. Have the unit checked by a qualified service engineer before using it again. | Set the unit in an appropriate location. Not doing so may result in fire, electric shock, or equipment damage. Do not place outdoors. Do not place in the transportation system (ship, aircraft, trains, automobiles, etc.). Do not place in a dusty or humid environment. Do not place in a location where the steam comes directly on the screen. Do not place near heat generating devices or a humidifier. |
| The equipment must be connected to a grounded main outlet. Not doing so may result in fire or electric shock. | Lamps contain mercury, dispose according to local, state or federal laws. |

CAUTION

Do not block the ventilation slots on the cabinet.
- Do not place any objects on the ventilation slots.
- Do not install the unit in a closed space.
- Do not use the unit laid down or upside down.
Blocking the ventilation slots prevents proper airflow and may result in fire, electric shock, or equipment damage.
Do not carry the monitor with the hood attached.
While carrying the monitor, the hood may fall or slip off, which may result in injury or equipment damage.
Close the open/close cover until it contacts the stopper.
If the cover is not closed properly, the ventilation slots on the monitor will be covered and proper airflow will be prevented. This may cause overheating inside the monitor and may result in fire, electric shock, or equipment damage.

Use an easily accessible power outlet.
This will ensure that you can disconnect the power quickly in case of a problem.

Do not place any objects on the hood.
If the hood falls or slips off or the monitor falls over, it may result in injury or equipment damage.

Do not rotate the monitor into the portrait position.
Doing so may cause the hood to slip off, which may result in injury or equipment damage.
Package Contents
Check that all the following items are included in the packaging box. If any items are missing or damaged, contact your local dealer.
NOTE
Please keep the packaging box and materials for future movement or transport of the monitor.
Monitor
Power cord
Digital signal cable (FD-C39)
- Analog signal cable (FD-C16)
- EIZO USB cable (MD-C93)
Hood
- Mounting Screws (M4 x 12, 4 pcs)
- Cleaning kit "ScreenCleaner"
- EIZO LCD Utility Disk (CD-ROM)
- Calibration software "ColorNavigator"
-User's Manual - Setup Manual (this manual)
ColorNavigator Quick Reference - Limited warranty
Recycling Information - Adjustment Certificate
Controls and Functions
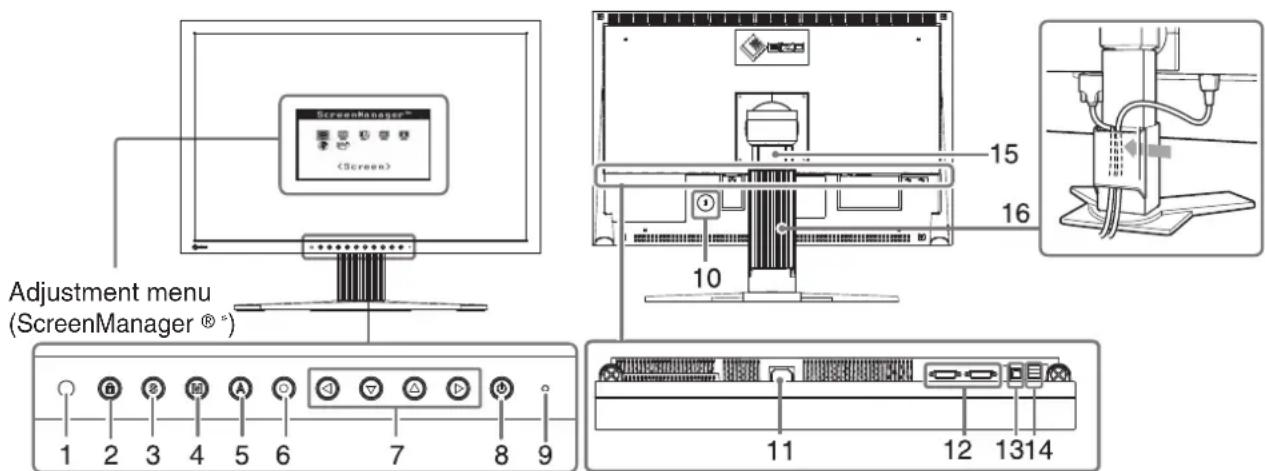
| 1 Sensor Detects ambient brightness. BrightRegulator function. Refer to the User's Manual on the CD-ROM. | |
| 2 Adjustment Lock button Ths function locks the buttons to retain the status adjusted or set once. | |
| 3 Input Signal Selection button | Switches input signals for display when two PCs are connected to the monitor. |
| 4 Mode button Allows you to switch the display mode. | |
| 5 Auto button Performs the function to adjust the screen automatically. (analog input only) | |
| 6 Enter button Displays the Adjustment menu, determines an item on the menu screen, and saves values adjusted. | |
| 7 Control buttons (Left, Down, Up, Right) | Chooses an adjustment item or increases/decreases adjusted values for advanced adjustments using the Adjustment menu. |
| 8 Power button Turns the power on or off. | |
| 9 Power indicator Indicates monitor's operation status. | |
| Blue: Operating Orange: Power saving Off: Power off Flashing blue (2 times for each): When the timer is set for ColorNavigator, notifies that a recalibration is required (for CAL mode or EMU mode). | |
| 10 Security lock slot Complies with Kensington's MicroSaver security system. | |
| 11 Power connector Connects the power connector. | |
| 12 Input signal connectors DV-I Connector x 2 | |
| 13 USB port (Up) Connects the USB cable in order to use the provided software. For how to use it, refer to the User's Manual on the CD-ROM. | |
| 14 USB port (Down) Connects a peripheral USB device. | |
| 15 Stand Used to adjust the height and angle of the monitor screen. | |
| 16 Cable holder Covers the monitor cables. | |
- ScreenManager © is an EIZO's nickname of the Adjustment menu. (For how to use ScreenManager, refer to the User's Manual on the CD-ROM.)
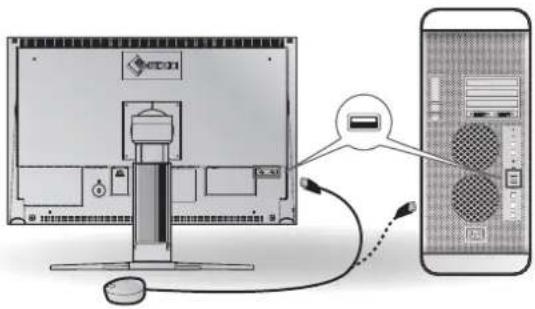
Connecting Cables
Check that the monitor and the PC are powered off.
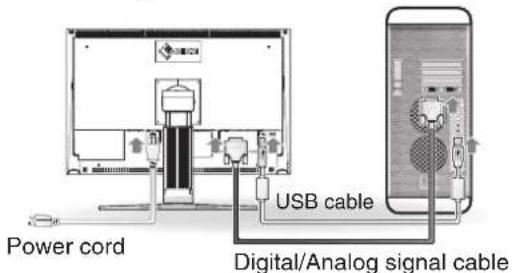
1 Connect the monitor to the PC with a signal cable that matches the connectors. After connecting the cable connectors, tighten the screws of the connectors to secure the coupling.
| Connectors on the PC cable | Connectors on the monitor | |
| S AEG | Signal cable FD-C16 | |
| S AEG | Signal cable FD-C39 |
2 Connect the monitor to the PC with the USB cable.

Note
The USB cable is required for calibration. Be sure to connect the monitor and PC with the USB cable.
3 Plug the power cord into a power outlet and the power connector on the monitor.
4 Press to turn on the monitor.
The monitor's Power indicator lights up blue.
5 Turn on the PC.
The screen image appears.
If an image does not appear, refer to "No-Picture Problem" for additional advice.
Note
- Turn off the monitor and PC after using them. Unplugging the power cord completely shuts off power supply to the monitor.
Adjusting the Screen Height and Angle
Adjust the screen height, tilt and swivel the screen to the best condition for working.

How to install the Hood
The Hood can reduce light reflection for on screen color consistency.
Package Contents
Check that all the following items are included in the packaging box.
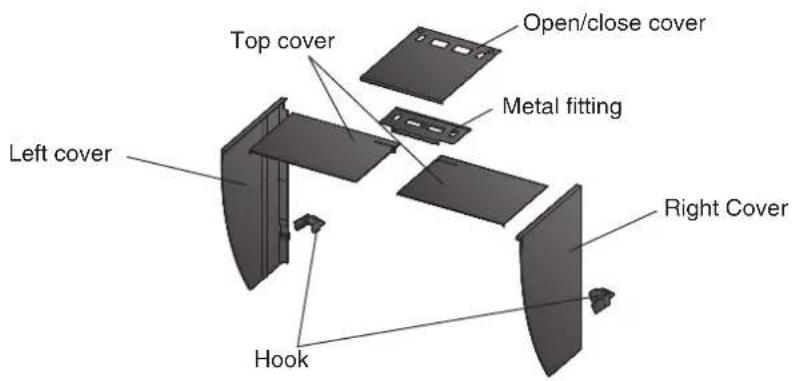
Assemble the left and right hoods
Tips
- Assemble the hoods in the direction of the arrows marked on the insertions on the top covers of the right and left hoods.
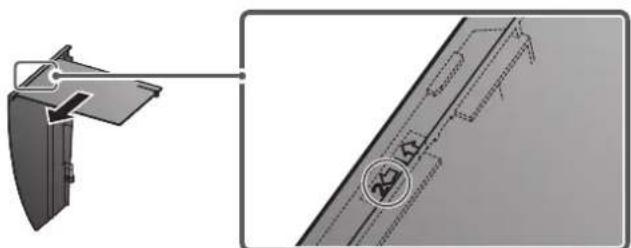
1 Hold the left hood's left and top covers with the sides with the anti-reflective sheet facing inward.
2 Connect the top and left covers by aligning the arrow (1 ) on the top cover's insertion with the two lines on the left cover's insertion slot.
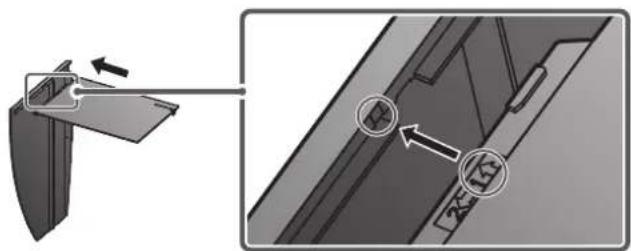
3 Slide the top cover in the direction shown by the arrow (2 ). Assembly of the left hood is complete.
4 Assemble the right hood in the same way.
Attach the left and right hoods to the monitor
Note
- Be sure to install the second hood only after the other hood is firmly attached with hook.
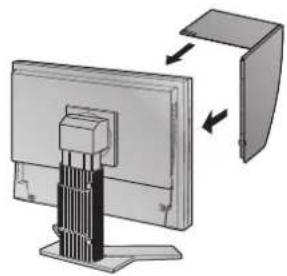
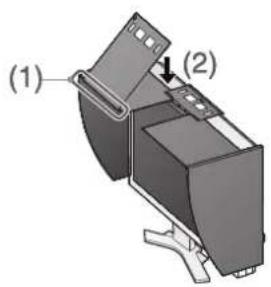
1 Attach the top side of the left hood to the monitor first and then securely fit the left side of the hood in order to fix the hood to the monitor.
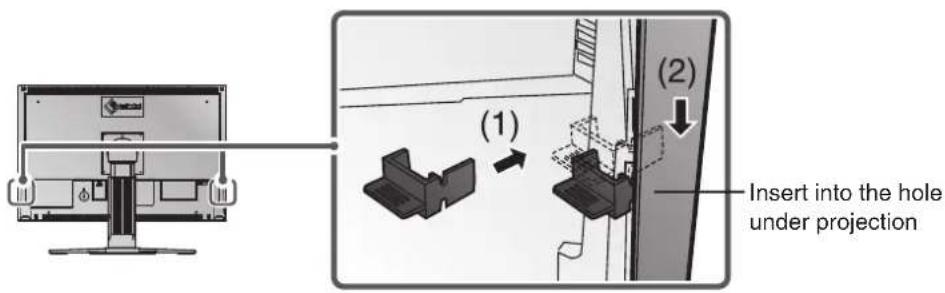
2 Insert the hook into the hole under the projection on the back side of the monitor (1) and slide it down (2).
3 Attach the right hood in the same way.
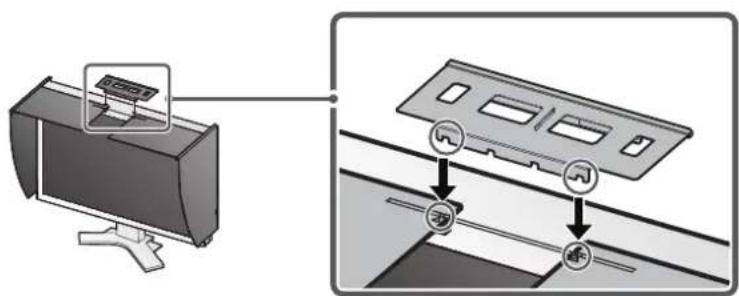
4 Attach the left and right hoods to the monitor with the metal fitting.
5 Check the locations of the depressions in the fitting and insert the fitting into the left and right hoods by aligning those depressions with the projections () in the grooves on the right and left hoods.
6 Attach the open/close cover to the left hood.
Note
- Do not attach the open/close cover to the right hood. Doing so prevents the cover from closing.
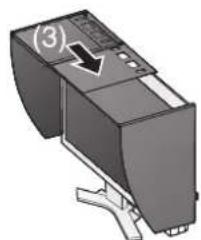
7 Place the open/close cover on the top of the left hood (without contacting the metal fitting) from front (1) to back (2).
Slide the open/close cover to the right (3) until it contacts the stopper on the metal fitting.
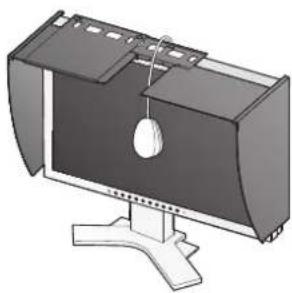
9 When performing calibration, slide the open/close cover to the right in order to attach the sensor.
Note
- The open/close cover does not slide onto the right cover.
Prepare for the Monitor Calibration
Note
- For details regarding the calibration procedure, refer to the ColorNavigator User's manual on the CD-ROM.
Installing ColorNavigator
MacOS X
1 Insert the "EIZO LCD Utility Disk" to the CD-ROM drive
The "EIZO LCD Utility Disk" icon appears on the desktop. Double click the icon to open the window.
2 Double click "ColorNavigator" folder on the window
3 Double click "ColorNavigator.pkg" icon on the window
The ColorNavigator installer starts up.
4 Install the software
Follow the instructions to install the software.
Windows
1 Insert the "EIZO LCD Utility Disk" to the CD-ROM drive
The start menu opens. Click "Software" tab.
Double click the "Launcher.exe" icon if the menu does not open automatically.
If your OS is Windows Vista, the "User Account Control" dialog may appear when you double click "Launcher.exe". Click [Continue] to open the menu.
2 Click "ColorNavigator" on the menu
The other dialog appears.
3 Click "Install" on the menu
The ColorNavigator installer starts up.
"Hardware Installation"(Windows XP) / "Windows Security"(Windows Vista) dialog may appear several times when you install the driver software. Click Continue Anyway / Install this driver software anyway to install the driver software.
Continue the installation of the driver software until the dialog disappears.
4 Install the software
Follow the instructions to install the software.
Connecting the measurement device
Connect your measurement device to the USB downstream port on your computer or keyboard, or the USB port on your monitor.
Note
- The measurement device is not included in this product.
Refer to the User's Manual for the measurement device in regard to connection.
No-Picture Problem
If no picture is displayed on the monitor even after the following remedial action is taken, contact your local dealer.
1. Check the Power indicator.
| Symptom Status Possible cause and remedy | |
| No picture Power indicator does not light up. | Check whether the power cord is connected correctly. If the problem persists, turn off the monitor, and then turn it on again a few minutes later. Press◎ |
| Power indicator lights blue. • Set high values for Gain RGB levels. | |
| Power indicator lights orange. | Switch the input signal with Ⓢ. |
| Press a key on the keyboard or click the mouse. | |
| Turn on the PC. | |
2. Check the error message that remains on the screen.
These messages appear when the input signal is incorrect even if the monitor is functioning.
| Symptom Status Possible cause and remedy | ||
| Signal Check Signal 2 fH: 0.0kHz fU: 0.0Hz | The input signal is not received. | Check whether the PC is turned on. |
| Check whether the signal cable is properly connected to the PC. | ||
| Switch the input signal with S. | ||
| Signal Error Signal 2 fD:165.0MHz fH: 75.0kHz fU: 60.0Hz | The signal frequency is outside the specification. Incorrect signal frequency is shown in red. | Reboot the PC. Change the mode to an appropriate mode using the graphics board's utility software. Refer to the manual of the graphics board for details. |
ColorEdge CG241W
LCD-Farbmonitor