
RXV350 - Home cinema amp YAMAHA - Free user manual and instructions
Find the device manual for free RXV350 YAMAHA in PDF.

| Product type | Home theater amplifier |
| Brand | YAMAHA |
| Model | RXV350 |
| Dimensions (W × H × D) | 435 × 151 × 315 mm |
| Weight | 9.0 kg |
| Power supply | 110–240 V AC, 50/60 Hz (depending on model); power consumption 240 W, standby ≤ 0.7 W |
| Output power (6 ohms, 1 kHz, 0.1% THD) | 5 × 100 W (Canada/US models) or 5 × 90 W (others) |
| Supported audio formats | Dolby Digital, DTS, Dolby Pro Logic II, Dolby Digital + Matrix 6.1, DTS + Matrix 6.1 |
| Sound field processor | CINEMA DSP, Virtual CINEMA DSP, SILENT CINEMA |
| Number of channels | 5.1 (can be extended to 6.1 with Matrix 6.1) |
| Tuner | AM/FM with 40 presets, RDS (depending on model) |
| D/A converter | 96 kHz / 24 bits |
| Digital audio inputs | Optical and coaxial (jacks for PCM, Dolby Digital, DTS signals) |
| 6-channel analog audio input | Yes (RCA jacks: front L/R, center, surround L/R, subwoofer) |
| Speaker outputs | Front A/B, center, surround, subwoofer (mono jack) |
| Supplied accessories | Remote control, batteries (2 × AA), AM loop antenna, indoor FM antenna |
| Maintenance and cleaning | Use a dry, clean cloth; do not use chemical solvents |
| Safety | Do not expose to rain or moisture; do not open the case; disconnect during thunderstorms; respect the power supply voltage; ensure free ventilation (≥ 30 cm above, ≥ 20 cm on sides and rear) |
| Spare parts and repairability | For any repairs, contact an authorized YAMAHA service center; do not attempt to repair yourself |
| General information | 331-page user manual available in several languages (French, English, German, etc.) |
Frequently Asked Questions - RXV350 YAMAHA
User questions about RXV350 YAMAHA
0 question about this device. Answer the ones you know or ask your own.
Ask a new question about this device
Download the instructions for your Home cinema amp in PDF format for free! Find your manual RXV350 - YAMAHA and take your electronic device back in hand. On this page are published all the documents necessary for the use of your device. RXV350 by YAMAHA.
USER MANUAL RXV350 YAMAHA
1 To assure the finest performance, please read this manual carefully. Keep it in a safe place for future reference.
2 Install this sound system in a well ventilated, cool, dry, clean place — away from direct sunlight, heat sources, vibration, dust, moisture, and/or cold. Allow ventilation space of at least 30~cm on the top, 20~cm on the left and right, and 20~cm on the back of this unit.
3 Locate this unit away from other electrical appliances, motors, or transformers to avoid humming sounds.
4 Do not expose this unit to sudden temperature changes from cold to hot, and do not locate this unit in a environment with high humidity (i.e. a room with a humidifier) to prevent condensation inside this unit, which may cause an electrical shock, fire, damage to this unit, and/or personal injury.
5 Avoid installing this unit where foreign object may fall onto this unit and/or this unit may be exposed to liquid dripping or splashing. On the top of this unit, do not place:
- Other components, as they may cause damage and/or discoloration on the surface of this unit.
- Burning objects (i.e. candles), as they may cause fire, damage to this unit, and/or personal injury.
- Containers with liquid in them, as they may fall and liquid may cause electrical shock to the user and/or damage to this unit.
6 Do not cover this unit with a newspaper, tablecloth, curtain, etc. in order not to obstruct heat radiation. If the temperature inside this unit rises, it may cause fire, damage to this unit, and/or personal injury.
7 Do not plug in this unit to a wall outlet until all connections are complete.
8 Do not operate this unit upside-down. It may overheat, possibly causing damage.
9 Do not use force on switches, knobs and/or cords.
10 When disconnecting the power cord from the wall outlet, grasp the plug; do not pull the cord.
11 Do not clean this unit with chemical solvents; this might damage the finish. Use a clean, dry cloth.
12 Only voltage specified on this unit must be used. Using this unit with a higher voltage than specified is dangerous and may cause fire, damage to this unit, and/or personal injury. YAMAHA will not be held responsible for any damage resulting from use of this unit with a voltage other than specified.
13 To prevent damage by lightning, disconnect the power cord from the wall outlet during an electrical storm.
14 Do not attempt to modify or fix this unit. Contact qualified YAMAHA service personnel when any service is needed. The cabinet should never be opened for any reasons.
15 When not planning to use this unit for long periods of time (i.e. vacation), disconnect the AC power plug from the wall outlet.
16 Be sure to read the "TROUBLESHOOTING" section on common operating errors before concluding that this unit is faulty.
17 Before moving this unit, press STANDBY/ON to set this unit in standby mode, and disconnect the AC power plug from the wall outlet.
18 VOLTAGE SELECTOR (Asia and Greneral models only) The VOLTAGE SELECTOR on the rear panel of this unit must be set for your local main voltage BEFORE plugging into the AC main supply. Voltages are 110V-120V, 220V-240V AC, 50/60 Hz.
This unit is not disconnected from the AC power source as long as it is connected to the wall outlet, even if this unit itself is turned off. This state is called standby mode. In this state, this unit is designed to consume a very small quantity of power.
WARNING
TO REDUCE THE RISK OF FIRE OR ELECTRIC SHOCK,DO NOT EXPOSE THIS UNIT TO RAIN OR MOISTURE.
■For U.K. customers
If the socket outlets in the home are not suitable for the plug supplied with this appliance, it should be cut off and an appropriate 3 pin plug fitted. For details, refer to the instructions described below.
Note
- The plug severed from the mains lead must be destroyed, as a plug with bared flexible cord is hazardous if engaged in a live socket outlet.
Special Instructions for U.K. Model
IMPORTANT
THE WIRES IN MAINS LEAD ARE COLOURED IN ACCORDANCE WITH THE FOLLOWING CODE:
Blue: NEUTRAL
Brown: LIVE
As the colours of the wires in the mains lead of this apparatus may not correspond with the coloured markings identifying the terminals in your plug, proceed as follows:
The wire which is coloured BLUE must be connected to the terminal which is marked with the letter N or coloured BLACK. The wire which is coloured BROWN must be connected to the terminal which is marked with the letter L or coloured RED.
Making sure that neither core is connected to the earth terminal of the three pin plug.
CONTENTS
INTRODUCTION
CONTENTS 1
FEATURES 2
GETTING STARTED 3
Supplied accessories 3
Installing batteries in the remote control 3
CONTROLS AND FUNCTIONS 4
Front panel 4
Remote control 6
Front panel display 8
PREPARATION
CONNECTIONS 9
Before connecting components 9
Connecting video components 10
Connecting audio components 11
Connecting the antennas 12
Connecting an external decoder 13
Connecting the speakers 14
Connecting the power supply cords 17
Turning on the power 17
BASIC SYSTEM SETTINGS 18
Using the basic menu 18
Setting the unit to match your speaker system 20
2 SP LEVEL (Setting speaker output levels) 20
BASIC OPERATION
PLAYBACK 21
Input modes and indications 23
Selecting a sound field program 24
DIGITAL SOUND FIELD PROCESSING (DSP)
27
Understanding sound fields 27
HiFi DSP programs 27
CINEMA DSP 28
Sound design of CINEMA DSP 28
CINEMA DSP Programs 28
Sound field effects 30
TUNING 31
Presetting stations 32
Selecting preset stations 34
RECEIVING RDS STATIONS 35
Description of RDS data 35
Changing the RDS mode 35
PTY SEEK function 36
EON function 36
SLEEP TIMER 37
RECORDING 38
ADVANCED OPERATION
SET MENU 39
Set menu list 39
Adjusting the items on the set menu 39
SOUND 1 SPEAKER SET (speaker mode settings) 40
SOUND 2 SP DISTANCE (speaker distance) 42
SOUND 3 LFE LEVEL 42
SOUND 4 D. RANGE (dynamic range) 42
SOUND 5 CENTER GEQ (center graphic equalizer) 43
SOUND 6 HP TONE CTRL (headphone tone control) 43
INPUT 1 I/O ASSIGN (input/output assignment) .. 43
INPUT 2 INPUT MODE (initial input mode) ..... 43
OPTION 1 DISPLAY SET 44
OPTION 2 MEM. GUARD (memory guard) 44
OPTION 3 AUDIO MUTE 44
SETTING THE SPEAKER LEVELS 45
Adjusting the speaker levels during playback 45
Using the test tone 45
ADDITIONAL INFORMATION
EDITING SOUND FIELD PARAMETERS .... 46
Changing parameter settings 46
Sound field parameter descriptions 47
TROUBLESHOOTING 48
Resetting the factory presets 51
GLOSSARY 52
SPECIFICATIONS 54
FEATURES
Built-in 5-channel power amplifier
Minimum RMS output power (0.1% THD, 1 kHz, 6Ω)
[U.S.A. and Canada models]
Front: 100W + 100W
Center: 100 W
Surround: 100W + 100W
[Other models]
Front: 90W + 90W
Center: 90 W
Surround: 90W + 90W
Sound field features
Dolby Pro Logic/Dolby Pro Logic II decoder
Dolby Digital/Dolby Digital ^+ Matrix 6.1 Decoder
DTS/DTS + Matrix 6.1 Decoder
CINEMA DSP: Combination of YAMAHA DSP technology and Dolby Pro Logic, Dolby Digital or DTS
Virtual CINEMA DSP
SILENT CINEMA TM
Sophisticated AM/FM Tuner
40-Station random access preset tuning
Automatic preset tuning
Preset station shifting capability (Preset editing)
Other features
96 kHz/24-bit D/A converter
Set menu for optimizing this unit for your Audio/ Video system
Test tone generator for easier speaker balance adjustment
6-channel external decoder input
Optical and coaxial digital audio signal jacks
Sleep timer
■About this manual
indicates a tip for your operation.
- Some operations can be performed by using either the buttons on the main unit or on the remote control. In cases when the button names differ between the main unit and the remote control, the button name on the remote control is given in parentheses.
- This manual is printed prior to production. Design and specifications are subject to change in part for the reason of the improvement in operativity ability, and others. In this case, the product has priority.

DIGITAL
PROLOGIC II
Manufactured under license from Dolby Laboratories.
"Dolby", "Pro Logic", and the double-D symbol are trademarks of Dolby Laboratories.

1
"DTS" and "DTS Digital Surround" are registered trademarks of Digital Theater Systems, Inc.
"SILENT CINEMA" is a trademark of YAMAHA CORPORATION.
GETTING STARTED
Supplied accessories
Please check that you received all of the following parts.
Remote control

Batteries (2)
(AA, R06, UM-3)
AM loop antenna

Indoor FM antenna
(U.S.A., Canada, China, Asia and General models)
(Europe, U.K., Australia and Korea models)

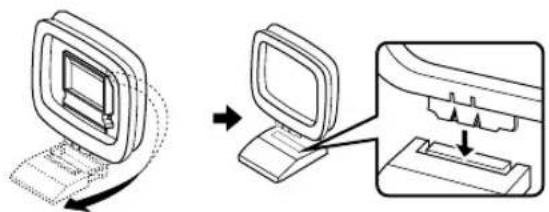
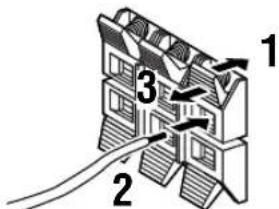
Installing batteries in the remote control
Insert the batteries in the correct direction by aligning the + and - marks on the batteries with the polarity markings (+) and (-) inside the battery compartment.
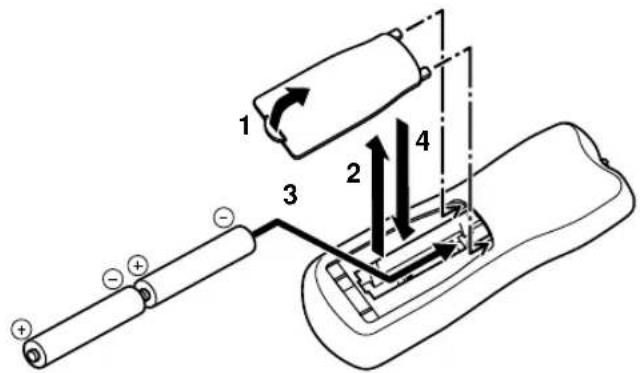
1 Press the tab of the battery compartment cover and pull it in the direction of the arrow to open the cover.
2 Remove the cover.
3 Insert the two batteries supplied (AA, R06, UM-3) according to the polarity markings on the inside of the battery compartment.
4 Put the cover back into place.
Notes on batteries
- Change all of the batteries if you notice a decrease in the operating range of the remote control.
- Do not use old batteries together with new ones.
- Do not use different types of batteries (such as alkaline and manganese batteries) together. Read the packaging carefully as these different types of batteries may have the same shape and color.
- If the batteries have leaked, dispose of them immediately. Avoid touching the leaked material or letting it come into contact with clothing, etc. Clean the battery compartment thoroughly before installing new batteries.
CONTROLS AND FUNCTIONS
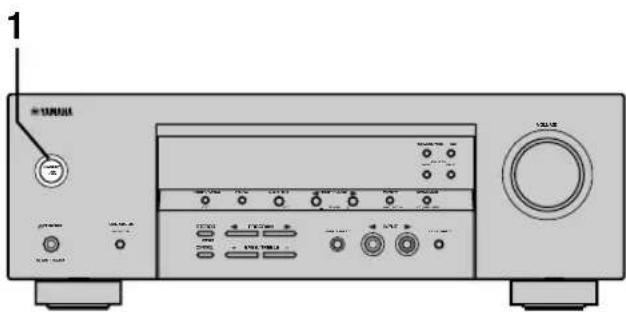
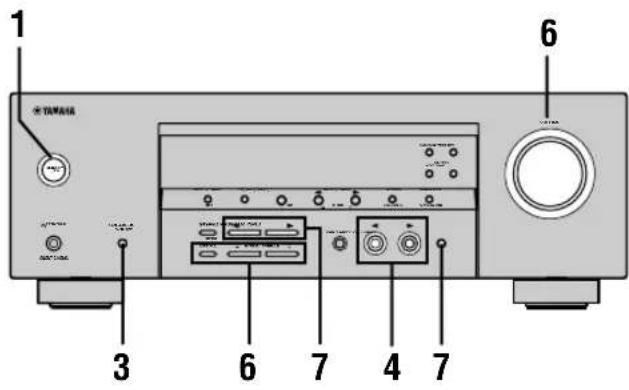
Front panel
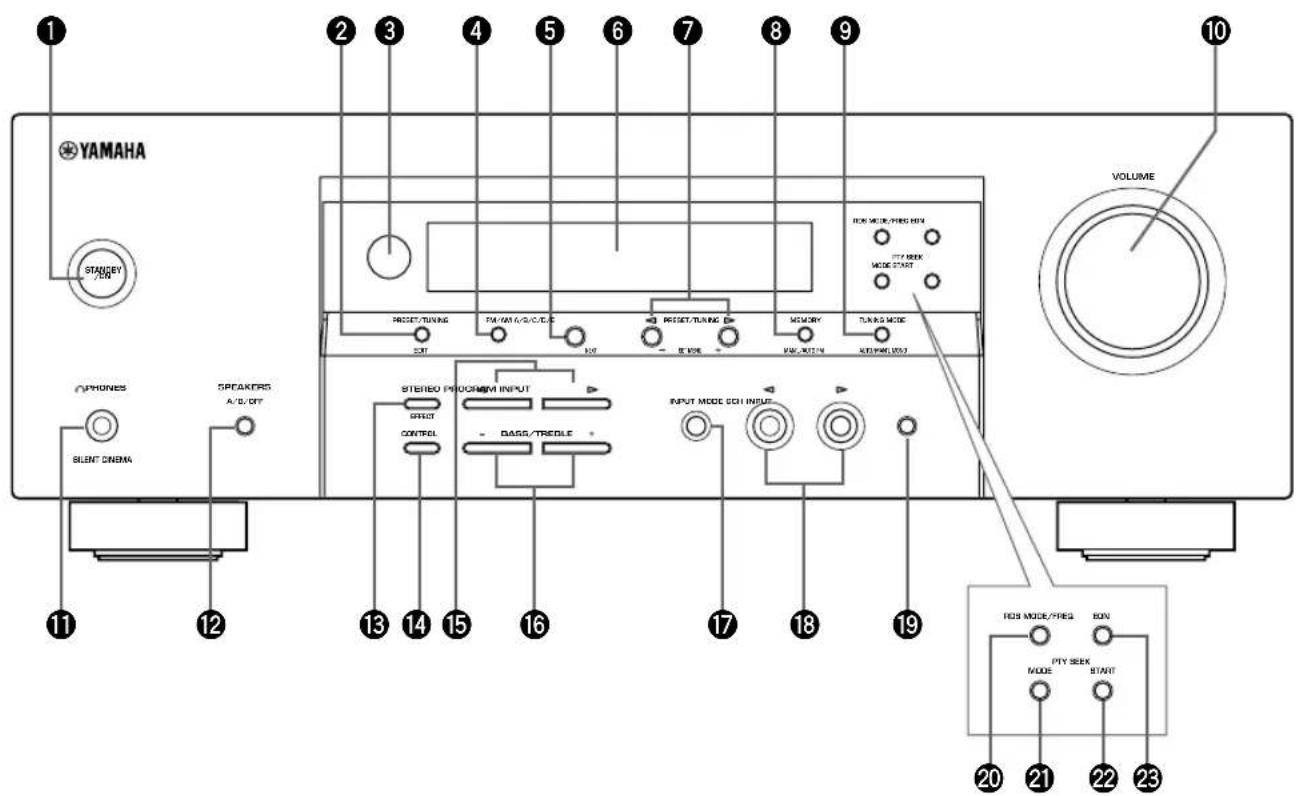
(U.K. and Europe models only)
STANDBY/ON
Turns on this unit or sets it to the standby mode. When you turn on this unit, you will hear a click and there will be a 4 to 5-second delay before this unit can reproduce sound.
Note
In standby mode, this unit consumes a small amount of power in order to receive infrared-signals from the remote control.
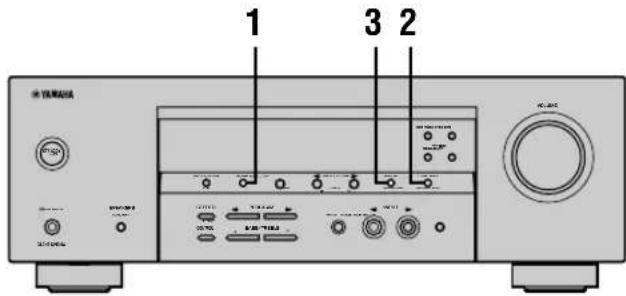
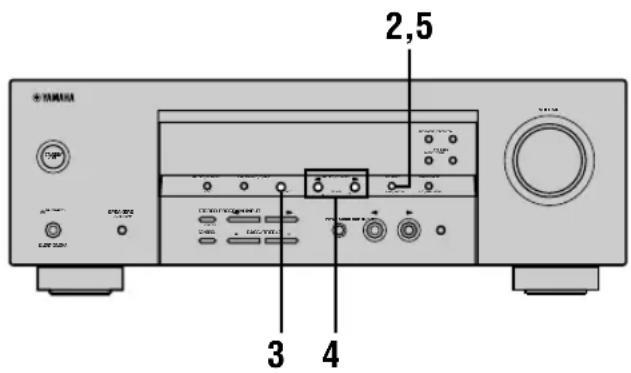
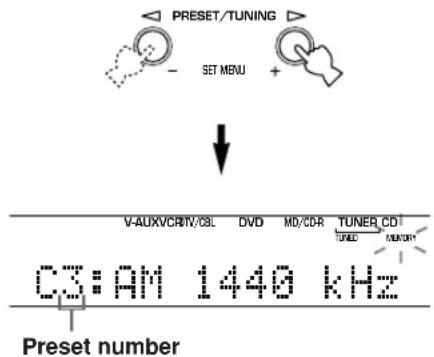
2 PRESET/TUNING
Switches the function of PRESET/TUNING < 1 / > between selecting a preset station number and tuning (the colon (·) turns on or off).
(EDIT)
This button is also used to exchange the assignment of two preset stations with each other.
Remote control sensor
Receives signals from the remote control.
FM/AM
Switches the reception band between FM and AM.
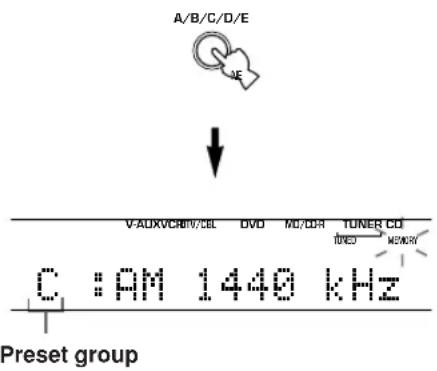
A/B/C/D/E
Selects preset station groups A to E when the unit is in tune mode.
(NEXT)
Selects the set menu mode when the unit is not in tuner mode.
Front panel display
Shows information about the operational status of the unit.
7 PRESET/TUNING /
Select preset station numbers 1 to 8 when a colon (·) is displayed in the front panel display. Select the tuning frequency when a colon (·) is not displayed when the unit is in tuner mode.
(SET MENU - / +
Adjust settings on the set menu when the unit is not in tuner mode.
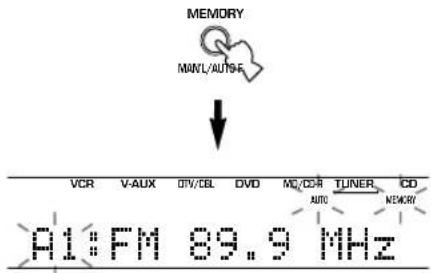
3MEMORY (MAN'L/AUTO FM)
Stores a station in the memory.
9TUNING MODE (AUTO/MAN'L MONO)
Switches the tuning mode between automatic and manual.
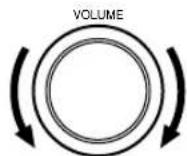
10VOLUME
Controls the output level of all audio channels. This does not affect the OUT (REC) level.
1 PHONES (SILENT CINEMA)
Allows you to enjoy DSP effects when listening with headphones.
SPEAKERS A/B/OFF
Selects the set of front speakers connected to the A or B terminals. To turn off the speakers, press the button repeatedly and select OFF.
3STEREO (EFFECT)
Switches between normal stereo and DSP effect reproduction. When you select STEREO, the unit mixes down all Dolby Digital and DTS signals (except the LFE channel) as well as those 2-channel signals without effect sounds, to the front left and right speakers.
14CONTROL
Switches between Bass (low-frequency response) control mode and Treble (high-frequency response) control mode.
15PROGRAM
Use to select sound field programs.
16BASS/TREBLE-/+
Increase or decrease low/high-frequency response when the unit is in Bass/Treble control mode. The sound changes 2dB each time you press one of these buttons. Control range: -10 to +10dB.
INPUT MODE
Sets the priority for the types of input signals (AUTO, DTS, ANALOG) received when one component is connected to two types of input jacks. You cannot set priority for an audio sources if you have selected 6CH INPUT as the input source.
INPUT
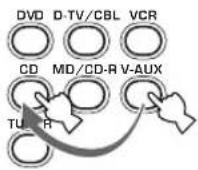
Selects the input source you want to listen to or watch.
96CH INPUT
Selects the audio source connected to the 6CH INPUT jacks. This selection takes priority over sources selected with INPUT (or the input selector buttons on the remote control).
■U.K. and Europe models only
20RDS MODE/FREQ
Press this button when the unit is receiving an RDS station, to cycle the display mode among PS mode, PTY mode, RT mode, CT mode (if the station offers those RDS data service) and/or frequency display mode in turn.
②PTY SEEK MODE
Press this button to set the unit in the PTY SEEK mode.
2PTY SEEK START
Press this button to begin searching for a station after the desired program type has been selected in the PTY SEEK mode.
EON
Press this button to select a radio program type (NEWS, INFO, AFFAIRS, SPORT) to tune in automatically.
Remote control
This section describes the function of each control on the remote control.
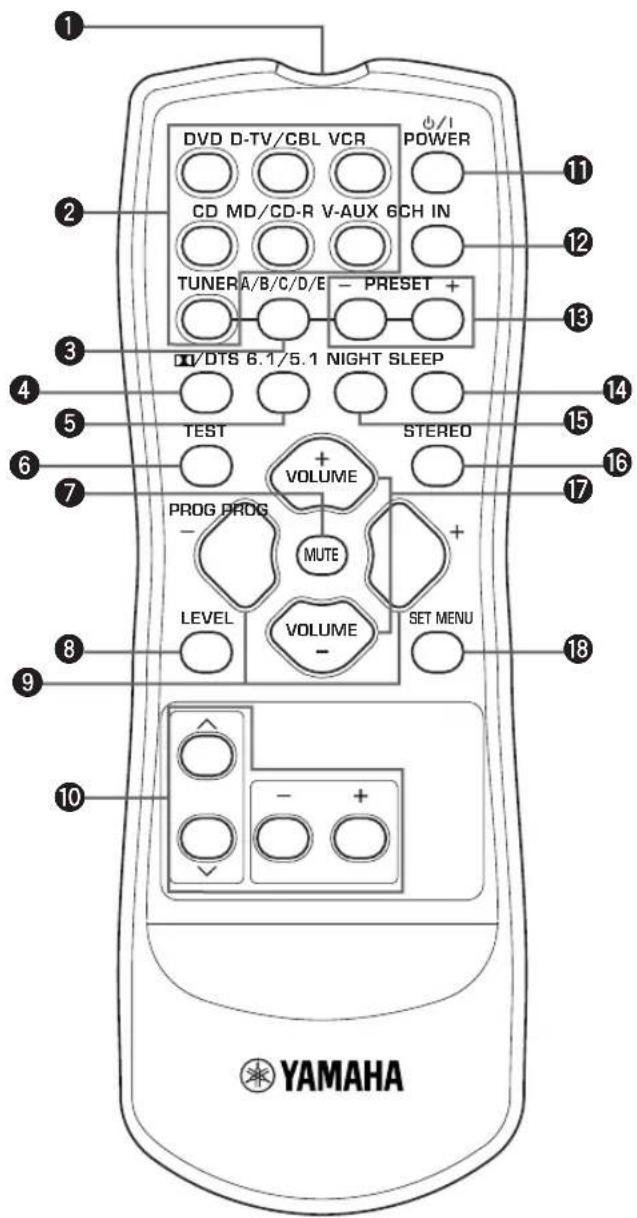
Infrared emitter
Outputs infrared control signals. Aim this emitter at the unit when using the remote control.
Input selector buttons
Select the input source and change the control area.
A/B/C/D/E
Selects preset station groups A to E when the unit is in tune mode.
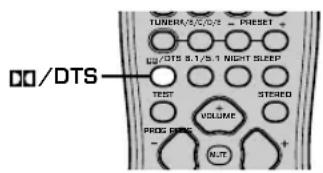
4D/DTS
Selects the built-in Dolby Digital, DTS, Dolby Pro Logic or Pro Logic II decoder.
6.1/5.1
Switches on or off the Dolby Digital + Matrix 6.1 or DTS + Matrix 6.1 decoder.
6TEST
Outputs the test tone to adjust the speaker levels.
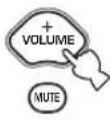
MUTE
Mutes the sound. Press again to restore the audio output to the previous volume level.
LEVEL
Selects the effect speaker channel to adjust.
9PROGRAM-/+
Use to select sound field programs.
10Multi control section
Use to select and adjust sound field program parameters or SET MENU items.
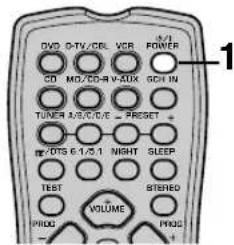
1 POWER
Turns the unit on, or sets it in standby mode.
26CH IN
Selects the audio source connected to the 6CH INPUT jacks.
15 PRESET-/+
Select preset station numbers 1 to 8.
4SLEEP
Sets the sleep timer.
15NIGHT
Sets the unit in night listening mode.
16STEREO
Switches between normal stereo and DSP effect reproduction. When you select STEREO the unit mixes down all Dolby Digital and DTS signals (except the LFE channel) as well as those 2-channel signals without effect sounds, to the front left and right speakers.
VOLUME + / -
Increases or decreases the volume level.
SET MENU
Selects the set menu mode.
Using the remote control
The remote control transmits a directional infrared beam. Be sure to aim the remote control directly at the remote control sensor on the main unit during operation.
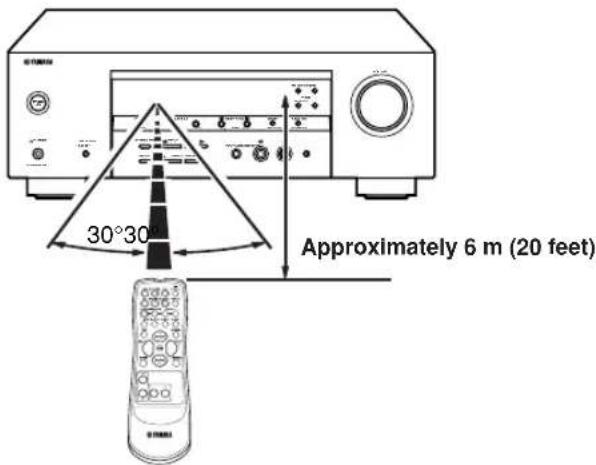
■Handling the remote control
- Do not spill water or other liquids on the remote control.
- Do not drop the remote control.
- Do not leave or store the remote control in the following types of conditions:
- high humidity such as near a bath
- high temperature such as near a heater or stove
extremely low temperature
-dustyplaces
Front panel display
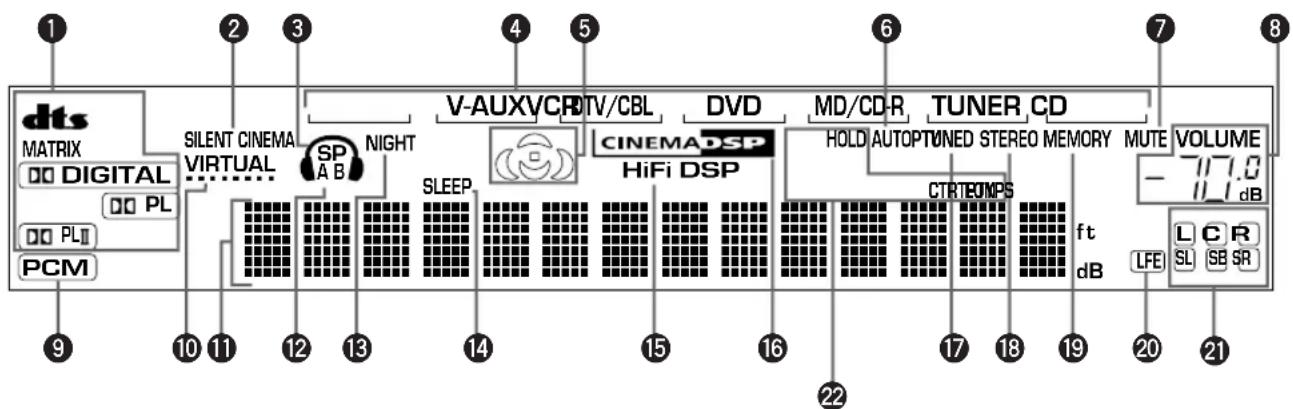
(U.K. and Europe models only)
1 Decoder indicators
When any of this unit's decoders function, the respective indicator lights up.
SILENT CINEMA indicator
Lights up when headphones are connected and a sound field program is selected (see page 26).
3 Headphones indicator
Lights up when headphones are connected to the.
headphone jack.
4 Input source indicator
Highlights the current input source with a cursor.
Sound field indicator
Light to indicate the active DSP sound fields.
AUTO indicator
Shows that this unit is in the automatic tuning mode.
MUTE indicator
Flashes while the MUTE function is on.
VOLUME level indicator
Indicates the volume level.
⑨ PCM indicator
Lights up when this unit is reproducing PCM (pulse code modulation) digital audio signals.
10 VIRTUAL indicator
Lights up when using Virtual CINEMA DSP.
1 Multi-information display
Shows the current sound field program name and other information when adjusting or changing settings.
SPABindicator
Lights up to indicate which set of front speakers is selected. Both indicators light up when both sets of speakers are selected.
15 NIGHT indicator
Lights up when the unit is set to night listening mode.
14 SLEEP indicator
Lights up while the sleep timer is on.
HiFi DSP indicator
Lights up when you select a HiFi DSP sound field program.
CINEMA DSP indicator
Lights up when you select a CINEMA DSP sound field program.
TUNED indicator
Lights up when this unit is tuned to a radio station.
STEREO indicator
Lights up when the unit is receiving a strong signal from a FM stereo broadcast while the "AUTO" indicator is lit.
19 MEMORY indicator
Flashes to show a station can be stored.
20 LFE indicator
Lights up when the input signal contains an LFE signal.
2 Input channel indicator
The indicators for the appropriate sound channels light up when a digital signal from a source is played back.
2 RDS indicator (U.K. and Europe models only)
The name(s) of the RDS data offered by the currently received RDS station light(s) up.
EON lights up when an RDS station that offers the EON data service is being received.
PTY HOLD lights up while searching for stations in the PTY SEEK mode.
CONNECTIONS
Before connecting components
CAUTION
Do not connect this unit or other components to the mains power until all connections between the components have been completed.
- Be sure to connect the left channel (L), right channel (R), "+" (red) and "-" (black) properly. Some components require different connection methods and have different jack names. Refer to the operation instructions for each component you wish to connect to this unit.
After you have completed all connections, check them again to make sure they are correct. - The jack names correspond to the names on the input selector.
Connecting to digital jacks
This unit has digital jacks for direct transmission of digital signals through either a coaxial or fiber optic cable. You can use the digital jacks to input PCM, Dolby Digital and DTS bitstreams. Use digital connections if you wish to enjoy the multi-channel sound track of DVD material, etc. with DSP effects. Both digital input jacks are acceptable for 96kHz sampling digital signals.
Note
- The OPTICAL jack on this unit conform to the EIA standard. If you use a fiber optic cable that does not conform to EIA standard, this unit may not function properly.
DIGITAL INPUT jacks
(pages 9-11)
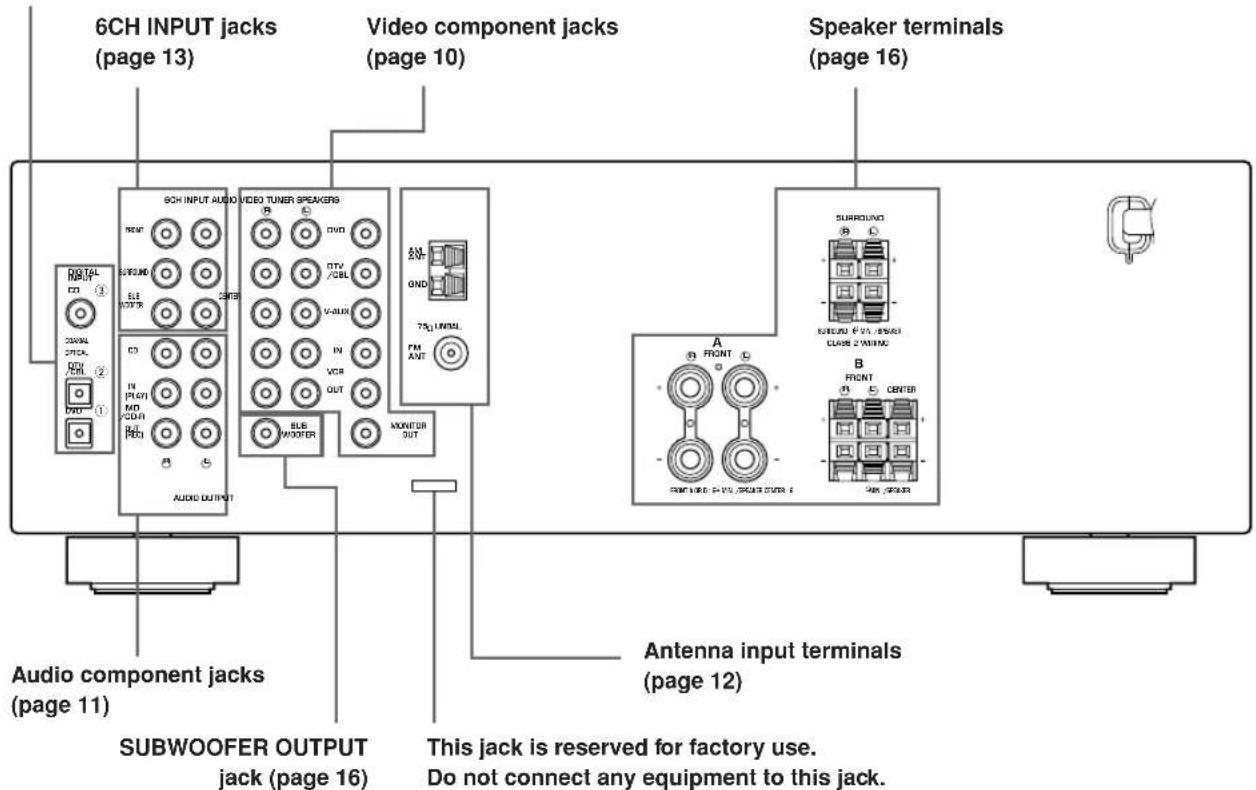
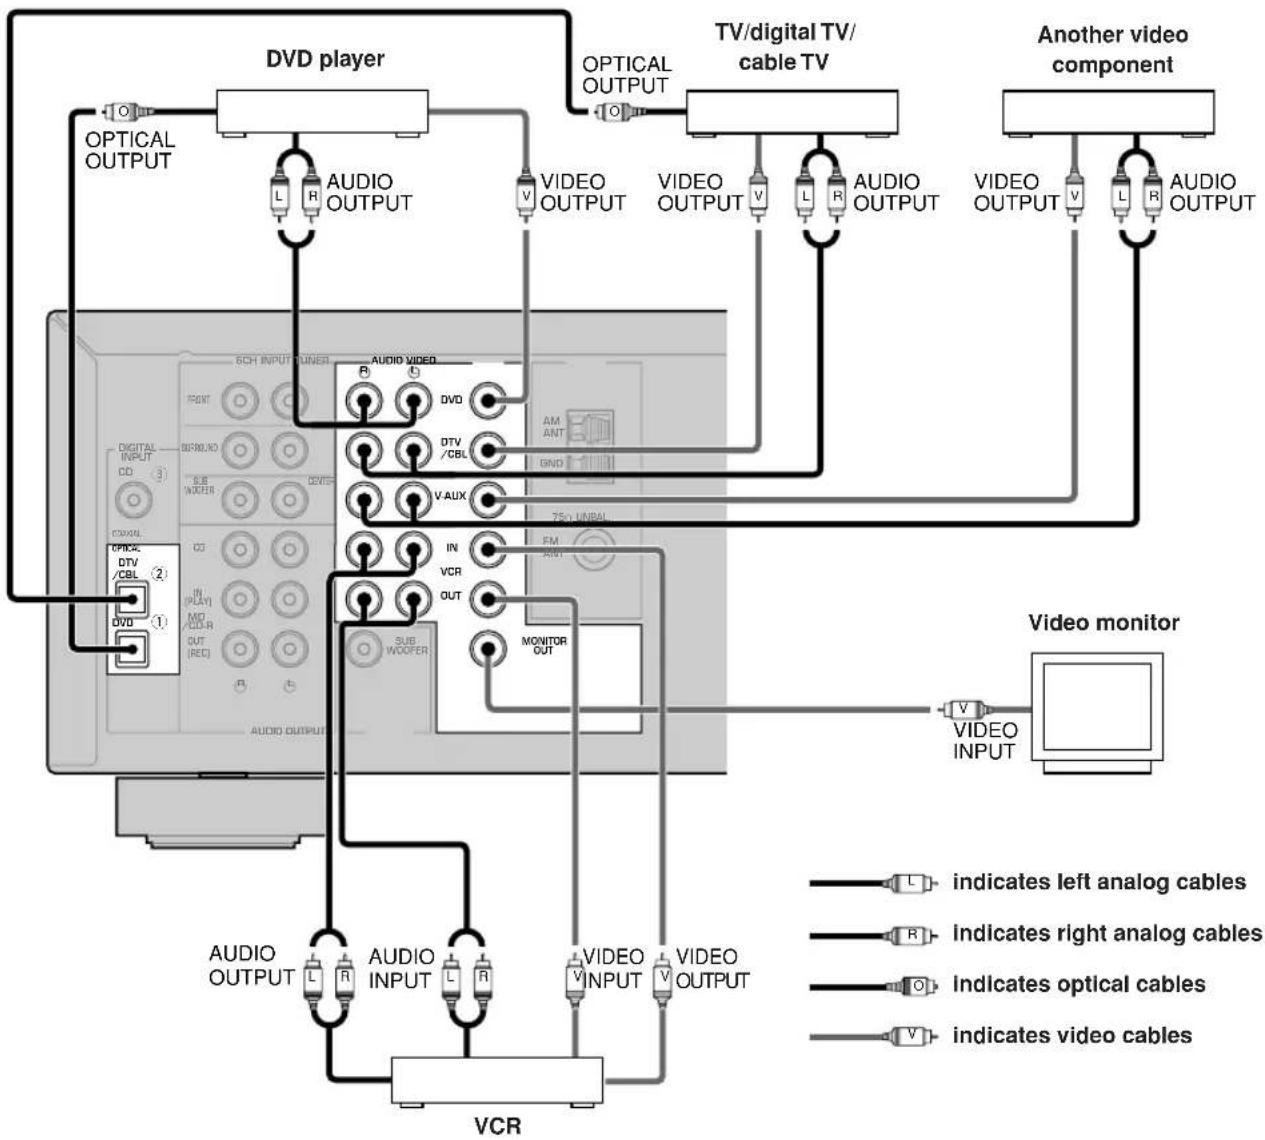
Connecting video components
Connecting a video monitor
Connect the video input jack on your video monitor to the MONITOR OUTVIDEO jack.
Connecting a DVD player/digital TV/cable TV
Connect the optical digital audio signal output jack on your component to the DIGITAL INPUT jack and connect the video signal output jack on the component to the VIDEO jack on this unit.
#
- Use the AUDIO jacks on this unit for a video component which does not have optical digital output jack. However, multi-channel reproduction cannot be obtained with audio signals input from the AUDIO jacks.
Connecting a digital TV/cable TV
Connect the video signal output jack on your component to the VIDEO jack on this unit.
Connect the audio signal output jacks on the component to the AUDIO jacks on this unit.
Connecting another video component
Connect the video signal output jack on your component to the VIDEO jack on this unit.
Connect the audio signal output jacks on the component to the AUDIO jacks on this unit.
Connecting a recording component
Connect the audio signal input jacks on your video component to the AUDIO OUT jacks on this unit. Then connect the video signal input jack on the video component to theVIDEO OUT jack on this unit for picture recording.
Connect the audio signal output jacks on your component to the AUDIO IN jacks on this unit. Then connect the video signal output jack on the component to theVIDEO IN jack on this unit to play a source from your recording component.
Note
- Once you have connected a recording component to this unit, keep its power turned on while using this unit. If the power is off, this unit may distort the sound from other components.
Connecting audio components
Connecting a CD player
Connect the coaxial digital output jack on your CD player to the DIGITAL INPUT CD jack on this unit.

- Use the AUDIO jacks on this unit to connect to a CD player that does not have a COAXIAL DIGITAL OUTPUT jack, or to record from CD players.
- Connecting a CD recorder or MD recorder
Connect the input jacks on your CD recorder or MD recorder to the MD/CD-R OUT (REC) jacks. Connect the output jacks on your CD recorder or MD recorder to the MD/CD-R IN (PLAY) jacks to play a source from your recording component.
Note
- Once you have connected a recording component to this unit, keep its power turned on while using this unit. If the power is off, this unit may distort the sound from other components.
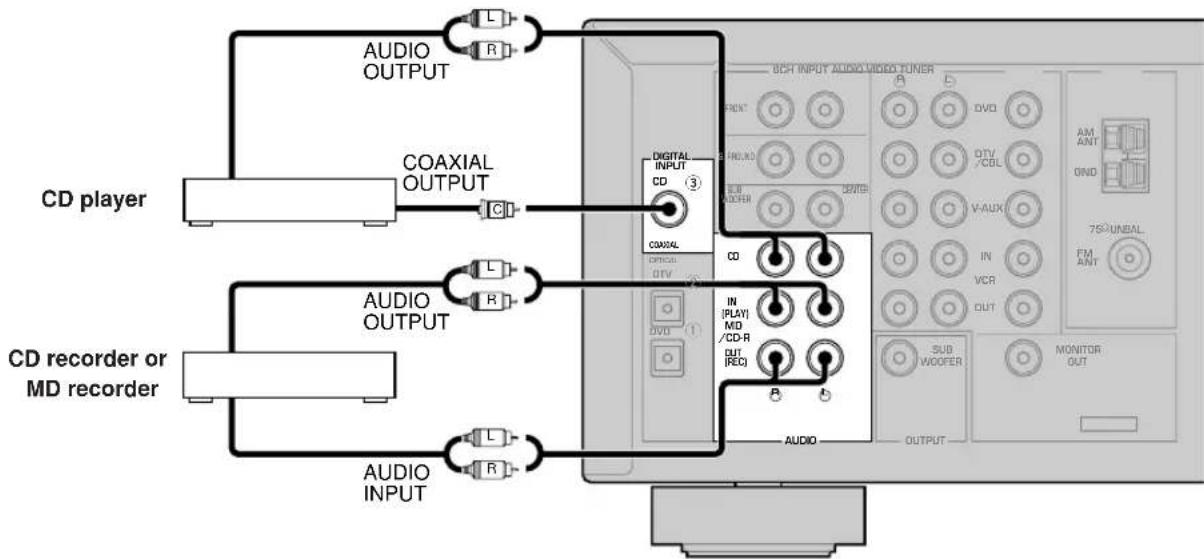


indicates left analog cables


indicates right analog cables


indicates coaxial cables
Connecting the antennas
Both AM and FM indoor antennas are included with this unit. In general, these antennas should provide sufficient signal strength.
Connect each antenna correctly to the designated terminals.
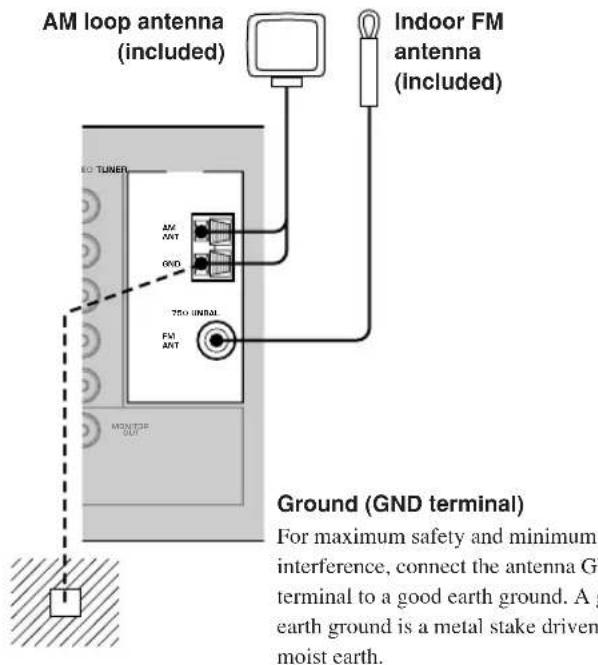
Connecting the AM loop antenna
1 Set up the AM loop antenna, then connect it to the terminals on this unit.
2 Press and hold the tab to insert the AM loop antenna lead wires into the AM ANT and GND terminals.
3 Orient the AM loop antenna for the best reception.

Notes
- The AM loop antenna should be placed away from this unit.
- The AM loop antenna should always be connected, even if an outdoor AM antenna is connected to this unit.
- A properly installed outdoor antenna provides clearer reception than an indoor one. If you experience poor reception quality, an outdoor antenna may improve the quality. Consult the nearest authorized YAMAHA dealer or service center about the outdoor antennas.
FREQUENCY STEP switch (Asia and General models only)

Because the interstation frequency spacing differs in different areas, set the FREQUENCY STEP switch (locating on the rear panel) according to the frequency spacing in your area.
North, Central and South America: 100kHz / 10kHz
- Other areas: 50kHz / 9kHz Before setting this switch, disconnect this unit's AC power cord from the wall outlet.
Connecting an external decoder
This unit is equipped with 6 additional input jacks (FRONT left and right, CENTER, SURROUND left and right and SUBWOOFER) for discrete multi-channel input from a component equipped with a multi-channel decoder and 6 channel output jacks such as a DVD/Super Audio CD player.
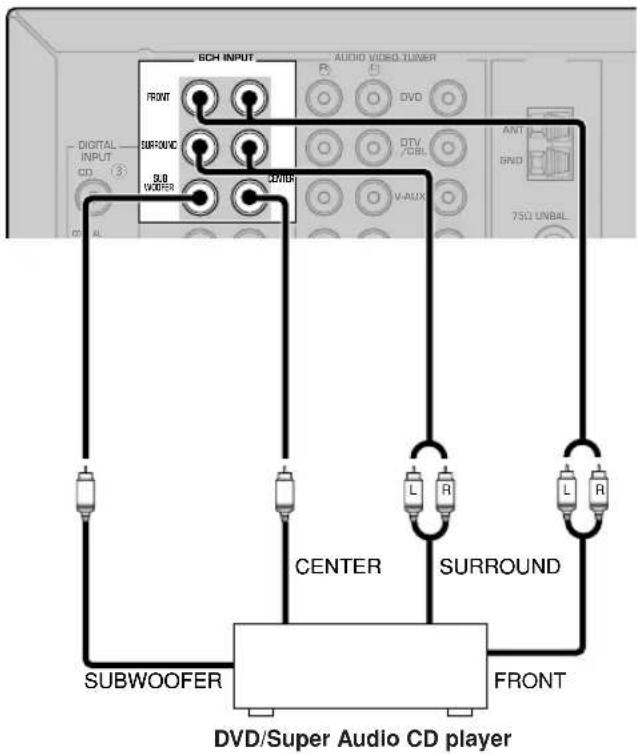
Notes
- When you select 6CH INPUT as the input source, this unit automatically turns off the digital sound field processor, and you cannot select sound field programs.
- When headphones are used, only front L/R channels are output.
Connecting the speakers
■Speaker placement
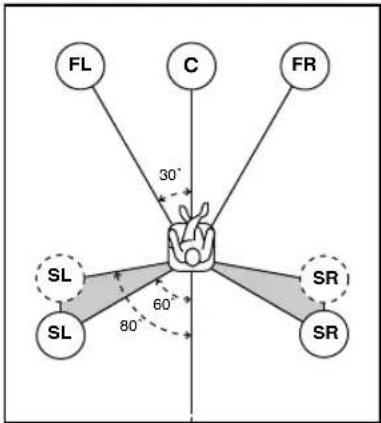
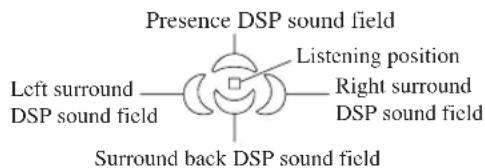
The speaker layout above shows the standard ITU-R speaker setting. You can use it to enjoy CINEMA DSP, multi-channel audio sources.
Front speakers (FR and FL)
The front speakers are used for the main source sound plus effect sounds. Place these speakers an equal distance from the ideal listening position. The distance of each speaker from each side of the video monitor should be the same.
Center speaker (C)
The center speaker is for the center channel sounds (dialog, vocals, etc.). If for some reason it is not practical to use a center speaker, you can do without it. Best results, however, are obtained with the full system. Align the front face of the center speaker with the front face of your video monitor. Place the speaker centrally between the front speakers and as close to the monitor as possible, such as directly over or under it.
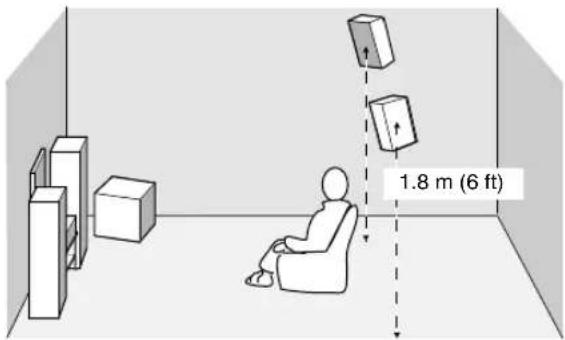
Surround speakers (SR and SL)
The surround speakers are used for effect and surround sounds. Place these speakers behind your listening position, facing slightly inwards, about 1.8m (6 ft) above the floor.
Subwoofer
The use of a subwoofer, such as the YAMAHA Active Servo Processing Subwoofer System, is effective not only for reinforcing bass frequencies from any or all channels, but also for high fidelity reproduction of the LFE (low frequency effect) channel included in Dolby Digital and DTS software. The position of the subwoofer is not so critical, because low bass sounds are not highly directional. But it is better to place the subwoofer near the front speakers. Turn it slightly toward the center of the room to reduce wall reflections.
■Speaker connections
Be sure to connect the left channel (L), right channel (R), "+" (red) and "-" (black) properly. If the connections are faulty, no sound will be heard from the speakers, and if the polarity of the speaker connections is incorrect, the sound will be unnatural and lack bass.
CAUTION
- Use speakers with the specified impedance shown on the rear panel of this unit.
- Before connecting the speakers, make sure that the power of this unit is off.
- Do not let the bare speaker wires touch each other or do not let them touch any metal part of this unit. This could damage this unit and/or speakers.
- Use magnetically shielded speakers. If this type of speakers still creates the interference with the monitor, place the speakers away from the monitor.
Connecting to the FRONT A SPEAKERS terminals
A speaker cord is actually a pair of insulated cables running side by side. One cable is colored or shaped differently, perhaps with a stripe, groove or ridges. Connect the striped (grooved, etc.) cable to the “+” (red) terminals on this unit and your speaker. Connect the plain cable to the “-” (black) terminals.

Red: positive (+) Black: negative (-)
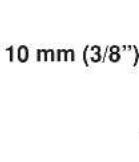
1 Remove approximately 10 mm( 3/8) of insulation from the end of each of the speaker cables.
2 Twist the exposed wires of the cable together to prevent short circuits.
3 Unscrew the knob.
4 Insert one bare wire into the hole in the side of each terminal.
5 Tighten the knob to secure the wire.
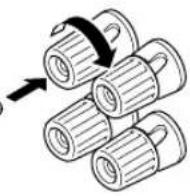
Banana plug
(With the exception of U.K., Europe and Asia models)
Banana plug connections
With the exception of U.K., Europe and Asia models) First, tighten the knob and then insert the banana plug connector into the end of the corresponding terminal.
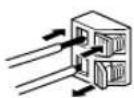
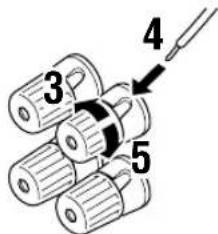
Connecting to the FRONT B, CENTER and SURROUND SPEAKERS terminals
Red: positive (+) Black: negative (-)
1 Press and open the tab.
2 Insert one bare wire into the hole of each terminal.
3 Release the tab to secure the wire.
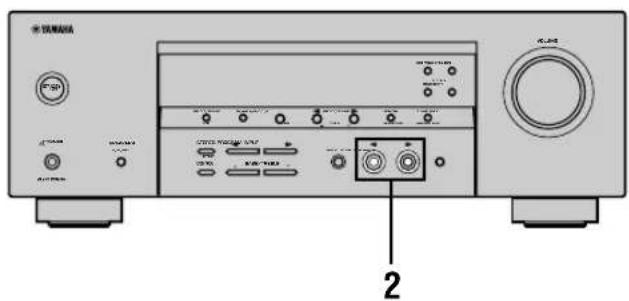
CONNECTIONS
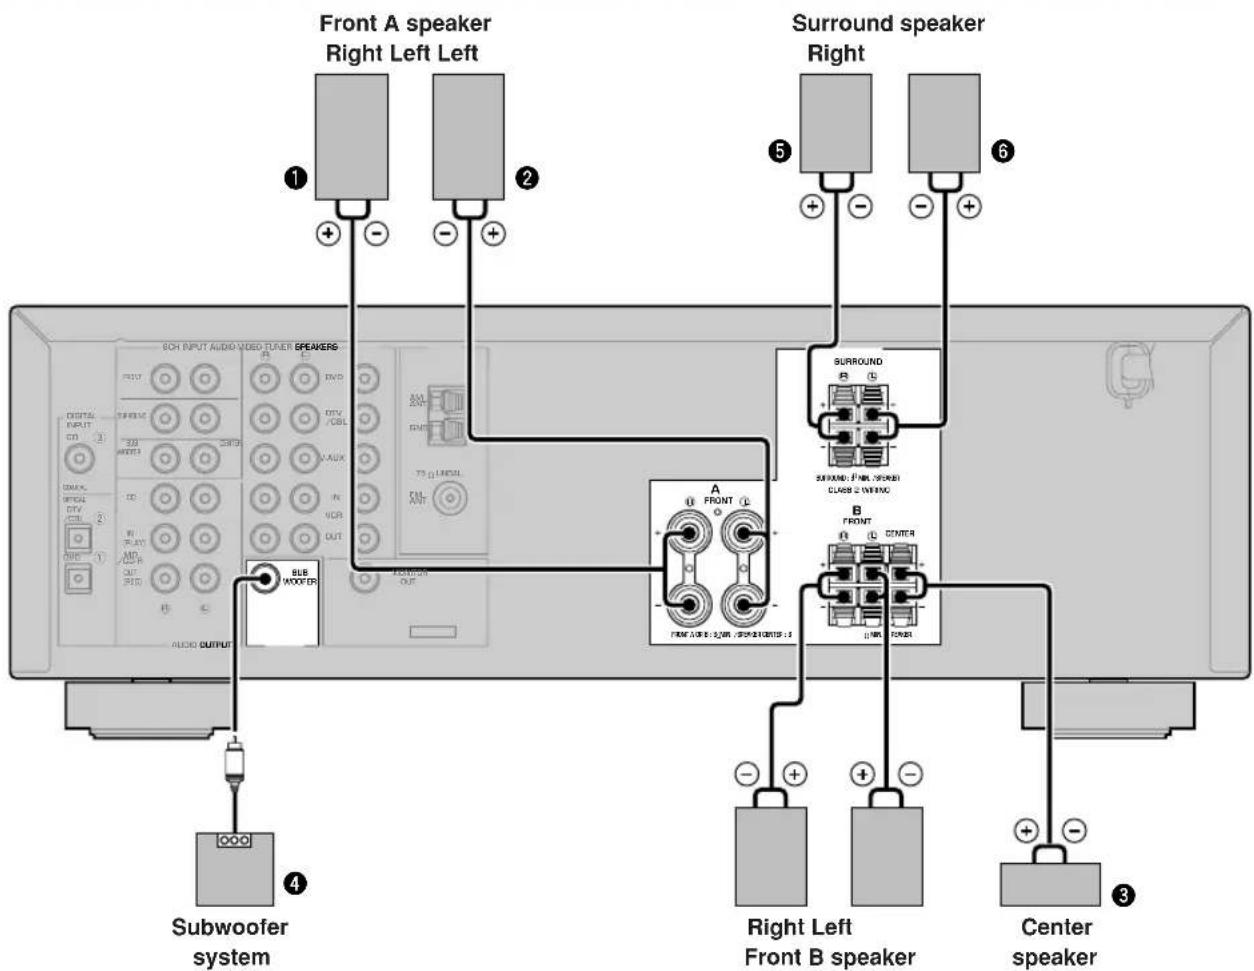
FRONT SPEAKERS terminals
You can connect up to two speaker systems to these terminals. When using only one speaker system, connect it to either of the FRONT A or the FRONT B terminals.
A surround speaker system can be connected to these terminals.
CENTER SPEAKER terminals
A center speaker can be connected to these terminals.
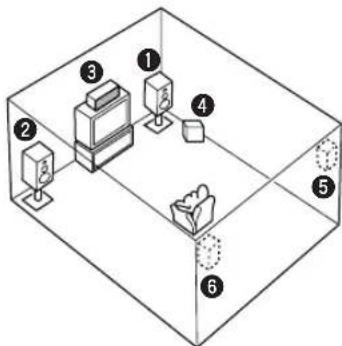
The diagram shows the speaker layout in the listening room.
SUBWOOFER jack
When using a subwoofer with built-in amplifier, including the YAMAHA Active Servo Processing Subwoofer System, connect the input jack of the subwoofer system to this jack. This unit will direct low bass signals distributed from the front, center and/or surround channels to this jack in accordance with your SPEAKER SET selections. The LFE (low-frequency effect) signals generated when Dolby Digital or DTS is decoded are also directed to this jack in accordance with your SPEAKER SET selections.
Notes
The cut-off frequency of the SUBWOOFER jack is 90Hz
- If you do not use a subwoofer, allocate the signals to the front left and right speakers by changing the setting of "SOUND 1 SPEAKER SET" item "1D BASS" on the set menu to FRONT.
- Use the control on the subwoofer to adjust its volume level. You can also adjust the volume level by using this unit's remote control (see "SETTING THE SPEAKER LEVELS" on page 45).
Connecting the power supply cords
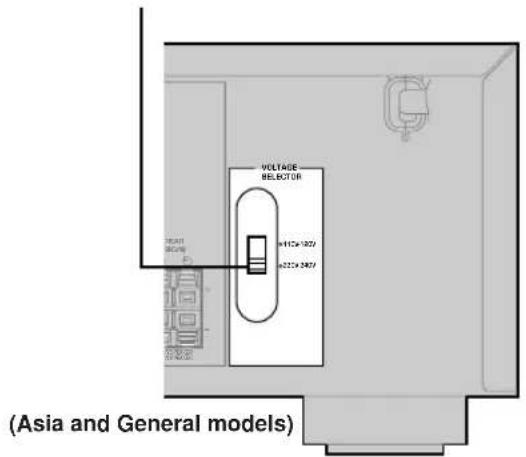
VOLTAGE SELECTOR
Connecting the AC power cord
Plug the power cord into an AC wall outlet.
■VOLTAGE SELECTOR
(Asia and General models only)
The VOLTAGE SELECTOR on the rear panel of this unit must be set for your local main voltage BEFORE plugging into the AC main supply. Voltages are 110V - 120V / 220V - 240VAC 50 / 60Hz
Turning on the power
When all connections are complete, turn on the power of this unit.
1 Press STANDBY/ON (POWER on the remote control) to turn on the power of this unit.
Front panel

or


Remote control
The level of the volume, and then the current sound field program name appear on the front panel display.
BASIC SYSTEM SETTINGS
The "BASIC" menu allows you to set some of the basic "SOUND" menu parameters with a minimum of effort. If you wish to configure the unit more precisely to suit your listening environment, use the more detailed parameters from the "SOUND" menu instead of those under the "BASIC" menu (See page 40). Altering any parameters in the BASIC menu will reset all parameters in the "SOUND" menu.
Using the basic menu
Use the remote control to make adjustments.
- Press SPEAKERS A/B/OFF on the front panel to select the front speakers you want to use.
- Make sure you disconnect headphones from this unit.
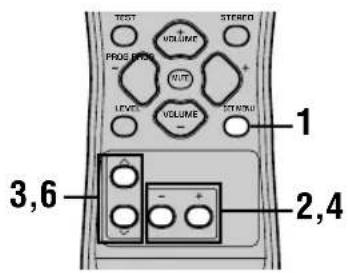
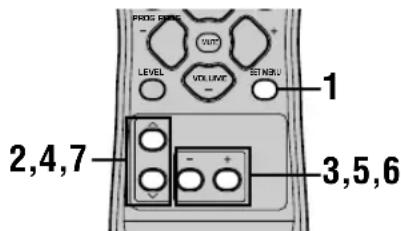
1 Press SET MENU.
"BASIC MENU" appears on the front panel display.


BASIC MENU
If the front panel display changes to show anything other than "BASIC MENU", press SET MENU until it displays "BASIC MENU".
2 Press - / + to enter into the BASIC menu.
"1 SETUP" appears on the front panel display.

3 Press / to change the display to the setting you want to alter.
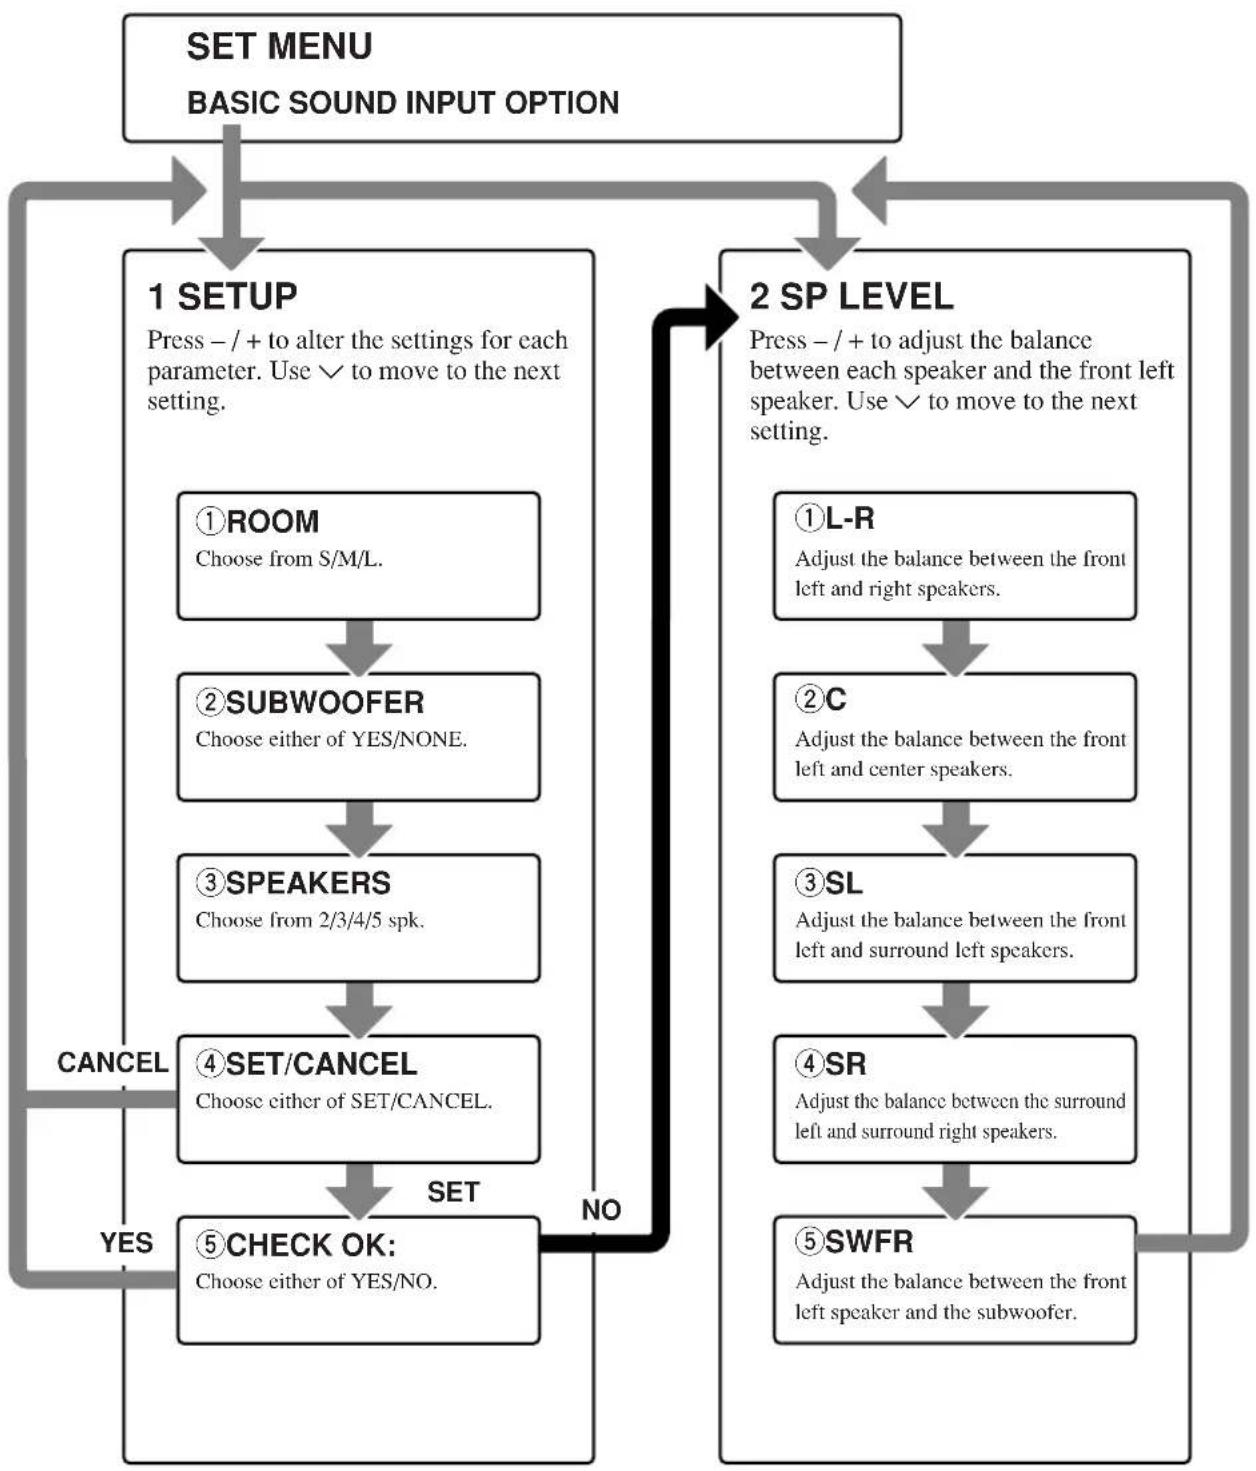
1 SETUP
Changes the speaker and amplifier settings to suit the size of the room you are using. Refer to "Setting the unit to match your speaker system" on page 20 for more information.
2 SP LEVEL
Adjusts the output levels of the speakers.
Refer to "SP LEVEL" on page 20 for more information.
4 Press - / + to enter the desired setting mode.
5 Change the unit settings to suit your listening environment.
6 Press / to exit from the set menu.
The front panel display changes in the following order:


Exit
↑
BASIC
↓↑
SOUND
↓↑
INPUT
↓↑
OPTION
↓
Exit
■Basic menu operation sequence
After altering the "1 SETUP" parameters, readjust the output levels of the speakers at "2 SP LEVEL".
See pages 39-44 for a detailed explanation of the "SOUND", "INPUT" and "OPTION" menus.
Setting the unit to match your speaker system
Follow the instructions below to set the amplifier output to match the size of your room and speakers. Press / to cycle through parameters 1 through 4, and -/+ to alter the parameter setting.
Factory default settings are highlighted.
①ROOM
Settings: S, M, L
Select the size of the room you have installed your speakers in. Roughly speaking, the room sizes are defined as follows:
[U.S.A. and Canada models]
S:16x13ft,200 ft ^2(4.8× 4.0m,20m^2)
M: 20 × 16 ft, 300 ft^2 (6.3 × 5.0 ~m, 30 ~m^2)
L: 26 × 19 ft, 450 ft^2 (7.9 × 5.8 ~m, 45 ~m^2)
[Other models]
S: 3.6 × 2.8 ~m, 10 ~m^2
M: 4.8 × 4.0 ~m, 20 ~m^2
L: 6.3 × 5.0 ~m, 30 ~m^2
②SUBWOOFER
Settings: YES, NONE
Select YES if you have a subwoofer in your system, or NONE if you do not.
③SPEAKERS
Settings: 2, 3, 4, 5 (spk)
Select the number of speakers connected in your speaker configuration. This number does not include your subwoofer.
| Setting | Display | Speaker |
| 2spk | L R | Front L/R |
| 3spk | L C R | Front L/R, Center |
| 4spk | L R SL SR | Front L/R, Surround L/R |
| 5spk | L C R SL SR | Front L/R, Center, Surround L/R |
④ SET or CANCEL
Select SET to confirm the changes you made. Select CANCEL to exit SETUP MENU without altering any of the unit settings. The unit will output a test tone to the speakers (see 5).
Use the test tone to check the speaker levels.
When you select SET in 4, the display changes to "CHECK: Test Tone" for a few seconds, and the unit outputs a test tone to each of the speakers in turn twice. When the test tone begins, the display changes to "CHECK OK?--YES".
If the test tone is output at the same volume from all of the speakers, select "CHECK OK: YES". Press to exit from the SETUP menu.
If the volume of the test tone varies between speakers, press - / + to change the display to "NO".
Note
- The indicator of the speaker currently outputting the test tone flashes on the front panel display.
2 SP LEVEL
(Setting speaker output levels)
Use this menu to compare and adjust the test tone output from each speaker to the output from the front left (or surround left) speaker so that the volume level for all speakers is identical. Press / to select a speaker, then adjust the balance using - / + .
Note
- The unit outputs the test tone from the selected speaker and the front left (or surround left) speaker in turn. The indicator of the speaker currently outputting the test tone flashes on the front panel display.
L-R
Adjust the balance between the front left and right speakers.
C
Adjust the balance between the front left and center speakers.
SL
Adjust the balance between the front left and surround left speakers.
SR
Adjust the balance between the surround left and surround right speakers.
SWFR
Adjust the balance between the front left speaker and the subwoofer.
PLAYBACK
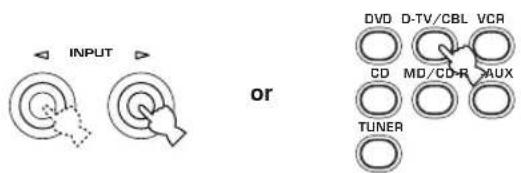
1 Press STANDBY/ON (POWER on the remote control) to turn on the power.

Front panel
or

Remote control
2 Turn on the video monitor connected to this unit.
3 Press SPEAKERS A/B/ OFF on the front panel to select the front speakers you want to use.

SPEAKERS A/B/OFF
4 Press INPUT / repeatedly (one of the input selector buttons on the remote control) to select the input you desire.
The selected input source name and input mode appear on the front panel display for a few seconds.

5 Start playback or select a broadcast station on the source component.
Refer to the operation instructions for the component.
6 Adjust the volume to the desired level.
Front panel
or
Remote control
If desired, use CONTROL and BASS/TREBLE - / + These controls only effect the sound from the front speakers.

Front panel
Notes
If you increase or decrease the high-frequency or the low-frequency sound to an extreme level, the tonal quality from the center and surround speakers may not match that of the front left and right speakers.
- If you have connected a recording component to the VCR OUT, or MD/CD-R OUT jacks, and you notice distortion or low volume during playback from other components, try turning on the recording component.
7 Select a sound field program if desired.
Use PROGRAM < / > (PROG - / + on the remote control) to select a sound field program. See pages 27-30 for details about sound field programs.

Front panel Remote control
■Selecting the 6CH INPUT
Press 6CH INPUT until "6CH INPUT" appears on the front panel display.

Note
- If "6CH INPUT" is shown on the front panel display, no other source can be played. To select another input source, first press 6CH INPUT so that "6CH INPUT" disappears from the front panel display.
■Playing video sources in the background
You can combine a video image from a video source with a sound from an audio source. For example, you can enjoy listening to classical music while having beautiful scenery from the video source on the video monitor.
Use the input selector buttons to select a video source, then select an audio source.
■To mute the sound
Press MUTE on the remote control.
"MUTE" blinks on the front panel display.
To resume audio output, press MUTE again.


- You can also cancel mute by pressing VOLUME +/-, etc.
- You can adjust the muting level (see page 44).
Night listening mode
This mode reproduces dialogue clearly while reducing the volume of loud sound effects for easier listening at low volumes or at night.
Press NIGHT on the remote control.
The NIGHT indicator in the front panel display lights up.
Press NIGHT once more to return to normal reproduction.


- You can use night listening mode with any of the sound field programs.
- Night listening mode may vary in effectiveness depending on the input source and surround sound settings you use.
When you have finished using this unit
Press STANDBY/ON (POWER on the remote control) to set this unit in standby mode.

Front panel Remote control
Input modes and indications
This unit is equipped with 2 types of input jacks. Do the following to select the type of input signals you want to use.
Press INPUT MODE repeatedly until the desired input mode is shown on the front panel display.

INPUT MODE
Front panel
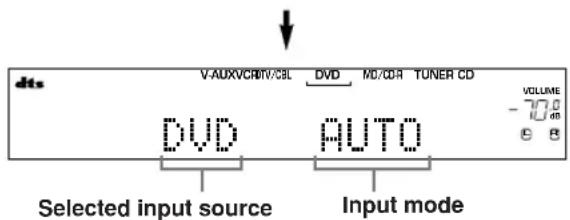
AUTO Automatically selects input signals in the following order:
1) Digital signals*
2) Analog signals
DTS Selects only digital signals encoded in DTS. If no DTS signals are input, no sound is output.
ANALOG Selects only analog signals. If no analog signals are input, no sound is output.
- If this unit detects a Dolby Digital or DTS signal, the decoder automatically switches to the appropriate sound field program.
You can adjust the default input mode this unit selects when the power is turned on (see page 43).
Notes
- When you play DTS encoded CD/LDs with the input mode set to AUTO:
- This unit automatically switches to the DTS decoding mode. The unit remains in DTS mode (and the "dts" indicator may flash) for up to 30 second after playback of the DTS source is complete. To manually release the DTS mode, press INPUT MODE to reselect AUTO.
- The DTS decoding mode may be released if search or skip operations are performed for more than 30 seconds. To prevent this, press INPUT MODE to select DTS.
- If the digital output data of the player has been processed in any way, you may not be able to perform DTS decoding even if you make a digital connection between this unit and the player.
Selecting a sound field program
You can enhance your listening experience by selecting sound field programs. For details about each program, see pages 27 - 30.

Press PROGRAM < / > (PROG - / + on the remote control) repeatedly to select the desired program (including sub-programs if available).
The name of the selected program appears on the front panel display.


- Select a program based on your listening preference. Program names are just for reference.
Notes
- There are 9 programs with sub-programs available with this unit. However, the selection depends on the input signal format and not all sub-programs can be used with all input signal formats.
- You cannot use the digital sound field processor with a source connected to the 6CH INPUT jacks of this unit or when the unit is reproducing a digital source with a sampling frequency greater than 48kHz .
- The acoustics of your listening room affect sound field programs. Minimize sound reflections in your room to maximize the effect created by the program.
- When you select an input source, this unit automatically selects the last sound field program used with that source.
- When you set this unit in standby mode, it stores the current source and sound field program in memory and automatically selects them when you turn on the power again.
- If the unit receives a Dolby Digital or DTS signal when the input mode is set to AUTO, the sound field program (No. 7-9) automatically switches to the appropriate decoding program.
- When the unit is reproducing a monaural source with PRO LOGIC or PRO LOGIC/Enhanced, or PRO LOGIC II Movie, no sound is output from the front and surround speakers. Sound can only be heard from the center speaker. (If "1A CENTER" on the set menu is set to NON, the center channel sound is output from the front speakers.)
■Selecting PRO LOGIC or PRO LOGIC II
You can listen to 2-channel sources decoded into five discrete channels by selecting PRO LOGIC or PRO LOGIC II in program No. 9.
1 Select a 2-channel source and start playback on the source component.
2 Press D/DTS.
The display cycles as follows each time you press D0/ DTS:
PRO LOGIC PRO LOGIC Enhanced PRO LOGIC II Movie PRO LOGIC II Music PRO LOGIC ....
#
- You can select PRO LOGIC, PRO LOGIC Enhanced, PRO LOGIC II Movie, and PRO LOGIC II Music by pressing PROGRAM < 1 / > on the front panel repeatedly.
■Playing Dolby Digital EX or DTS ES material
Press 6.1/5.1 to turn on the Dolby Digital + Matrix 6.1 or DTS + Matrix 6.1 decoder.
The display changes AUTO Matrix6.1 OFF each time 6.1/5.1 is pressed.
AUTO: Automatically switches Dolby Digital + Matrix 6.1 and DTS + Matrix 6.1 depending on the signal. Virtual surround back speaker does not work for 5.1- channel sources.
Matrix 6.1: Produces 6-channel playback of the input source using the Matrix 6.1 decoder. The virtual surround back speaker can be used when playing a 5.1- channel source.
OFF: Virtual surround back speaker does not work.
Notes
- Some 6.1-channel compatible discs do not have a signal (flag) that this unit can automatically detect. Select "Matrix 6.1" to play these kinds of discs with 6.1-channel sound.
- 6.1-channel playback is not possible even if you press 6.1/5.1 in the following cases:
- When effects are turned off.
- When the source connected to the 6CH INPUT jacks is being played.
- When the unit is reproducing a Dolby Digital KARAOKE source.
- When headphones are connected to the PHONES jack.
- The input mode resets to AUTO when you turn the unit power off.
PLAYBACK
■Virtual CINEMA DSP
With Virtual CINEMA DSP, you can enjoy all sound field programs without surround speakers. It creates virtual speakers to reproduce a natural sound field.
You can listen to virtual CINEMA DSP by setting "1C SURROUND LR" in the set menu to NON. Sound field processing changes to Virtual CINEMA DSP automatically.
Note
- Virtual CINEMA DSP will not activate, even when IC SURROUND LR is set to "NON" (see page 41) in the following cases:
- When the 5ch Stereo, DOLBY DIGITAL, Pro Logic, Pro Logic II, or DTS program is selected.
- When the sound effect is turned off.
- When 6CH INPUT is selected as the input source.
- When a digital signal with a sampling frequency greater than 48kHz is input to this unit.
- When using the test tone.
- When connecting the headphones.
■To listen with headphones (SILENT CINEMA)
The SILENT CINEMA mode allows you to enjoy multichannel music or movie sound, including Dolby Digital and DTS surround, through ordinary headphones.
SILENT CINEMA activates automatically whenever you connect headphones to the PHONES jack while listening to CINEMA DSP or HiFi DSP sound field programs. The "SILENT CINEMA" indicator lights up on the front panel display. (If the sound field programs are off, you listen with normal stereo reproduction.)
Notes
- This feature is not available when 6CH INPUT is selected or the unit is receiving a digital signal with a sampling frequency greater than 48kHz .
- The sound from the LFE channel will be mixed and output from the headphones.
■Normal stereo reproduction
Press STEREO to turn off the sound effect for normal stereo reproduction.
Press STEREO again to turn the sound effect back on.

or


Front panel
Remote control
Notes
- If you turn off the sound effects, no sound is output from the center speaker or surround speakers.
- If you turn off the sound effects while the unit is reproducing sound from a Dolby Digital or DTS signal, the dynamic range of the signal is automatically compressed and the unit will mix the sounds of the center and surround speaker channels and output them from the front speakers.
- The volume may be greatly reduced when you turn off the sound effects or if you set "SOUND 4 D. RANGE (dynamic range)" on the set menu to MIN. In this case turn on the sound effect.

- During stereo reproduction, you can display information such as the type, format and sampling frequency of the signal input from the components connected to this unit.
(While playing a source)
1 Press / to display the information about the input signal.


(Format): The display shows the signal format. When the unit cannot detect a digital signal it automatically switches to analog input.
in: The display shows the number of input signal source channels, as follows: For multi-channel soundtrack such as front 3 channels, surround 2 channels and LFE, the display shows "3/2/LFE".
fs: The display shows the sampling frequency. When the unit is unable to detect the sampling frequency "Unknown" shows in the front panel display.
rate: The display shows the bit rate. When the unit is unable to detect the bit rate "Unknown" shows in the front panel display.
flg: The display shows the flag - data encoded in a DTS or Dolby Digital signal that causes this unit to automatically switch to the appropriate decoder for playback.
DIGITAL SOUND FIELD PROCESSING (DSP)
Understanding sound fields
A sound field is defined as the "characteristic sound reflections of a particular space." In concert halls and other music venues, we hear early reflections and reverberations as well as the direct sound produced by the artist(s). The variations in the early reflections and other reverberations among the different music venues is what gives each venue its special and recognizable sound quality.
YAMAHA sent teams of sound engineers all around the world to measure the sound reflections of famous concert halls and music venues, and collect detailed sound field information such as the direction, strength, range, and delay time of those reflections. Then we stored this enormous amount of data in the ROM chips of this unit.
Recreating a sound field
Recreating the sound field of a concert hall or an opera house requires localizing the virtual sound sources in your listening room. The traditional stereo system that uses only two speakers is not capable of recreating a realistic sound field. YAMAHA's DSP requires four effect speakers to recreate sound fields based on the measured sound field data. The processor controls the strength and delay time of the signals output from the four effect speakers to localize the virtual sound sources and fully encompass the listener.
HiFi DSP programs
The following list gives you a brief description of the sound fields produced by each of the sound field programs. Keep in mind that most of these are precise digital recreations of actual acoustic environments.
| No. | Program | Features |
| 1 | CONCERT HALL | A large round concert hall with a rich surround effect. Pronounced reflections from all directions emphasize the extension of sounds. The sound field has a great deal of presence, and your virtual seat is near the center, close to the stage. |
| 2 | JAZZ CLUB | This is the sound field at stage front in “The Bottom Line”, a famous New York jazz club, that seats up to 300 people. Its wide left to right scating arrangement offers a real and vibrant sound. |
| 3 | ROCK CONCERT | The ideal program for lively, dynamic rock music. The data for this program was recorded at LA’s “hottest” rock club. The listener’s virtual seat is at the center-left of the hall. |
| 4 | ENTERTAINMENT/Disco | This program recreates the acoustic environment of a lively disco in the heart of a big city. The sound is dense and highly concentrated. It is also characterized by a high-energy, “immediate” sound. |
| ENTERTAINMENT/5ch Stereo | Using this program increases the listening position range. This is a sound field suitable for background music at parties, etc. |
CINEMA DSP
Sound design of CINEMA DSP
Filmmakers intend for the dialog to be located right on the screen, the effect sound a little farther back, the music spread even farther back, and the surround sound around the listener. Of course, all of these sounds must be synchronized with the images on the screen.
CINEMA DSP is an upgraded version of YAMAHA DSP specially designed for movie soundtracks. CINEMA DSP integrates the DTS, Dolby Digital, and Dolby Pro Logic surround sound technologies with YAMAHA DSP sound field programs to provide a surround sound field. It recreates comprehensive movie sound design in your audio room. In CINEMA DSP sound field programs, YAMAHA's exclusive DSP processing is added to the Front left and right, and Center channels, so the listener can enjoy realistic dialogue, depth of sound, smooth transition between sound sources, and a surround sound field that goes beyond the screen.
When a DTS or Dolby Digital signal is detected, the CINEMA DSP sound field processor automatically chooses the most suitable sound field program for that signal.

In addition to the DSP, this unit is equipped with a variety of precise decoders; Dolby Pro Logic decoder for Dolby Surround sources, Dolby Pro Logic II decoder for Dolby Surround and 2-channel sources, Dolby Digital/DTS decoder for multi-channel sources and Dolby Digital + Matrix 6.1 or DTS + Matrix 6.1 decoder for adding a surround back channel (the surround back channel is outputted from virtual surround back speaker). You can select CINEMA DSP programs to optimize these decoders and the DSP sound patterns depending on the input source.
CINEMA DSP Programs
The following list gives you a brief description of the sound fields produced by each of the sound field programs. Keep in mind that most of these are precise digital recreations of actual acoustic environments. Select the sound field program that you feel sounds best regardless of the name and description given for it below.
For audio-video sources: No. 4 to 6
| No. | Program | Features |
| 4 | ENTERTAINMENT/ Game | This program adds a deep and spatial feeling to video game sounds. |
| 5 | MUSIC VIDEO | This program lends an enthusiastic atmosphere to the sound, giving you the feeling you are at an actual jazz or rock concert. |
| 6 | TV THEATER/ Mono Movie | This program is provided for reproducing monaural video sources (such as old movies). The program produces the optimum reverberation to create sound depth using only the presence sound field. |
| TV THEATER/Variety/ Sports | Though the presence sound field is relatively narrow, the surround sound field employs the sound environment of a large concert hall. This effect enhances the experience of watching various TV programs such as news, variety shows, music programs or sports programs. |
■For movie programs
| No. | Program | Features | |
| 7 | MOVIE THEATER 1 | Spectacle | This program creates the extremely wide sound field of a 70-mm movie theater. It precisely reproduces the source sound in detail, making both the video and the sound field incredibly real. This is ideal for any kind of video source encoded with Dolby Surround, Dolby Digital or DTS (especially large-scale movie productions). |
| Sci-Fi | This program clearly reproduces dialog and sound effects in the latest sound form of science fiction films, thus creating a broad and expansive cinematic space amid the silence. You can enjoy science fiction films in a virtual-space sound field that includes Dolby Surround, Dolby Digital and DTS-encoded software employing the most advanced techniques. | ||
| 8 | MOVIE THEATER 2 | Adventure | This program is ideal for precisely reproducing the sound design of the newest 70-mm and multichannel soundtrack films. The sound field is made to be similar to that of the newest movie theaters, so the reverberations of the sound field itself are restrained as much as possible. |
| General | This program is for reproducing sounds from 70-mm and multichannel soundtrack films, and is characterized by a soft and extensive sound field. The presence sound field is relatively narrow. It spatially spreads all around and toward the screen, restraining the echo effect of conversations without losing clarity. | ||
| 9 | Straight Decode | The built-in decoder reproduces source sounds and sound-effects precisely. No DSP effect is applied in this program. | |
| Enhanced Mode | This program ideally simulates the multi-surround speaker systems of the 35-mm film theaters. Dolby Pro Logic decoding, Dolby Digital decoding or DTS decoding and digital sound field processing create precise effects without altering the original sound orientation. The surround effects produced by this sound field wrap around the viewer naturally from the back to the left and right, and toward the screen. | ||
Straight Decode
This unit is equipped with various precise decoders;
- Dolby Digital/DTS decoder for multi-channel reproduction of the original sound
- Dolby Pro Logic/Pro Logic II decoder for multi-channel reproduction of 2-channel sources
Select any of the Straight Decode modes in Program 9 (except for the sub-program "Enhanced") to use any of these decoders for reproducing the original sound without any sound effects added. In this case, no DSP effect is applied and the DSP indicator turns off.
Note
- When playing a monaural source with a CINEMA DSP program, the source signal is directed to the center channel, and the front and surround speakers output effect sounds.
Sound field effects
The 6-channel soundtracks found on 70-mm film produce precise sound field localization and rich, deep sound without using matrix processing. This unit's MOVIE THEATER programs provide the same quality of sound and sound localization that 6-channel soundtracks do. The built-in Dolby Digital or DTS decoder brings the professional-quality sound designed for movie theaters into your home. With this unit's MOVIE THEATER programs, you can use Dolby Digital or DTS technology to recreate a dynamic sound that gives you the feeling of being in a public theater.
■Dolby Digital/DTS + DSP sound field effect
These programs use YAMAHA's tri-field DSP processing on each of the Dolby Digital or DTS signals for the front, left surround, and right surround channels. This processing enables this unit to reproduce the immense sound field and surround expression of a Dolby Digital-or DTS-equipped movie theater without sacrificing the clear separation of all channels.
■Dolby Digital/DTS + Matrix 6.1 + DSP sound field effect
These programs provide you with the maximum experience of the spacious surround effects by adding an extra surround back DSP sound field created from the virtual surround back speaker.
■Dolby Pro Logic + DSP sound field effect
Most movie material has 4-channel (left, center, right, and surround) sound information encoded by Dolby Surround matrix processing and stored on the left and right tracks. These signals are processed by the Dolby Pro Logic decoder. The MOVIE THEATER programs are designed to recreate the spaciousness and delicate nuances of sound that tend to be lost in the encoding and decoding processes.
■Dolby Pro Logic II
Dolby Pro Logic II decodes Dolby Surround software into 5 discrete full-range channels (3 channels in front and 2 channels in surround). There are 2 modes; MOVIE for movies and MUSIC for 2-channel audio sources.
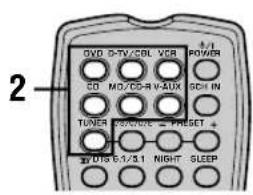
TUNING
There are 2 methods of tuning; automatic and manual. Automatic tuning is effective when station signals are strong and there is no interference.
Automatic tuning
1 Press INPUT / (TUNER on the remote control) to select TUNER as the input source.
Front panel Remote control
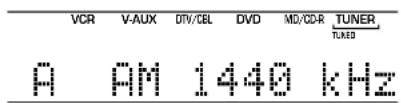
2 Press FM/AM to select the reception band. "FM" or "AM" appears on the front panel display.


3 Press Tuning Mode (AUTO/MAN'L MONO) so that the "AUTO" indicator lights up on the front panel display.


Lights up
If the colon (:) appears on the front panel display, tuning is not possible. Press PRESET/TUNING (EDIT) to turn it off.

4 Press PRESET/TUNING < / > once to begin automatic tuning.
Press to tune in to a higher frequency, or press to tune in to a lower frequency.
When the unit is tuned in to a station, the "TUNED" indicator lights up and the frequency of the station received is shown on the front panel display.
Manual tuning
If the signal from the station you are trying to select is weak, tune in to it manually.
1 Select TUNER and the reception band following steps 1 and 2 described in "Automatic tuning" at left.
2 Press TUNING MODE (AUTO/MAN'L MONO) until the "AUTO" indicator disappears from the front panel display.


Disappears
If the colon () appears on the front panel display, press PRESET/TUNING (EDIT) to turn it off.

3 Press PRESET/TUNING
to tune in to the desired station manually.
Hold down the button to continue searching.

Note
- Manually tuning in to an FM station will automatically change the reception mode to monaural to increase the signal quality.
Presetting stations
Automatically presetting FM stations You can use the automatic preset tuning feature to store FM stations. This function enables the unit to automatically tune in to FM stations with strong signals, and to store up to 40 (8 stations in 5 groups, A1 through E8) of those stations in order. You can then recall any preset station easily by selecting the preset number.
1 Press FM/AM to select the FM band.


FM
2 Press TUNING MODE (AUTO/MAN'L MONO) until the "AUTO" indicator lights up on the front panel display.


AUTO Lights up
3 Press and hold MEMORY (MAN'L/AUTO FM) for more than 3 seconds.
The preset number, the "MEMORY" and "AUTO" indicators flash. After about 5 seconds, automatic presetting starts from the frequency currently displayed and proceeds toward the higher frequencies.
When automatic preset tuning is completed, the front panel display shows the frequency of the last preset station.
Notes
- Any stored station data existing under a preset number is cleared when you store a new station under that preset number.
- If the number of the received stations does not reach 40 (E8), automatic preset tuning has automatically stopped after searching all stations.
- Only FM stations with sufficient signal strength are stored automatically by automatic preset tuning. If the station you want to store is weak in signal strength, tune in to it manually in the monaural mode, and store it by following the procedure described in "Manually presetting stations" on page 33.
Automatic preset tuning options
You can select the preset number from which this unit will store FM stations and/or begin tuning toward lower frequencies.
After pressing MEMORY in step 3:
1 Press A/B/C/D/E, then PRESET/TUNING < / > to select the preset number under which the first station will be stored. Automatic preset tuning will stop when stations have all been stored up to E8.
2 Press PRESET/TUNING (EDIT) to turn off the colon (:) and then press PRESET/TUNING < to begin tuning toward lower frequencies.
Memory back-up
The memory back-up circuit prevents the stored data from being lost even if this unit is set in the standby mode, the power cord is disconnected from the AC outlet, or the power supply is temporarily cut due to power failure. However, if the power is cut for more than one week, the preset stations may be cleared. If so, store the stations again by using the presetting station methods.
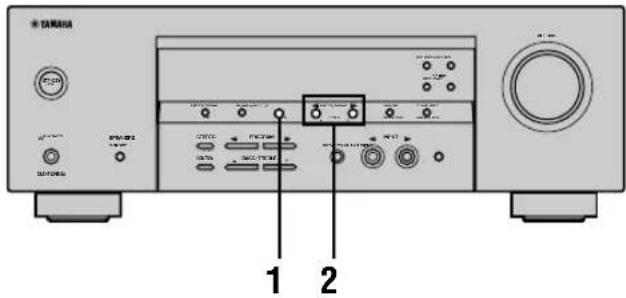
Manually presetting stations
You can store up to 40 stations (8 stations x 5 groups) manually.
1 Tune in to a station.
See page 31 for tuning instructions.
When tuned in to a station, the front panel display shows the frequency of the station received.
2 Press MEMORY (MAN'L/AUTO FM).
The "MEMORY" indicator flashes for about 5 seconds.


3 Press A/B/C/D/E repeatedly to select a preset station group (A to E) while the "MEMORY" indicator is flashing.
The group letter appears. Check that the colon (·) is showing on the front panel display.
4 Press PRESET/TUNING / to select a preset station number (1 to 8) while the "MEMORY" indicator is flashing.
Press to select a higher preset station number. Press to select a lower preset station number.
5 Press MEMORY (MAN'L/AUTO FM) on the front panel while the "MEMORY" indicator is flashing.
The station band and frequency appear on the front panel display with the preset group and number you have selected.
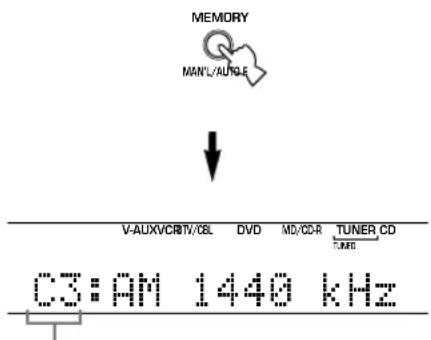
Shows the displayed station has been stored as C3.
6 Repeat steps 1 to 5 to store other stations.
Notes
- Any stored station data existing under a preset number is cleared when you store a new station under that preset number.
- The reception mode (stereo or monaural) is stored along with the station frequency.
Selecting preset stations
You can tune any desired station simply by selecting the preset station number under which it was stored.
1 Press A/B/C/D/E (A/B/C/D/E on the remote control) to select the preset station group.
The preset group letter appears on the front panel display and changes each time you press A/B/C/D/E.

Front panel


Remote control
2 Press PRESET/TUNING / (PRESET- 1+ on the remote control) to select a preset station number (1 to 8).
The preset group and number appear on the front panel display along with the station band, frequency and the "TUNED" indicator lights up.


Exchanging preset stations
You can exchange the assignment of two preset stations with each other. The example below describes the procedure for exchanging preset station "E1" with "A5".
1 Select preset station "E1" using A/B/C/D/E and PRESET/TUNING /
See "Selecting preset stations" at left.
2 Press and hold PRESET/TUNING (EDIT) for more than 3 seconds.
"E1" and the "MEMORY" indicator flash on the front panel display.

3 Select preset station "A5" using
A/B/C/D/E and PRESET/TUNING
"A5" and the "MEMORY" indicator flash on the front panel display.

4 Press PRESET/TUNING (EDIT) again.
The stations stored at the two preset assignments are exchanged.

Shows the exchange of stations has been completed.
RECEIVING RDS STATIONS
RDS (Radio Data System) is a data transmission system used by FM stations in many countries.
RDS data contains a variety of information such as PS (Program Service name), PTY (Program Type), RT (Radio Text), CT (Clock Time), EON (Enhanced Other Networks), and others.
Description of RDS data
This unit can receive, PS, PTY, RT, CT, and EON data when tuned to stations broadcasting RDS.
■PS (Program Service name) mode:
The name of the RDS station being received is displayed.
■PTY (Program Type) mode:
There are 15 program types used to classify RDS stations.
| NEWS | News |
| AFFAIRS | Current affairs |
| INFO | General information |
| SPORT | Sports |
| EDUCATE | Education |
| DRAMA | Drama |
| CULTURE | Culture |
| SCIENCE | Science |
| VARIED | Light entertainment |
| POP M | Pops |
| ROCK M | Rock |
| M.O.R. M | Middle-of-the-road music (easy-listening) |
| LIGHT M | Light classics |
| CLASSICS | Serious classics |
| OTHER M | Other music |
RT (Radio Text) mode:
Information about the program (such as the title of the song, name of the singer, etc.) on the RDS station being received is displayed using a maximum of 64 alphanumeric characters, including the umlaut symbol. Any other characters used in RT data are displayed with under-bars.
CT (Clock Time) mode:
The current time is displayed and updated every minute. "CT WAIT" may appear if the data is accidentally cut off.
■EON (Enhanced Other Networks):
Refer to the following page.
Changing the RDS mode
This unit provides four modes for displaying RDS data. The PS, PTY, RT and/or CT mode indicators that correspond to the RDS data services offered by the station light up on the front panel display when an RDS station is being received. Press RDS MODE/FREQ repeatedly to cycle the display through the RDS data offered by the transmitting station in the order shown below.
Notes
- Do not press RDS MODE/FREQ when an RDS station is being received until one or more RDS mode indicators light up on the front panel display. You cannot change the mode if you press this button prior to this. This is because this unit has not finished receiving all of the RDS data on the station.
- RDS data not offered by the station cannot be selected.
- This unit cannot utilize the RDS data service if the signal received is not strong enough. In particular, the RT mode requires a large amount of data, so it is possible that the RT mode may not be displayed even if other RDS modes (PS, PTY, etc.) are displayed.
- Sometimes, RDS data cannot be received in poor reception conditions. If this is the case, press TUNING MODE so that the "AUTO" indicator disappears from the front panel display. Although this will change the reception mode to monoaural, RDS data may be displayed when you change the display to RDS mode.
- If the signal strength is weakened by external interference during the reception of an RDS station, the RDS data service may cut off suddenly and "...WAIT" will appear on the front panel display.
PTY SEEK function
If you select the desired program type, the unit automatically searches all preset RDS stations that are broadcasting a program of the required type.
1 Press PTY SEEK MODE to set the unit in PTY SEEK mode.
The program type of the station the unit is currently receiving, or "NEWS" flashes on the front panel display.

Flashes
2 Press PRESET/TUNING / to select the desired program type.
The selected program type appears on the front panel display.

3 Press PTY SEEK START to begin searching all preset RDS stations.
The selected program type flashes and the "PTY HOLD" indicator lights up on the front panel display while the unit is searching for stations.
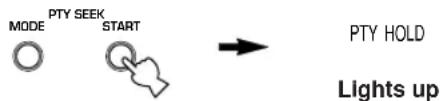
- The unit will stop searching if a station that is broadcasting a program of the required type is found.
- If the station found is not the desired one, press PTY SEEK START again. The unit begins searching for another station that is broadcasting a program of the same type.
■To cancel this function
Press PTY SEEK MODE twice.
EON function
This function uses the EON data service on the RDS station network. If you select the desired program type (NEWS, INFO, AFFAIRS or SPORT), the unit automatically searches for all preset RDS stations that are scheduled to broadcast a program of the required type and switches from the station being currently received to the new station when the broadcast starts.
Note
- This function can only be used when an RDS station that offers the EON data service is being received. When the unit is tuned to such a station, the "EON" indicator lights up on the front panel display.
1 Check that the "EON" indicator lights up on the front panel display.
If the "EON" indicator does not light up, tune in to another RDS station so that the "EON" indicator lights up.
2 Press EON repeatedly to select the desired program type (NEWS, INFO, AFFAIRS or SPORT).
The selected program type name appears on the front panel display.

- If a preset RDS station of the selected program type starts broadcasting, the unit will automatically switch from the program being currently received to that program. (EON indicator flashes.)
- When broadcasting of the required program ends, the unit returns to the previous station (or another program on the same station).
■To cancel this function
Press EON repeatedly until the program type name disappears from the front panel display.
SLEEP TIMER
Use this feature to automatically set this unit in the standby mode after a certain amount of time. The sleep timer is useful when you are going to sleep while this unit is playing or recording a source.
The sleep timer can only be set with the remote control.

- By connecting a commercially available timer to this unit, you can also set a wake-up timer. Refer to the operation instructions of the timer.
Setting the sleep timer
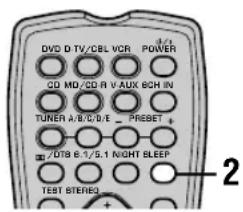
1 Select a source and start playback on the source component.
2 Press SLEEP repeatedly to set the amount of time.
Each time you press SLEEP, the front panel display changes as shown below. The SLEEP indicator flashes while switching the amount of time for sleep timer.

SLEEP

3 The "SLEEP" indicator lights up on the front panel display after the sleep timer has been set.

Canceling the sleep timer
Press SLEEP repeatedly until "SLEEP OFF" appears on the front panel display.
After a few seconds, "SLEEP OFF" disappears, and the "SLEEP" indicator goes off.


SLEEP OFF

The sleep timer setting can also be canceled by pressing POWER on the remote control (or STANDBY/ON on the front panel) to set this unit to the standby mode.
RECORDING
Recording adjustments and other operations are performed on other recording components. Refer to the operation instructions for these components for details on their operation.
Notes
- Do a test recording before you start an actual recording.
- When this unit is set in the standby mode, you cannot record between other components connected to this unit.
The setting of TONE CONTROL, VOLUME, "SP LEVEL" (page 20) and programs does not affect the recorded material. - A source connected to the 6CH INPUT jacks of this unit cannot be recorded.
- A given input source is not output on the same REC OUT channel. (For example, the signal input from VCR 1 IN is not output on VCR 1 OUT.)
- Check the copyright laws in your country to record from records, CDs, radio, etc. Recording of copyrighted material may infringe copyright laws.
If you playback a video source that uses scrambled or encoded signals to prevent it from being dubbed, the picture itself may be disturbed due to those signals.
1 Turn on the power of this unit and all connected components.
2 Select the source component you want to record from.
Front panel Remote control
3 Start playback (or select a broadcast station) on the source component.
4 Start recording on the recording component.
SET MENU
You can set the following parameters on the set menu to obtain a better sound from the unit. Change the settings to reflect the needs of your listening environment.
Set menu list
The set menus are divided by use and function into the 4 categories listed here.
■BASIC MENU
The BASIC MENU contains the basic parameters that you must set before using this unit. It consists of the following menus. See pages 18-20 for a detailed explanation.
1 SETUP
2 SP LEVEL (Speaker level)
■SOUND MENU
The SOUND MENU contains parameters for altering sound output. It consists of the following menus that you can use to alter the quality and tone of the sound output by the system.
1 SPEAKER SET
2 SP DISTANCE (Speaker distance)
3 LFE LEVEL (Low frequency effect level)
4 D. RANGE (Dynamic range)
5 CENTER GEQ (Center graphic equalizer)
6 HP TONE CTRL (Headphone tone control)
INPUT MENU
The INPUT MENU contains parameters concerned with signal input. It consists of the following menus that you can use to change the assignment of input jacks.
1 I/O ASSIGN
2 INPUT MODE
■OPTION MENU
This is a supplementary set up menu provided for your convenience. It consists of the following menus that you can use to change display brightness, protect existing settings, and perform other non-essential functions.
1 DISPLAY SET
2 MEM. GUARD
3 AUDIO MUTE
- In the descriptions for each item from the following page, the default setting is indicated in bold.
Adjusting the items on the set menu
Use the remote control to make adjustments.

- You can change set menu parameters while the unit is reproducing sound.
- You can use NEXT and SET MENU +/- on the front panel to change these settings, if the unit is not set to TUNER mode. Press NEXT to select the category or field you wish to change, and SET MENU +/- to change the parameters.
Note
- You cannot change some set menu parameters while the unit is in night listening mode.
1 Press SET MENU to enter the set menu.
SET MENU

2 Press / repeatedly to select the desired menu.


3 Press - / + to enter the selected menu.

4 Press / repeatedly to select the item you want to adjust.


- By pressing SET MENU repeatedly, you can select items in the same order as when pressing .
5 Press - / + once to enter the setup mode of the selected item.
The last setting you adjusted appears on the front panel display.
Depending on the menu item, press / to select a sub item.


6 Press - / + repeatedly to change the menu item setting.

7 Press / repeatedly until the menu disappears.


Memory back-up
The memory back-up circuit prevents the stored data from being lost even if this unit is in standby mode. However, if the power cord is disconnected from the AC outlet, or the power supply is cut for more than one week, the stored data will be lost. If this happens, adjust the items again.
The BASIC and SOUND menus
The "BASIC" menu allows you to easily set the "SOUND 1 SPEAKER SET" and "SOUND 2 SP DISTANCE" parameters. It is not necessary to reset any of the parameters in the "BASIC" menu, but you can access more detailed parameters in the "SOUND" menu if you wish.
Note
After altering parameters in the "SOUND" menu, if you select "BASIC 1 SETUP" and then select "SET", the parameters from the "SOUND" menu alter in response to any changes you make in "BASIC 1 SETUP". Do not enter the "BASIC 1 SETUP" menu unless you wish to change these settings. If you accidentally enter the "BASIC 1 SETUP" menu, select CANCEL to return to the "BASIC" menu. (page 19)
SOUND 1 SPEAKER SET
(speaker mode settings)
Use this feature to select suitable output modes for your speaker configuration.
Note
- Some menu item settings have no effect when the unit is reproducing a source with a digital signal sampling frequency greater than 48kHz .
1A CENTER (center speaker mode)
If you add a center speaker to your speaker configuration, this unit can provide better dialog localization for several listeners and superior synchronization of sound and images.
Choices: LRG (large), SML (small), NON (none)
LRG
Select this if you have a large center speaker. The unit directs the entire range of the center channel signal to the center speaker.
SML
Select this if you have a small center speaker. The unit directs the low-frequency signals (90 Hz and below) of the center channel to the speakers selected with "1D BASS".
NON
Select this if you do not have a center speaker. The unit directs all of the center channel signal to the front left and right speakers.
■1B FRONT (front speaker mode)
Choices: LRG (large), SML (small)
LRG
Select this if you have large front speakers. The unit directs the entire range of the front left and right channel signals to the front left and right speakers.
SML
Select this if you have small front speakers. The unit directs the low-frequency signals (90Hz and below) of the front channel to the speakers selected with "1D BASS".
1C SURROUND LR (surround speaker mode)
Choices: LRG (large), SML (small), NON (none)
LRG
Select this if you have large surround left and right speakers. The entire range of the surround channel signal is directed to the surround left and right speakers.
SML
Select this if you have small surround left and right speakers. The low-frequency signals (90Hz and below) of the surround channel are directed to the speakers selected with "1D BASS".
NON
Select this if you do not have surround speakers. This unit is set in the virtual CINEMA DSP mode when you select NON for "1C SURROUND LR".
■1D BASS (bass out mode)
LFE signals carry low-frequency effects when this unit decodes a Dolby Digital or DTS signal. The Low-frequency signals can be directed to both front left and right speakers, and to the subwoofer (subwoofer can be used for both stereo reproduction and the sound field program).
Choices: SWFR (subwoofer), FRONT, BOTH
SWFR
Select SWFR if you connect a subwoofer. LFE and low-frequency signals from other channels are directed to the subwoofer according to the speaker settings.
FRONT
Select FRONT if you do not use a subwoofer. LFE and low-frequency signals from other channels are directed to the front speakers according to the speaker settings (even if you have previously set the front speakers to SMALL).
BOTH
Select BOTH if you connect a subwoofer and you want to output low-frequency signals from front channels to both front speakers and the subwoofer. LFE and low-frequency signals from other channels are directed to the subwoofer according to the speaker settings.
Use this function to reinforce low-frequency signals using the subwoofer when playing back source such as CDs.
Note
- When you select FRONT for "1D BASS", the unit directs the low-frequency signals (90Hz and below) of the front channel to the front speakers even if you select SMALL for the front speaker mode.
SOUND 2 SP DISTANCE (speaker distance)
Use this feature to manually input the distance of each speaker and adjust the delay applied to respective channel. Ideally, each speaker should be the same distance from the main listening position. However, this is not possible in most home situations. Thus, a certain amount of delay must be applied to the sound from each speaker so that all sound will arrive at the listening position at the same time.
1 Press / to select "UNIT".
2 Press - / + to select the unit "meters" or "feet" to be used in setting.
3 Press / to select a speaker.
4 Press - / + to set the distance. Press ^+ for higher values and - for lower values.
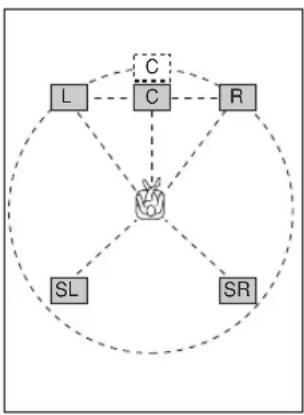
Setting by "meters"
Control range: 0.3 to 24.00m (for front L/R, center, surround L/R)
Initial settings: 3.00m (for front L / R , center, surround L/R)
Setting by "feet"
Control range: 1 to 80 ft (for front L/R, center, surround L/R)
Initial settings: 10.0 ft (for front L/R, center, surround L/R)
Note
- No delay will be set if you set the same distance for the front L/R and center, or the surround L/R.
SOUND 3 LFE LEVEL
Use to adjust the output level of the LFE (low-frequency effect) channel according to the capacity of your subwoofer or headphones. The LFE channel carries low-frequency special effects which are only added to certain scenes. This setting is effective only when this unit decodes Dolby Digital or DTS signals.
Control range:
SPEAKER -20 to 0 dB
HEADPHONE.....-20 to 0 dB
Initial setting: 0 dB
1 Press / to select the item to be adjusted.
2 Press - to adjust the LFE level.
Note
- Adjust the LFE level according to the capacity of your subwoofer or headphones.
SOUND 4 D. RANGE (dynamic range)
Use this feature to adjust the dynamic range. This setting is effective only when the unit is decoding Dolby Digital signals.
Choices: MAX, STD (standard), MIN (minimum)
MAX
Select MAX for feature films.
STD
Select STD for general use.
MIN
Select MIN for listening to sources at low volume levels.
SOUND 5 CENTER GEQ (center graphic equalizer)
Use this feature to adjust the built-in 5-band graphic equalizer so that the center speaker tonal quality matches that of the left and right front speakers. You can select the 100Hz 300Hz 1kHz 3kHz or 10kHz frequencies. Control range (dB): -6 to +6 Initial setting: 0 dB for 5-band
1 Press to select a higher frequency and to select a lower frequency.
2 Press - / + to adjust the level of that frequency.
Note
- You can monitor the center speaker sound while adjusting this parameter by using the test tone. Press TEST before starting the foregoing procedure. Once you begin this procedure, the test tone remains at the center speaker and you can hear how the sound changes as you adjust the various frequency levels. To stop the test tone, press TEST.
SOUND 6 HP TONE CTRL (headphone tone control)
Use this feature to adjust the level of the bass and treble when you are using headphones.
Control range (dB):
$$ B A S S \dots \dots \dots \dots \dots \dots \dots \dots \dots \dots \dots \dots \dots \dots \dots \dots \dots \dots \dots \dots \dots $$
$$ \text {T R B L} (\text {t r e b l e}) \dots - 6 \text {t o} + 3 $$
Initial setting:
$$ B A S S \dots \dots \dots \dots \dots 0 d B $$
$$ \mathrm {T R B L} \dots \dots \dots \dots \dots \dots 0 \mathrm {d B} $$
INPUT 1 I/O ASSIGN (input/output assignment)
You can assign jacks according to the component to be used if this unit's initial settings do not correspond to your needs. Change the following parameters to reassign the respective jacks and effectively connect more components. Once the inputs have been reassigned, you can select the corresponding component by using INPUT / on the front panel or the input selector buttons on the remote control.
■1A (1) for OPTICAL INPUT jack
Choices: (1) DVD, MD/CD-R, CD, VCR, V-AUX, DTV/CBL
■1A (2) for OPTICAL INPUT jack
Choices: (2) DTV/CBL, DVD, MD/CD-R, CD, VCR, V-AUX
■1B (3) for COAXIAL INPUT jack
Choices: (3) CD, VCR, V-AUX, DTV/CBL, DVD, MD/CD-R
Note
- When you connect a component to both the COAXIAL and OPTICAL jacks, priority is given to the input signals from the COAXIAL jack.
INPUT 2 INPUT MODE (initial input mode)
Use this feature to designate the input mode for sources connected to the DIGITAL INPUT jacks when you turn on this unit (see page 23 for details about the input mode).
Choices: AUTO, LAST
AUTO
Select this setting to allow the unit to automatically detect the type of input signal and select the appropriate input mode.
LAST
Select this setting to set this unit to automatically select the last input mode used for the respective sources.
OPTION 1 DISPLAY SET
■DIMMER
Use this to adjust the brightness of the front panel display.
Control range: -4 to 0
OPTION 2 MEM. GUARD (memory guard)
Use this feature to prevent accidental changes to sound field program parameter values and other system settings.
Choices: ON, OFF
Select ON to protect:
Sound field program parameters
- All SET MENU items
- All speaker levels
When MEMORY GUARD is set to ON, you cannot use the test tone or select any other SET MENU items.
OPTION 3 AUDIO MUTE
Use to adjust how much the mute function reduces the output volume.
Choices: MUTE, -50dB, -20dB
MUTE
Completely halts all output of sound.
-50dB
Reduces the volume of the present sound output by 50dB.
-20dB
Reduces the volume of the present sound output by 20dB.
SETTING THE SPEAKER LEVELS
Adjusting the speaker levels during playback
You can adjust the output level of each speaker while listening to sound playback.

Using the test tone
Use the test tone to set speaker levels so that the volume from each speaker is identical when heard from your listening position.
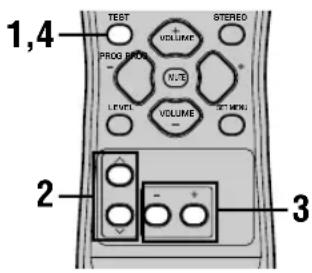
1 Press LEVEL repeatedly to select the speaker you want to adjust.
The unit cycles through the speakers in the following order each time you press LEVEL:
FRONT L CENTER FRONT R
SUR R. (surround R) SUR L. (surround L)
SWFR (subwoofer) ....

- Pressing LEVEL once opens the level display. Press / at this time to select a speaker.
2 Press - / + to adjust the speaker output level.
- The center and surround speakers can be adjusted by a maximum of -10dB +10dB .
- The front speakers and subwoofer can be adjusted by a maximum of -20dB 0dB .
Notes
- You cannot adjust speaker levels if the "SOUND 1 SPEAKER SET" parameter in the set menu is set to NON.
- You cannot adjust the subwoofer level if the "1D BASS" parameter in "SOUND 1 SPEAKER SET" in the set menu is set to FRONT.
- If you use LEVEL to adjust speaker levels, the speaker levels you previously set with the test tone will also change.
- If you select "BASIC 1 SETUP" in the set menu and then select "SET", speaker levels change in response to any changes you make in "BASIC 1 SETUP".
1 Press TEST.
The unit will output a test tone.
2 Press / repeatedly to select a speaker to adjust.
Each time you press the unit will cycle through the speakers in the following order:
TEST LEFT(front L) TEST CENTER (center)
TEST RIGHT (front R) TEST SUR R. (surround
R) TEST SUR L. (surround L) TEST
SUBWOOFER(subwoofer) ....
(Press to cycle the speakers in the reverse order.)
3 Press - / + to adjust the speaker output level.
4 Press TEST when you have completed your adjustment.
The test tone halts.
Notes
- You cannot enter test mode if headphones are connected to the PHONES jack. Remove the headphones from the PHONES jack.
- You cannot adjust speaker volumes if the "SOUND 1 SPEAKER SET" parameter on the set menu is set to NON.
- You cannot adjust the subwoofer level if the "1D BASS" parameter in "SOUND 1 SPEAKER SET" in the set menu is set to FRONT.
- If you select "BASIC 1 SETUP" in the set menu and then select "SET", speaker levels change in response to any changes you make in "BASIC 1 SETUP".

- Depending on the source the unit is reproducing, the speaker levels set with the test tone may not be to your liking. If this is the case, adjust the speaker levels while listening to the source.
EDITING SOUND FIELD PARAMETERS
Changing parameter settings
The initial sound field program settings will provide you with an excellent listening experience as they are. But you can create an original listening environment by altering some settings.
Note
The editable parameters vary depending on the sound field program you select. Refer to the explanation for the parameter.
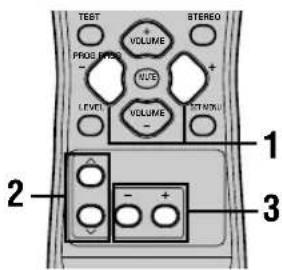
1 Select the sound field program you want to adjust.

2 Press / to select the parameters.


3 Press - / + to change the parameter value.

4 Repeat steps 1 - 3 if you wish to alter other parameters.
Note
- You cannot change parameter values when "OPTION 2 MEM. GUARD" is set to "ON". If you want to change the parameter values, set "OPTION 2 MEM. GUARD" to "OFF" (see page 44).
Sound field parameter descriptions
You can adjust the values of certain digital sound field parameters so the sound fields are recreated accurately in your listening room. Not all of the following parameters are found in every program.
DSP LEVEL
Function: This parameter adjusts the level of all the DSP effect sounds within a narrow range.
Description: Depending on the acoustics of your listening room, you may want to increase or decrease the DSP effect level relative to the level of the direct sound.
Control Range: -6 dB to +3 dB
■DELAY
Function: This parameter changes the apparent distance from the source sound by adjusting the delay between the direct sound and the first reflection heard by the listener.
Description: The smaller the value, the closer the sound source seems to the listener. The larger the value, the farther it seems. For a small room, set to a small value. For a large room, set to a large value.
Control range: 1-99 msec
For 5ch Stereo
Function: These parameters adjust the volume level for each channel in 5-channel stereo mode.
Control range: 0 to 100%
CT LEVEL (Center level)
■SL LEVEL (Surround left level)
■SR LEVEL (Surround right level)
For PRO LOGIC II Music
■PANORAMA
Function: Extends the front stereo image to include the surround speakers for a wraparound effect.
Choices: OFF/ON, initial setting is OFF.
DIMENSION
Function: Gradually adjusts the sound field either towards the front or towards the rear.
Control range: -3 (towards the rear) to +3 (towards the front), initial setting is STD (standard).
CTWIDTH (Center width)
Function: Adjusts the center image from all three front speakers to varying degrees. A larger value adjusts the center image towards the front left and right speakers.
Control range: 0 (center channel sound is output only from center speaker) to 7 (center channel sound is output only from front left and right speakers), initial setting is 3.
TROUBLESHOOTING
Refer to the chart below when this unit does not function properly. If the problem you are experiencing is not listed below or if the instruction below does not help, set this unit to standby mode, disconnect the power cord, and contact the nearest authorized YAMAHA dealer or service center.
■General
| Problem | Cause | Remedy | Refer to page |
| This unit falls to turn on when STANDBY/ON (or POWER) is pressed, or enters In standby mode soon after the power has been turned on. | The power cord is not connected or the plug is not completely inserted. | Connect the power cord firmly. | - |
| The protection circuitry has been activated. | Make sure all speaker wire connections on this unit and on all speakers are secure and that the wire for each connection is not touching anything other than its respective connection. | 15 - 16 | |
| This unit has been exposed to a strong external electric shock (such as lightning and strong static electricity). | Set this unit in standby mode, disconnect the power cord, plug it back in after 30 seconds, then use it normally. | - | |
| No sound. | Incorrect input or output cable connections. | Connect the cables properly. If the problem persists, the cables may be defective. | 9 - 16 |
| No appropriate input source is selected. | Select an appropriate input source with INPUT < / > or 6CH INPUT (or the input selector buttons). | 21 | |
| The speaker connections are not secure. | Secure the connections. | 15 - 16 | |
| The front speakers to be used have not been selected properly. | Select the proper front speakers with SPEAKERS A/B/OFF. | 21 | |
| The volume is turned down. | Turn up the volume. | 22 | |
| The sound is muted. | Press MUTE or any operation buttons of this unit to cancel a mute and adjust the volume. | - | |
| The signals this unit cannot reproduce are being received from a source component e.g.: a CD-ROM. | Play a source whose signals this unit can reproduce. | - | |
| The sound suddenly goes off. | The protection circuitry has been activated because of a short circuit, etc. | Check that the speaker wires are not touching each other and then turn the unit back on. | - |
| The sleep timer has turned the unit off. | Turn on the power, and play the source again. | - | |
| The sound is muted. | Press MUTE or any operation buttons on the unit to cancel a mute and adjust the volume. | - | |
| No sound / weak sound from particular speakers. | Incorrect cable connections. | Connect the cables properly. If the problem persists, the cables may be defective. | 15 |
| No sound from the effect speakers. | The sound effect is switched off. | Press STEREO to turn it on. | - |
| A Dolby Surround, Dolby Digital or DTS decoding program is being used with material not encoded with Dolby Surround, Dolby Digital or DTS. | Select another sound field program. | 24 - 29 | |
| A digital signal with a sampling frequency of greater than 48 kHz is input to this unit. | - | ||
| No sound from the center speaker. | The output level of the center speaker is set to minimum. | Raise the level of the center speaker. | 45 |
| “SOUND 1A CENTER” on the set menu is set to NON. | Select the appropriate mode for your center speaker. | 40 | |
| One of the HiFi DSP programs (1 to 4) has been selected (except for 5ch Stereo). | Select another sound field program. | 24-29 | |
| The source encoded with a Dolby Digital or DTS signal does not have a center channel signal. | - | ||
| No sound from the surround speakers. | The output level of the surround speakers is set to minimum. | Raise the output level of the surround speakers. | 45 |
| A monaural source is being played with program 9. | Select another sound field program. | 24-29 | |
| No sound from the subwoofer. | “SOUND 1D BASS” on the set menu is set to FRONT when a Dolby Digital or DTS signal is being played. | Select SWFR or BOTH. | 41 |
| “SOUND 1D BASS” on the set menu is set to SWFR or FRONT when a 2-channel source is being played. | Select BOTH. | 41 | |
| The source does not contain low bass signals (90 Hz and below). | - | ||
| Poor bass reproduction. | “SOUND 1D BASS” on the set menu is set to SWFR or BOTH and your system does not include a subwoofer. | Select FRONT. | 41 |
| The speaker mode settings (front, center or surround) on the set menu does not match your speaker configuration. | Select the appropriate position for each speaker based on the size of the speakers in your configuration. | 40-41 | |
| A “humming” sound can be heard. | Incorrect cable connections. | Firmly connect the audio plugs. If the problem persists, the cables may be defective. | - |
| The volume level cannot be increased, or the sound is distorted. | The component connected to the OUT (REC) jacks of this unit is turned off. | Turn on the power to the component. | - |
| The sound effect cannot be recorded. | It is not possible to record the sound effect with a recording component. | - | |
| The sound field parameters and some other settings on the unit cannot be changed. | “OPTION 2 MEM. GUARD” in the SET MENU is set to ON. | Select OFF. | - |
| The unit does not operate properly. | The internal microcomputer has been frozen by an external electric shock (such as lightning or excessive static electricity) or by a power supply with low voltage. | Disconnect the AC power cord from the outlet and then plug it in again after about 30 seconds. | - |
| “CHECK SP WIRES” appears on the front panel display. | The speaker cables are short circuited. | Make sure all speaker cables are connected correctly. | - |
TROUBLESHOOTING
| Problem | Cause | Remedy | Refer to page |
| There is noise interference from digital or high-frequency equipment, or this unit. | This unit is too close to the digital or high-frequency equipment. | Move this unit further away from such equipment. | - |
| The unit suddenly turns into standby mode. | The internal temperature has become too high and the overheat protection circuitry has been activated. | Wait until the unit cools down and then turn it back on. | - |
■Tuner
| Problem | Cause | Remedy | Refer to page | |
| FM | FM stereo reception is noisy. | The characteristics of FM stereo broadcasts may cause this problem when the transmitter is too far away or the antenna input is poor. | Check the antenna connections.Try using a high-quality directional FM antenna. | 12 |
| Use the manual tuning method. | 31 | |||
| There is distortion, and clear reception cannot be obtained even with a good FM antenna. | There is multipath interference. | Adjust the antenna position to eliminate multipath interference. | - | |
| The desired station cannot be tuned in with the automatic tuning method. | The station is too weak. | Use a high-quality directional FM antenna. | - | |
| Use the manual tuning method. | 31 | |||
| Previously preset stations can no longer be tuned In. | The unit has been disconnected for a long period. | Preset the stations again. | 32 | |
| AM | The desired station cannot be tuned in with the automatic tuning method. | The signal is weak or the antenna connections are loose. | Tighten the AM loop antenna connections and orient it for best reception. | - |
| Use the manual tuning method. | 31 | |||
| There are continuous crackling and hissing noises. | Noises result from lightning, fluorescent lamps, motors, thermostats and other electrical equipment. | Use an outdoor antenna and a ground wire.This will help somewhat, but it is difficult to eliminate all noise. | 12 | |
| There are buzzing and whining noises (especially in the evening). | A TV set is being used nearby. | Move this unit away from the TV. | - | |
Remote control
| Problem | Cause | Remedy | Refer to page |
| The remote control does not work nor function properly. | Wrong distance or angle. | The remote control will function within a maximum range of 6 m (20 feet) and no more than 30 degrees off-axis from the front panel. | 7 |
| Direct sunlight or lighting (from an inverter type of fluorescent lamp, etc.) is striking the remote control sensor of this unit. | Reposition this unit. | - | |
| The batteries are weak. | Replace all batteries. | 3 |
Resetting the factory presets
If you want to reset all of your unit's parameters for any reason, do the following. This procedure completely resets ALL parameters, including the SET MENU, level and tuner presets.
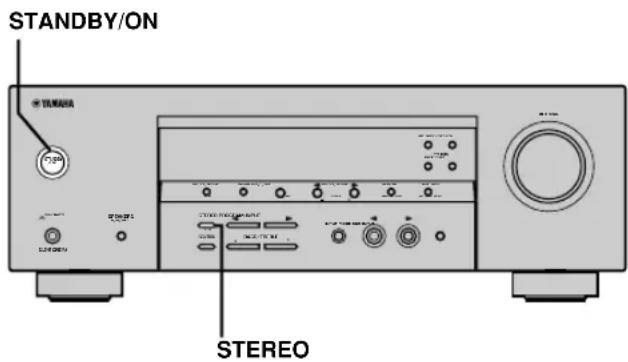
Be sure this unit is in standby mode.
1 Hold down STEREO on the front panel and press STANDBY/ON.
"FACTORY PRESET" appears in the front panel display.
中
To cancel the initialization procedure without making any changes, press STANDBY/ON.
2 Press STEREO to select the desired setting.
Reset To reset the unit to its factory presets.
Cancel To cancel without making any changes.
3 Press STANDBY/ON to confirm your selection.
If you selected "Reset", the unit is reset to its factory presets and switches to standby mode.
If you selected "Cancel", the unit switches to standby mode and nothing is reset.
GLOSSARY
CINEMA DSP
Since the Dolby Surround and DTS systems were originally designed for use in movie theaters, their effect is best felt in a theater having many speakers and designed for acoustic effects. Since home conditions, such as room size, wall material, number of speakers, and so on, can differ so widely, it's inevitable that there are differences in the sound heard as well. Based on a wealth of actually measured data, YAMAHA CINEMA DSP uses YAMAHA original sound field technology to combine Dolby Pro Logic, Dolby Digital and DTS systems to provide the visual and audio experience of movie theater in the listening room of your own home.
■Dolby Digital
Dolby Digital is a digital surround sound system that gives you completely independent multi-channel audio. With 3 front channels (left, center, and right), and 2 surround stereo channels, Dolby Digital provides 5 full-range audio channels. With an additional channel especially for bass effects, called LFE (low frequency effect), the system has a total of 5.1 channels (LFE is counted as 0.1 channel).
By using 2-channel stereo for the surround speakers, more accurate moving sound effects and surround sound environment are possible than with Dolby Surround. The wide dynamic range (from maximum to minimum volume) reproduced by the 5 full-range channels and the precise sound orientation generated using digital sound processing provide listeners with previously unheard of excitement and realism.
With this unit, any sound environment from monaural up to a 5.1-channel configuration can be freely selected for your enjoyment.
Dolby Pro Logic II
Dolby Pro Logic II is an improved technique used to decode vast numbers of existing Dolby Surround software. This new technology enables a discrete 5-channel playback with 2 front left and right channels, 1 center channel, and 2 surround left and right channels (instead of only 1 surround channel for conventional Pro Logic technology). A music mode is also available for 2-channel sources in addition to the movie mode.
■Dolby Surround
Dolby Surround uses a 4 channel analog recording system to reproduce realistic and dynamic sound effects: 2 front left and right channels (stereo), a center channel for dialog (monaural), and a surround channel for special sound effects (monaural). The surround channel reproduces sound within a narrow frequency range. Dolby Surround is widely used with nearly all video tapes and laser discs, and in many TV and cable broadcasts as well. The Dolby Pro Logic decoder built into this unit employs a digital signal processing system that automatically stabilizes the volume on each channel to enhance moving sound effects and directionality.
DTS (Digital Theater Systems) Digital Surround
DTS digital surround was developed to replace the analog soundtracks of movies with a 6-channel digital sound track, and is now rapidly gaining popularity in movie theaters around the world. Digital Theater Systems Inc. has developed a home theater system so that you can enjoy the depth of sound and natural spatial representation of DTS digital surround in your home. This system produces practically distortion-free 6-channel sound (technically, a left, right and center channels, 2 surround channels, plus an LFE 0.1 channel as a subwoofer, for a total of 5.1 channels).
■LFE 0.1 channel
This channel is for the reproduction of low bass signals. The frequency range for this channel is 20Hz to 120Hz . This channel is counted as 0.1 because it only enforces a low frequency range compared to the full-range reproduced by the other 5 channels in a Dolby Digital or DTS 5.1 channel systems.
■Matrix 6.1
The unit incorporates Matrix 6.1 decoder for Dolby Digital and DTS multi-channel software that enables 6.1-channel reproduction by adding the surround back channel to existing 5.1-channel format. (The surround back channel is created from surround left and right channels, and outputted from virtual surround back speaker.) With this additional channel, you can experience more dynamic and realistic moving sound especially with scenes with "fly-over" and "fly-around" effects.
PCM (Linear PCM)
Linear PCM is a signal format under which an analog audio signal is digitized, recorded and transmitted without using any compression. This is used as a method of recording CDs and DVD audio. The PCM system uses a technique for sampling the size of the analog signal per very small unit of time. Standing for "pulse code modulation", the analog signal is encoded as pulses and then modulated for recording.
Sampling frequency and number of quantized bits
When digitizing an analog audio signal, the number of times the signal is sampled per second is called the sampling frequency, while the degree of fineness when converting the sound level into a numeric value is called the number of quantized bits.
The range of rates that can be played back is determined based on the sampling rate, while the dynamic range representing the sound level difference is determined by the number of quantized bits. In principle, the higher the sampling frequency, the wider the range of frequencies that can be played back, and the higher the number of quantized bits, the more finely the sound level can be reproduced.
■SILENT CINEMA
YAMAHA has developed a natural, realistic sound effect DSP algorithm for headphones.
Parameters for headphones have been set for each sound field so that accurate representations of all the sound field programs can be enjoyed using headphones.
■Virtual CINEMA DSP
YAMAHA has developed a virtual CINEMA DSP algorithm that allows you to enjoy DSP sound field surround effects even without any surround speakers by using virtual surround speakers.
It is even possible to enjoy virtual CINEMA DSP using a minimal 2-speaker system that does not include a center speaker.
SPECIFICATIONS
AUDIO SECTION
Minimum RMS Output Power for Front, Center, Surround 1 kHz, 0.1% THD, 6Ω
[U.S.A. and Canada models] 100 W
[Other models] 90 W
1 kHz, 0.7% THD, 6Ω
[U.S.A. and Canada models] 103 W
[Other models] 93 W
DIN Standard Output Power
[Europe model]
1 kHz, 0.7% THD, 4 Ω 105 W
Maximum Power
[China, Korea and General models]
1 kHz, 10% THD, 6 Ω 110 W
- Dynamic Power (THF, 6/4/2 Ω)
[U.S.A. and Canada models] 110/140/170 W
[Other models] 105/135/165 W
Frequency Response
CD, etc. to Front L/R 10 Hz to 100 kHz, -3 dB
Total Harmonic Distortion
1 kHz, 50 W, 6 Ω, Front L/R 0.06%
- Signal to Noise Ratio (IHF-A Network)
CD (250 mV, shorted) to Front L/R, Effect Off ... ≥ 100 dB
- Residual Noise (IHF-A Network)
Front L/R 150 V or less
- Channel Separation (1 kHz/10 kHz)
CD, etc. (5.1 kΩ terminated) to Front L/R ... ≥60 dB/≥45 dB
- Tone Control (Front L/R)
BASS Boost/Cut. ±10 dB/100 Hz
TREBLE Boost/Cut. ± 10dB / 20kHz
-
Phones Output 400 mV/470 Ω
-
Input Sensitivity
CD, etc. 200 mV/47 kΩ
6CH INPUT 200 mV/47 kΩ
Output Level
OUT (REC) 200 mV/1.2 kΩ
OUTPUT SUBWOOFER 4 V/1.2 kΩ
VIDEO SECTION
Video Signal Type NTSC or PAL
Composite Video Signal Level 1 Vp-p/75Ω
- Signal to Noise Ratio. ≥ 50 dB
Frequency Response (MONITOR OUT)
5 Hz to 10 MHz, -3 dB
FM SECTION
Tuning Range
[U.S.A. and Canada models] 87.5 to 107.9 MHz
[Other models] 87.50 to 108.00 MHz
- 50 dB Quieting Sensitivity (IHF, 100% mod.)
Mono/Stereo 2.0 V (17.3 dBf)/25 V (39.2 dBf)
- Selectivity (400kHz)
- Signal to Noise Ratio (IHF)
Mono/Stereo 76 dB/70 dB
- Harmonic Distortion (1 kHz)
Mono/Stereo 0.2%/0.3%
- Stereo Separation (1 kHz)
Frequency Response..
AM SECTION
Tuning Range 530/531 to 1710/1611 kHz
- Usable Sensitivity 300 μV/m
GENERAL
Power Supply
[U.S.A. and Canada models] AC 120 V/60 Hz
[Australia model] AC 240 V/50 Hz
[U.K., and Europe models] AC 230 V/50 Hz
[Korea model] AC 220 V/60 Hz
[China model] AC 220 V/50 Hz
[Asia and General models] ... AC 110-120 V/220-240 V, 50/60 Hz
Power Consumption
[U.S.A.and Canada models] 240 W/320 VA
[Other models] 240 W
- Standby Power Consumption
[U.S.A. and Canada models] 0.5 W
[Other models] 0.7 W
Dimension (W x H x D) 435 x 151 x 315 mm
(17-1/8" x 5-15/16" x 12-7/16")
Weight 9 kg (19 lbs 13 oz)
*Specifications are subject to change without notice.
ATTENTION: VEUILLEZ LIRE CE QUI SUIT AVANT D'UTILISER L'APPAREIL.
Corrections CINEMA DSP 28
Effets de champ sonore 30
SYNTONISEUR 31
RECEPTION DES STATIONS RDS 35
Prises DIGITAL INPUT
(pages 9 à 11)
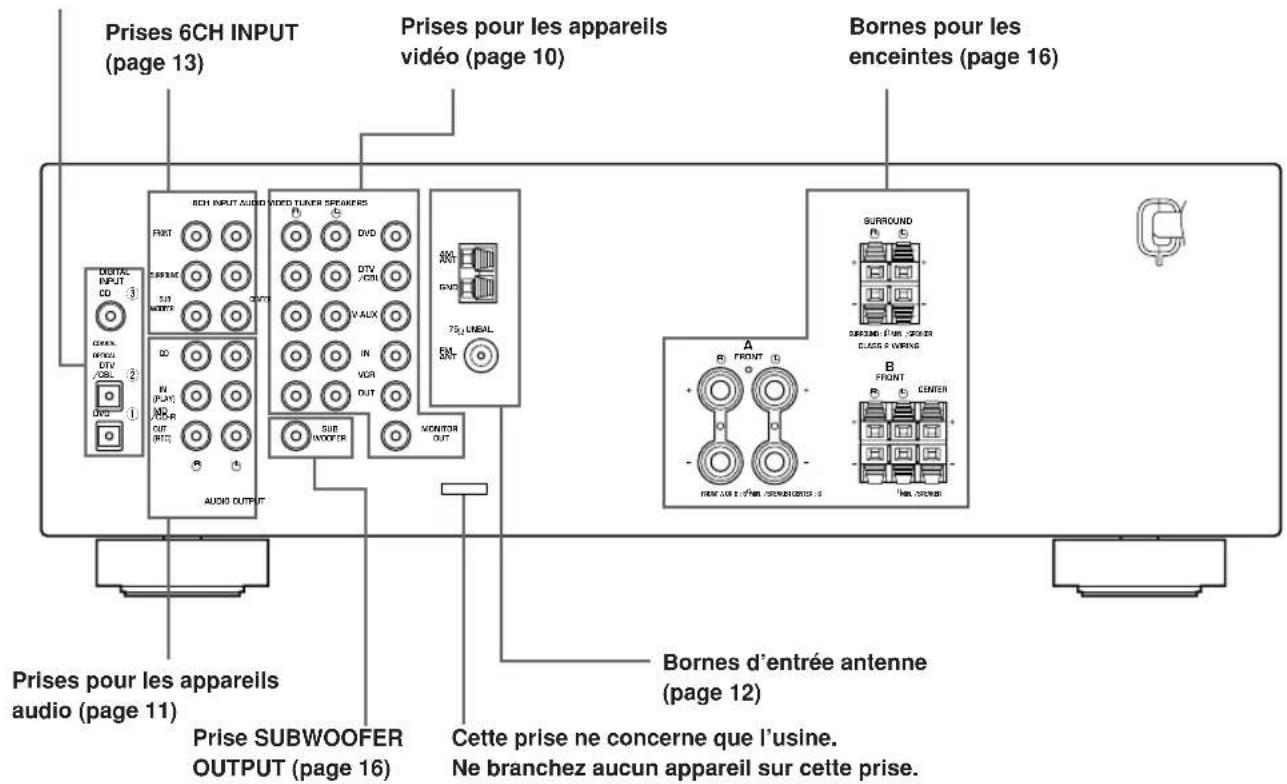
Corrections CINEMA DSP
Straight Decode (Decodage direct)
RéCEPTION DES STATIONS RDS
OPTION 1 DISPLAY SET
■DIMMER
■DTS (Digital Theater Systems) Digital Surround
DIGITAL-SOUNDFELD-PROZESSOR (DSP) 27
DIGITAL-SOUNDFELD-PROZESSOR (DSP)
CINEMA DSP Programme
■EON-Modus (Enhanced Other Networks):
OPTION 1 DISPLAY SET
DIMMER
CTWIDTH (Center-Breite)
DTS (Digital Theater Systems) Digital Surround
1 kHz, 0.1% Klirr, 6Ω
1 kHz, 0.7% Klirr, 4 Ω 105 W
(DSP-DIGITAL SOUND FIELD
PROCESSING) 27
Forstalefvorladludfaltar. 27
DSP-program for HiFi. 27
BIOGRAF DSP (CINEMA DSP). 28
Ljuddesignen for CINEMA DSP 28
CINEMA DSP-program 28
Ljudfaltseffekt 30
STATIONSINSTALLNING 31
OPTION 1 DISPLAY SET 44
OPTION 2 MEM. GUARD (minneslasning) 44
OPTION 3 AUDIO MUTE 44
INSTALLING AV HOGTALARNIVA 45

Batterier (2) (AA, R06, UM-3)
AM-ramantenn

INPUT MODE
Frontpanelen
DSP-program for HiFi
Ljuddesignen for CINEMA DSP
■Manuell stationsinstalling
OPTION 1 DISPLAY SET
DIMMER (ljusdampning)
■DTS (Digital Theater Systems) Digital Surround
1 kHz, 0.7% THD, 4 Ω 105 W
Maximal uteffekt
1 kHz, 10% THD, 6 Ω 110 W
Dynamisk effekt (IHF) 6/4/2 Ω
- Total harmonisk distorsion
- Kanalseparation (1 kHz/10 kHz)
DIGITALE GELUIDSVELD BEWERKING
(DSP) 27
CINEMA DSPprogramma's 28
Geluidsveldeffecten 30
TUNER 31
OPTION 1 DISPLAY SET 44
OPTION 2 MEM. GUARD (gechugen vergrendcling) 44
OPTION 3 AUDIO MUTE 44
INSTellenEN VAN DE WEERGAVENIVEAUS
VAN DE LUIDSPREKERS 45
DIGITALE GELUIDSVELD BEWERKING (DSP)
CINEMA DSP programma's
Surround DSP geluidsveld
OPTION 1 DISPLAY SET
■DIMMER
■DTS (Digital Theater Systems) Digital Surround
DONOHHTENbHAR MHΦOPMALI
PEDAKTIPOBAHNEIAPAMETPOB 3BYKOBOIIOJI 46 I3meHHeHn HAcTpoE npaMeTPOB 46 Oncanhe npametpoB 3BykoBOro noJr 47 BO3MOXHbIE HENCnPABHOCTN CnOCObI INX YCTPAHEHIN 48 C6poc HactpoeB INCXOHNbIe yCTaHOBKn 51 CINPABOUYHK 52 TEXHUNECKNE XAPAKTEPNCTUKN 3aHnKa KpbuKa
OCOBEHHOCTN
BcTpoeHHbI 5-KaHaJIbHbI yCnInTeJb
MnHmAbHoe nCXoJuee 3JeKtpueeckoe HapjKeHne RMS (0.1% THD (obüee HeJIINHeHoe nCKaXeHne), 1 KΓι, 6 OM) [MoJen nJIa CLJA n KaHaIbbl] ΦoHTaHbHbI:100 BaTT + 100 BaTT LeHTpaIbHbI:100BaTT Okpykaiooero 3ByaHnA:100 BaTT +100 BaTT [DpyrneMoJeN] ΦροHTaJIbHbI: 90 BaTT + 90 BaTT ZeHTpaHbHb:90BaTT Okpykaioeero 3ByuHa:90BaTT+90BaTT
3BykoBoe none
Декорс Dolby Pro Logic/Dolby Pro Logic II Декор Dolby Digital/Dolby Digital + Matrix 6.1 Декорд.TS/DTS+Matrix6.1 CINEMA DSP: KomboHaTne TexHoiTnYAMAHA DSP n Dolby Pro Logic, Dolby Digital nn DTS BvrtyajnbHcINEMA DSP SILENT CINEMA
YCOBepueHCTBOBaHHbI AM/FM TIOHEP
HacptpoKa CO cnUaHbIM DOCTyNOM INpeDyctaHOBka Do 40 paAnocTaHm ABTomatuecka HAcTpoKa nIpeDyucTaHOBka ФункцязамениMeCTamnпpeДуctaHOBJeHHbIX cTaHcN(PeJaKtIpOBaHne npdeUcyTahOBKn)
Dpyrme xapaKTepeuCTKn
D/A npoeo6pa30BaTeIb cIuΦpoBOrO CnHana Ha aHaNoRoBbI Ha 96 KU/24 6nt MeHIO yCTaHOBKn IJIa ONTUMn3aUNI daHHoro annapata noA Ayuio/BuJeocncTeMy TepaTop TectoBoro ToHaNbHOro CnHana dna o6nerHeHH peryunipOBKn banaHca KOHOK BxOД nIg 6-KaHaJIbHOro BHeuHero DeKoDepa OnTnueckne N KOaKcnaIbHbIe rHe3da cnpoBbIX ayDnO CnHaIOB TaMep cHa
O daHHo HnctpyKuH
-03Haayet COBET BO Bpem 3KcnjlyaTaun. - HeKOTOpbIe onepaunu npabneHn MoryT BblOnHrTcR C nCNoJIb3ObaHnEM KHOJOK OCHOBHoro 6Noka n nyIbTa Dv. B cnyuaX HecooTBeTCTBnH HaMeHOBaHn KHOJOK Ha OCHOBHom 6IOKe n NylbTe Dv, HaMeHOBaHn KHOKN Ha NyIbTe Dy yka3aHo B CkO6kax. -Даннан ИНСТPyкци ИЗдэп До Нача пpon3BOДСТВ.ДИЗай И Тхнчecке xapakTePnCTNk MOryT ChactuHNo I3MeHЯтбс C ZeIbIO yIyUWeHЯ KaueCTBa,И T.I.D.B TaKOM cIvyae, annapat Imeet npemMyIeCTBO.  DIGITAL PROLOGIC II I3roToBnEHO no IInueH3nn fnpMb Dolby Laboratories. Dol6n,“Dolby”,“Pro Logic”и симьол с довныm “D”-Товарные захи Фпрмы Dolby Laboratories.  13 SURROUND "DTS" n "DTS Digital Surround" RAJIOTc3apeRnCTpnpoBaHHbIMN TOPROBbIMN MapKaMn Digital Theater Systems, Inc. "SILENT CINEMA" ABNIEcTc TopROBm MapKoYAMAHA CORPORATION.
HaHnKa TaKke nCnoB3yeTcna OMeHa MeCTaMn DByx yCTaHOBneHHbIX paDIOCTaHcN.
③ Cencop nylbTa Dy
Pnem CnHaNoB OTo nylbTa Dv.
FM/AM
IpeekJIIOUeHne UM n AM dnaNa3oHOB npnema.
5 A/B/C/D/E
Korda daHHbI annapaT haxoNTcB peXmte TIOHEpa, no3BOJnEe TBb6paTb rpynny yCTaHOBN paAnocTaHcN OTA Do E.
(NEXT)
Korda daHHbI annapaT He HaxoHTcBpeXIMe TIOHEpa, No3BOJnET Bbl6paTb peXIM MeHIO yCTaHOBKn.
6 DmCnne pOHTaJIbHOI naHeJN
OTo6paXeHne HOpMaun O HaCToIeM COCToHHN DaHHoro annapaTa.
7 PRESET/TUNING
PnOTo6paXeHNI BoeToyra()HaDncnnee φpoHTaJIbHOI NaHeJIN,N03BOJHET BbIbpaTb HOMep yCTaHOBNeHHo CTaHcnn1-8. PnOTcyTCTBnI DBOeToyra () Ha nCnJee φpoHTaJIbHOI NaHeJN, N03BOJNeT Bbl6paTb YactOry HacTPOKn.
(SET MENU -/+
Korda daHHb annapaT he HaxoNTcB peXnMe TIOhepa, No3BOJrET peryInpoBaTb yCTaHOBKn MEHIO HAcTPOKN.
MEMORY (MAN'L/AUTO FM)
3anomnHaHne paAnocTaHcN.
TUNING MODE (AUTO/MAN'L MONO)
IpeekJIIOueHHe aBtOMaTnueckoro n pyHOrO pekmOB HAcTPOkN.
10VOLUME
PerynnpOBka ypoBHa 3ByaHnB CEx ayNoKaHaIOB. He BnIeT Ha ypoBeHb OUT (REC).
PHONES (SILENT CINEMA)
I03BOJRAET HACnAunTbcra 3cpeKtAm DSP BO BpEMr IPOCnyuBaHn C NcNoJIb3OBaHnEm HayuHKOB.
SPEAKERS A/B/OFF
Bb6op rpynnbl ppoHTaJIbHbIX KOHOK, NOkNIOUeHHbIX K TepMnHaJAm A nn B. DnA OTKnIOUeHnRA KOHOK, NOBTOpHO HaXkMaIte Ha DaHHyIO KNOpKY n Bb6epuTe OFF.
1STEREO (EFFECT)
IpeeknIOueHne BocnpOn3BeDeHnO 6bUHOro ctepeofoHnueckoro 3ByuHaHnN u 3pFKeTob DSP. PnBbIbopeSTEREO, annapat npOn3BOJNT MkUnpoBaHne Bcex CnHAnOB Dolby Digital n DTS (Kpome KaHaJa Hn3KoYAcToTHbIX 3pFKeTob LFE), a TaKxke 2-KaHaNbHbIX CnHAnOB 6e3 3pFKeTob 3ByaHnI, C BbIXoDM Ha pOHTaNbHbIe JEByIO n npaBYIO KOLOHKn.
1CONTROL
IpeeknIOuayet pexmbl ynpaBneHna Bass (Hn3Kne YactOTbl) n Treble (BbICOKne YactOTbl).
15 PROGRAM
Bb6op nporpamM 3ByKOBbIX NOJIe.
BASS/TREBLE -/+
Korda annapat haxoindTcB pexkme ynpabneHnBass/Treble, no3BOJnREyBeJIuINBaT nIynymHehbaTb Hn3KNE/BbICOKNe YactOTbl. C kaxdbIM HaKaTneM OHOH N3 DaHHbIX KHOIOK, 3ByK MeHReTcC YactOToB B 2d5. Dnaana3OH ynpabneHn: oT-10do+10d5.
INPUT MODE
Korda OdnH KOMNOHEHT-NUCTOCHNK NODKLIOUeH K DBYM TINam BXODHBIX RHe3D, N03BONRAET YCTAHOBJNBAbTB npNOPITET DnTINOB NocTyNAIOxxCnHaNoB (AUTO, DTS, ANALOG). B Cnyuae, ecn BBi6pHaФyHKcIg 6CH INPUT KaK NCTOCHNK NOCTUAnIOJIero CnHAla, yCTaHOBKa npNOPITETA nAayDNIONCTOHKNOB HeBO3MOXHa.
18 INPUT<1/D
Bb6op nCTOuHnKa CnHaJa dIy npocnyuBaHnI nn npocmoTa.
96CH INPUT
Bb6op ayduonctOuHnka, nokJIOueHHoro K rHe3daM 6CH INPUT. Pn Bb6ope daHHoJ cyHKun, npOpntET OTdaetcEi, Yem NO OTHoWeHnK INCTOChkam, Bb6paHHbIM C NcNoJIb3OBaHneM cyHKunINPUT (nnC nCNOJIb3OBaHneM KHOJOK Bb6opa nCTOchNka cIrHaHa ha nyIbTe DY). ToIbKO dIa MoJeIeI dJIa CoeINHeHHoro KopoJIeBCTBa BeIIKo6pHTaHn n CeBepHO IpnaHnn n EbpOnbl
20RDS MODE/FREQ
Korda annapaT haoDntcB pekIme npneema paAnocTaHnRDS, daHna KhoNka no3BOJareT noopeIHO nepeKIOUOATb peKIM dncJIeHa peKIM PS, peKIM PTY, peKIM RT, peKIM CT (ecIn paAnocTaHnIpeIoCTabJIeT ycnyr RDS) IIN peKIM YacToTbl.
②PTY SEEK MODE
Даннай КНонka NO3ВОЛЯТ yCTaHOBuTb aannapatВ peхи PM TY SEEK.
2PTY SEEK START
IocneToro,KakKeJaembInTNnporpaMMb6bln BbIbpaHbpexKmpePTYSEEK,haxMnte daHHyIO KhoNkyIaHaayana noncka paAnocTaHun.
23EON
JaHHa KONKa NO3BOJHeT BbI6paTb TnPaanonporpamMbI (NEWS, INFO, AFFAIRS, SPORT) ABTomatuecko HacTpouKn.
IyIbT InCTaHcNoHHOrO ynpaBHeHnA
B daHHOM pa3deJe OINcaHbI cyHKUIn KHOJOK ynpabNeHn nybTa Dv. 
1HΦpaKpaChbI n3nyaTeJIb
N3daet nHppaKpacHbIe cHrHaIbI ynpaBneHnra.Bo BpemnncnoJb30BaHnnybTa Nv, ydepXnBaTe DaHHbN 3NpyaTeJIb HnpaBneHHbIM Haanapat.
2KhoNKn Bb6opa nctouHnKa noctynauoero cnHaJa
IpeHa3NaYeHbI DnB BbOpa nCToHnKa Noctynaiouero CnHaHa N dNnpeKIOueHnA 3OnHbI ynpaBHeHn.
A/B/C/D/E
Korda annapaT haoDntcBpeXmte TIOhepa, no3BOJnEe BbIbpaTb rpynny yCTaHOBKn paAnocTaHcN OTo A do E.
4DD/CTS
BbIbpaet BcTpoeHHbI deKoep Dolby Digital, DTS,Dolby Pro Logic nII Pro Logic II.
6.1/5.1
BknioyaeTnBbIKnoyaeTdekoep Dolby Digital ^+ Matrix 6.1 nDTS ^+ Matrix 6.1.
6TEST
BbIOuNT TECTOBBI TOHaJIbHbI CNrHaI dna peryJInpOBN yPOBHeKoJIOHOK.
MUTE
Pnirnywaet3ByuHne.ДЯ BO3O6JIeHnA 3ByuHnHa npexKHe ypOBHe rPOMKOCTN, NOBTOpHO HaxmTe DaHHyIO KONKy.
LEVEL
BbIbupaet kaHan 3oΦeKta KOHOK dnerpeyInpOBN.
9PROGRAM-/+
VcnoB3yETcA nnB BbIbopa nporpamM 3ByKOBbIX noJe.
CeknMHorOyHKnOHaJIbHOKHTpOJa
NcnoB3yeTcIINBAIB6opaNperynpOBKn npaMeTPOB nporpaMM 3ByKOBbIX NOJENnn ycTaHOBOK MeHIO SET MENU.
1 POWER
BkIIOUaET nJIn yCTaHaBJIbAeT annapat B peKIM OXnDaHn.
6CHIN
BbIbpaetaydnoNCToHnK,NOdkIOueHHbIK rHe3dAm 6CH INPUT.
15 PRESET -/+
BbIbnpaET HOMepa yCTaHOBJIeHHbIX paAnocTaHcNt O T 1 Do 8.
4SLEEP
YCTaHaBnBaET TaMep cHa.
15NIGHT
YcTaHaBnBaet annapaT Ha pexm HOHOro npocnyuBaHH.
16STEREO
IpeekluoyaET BOCPON3BedeHne 06bIyHoro CTepeofoHNueCKOro 3ByuHaHn I 3cpeKTOB DSP. PnB bIbope STEREO, annapat npOn3BOiNT MmKUnpoBaHnE BcexCnHaNoB Dolby Digital n DTS (Kpome KaHaHa Hn3KOAcTOb TbIX 3cpeKTOB LFE), a TaKxHe 2-KaHaNbHBix CnHaNoB 6e3 3cpeKTOB 3ByuHaHn, C BbIXoDM Ha cpoHTaJIbHbIe JEBYIO n PpaBYIO KOJOhKn.
VOLUME + / -
YBENHnBaETIyMEnbShaetypoBeHb3ByaHa.
SET MENU
BbIbpaet peKMM MeHIO yCTaHOKn.
IcnoJb3ObaHne npJbTa DY
NylbT Dy nepeadaet HappaBHeHHbI HfpaKpaChbI Nyu.Bo BpMa nCNoB3OBAHNr, 06Ha3aTeNbHO yDepkNBaTe NylbT DY HaPpaBHeHHbIM pRMO Ha ceHCop Dy Ha annapate. 
O6paueHne c nYnbTom dY
He npolBaTe BoDy nn Dpyne BnDbj KndKoCTe Ha nyIbT y. - Y6eperaTe nybT Dv ot naeHna. He octabnnte nnn xpaHnte npblt DY B Mectax CO CneDyIOUIMN yCNOBnMn: - C BblcOKoB BLaXHOCTbH, HApPIMep, BO3JIe BaHHOJ C NOBbIeHHoTempeatypoH,HaPImep, BO3Je 06OrpeBaTeTn nn neu C OueHb Hn3KoTemnpaTypoi -B3aIbJIeHHbIX MeCTaX
DncnnneFpOHTaIbHOHaHeJI

(TonbKO mIeMoei CoeHHeHHoro KopoJIeBCTBa BeNKo6pTuHaHn n CeBepHoI npHaHm n EbpOnbl)
MHOFOyHKUHOHaBbHINHΦopMaUONHHI INCJIeI OTo6paKaet HaMeHOBaHne npOrpAmMbI 3ByKOBOrIO NOJI IN DpyryIO IHOpMaUIO npi HAcTPOKe IIN N3MeHeHNYcTaHOBOK. 12 HdkauaSPA B BbICBeuNbBaetcIgO60HaueHnBbIbpaHHoAkyCTnueckOn CNTeMbI pOHTaJIbHbIX KOHOK. EcIN BbIbpaHbI o6e aKyCTnueckne CNTeMbI, BBICBeuNbAOTC O6e INHdNkauuN. 15 INHnkaaN NIGHT 3aropaetcn npy yctaHOBe annapata Ha peKIM HooHOro npocJyunBaHa. 14 NHdNkaqua SLEEP 3aropaETcBCE TO Bpemn, NOKA BKIOeH TaMep cHa. 15 NHHkaqH HiFi DSP 3aropaetc npn BbIbpe nporpammbi 3BykoBOro nona HiFi DSP. 16 INHdkauCINEMA DSP 3aropaetc npn BbIbope nporpammbi 3BykoBOr noJr CINEMA DSP. TUNED 3aropaeTcnpnHactpKe DaHHoro annapaTaHa paanocTaHcIO. 18 Hdkaa STEREO 3aropaetcBO BPmnpnmaanapatom CnIbHoro CnHana CTpeoohneckoHm paiooctaun npn BkIOueHHo HnDkaun "AUTO" 19 Nndkauna MEMORY Muraet dIra 06o3haueHnra TORO, YTO paAnocTaHnma MoKET 6bITb COxpaHeHa. 20 Nndkaun LFE 3aropaetc, korga noctynaoiun cnirhan codepknt cnirhal LFE. HnkaKaHa KaHa NcToHnKa Noctyauoero CnHaHa HnKauCCOTBETCTByOux 3BYKOBbIX KaHaIOB 3aropaOTc pnp BocpnOn3BeDeHHn UcpPobOro CnHaHa OT nCToHnKa. 2 HndkaRDS (TolboKO dIe MoedeJe dIe CoedHnHO KoponeBCTBa BeIinKo6pTaHmN CeBepHoN UpranDmN EbpOnbl) 3aropaetc(-OTc)HaHMeHOBaHHe(-Hn)HOpMaunCnCTEmB RDS, npedocabIReMoCtAnuEe CnCTEmB RDS, npHnMaemOn annapatOM Ha daHHbIMoMEHT. INdkaEON 3aropaeTc npnpneMe paanocTaHmCnCTembl RDS, npedoctabJIOUe HfOpMaioHHbIe ycnyr nCnCTembl EON. INdkaPTY HOLD 3aropaeTc BO BpEM naCKa paanocTaHmB pexime PTY SEEK.
3 INHnKaTOp HayuHnKOB
3aropaeTc npn noKIOueHn HayuHKnOB B rHe3do nn HayuHKnOB.
4 INHdkaTOp nCTOuHNka 3ByKObORo CnRHaJa
BbIeJnEET KypcOpOM NCTOCHNK 3ByKOBOrO CnHaJa, nCNoJIb3yEmbI Ha DaHHbIM MOMENT.
5 INHdkaTop 3BykoBoro noJr
3aropaeTcIy 603HaehnA kTINBbIX 3ByKOBbIX nOei DSP. 3BykoBoe noJe DSP c 3dpeKToM npncyTCTB JeBoe 3BykoBoe none DSP Okpykaiozero 3ByuHaHn  cTo cLywaTeTnI lpaBoe 3BykoBoe none DSP OkpykaUoero bByaHn TbINOBoe 3BykoBoe none DSP OkpykaHcero 3ByaHn
6 HdkauA AUTO
O6o3HaayeT COCTOaHHe DaHHoro aannapata B aBTOMaTuueckOM pexKMe HaCTpoiKn.
7 HdNkaun MUTE
Muraet BO Bpemn AKTNBn3aunn cyHKUNnpurnyeHn 3ByaHn MUTE.
8 INdkauny ypoBnVOLUME
OTo6paKaeT yPoBeHrpoMkoCTn.
9 Nndnkaqna PCM
3aropaeTcB BO BpMa BocnpOn3BeDeHn DaHHbIM aannapatOM uppoBbix aydnocnHaIOB PCM (MoynyIINmNynbChoro KoJa).
10 INHdNkaCua VIRTUAL
3aropaeTcBOBpemHICNOJIb30BaHHBnpyaIbHOyHKuIN CINEMA DSP.
ПОДКЛЮЧЕНЯ
Ipeed nodkJIOUeHneM KOMNOHeHTOB
IPEDOCTEPEXEHNE
He noKlnHouaTe DaHHb annapat n pyrne KOMNOHEHTbI K NCTOCHNKAM 3NeKTpO3HepRn Do Tex nop, NOKa He npoN3BeDeHb BCE NOKJIIOUeHIN MEXy KOMNOHENTAMN. -6eIntecbB npabINbHOM NOKIOueHn JEBORO KaHana (L), npaBOrKaHana (R), " + " (KpaCHbI) n "-(Yephbl).DnHEKOToPbIX KOMNOHeHTOB C pa3HbIMn HAMMeHOBaHNMA rHe3d Tpe6yETcnpimHeHne dpynx MeTOOB NOKJIIOueHn. DnA NOKJIIOUeHn KOMNOHeTOB K DaHHOMy aannapaty, pyKOBoIDCTByITecb INHCTpyKUHmN NO 3KCNlyatauNN K KaXDOMY KOMNOHeHTy. -Поссе Вынолинь Сбс NOДКЛIOЧЕН, y6eNTecb eue pa3, YTO NOДКЛIOчЕнЯ 6bln npOu3BeDEHbI HADJIeXaUIM O6pa3OM. HaHMeHOBaHHrHe3D COOTBETCTBYIOT HAnMeHOBaHNrMa Ha CeJIeKTope NCTOCHNkA NOCTyNaIOUeRO CnHana.
BbINOHeHne NOdKIOUeHn K uΦpOBbIM rHe3dAm
Ha daHOM annapate nmeOTc unpoBbIe rHe3da dna npAMoNEpeaunu npOpBBx CnHaNoB NO KoAKCnAIBHOMY Nn ONTko-BOJOKOHOMy Ka6JIIO. LnpOBbIE rHe3da MOrYT 6bITb NCNOJB3OBAHbl dnn BXoNbIX 6ntOBXnTOkOB PCM,Dolby Digital n DTS.Dn npocnyuBaHHMHOrOKaHaJIbHbIX ayno3anCe c DVD n.T.d.cΦpeKTamN DSP, NCNoJIb3yInTe unpoBBie nOdkJIOueHH.Oba uNPoBBix BXoHBIX rHe3da COBmectIMbl c unpoBBIMn CnHaIIc C qactOTOI CTPObIPOBAHn 96 KfU.
PpmeaHne
「He3do OPTICAL daHHoro annapata cooTBeTcTByeT cTaNdapTy EIA. DaHHb annapat moKeT pa60TaTB He npaBnIbHO npn nCNOb3ObaHm ONTNko-BONOKOHoro Ka6eJI, He COoTBeTcTByIOUe rCTaHdApTy EIA.
Гнэзда DIGITAL INPUT
(ctp. 9-11) 
KoJohKn OkpykaIoUeO 3ByuHaHn (SR n SL)
KoONKn OKpykaIOUeO 3ByaHnNcNOJb3yOTcN IIN 3ByKObbIX CNHaIOB 3cpeKTOB IN OKpykaIOUeO 3ByaHn. PaMecNTe DaHHbIE KoONKn 3a MeCTOM CnyuataTn, CJIerKa HAnpabNB IIueByIO YAcTB BO BHyTpEHIOIO CTOpOHy, PnpOnDnHB IN PnpmepHO Ha 1.8 M OT yPOBH NOJa.
Ca6ByΦep
IcnoJb3OBAHHe c6Bypepa, Hapmep, YAMAHA Active Servo Processing Subwoofer System, NO3BOJREr He TOJIbKO yCUNITb HN3KoayactOTHbIE CNHaJI bIO60r OIN BCEx KaHAnOB, HO TaKKe BOCnpon3BOIDtB C BbICOKO ToHOCbIO KaHAn LFE (HN3KoayctOTHbI 3ΦΦeKT), CoepKaunCBA nporpamMax DTS INl Dolby Digital. PacNoLoXeHne ca6Bypepa He TAK BaXHO, TAK KAK HN3KoayactOTHbIM 3BYK He ABInETCA BBICOKOHApABNeHHbIM. Ho BCE-Ke IyUwe 6yDeT paCNOJOxNTb c6Bypep BO3Ne ppoHTaNBbIX KOHOHK. dYMeHBWeHn OTPaXeHn HN3KoayactOTHbIX 3BYKOBbIX CnIHANOB Ha CTehax, Cnerka NoBepHnte IN HappaBBTe c6Bypep No HApBaBHeHIO UeHTPa KOMHaTBI.
IOnkNIOUeHnKoJIOHOK
Y6eIITecb B npaBnHOM NOKJIIOueHm JEBORO KAHJAL (L), npaBoro KaHJAL (R), “+” (KpaCHb) n “-” (YePb). 3ByaHne OT KOLOHOK 6yET OTCYCTBOBaTb npi HnPaBnHbHO BblONHeHHOM NOKJIIOueHm, N 3ByaHne 6yET HeECTcTBHbIM C OTCYCTBnEM Hn3Knx YactOT npi HECOBIOJeHHN IOJARPHOCTN npi NOKJIIOUeHm KOLOHOK.
PDEOCTEPEXEHNE
- IMpeHaHC KOJIOHOK DOJKeH COOTBETCTBOBaTb IMpeHaCy, yKa3aHHOMy Ha TBIOBOI NaHeJI NaHHORO annapaTa. -IO NOKJIIOHHeHH KOLOHOK yBeINTEcB, YTO NITaHne DaHHoro annapaTa OTKJIIOUeHO. - Hen30InpoBaHHbIe npOBoJa KOJIOHOK He DoJIxHbI cOnpKacatbcra Dpyr C dpyrom, nIc IIO6oM MeTaNuecko YactbIO daHHoro annapata. 3TO MOKeT pPnBecT N K NOIOMKe daHHoro annapata W/ nIIN KOJHOHK. - IcnoIb3yIte KOLOHKn C MaHHTHnTHbIM 3KpaHOM. Ecnn DaHHb TnN KOLOHOK BCE-Je Bbl3BaET NOMEXn npu IcnoJIb3OBAHnC 3KpaHOM, pa3MeCTnte KOLOHKn Ha HEKOToPOM paCCTOHnOT 3KpaHa.
Подключени К Термнанлам FRONT A SPEAKERS
Ka6eIb KOnoHOK Ha cAmOM DeJe COCTOHT n3 DByX CnapeHHbIX n30JInpOBAHHbIX npOBoIDOB, PAnOM dpyr C dpYROM. NObepxHOCTb OndHOro pPOBOda OTJIuHaTc TBeTOM IIN NImMeet dpyryo fOpMy, HApPIMep, OH MOKeT 6bITb OTmeueH NOLOCKaMn, Hape3aMn IIN bByrpaMn. PoDKJIIOUHTe npOBoC nNOLOCKaMn (Hape3aMn, T.D.) K TepMNHaIam “+” (KpaChbI) DaHHoro annapata n KOJOnHKn. POnKJIIOUHTe rJaIKN npOBoD K TepMNHaIam “-” (YePhbI).  10MM  KpachbI: NOJIOXHTeNbHbI(+) Uepnbl: OTpnuataIbHbI (-)  "Банановь" wTeKKeP (3a ncknuehenm moe ne dna CoeHHHORO KoponeBCTBa BeNko6pTaHHu CeBepHo npHaundn, EbpOnbI u A3nn) 1 ydaInte npimepno 10 MM n3OJauNOHORO CNoI Ha KOHcax KaXdoro npoBoda Ka6JIa KOJIOHKn. 2 CkpyTnte OTKpbITbIe KOHcbl npoBODOB Ka6eJn DJI npedOTBpaueHn KopoTKoro 3aMbIKAHn. 3 OtkpyTnte roJOBky. 4 BcTaBbTe OdH npoBoH HeH3OJInpOBaHHo HAcTbIO B OTKpbITbI INPOMExyTOK C BHyTpENHe CTOpOHb KaJDoR TopeMHHaJa. 5 3akpyTte roIOBky dJa 3akpenIeHn npoBOda.
CoeHHeHcNcNoJb3OBAHnEM“6aHaHOBOB" BUNK
(3a nckHneHem moJeIe JIra CoeHHeHHoro KoponeBCTBa BEnIKo6pTaHn N CeBepHoI npHaHnn, EbpOnbl A3nn) Chayana 3aKpyTnte rONOBky, 3aTeM BotKNHTe KOHHeKTOp "6aHaHOBOB" BUNIKN C 3aJHEn CTOPOHbI COOTBeTCTByIOUeTO TepMNHaJa.
Подключени К Термуналам FRONT B, CENTER n SURROUND SPEAKERS
Kpachny: IIOJOKHTeHbHbI(+) Uephbl: OTpuataIbHbI(-)  1 HaKmTe n OTKpOte 3aueIky. 2 BCTaBBTe OROJEHNYO qAcTb npOBoJa B OTKpbITbI pOMeXyTOK KaXdORo TepMHaHa. 3 OTnycntte 3aueKky dnn 3akpenneHn npoBOda. 
TepmHaJIbI FRONT SPEAKERS
K DaHHbIM KOJOhKaM MoXHo NOJKNIOuHTb DO DByX aKyCTnuecknx CnCTem. Pp NcNoJIb3OBAHm TOJbKO OdHO aKyCTnuecko CnCTembl, NOJKNIOuHTe ee K TepMHanaF RONT A nI INFRONT B.
OCHOBHbIE CNCTEMHbIE HACTPOIKN
MeHIO "BASIC" no3BOJnREt JERKO yCTaHOBnTB HeKOTOpbIe OCHOBhIe npaMeTpbl MeHIO "SOUND". EcN Bbl XOTnte 6oJIee TOnHO cKOHcHmrgpnpOBaTb aIInapaT dIN H COOTBeTCTBnA ONpeJeHNHO CpeDe npocnyuBaHH, BMEcTO MeHIO "BASIC", BOCNoJIb3yIteCb 6OJIe DeTaJIbHbIM npaMeTpamn B MeHIO "SOUND" (CMOTpnte cTp. 40). IV3MeHeHne IIO6bIX npaMeTpOB B MeHIO BASIC npnbEdet K cbpocy Bcex npaMeTpOB B MeHIO "SOUND".
ИспOLSь3OBaHne OCHOBHOROMeHIO
IperynpoBOK,BOcnoJb3yTeCb nybTOM y. Haxkab KhoNky SPEAKERS A/B/OFF Ha pOHTaJIbHOI nAHeJN, BbIepeNTe XeJaemblc pOHTaJIbHbIE KOJOHKn. - Y6eIITecb, YTO HayuHnKn OTKJIIOueHbI OT daHHoro annapaata.  1 HaXmTe KhONky SET MENU. HnDnKaun "BASIC MENU" noRbntcHa nncnnee pOHTaIbHOI naHenn.  BASIC MENU EcnBmecTo HnDnKaun "BASIC MENU"Ha dncnlee ppoHTaIbHOJ naneN OTObpaXaeTc dpyraHnDnKaun, HaxnMaTe KhONKy SET MENU Do NoRBeHnA HnDnKaun "BASIC MENU". 2 Haxmam KhoNky-/+, BoiDnte B MeHIO BASIC. Hnkaun“1SETUP"noBntcnaIncnnee pOHTaJIbHOI naHei.   1SETUP 3 Haxkab KhoNky / nepeKJIouaIte DnCIIneJdo Tex Nop, NOKa He NOBNTcH NaCTpOka, KOtopyIO Bbl XOTNTe N3MeHITb.
1 SETUP
IpeHa3HaueH IINa HAcTpoE KOnOHOK YcNInTeIa DnA COOTBeCTBnA pa3Mepy NcNoJIb3YeMoKOMHaTbI.Bonee NOpO6Ho,CMoTpIte“HAcTpoIka annapaTa IAn COOTBeCTBnA aKyCTnueckOcnCTeme" Ha cTp.20.
2 SP LEVEL
IpeHa3HaueHДЯperyInpOBKn yPoBnHrpOMKocTn KOJHOK.BoJee NoDpo6Ho,CMOTpNTe "SP LEVEL" Ha cTp.20. 4 Haxmam KhONky -/+,BBeNTe XeJaembl peKm HacTpoKn. 5 OtperynpyuTe HacTpoKu annapaTa JIa COOTBeTCTBnCpeI npocnyuBaHna. 6 Haxnma KhONky / , BbIaTe n3 MeHIO Hactpoek. IinCnnePpOHTaJIbHOI nAHeIN I3MeHReTcB CJeDyUoSeI NocJeIOBaTeNbHOCTN:   BbIXOa ↑ BASIC ↓↑ SOUND ↓↑ INPUT ↓↑ OPTION ↓ BbIXoD
IocJeIOBATEJIbHOCTb DeIcTBnO OCHOBHOTo MeHIO
 -ПоссеизмениnapametpoB"1SETUP",3aHOBOOTperynpyte ypoBHn rpoMkoCTN KOHOHOK B "2 SP LEVEL". -Bolee noopobno o meHNo "SOUND", "INPUT" n "OPTION", cmoptne ctp. 39 - 44.
Hac troponka annapaTa Дл COOTBETCTBnA aKyCTnuecko CnCTeMe
CneIy HNCTpyKuHnHexe, yCTaHOBInTe ypoBeHb BixOJa ycINITeJr dIra npIBeHnB COOTBeTcTBnpepa3Mepa KOMHaTbI IN KOLOHOK. Haxmaite KhoNkY / IJI nepeKIOUeHnnpaMeTpOB 1-4, n KhoNkY-/+IJI N3MeHeHNy YCTaHOBKn npaMeTpA. IVxOHDhie 3aBOIDCKNe yCTaHOBKn OTo6paXeHbblJeHnEM.
①ROOM
NapametpbI HacTpoiKn: S, M, L BbI6epnte pa3Mep KOMHaTbI, rDe yCTaHOBJIeHbI KoJOnHKn. rpy60 roBOpR, pa3Mepbl KOMHaTbI OnpedelaTcraCneDyUOuM 6pa3OM: [MoDennnCLNA nKaHaDb] S:16x13dyTOB,200dyTOB² (4.8 × 4.0 ~M, 20 ~M^2) M:20x16yTOB,300yTOB (6.3× 5.0M,30M^2) L:26x19 cyyTOB,450 cyyTOB² (7.9× 5.8M,45M^2) [Дугne mo'den] S:3.6x2.8M,10M M: 4.8 x 4.0 M, 20 M L:6.3x5.0M,30M 2
②SUBWOOFER
NapaMeTpbl NaCtpoiKn: YES, NONE Pn HauuHcBpyepa B CnCTeMe, BbIbepntE YES, NNN NONE npn erO oTcyTCTBn.
SPEAKERS
NapaMeTpbl NaCtpoiKn: 2, 3, 4, 5 (spk) BbI6epnte KOJInueCTBO NOKNIUOeHHbIX KOJIOHOK B COOTBeTCTBmC KOHfNrgpauneKoJIOHOK. DaHHoe KOJIInueCTBO He BKJIIOuaET caBByep.
| Параметр настоюк | Ди检пел | Колонka |
| 2spk | L R | Фразтыльна щевая/ празва |
| 3spk | L C R | Φразтыльна щевая/ празва, центральна |
| 4spk | L R SL SR | Φразтыльна щевая/ празва,.okржкоцero Звuchnia щевая/празва |
| 5spk | L C R SL SR | Φразтыльна щевая/ празва, цentральна, okржкоцero 3вочnia Левая/празва |
④ SET nJn CANCEL
Bb6epTe SET nIOITBePckDeHnI npO3BeEHHbIX n3MeHen. nIbBixoJa n3 SETUP MENU 6e3 n3MeHENyCTaHOBOK DaHHoro annapata, Bb6epTe CANCEL.Annapa 6yDet BBIOuNb TeCTOBBI ToHaJIbHbCnIHnHa KOJONHK (CMOTpTe NyHKT ⑤).
⑤McNoJIb3OBAHMe TECTOBORo TOHaJIbHOrO cnHaJana IpOBepKn yPOBn KOJOHOK.
PnBbIbope SET B nyHKeT 4,Ha dncnnee Ha HeckoNbKO cekynd noBnBnTeCn HnDnKaun "CHECK:Test Tone",n annapat NaHnHaet BBIOBnTB TcTeBOBn TOHaNbHn CnHAn Ha KaKdyIO KOHOky DbaXdbI B NocneDobATEnbOcTN. KaT OJbKO TcTeBOBn TOHaNbHn CnHAn HaHnHaET BBIOBnTBcA,Ha dncnnee noBnBnTeCn HnDnKaun "CHECK OK?-YES". EcIN TeCTOBbI ToHaNbHbI CnHbI BbIBOHTC8 CO BCEx KOHOK Ha OdnHakOBom ypOBHe rPOMKOCTN, Bbl6epTe "CHECK OK: YES".ДЯ BbIXOJa n3 MeHIO SETUP, HaxMITE KhoNky. Ppi pa3nHOM ypOBHe rPOMKOCTN TeCTOBORO ToHaNbHOro CnHbIa OT KOLOHOK, HaxMITE KhoNky -/+ ДЯ NepeKlIOUeHn INDkaun Ha DnCnlee Ha "NO".
PnmuMeaHne
Ha dncnnee ppoontalbHno naneMnraeT INnKkATOP KOnOHKn, 3daioe TecTOBbI TOHaJIbHbI CnHbI B daHHbIMoment.
2 SP LEVEL
(Hactpoika ypOBHei rpOMKocTn KOJHOK)
NcnoB3yraHHOMeHIO,CpaBHnTe TcTOBbI TOHaNbHbIN CnHJI,BBIOIMbIM N3KaKDoN KOONHKINCTOEBIMTOHaNbHbIM CNrHaIOM,BBIOIMMbIM N3ΦpOHaNbHOJNEBOI KOONKN(NJNEBOI KOONKN OKpyKaIOeero 3ByaHnI),NHaCTpoITe KOONKIn TAkIM O6pa3OM,YTObI yPOBEhB rPOMKOCTN BCEX KOONOK 6blOOnHaKOBbIM.Hakab KhoNky 一 /一 ,BbIEpHTe KOONKHy,3aTeM,NCNoB3yR-/+,OTperylnpyte6anaHC.
PnmeaHne
AnnapaT BbIOuNT TcTOBbI ToHaJIbHbI CnHAN OT BbIbpaHHO KOnOHKn B nape C pOHTaBHO JEBoB KOHOKo (NJN JEBoB KOHOKO OkpyKaIoero 3ByaHnR) B NocneIOBaTeJbHocTN. Ha dncnnee pOHTaBHO NaHei MnaeT INdkaTOP KOHOKn, I3daIOSe TcTOBbI ToHaJIbHbI CnHAN B daHHbMOMeHT.
L-R
Otperynpyte6aIahm Mekdy fpoHTaIbHOn JeBOH npaBOKoONKaMn.
C
OtperynpyTe 6aHaC mExky dpoHTaIbHOJneBOH n cHTpaJIbHOKoIOHkAMn.
SL
Otperynpyte6anacmexkydpohtaibhoJneBOI KOHOKIO neBOI KOHOKOOKpykaOioero 3ByaHNA.
SR
Otperynpyte6baHcMeKdyfpoHTaBHOJneBOI KOHOKOIIpaBOI KOHOKOOKpyXauoero3ByaHnA.
SWFR
OtperynpyTe 6aIaHc Mekdy fpoHTaIbHOJneBOn KOIOHKO n ca6Bypepom.
BOCNPOIN3BEIDEHNE
  1 Haxkab KhoNky STANDBY/ON (KhoNky POWER Ha nyIbTe D), BKJIIOHTe NITaHne.  ΦpoHTaIbHa naHeIb HNN  IyIbT DY 2 BkIIOHTe BnDEo3KpaH, NOkIIOHeHHbI K daHHOMy annapaTy. 3 Haxab KhoNky SPEAKERS A/B/OFF Ha pOHTaIbHOJ NaHeJI, Bbl6epTe XeJaEMbIe pOHTaIbHbIe KOJOhKn. SPEAKERS A/B/OFF  4 NOBTOPOHaXIMaKHOKNkyINPUT<1/>(OdHy n3 CeJIeKTOPhbIX KHOJOK BbIbopaNCTOCHNaNoCTyNAIOUe CnHrHaHa NaYbTe DY),BbIBepuTe XeJaEMbI NCTOCHNK NOCTyNAIOUe CnHrHaHa. HaDinCnleeΦpOHTaNbHOHaHeKnHa HeckoJIcKeYHd 3aROpaeTc INDAKauIN HaMeHoBaHN HCTOCHKa NOCTyNAIOUe CNHrHaHa npeXIM npneMa.  5 HaHnTe BocnpOn3BeDeHne IIN BbI6epHe paAnOCTaHnHO HA KOMNoHErTe-NCToOHKe. PokoBoDCTByInTeCb INcTpyKuEn IO 3KcNpyataun, npinaraemoi K KomnoHHTy. 6 OtperynpyTe ypoBeHb rpoMkoCTn.  PnXeNaHm, BblMOxTe BOCNOb3OBaTbCfYHKUARM CONTROL n BASS/TREBLE -/+ DaHHBle fYHKUIN DeICTBNTeJIbHbI TOJbKO dNpOHTaJIbHbIX KOHOHOK. 
PnmeuHn
- Pn yBENuHEn Hm yMeHbUeHm UyOBHe BbICOKOaCTOTbIX INN Hn3KoHaCTOTbIX 3ByKObBix CnHAnOB Do MaKCmAmJbHO DOnyCTMIMO rYOBHr, ToHaJIbHOe KaeeCTBO 3ByaHnA ueHTpaJbHOI KOJOhKn I KOJOhOK OkpyKaIOUeO 3ByaHn MOKeT He COBnaJaTb CO 3ByaHnEM cpoHTaJIbHbIX JEBO IN PaBoi KOJIOHok. - Ecni, npn noKnIOHem 3aIncbIbAIOeM KOMnoHEte K rHe3dAM VCR OUT, nN MD/CD-R OUT, Bbl 3amTeuN NCKaKeHne Nn Hn3Kn ypoBeHb 3ByaHn npn BocpOn3BedeHm C dpynx KOMnoHEtOB, nonpo6yTe BKIOHTb IITaHne 3aIncbIbAIOeO KOMnoHEta.
7 BbI6epnte XeJnaEmy nporpammy 3ByKOBOrO NOJr.
HaKIma KhoNky PROGRAM / (KhoNky PROG-+Ha npJIbTe Nv), BbIbepnte nporpamMy 3ByKOBOrO nOJI. BoJee noDpo6Ho o nporpamMax 3ByKObBix NoJe, CMOTpNTe CTp. 27-30. 
Bb16op 6CH INPUT
HaximaiTe KhoNky 6CH INPUT Do noBHeHnHa IinCnlee fpoHTaJIbHOi NaHeJi INDnKaUIn "6CH INPUT".  6CH INPUT MUN 6CH IN  IyblDy  ΦpoHTaIbHaI naHeJIb
6CH INPUT
PnmeaHne
- Bo Bpemr OTo6paXeHn HnDnKaaun "6CH INPUT" Ha DnCnnee pOHTaBHO nAHeJI, BOCnPON3BeDeHne C Dpyrnx NCToUHKnOB HeBO3MOxHO. IIN BbIbopa DpyrOIOCToUHnKa NOctuHaOJero CNrHa, ChaHa nHaKMnTe KhONKy 6CH INPUT DO nCye3HOBeHn HnDnKaaun "6CH INPUT" c DnCnnee pOHTaBHO nAHeJI.
Bocnpon3BeHHe BnDeoNCToHKnOB KaK fOHa
BbMOKTe cKOM6HnHPOBaT bNDeOKeapTNHKyOT BnDEoNCToCHNKa CO 3ByKOM OT ayDNIOCTOCHNKa. Hanpimep, Bbl MOKTe pocnyuNBaTB KJIaccNueckyo My3bIKY, IN TO Xe BpeM npOCMaTHNBaTB npeKpaChbI BNDOT BnDEoCToCHNKa Ha BNDeO3KpaHe. Haxmay KhoNk Bb6opa nToHnka noctynaooeroCnHna, BbIeepute BnDeoNCTOCHK,3aTEM BbIbepnte ayDIOONCTOCHNK. 
PprrnyeHne 3ByaHnA
HaKMTe KONKy MUTE Ha npIbTe Dv.
Ha dncnnee fpoHTaHbHo nane Mrraet Hndkaun "MUTE". IINBO306HOBHeHH 3ByaHn, CHOBA hXkMTe KhONKy MUTE.   -ДЯ OTMeHbI npRJIyUWeHn3BvUaHn, Bbl TaKKe MOKeTe BOCNoB3oBaTbCk KHONKoVOLUME+/-,N.T.D. - Bby moxete oTpereynpobatb ypoBeH npnnyuene H3ByaHn (CMOTpnte ctp.44).
Pekm HouHoro npocJyBaan
JaHHbI pEXMMIO3BOJHET YETKO BOCnPON3BOJNTB DnaIaIor, IN B TO Xe BPemr yMeHbWaaTb yPOBeHb rPOMKoCTn rPOMKINX 3ByKOBbIX 300EKTOB, TaKM O6pa3OM O6nerqan IpocnyuBaHne Ha HN3KINx yPOBHAX rPOMKoCTn nIN B HOHHOE BPema.
HaXMMTe KhoNky NIGHT Ha npIbTe Dv.
Ha dncnnee fpoontaHnoi naHenn 3aropaetcN Hndkaun NIGHT. ДЯ BO3BpTa B O6bUHbI pexIM BOCPOn3BeDHeNIA, eue pa3 HaxMMTe KhoNky NIGHT.  NIGHT  BbMOKeTe NcIOJIb3OBAbIpeXIMHOHOrOpocnyuBaHnCJIIO6oN3nporpaMM 3ByKOBbIX NOJe. 3ΦΦeKTHBHOCTbpeXIMa HOHOro IpocnyuINBaHNMOKET N3MeHArTbcraB 3aBNCIMOcTN OT NCTOCHNkAIOCTyNaIOUeRO CNrHaHa NcNoJIb3yEmbIX HAcTpoek3ByKObbIX CNrHaNoB OKpyKaIOUeRO 3ByaHN.
Pn 3aBepseHm nCnoJb3ObaHna DaHHoro annapata
Haxab Khonky STANDBY/ON (Khonky POWER Ha nyIbTe Dv), yCTaHOBNTe daHHbI annapaT B peXIM OxndaHna.   # 51 ΦpoHTaJIbHaI naHeJIb NyblT D
Pexmbi npema noctypanuux cnHaIOB n Hndkaun
DaHbI annapaT obopydoBaH 2-Mr TnAmBxOHBIX rHe3d. IIN BbIOpa JKeJaEMOro TnPaNocTyNaIOuix CnHaNoB, BbINOHNHTe CneDyIOUIO npoueDpy.  NoBTOPOH HAXMauTe KhoNky INPUT MODE Do NOBJIeHn JxelaEMoro peXmua npneMa NOCTyNAUUX CNrHaNoB Ha dncnnee fpoHTaIbHO nAHeJI. AUTO ABTomatnueckn BbIbOp nocTynaUox cnHaIOB BCJeDyHOSei NocneDoBaTeNbHOCtN: 1) LcnpoBbie CnHaJI\* 2) AnanorOBbie CnHaJIbI DT5 Bb6op TOnbko UcfoPoBbI CnHaNoB, 3aKoDnpoBaHHbIX NO CnCTeMe DTS. 3ByuHHe OTCyTCTByET npN OTCyTCTBnN nocTynaOxnx CnHaNoB DTS. ANALOG Bb6op TOnbko aHaIorOBbIX CnHrHaIOB. 3ByuHHe OTCyTCTByeT npN OTCyTCTBn INoCTynAIOxuX aHaIorOBbIX CnHrHaIOB. \* DeKoep aBTOMaTnueckn nepeKlHouaetcHa COOTBeTCTBYIOUyIO nporpaMMy 3ByKOBOrO NOJI, KaT TOnbKO daHHbI annapaT obHapyXnBaET CnHaNBI B fOpMaTe Dolby Digital nN DTS.  Bb mokeTe oTperynipoBaTpeXm npema NoCTynaIOUX CnHAnOB no yMOJHaHIO, KOtOpbi 6ydet BbIbpaTbcAaHHbIM aannapatOM noka nHTaHne BKNoeHO (CMOTpnte cTp.43).
PnmuMeaHn
- PpN BOCnpOn3BedeHn CD/LD nCTOHTNKOB, 3aKoInpoBaHHbIX NO CnCTeMe DTS, B pexIme npneMa NoCTynaIOxN CNrHaNoB AUTO: -Данньий annapaT abTomatnueckn nepeKIOuOaETcHa peKIM DeKOINPOBaHn DTS.ДanHbI annapaTocTaETcB peKIMe DTS (C BO3MOXbIM MmraHnEMInDnKaun "dtS") eune npImepHO 30 ceKyHn IocNe3aBepSeHHN BOCnpON3BeDEHN NCTOHyNA BΦopMaTe DTS.ДЯ OTKIOUeHHN peKIMa DTSBpyHyIO, Haxab KOnkY INPUT MODE,Bbl6epnteAUTO. - PexkIM DeKoDnOpaHn DTS MoKet 6bITb OTKJIOueH npBbIOnHeHn 60Jee Yem Ha 30 cekyHd onepaun nnCKa HnnpOnycka. IInn npedOTbpaueHn 3TOrO, hXab KhoNky INPUT MODE, BbIbepnte npametp DTS. - EcInuФpoBaB bIXoHnHa INHOpMaunr OTo npOnrpbIbATEn8 6bIna XOTb KaKIM-To CnOCOBom 6pa6oTaHa,peKIM DeKOIpOBaHnD TDS MoKet 6blb HeOCTyne, daKe ecIn 6blIn npOn3BeHebl UΦpOBoBHe CoeHNHeHn MeKdy DaHHbIM aAnpaTOM n npOnrpbIbATEm.
BbI6op npoRpaMMbl 3ByKOBOrO nOJIa
BblMOxkeTe yIyUHTb CBOI OUsyeHnO T npocnyuBaHHa, BblpaB nporpaMMbl 3ByKOBOr oon. Boone noDpo6Ho o KaKdoi nporpaMMe, cmotpnte ctp.27-30.   NoBToPHo Haxmam KhOnKy PROGRAM <1/>(KhoNkpy PROG-/+Ha npIbTe DY), Bbl6epnTe Jekelaemyu nporpaMMy (BkIIOUaHMeIOUncsra NOI-NpOporpaMMbl). Ha dncnnee ppoHTaBHO nAHeN 3aropaetc HAnMeHOBaHne BbIpaHHo nporpaMMbl.    BbIePeTe npENoHTaEmyIO npOrpaMMy nI npocnyuBaHnHaMeHOBaHn npOprpAMM npNBedeHbI TOnbKO dNpykoBOdCTBa.
PnmeaHn
-Данн布局ларатобладаet9nporpammnc BO3MOXHbIMN NOI-NpOprpAMMaM.ODHaKO,Bb6op npOrpAmMb 3aBnCITOTФopMaTaNCTyNaUoero CnHaJa,И He BCE NOI-NpOprpAMMb MOrY 6bITb NcNoJIb3OBaHbICO BCEMNΦOpMaTAMN NOCTyNaUoUx CNrHaJIOB. BbHe MoKTe BOCNoB3OBAtbcr cnppoBBIM npoecccopom 3ByKOBO rnoJr nCTOHHKa, noKJIooHHeHoro K rHe3dAm 6CH INPUT daHHoro annapata, INI BO BpemBocPon3BeJeHn DaHHbIM annapaTOM cnpPOBO rTOCHKa c qactOTOn CTpObPOBaHn, PpeBbIaHOe 48 kU. - Akyctuka KOMHaTbI nI npocnyuBaHn OKa3bIbaeBJIHHe Ha nporpaMMbI 3ByKOBOrO nOI. IIOCTNKeHnMaKcMmaJIbHOrO 3ΦΦeKta,IpON3BOIMMO rnporpaMMo, CneJyETMNHMn3npoBaTb ypOBeHb OTpaXeHn 3ByKOBbIXCNRHaNoB B KOMHaTe dI npocNyuBaHn. - PnBbIbOpne NcToUHnKa NoCTynaIOUeO CnHaJa, daHHbI aannapat ABTomATnueckN BbIbnpaET nporpaMMy 3ByKOBOrO NOJI, MCNoJIb3OBaHHyIO DJIaDaHHORO NcToUHnKa B NocNeHN pa3. - Pn yCTaHOBKe DaHHoro annapaTa B peKIM OxuHaHnA, annapaT coXpaHReT B nAMrTu NCNoJIb3OBAHHBe B daHHbI MOMENT NCTOCHNk I npOrpAmMy 3ByKOBOrO NOJIA, IN ABTOMaTIueCKN Bbl6NuPaET IN X npn erO NOBTOPHOM BKIOUeHN. Bo Bpem npnema daHHbIM aannapatom cnHrHaOB fopmata Dolby Digital nIN DTS, c yctaHOBneHHbIM pexHMOM npnema nocTynaIOxN CnHrAONB AUTO, nporpamma 3ByKOBOI NOI (N97-9) aBTOMaTneckn nepeKJIouyaeTc Ha COOTBeTCTByIOUyIO nporpaMMy DeKOdIpOBAHn. -ПиВOCNpON3BVeDEHnAnnapaTOMMOHOFOHnueCKOrO nCToUHnKa C NcNoJIb3OBaHnEM PRO LOGIC nIIN PRO LOGIC/Enhanced, nIIN PRO LOGIC II Movie, 3ByuHnne otФpoHTaNbHbIX KOnOHOK KOnOHOK OkpyKaIOeTo 3ByuHnN OTCyTcTBYeT. 3ByuHnne IcXoJIT ToJIbKO OT ueHTpaJIbHOI KOLOHKn. (EcIn npaMeTp "1A CENTER" B MeHIO yCTaHOBKn YcTaHOBJeH ha NON, 3ByKOBbIe CnIRHaJIbI cEHtpaJIbHOrO KaHaJa BbIBOJrTcH Ha φpoHTaNbHbIe KOLOHKn.)
Bb6op PRO LOGIC nIN PRO LOGIC II
BbMOKeTe npocnyuBaTb 2-KaHaJIbHbIe NCTOUYKNI,JeKOJInpOBAHHbIe Ha 5 INCKpeTHbIX KaHaIOB,BbIbpaB PRO LOGIC nIN PRO LOGIC II B nporpaMMe No 9.  1 BbI6epnte 2-KaHaJIbHbI INCTOuHKn HauHnTe BOCpON3BeDeHne Ha KOMNoHEtE- nCTOuHKe.
2 HaxMute KhONky D/DTS.
 При Кадом На Кати КНОКИ DДТС, Идд Каду На ДИССЛЕЕ ИЗMEнHOTСВ СLEДУОSU ЦКИЧЕСКО ПОСLEДОВАТELБHOCТИ: PRO LOGIC→PRO LOGIC Enhanced→PRO LOGIC II Movie→PRO LOGIC II Music→PRO LOGIC→...  - NOBTOPOH HAXIMAR KHONKY PROGRAM Ha ΦροHTaMbHOI NaHeN, BbI MoXeTe BbIbpaTb PRO LOGIC, PRO LOGIC Enhanced, PRO LOGIC II Movie, n PRO LOGIC II Music.
Bocnpoun3BeDeHne nCTOuHnKOB BΦopmate Dolby Digital EX uIN DTS ES
Haxkab KhoNky 6.1/5.1, BKnIOuHTe IekOepe Dolby Digital ^+ Matrix 6.1 nnn DTS ^+ Matrix 6.1.  При Кадом На Кати Кногн 6.1/5.1, Ид И ДИСПЛЕ MEHЯOTСВ ПОСLEДОВАТЕЛБНСТИ AUTO → Matrix6.1 → OFF. AUTO: ABTomatueckoe nepeknioeHne Dolby Digital ^+ Matrix 6.1 n DTS ^+ Matrix 6.1 v 3abncmocntoT cnHaHa. Ia 5.1- KaHaJIbHbIX NCTOCHNKOB, INcNoIb3OBAHnE BnPTyaIbHOt TblIOBOI KOJOhKn OKpykaIOUeTo 3ByuHaHn REBO3MOXHO. Matrix 6.1: 6-KaHaJIbHoe BOCpON3BeJeHne nCTOuHnKa nocTynaIOUero CnHana c nCIOJIb3OBaHHeM DeKoDEpa Matrix 6.1. BnpyaHbHa TblOBa KOnOHka OKpyXaIOUe 3ByuHaHn MoKeT 6blb nCIOJIb3OBaHa dIb BOCpON3BeJeHn 5.1-KaHaJIbHbIX nCTOuHnKa. OFF:OTKJIIOUeHHe BnPTyAJIbHOI TbIIOBOI KOJIOHKN OKpyXaIOJero 3ByaHNA.
PnmeaHn
Ha HeKOTopbIX DnCKax, NoXoJxuXn 6.1-KaHaNbHorO BOCnpOn3BeDeHn, OTCyTCTByeT CnHAn (Флaxok), KOTOpBn ABTomAtUeCKn OnpeDJIReTcR daHHbIM annapaTOM.ДЯ 6.1-KaHaNbHorO BOCnpOn3BeDEHn TAKNX DnCKOB, BblBepNTe napamTp "Matrix 6.1". -6.1-KaHaJIbHoe BOCPOn3BeDeHne HeIOCTynHO,JaXe npn HaxKaTmN KhoNk 6.1/5.1,BcNeDyUOuNX CnyuaX: - Pn OTKHIOUeHHbIX 3000eKTx. -Пи BOCPON3BEdENHIN NCTOCHNka, NOKJIIOUeHHOROK THe3dAM 6CH INPUT. -Пи ВОСпpon3БeДЕнДанHBIM annapaTOM nCTOчнkaВфорmate Dolby Digital KARAOKE. -Пи hayunHKax, noKIOueHHbIX K rHe3dy PHONES. - Пи OTKЛIOUeHIN NITaHIN annapaTа, peKIM npIeMa NOCTynaIOx CNrHaNoB nepeKlIOuHaetc H AUTO.
■Virtual CINEMA DSP
VcnoJb3yra Virtual CINEMA DSP, Bbl Moxete npocnyuBaTb BCE nporpaMMbl 3ByKOBbIX NOJIe 6e3 KOJHOK OKpykaUoIero 3ByuHaH. DaHHa H yHKUaNIO3BOJAEt CO3DaTb BnPTyAJIbHbIE KOJOHKn DnBOCpOu3BeJeHnE cTeCTBeHHORO 3BYKOBOrO NOJIa. BbMOKeTe npocnyuBaTb Virtual CINEMA DSP, yCTaHOVB napameTp "1C SURROUND LR" B MeHIO HacTpoiKn Ha NON. PpOncxoIIT aBTOMaTeueckoe nepeKlIOUeHne 6pa60TK 3ByKOBOrO nOJIHa Virtual CINEMA DSP.
PnmeaHne
-ФункцИR Virtual CINEMA DSP He DeiCTByeT,Даже ecnnapaMeTp 1C SURROUND LR B MeHIO HAcTpOoiKynycTaHOBJIeH Ha "NON"(cMOTpIte cTp.41),BcNeDuOuNX cnUyAax: - Korda BbIbpaHa nporpamma 5ch Stereo, DOLBY DIGITAL, Pro Logic, Pro Logic II, nII DTS. -Korda 3ByKObIe 3OΦeKtbl OTKJIIOHeHbl. -Korda6CH INPUT BbIbpaH KAc NcToHHK noctyanaoJero ciHaJa. -Пи пиeme ДаньIM annapatOM uNФpoBOrO cnHana CчactOTOn CTpo6uPobAHn, npeBbIaHOse 48 KU. -ПиИСЮЛБЗОВАнМТECTOBORTOToHальбОНCSINHAJa. -Пи рпндклioчehин hayшнков.
■PocnyuBaHne c HayuHKamn (SILENT CINEMA)
Pexm SILENT CINEMA no3B0JAE TnpocnyuBaTb MHOROKaHaJIbHOe 3ByuHHe My3bIKn INI KINHOcNtMbOB, BKIOUaO kpykuaOoee 3ByuHHe fOpMaTOB Dolby Digital n DTS,uepe3 obchIbe HayuHKn. Pexm SILENT CINEMA aBTOMaTuYeCKn BkIOUaETc npn noKIOUeHNn HayuHKnOB B rHe3do PHONES BO Bpem npocnyuBaHHn pporpaMM 3BykoBOrO nONn CINEMA DSP nIn HiFi DSP.Ha dinCnlee fpoHTaJIbHO nane H3aropaeTc nHnkaun "SILENT CINEMA".(Ecnn nporpammbi 3ByKOBOrO nONn OTKIOUeHbl, npoCXoNDt o6bUHoe cTepeofoHnueckoe BOCpOn3BeDeHne.)
PnmeuHn
JaHHaФyHKUH HeOCTynHa,ecnBbIbpaHnapaMeTp6CH INPUT npnpnpipeMaHbIM aannapatoCnΦpOBOro CnHaJc cactOTOn CTpOuPobAHn, npeBbIwaOuei 48 Kt. 3ByKOBbIe CnHaJIb KaHana LFE MKNWIpYIOTCN BbIBOaTcRa Ha HayuHNKn.
06bIHyoe cTepeofoHueeckoe Bocpnou3BeHeNe
Haxab KhoNky STEREO, BbIKIOHTe 3ByKOBbIe 3ofoekTbI dIra npocLyuBaHnB O6bIHOM cTepeoOohueckOM pexmme.
ДЯВКЛIOUeHIN3ByKOBbIXФфсEkTOB,надмITE KhoNky STEREO eue pa3. 
PpmeaHn
-Пи ВьIKLOUeHIN 3ByKOBbIX 3ФФeKTOB,3ByuHaHne OT ueHTpaJIbHOI KOJIOHKn I KOJIOHOK OkpyKaIOUeTo 3ByuHaHN OTCyTCTByeT. -Пи ВIKLOUeHIN 3ByKOBbIX 3ΦΦeKTOB BO BpEMBOCPON3BeDEHIN aIppaTOM CnHaJa OT NCTOCHNKA BΦopMaTe Dolby Digital nIN DTS, dHAmMuecknДnaNa3OH CnHaJa aBTOMaTHueCKn CXkImaetcR, n aIInapaT MKNUnpye T3ByKOBBie CnHaJI b KaHaJIOB ueHTpaJIbHO KOLOHKn I KOLOHOK OkpyKaIOSeRo 3ByaHIN, C BBIODOM 3ByKOBBix CnHaJIOB HaΦpoHTaJIbHbIE KOLOHKn. - YpOBeHb rPOMKoCTn MOKeT 3HaUHTeNbHO yMeHbWHTbcr npn OTKIOUeHN 3ByKObBIX 3ΦΦeKTOB nIN npn ycTaHOBKe npaMeTpap "SOUND 4 D.RANGE (DInHAMueckn dIina3OH) B MeHIO HAcTpoek Ha MIN. B TAKOM Cnyae, BKNIOHTe 3ByKObBIE 3ΦΦeKTbl.  Bo BpemcTepeoOponHueckoro BocPon3BedeHnBbIMoKeTe Bb3BaTb Ha DCnIe Takyo HOpMaunKAKTN, cOpMaT NcaToTa CtpoBupOBaHn CNHaNa, NOCTyNAooero OT KOMNoHETOB, NOKnIOUeHHbIX KDaHHomy annapaTy.
(BoBpemBocnpOn3BeDeHnNcToHnKa)
1 Haxkab KhoNky / , Bbl3OBtHe Ha dinCnIeHnΦopMaunIO nOcTynaIoUeM cnHaJe.   (Формат):Ha dinnilee OTo6paKaetcФopMat CnHana. Korda annapat He B COCToHIN ONpeDenITb UnpOboBoi CnHaN, npOnCXoJNT ABtOMaTHueCKoe nepeKKnUChHe Ha aHaNoROBbI npNem NOctynauoJero CnHana. in: KoJInueCTBO KaHAnOB NCTOuyHnKa NOcTyNaUoIe O cnHana OTobpaXaeteC H NaIcnPiee CneIyIOuIM 6bpa3OM: IIN MHOroKaHaJIbHoH POHOrpAmMbIC 3 0poHTaJIbHbIM KaHaIaMn, 2 KaHaIaMn OKpyxKaIOeT BByaHn HnI3KOaCTOTHbIM KaHaIOM LFE, Ha DnCnIee OTobpaXaeteC INNdkaIaN“3/2/LFE". fs: Ha nucnnee oTo6paKaTc yactota cTpo6npoBaHn. Korda annapaT He B COCTOHN ONpeDenITb YACTOTy cTpo6npoBaHn,Ha nucnnee fpoHTaIbHoN naHeJIN NOBJIeTc INDInKaUg "Unknown". rate: Ha dincnnee oTo6paKaTcKcOpocTb nepaH 6nTOB. KOrda annapat He B coCToHHN ONpeJeNTb cKOpocTb nepaH 6nTOB,Ha dincnnee fpoHTaNbHOI naHIn NOBnRETCn HnDKaCn "Unknown". flg:Ha nncnlee oTo6paKaaeTcAplaKoK - HΦopMaun, coepkaaanrB CnHaneΦopMaTa DTS nn Dolby Digital, KOTOPaI pINBOOHT K aBTOMaTHueCKOMy NepeKJIIOUeHNIO daHHoro annapaTa Ha COOTBeTCTByIOUm Tn DEKOdepa dna BOCpON3BEDeHn.
LINΦPOBAOOBAPAO 3BYKOBOI NOJI (DSP)
Onu n aBToMaTnuecko npedyctaHOBKn
BbMOXeTe BbIbpaTb HOMep npEynctaHOBKn, C KOtOpO JaHHbI aannapat 6yDet coxpaHrTa YMpaNIOCTaHcHn, n/nn HaayTa b HAcTpOy B HAnpAbJeHN Hn3Knx YACTOT. Iocne haxknta KhoKn MEMORY ha Ware 3: 1 HaXmnte KhoNky A/B/C/D/E, 3aTeM, HaxKaB KhoNky PRESET TUNING / , BbIbePnte Homep npEpyCTaHOBKn DnIcoxpaHeHn IepBOI paAnocTaHcN. ABToMaTnuecka npEpyCTaHOBKa nppepbIbaeTcR, KaK ToJIbKO KOJInueCTBO COxpaHeHHbIX paAnocTaHcN IOCTnraet E8. 2 HaKaB KhoNky PRESET/TUNING (EDIT), OTKNoHTe DBoEToUne (:), 3aTeM, HaKaB KhoNky PRESET TUNING <, NaHnTe HacTpOuKy B HappaBHeHn Hn3Knx YactOT.
Pe3epBHaKONNAmATN
Cxema pe3epBHOKoNNnamrN ppeOxpaHReT coXpaHeHHyIO INHΦopMaIIO OT Ncye3HOBeHN, daKe ecnn DaHHbAnnapaY cTaHOBneH napeKIM OXnDaHn, CnIOBOJ Ka6JIb nepemehHoro ToKa OTKJIIOUeHOTpO3eTKN, nIN BpeMeHHO npeBaHO NITaHne N3-3a OTKIIIOUeHn 3JeKTPo3Hepn. OdHaKO, ecnn nITaHne npeBaHO 60Jee Yem Ha OdHy HeDeHNO, npeDyCTaHOBHeHbIE CTaHmMOryt 6bITb cTeptbl. B TAKOM cnUyae, npeDyCTaHOBNTe paAINOCTaHcHOBa, NcNoJIb3yra MeTOdbI npeDyCTaHOBKn.
IpeDyCTaHOBka paAnocTaHcN BpyHyIO
BbIMoKeTe coXpaHntb do 40 paAnocTaHcui (8 paanocTaHnB 5 rpynnax) BpyHyIO. 
1 HactpoNTecb Ha paAnocTaHcNIO.
INHCTpyKUHAACTPOKe,CMOTpnte CTP. 31.  Pn HacpoKe Ha paNocTaHcHIO, YacToTa npHmAmoM PaNocTaHcIM BbICBeHbAeTcHa DncJIee pOHTaBHO NaHeIN.
2 HaXMMTe KHonKy MEMORY (MAN'L/ AUTO FM).
OkoI 5ceKyHd Muraet Hdkaun "MEMORY". 
3 Bo BpemM MraHn HnDnKaun "MEMORY", NOBTOPO HaXmMa KHOkU A/B/C/D/E, BBb6epnte rpynny npedcytaHOBKn (A-E).
IoBntcO603NaueHne rpynnbl.Y6eDnTeCb, YTO DBOEToUHe (:OTObpaKeHo Ha DCnnee fpoHTaJIbHOI NaHeN.  rpynnn ppeyctaHOBKn
4 Bo Bpem MrraHn HndnKaun "MEMORY", Haxmna KhoNky PRESET TUNING 1 / BBi6epTe Homep npedctanOBkn (1-8). DnBb6opa 6oJbIero Homepa
npeNyctaHOBKn,HaXImaTe KHONKy>. IbBb6opa MehBwero HOMepa npeNyctaHOBKn,HaXImaTe KHONky<1. 
5 Bo BpemM MrraHnN HndnKaun "MEMORY", HaxmTe KhoNky MEMORY (MAN'L/ATO FM) Ha φpoNTaJIbHOI naneJN.
Iina30H uactota paiaocTaHn, a TaKxBe BbipahHbIe rpynna HOMep npedyctaHOBKn OTo6paXaOTcHa IINCnnee pOHTaIbHoI naHeJI.  OTo6paXeHHa paIIOCTaHcIIa 6blna coxpaHeHa kaC3.
6 NOBTOPA WARM 1-5, COXPAHNTe OCTaJIbHbIe paDnOCTAHcHm.
PnmuMeaHn
JIIO6aHnHOpMaUOpaNIOCTaHcUNcoxpaHeHHoI NOc cyueCTbYIOUHM HOMepom npeNyCTaHOBKn, CTnpaETc npu COxpaHmHOBo paNIOCTaHcUN HaTOT-Ke HOMep. Pexm npema (cteepoohnueckn mmoHooHnueckn) coxpaHReTcHapy c yactOTOn paNocTaHcnn.
BbI6Op npeducTaHOBJIeHHbIX paIIOCTaHcN
BblMOKETeJERKOHaCTpOHTbCnHaJIIObYIO XeJaEMyO paIIOCTaHcNIO, Bbl6paB HOMep IpeNyCTaHOBKn, NOI KOTOpbIM DaHHa paIIOCTaHcNIO 6blNa COxpaHeHa.  
1 HaKaB KhoNky A/B/C/D/E (KhoNkyA/B/C/D/E Ha nyIbTe y), BbIbePnte rpynny npeducTaHOBJIeHHoJ paAnocTaHcun.
Obo3haueHne rpynnbI NOBnAeTcHa Iucnnee ppoNTaJIbHOI naHeII, INImeHReTcI npKakDom HaKaTIN KHOKN A/B/C/D/E.  ΦpoHTaIbHa naHeIb NNN  IyIbT DY
2 Haxkab KhoNky PRESET TUNING / (KhoNky PRESET- + + Ha npIbTe dy), BbI6epnTe Homep npeDyctaHOBJIeHNHO paAnocTaHcnn (1-8).
Диana3OH uactOta paIIOCTaHcIMn, a TaKKe rpynnna n Homep npeDyuctaHOBKn OTobpaKaOTcH NaIcPJIe e pOHTaJIbHOJ naHeN, n 3aropaetc HdNkaun "TUNED".  NIN  Nybld  
3aMeHa npeyctaHOBJIeHHbIX paHIOCTaHcN
BbMOKeTe 3aMeHHTb MeCTaMn DBe npEynCTaHOBHeHHbe paAnocTaHcNn. Ha npImepe HNKe OINcHa NPOeDpya 3aMeHbI npEynCTaHOBHeHHo CTaHcNn "E1" Ha "A5".  2,4,31,3 1 BbI6epnte npedyctaHOBJIeHHUO cTaHcNIO "E1", nCNoJIb3yA KHOJKN A/B/C/D/E n PRESET TUNING / . CmOTpnte pa3dEn "BbI6Op npedyCTaHOBJIeHHbIX paAnIOCTaHcN" cIeBa. 2 HaxmTe u ydepXnBaIte HaXaToN KhoNky PRESET/TUNING (EDIT) Ha 6oJee Yem 3 ceKynDbI. Ha dinCnlee fpoHtAlbHoN nAHeN MIRaOT nHdNkaun "E1" n "MEMORY". 
3 Bb6epnte npedyctaHOBJeHHyO cTaHcHIO “A5”,ncnoJb3yKhoNKn A/B/C/D/E n PRESET TUNING /
Ha dncnnee ppoNTaJIbHOI naHeH mraIoT nHdkaun "A5" n "MEMORY". 
4 Eue pa3 Haxmnte KhoNky PRESET/TUNING (EDIT).
IBe IpeNyctaHOBHeHHbIe paAnocTaHcIMN 3aMeHHTCmECTAMN.  3aMeHa paAnocTaHcH 3aBepSeHa.
ПРИЕМ Радиоctанци的新СNTeMbl RDS
RDS (cncTeMa paHOnHOpMaun) - 3TO cncTeMa nepeaun HOpopMaun, nCIOJIb3yeMaJ CM-paHNOCTAHmM MHOINX CTpaH. INHOpMaunRDS coepKNT pa3nHyIO INHOpMaunIO, Takyo Ka PS (HaMeHOBaHne nporpaMb), PTY (TIN nporpambl), RT (paInoTeKCT), CT (TeKyuee BpeM), EON (dpyrue ycnJeHHbIe CET), n dpyroe.
OnncanHe nHopmaun RDS
Pn HacptpoKe Ha paAnocTaHcIIO CnCTeMBI RDS, daHHb annapa MoKet npHmAtb INOpMaCIO PS, PTY, RT, CT, n EON.
■Pexm PS (HaMeHOBaHne nporpaMMbl):
OTo6paKaeTcHaIMMeHOBaHne PpINHMaEmo paAnocTaHcN CnCTembl RDS.
Pexm PTY (Tn nporpammbi):
IJI KNaaccnDnKaun paAnocTaHcN CnCTeMbRDS, cyueCTByeT 15 TINOB nporpaMM.
- OTPeryIpyyte ypoBeHb LFE B COOTBeTCTBnC MOuHOCTbIO ca6Bypepa nn HauHHKOB.
OPTION 1 DISPLAY SET
DIMMER
JaHHaHnacTpoiKa npEHa3HaueHa nIpyuNipOBKn npKocTn dncnpe pOHTaBHO naHeJI. Дианаэн HabстpoКn: -4-0
Bb6epTe ON 3aunTbI: - NapaMeTpoB nporpaMMbI 3ByKOBOrO NOJr - Bcex napametpoB MeHIO SET MENU - YpOBHeB BCEX KOJHOHK Pn yctaHOBKe npametpa MEMORY GUARD Ha ON, Bbl He CMOXeTe NcNoB3OBAbT TeCToBbI ToHaJIbHbI CNHAI INN Bbl6paTb IIO6bie Dpyrne npametpbMeHIO SET MENU.
OPTION 3 AUDIO MUTE
JaHHaФyHKUH npeJHa3HaueHa dIpyrJnPoBKN yPOBHN yMeHbWeHn rPOMKoCTN3ByaHn pN aKTtBu3aUNФyHKuN npRrnyWeHn3ByeHn. Onu: MUTE, -50dB, -20dB
MUTE
PonHoe npnRnyuSeHne 3ByaHa.
-50dB
YMeHbShaet rPOMKoCTb 3ByaHnA, BOCpON3BOJaUeOcR B daHHbIMoMeHT, Ha 50 dE.
-20dB
YMeHbShaet rPOMKocTb 3ByaHnA, BOCpON3BOJAAUeOcR B DaHHbIM MOMET, Ha 20 dB.
HACTPOIKA UPOBHEI rPOMKOCTN KOJIOHOK
PerynpoBka ypOBHei rpOMKoCTN KOJHOK BO BpeMa BocnpOn3BeDeHnA
Bbl mojkeTe oTpereylnipoBaT ypoBNI rpoMKoCTN KaKdoi KOLOHKn BO BpeMa IpocnyuINBaHn 3ByuHaHn.  1 NOBTOPOH HAXIMAR KONKY LEVEL, BbI6epnte JKeJaEMyO KOLOHky dIa NaCTPOINK. C KaXDbIM HaxKaTneM KOnKN KELEVEL, INDnKauNHa DInCnPee nepeKJIuOaETcB CNe dyUoIe MIKJInueckOM IopRdKe: FRONT L CENTER FRONT R SUR R.(npabra OKpykaIoJero 3ByuHaN) SUR L.(JeBaB OKpykaIoJero 3ByuHaN) SWFR (ca6Bypep) .... - OДно habkaTne KhoNkI LEVEL oTKpbIbAe TINcJIneu ypoBHa rPOMKoCTn. B 3TOT MOMENT, Haxmam KhoNkY / BB6epnte KOJOnKy. 2 Haxmam KhoNky-/+,OTpeynpuTe ypoBeHb rPOMKoCTn KOJOHKn. - LcHTpaIbHnKoONKa n KOnOHKn OkpykaIOeero 3ByaHnMOryT perynipOBaTbcB npeJeIax OT -10d5do +10d5. -ФpoHTaHbIe KOLOHKn Cu6Bypep MoryT perynipoBaTbcn B npedeJax ot -20d do 0d5.
PnmeaHna
- PerynipoBka ypOBHeI rPOMKocTn KOHOK HeBO3MOxHa,ecnnapaMeTp "SOUND 1 SPEAKER SET" B MeHIO HAcTpoKn ycTaHOBneH Ha NON. - Perylnpobka ypOBHr rpoMocTn ca6Bypepa HeBO3MOxHa, ecn napameTp "1D BASS"napaMeTp a"SOUND 1 SPEAKER SET" B MeHIO HAcTpoiKn yctahOBJIeH ha FRONT. -Пи ИСпОЛьЗOBAHИ KНОПКI LEVEL ДЯРЕЧИРОВКИ уровHeI ГомКоCTN KOLOHOK, уровИ ГомКоCTN KOLOHOK, yCTaHOBJIeHHbIe B IpoшЛы pa3 C ИСПОЛьЗOBAHИМ TECTOBORO TOHaJIbHORO CINHana, ТAKKE ИЗMEHARTCI. - Ecni, Bb6paB npaMeTp "BASIC 1 SETUP" B MeHIO HAcTpoiKN, Bbl Bb6epnTe "SET", ypOBHN rPOMKOCTN KOHOHK n3MeHrTCa KAc CNeDCTBne JIO6bIX n3MeHeHNI, npoN3BeDeHHbIX B "BASIC 1 SETUP".
BO3MOXHbIE HENCINPABHOCTN IN CNOCObI INX YCTPAHEHn
EcIyBAC 03HnKIn IIO6bIe N3 CLEyUOxNt P2HNOCTe B0 BPMe 3KcTlPyATAuM DaHHOro aannapata, BOCNoJIb3yTEc b5nue HnKe IINy UCTpaHeHn Ow6Kn. B clyae, ecn HeNCnpaBHOCTb He yka3aHa B TabIue nbl BbI He CMOrn NCnpaBnTB Ow6kY, CneDy INHCTpyKUHM TabIuBb, YCTaHOBNT daHHbI annapat B pexmM OxndHn, oToCoeHNHTe CNIOB KabeN, N6p4ntecb K 6nnKaWemy OfmuNbHOMy Dnepy nI IN cepBnc ceHtp YAMAHA. 067aJacTb
| Henschnpabnoctb | Прична | Способ устраенья | Сmotрочьстр. |
| Данный anecdot в BKлочьетс рpr nashattni кноки STANDBY/ON (или кноки POWER), пли устанылбаятс на ржим ожidiаничсязороткийnpomexуtokВrimechни поочь ВКлоченя ритань. | He bly nockluchen cnilobov kaib ly nlinka He nohlnoctbvo Bctablenha In pozetky. | Пдклочite сnilobov kaib ly cootbetctbyuoshim obpa3om. | - |
| Быla aktnibnizipobova h cxeMa 3auzntbI. | Убдіпесь, чTO Спо探测ны coeDIнEDИЕ KOLOHOK BынОнЕны coOTBETCTBYUOIM obpa3OM KAK Na ДаднOM annapate, tak И на сamix KOLOKHax, a TAKXe B TOM,чTo npOBDA dlya coeDIнEDИЕ He copNKACAOTc H N C YEM, kPOME TOKNI dlya COOTBECTBYUOSEO COeDIENHIV. | 15 - 16 | |
| Данный anecdot noDberpocr SclbHOMy 3neKTPUHECKOMy haprajehmo ot BheuHINIX NCTOCHNOK (Hapmmpel, MOnHINx INCILBOE CTATMIECKOE 3neKTPUHECTBO). | UstahOBITE daHnBiy anppatВ ржим ожidiани, OTKLIOCHTE cnilobov kaib ly, noDkIOCHITE erO KpozeTke chep3 30 sekuHd, n POnb3yItebck Kaok obvHNo. | - | |
| Остуговет Stbyанhoe | Kaobela BxOda/BxOda 6blny noDkILOChelb HneРabInbNo. | Пдклочite kaobeli cootbetCTBYUOIM obpa3om. Esnni HesICPRAIBOCHTb He bly uctpaHena, 3TO OZHauAET,чTo Исплььшемы kaobela moryt 6blt c depeKTOM. | 9 - 16 |
| He bly Bly iban CoOTBETCTBYUOIM | BbIbEpitce cootbetCTBYUOIM NOCTOCHNik NOCTUAPUOSEO CInHana, IncNOL3yR KhoNkY INPUT < / > Ili KhoNk 6CH INPUT (Ili celTeKTopbIe bKoNk Blbopa INTOHINKA). | 21 | |
| KolonHKn noDkILOChelb HneHadeJHNo. | HaDeXHo no DuklIOUITE KOLONKn. | 15 - 16 | |
| ФрontalbHyе kOLONKn dlya IncNOL3OBAHIN 6blny Bly IbpaHb HnePabInbNo. | BbIbEpitce cootbetCTBYUOIM ФрontalbHye KOLONKn, IncNOL3yR KhoNkY SPEAKERS A/B/OFF. | 21 | |
| Hn3kyn yrobeH bromkoCTn. | YBeJIuYbte yrobeH bromkoCTn. | 22 | |
| Звунhoe npriIpyuSeNo. | Haxav KhONkY MUTE Или ПIOБLE dpyrime KhoNkY uPRAVALENH YAHNORO annapata, OTMENHITe pRITIpyuSeHme I OTPERIpyuYte yrobeH bromkoCTn. | - | |
| Данный anecdot He moXet BocPON3BODInb TcHnAbIy, noCTUAPUOSeIe OT KOMIOHENTa- INCTOCHNka, Hapmmpel CD-ROM. | BocPON3BIDte NCTOCHNk, CInHaNBy KoTOPoro MOrgT y BOCPON3BODInbCS DaHNbIM annapatom. | - | |
| Визанhoe otKlIOUHHe 3byuHnA. | Быla akTNbIzIPOBaHa cXeMa 3aOuNTbI n3-3a KOrpOTKOrO 3aMbIaKAnHry, T.D. | UbDlNTecb, ChTo noPoDDA KOLONK He conPikacAOTc Dpyr c duYrOm, ИЗТAMe CHOBa BkILOUHTe annapat. | - |
| Таймр сha npriVeB annapat K OTKlIOUHNo. | BknOHTe annapat, И заноВ noCHNITe BocPON3BDEHMe INTOCHNka. | - | |
| Звунhoe npriIpyuSeNo. | Haxav KhONkY MUTE Или ПIOБLE dpyrime KhoNkY uPRAVALENH YAHNORO annapata, OTMENHITe pRITIpyuSeHme I OTPERIpyuYte yrobeH bromkoCTn. | - | |
| Остуговет Stbyанhoe/ Staboe 3byuHnA ot onpeDelenHbIX KOLOHOK. | Кабел noDkILOChelb HnePabInbNo. | Пдклочite kaobeli cootbetCTBYUOIM obpa3OM. Esnni HesICPRAIBOCHTb He bly uCTpaHena, 3TO OZHauAET,чTo IcPON3BUEMble kaobela Moryt 6blt c depeKTOM. | 15 |
| Остуговет Stbyанhoe ot KOLONOK дlya BocPON3BDEHIN 3ФФeKTOB. | ОТКlIOUHb 3ByKOBbte 3ФФeKTOB. | Haxmite KlonkySTEREO ДЯв BKIOUHEN 3ФФeKTOB. | - |
| Исрлььуетс prporpamma DeokIoRobAHn CrlHAnOB B φoPMAte Dolby Surround, Dolby Digital Или DTS對於 NOUHINs, КOTorBу He bly 3akOДрOBaHn IO CnCTeMe Dolby Surround, Dolby Digital Или DTS. | Выберite дугую prorpammy 3ByKOBOrO polny. | 24 - 29 | |
| ЧастotaстбрOB�ноги снфрOBOrO сгнала, noCTUaOuZeRo Ha daHnBiy anppat,Превышael 48 кГ. | - | ||
| Heinspaprabnoctb | Прични | Способ устраенья | Смогитестр. |
| Осуства Зуань OTцentraльно Колонки. | Уразовь гомковOSTИ сcentraльно колонки установлел на минималый уразовь. | Увенисту уразовь гомковOSTИ сcentraльно Колонки. | 45 |
| Параметр "SOUND 1A CENTER" в менhohaltroйу установлел на NON. | Выберіпесоштбуюші рекиді центрально колонки. | 40 | |
| Быбрана ода наиз prогамm HiFi DSP (1-4) (эа исклочених 5ch Stereo). | Выберіп дугун prогамму звуховoro пая. | 24 - 29 | |
| У㗄точниксс с захадрованьим сигналом формата Dolby Digital лим-DTS otcystbvety спогнал сcentraльно каналa. | - | ||
| Осуства Зуань OT колонок okryжайся Зучань. | Уразовь гомковOSTИ колонок okружайся Зучань установлел на минималый уразовь. | Увенисту уразовь гомковOSTИ колонок okryжайся звухал. Кучайский Cпсплььзовалим prогамьл 9. | 45 |
| Восprоньдоста с монфошиескі 㗄точникс с㗄пальь сигнал. Спогледу Спогледу Спогледу Спогледу Спогледу Спогледу Спогледу Спогледу Спогледу Спогледу Спогледу Спогледу Спогледу Спогледу Спогледу СИЗ Спогледу Спогледу Спогледу Спогледу Спогледу Спогледу Спогледу Спогледу Спогледу Спогледу Спогледу Спогледу Спогледу Спогледу Cпогледу Cпогледу Cпогледу Cпогледу Cпогледу Cпогледу Cпогледу Cпогледу Cпогледу Cпогледу Cпогледу Cпогледу Cпогледу Cпогледу Cпсогледу Cпсогледу Cпсогледу Cпсогледу Cпсогледу Cпсогледу Cпсогледу Cпсогледу Cпсогледу Cпсогледу Cпсогледу Cпсогледу Cпсогледи Cпсогледу Cпсогледу Cпсогледу Cпсогледу Cпсогледу Cпсогледу Cпсогледу Cпсогледу Cпсогледу Cпсогледу Cпсогледу Cпсогледу Cпогледу Cпогледу Cпогледу Cпогледу Cпогледу Cпогледу Cпогледу Cпогледу Cпогледу Cпогледу Cпогледу Cпогледу Cпогледу Cпогlor Cпогlor Cпогlor Cпогlor Cпогlor Cпогlor Cпогlor Cпогlor Cпогlor Cпогlor Cпогlor Cпогlor Cпогlor Cпогlor Cпогlor Cпогlor Cпогlor Cпогlor Cпогlor Cпогlor Cпогледу Cпогlor Cпогlor Cпогlor Cпогlor Cпогlor Cпогlor Cпогlor Cпогlor Cпогlor Cпогlor Cпогlor Cпогlor Cпогlor Cпогlor Cпогlor Cпогlor Cпогlor Cпогlor Cngor Cngor Cngor Cngor Cngor Cngor Cngor Cngor Cngor Cngor Cngor Cngor Cngor Cngor Cngor Cngor Cngor Cngor Cngor Cngor Cngor Cngor Cngor Cngor Cngor Cnger Cngor Cngor Cngor Cngor Cngor Cngor Cngor Cngor Cngor Cngor Cngor Cngor Cngor Cngor Cngor Cngor Cngor Cngor Cngor Cngor Cngor Cngor Cngor Cngor CngOR Cngor Cngor Cngor Cngor Cngor Cngor Cngor Cngor Cngor Cngor Cngor Cngor Cngor Cngor Cngor Cngor Cngor Cngor Cngor Cngor Cngor Cngor Cngor Cngor Cngo Cngor Cngor Cngor Cngor Cngor Cngor Cngor Cngor Cngor Cngor Cngor Cngor Cngor Cngor Cngor Cngor Cngor Cngor Cngor Cngor Cngor Cngor Cngor Cngor Cngorr Cngor Cngor Cngor Cngor Cngor Cngor Cngor Cngor Cngor Cngor Cngor Cngor Cngor Cngor Cngor Cngor Cngor Cngor Cngor Cngor Cngor Cngor Cngor Cngor Cngr Cngor Cngor Cngor Cngor Cngor Cngor Cngor Cngor Cngor Cngor Cngor Cngor Cngor Cngor Cngor Cngor Cngor Cngor Cngor Cngor Cngor Cngor Cngor Cngor Cngg Cngor Cngor Cngor Cngor Cngor Cngor Cngor Cngor Cngor Cngor Cngor Cngor Cngor Cngor Cngor Cngor Cngor Cngor Cngor Cngor Cngor Cngor Cngor Cngor Cngot Cngor Cngor Cngor Cngor Cngor Cngor Cngor Cngor Cngor Cngor Cngor Cngor Cngor Cngor Cngor Cngor Cngor Cngor Cngor Cngor Cngor Cngor Cngor Cngor Cngod Cngor Cngor Cngor Cngor Cngor Cngor Cngor Cngor Cngor Cngor Cngor Cngor Cngor Cngor Cngor Cngor Cngor Cngor Cngor Cngor Cngor Cngor Cngor Cngor Cngon Cngor Cngor Cngor Cngor Cngor Cngor Cngor Cngor Cngor Cngor Cngor Cngor Cngor Cngor Cngor Cngor Cngor Cngor Cngor Cngor Cngor Cngor Cngor Cngor Cngur Cngor Cngor Cngor Cngor Cngor Cngor Cngor Cngor Cngor Cngor Cngor Cngor Cngor Cngor Cngor Cngor Cngor Cngor Cngor Cngor Cngor Cngor Cngor Cngor Cngov Cngor Cngor Cngor Cngor Cngor Cngor Cngor Cngor Cngor Cngor Cngor Cngor Cngor Cngor Cngor Cngor Cngor Cngor Cngor Cngor Cngor Cngor Cngor Cngor Cngore Cngor Cngor Cngor Cngor Cngor Cngor Cngor Cngor Cngor Cngor Cngor Cngor Cngor Cngor Cngor Cngor Cngor Cngor Cngor Cngor Cngor Cngor Cngor Cngor Cngar Cngor Cngor Cngor Cngor Cngor Cngor Cngor Cngor Cngor Cngor Cngor Cngor Cngor Cngor Cngor Cngor Cngor Cngor Cngor Cngor Cngor Cngor Cngor Cngor Cngcr Cngor Cngor Cngor Cngor Cngor Cngor Cngor Cngor Cngor Cngor Cngor Cngor Cngor Cngor Cngor Cngor Cngor Cngor Cngor Cngor Cngor Cngor Cngor Cngor Cngmor Cngor Cngor Cngor Cngor Cngor Cngor Cngor Cngor Cngor Cngor Cngor Cngor Cngor Cngor Cngor Cngor Cngor Cngor Cngor Cngor Cngor Cngor Cngor Cngor Cngror Cngor Cngor Cngor Cngor Cngor Cngor Cngor Cngor Cngor Cngor Cngor Cngor Cngor Cngor Cngor Cngor Cngor Cngor Cngor Cngor Cngor Cngor Cngor Cngor Cngtor Cngor Cngor Cngor Cngor Cngor Cngor Cngor Cngor Cngor Cngor Cngor Cngor Cngor Cngor Cngor Cngor Cngor Cngor Cngor Cngor Cngor Cngor Cngor Cngor Cngsor Cngor Cngor Cngor Cngor Cngor Cngor Cngor Cngor Cngor Cngor Cngor Cngor Cngor Cngor Cngor Cngor Cngor Cngor Cngor Cngor Cngor Cngor Cngor Cngor Clngor Cngor Cngor Cngor Cngor Cngor Cngor Cngor Cngor Cngor Cngor Cngor Cngor Cngor Cngor Cngor Cngor Cngor Cngor Cngor Cngor Cngor Cngor Cngor Cngor CNGR Cngor Cngor Cngor Cngor Cngor Cngor Cngor Cngor Cngor Cngor Cngor Cngor Cngor Cngor Cngor Cngor Cngor Cngor Cngor Cngor Cngor Cngor Cngor Cngor Cngosr Cngor Cngor Cngor Cngor Cngor Cngor Cngor Cngor Cngor Cngor Cngor Cngor Cngor Cngor Cngor Cngor Cngor Cngor Cngor Cngor Cngor Cngor Cngor Cngor Clngo Cngor Cngor Cngor Cngor Cngor Cngor Cngor Cngor Cngor Cngor Cngor Cngor Cngor Cngor Cngor Cngor Cngor Cngor Cngor Cngor Cngor Cngor Cngor Cngor Clngr Cngor Cngor Cngor Cngor Cngor Cngor Cngor Cngor Cngor Cngor Cngor Cngor Cngor Cngor Cngor Cngor Cngor Cngor Cngor Cngor Cngor Cngor Cngor Cngor Cengr Cngor Cngor Cngor Cngor Cngor Cngor Cngor Cngor Cngor Cngor Cngor Cngor Cngor Cngor Cngor Cngor Cngor Cngor Cngor Cngor Cngor Cngor Cngor Cngor CpgnOg CpgnOg CpgnOg CpgnOg CpgnOg CpgnOg CpgnOg CpgnOg CpgnOg CpgnOg CpgnOg CpgnOg CpgnOg CpgnOg CpgnOg CpgnOg CpgnOg CpgmOg CpgmOg CpgmOg CpgmOg CpgmOg CpgmOg CpgmOg CpgmOg CpgmOg CpgmOg CpgmOg CpgmOg CpgmOg CpgmOg CpgmOg CpgmOg CpgmOg СpgmOg СpgmOg СpgmOg СpgmOg СpgmOg СpgmOg СpgmOg СpgmOg СpgmOg СpgmOg СpgmOg СpgmOg СpgmOg СpgmOg СpgmOg СpgmOg СpgmOq СpgmOq СpgmOq СpgmOq СpgmOq СpgmOq СpgmOq СpgmOq СpgmOq СpgmOq СpgmOq СpgmOq СpgmOq СpgmOq СpgmOq СpgmOq СpgmOq Сpgmonl Сpgmonl Сpgmonl Сpgmonl Сpgmonl Сpgmonl Сpgmonl Сpgmonl Сpgmonl Сpgmonl Сpgmonl Сpgmonl Сpgmonl Сpgmonl Сpgmonl Сpgmonl Сpgmonl Сpgmonl Сpgmonl Сpgmonl Сpgmonll Сpgmonll Сpgmonll Сpgmonll Сpgmonll Сpgmonll Сpgmonll Сpgmonll Сpgmonll Сpgmonll Сpgmonll Сpgmonll Сpgmonll Сpgmonll Сpgmonll Сpgmonll Сpgmonll Сpgmonll Сpgmonll Сpgmonll Сpgmonl Сpgmonll Сpgmonll Сpgmonll Сpgmonll Сpgmonll Сpgmonll Сpgmonll Сpgmonll Сpgmonll Сpgmonll Сpgmonll Сpgmonll Сpgmonll Сpgmonll Сpgmonll Сpgmonll Сpgmonll Сpgmonll Сpgmonl Сpgmonl Сpgmonll Сpgmonll Сpgmonll Сpgmonll Сpgmonll Сpgmonll Сpgmonll Сpgmonll Сpgmonll Сpgmonll Сpgmonll Сpgmonll Сpgmonll Сpgmonll Сpgmonll Сpgmonll Сpgmonll Сpgmonl Сpgmonll Сpgmonl Сpgmonll Сpgmonll Сpgmonll Сpgmonll Сpgmonll Сpgmonll Сpgmonll Сpgmonll Сpgmonll Сpgmonll Сpgmonll Сpgmonll Сpgmonll Сpgmonll Сpgmonll Сpgmonll Сpgmonll Сpgmonl Сpgmonl Сpgmonl Сpgmonll Сpgmonll Сpgmonll Сpgmonll Сpgmonll Сpgmonll Сpgmonll Сpgmonll Сpgmonll Сpgmonll Сpgmonll Сpgmonll Сpgmonll Сpgmonll Сpgmonll Сpgmonll Сpgmonl Сpgmonll Сpgmonll Сpgmonl Сpgmonll Сpgmonll Сpgmonll Сpgmonll Сpgmonll Сpgmonll Сpgmonll Сpgmonll Сpgmonll Сpgmonll Сpgmonll Сpgmonll Сpgmonll Сpgmonll Сpgmonll Сpgmonll Сpgmonl Сpgmonll Сpgmonl Сpgmonl Сpgmonll Сpgmonll Сpgmonll Сpgmonll Сpgmonll Сpgmonll Сpgmonll Сpgmonll Сpgmonll Сpgmonll Сpgmonll Сpgmonll Сpgmonll Сpgmonll Сpgmonll Сpgmonll Сpgmonl Сpgmonl Сpgmonll Сpgmonl Сpgmonll Сpgmonll Сpgmonll Сpgmonll Сpgmonll Сpgmonll Сpgmonll Сpgmonll Сpgmonll Сpgmonll Сpgmonll Сpgmonll Сpgmonll Сpgmonll Сpgmonll Сpgmonll Сpgmonl Сpgmonl Сpgmonl Сpgmonl Сpgmonll Сpgmonll Сpgmonll Сpgmonll Сpgmonll Сpgmonll Сpgmonll Сpgmonll Сpgmonll Сpgmonll Сpgmonll Сpgmonll Сpgmonll Сpgmonll Сpgmonll Сpgmonl Сpgmonll Сpgmonll Сpgmonll Сpgmonl Сpgmonll Сpgmonll Сpgmonll Сpgmonll Сpgmonll Сpgmonll Сpgmonll Сpgmonll Сpgmonll Сpgmonll Сpgmonll Сpgmonll Сpgmonll Сpgmonll Сpgmonll Сpgmonl Сpgmonll Сpgmonll Сpgmonl Сpgmonl Сpgmonll Сpgmonll Сpgmonll Сpgmonll Сpgmonll Сpgmonll Сpgmonll Сpgmonll Сpgmonll Сpgmonll Сpgmonll Сpgmonll Сpgmonll Сpgmonll Сpgmonll Сpgmonl Сpgmonll Сpgmonl Сpgmonll Сpgmonl Сpgmonll Сpgmonll Сpgmonll Сpgmonll Сpgmonll Сpgmonll Сpgmonll Сpgmonll Сpgmonll Сpgmonll Сpgmonll Сpgmonll Сpgmonll Сpgmonll Сpgmonll Сpgmonl Сpgmonll Сpgmonl Сpgmonl Сpgmonl Сpgmonll Сpgmonll Сpgmonll Сpgmonll Сpgmonll Сpgmonll Сpgmonll Сpgmonll Сpgmonll Сpgmonll Сpgmonll Сpgmonll Сpgmonll Сpgmonll Сpgmonll Сpgmonl Сpgmonl Сpgmonll Сpgmonll Сpgmonl Сpgmonll Сpgmonll Сpgmonll Сpgmonll Сpgmonll Сpgmonll Сpgmonll Сpgmonll Сpgmonll Сpgmonll Сpgmonll Сpgmonll Сpgmonll Сpgmonll Сpgmonll Сpgmonl Сpgmonl Сpgmonll Сpgmonl Сpgmonl Сpgmonll Сpgmonll Сpgmonll Сpgmonll Сpgmonll Сpgmonll Сpgmonll Сpgmonll Сpgmonll Сpgmonll Сpgmonll Сpgmonll Сpgmonll Сpgmonll Сpgmonll Сpgmonl Сpgmonl Сpgmonl Сpgmonll Сpgmonl Сpgmonll Сpgmonll Сpgmonll Сpgmonll Сpgmonll Сpgmonll Сpgmonll Сpgmonll Сpgmonll Сpgmonll Сpgmonll Сpgmonll Сpgmonll Сpgmonll Сpgmonll Сpgmonl Сpgmonl Сpgmonl Сpgmonl Сpgmonl Сpgmonl Сpgmonl Сpgmonl Сpgmonl Сpgmonl Сpgmonl Сpgmonl Сpgmonl Сpgmonl Сpgmonl Сpgmonl Сpgmonl Сpgmonl Сpgmonl Сpgmonlla Сpgmonl Сpgmonl Сpgmonl Сpgmonl Сpgmonl Сpgmonl Сpgmonl Сpgmonl Сpgmonl Сpgmonl Сpgmonl Сpgmonl Сpgmonl Сpgmonl Сpgmonl Сpgmonl Сpgmonl Сpgmonl Сpgmonl Сpgmonr l Сpgmonl Сpgmonl Сpgmonl Сpgmonl Сpgmonl Сpgmonl Сpgmonl Сpgmonl Сpgmonl Сpgmonl Сpgmonl Сpgmonl Сpgmonl Сpgmonl Сpgmonl Сpgmonl Сpgmonl Сpgmonl Сpgmonl Сpgmonrl Сpgmonl Сpgmonl Сpgmonl Сpgmonl Сpgmonl Сpgmonl Сpgmonl Сpgmonl Сpgmonl Сpgmonl Сpgmonl Сpgmonl Сpgmonl Сpgmonl Сpgmonl Сpgmonl Сpgmonl Сpgmonl Сpgmonl СpgmonI l Сpgmonl Сpgmonl Сpgmonl Сpgmonl Сpgmonl Сpgmonl Сpgmonl Сpgmonl Сpgmonl Сpgmonl Сpgmonl Сpgmonl Сpgmonl Сpgmonl Сpgmonl Сpgmonl Сpgmonl Сpgmonl Сpgmonl Сpg monl Сpgmonl Сpgmonl Сpgmonl Сpgmonl Сpgmonl Сpgmonl Сpgmonl Сpgmonl Сpgmonl Сpgmonl Сpgmonl Сpgmonl Сpgmonl Сpgmonl Сpgmonl Сpgmonl Сpgmonl Сpgmonl Сpgmonl Сpg monll Сpgmonl Сpgmonl Сpgmonl Сpgmonl Сpgmonl Сpgmonl Сpgmonl Сpgmonl Сpgmonl Сpgmonl Сpgmonl Сpgmonl Сpgmonl Сpgmonl Сpgmonl Сpgmonl Сpgmonl Сpgmonl Сpgmonl Сpg monr l Сpg monr l Сpg monr l Сpg monr l Сpg monr l Сpg monr l Сpg monr l Сpg monr l Сpg monr l |
BO3MOXHbIE HENCTPABHOCTN IN CTOOCO6bl NX YCTPAHEHNA
TEXHUNCHECKNE XAPAKTEPNUCTUKN
AUYINOPA3DEJI
MHHMaJIbHOe 3NEKtpnueckoe HaprJKeHne RMS dIa fpoHTaJIbHOro, cHTpANbHOro KaHana N KaHanoB OKpyKaIOUeO 3ByuHnI 1 KΓι, 0.1% THD (οὐζε ένηλησην Μεύκαχεην), 6ΟΜ [MoDJII nCLJIA u KaHab] 100 BaTT [Дугные мodyп] 90 BaTT 1 KΓι, 0.7% THD (οὐζε ένηλησην Μεύκαχεην), 6ΟΜ [MoDenn nIa CLJa n KaHaIbI] 103 BaTT [Дргпе модени] 93 BaTT CTaHapTHoe 3JKeTpueckoe HnpanjKeHne DIN [MdoJIb dIe EbpOnbl] 1 KГU, 0.7% THD (обочee Heинhoe Искжени), 4 OM . 105 BaTT - М akсимальhoe Hanpяжени [OchOBHaMaMoEJIb u MoEJIu dna KTuTaI u Kopen] 1 KГч, 10% THD (оьшee Heинhoe Иckажэн), 6 Om 110 BaTT -ДиHamuueckoe HanpaxeHne (IHF,6/4/2 OM) [MoJennncllaNkaHaIb] 110/140/170 BaTT [Дугп модени] 105/135/165 BaTT - YactoTnHaXapaKTepeNCTnKa CD,T.D.ДлЯфpoHTaIbHbIXNeBOrOиnpaBOro KaHaNoB 10Γu-100KΓu,-3D5 - ΜύCEE HeJIeHHeHoe NcKaXeHne 1KΓU,50BaTT,6OM,ΦpOHTaJIbHbIeJIeBbIu npaBbI 0.06% - CoOTHOseHHe CnHAn/7yM (CeTb IHF-A) CD (250 MB, ykopoeHHbI) nIpaHTaJIbHbIX IeBOrO npaboro KaHaNoB, 3ΦΦeKtBI OKIIoueHbl ...100 d6 - OctaToUHbIy WM (CeTb IHF-A) ΦoHTaHbI JEBbI IN paBbI 150MB nIN MeHbIe Pa3deneHne KaHaoB(1Kt/10Kt) CD,dpyroe(5,1KOM,npepbaHHbI)ДЯфpoHTaNbHbIXJIeBOrO n npaBoro KaHaNoB 60d5/≥45dB ToHaNbHbI KOHTpoJIb (ΦpOHTaHbHbIe NeBbI IN npaBbI) BASS Do6aBOHoe HAnpXKeHne/ Pa3deneHne 10 d6/100 TREBLE Dobaohoe HapxkeHne/ Pazdelenne 1065/20Ku BbIXoHnMa MoUHocTb Ha KOJIOHKn 400 MB/470 OM -HyBCTBNTeJIbHOCTb npHema CD, T.Д. 200 MB/47 KOM 6CH INPUT 200 MB/47 KOM - BbIXoHnA MoUHOCtB OUT (REC) 200 MB/1.2 KOM OUTPUT SUBWOOFER 4 B/1.2 KOM
BnDEOPA3DEJI
TnBnDoeocnHana NTSCnn PAL - YpOBeHb KOMnO3nTHOro BnDeocnHaHa 1 Vp-p/75 Om - CoOTHOWeHHe cIrHaJI/7yM. 50 - YACTOTHbIOTBET (MONITOR OUT) 5Γu-10MΓu,-3dB


