
Multiclima 70 - Air Conditioning Eurom - Free user manual and instructions
Find the device manual for free Multiclima 70 Eurom in PDF.

| Product type | Mobile air conditioner (cool, heat, dehumidify) |
| Brand | Eurom |
| Model | Multiclima 70 |
| Cooling capacity | 7000 BTU/h (2000 W) |
| Heating capacity | 2000 W |
| Dehumidification | 1.25 l/h |
| Power consumption (cooling) | 900 W |
| Power consumption (heating) | 700 W |
| Maximum airflow | 360 m³/h |
| Connection voltage | 220–240 V / 50 Hz |
| Refrigerant | R410A |
| Insulation class | IPX4 |
| Timer | 1 to 24 hours |
| Operating temperature (cooling) | 17–32 °C |
| Operating temperature (heating) | 5–23 °C |
| Exhaust hose length | 150 cm (max), ∅ 15 cm |
| Noise level | 62 dB |
| Power cord length | 1.8 m |
| Net weight | 24 kg |
| Dimensions (W x D x H) | 52.6 x 30 x 62.4 cm |
| Main functions | Cooling, heating, dehumidification, ventilation, sleep, timer |
| Maintenance and cleaning | Regular cleaning of air filters (activated carbon) with vacuum cleaner; exterior with damp cloth. |
| Safety | Thermal safety in case of overheating; automatic shut-off if tank is full (code E4); errors E1-E3 require repair. |
| Spare parts and repairability | Use only original parts; repairs by a certified electrician. |
| General information | Warranty not covered in case of incorrect voltage; CE declaration. |
Frequently Asked Questions - Multiclima 70 Eurom
User questions about Multiclima 70 Eurom
0 question about this device. Answer the ones you know or ask your own.
Ask a new question about this device
Download the instructions for your Air Conditioning in PDF format for free! Find your manual Multiclima 70 - Eurom and take your electronic device back in hand. On this page are published all the documents necessary for the use of your device. Multiclima 70 by Eurom.
USER MANUAL Multiclima 70 Eurom
EN - Instruction leaflet
natural_image
Line drawing of a portable air conditioner unit with cooling fan and wheels (no text or symbols)natural_image
Simple line drawing of a container with arrows indicating flow or movement, no text or symbols present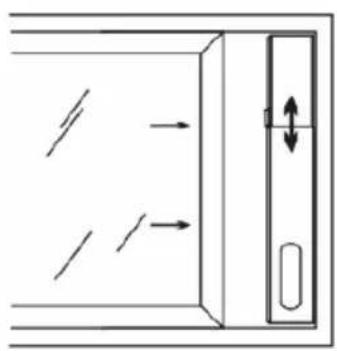
natural_image
Diagram of a door with directional arrows indicating movement, no text or symbols present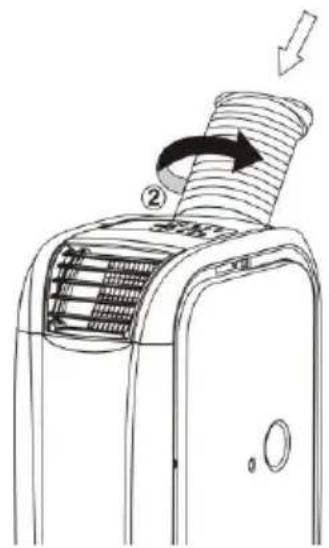
8
flowchart
graph LR
    A["Air Inlet"] --> B["Cooling"]
    B --> C["Drying"]
    C --> D["After Finishing"]
Fig.01
Fig.02
Fig.03
9
7. Timer
natural_image
Diagram of a heat exchanger or cooling unit with a grid of cooling fins and wheels, no text or symbols present.Middels de afstandsbediening:
natural_image
Simple line drawing of a cart with wheels and a numbered component (no text or symbols)ONDERHOUD
natural_image
Technical line drawing of a mechanical device with internal heat exchanger and wheels (no text or symbols)natural_image
Symbol of a trash bin with crossed lines and a blank rectangular base (no text or labels)OPTIONEEL RAAMSET
Many thanks for choosing this EUROM MULTICLIMA: you have chosen an excellent device that you will be able to enjoy for many years to come!
The unit offers a range of options including the six functions below:
- Cooling wherever and whenever you need it
- Heating wherever and whenever you need it
- Dehumidification wherever and whenever you need it
- Fan function
- Sleep function
- Timer
And also:
- It is easy to move from room to room
- No special form of installation is required: just insert the plug into the socket
- A supply of dehumidified and filtered air eases and improves breathing
- A 24-hour timer which can be used to set the air conditioning, heating and dehumidification function.
- A unique sleep function
- A remote control that can be used to control all functions from the comfort of your chair
- Don't need a remote control? Then simply press a button to operate the unit
Never install and/or use the unit before reading the entire instruction leaflet carefully; it contains important safety information, recommendations etc. and will help you get the very best from your Multiclima!
We recommend that you keep the instruction booklet and the packaging in a safe place; the leaflet can then be used as reference material and the packaging can be used to store the unit at the end of the season.
Finally, we hope your Multiclima perfectly meets your requirements!
TECHNICAL SPECIFICATIONS
| MODEL | MULTICLIMA70 | MULTICLIMA90 | MULTICLIMA120 |
| Cooling capacity | 7000 btu/HOUR2000 Watt | 9000 BTU/hour2600 Watt | 12000 BTU/hour3500 Watt |
| Heating capacity | 2000 Watt | 2600 Watt | 3500Watt |
| Dehumidification | 1,25 l/hour | 2.25 l/hour | 2.50 l/hour |
| Power consumptioncoolingheating | 900 Watt700 Watt | 1100 Watt950 Watt | 1480 Watt1300 Watt |
| Air displacement max. | 360 m3/hour | 420 m3/hour | 450 m3/hour |
| Connected power | 220–240V / 50Hz | 220–240V / 50Hz | 220–240V / 50Hz |
| Cooling fluid | R410A | R410A | R410A |
| Insulation category | IPX4 | IPX4 | IPX4 |
| Timer setting | 1 – 24 hours | 1 – 24 hours | 1 – 24 hours |
| Working temperature -coolingheating | 17 – 32 °C5 – 23 °C | 17 – 32 °C5 – 23 °C | 17 – 32 °C5 – 23 °C |
| Waste pipe | 150 x ∅ 15cm | 150 x ∅ 15cm | 150 x ∅ 15cm |
| Sound level | 62 dB | 63 dB | 63 dB |
| Length of electricalcable | 1,8 | 1.8 m | 1.8 m |
| Net weight | 24 kg | 25 kg | 29,5 kg |
| Dimensions | 52,6 x 30 x 62,4 | 52,6 x 30 x 62,4 | 55 x 30 x 76 cm |
SAFETY INSTRUCTIONS
General Safety:
- This unit is exclusively intended for household use, i.e. cooling, heating and dehumidifying
- Only use the Multiclima in the upright position as this allows the compressor to work correctly.
-
Ensure that the unit is always placed on a sturdy, flat and horizontal surface.
-
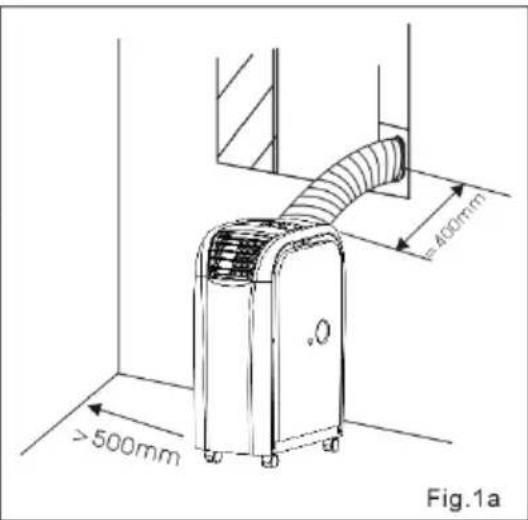
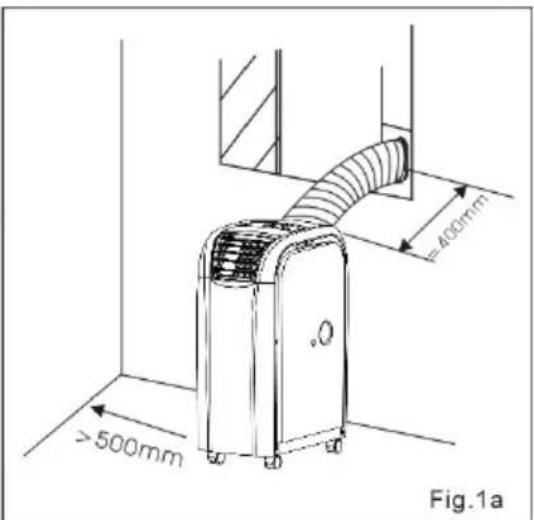
Ensure that the Multiclima has a free space of at least 50 cm on each side.
- Make sure that the plug and socket remain visible and accessible at all times.
- Never place objects on the Multiclima.
- Never leave a functioning device unsupervised, not even for a moment!
- Do not use the Multiclima in the vicinity of flammable or explosive substances or fuels. Never use any paint, cleaning sprays, anti-insect sprays or similar near the Multiclima; this could deform the plastic or cause electrical damage.
- Never block the grilles for incoming or outgoing air (not even partially). Never insert objects such as pens into the device via the grilles and ensure that the ventilator does not become blocked.
- Keep an eye on children, incapacitated persons or animals if they occupy the same room as the Multiclima.
- This device is not suitable to be operated by persons (including children) with limited physical, sensual or mental capabilities or little experience with and/or knowledge of the device even if they are supervised by someone who is responsible for their safety or who is providing instructions.
- Avoid children coming into contact or playing with the device.
- If required, only ever use original parts and accessories that are recommended and supplied by the manufacturer.
Electrical safety:
- Only use the plug that is installed on the device in the factory and no other form of connector!
- The unit must be connected according to local, regional and national rules.
- Before use, check whether the socket voltage that you will be using corresponds to the specification plate on the Multiclima. Damage caused by incorrect voltage is not covered by the guarantee!
- If the Multiclima is not in use or you are cleaning or carrying out maintenance on it, turn it off and remove the plug from the socket. Always turn off first and then remove the plug!
- Also, when you are going to use the Multiclima: first insert the plug into the socket, then switch the device ON and then use the control button!
- When you switch off the Multiclima, wait at least 3.5 minutes before reusing to avoid damaging the compressor.
- Avoid the use of extension cables if you can. If this is unavoidable, use a cable with diameter of at least 1.5 mm ^2 and do not let it cross any walking routes!
- This unit needs at least 10 Amp power. So never connect any other devices to the same socket or other equipment to the same group. Otherwise, you may cause a power outage.
- Do not move the Multiclima by tugging on the electric cable and never remove the plug from the socket by pulling the cable.
- Do not use the unit if the electrical cable, plug or device is damaged or broken. The device, plug and/or cable must be repaired/replaced by an electrician or another suitably qualified person. Repairs by unqualified persons will result in the guarantee becoming null and void and could lead to dangerous situations!
For maximum effect:
- Use a unit that is suitable for the area to be heated/cooled.
- Do not place the Multiclima in the vicinity of a heat source or in direct sunlight.
- Close windows and doors.
- Keep curtains or hatches closed during the sunniest hours in the day
- Keep filters clean
- Modify temperature and ventilation settings once the area has reached the required condition.
DESCRIPTION
Multiclima:
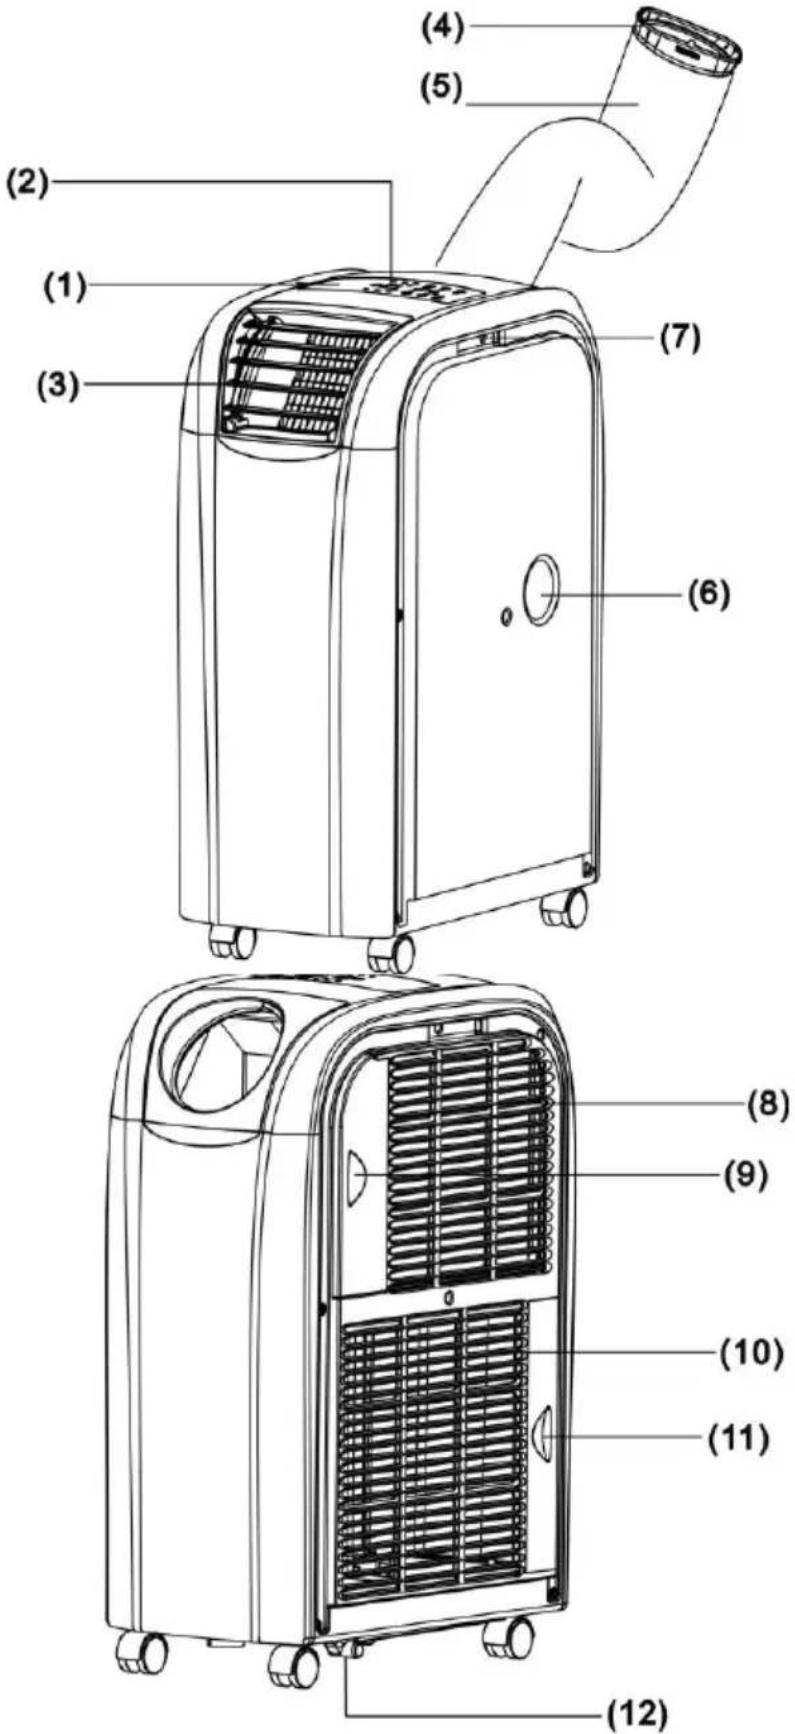
Front:
- Control panel
- Receiver point for remote control
- Adjustable fins
- Hose connection
- Flexible air outlet pipe
- Water outlet top
- Optional window set connection
Back:
- Inlet cold air
- Cold air filter
- Inlet hot air
- Hot air filter
- Water outlet
Check device and accessories before use!
INSTALLATION
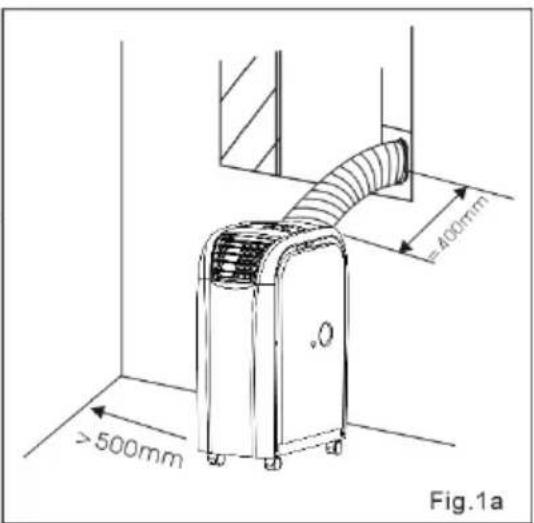
Remove packaging material and ensure that the Multiclima always remains upright, even during unpacking. The Multiclima is a mobile unit that can be moved from room to room.
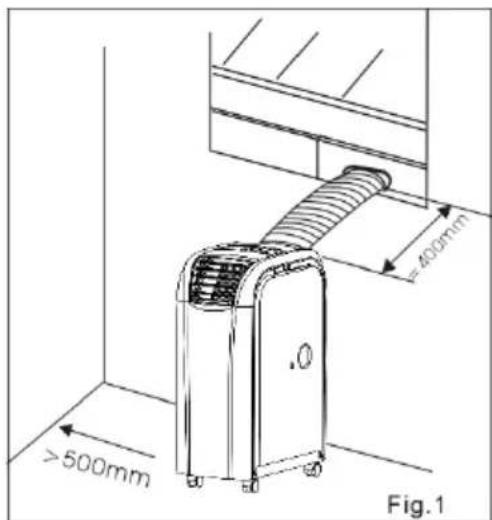
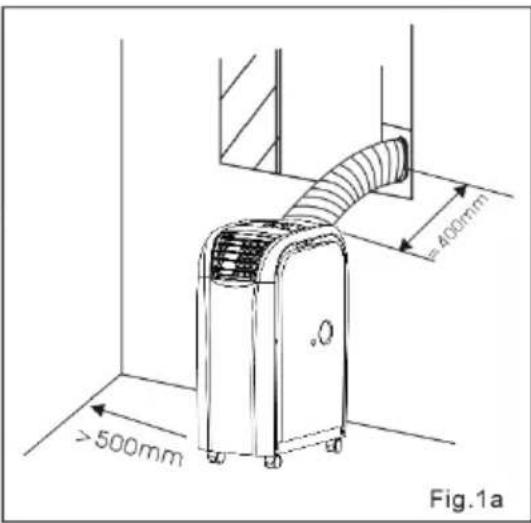
- Place the Multiclima on a sturdy, flat, dry and horizontal surface. Make sure that the unit has at least 50 cm of free space on all sides and take all safety instructions into account.
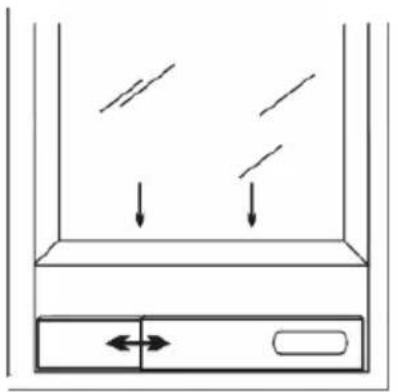
- For dehumidifying – connect a hose to the top water outlet (6) and let this run into a bucket or container. No further installation is necessary, even no flexible outlet pipe.
- If you wish to cool or heat – choose a location near an outlet point for the hot or cold air, e.g. a window that can be partially opened.
natural_image
Simple line drawing of a container with arrows indicating flow or movement, no text or symbols present.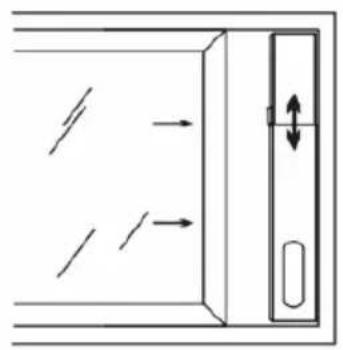
natural_image
Diagram of a door with directional arrows indicating movement, no text or symbols present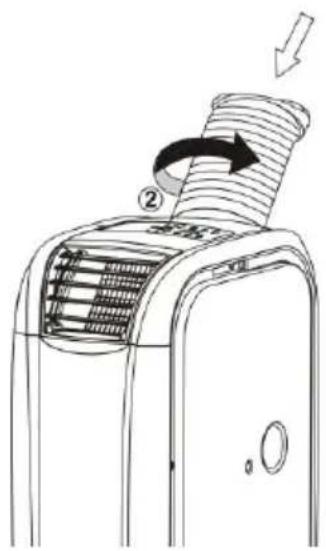
- Place window panel in the window opening. The length of the window panel can be adjusted from 55 to 100 cm.
- Don't forget about preventing access to burglars!
- Screw the flexible outlet pipe to the Multiclima, see diagram.
23
- Place the other end of the flexible hose (with the oval opening) in the opening in the window panel.
- The unit usually comes with the outlet pipe fitted for the cooling function: (removing hot air). If you wish to use the heater function, the cold air must be removed. In order to do so, you must change the connection: the attachment plate with outlet pipe must change places with the attachment plate with exhaust fins (and vice versa). Remove from the Multiclima by pulling upwards and then
replace in the appropriate position, see diagram.
- Avoid kinks or bends in the hose and keep it sloping slightly upwards. Kinks and bends will lead to a build up of damp, waste air which can cause overheating or lead to the Multiclimaair switching off.
- Warning! Do not use your Multiclima until it has been installed according to the instructions above!
- Warning! The length of the outlet pipe is especially designed to suit the Multiclima technique. Do not replace or extend it using another pipe as this could have a negative impact on the effectiveness of the Multiclima. The hose can be stretched to 150 cm but must be kept as short as possible (max. 40 cm) in order to ensure optimum functioning.
Make sure that all connections are secured properly, that the unit is not damaged or broken and that the socket to which you wish to connect the Multiclima is the same voltage as stated on the device's specification plate.
If everything is ok, insert the plug into the socket.
OPERATION
Via the control panel on the air conditioner
Functions:
1. ON/OFF button
Switch the unit on or off using this button.
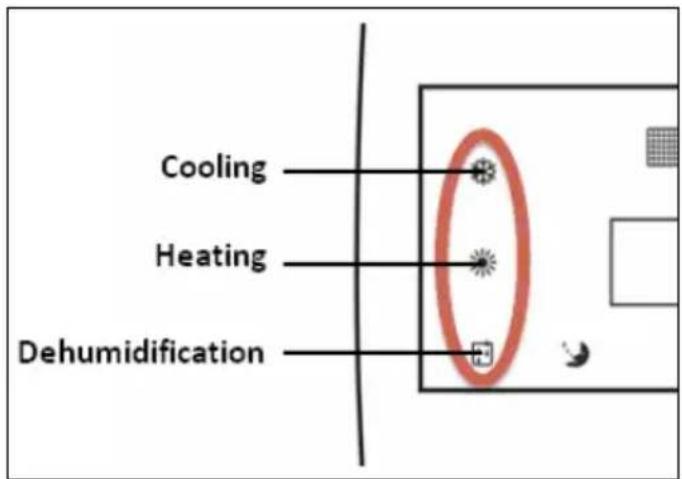
2. Function selection
Press once or more on this button to select a function: cool (a), dehumidify (b) or heat (c). If you wish to dehumidify, first connect the water outlet (see page 7!
3. Temp. regulation up ▲
During cooling: every time you press this button, the set temperature will increase by one degree up to a maximum of 30^ . During heating: every time you press this button, the set temperature will increase by one degree up to a maximum of 25^ .
4. Temperature regulation down ▼
During cooling: every time you press this button, the set temperature will decrease by one degree to a minimum of 17^ . During heating: every time you press this button, the set temperature will decrease by one degree to a minimum of 15^ .
5. LED-display
The display shows whether power is connected and the temperature or timer settings. If settings are amended, the display will show the new setting and then revert back to displaying the set temperature.
The display also shows error codes, see later in the leaflet.
6. Speed
Select fan speed with this button: low, medium, high or automatic. If you choose ‘automatic’ (during cooling), the device will select low, medium or high depending on the degree of cooling required. Note: the speed button does not work during the heating or dehumidifying process; the correct setting is selected automatically (high for heating or low for dehumidifying).
7. Timer
Set the operating time for the Multiclima using this button.
Note: the timer can only turn the Multiclima off, it cannot start it!
If you wish to turn the Multiclima off using the timer, proceed as follows:
- Set the Multiclima in the usual way by selecting the appropriate function (cooling, heating or dehumidifying)
- Press once on the timer button: the display will blink and then show the time set using the timer. If no time has been set, the display will show '0'.
- Press the ‘temp+’ or ‘temp-’ buttons to set the required operating time, up to a maximum of 24 hours. After setting, the display will flash the set time for 8 seconds and then return to the set temperature (not blinking).
- You can amend the time by pressing on the timer again and using ‘temp+’ or ‘temp-’ to change the time. You can also cancel the timer task by switching the unit off.
8. Sleep function
The sleep function will be selected if you press this button while using the cooling function. After one hour, the set temperature will be increased by one degree; it will increase by a further degree after a second hour. This setting will be maintained. During the sleep function, the fan works on low speed.
Press this button during heating and the set temperature will be decreased by one degree after an hour and by a further degree after a second hour. This setting will be maintained; the fan works on a low speed.
The sleep function cannot be used during dehumidification.
9. Alarm
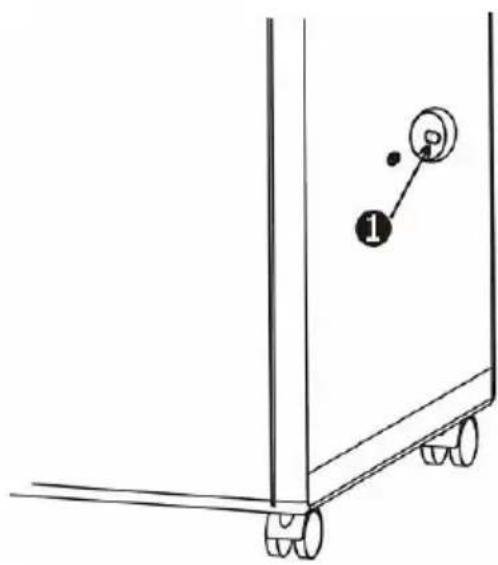
When the tank is full, the Multiclima stops and the display shows 'E4'. Switch the Multiclima off, remove the plug from the socket and remove the rubber cap (2) on the water outlet underneath the unit to drain water (see Fig.). Replace the cap and you can start the Multiclima as usual.
natural_image
Diagram of a heat exchanger or cooling unit with a grid of heat sinks and a labeled component (no text or symbols present)Via remote control:
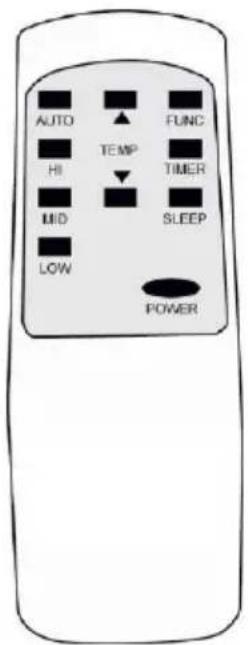
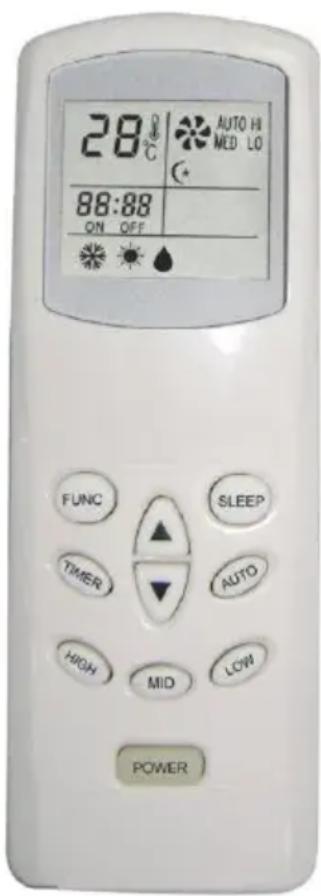
The remote control provides the same options as the buttons on the control panel:
POWER = ON/OFF button
FUNC = Function selection
TIMER = Timer
AUTO = Fan speed automatic
HI = Fan speed high
MID = Fan speed medium
LOW = Fan speed low
SLEEP = Sleep function
TEMP. = Temperature regulation
- When you start the Multiclima and select a certain function or change the function, the compressor will not begin to work immediately; this is to protect the internal components. The symbol that corresponds to the display (see diagram) will blink to show it is 'waiting'. This can take 3 to 4 minutes.
- The fins for the outlet opening can be adjusted manually to change the outlet direction.
- If the cooling function is used for a while, internal ice may form in the Multiclima. You will notice a drop in the unit's effectiveness as a result. To resolve this situation, switch the unit off and leave for a while so that the ice can melt. The fan can also be switched on at the highest setting without cooling.
- Select the function ‘cooling’ and set the temperature to 30^ C if you would like the Multiclima to ventilate (without cooling or heating). The compressor will stop working and cooling will cease; the fan, however, will carry on working.
Water outlet
When cooling, you do not need to install a drainage hose. During the cooling process, the device removes water from the air; this water evaporates and is then transferred outdoors with the hot air. Ensure that the rubber cap (1) is placed on the water drainage point.
A drainage hose is also not required when heating; it does, however, increase the effectiveness of the heating function. Remove the cap on the water outlet on the side of the unit (1) and connect a suitable drainage hose to the outlet; the end of this should then be placed in a bucket or drain. If you wish to humidify, remove the air outlet hose. Connect a water outlet hose to the drainage point (1) and run the hose to a collection reservoir or a drain. The Multiclima does not have an in-built water tank for the moisture!
natural_image
Simple line drawing of a cart or container with wheels and a numbered label (1), no text or symbols present.MAINTENANCE
Always switch the unit off and remove the plug from the socket before carrying out maintenance. Regular cleaning is vital in order to keep the Multiclima in good working order!
natural_image
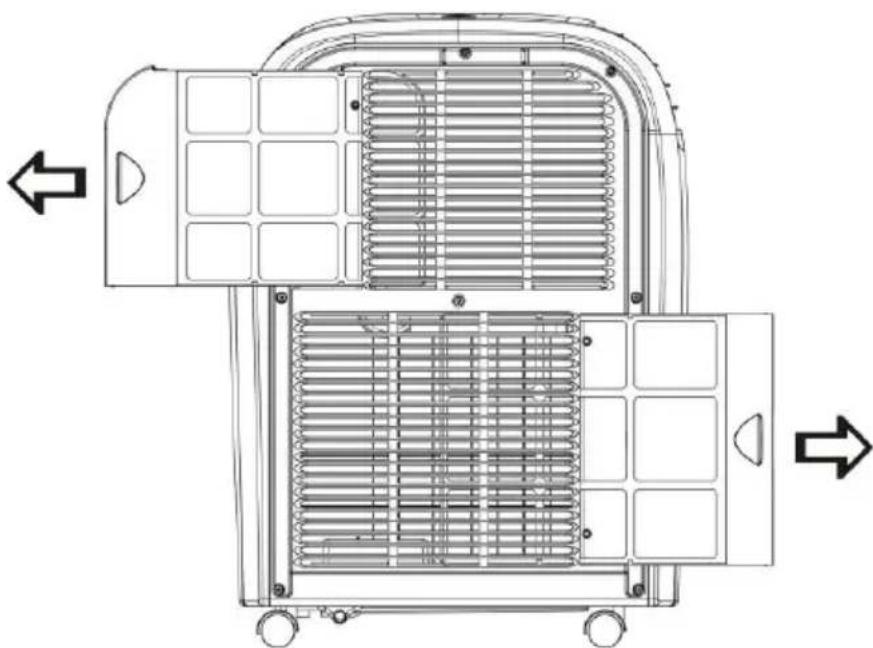
Technical line drawing of a mechanical device with heat exchanger and wheels (no text or symbols)The air filters (active carbon filters) on the left hand side of the unit can easily be removed by sliding the frame either left or right. Clean by gently vacuuming using the brush attachment on the vacuum cleaner.
The condenser and humidifier can be found behind the air filters. Clean them in the same way.
The housing can be
removed if necessary and cleaned with a damp (not wet!) cloth and a mild cleaning agent. Dry afterwards with a soft cloth.
PROTECTION
The Multiclima is fitted with an overheating safeguard that switches the unit off if it overheats. If this should occur, you must remove the plug from the socket and leave to Multiclima to cool for at least 30 minutes. Remove the cause of overheating - has the device been (partially) covered? Is it too close to a wall or another obstacle, preventing it sucking in or dispelling sufficient air?
You can then use the device normally again but keep an eye on it for the first 30 minutes to ensure there are no further problems. If the device is showing signs of problems or the overheating recurs, even though there is no obvious assignable cause, ask your supplier or a recognised electrician to check/repair the unit.
PROBLEMS AND SOLUTIONS
The display will help diagnose what is wrong in certain circumstances.
It will provide the following information code
E1 Short circuit in temperature sensor and printed circuit board. Contact your supplier for repairs under guarantee.
E2 Short circuit in the copper wire from temperature sensor and wiring from printed circuit board. Contact your supplier for repairs under guarantee.
E3 Leak of coolant from copper pipes. Contact your supplier for repairs under guarantee.
E4 The tank is full or the cap is not secured properly. Remove the cap from the drainage point on the underside of the unit and allow water to drain away. Make sure that the cap is replaced correctly.
DISPOSAL
When the Multiclima eventually comes to the end of its useful life and must be disposed of, it must not be removed with ordinary household waste. Take it to a special collection point organised by your local council. Remove the batteries before doing so!
natural_image
Symbol of a trash bin crossed with a diagonal line and a horizontal bar below (no text or labels)OPTIONAL WINDOW SET
The Multiclima can be supplied with an optional window set. A window set enables the Multiclima to be placed outdoors while the cool air (or hot air) is blown in via an opening in the window; this keeps the noise outside and the heating/cooling effect inside.
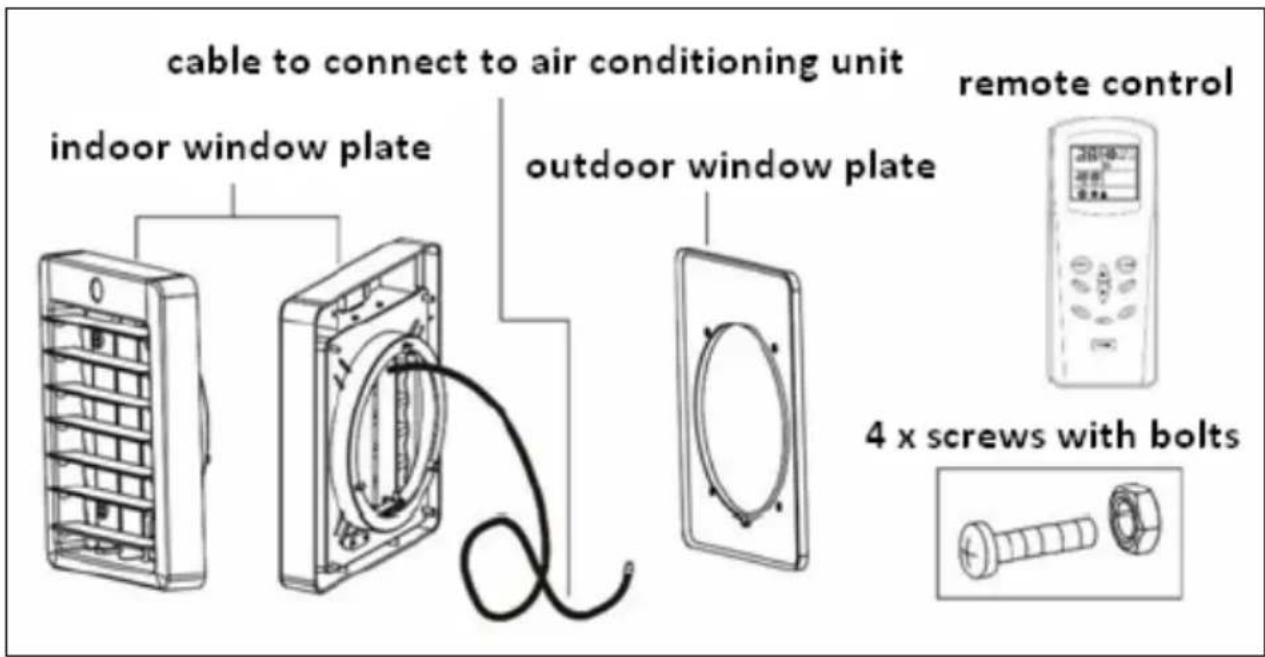
A window set is made up of:
- Indoor window plate with remote control receiver point and a cable to connect to air conditioning unit.
• Outdoor window plate - 2 screws with bolts to secure the indoor and outdoor window plates to one another.
• Digital remote control with display
Install as follows:
- Decide upon a suitable place for the hole in the window. Be aware that the Multiclima must be located near the hole and that the hose ideally goes slightly upwards between the Multiclima and the hole (but not too much); the hose must not be bent! Take the length of the remote control cable into account too.
- Cut a circular hole with a diameter of 190mm in the window at the appropriate
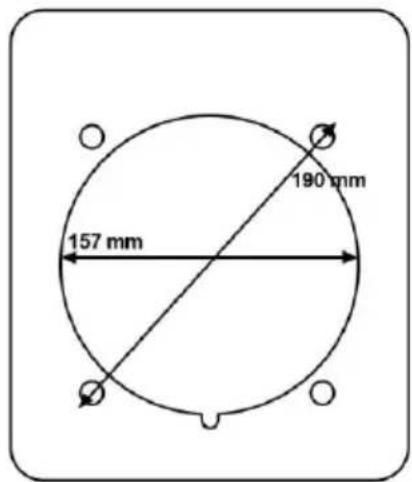
place (the screws then fall within the recess) or 157mm, with 4 small holes for the screws. You can determine the location of the screws using the back-plate.
- Place the window plates on the appropriate sides over the hole and screw them together.
- Run the cable to the Multiclima and connect it to the connection point (see page 6 point 7).
- Place the Multiclima outdoors at a suitable location, see Installation. Connect one end of the air outlet pipe to the side opening on the side of the Multiclima that blows out cool air (if you wish to use the cooling function) or to the opening that blows out hot air (if you wish to use the heating function); the other side is connected to the outdoor window plate.
Note: the air outlet hose is now positioned on the opposite side compared to when the Multiclima is located indoors!
- Make sure that all connections are secured properly, that the unit is not damaged or broken and that the socket to which you wish to connect the Multiclima is the same voltage as stated on the device's specification plate. If you are using an outdoor socket, it must fulfil the requirements of an outdoor electrical socket!
- If everything is ok, insert the plug into the socket.
- You can now operate the Multiclima with the digital remote control. Make sure that the remote control is directed towards the receiver in the indoor window plate!
Digital remote control
A digital remote control is supplied with the window set. The same buttons are provided on this remote control as can be found on the standard Multiclima remote control; there is also a display that gives the settings.
To use the digital remote control, you must point it towards the receiver on the indoor window plate.
Note: The Multiclima has an insulation category of IPX4. This means that it can withstand a few raindrops but must never be exposed to downpours or long periods of mist.
CE Conformity statement
Euromac bv., Genemuiden-NL hereby declares that the mobile air-conditioner/dehumidifier, brand EUROM, type Multiclima 70-90-120, cooling unit R410A, fulfils the LVD guideline 2006/95/EC and the EMC guideline 2004/108/EC and corresponds to the following norms:
Multiclima 70:
EN 55014-1:06+A1:09 EN 60335-2-40:02+A1:05+A2:05
EN 55014-2 :97+A1 :01+A2 :08 EN 60335-1:01+A1:04+A2:06
EN 61000-3-2:06+A1:09+A2:09 EN 62233:2005
EN 61000-3-3 :2008
Multiclima 90 :
EN 55014-1:2006 EN 60335-2-40/A1:06
EN 61000-6-3 :2007 EN 60335-1/A13:2008
EN 61000-3-11 :2000 EN 62233:2008
EN 61000-3-2:2006
EN 61000-3-3 :2008
Multiclima 120 :
EN 55014-1:2006
EN 61000-6-3 :2007 EN 60335-2-40/A1:2006
EN 61000-3-11 :2000 EN 60335-1/A2:2006
EN 61000-3-2:2006 EN 50366/A1:2006
EN 61000-3-3 :95+A1 :01+A2 :05
Genemuiden, 23-11-2012
W.J. Bakker, Gen. Dir.
EUROMAC BV.
HERZLICHEN GLÜCKWUNSCH!

flowchart
graph LR
    A["Top Air Conditioner Unit"] --> B["Cooling Machine"]
    B --> C["Drying Machine with Cover"]
    C --> D["Final Air Conditioner Unit"]
Fig.01
Fig.02
Fig.03
7. Timer
natural_image
Diagram of a heat exchanger or cooling unit with a grid of cooling fins and wheels, no text or symbols present.natural_image
Simple line drawing of a vehicle chassis with wheels and a numbered component (no text or symbols)WARTUNG
natural_image
Technical line drawing of a mechanical device with internal heat exchanger and wheels (no text or symbols)natural_image
Symbol of a trash bin with crossed lines indicating no waste, and a solid black rectangle below (no text or labels)OPTIONALES RAHMENSET
natural_image
Technical line drawing of a refrigerator with airflow indicators and air vent diagram (no text or symbols)
53
flowchart
graph LR
    A["Top Air Conditioner Unit"] --> B["Cooling Machine"]
    B --> C["Drying Machine with Cover"]
    C --> D["Final Air Conditioner Unit"]
Fig.01
Fig.02
Fig.03
natural_image
Technical line drawing of a heat exchanger or cooling unit with no visible text or symbolsnatural_image
Simple line drawing of a vehicle chassis with wheels and a numbered component (no text or symbols)natural_image
Technical line drawing of a mechanical device with internal grid structure and directional arrows (no text or symbols)natural_image
Symbol of a trash bin with crossed lines and a blank rectangular base (no text or labels)KIT DE FENÊTRE EN OPTION
natural_image
Simple line drawing of a container with arrows indicating flow or movement, no text or symbols present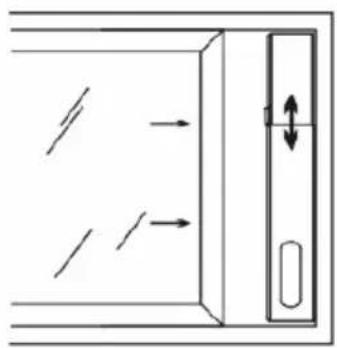
natural_image
Diagram showing directional arrows and a vertical arrow inside a rectangular frame, with no readable text or symbols.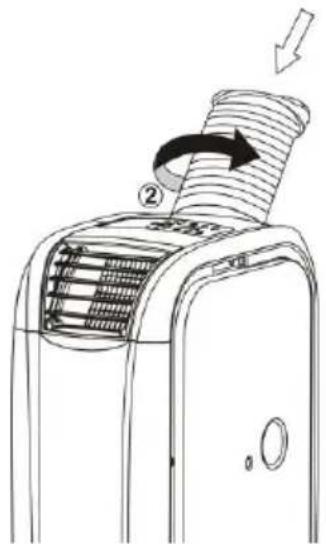
69
flowchart
graph LR
    A["Top Air Conditioner Unit"] --> B["Cooling Machine"]
    B --> C["Drying Machine with Cover"]
    C --> D["Final Air Conditioner Unit"]
Fig.01
Fig.02
Fig.03
natural_image
Diagram of a heat exchanger or cooling unit with a grid of cooling fins and a labeled component (no text or symbols present)natural_image
Technical line drawing of a mechanical device with internal heat exchangers and wheels (no text or symbols)natural_image
Symbol of a trash bin crossed with no text or numbers, representing waste sorting or disposal (no text present)SET DA FINESTRA OPTIONAL
natural_image
Simple line drawing of a container with arrows indicating flow or movement, no text or symbols present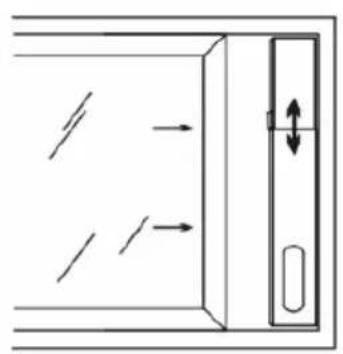
natural_image
Diagram of a door with directional arrows indicating movement, no text or symbols present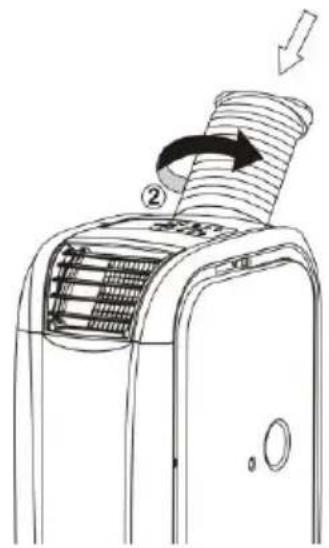

natural_image
Diagram of a heat exchanger or cooling unit with a grid of cooling fins and a labeled component (no text or symbols present)natural_image
Simple line drawing of a vehicle chassis with wheels and a numbered component (no text or symbols)natural_image
Technical line drawing of a mechanical device with internal grid structure and directional arrows (no text or symbols)natural_image
Symbol of a trash bin with crossed lines indicating no waste, and a solid black rectangle below (no text or labels)ADAPTADOR PARA VENTANA OPCIONAL
natural_image
Simple line drawing of a container with arrows indicating flow or movement, no text or symbols present.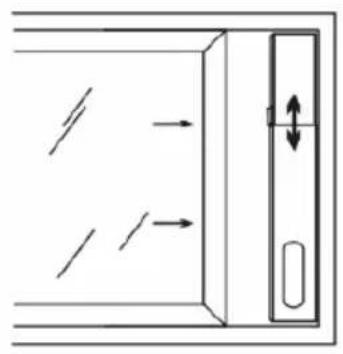
natural_image
Diagram of a door with directional arrows indicating movement, no text or symbols present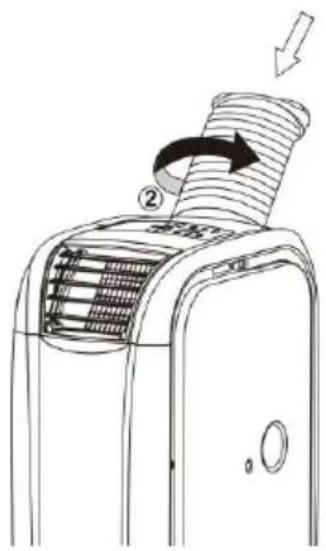
flowchart
graph LR
    A["Air Conditioner Unit"] --> B["Cooling Machine"]
    B --> C["Drying Machine with Cover"]
    C --> D["Final Air Conditioner Unit"]
Fig.01
Fig.02
Fig.03
natural_image
Diagram of a heat exchanger or cooling unit with a grid-patterned chamber and two wheels (no text or symbols)natural_image
Simple line drawing of a mechanical component with wheels and a numbered label (no text or symbols beyond the number)MANUTENÇÃO
natural_image
Technical line drawing of a mechanical device with internal heat exchanger and wheels (no text or symbols)PROBLEMAS E SOLUÇÕES
natural_image
Symbol of a trash bin crossed with a diagonal line and a horizontal bar below (no text or labels)natural_image
Simple line drawing of a container with arrows indicating flow or movement, no text or symbols present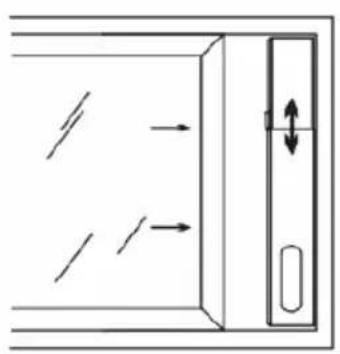
natural_image
Diagram of a door with directional arrows indicating movement, no text or symbols present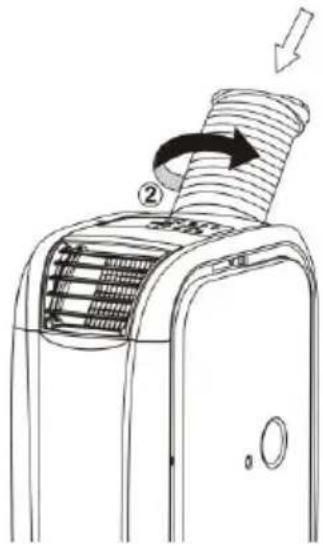
7. Ajastin
natural_image
Diagram of a heat exchanger or cooling unit with a grid of heat sinks and a labeled component (no text or symbols present)Kaukosäätimellä:
VIRTA = ON/OFF-painike
FUNC = Toiminnon valinta
TIMER = Ajastin
natural_image
Simple line drawing of a vehicle chassis with wheels and a numbered component (no text or symbols)KUNNOSSAPITO
natural_image
Technical line drawing of a mechanical device with internal heat exchanger and wheels (no text or symbols)natural_image
Symbol of a trash bin with crossed lines indicating no waste or restriction, and a solid black rectangle below (no text or labels)IKKUNASARJA (LISÄVARUSTE)
EUROMAC BV., Kokosstraat 20, 8281 JC Genemuidene-mail: info@euromac.nl www.euromac.nl

- Timer
- Middels de afstandsbediening:
- ONDERHOUD
- OPTIONEEL RAAMSET
- TECHNICAL SPECIFICATIONS
- SAFETY INSTRUCTIONS
- General Safety:
- Electrical safety:
- For maximum effect:
- DESCRIPTION
- Multiclima:
- Front:
- Back:
- INSTALLATION
- OPERATION
- Via the control panel on the air conditioner
- Functions:
- ON/OFF button
- Function selection
- Temp. regulation up ▲
- Temperature regulation down ▼
- LED-display
- Speed
- Sleep function
- Alarm
- Via remote control:
- Water outlet
- MAINTENANCE
- PROTECTION
- PROBLEMS AND SOLUTIONS
- DISPOSAL
- OPTIONAL WINDOW SET
- Digital remote control
- CE Conformity statement
- Multiclima 70:
- Multiclima 90 :
- Multiclima 120 :
- HERZLICHEN GLÜCKWUNSCH!
- WARTUNG
- OPTIONALES RAHMENSET
- KIT DE FENÊTRE EN OPTION
- SET DA FINESTRA OPTIONAL
- ADAPTADOR PARA VENTANA OPCIONAL
- MANUTENÇÃO
- PROBLEMAS E SOLUÇÕES
- Ajastin
- Kaukosäätimellä:
- KUNNOSSAPITO
- IKKUNASARJA (LISÄVARUSTE)
Brand : Eurom
Model : Multiclima 70
Category : Air Conditioning