
20HF7835 - Television PHILIPS - Free user manual and instructions
Find the device manual for free 20HF7835 PHILIPS in PDF.
| Brand | PHILIPS |
| Model | 20HF7835 |
| Product type | LCD TV |
| Power supply | 220-240 V / 50 Hz via AC-DC adapter |
| Standby consumption | Less than 1 W |
| TV standards | PAL, SECAM, NTSC (depending on system) |
| Main functions | Teletext, Timer (0-240 min), Programmable alarm, Child lock and key lock, Screen saver, Picture/sound presets, FM radio mode |
| Connectors | Scart EXT1 (RGB), TV antenna, FM antenna, DC input, Headphone (32-600 ohms), Side audio/video inputs |
| Included accessories | AC-DC adapter, Remote control, 2 R6 batteries, Radio antenna cable |
| Cleaning | Soft lint-free cloth, no alcohol or solvent |
| Safety | Do not expose to water, heat source, obstruct ventilation grilles |
| Stand | Tiltable, removable for wall mount (optional kit) |
| Program identification | Up to 40 programs can be named |
| Teletext compatibility | Yes, with favorite pages and subpages |
| Screen type | LCD |
Frequently Asked Questions - 20HF7835 PHILIPS
User questions about 20HF7835 PHILIPS
0 question about this device. Answer the ones you know or ask your own.
Ask a new question about this device
Download the instructions for your Television in PDF format for free! Find your manual 20HF7835 - PHILIPS and take your electronic device back in hand. On this page are published all the documents necessary for the use of your device. 20HF7835 by PHILIPS.
USER MANUAL 20HF7835 PHILIPS
natural_image
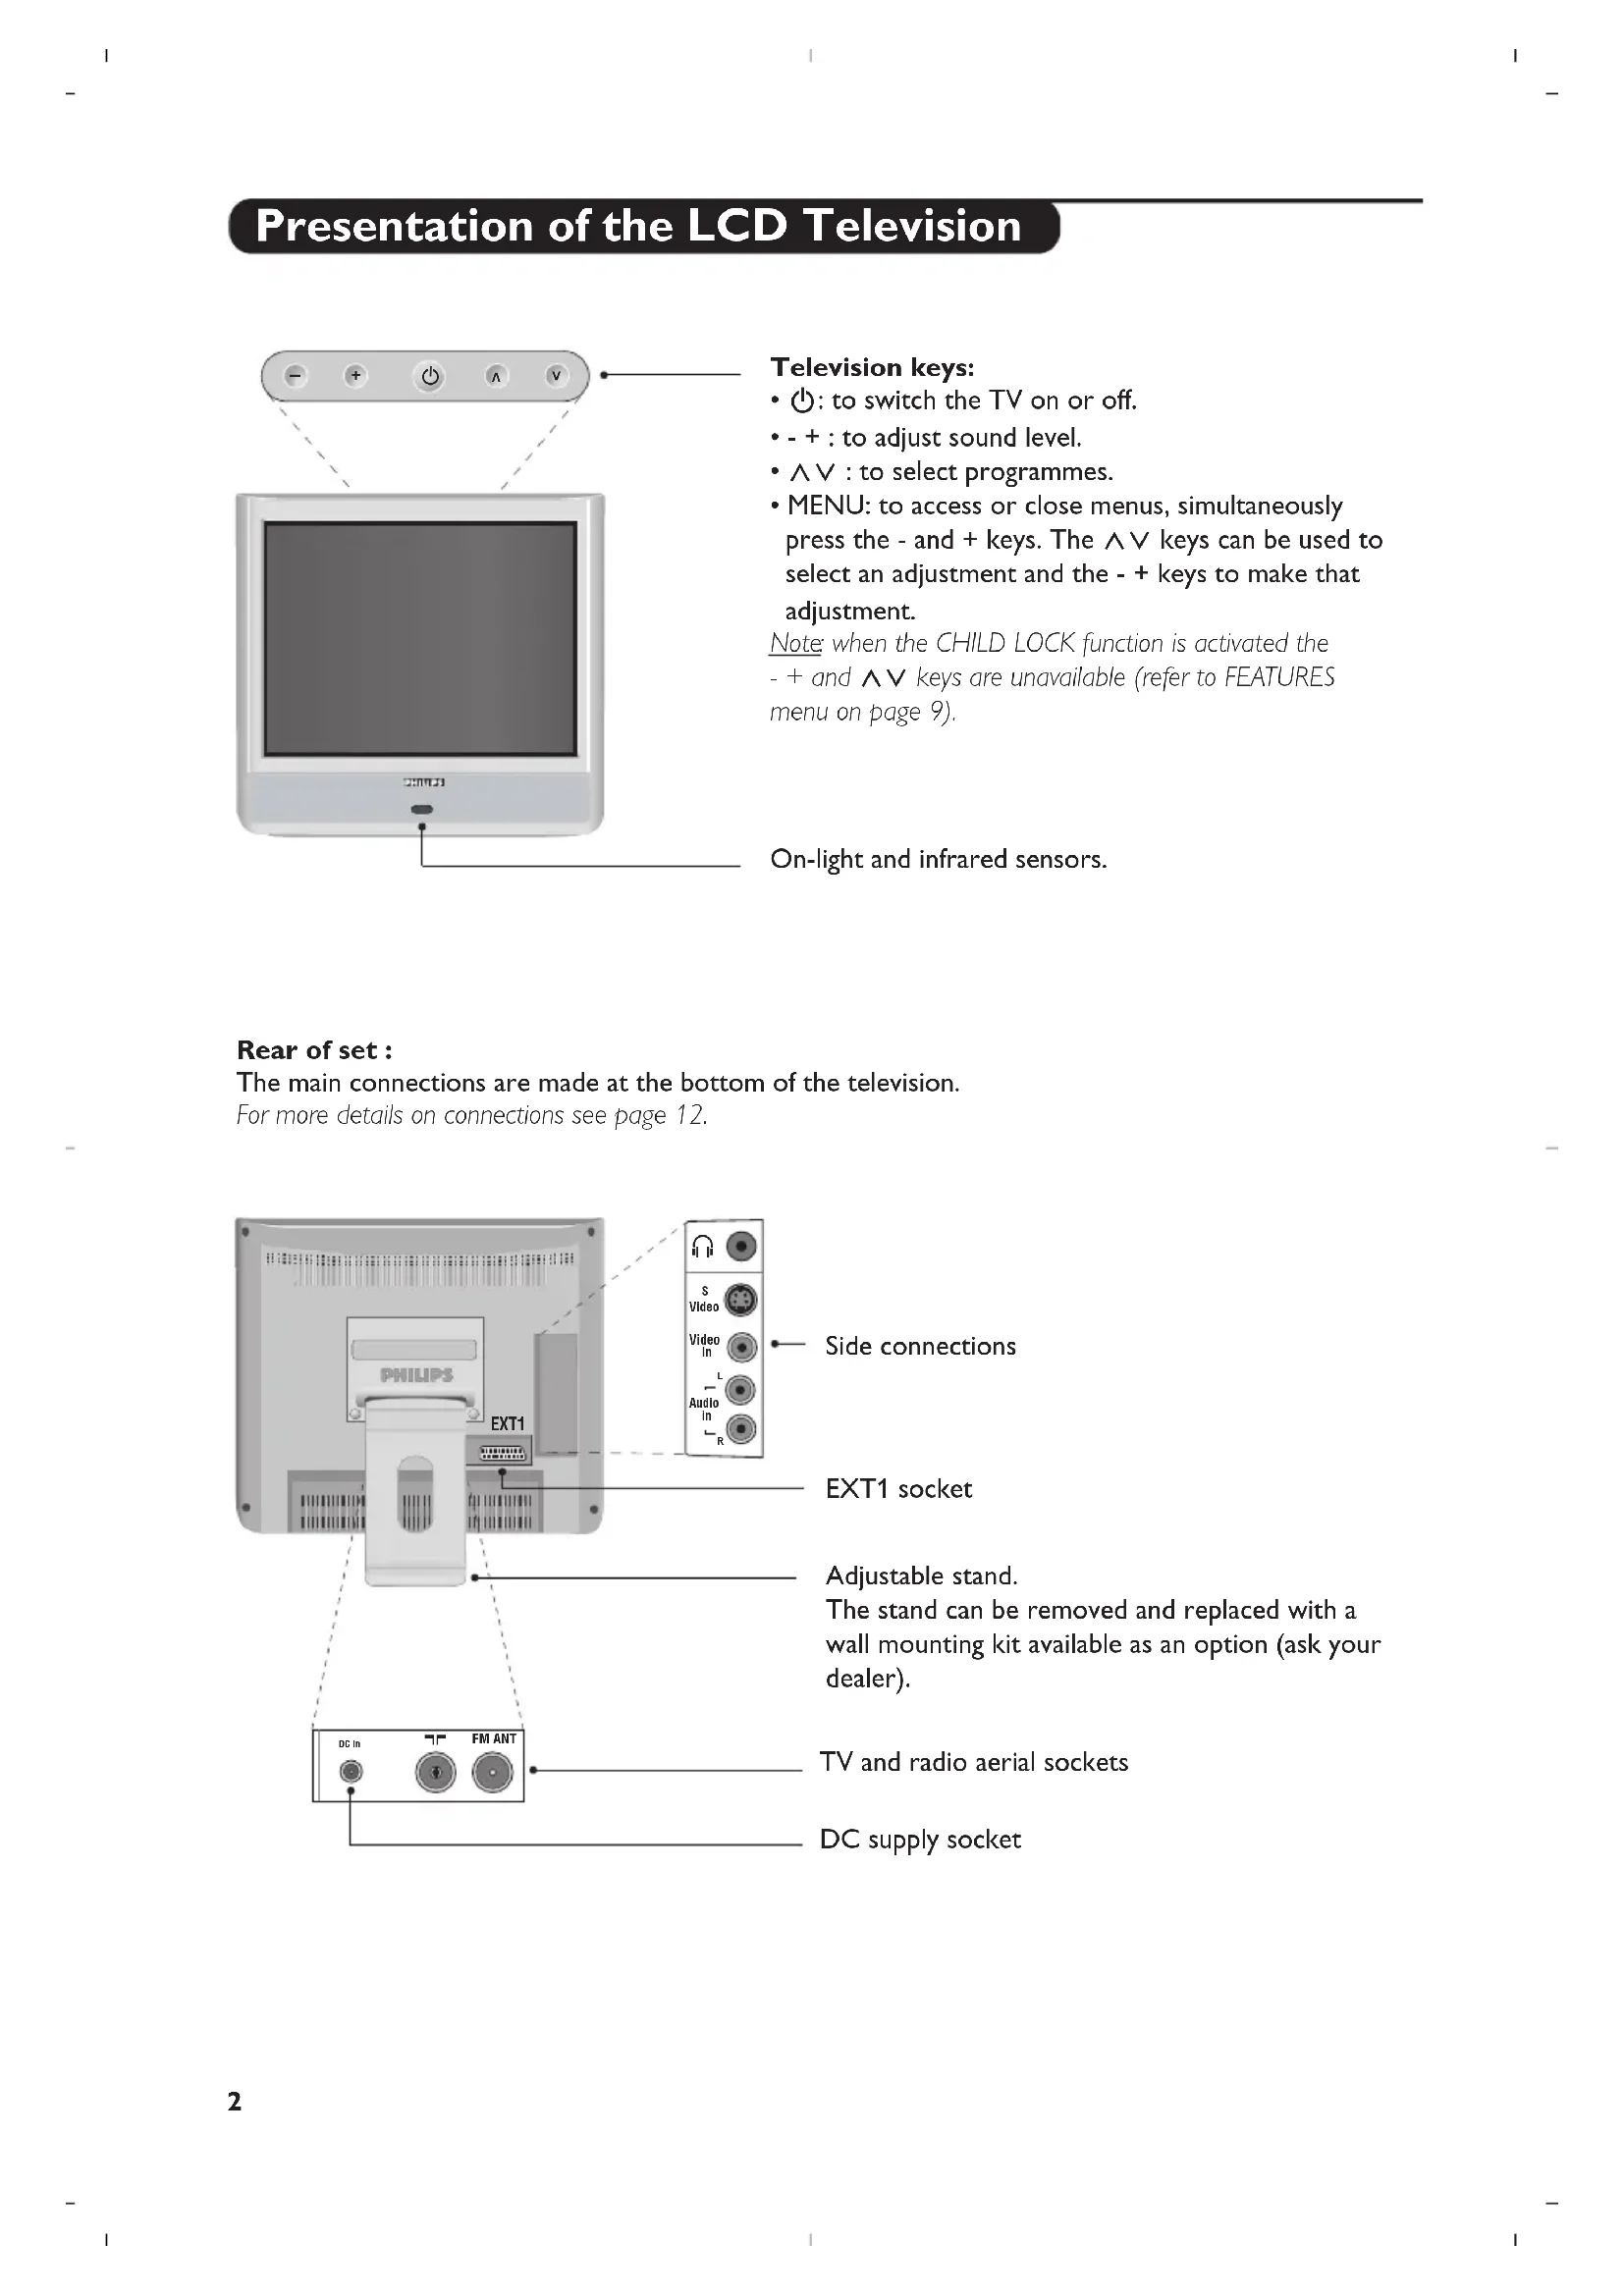
3D illustration of a remote control device with two batteries and a partially open lid (no text or symbols)
natural_image
Illustration of a hand pointing at a blank screen with '2012' written below (no text or symbols on screen)Videorecorder (of DVD recorder)
Thank you for purchasing this television set.
This handbook has been designed to help you install and operate your TV set.
We would strongly recommend that you read it thoroughly.
We hope our technology meets entirely with your satisfaction.
Table of Contents
Installation
Presentation of the LCD Television 4
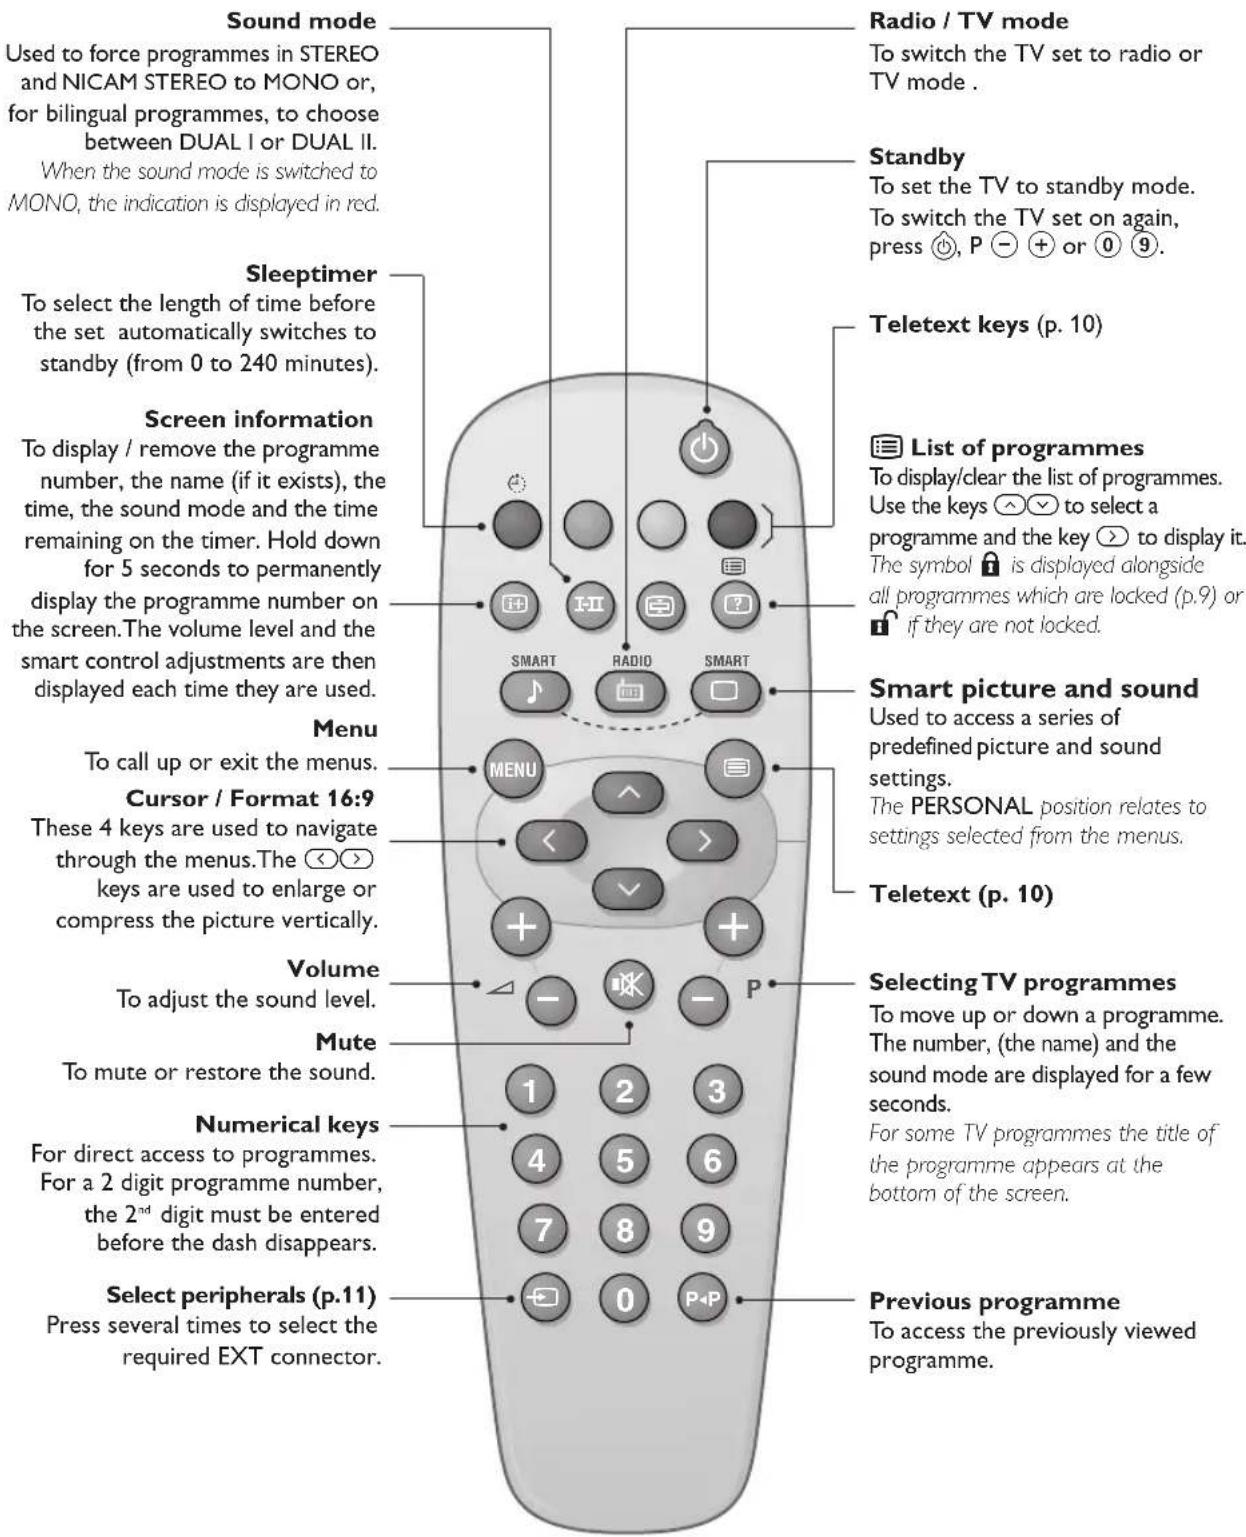
The remote control keys ....3
Installing your television set 4
Quick installation 5
Sorting programmes ....5
Choosing a language and country 6
Automatic tuning 6
Programme name 6
Manual tuning 7
Operation
Using the radio 7
Adjusting the picture ....8
Adjusting the sound 8
Feature settings 8
Timer function 9
Locking the set 9
Teletext 10
Peripherals
Video recorder 11
Other equipment 11
Side connections 11
To select connected equipment 11
Tips 12

Cleaning the set
Only use a clean, soft and lint-free cloth to clean the screen and the casing of your set. Do not use alcohol-based or solvent-based products.
Presentation of the LCD Television
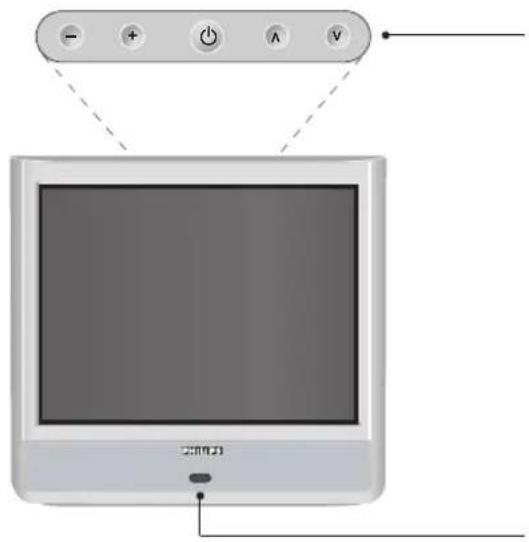
Television keys:
• ⏻: to switch the TV on or off.
- - + : to adjust sound level.
• ∧ ∨ : to select programmes.
- MENU: to access or close menus, simultaneously press the - and + keys. The keys can be used to select an adjustment and the - + keys to make that adjustment.
Note: when the CHILD LOCK function is activated the - + and keys are unavailable (refer to FEATURES menu on page 9).
On-light and infrared sensors.
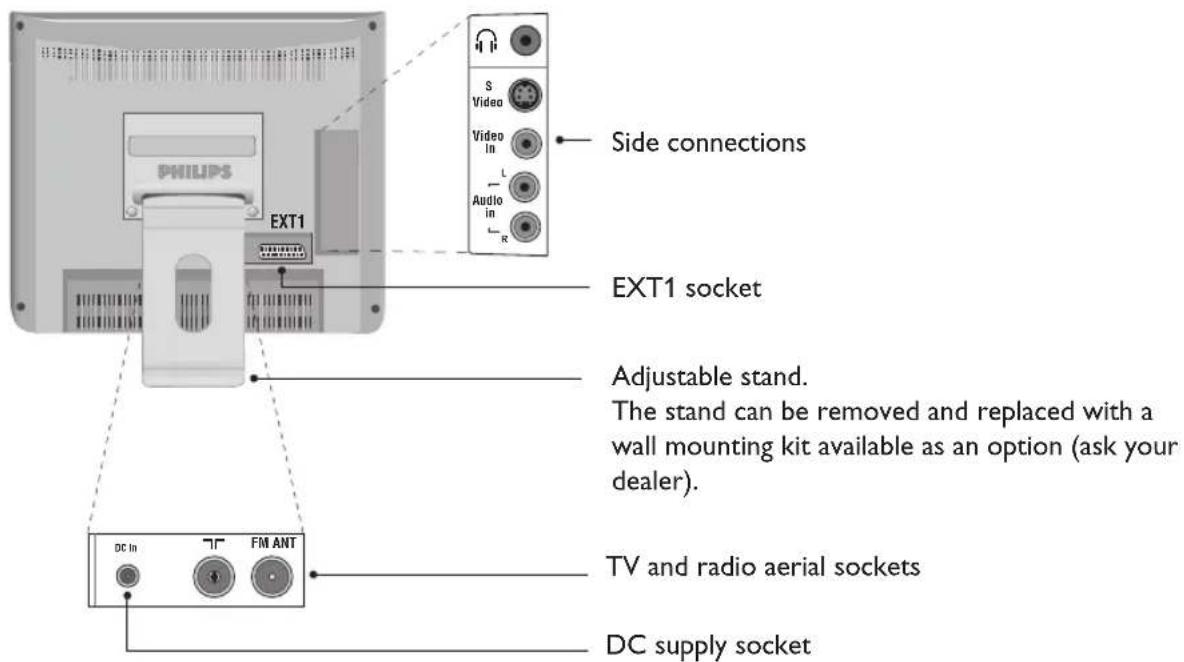
Rear of set :
The main connections are made at the bottom of the television.
For more details on connections see page 12.
Remote control keys
Installing your television set
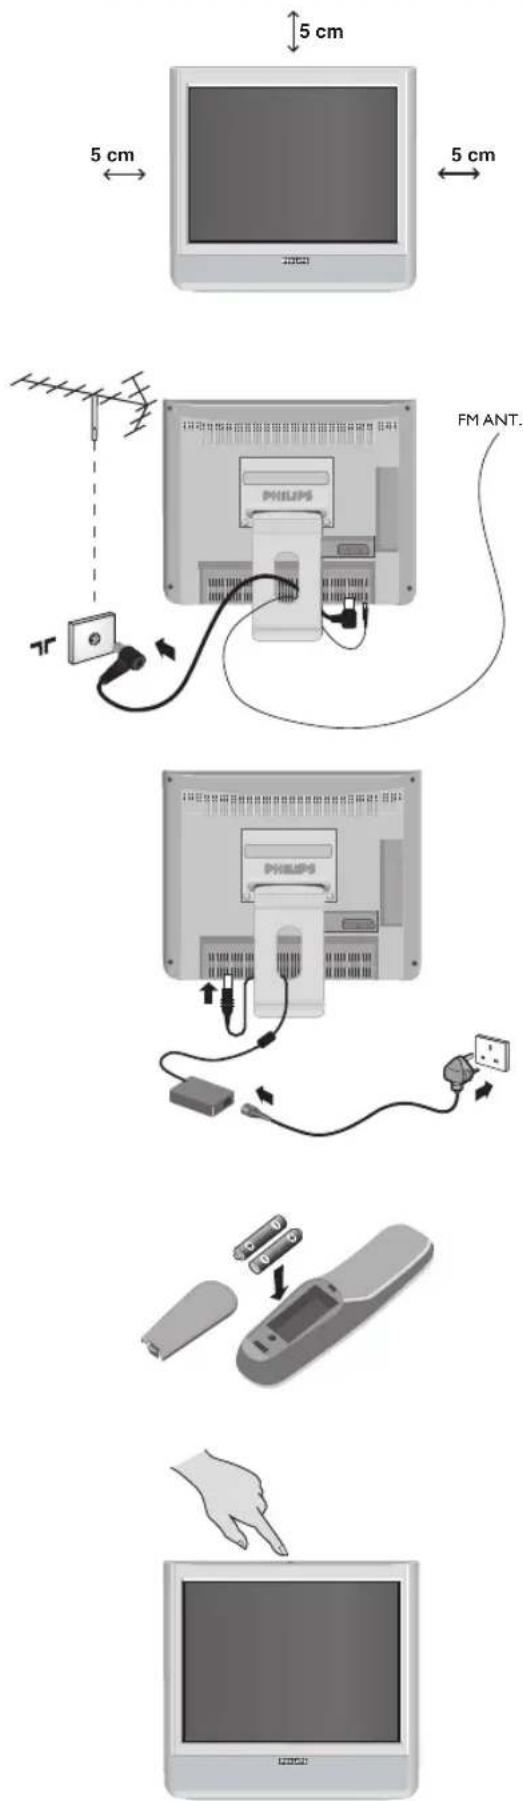
① Positioning the television set
Place your TV on a solid stable surface. To avoid danger do not expose the TV to water, or a heat source (e.g. lamp, candle, radiator). Do not obstruct the ventilation grid at the rear.
② Connecting the aerials
- Connect the socket situated at the bottom of the TV to your aerial socket.
- Insert the radio aerial lead supplied into the FM ANT socket located at the bottom of the TV.
- Arrange the leads by passing them through the television stand.
③ Power supply connections
The TV works with a DC supply (the voltage is indicated on the label). Only use the AC-DC adaptor supplied with the TV.
- Connect the DC plug of the adaptor to the TV DC socket. Leave a space round the adaptor for ventilation.
- Insert the adaptor power lead and insert the mains plug into the wall socket.
For connecting other appliances see page p.12.
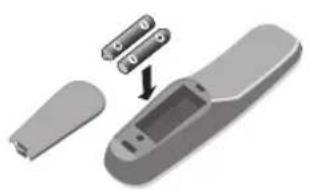
④ Remote control
Insert the two R6-type batteries supplied, making sure they are the right way round.
The batteries supplied with the appliance do not contain mercury or nickel cadmium so as to protect the environment. Please do not discard your used batteries, but use the recycling methods available (consult your distributor).
⑤ Switching on
To switch on the set, press the on/off key.
A green indicator comes on and the screen lights up. Go straight to the Quick Installation chapter on page 5. If the TV remains in standby mode (red indicator), press the P ⊕ key on the remote control.
The indicator will flash when you use the remote control.
Quick installation
The first time you switch on the television, a menu appears on the screen. This menu asks you to choose the language of the menus:
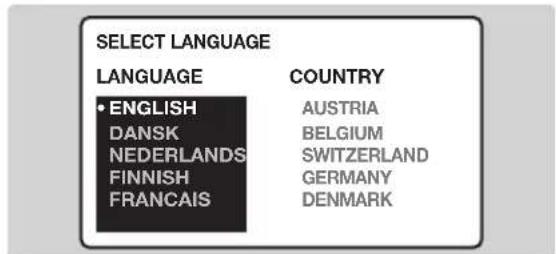
If the menu does not appear, hold down the - and + keys on the set for 8 seconds to bring it up.
① Use the ⬆ keys on the remote control to choose your language then confirm with >.
② Then select your country using the ^▼ keys and confirm with >.
If your country does not appear in the list, select “...”
3 Tuning starts automatically.
The operation takes several minutes.
A display shows the search status and the number of programmes found. When it has finished the menu disappears.
To exit or interrupt the search, press the ☐ key.
If no programmes are found, refer to the chapter entitled Tips on p. 12.
4 If the transmitter or the cable network broadcasts the automatic sort signal, the programmes will be correctly numbered.
5 If not, the programmes found will be numbered in descending order starting at 99, 98, 97, etc. Use the SORT menu to renumber them.
Some transmitters or cable networks broadcast their own sort parameters (region, language, etc.). Where this is the case, make your choice using the ^▼ keys and confirm with >.
Sorting programmes
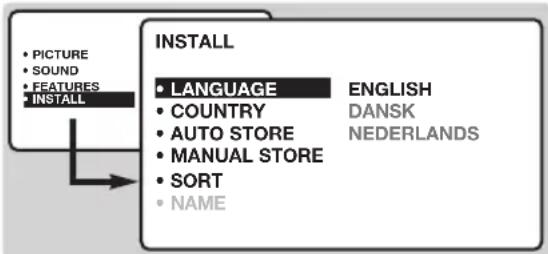
① Press the Ⓜ key. The main menu is displayed.
② Select INSTALL (☑), then press >. The INSTALL menu appears.

flowchart
graph TD
    A["INSTALL"] --> B["INSTALL"]
    B --> C["• LANGUAGE FROM"]
    B --> D["• COUNTRY TO EXCHANGE"]
    B --> E["• AUTO STORE"]
    B --> F["• MANUAL STORE"]
    B --> G["• SORT"]
    B --> H["• NAME"]
③ Using the ⬇ key, select SORT then press ⬇. The SORT menu appears. The FROM option is activated.
Note: this menu works as follows:
- Change "FROM" (enter the current programme number),
• "TO" (enter the new number), - EXCHANGE numbers" (the operation is carried out).
4 Select the programme you wish to renumber using ◀▶ keys or ① to ⑨.
Example: to renumber programme 78 as 2 press ⑦ ⑧.
5 Select TO (using ⬇ key) and enter the new number with ⏻ keys or Ⓞ to Ⓢ (for the example given, enter Ⓥ).
6 Select EXCHANGE ( √ key) and press ⚠. The message EXCHANGED appears, the exchange takes place. In our example, programme 78 is renumbered as 2 (and programme 2 as 78).
⑦ Select the option FROM ( ⬆ key) and repeat stages ④ to ⑥ as many times as there are programmes to renumber.
⑧ To exit from the menus, press 📊.
Choosing a language and country
① Press the Ⓜ key to display the main menu.
② Select INSTALL (☑), then press >. The INSTALL menu appears.
The LANGUAGE option is activated.
flowchart
graph TD
    A["• PICTURE<br>• SOUND<br>• FEATURES<br>• INSTALL"] --> B["INSTALL"]
    B --> C["• LANGUAGE<br>• COUNTRY<br>• AUTO STORE<br>• MANUAL STORE<br>• SORT<br>• NAME"]
    C --> D["ENGLISH<br>DANSK<br>NEDERLANDS"]
③ Press ➤ to go into the LANGUAGE menu.
④ Select your language with the ⏻ keys.
The menus will appear in the chosen language.
5 Press ◀ to exit the LANGUAGE menu.
6 Select the option COUNTRY and press ⬤.
⑦ Select your country with ⬆▼ keys.
If your country does not appear in the list, select OTHER.
⑧ Press ◀ to exit the COUNTRY menu.
⑨ To exit from the menus, press 📊.
Automatic tuning
This menu allows you to automatically search for all the programmes available in your region (or on your cable network).
① First carry out operations ① to ⑧ above, then:
② Press ▼ once to select AUTO STORE then press ▶.The search begins.
After several minutes, the INSTALL menu reappears automatically.
INSTALL
- LANGUAGE
• COUNTRY
• AUTO STORE
• MANUAL STORE - SORT
• NAME
SEARCHING
PLEASE WAIT
PROG. NO. 2
215.18 MHZ
Programme name
You may, if you wish, give a name to the first 40 programmes (from 1 to 40).
① Press (MENU).
② Select INSTALL (√), then press >.
The INSTALL menu appears.
3 Press √ 5 times to select NAME (concealed at the bottom of the screen), then press >.
The menu appears :
INSTALL
• LANGUAGE
• COUNTRY
• AUTO STORE
• MANUAL STORE
- SORT
• NAME

③ If the transmitter or the cable network broadcasts the automatic sort signal, the programmes will be correctly numbered.
4 If not, the programmes found will be numbered in descending order starting at 99, 98, 97, etc.
Use the SORT menu to renumber them.
Some transmitters or cable networks broadcast their own sort parameters (region, language, etc.)
Where this is the case, make your choice using the ⬆ keys and confirm with >.
To exit or interrupt the search, press the Ⓜ key. If no picture is found, refer to the chapter entitled Tips on p. 12.
⑤ To exit from the menus, press 📊.
4 Select the programme you wish to name using the keys 0 9 or - P +.
Note: at the time of installation, the programmes are automatically named when the identification signal is transmitted.
⑤ Use the keys ◀◀▶ to move within the name display area (5 characters).
⑥ Use keys ⬆ to choose the characters.
7 Press Ⓜ when the name has been entered. The programme name is stored.
⑧ Repeat steps ④ to ⑦ for each programme to be named.
⑨ To exit from the menus, press ⓘ+
Manual tuning
This menu allows you to store the programmes one by one.
① Press MENU.
② Select INSTALL (☑), then press >. The INSTALL menu appears.
3 Select MANUAL STORE ( √ ) then press >. The menu appears :
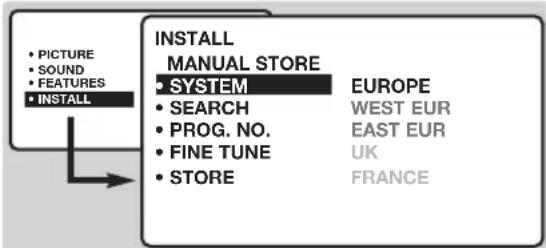
4 Press ⬤ to go to the SYSTEM menu. Use ⬇ to choose EUROPE (automatic detection*) or manual detection with WEST EUR (standard BG reception), EAST EUR (standard DK reception), UK (standard I reception) or FRANCE (standard LL'). Then press ⬾ to exit from the menu.
* Except for France (standard LL'): select the option FRANCE.
5 Select SEARCH and press >.
The search begins. As soon as a programme is found, the search will stop. If you know the frequency of the programme required, enter its number directly using the ① ⑨ keys and go to step ⑦.
If no programme is found, refer to the Tips chapter on page 12).
6 If reception is un-satisfactory, select FINE TUNE and hold down ◀ or ▶ key.
⑦ Select PROG. NO (programme number) and use the ◀ > or ① to ⑨ keys to enter the desired number.
⑧ Select STORE and press ⬤. The message STORED appears. The programme is stored.
⑨ Repeat steps ⑤ to ⑧ for each programme to be stored.
To exit: press the ⓘ+ key.
Using the radio
Choosing radio mode
Press the 🔒 key on the remote control to switch the TV to radio mode.
In radio mode the number and name of the station (if available), its frequency and the sound mode are indicated on the screen.
To enter the name of the stations use the NAME menu. (p. 7)
Selecting programmes
Use the ①⑨ or ② P ④ keys to select the FM stations (from 1 to 40).
List of radio stations
Press the ☐ key to display / hide the list of radio stations. Then use the cursor to select a station.
Using the radio menus
Use the Ⓜ key to access the specific radio settings.
Searching radio stations
If you have used the quick installation all the available FM stations will be stored. To start a new search use the INSTALL menu:
AUTO STORE (for a complete search) or MANUAL STORE (for a station by station search).
The SORT and NAME menus let you classify or name the radio stations. These menus work in exactly the same way as the TV menus.
Screen saver
In the FEATURES menu you can activate / close the screen saver. The time, the frequency of the station and its name (if available) move across the screen.
Adjusting the picture
① Press Ⓜ then >.
The PICTURE menu appears :
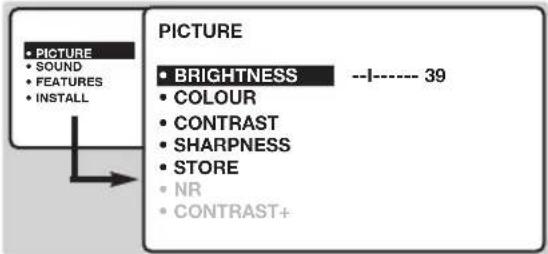
② Use ⬆ keys to select a setting and ◀ keys to adjust.
Note: the menu is a scroll-down menu. Keep the key ▼ held down to access the settings hidden at the bottom of the screen.
③ Once the necessary adjustments have been made, select the option STORE and press ➤ to store them.
④ To exit from the menus, press ⓘ.
Description of the settings:
• BRIGHTNESS: alters the brightness of the image.
• COLOUR: alters the colour intensity.
• CONTRAST: alters the variation between light and dark tones.
• SHARPNESS: alters the crispness of the image.
- STORE: stores the picture settings.
- NR: attenuates picture noise (snow) in difficult reception conditions.
- CONTRAST + :To activate / de-activate the automatic contrast adjustment system (the dark areas are made darker whilst maintaining the detail).
Adjusting the sound
① Press Ⓜ, select the SOUND option (√) and press >. The SOUND menu appears :
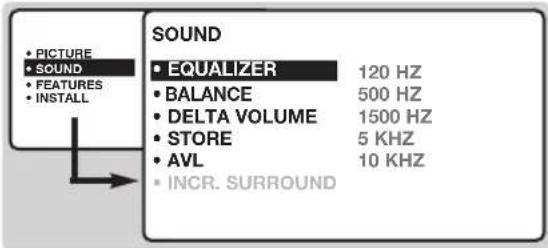
② Use ⬆ keys to select a setting and keys ⏻ to adjust.
③ Once the necessary adjustments have been made, select the option STORE and press > to store them.
④ To exit from the menus, press 📊.
Description of the settings:
- EQUALIZER: to adjust the sound tone (from bass: 120 Hz to treble: 10 kHz).
• BALANCE: to balance the sound between the left and right speakers.
- DELTAVOLUME(volume difference): allows you to compensate for the volume differences between the different programmes or the EXT sockets. This setting is available for programmes 1 - 40 and the EXT sockets. Use the ⏻ P ⭕ keys to compare the level of different programmes.
- STORE: stores the sound settings.
- AVL: automatic volume control used to avoid sudden increases in volume, particularly when changing programmes or during advertisements.
- INCR. SURROUND: To activate / deactivate the surround sound effect. In stereo, this gives the impression that the speakers are further apart. In mono, a stereo spatial effect is simulated.
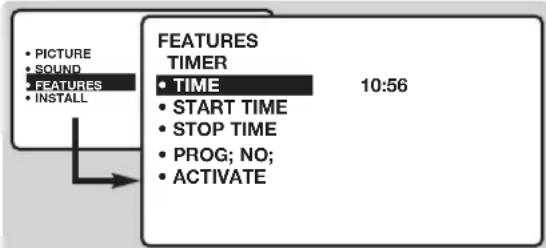
Feature settings
① Press Ⓜ, select FEATURES (√) and press >. You can adjust:
2 TIMER, PARENTAL. CONT. and CHILD LOCK : see next page
③ MODE SELECT.: to switch the TV in radio or TV.
④ To quit the menus, press ⓘ+
Timer function
This menu allows you to use your TV as an alarm clock.
① Press MENU
② Select FEATURES (☑) and press > twice.
The TIMER menu appears :
flowchart
graph TD
    A["FEATURES TIMER"] --> B["10:56"]
    C["PICTURE"] --> A
    D["SOUND"] --> A
    E["FEATURES"] --> A
    F["INSTALL"] --> A
    G["START TIME"] --> A
    H["STOP TIME"] --> A
    I["PROG; NO; ACTIVATE"] --> A
③ Press ⬤ to enter and exit the sub-menus and use keys ⬇ to adjust:
4 TIME: enter current time.
Note: the time is updated automatically each time the set is switched on using teletext information taken from programme 1. If programme 1 does not have teletext, the update will not take place.
5 START TIME enter the start time.
6 STOP TIME: enter the stop time.
7 PROG. NO; enter the number of the programme for the wake-up alarm. For models equipped with a radio, you can select an FM station by using the <> keys (the 0⑨ keys are only used to select TV programs).
8 ACTIVATE: y ou can set the alarm to be activated:
- ONCE ONLY for a one-off alarm,
• DAILY for a daily alarm or - OFF to cancel.
9 Press ⏻ to set the TV to standby. It will automatically switch on at the time programmed. If you leave the TV switched on, it will only change programme at the time indicated.
The combination of the CHILD LOCK and TIMER functions may be used to limit the length of time your television is in use, for example, by your children.
Locking the set
You can bar access to certain programmes or completely lock the set by locking the keys.
Locking programmes
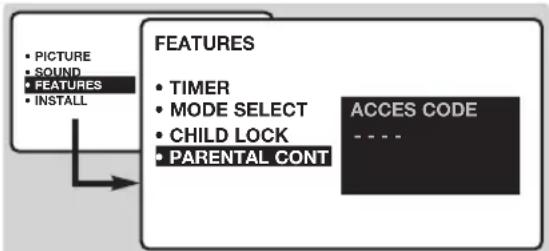
① Press MENU.
flowchart
graph TD
    A["• PICTURE\n• SOUND\n• FEATURES\n• INSTALL"] --> B["FEATURES"]
    B --> C["• TIMER\n• MODE SELECT\n• CHILD LOCK\n• PARENTAL CONT"]
    C --> D["ACCES CODE\n----"]
② Select ( √) and press >.
③ Select PARENTAL. CONT. (☑) and press >.
④ Enter your confidential access code. The first time, enter the code 0711 then confirm by re-entering 0711. The menu appears.
5 Press ➤ to go into the menu.
6 Use keys ⬆ to select the required programme and confirm with >.The symbol 🔒 is displayed alongside the programmes or sockets that have been locked.
⑦ Press ⓘ to exit.
To watch a programme which has been locked you will now need to enter the confidential
code; otherwise the screen will remain blank. The INSTALL menu access is also locked.
Caution: in the case of encrypted programmes which use an external decoder, it is necessary to lock the corresponding EXT socket.
To unlock all programmes
Repeat stages ① to ④ above, then select CLEAR ALL and press >.
To change the confidential code
Repeat stages ① to ④ above, then:
⑤ Select CHANGE CODE and enter your own 4-digit number.
6 Confirm by entering it again.
Your new code will be stored.
⑦ Press Ⓗ to exit from the menus.
If you have forgotten your confidential code, enter the universal code 0711 twice.
Locking the keys
① Press Ⓜ, select FEATURES (▽) and press ▶.
② Select CHILD LOCK (☑) and press > to set the lock to ON.
③ Switch off the set and put the remote control out of sight. The set cannot be used (it can only be switched on using the remote control).
④ To cancel: switch CHILD LOCK to OFF.
Teletext
Teletext is an information system broadcast by certain channels which can be consulted like a newspaper. It also offers access to subtitles for viewers with hearing problems or who are not familiar with the transmission language (cable networks, satellite channels, etc.).
| Press : | You will obtain: | |
| Teletext on/off | This is used to call teletext, change to transparent mode and then exit. The summary appears with a list of items that can be accessed. Each item has a corresponding 3 digit page number. If the channel selected does not broadcast teletext, the indication 100 will be displayed and the screen will remain blank (in this case, exit teletext and select another channel). | |
| Selecting a page | Enter the number of the page required using the 0 to 9 or -P + keys. Example: page 120, enter 1 2 0. The number is displayed top left, the counter turns and then the page is displayed. Repeat this operation to view another page. If the counter continues to search, this means that the page is not transmitted. Select another number. | |
| Direct access to the items | Coloured areas are displayed at the bottom of the screen. The 4 coloured keys are used to access the items or corresponding pages. The coloured areas flash when the item or the page is not yet available. | |
| Contents | This returns you to the contents page (usually page 100). | |
| Enlarge a page | This allows you to display the top or bottom part of the page and then return to normal size. | |
| Stop sub-page acquisition | Certain pages contain sub-pages which are automatically displayed successively. This key is used to stop or resume sub-page acquisition. The indication appears top left. | |
| Hidden information | To display or hide the concealed information (games solutions). | |
| Favourite pages | Instead of the standard coloured areas displayed at the bottom of the screen, you can store 4 favourite pages on the first 40 channels which can then be accessed using the coloured keys (red, green, yellow, blue). Once set, these favourite pages will become the default every time tetetext is selected.1 Press the MENU key to change to favourite pages mode.2 Display the teletext page that you want to store.3 Press then the coloured key of your choice. The page is stored.4 Repeat steps 2 and 3 for the other coloured keys.5 Now when you consult teletext, your favourite pages will appear in colour at the bottom of the screen. To temporarily retrieve the standard items, press MENU. To clear everything, and return the standard items as the default, press for 5 seconds. | |
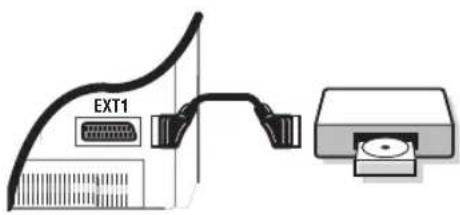
Connecting peripheral equipment
The EXT1 socket has audio, CVBS/RGB inputs and audio, CVBS outputs.
Video recorder

Video recorder (or DVD recorder)
Carry out the connections shown opposite, using a good quality euroconnector cable.
If your video recorder does not have a euroconnector socket, the only connection possible is via the aerial cable. You will therefore need to tune in your video recorder's test signal and assign it programme number 0 (refer to manual store, p. 7).
To reproduce the video recorder picture, press Ⓞ.
Video recorder with decoder
Connect the decoder to the second euroconnector socket of the video recorder. You will then be able to record scrambled transmissions.
Other equipment
Satellite receiver, decoder, DVD, games, etc.
Make the connections as shown opposite.
Side connections
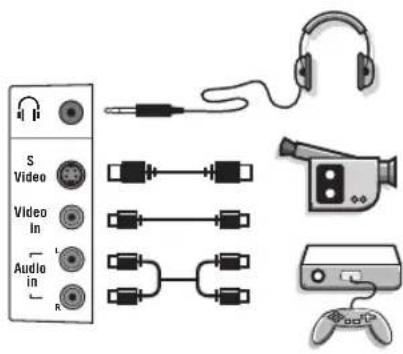
Make the connections as shown opposite. With the ⏻ key, select EXT2 or S-VHS2 (S-VHS signals from the EXT2 socket).
For a monophonic device, connect the audio signal to the AUDIO L input. The sound automatically comes out of the left and right speakers of the set.
Headphones
When headphones are connected, the sound on the TV set will be cut. The ⏻ P ╗ keys are used to adjust the volume level.
The headphone impedance must be between 32 and 600 Ohms.
To select connected equipment
Press the ⬤ key to select EXT1 and EXT2 and S-VHS2 (S-VHS signals from the EXT2 socket).
Most equipment (decoder, video recorder) carries out the switching itself.
Tips
| Poor reception | The proximity of mountains or high buildings may be responsible for ghost pictures, echoing or shadows. In this case, try manually adjusting your picture: see "fine tuning" (p.7) or modify the orientation of the outside aerial. Does your antenna enable you to receive broadcasts in this frequency range (UHF or VHF band)? |
| No picture | Have you connected the aerial socket properly? Have you chosen the right system? (p. 7). Poorly connected euroconnector cables or aerial sockets are often the cause of picture or sound problems (sometimes the connectors can become half disconnected if the TV set is moved or turned). Check all connections. |
| Peripheral equipment gives a black and white picture | To play a video cassette, check that it has been recorded under the same standard (PAL, SECAM, NTSC) which can be replayed by the video recorder. |
| No sound | If on certain channels you receive a picture but no sound,this means that you do not have the correct TV system. Modify the SYSTEM setting (p. 7).The amplifier connected to the TV does not deliver any sound? Check that you have not confused the audio output with the audio input. |
| Remote control | The TV set does not react to the remote control; the indicator on the set no longer flashes when you use the remote control? Replace the batteries. |
| Standby | When you switch the TV set on it remains in standby mode and the indication LOCKED is displayed when you use the keys on the TV set?The CHILD LOCK function is switched on (p. 9).If the set receives no signal for 15 mins, it automatically goes into standby mode.To save power, your set is fitted with components that give it a very low power consumption when in standby mode (less than 1 W). |
| Cleaning the set | Only use a clean, soft and lint-free cloth to clean the screen and the casing of your set. Do not use alcohol-based or solvent-based products. |
| Recycling | The materials used in your set are either reusable or can be recycled.To minimise environmental waste, specialist companies collect used appliances and dismantle them after retrieving any materials that can be used again (ask your dealer for further details). |
| Still no results? | Disconnect the mains plug of the TV for 30 seconds then reconnect it.If your TV set breaks down, never attempt to repair it yourself: contact your dealer's after-sales service. |
Indledning
natural_image
3D illustration of a remote control device with two batteries and a partially open lid (no text or symbols)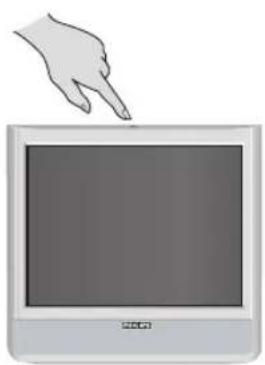
natural_image
Illustration of a hand pointing at a blank screen (no text or symbols)Tastene på TV-apparatet:
Dubbel text-TV-sida
Ligações laterais
Tomada SCART EXT1
Pé inclinável
- Videorecorder (of DVD recorder)
- Table of Contents
- Installation
- Operation
- Peripherals
- Cleaning the set
- Presentation of the LCD Television
- Television keys:
- Rear of set :
- Remote control keys
- Installing your television set
- ① Positioning the television set
- ② Connecting the aerials
- ③ Power supply connections
- ④ Remote control
- ⑤ Switching on
- Quick installation
- Sorting programmes
- Choosing a language and country
- Automatic tuning
- INSTALL
- Programme name
- Manual tuning
- Using the radio
- Choosing radio mode
- Selecting programmes
- List of radio stations
- Using the radio menus
- Searching radio stations
- Screen saver
- Adjusting the picture
- Description of the settings:
- Adjusting the sound
- Feature settings
- Timer function
- Locking the set
- Locking programmes
- To unlock all programmes
- To change the confidential code
- Locking the keys
- Teletext
- Connecting peripheral equipment
- Video recorder (or DVD recorder)
- Video recorder with decoder
- Headphones
- To select connected equipment
- Tips
- Indledning
- Tastene på TV-apparatet:
- Pé inclinável
Brand : PHILIPS
Model : 20HF7835
Category : Television