TwinTank Steam Mop - Steam cleaner HOOVER - Free user manual and instructions
Find the device manual for free TwinTank Steam Mop HOOVER in PDF.

| Product Type | Steam Cleaner |
| Brand | Hoover |
| Model | TwinTank Steam Mop |
| Model Number | WH20200 |
| Power Supply | 120 V ~ 60 Hz, 12 A |
| Heat-up Time | Approximately 30 seconds |
| Clean Water Tank | Front of mop, removable |
| Cleaning Solution Tank | Back of mop, removable |
| Main Functions | Steam cleaning, carpet freshening, hard surface disinfection |
| Included Accessories | 2 multi-surface microfiber pads, 1 hard floor microfiber pad, 1 carpet glider, 1 hard water filter, 1 cooling base, 2 SteamPlus solutions (8 oz) |
| Compatible Floor Types | Tile, linoleum, sealed wood, laminate, vinyl, sealed ceramic |
| Pad Care | Machine wash warm, no bleach or fabric softener, dry flat |
| Water Filter Replacement | About every 18 months, part no. 440001633 |
| Warranty | 2-year limited (household use) |
| Safety | Auto shut-off in case of overheating, polarized plug |
Frequently Asked Questions - TwinTank Steam Mop HOOVER
User questions about TwinTank Steam Mop HOOVER
0 question about this device. Answer the ones you know or ask your own.
Ask a new question about this device
Download the instructions for your Steam cleaner in PDF format for free! Find your manual TwinTank Steam Mop - HOOVER and take your electronic device back in hand. On this page are published all the documents necessary for the use of your device. TwinTank Steam Mop by HOOVER.
USER MANUAL TwinTank Steam Mop HOOVER
Questions or concerns? For assistance, please call Customer Service at 1-800-944-9200 Mon-Fri 8am-7pm EST. PLEASE DO NOT RETURN THIS PRODUCT TO THE STORE.
THIS PRODUCT IS INTENDED FOR HOUSEHOLD USE ONLY. IF USED COMMERCIAALLY WARRANTY IS VOID.
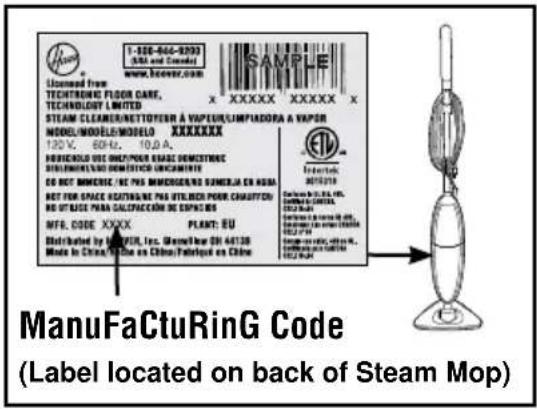
Please enter the complete model and Manufacturing Code in the spaces provided.
MODEL
MFG.CODE
Tip: Attach your sales receipt to this owner's manual. Verification of date of purchase may be required for warranty service of your HOOVER® product.
Be sure to register your product online at Hoover.com or call 1-800-944-9200 to register by phone. Visit hoover.com for additional video instructions for assembly and maintenance.
Contents
Important Safety Instructions. 3
Product Assembly 5
Carton Contents 5
Attach Handle 5
Cord Storage 5
How To Use 6
Steam Cleaner Description 6
Before You Begin Cleaning 6
Filling Water Tank 6
Attaching the Microfiber Pad 7
Filling Solution Tank 7
Steam Cleaning Hard Floors 8
Refreshing Carpet 9
After Steam Cleaner Use / Using Cooling Tray 9
Maintenance. 10
Water Tank. 10
Microfiber Pad 10
Water Filter 10
Storage 11
Troubleshooting 11
Clearing Blockages 12
Service 12
Warranty 13
If you need assistance:
If your product needs servicing within the warranty period, please contact Customer Service at 1-800-944-9200; Mon-Fri 8am-7pm EST. Always identify your steam cleaner by the complete model number when requesting information or ordering parts. (The model number of the steam cleaner is located on the data plate)
PLEASE DO NOT RETURN THIS STEAM CLEANER TO THE STORE.
IMPORTANT SAFETY INSTRUCTIONS SAVE THESE INSTRUCTIONS
When using an electrical steam cleaner, basic precautions should always be followed, including the following:
READ ALL INSTRUCTIONS BEFORE USING THIS STEAM CLEANER.
WARNING: TO REDUCE THE RISK OF FIRE, ELECTRIC SHOCK OR INJURY:
- Fully assemble before operating.
- Operate steam cleaner only at voltage specified on data label on back of steam cleaner.
- Do not leave steam cleaner when plugged in. Unplug from outlet when not in use and before cleaning or servicing.
- Do not use or store outdoors.
- Do not use for space heating purposes.
- Do not immerse in water.
- Do not allow to be used as a toy. Not intended for use by children age 12 and under. Close supervision is necessary when used near children. To avoid injury, burn, or damage, keep children away from product, and do not allow children to touch steam cleaner while in use or before completely cool, or to place fingers or other objects into any openings.
- Do not use any extension cord with this product.
- Do not handle the plug, or the Steam Mop with wet hands. Do not operate the Steam Mop without footwear.
- Do not place hands or feet under the Steam Mop while it is in operation as the steam cleaner gets very hot and may create a burn hazard.
- Use only on flat, horizontal surfaces. Do not use the Steam Mop on walls, counter tops or windows.
- To protect against a risk of electric shock, do not immerse the Steam Mop into water or any other liquids.
- Use only as described in this manual. Use only manufacturer's recommended attachments and products.
- Do not use with damaged cord or plug. If appliance is not working as it should, has been dropped, damaged, left outdoors, or dropped into water, call Customer Service at 1-800-944-9200 for instructions before continuing use.
- Do not pull or carry by cord, use cord as a handle, close a door on cord, or pull cord around sharp edges or corners. Do not place product on cord. Do not run steam cleaner over cord. Keep cord away from heated surfaces.
- Do not unplug by pulling on cord. To unplug, grasp the plug, not the cord.
- Do not handle plug or steam cleaner with wet hands.
- Do not put any object into openings. Do not use with any opening blocked.
- Keep hair, loose clothing, fingers, and all parts of body away from openings.
- Turn off all controls before unplugging.
- Use extra care when cleaning on stairs. When not in use do not place steam cleaner on stairs or furniture, as it may result in injury or damage.
-
To avoid burn or injury, do not apply steam directly to any person or animal.
-
Only use water to refill the water tank. Do not use any type of chemicals or additives in the water tank.
- Do not add descaling, aromatic, alcoholic products, cleaning solutions, scented perfumes, oils or any other chemicals to the water used in this steam cleaner as this may damage the steam cleaner or make it unsafe for use. While this Steam Mop is designed for tap water, to increase effectiveness of the steam and to avoid build up of minerals, you may use distilled water to fill Steam Mop.
- Do not use Steam Mop in an enclosed space filled with vapor given off by oil-based paint, paint thinners, some moth proofing substances, flammable dust, or other explosive or toxic vapors.
- When in use, never turn the steam cleaner over or use while on its side.
- Allow Steam Mop sufficient time to cool prior to removing the microfiber pad.
- Before cleaning the Steam Mop, unplug the power cord from the electrical outlet and clean with a dry or damp cloth. Do not pour water or use alcohol, benzene or paint thinner on the steam cleaner.
- Do not use in areas where flammable or combustible liquids, such as gasoline may be present.
- Do not use without microfiber pad properly attached to mophead.
- Do not clean over floor electrical outlets.
- Do not use the Steam Mop on leather, wax polished furniture or floors, synthetic fabrics, velvet or other delicate, steam sensitive materials.
- Use only with Hoover® SteamPlus™ Cleaning Solution.
- Do not operate Steam Mop without water in water tank.
WARNING: This product contains chemicals known to the State of California to cause cancer, birth defects or reproductive harm. WASH HANDS AFTER HANDLING.
CAUTION: TO REDUCE THE RISK OF DAMAGE:
- Store appropriately indoors in a dry place. Do not expose machine to freezing temperatures.
- Never use Steam Mop without microfiber pad attached.
- Never leave Steam Mop in one spot or on any surface for any period of time when pump is turned on and steam is activated.
WARNING:
- To reduce the risk of electric shock, this appliance has a polarized plug (one blade is wider than the other). This plug will fit in a polarized outlet only one way. If the plug does not fit fully in the outlet, reverse the plug. If it still does not fit, contact a qualified electrician to install the proper outlet. Do not change the plug in any way.
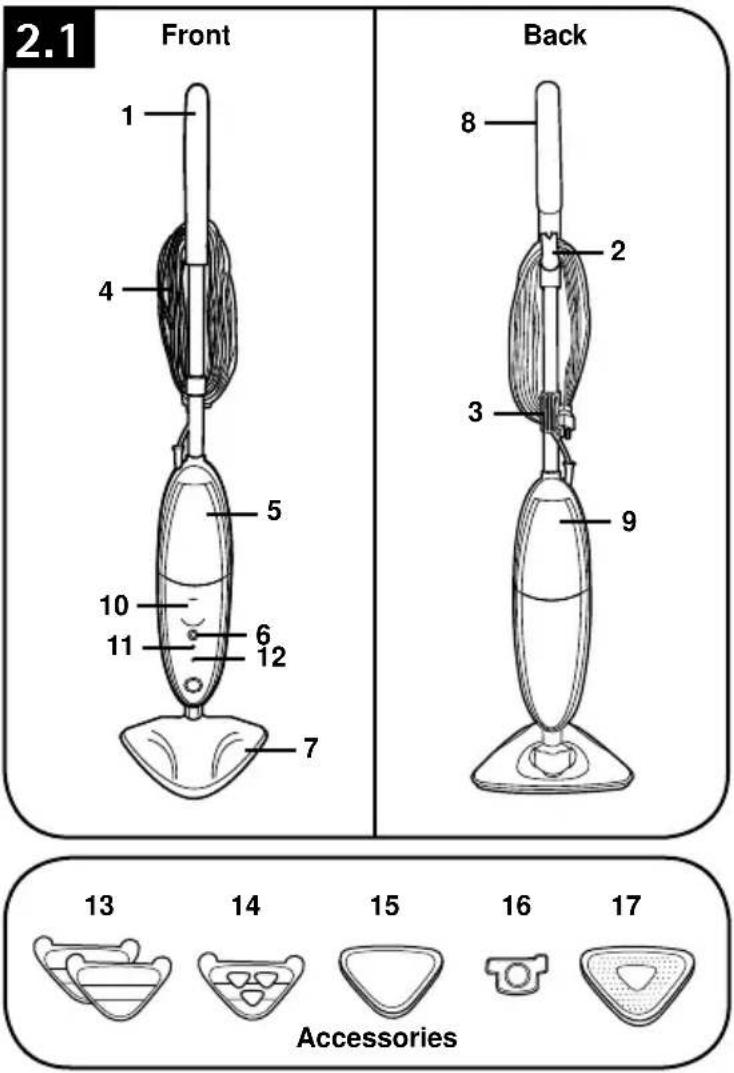
1. steamCleaner assembly
CaRton Contents
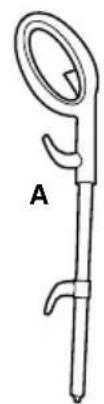
A. Handle
B. Steam Mop Body (Water
Tank and Solution Tank attached)
C. Multi-Surface Microfiber Pad (x2)
D. Hard Floor Microfiber Pad
E. Carpet Glider
F. Water Filter (Pre-assembled in steam cleaner, remove water tank to expose filter)
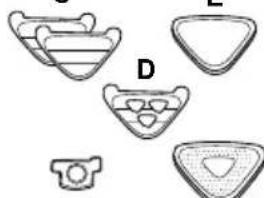
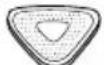
G. Cooling Tray
H. 8 oz 2X Hoover® SteamPlus™ Cleaning Solution
Remove all parts from carton and identify each item shown.
Make sure all parts are located before disposing of packing materials.
1.1
B
C
F
E
12 =
G
H
attaCh handle
Insert handle into main body (1.2).
Press firmly until you hear a click sound.

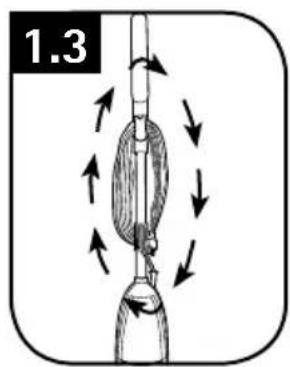
CoRd stoRaGe
Wrap cord around cord hooks for convenient storage (1.3). Attach the plug end to cord.
2. how to use
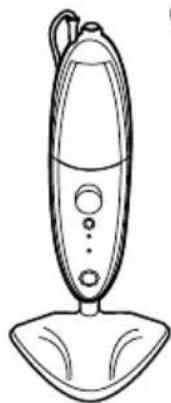
steamCleaner desCRiPtion
- Handle
- Upper Cord Hook (Rotating Quick Release Cord Hook)
- Lower Cord Hook (Fixed Cord Hook)
- Power Cord
- Water Tank
- Power Button
- Mop Head
- Steam Trigger
- Solution Tank
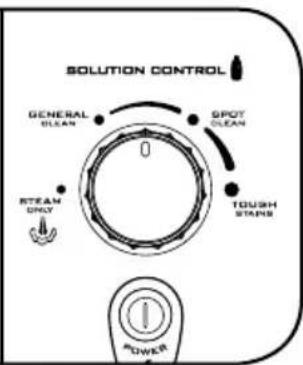
- Solution Control Dial
- Power Indicator Light Blue Light = Steam cleaner On
- Steam Ready Indicator Light Green Light = Steam Ready No Light = Steam NOT Ready
Accessories
- Multi-Surface Microfiber Pad (2)
- Hard Floor Microfiber Pad
- Carpet Glider
- Water Filter (Pre-assembled in steam cleaner, remove front tank to expose filter)
- Cooling Tray
TECHNICAL SPECIFICATION
Model Number: WH20200
Input Power: AC 120V / 60Hz / 12A
beFoRe you beGin CleaningG FillinG waterR tanK
WARNING
To reduce the risk of personal injury - Unplug the steam cleaner when assembling the steam cleaner.
Do not use hot or boiling water to fill water tank.
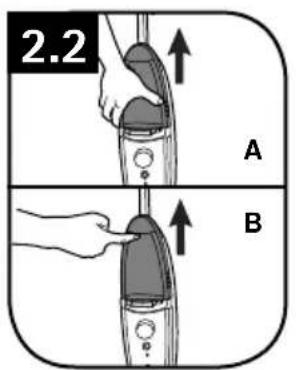
-Locate the water tank on the FRONT of the Steam Mop and use the side grips (2.2,A) or lip (2.2,B) on tank and remove.
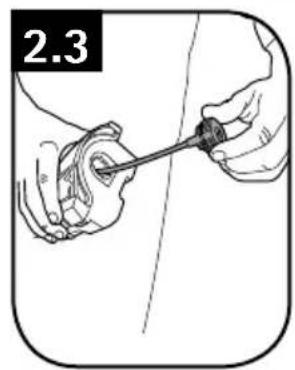
Twist the cap counter clockwise to remove (2.3).
Hold water tank under sink faucet and fill with water until full. Replace the water cap and twist clockwise until tightly secure.
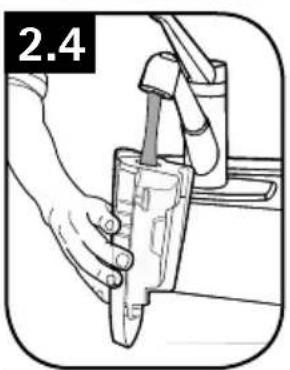
■Ensure Water Filter is in place (see 3.5).
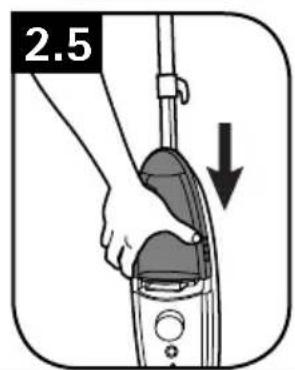
■Slide the water tank down and snap into place (2.5).
NOTE: When the tank is turned upright it may allow a few drops to drip from cap. This is normal.
- IMPORTANT
DO NOT ADD SOLUTION TO WATER TANK.
attaChinG the MiCRoFiberR Pads
WARNING
To reduce the risk of personal injury - Unplug the steam cleaner when assembling the accessories.
- IMPORTANT
Never use the Steam Mop without the Microfiber Pad correctly attached to the Mop Head.
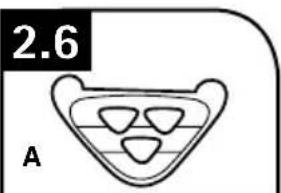
The "Hard Floor Microfiber Pad" (2.6, A) is used specifically for sealed hard floor surfaces, the pad cannot be used on carpets. The "Multi-Surface Microfiber Pad" (2.6, B) can be used on all sealed hard floor surfaces as well as carpet. When using on carpet the carpet glider attachment should be utilized as directed in the "Refreshing Carpet" section of this manual.

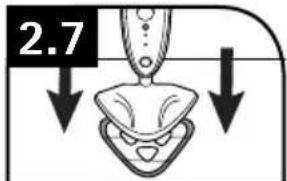
To attach, place the Microfiber Pad on the floor, white side up.
Place the product on top of the pad (2.7) making sure the Mop Head covers the entire pad. Hook and loop feature on the bottom of the mop will hold the pad in place.
FillinG solution tanK
(When using with HooverSteamPlus™ Cleaning Solution)
WARNING
To reduce the risk of personal injury - Unplug the steam cleaner when filling the steam cleaner.
- IMPORTANT
DO NOT MIX HOOVER ® STEAMPLUS™ CLEANING SOLUTION WITH ANY OTHER CLEANING SOLUTION.
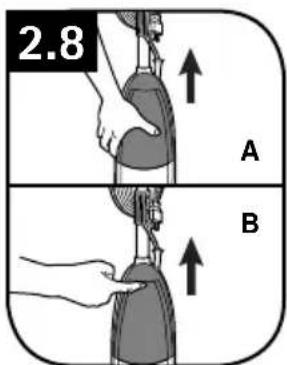
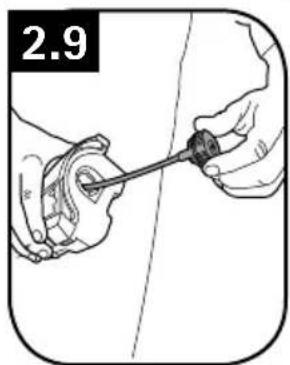
- Locate the Solution Tank on the BACK of the Steam Mop and use the side grips (2.8,A) or lip (2.8,B) on Solution Tank and remove.
Twist the cap counter-clockwise to remove (2.9).
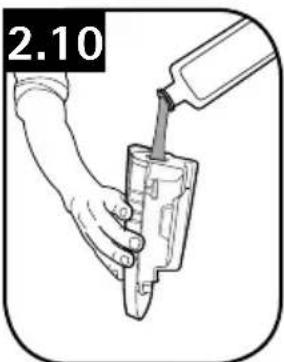
■Fill the solution tank with Hoover SteamPlus™ Cleaning Solution. FOR OPTIMAL CLEANING RESULTS, add the solution directly into the solution tank of your Hoover® steam cleaner. FOR REGULAR STRENGTH, add equal parts warm tap water (not boiled) and cleaning solution to solution tank, based on tank capacity of your specific appliance. Replace cap.
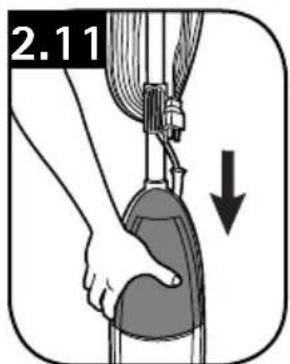
- Slide the Solution Tank down and snap into place (2.11).
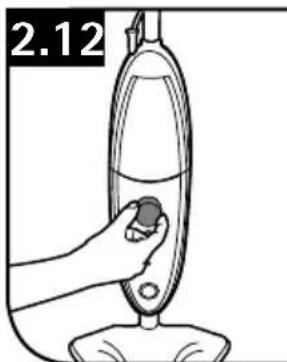
You can now clean on demand by turning the Solution Control dial (2.12) to the desired setting, which will automatically dispense the solution when pressing the Steam Trigger. Turn to the "STEAM ONLY" position if no Hoover ® SteamPlus™ Cleaning Solution is desired. See "Using the Solution Control Dial and Adjusting the Solution" for further instruction.
WARNING
Only use recommended Hoover SteamPlus™ Cleaning Solution.
USING THE SOLUTION CONTROL DIAL AND ADJUSTING THE SOLUTION
The Solution Control Dial controls the amount of cleaning solution that is added to the steam. It does not adjust the amount of steam, only the cleaning solution.
If you wish to clean with steam alone, simply turn the Solution Control Dial to "STEAM ONLY". Now every time you press the Steam Trigger, you will release steam alone.
If you wish to clean using cleaning solution, simply turn the Solution Control Dial to the desired setting. Now when pressing the Steam Trigger, the steam mop will release the amount of cleaning solution that is indicated on the Solution Control Dial as well as a steady flow of steam.
STEAM CLEANING HARD FLOORS
WARNING
Never leave the Steam Mop in one spot on any surface for an extended period of time with a damp or wet Microfiber pad attached as this may damage the floor surface.
When cleaning hard floors, your Steam Mop should only be used on tiles, linoleum, sealed hardwood flooring, engineered hardwood, laminate, vinyl, and sealed stone floors. If used on waxed flooring, you may experience loss of glossiness.
To reduce the risk of personal injury, unplug the steam cleaner when assembling the accessories.
Do not clean over floor electrical outlets.
Do not use steam cleaner or press the Steam Trigger without water in the water tank.
·IMPORTANT·
Never use the Steam Mop without the Microfiber pad properly attached to the Mop Head.
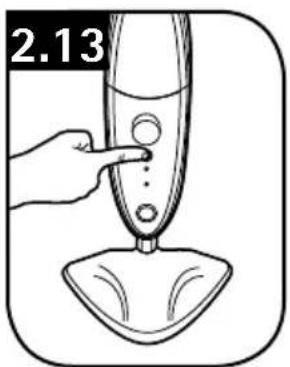
- Attach Microfiber pad. Plug in and press the power button on the steam cleaner (2.13).
The steam cleaner will take roughly 30 seconds to be ready to produce steam. Once steam is ready to be produced, the green "steam ready" indicator will illuminate.
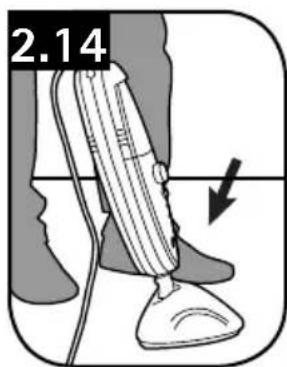
To recline the steam cleaner place foot on Mop Head and gently pull handle backwards (2.14).
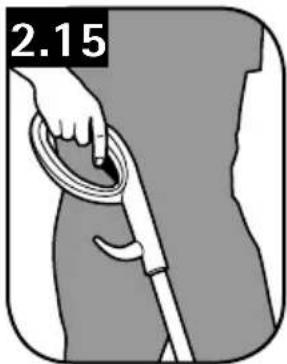
To produce steam squeeze the Steam Trigger (2.15).
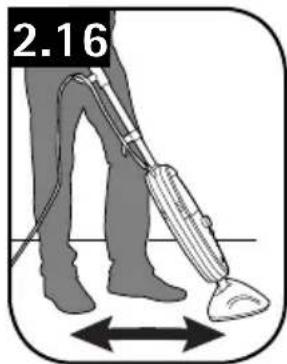
■Move the Steam Mop slowly backwards and forwards across the floor (2.16) paying particular attention to high traffic areas.
To Disinfect Hard Surfaces
■Use steam alone. Do not use cleaning solution. Turn Solution Control Dial to "STEAM ONLY".
Connect the hard floor Microfiber Pad (see 2.6, A) and run a minimum of 4 strokes at a medium pace (5-7 seconds per 32^ stroke) across same area. Allow to air dry.
ReFReshinG CaRPet
WARNING
Do not clean over floor electrical outlets.
Do not use steam cleaner or press the Steam Trigger without water in the water tank.
- IMPORTANT
When using on carpets, always ensure the multi-surface Microfiber Pad is properly attached to the Mop Head.
■Use steam alone. Do not use cleaning solution. Turn Solution Control dial to "STEAM ONLY".
The steam cleaner will take roughly 30 seconds to be ready to produce steam. Once steam is ready to be produced, the green "steam ready" indicator will illuminate.
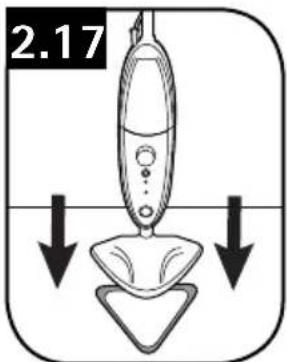
Place the steam cleaner into the Carpet Glider (2.17).
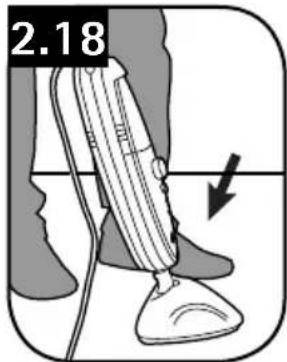
To recline the steam cleaner place foot on Mop Head and gently pull handle backwards (2.18).
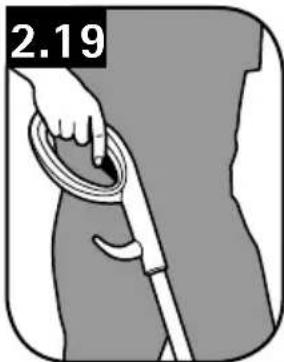
To produce steam squeeze the Steam Trigger (2.19).
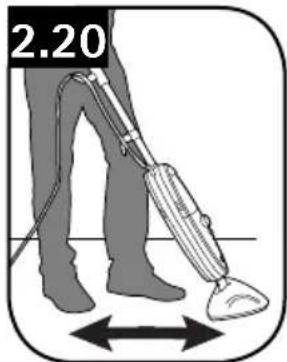
■Move the Steam Mop slowly backwards and forwards across the floor (2.20) paying particular attention to high traffic areas.
NOTICE: The Carpet Glider does not stay attached to the mop, it is designed in this way.
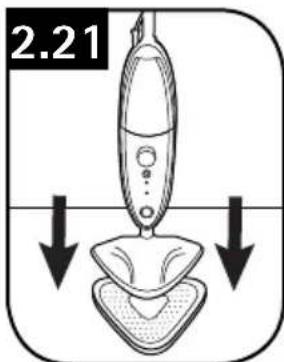
aFteR steam CleaneR use / using Cooling tRay
After using Steam Mop and to avoid damage to your floors, unplug and place Steam Mop in Cooling Tray (2.21) until product cools. Once steamer has cooled, remove Microfiber Pad and follow maintenance instructions on page 10 to avoid mold and mildew.
3. MAINTENANCE
Familiarize yourself with these home maintenance tasks as proper use and care of your Steam Mop will ensure continued cleaning effectiveness.
If steam cleaner is not working as it should, has been dropped, damaged, left outdoors, or dropped into water, call Customer Service at 1-800-944-9200 for further instruction before continuing use.
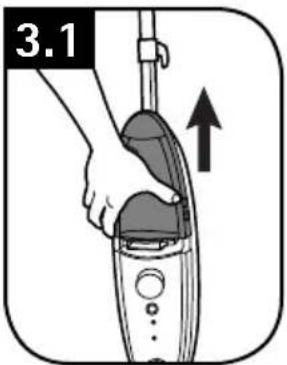
WATER TANK
·IMPORTANT·
Allow the steam cleaner to fully cool down before performing any maintenance or troubleshooting checks.
How to Empty
Remove the water tank located on the front side of Steam Mop (3.1).
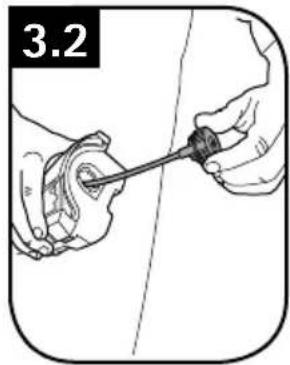
Twist the cap counter-clockwise to remove (3.2).
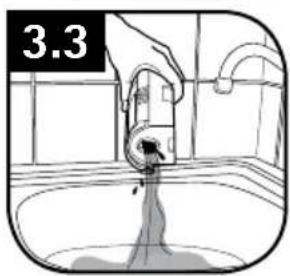
Empty any excess water into the sink, allow to air dry and replace water cap and return tank to the Steam Mop (3.3).
MICROFIBER PAD
- IMPORTANT
Allow the Steam Mop to fully cool down before performing any maintenance or troubleshooting checks.
How to Remove
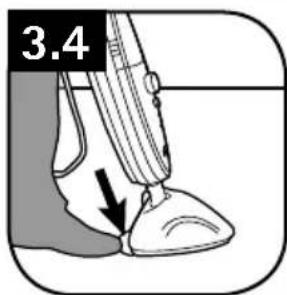
Step on exposed tab located on back of microfiber pad (3.4). Lift Steam Mop away from microfiber pad to remove.
How to Clean
- IMPORTANT
Never use bleach or fabric softener when washing the pad.
■Machine washable on "WARM" setting. Always use a detergent.
■For best care results, lay flat to dry.
WATER FILTER
When to Replace
·IMPORTANT·
The condition of the filter affects the performance of your machine.
Check and change filter (depending on level of use and water conditions in your area).
Do not operate Steam Mop without Water Filter in place.
3.5
What to Buy
Contact a HOOVER® customer service representative at 1-800-944-9200 for replacement details: Part #440001633 or visit www.hoover.com
Your machine is fitted with a Water Filter.
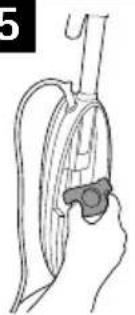
To locate Water Filter, remove water tank on FRONT of Steam Mop.
If you live in an area of hard water the filter will discolor/darken over time. Depending on water hardness and/or frequency of use the filter should be changed every 12 months (3.5).
4. stoRaGe
Unplug the power cord.
Place steam cleaner in Cooling Tray and allow to cool.
- Empty the residual water from the water tank and clean the external surface with a dry cloth. Allow to dry.
■ Re-install water tank, replace in Cooling Tray to prevent damage to floor and store in upright position. - You may leave solution in solution tank for short period of time, but if you are going to leave solution in tank for more than 2 weeks, it is recommended to empty the solution tank.
5. tRoubleshooting
USE TROUBLESHOOTING GUIDE AS A FIRST STEP TO RESOLVE ANY PROBLEMS YOU MAY BE EXPERIENCING.
If steam cleaner is not working as it should, has been dropped, damaged, left outdoors, or dropped into water, call Customer Service at 1-800-944-9200 for further instruction before continuing use.
| 警告M Possible Cause Possible solution | ||
| Steam Mop won't run | 1. Steam cleaner may not be plugged into the electrical outlet correctly. | 1. Ensure the plug is pushed in securely. |
| 2. The electrical outlet may not be working properly, check the fuse or breaker, or consult an electrician. | 2. Check fuse or breaker in home. Replace fuse/reset breaker in home. | |
| 3. The power cord may be damaged. 3. | If cord is damaged have it replaced by an authorized service representative. | |
| Steam mop not producing steam | 1. Water tank may be empty. 1. Please refer to the "Filling Water Tank" section - page 6. | |
| 2. The water tank may not be attached correctly. | 2. Please refer to the "Filling Water Tank" section - page 6, and ensure tank is fully seated. | |
| 3. Water Filter may be clogged and needs to be replaced. | 3. Check Water Filter and clean or replace. | |
| 4. Thermal protector may turn off pump if trying to operate steam cleaner before steam indicator is illuminated. | 4. Unplug steam cleaner and allow to cool down | |
| 5. Steam path may be blocked. | 5. Please refer to the "Clearing Blockages" section - page 12. | |
| Microfiber pad doesn't pick up dirt | 1. The cleaning pad may already be saturated with dirt and needs washing. | 1. Wash or replace with clean pad. Please refer to the "Microfiber Pad" section. |
CleaRinG bloCKaGes
There is a small opening towards the bottom of the trim that goes around the perimeter of the back of the steam cleaner. This opening is a steam exhaust vent (5.1), should the primary steam path become blocked. If steam starts to escape from this opening you should:
Turn the steam cleaner off, and unplug.
■Let it cool completely.
- Remove the Microfiber Pad and inspect the steam port on the bottom of the Mop Head for blockages. If a blockage can be seen, use a small thin object such as a paperclip to try to free the blockage (5.2).
If the steam path is still blocked, then remove the screw on the back of the tube (5.3, A) that runs down to the Mop Head.
Once the screw is removed, the Mop Head can be removed by pulling straight downward away from the main body of the steam cleaner.
After the Mop Head is removed, examine the small hole on the end of the tube extending from the steam cleaner. Using a thin object such as a paperclip, attempt to remove the blockage (5.3, B).
If the steam path is still blocked, call customer service as indicated below.

6. seRViCe
If you need further assistance:
If your product needs servicing within the warranty period, please contact Customer Service at 1-800-944-9200; Mon-Fri 8am-7pm EST. Always identify your steam cleaner by the complete model number when requesting information or ordering parts. (The model number of the steam cleaner is located on the data plate)
PLEASE DO NOT RETURN THIS STEAM CLEANER TO THE STORE.
Limited two year warranty
(Domestic Use)
WHAT THIS WARRANTY COVERS
When used and maintained in normal household use in accordance with the Owner's Manual, your HOOVER® appliance is warranted against original defects in material and workmanship for a full two years from date of purchase (the "Warranty Period"). During the Warranty Period, Hoover® will provide will provide replacement appliance or parts, at no cost to you, to correct any such defect in appliances purchased in the United States, U.S. Military Exchanges and Canada.
HOW TO MAKE A WARRANTY CLAIM
If this appliance is not as warranted, call 1-800-944-9200 OR visit Hoover online at www.hoover.com. For additional assistance or information concerning this Warranty, phone the Hoover Consumer Response Center, Phone 1-800-944-9200, Mon-Fri 8am-7pm EST.
WHAT THIS WARRANTY DOES NOT COVER
This Warranty does not cover: use of the appliance in a commercial operation (such as maid, janitorial and equipment rental services), pads, filter, improper maintenance of the appliance, damage due to misuse, acts of God, nature, vandalism or other acts beyond the control of Hoover, owner's acts or omissions, use outside the country in which the appliance was initially purchased and resales of the appliance by the original owner. This warranty does not cover pick up, delivery, transportation or house calls.
This warranty does not apply to appliances purchased outside the United States, including its territories and possessions, outside a U.S. Military Exchange and outside of Canada. This warranty does not cover appliances purchased from a party that is not an authorized retailer, dealer, or distributor of Hoovef® appliances.
OTHER IMPORTANT TERMS
This Warranty is not transferable and may not be assigned. This Warranty shall be governed and construed under the laws of the state of Ohio. The Warranty Period will not be extended by any replacement or repair performed under this Warranty.
THIS WARRANTY IS THE EXCLUSIVE WARRANTY AND REMEDY PROVIDED BY HOOVER. ALL OTHER WARRANTYES, EXPRESSED OR IMPLIED, INCLUDING WARRANTY OF MERCHANTABILITY OR FITNESS FOR PARTICULAR PURPOSE, ARE DISCLAIMED. IN NO EVENT WILL HOOVER BE LIABLE FOR ANY SPECIAL, INDIRECT, INCIDENTAL OR CONSEQUENTIAL DAMAGES OF ANY KIND OR NATURE TO OWNER OR ANY PARTY CLAIMING THROUGH OWNER, WHETHER BASED IN CONTRACT, NEGLIGENCE, TORT OR STRICT APPLIANCES LIABILITY OR ARISING FROM ANY CAUSE WHATSOEVER. Some states do not allow the exclusion of consequential damages, so the above exclusion may not apply to you. This warranty gives you specific rights; you may also have others that vary from state to state.
Manual del ProPietaRio
Remove the clean water tank located on the front side of Steam Mop (3.1).
NE PAS RETOURNER CE PRODUIT AU MAGASIN.
CONSIGNES DE SECURITE IMPORTANTES RANGER ET CONSERVER CES INSTRUCTIONS
NE PAS RETOURNER CE PRODUIT AU MAGASIN.