CDR7000U - Cd player/recorder ROADSTAR - Free user manual and instructions
Find the device manual for free CDR7000U ROADSTAR in PDF.
User questions about CDR7000U ROADSTAR
0 question about this device. Answer the ones you know or ask your own.
Ask a new question about this device
Download the instructions for your Cd player/recorder in PDF format for free! Find your manual CDR7000U - ROADSTAR and take your electronic device back in hand. On this page are published all the documents necessary for the use of your device. CDR7000U by ROADSTAR.
USER MANUAL CDR7000U ROADSTAR
The exclamation point within the triangle is a warning sign alerting the user of important instructions accompanying the product.
The lightening flash with arrowhead symbol within the triangle is a warning sign alerting the user of "dangerous voltage" inside the unit.
To reduce the risk of electric shock, do not remove the cover. No user serviceable parts inside the unit. Refer all servicing to qualified personnel.
This unit employs a laser. Only a qualified service person should remove the cover or attempt to service this device, due to possible eye injury.
Invisible laser radiation when the unit is opened or interlocks defeated. Avoid exposure to laser beam. Use of controls, adjustments or procedures other than those specified herein may result in hazardous radiation exposure.
This unit operates on 230V 50Hz . If the unit is not used for a long period of time, remove the plug from the AC mains.
This unit must not be exposed to moisture or rain.
The power switch in this unit is mounted on the secondary circuit and does not disconnect the whole unit from the mains in OFF position.
Ensure all connections are properly made before operating the unit.
This unit should be positioned so that it is properly ventilated. Avoid placing it, for example, close to curtains, on the carpet or in a built-in installation such as a bookcase.
Do not expose this unit to direct sunlight or heat radiating sources.
2
EnglishEn
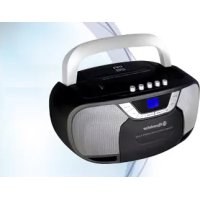
RCR-7000U
Portable stereo radio with front drawer CD Player and full function remote control.
INSTRUCTION MANUAL
Please read this instruction manual carefully and familiarize yourself with your new Radio Cassette before using it for the first time. Please retain this manual for future reference.
27
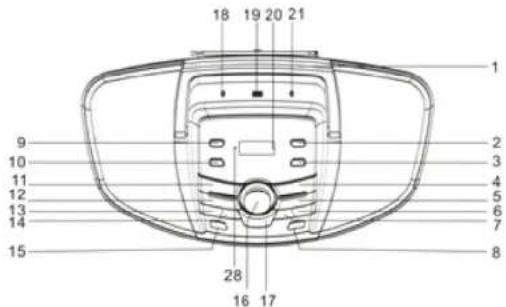
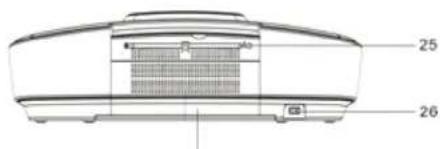
LOCATION OF CONTROLS
- HANDLE
- TIMER BUTTON
- SET/ID3 BUTTON
4 MO/ST./ BUTTON
5 CD PLAY/PAUSE BUTTON - CDSKIPUP/TUNING+BUTTON
- CD SKIP BACK / TUNING- BUTTON
- OPEN/CLOSE BUTTON
- SLEEP BUTTON
- MEMORY BUTTON
- EQ BUTTON
- FUNCTION BUTTON
- FOLD:10/M-BUTTON
- FOLD./10/M+ BUTTON
15.STANDBY BUTTON - VOLUME BUTTON
17.PROG./P-MODE BUTTON - PHONES JACK
- USB PORT
20.LCD DISPLAY
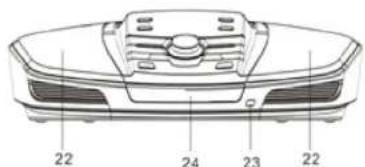
21.AUX IN JACK - SPEAKERS
- REMOTE SENSOR
- FRONT LOADING CD DOOR
- FM TELESCOPIC ANTENNA
- AC SOCKET
- BATTERY COMPARTMENT

3

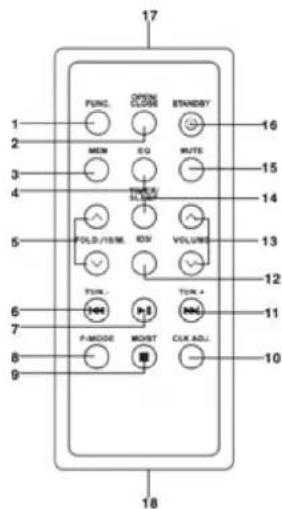
REMOTE CONTROL
- FUNCTION KEY
- OPEN/CLOSE KEY
- MEMORY KEY
- EQ KEY
- FOLD./10/M. UP/DOWN KEY
6.CDB-SKIPDOWN/TUN-KEY - CD PLAY/PAUSE KEY
8.P-MODE KEY - STOP/MO/ST. KEY
- CLK ADJ. KEY
11.CDF-SKIPUP/TUN. ^+ KEY - ID3 KEY
- VOLUME UP/DOWN KEY
- TIMER/SLEEP KEY
- MUTE KEY
16.STANDBY KEY - REMOTE SENSER
- BATTERY COMPARTMENT
Note: Please pull battery protector before using.
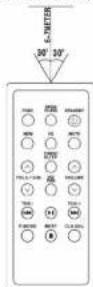
To operate the unit with the remote control, point the remote handset at the remote sensor on the front panel and press the a appropriate button on the remote handset. The remote works best within a range of 6 - 7 meters from the front panel and on an angle of 30 degrees. Bright sunlight or room light conditions can interfere with the remote control. If the remote operation is unsatisfactory or stops working entirely, first try replacing the remote batteries, then try reducing the room lighting conditions.
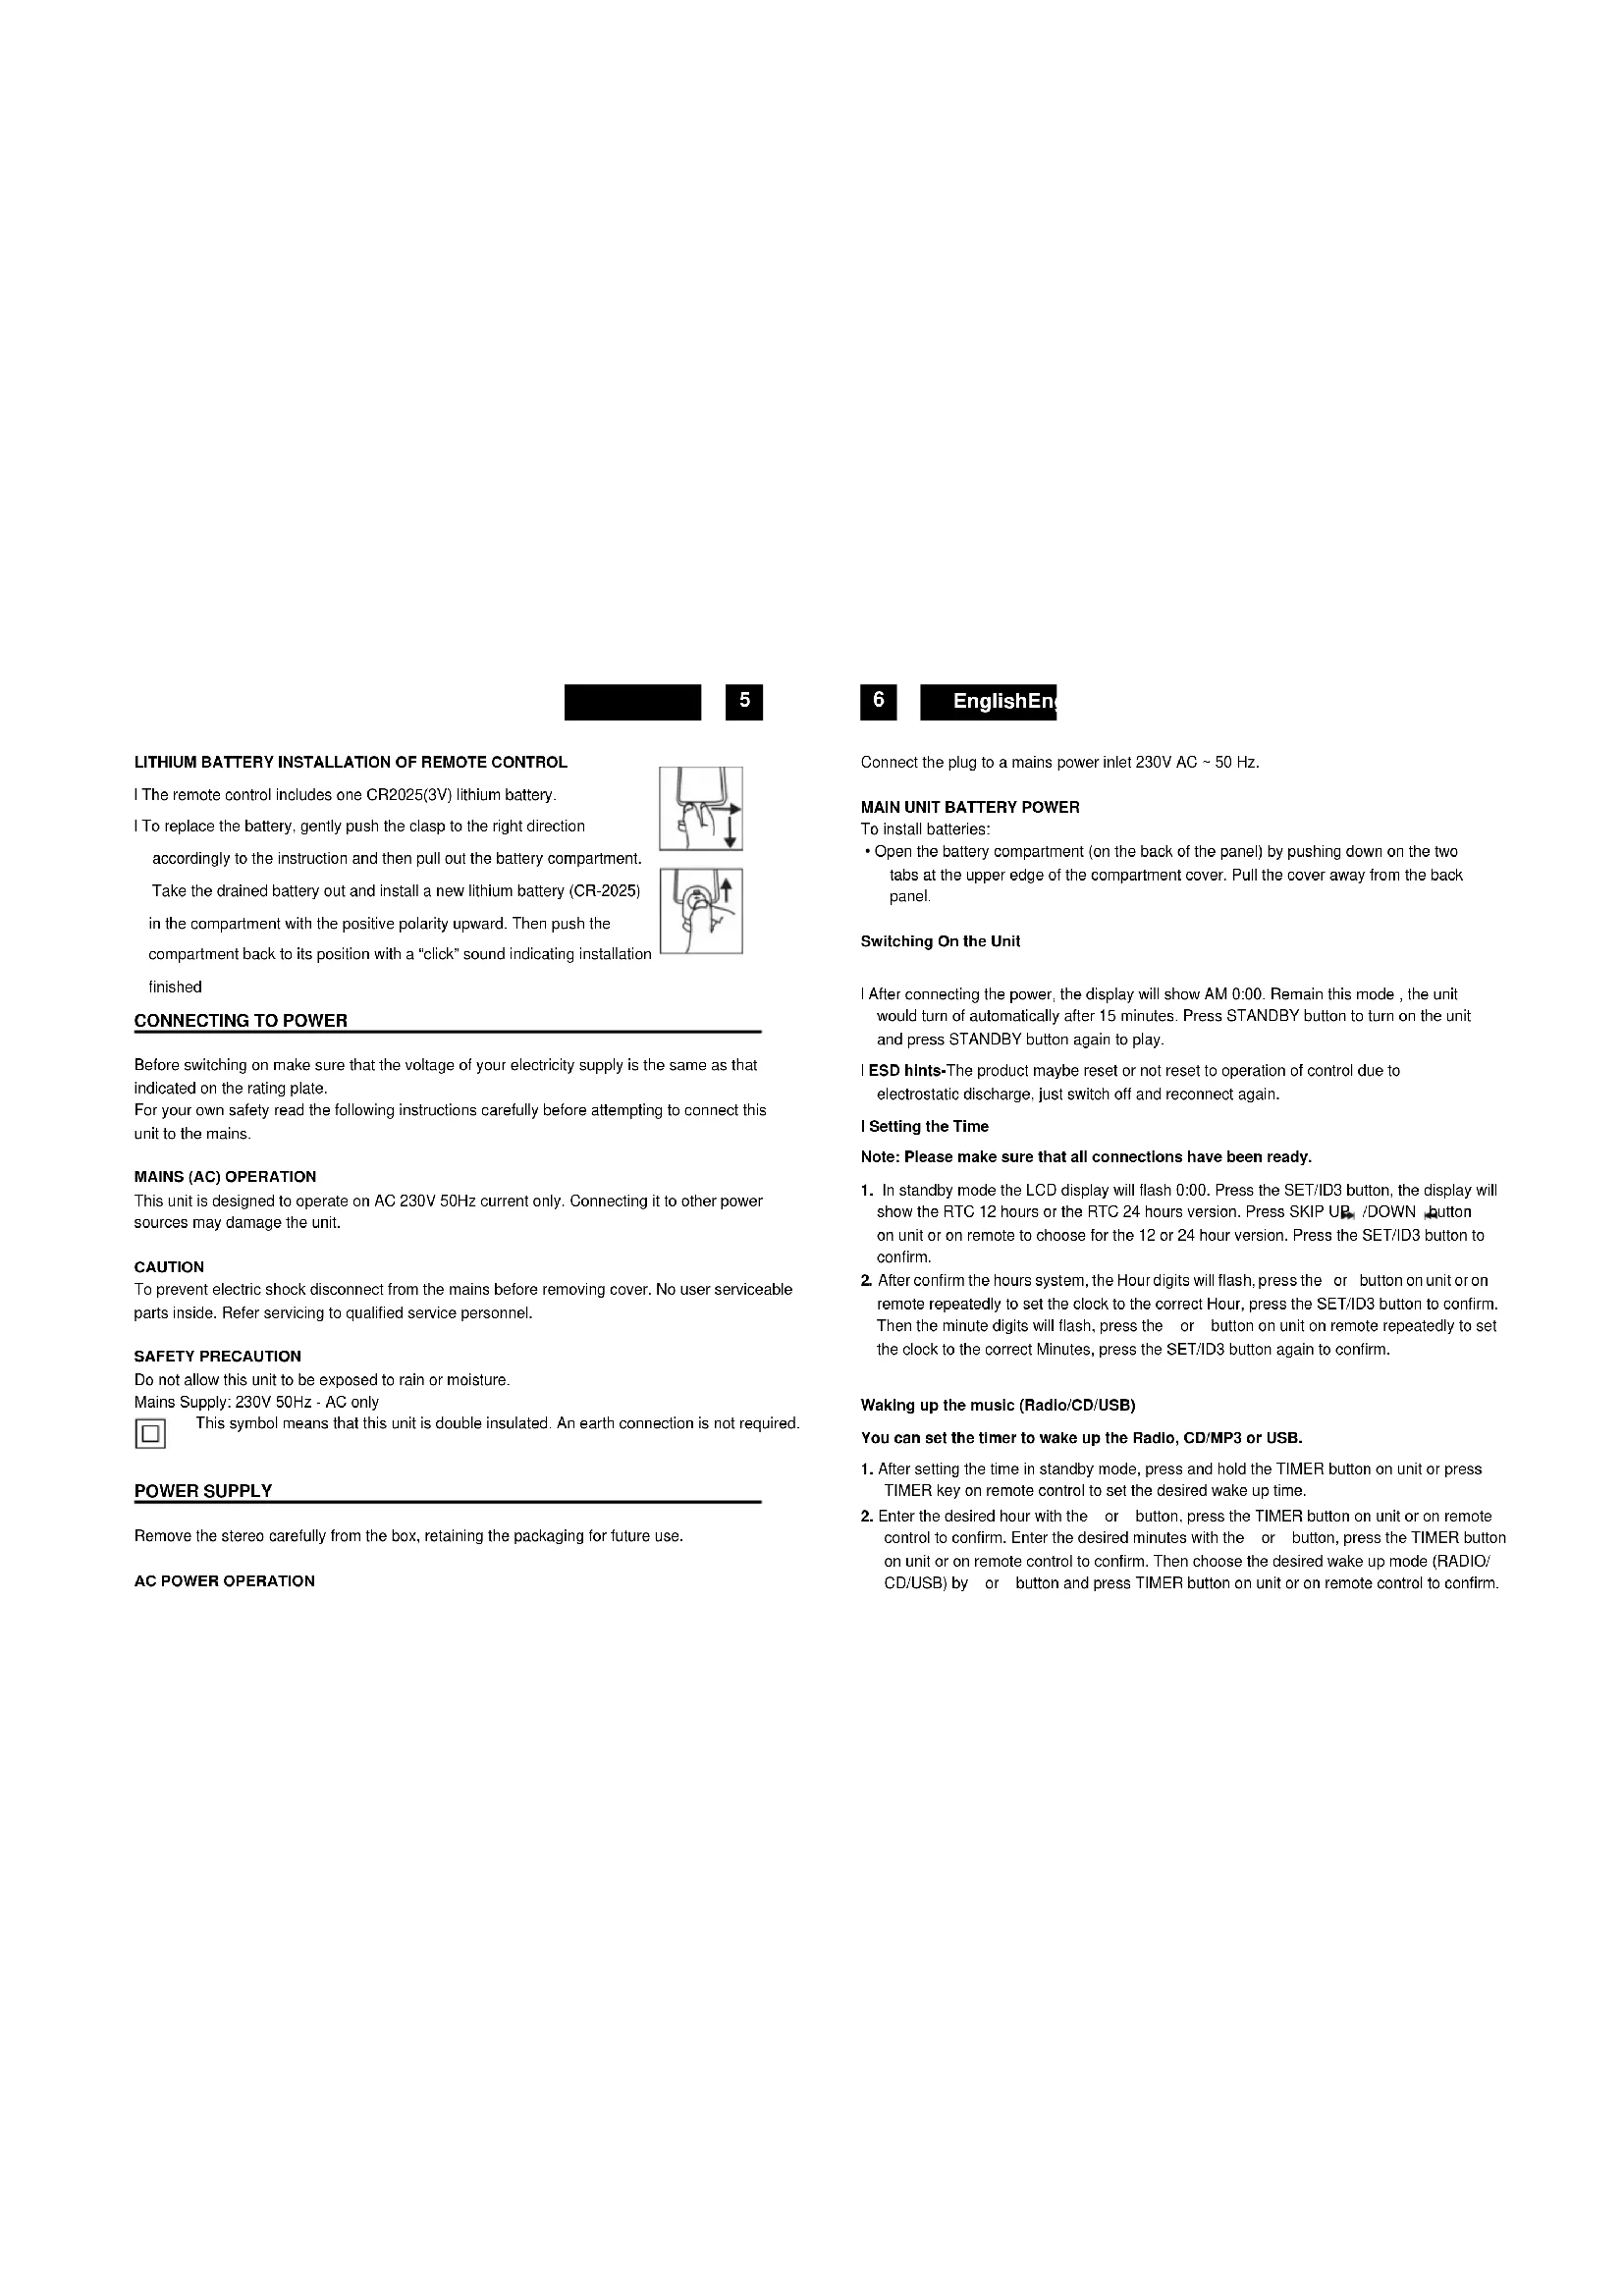
LITHIUM BATTERY INSTALLATION OF REMOTE CONTROL
I The remote control includes one CR2025(3V) lithium battery.
I To replace the battery, gently push the clasp to the right direction
accordingly to the instruction and then pull out the battery compartment.
Take the drained battery out and install a new lithium battery (CR-2025)
in the compartment with the positive polarity upward. Then push the
compartment back to its position with a "click" sound indicating installation
finished


CONNECTING TO POWER
Before switching on make sure that the voltage of your electricity supply is the same as that indicated on the rating plate.
For your own safety read the following instructions carefully before attempting to connect this unit to the mains.
This unit is designed to operate on AC 230V 50Hz current only. Connecting it to other power sources may damage the unit.
CAUTION
To prevent electric shock disconnect from the mains before removing cover. No user serviceable parts inside. Refer servicing to qualified service personnel.
SAFETY PRECAUTION
Do not allow this unit to be exposed to rain or moisture.
Mains Supply: 230V 50Hz - AC only
This symbol means that this unit is double insulated. An earth connection is not required.
POWER SUPPLY
Remove the stereo carefully from the box, retaining the packaging for future use.
AC POWER OPERATION
6
EnglishEn
Connect the plug to a mains power inlet 230V AC 50 Hz.
MAIN UNIT BATTERY POWER
To install batteries
- Open the battery compartment (on the back of the panel) by pushing down on the two tabs at the upper edge of the compartment cover. Pull the cover away from the back panel.
Switching On the Unit
After connecting the power, the display will show AM 0:00. Remain this mode, the unit would turn of automatically after 15 minutes. Press STANDBY button to turn on the unit and press STANDBY button again to play.
ESD hints- The product maybe reset or not reset to operation of control due to electrostatic discharge, just switch off and reconnect again.
I Setting the Time
Note: Please make sure that all connections have been ready.
- In standby mode the LCD display will flash 0:00. Press the SET/ID3 button, the display will show the RTC 12 hours or the RTC 24 hours version. Press SKIP UB /DOWN button on unit or on remote to choose for the 12 or 24 hour version. Press the SET/ID3 button to confirm.
- After confirm the hours system, the Hour digits will flash, press the or button on unit or on remote repeatedly to set the clock to the correct Hour, press the SET/ID3 button to confirm. Then the minute digits will flash, press the or button on unit on remote repeatedly to set the clock to the correct Minutes, press the SET/ID3 button again to confirm.
Waking up the music (Radio/CD/USB)
You can set the timer to wake up the Radio, CD/MP3 or USB.
- After setting the time in standby mode, press and hold the TIMER button on unit or press TIMER key on remote control to set the desired wake up time.
- Enter the desired hour with the or button, press the TIMER button on unit or on remote control to confirm. Enter the desired minutes with the or button, press the TIMER button on unit or on remote control to confirm. Then choose the desired wake up mode (RADIO/CD/USB) by or button and press TIMER button on unit or on remote control to confirm.
7
EnglishEn
- To the pre-set time, the desired wake up mode will turn on automatically.
Sleep To Music Timer
You can set the sleep timer to automatically turn off the unit during playback after a set period of time (10, 20, 30... up to 90 minutes).
1)During operation, press the SLEEP button on unit or on remote control repeatedly to select the desired sleep time from 90 minutes to 10 minutes, then stop pressing when the desired sleep time come up, after about 5 seconds the sleep time will be automatically set and the "SLEEP" indicator show on the display.
2)The RADIO or CD/MP3 or USB or AUX player will continue playing until the sleep timer counts down to "00" and then turn off automatically.
Note: If you are falling asleep to CD/USB/AUX, the sound will stop when the disc ends, even if a longer sleep time was selected.
Turning on the unit
Press the STANDBY button on unit or remote control, then press the FUNCTION button on unit or remote control to choose FM / CD / USB / AUX model.
VOLUME ADJUSTING
Rotate the VOLUME button on unit or remote control to increase or decrease volume.
Press MUTE button on remote control to turn off the sound. Press again to turn on.
EQ FUNCTION
This unit has a built-in equalizer system, Press EQ button on unit or remote control while playing to select different music style (sound tone): FLA, JAZZ, ROC, CLASS and POP.
ID3 System
When plays a MP3 file, press the SET/ID3 button on the unit or ID3 key on remote control, it will show "ID3 ON", if the MP3 file is "ID3" format, it will automatically search the information of "TITLE NAME" "ARTIST NAME" and "ALBUM NAME" and show on the display. Press the SET/ID3 button on the unit or ID3 key on remote control again to back to normal display.
TITLE NAME ARTIST NAME ALBUM NAME
HEADPHONE JACK
For private listening, insert a 3.5mm headphone (not included) into the HEADPHONE jack. The SPEAKER output would be automatically cut off.
CAUTION: LISTENING AT A HIGH VOLUME OVER A LONG PERIOD IS NOT GOOD FOR YOUR EARS.
RADIO OPERATION
TUNING RADIO STATIONS
- Press the FUNCTION button on unit or remote control to select the desired wave band: FM.
- Tune to desired station by pressing the TUN+or TUN-/the display will show the band frequency. Example: FM 97.10 MHz
- Extend FM TELESCOPIC ANTENNA to its full length if you are listening to FM broadcasting. Gently rock the unit back and forth to get the best reception when you are listening to FM program, or place the unit in an open location.
Note: The radio function is initially set at STEREO mode, if the broadcasting program is too noisy when you are listening to FM stereo station, press MO./ST. button on unit or press MO./ST. key on remote to switch to MONO FM. - To turn off the radio, press the FUNCTION button to switch to other functions or press STANDBY button to turn off the unit.
You may pre-store 20 (FM) radio stations in memory for your preference controlled by remote handset, so as you can listen to your desired station directly and quickly, no need to tuning and search for again.
- Press FUNCTION button to FM mode.
- Press MEMORY button on unit or press MEM/PROG./P-MODE key on remote, "P01 " will flash on the display. Then press the "TUN+/-" or "TUN-/-" button to select the first desired station.
- Press the FOLD./10/M- or FOLD./10/M- button unit or - MEM/FOLD./10 + on remote to choose the desired sequence you want to store, then press MEMORY button on unit or press -MEM/PROG./P-MODE+ key on remote again to enter.
-
Search another station, repeat steps (2) & (3) until all desired stations stored. Up to 20 stations can be programmed.
-
Press the FOLD./10/M+ or FOLD./10/M- on unit or MEM/FOLD./10 UP/DOWN button on remote to listen to the stored station directly.
CD/MP3 OPERATION
Discs for Playback
This system can playback all digital audio CD/MP3, finalized digital audio CD-Recordable (CD-R) discs, finalized digital audio CD-Rewritable (CD-RW) discs and CD-DA format digital audio CD/CD-R/CD-RW discs.
LOADING A DISC
- Press the FUNCTION button on unit or remote control to select "CD" mode.
- Press the OPEN/CLOSE button to open the CD door, "OPEN" will be shown on the display.
- Place an audio CD/MP3 DISC into the tray with the front side facing up.
- Close the CD door.
The display will show a flashing "— READING —", then the total number of tracks would be shown and the playback will start from track.
- To remove the CD, press OPEN/CLOSE to open CD door, the display will show "OPEN". Hold the CD by its edges, and take it out carefully.
Note:
- Make sure the disc is stopped before opening the CD DOOR.
- To ensure good system performance; wait until the unit completely reads the disc before proceeding.
- If no disc loaded into the tray, or the disc is unreadable, the display will show "NO DISC".
PLAYING A DISC
- The playback starts from track 1 automatically when reading the disc.
To pause playback, press button on unit or on remote. The current playing time will flash on the display.
To resume playback, press button on unit or on remote again. - To stop playback, press MO/ST./ button on unit or on remote, the total number of tracks.
10
EnglishEn
SELECTING A DESIRED TRACK/PASSAGE
To select a desired track
Press the TUN+/- button on unit or remote respectively in stop mode or during playing until the desired track appears on the display. Press the button on unit or on remote to start play.
To search for a particular passage during playback (track scanning at high speed)
Press and hold the TUN+/- or TUN-/- button on unit or on remote to scan the current playing track at high speed until desired point (passage) appears, then release the button for normal playback mode. Playback will start again from this point.
To select a song which track number exceeds 10
To select a song/track which number exceeds 10, Press the FOLD./10/M- or FOLD./10/M+ button on unit or -MEM/FOLD./10+ button on the remote control each time to skip backward or forward 10 tracks, then press the TUN+ button on unit or on remote to select desired track. For example: to select the 17th track from the 1st track, press FOLD./10/M+ button on unit or press MEM/FOLD./10 UP(12) key on remote, and then press the SKIP UP button on unit or on remote six times immediately.
To select a desired folder (for MP3 disc that contains more than one folder)
To select a desired folder during playback, press and hold the FOLD./10/M+ or FOLD./10/M- button on unit or -MEM/FOLD./10+ button on the remote control to next /previous folder.
PROGRAMING TRACKS
Programming tracks of disc are possible when playback is stopped. Up to CD 20 tracks / MP3 99 tracks can be stored in the memory in any order.
In stop mode, press the PROG./P-MODE button on unit or press MEM/PROG./P-MODE key on remote to enter program setting, the display will flash PROG and P01 001.
Press the TUN+ button on unit or on remote to select the first desired track to be programmed. (example: track 2)
Press the PROG.P-MODE button on unit or press MEM/PROG.P-MODE key on remote to enter. The display would flash PROG and P02 002.
Repeat steps 2 & 3 to store other desired tracks until all tracks programmed.
Press the button on unit or on remote to start playback from the first programmed
track. The display will show 001 and the " PROG " indicator will light up on LCD display.
Press the MO/ST. / button on unit or on remote to stop program playback.
To clear the program, you may
- Press MO/ST./ button on unit or on remote when the disc stopped, and
- Open the CD compartment lid, the program will be erased.
REPEAT
You can play one track or all tracks on the disc repeatedly. To Repeat a Single Track
1. Press PROG./P-MODE button on unit or press MEM/PROG./P-MODE key on remote control during play, the display will show a flashing and the current track will be played over an over again till you press the MO/ST./ button on unit or on remote.
2. To cancel repeat play, press PROG./P-MODE button on unit or press MEM/PROG./P-MODE key on remote control until " disappears from the display.
To repeat all the Tracks
- Press PROG./P-MODE button on unit or press MEM/PROG./P-MODE key on remote control until the "ALL" shows steady on the display, all tracks on the disc will be played over and over again till you press the MO/ST./ button on unit or on remote.
- To cancel repeat play, press the PROG./P-MODE button on unit or press MEM/PROG./P-MODE key on remote control until "ALL" disappears from the display.
To repeat the folder (only for MP3 disc which contains more than one folder)
- Press the PROG./P-MODE button on unit or press MEM/PROG./P-MODE key on remote control until "IR" show steady on the display, the current folder will be repeated over and over again till you press the MO/ST./ button on unit or on remote.
- To cancel repeat play, press the PROG./P-MODE button on unit or press MEM/PROG./P-MODE key on remote control until "DIR" and the local folder disappear from the display.
EnglishEn
RANDOM PLAY
Press the PROG./P-MODE button on unit or press MEM/PROG./P-MODE key on remote control in play mode till the "RAN" shows steady on the display, the random play will start from next track automatically, until all tracks are played over and then it will stop. Press the PROG./P-MODE button on unit or press MEM/PROG./P-MODE key on remote control again until the "RAN" disappears from the display to cancel.
USB OPERATION
- Press the FUNCTION button on unit or on remote to select "USB" mode.
- Connect the USB to the USB INPUT. The LCD will show the total number of tracks stored in the USB. The playback stars from track 1 automatically after reading the USB.
- Press the MO/ST./ button on unit or on remote to stop playing. The display will show total number of USB and STOP.
- Proceed repeat play (repeat 1 - repeat folder - repeat all)/program play/skip up and back operation as the same described in above "CD/MP3 OPERATION".
CAUTION:
4 Do not use any USB extension cable for connecting the USB bar which may cause harmful interference
AUX OPERATION
- Press the FUNCTION button to select "AUX" mode.
- Insert the AUX line plug into the AUX IN jack(03.5mm) on the player, music from the device would be amplified and exported from the speakers.
- Adjust the volume of the main unit to your desired level.
- Press PLAY of the external audio source (eg. MP3 player) to start playback.
MAINTENANCE AND CARE
- Electronic products of this kind should never be subjected to extreme temperatures or high humidity. For instance, this set should not be placed in bathing areas or around stoves and radiators.
- If necessary, clean the unit with a piece of cloth dampened with water only (Be sure the AC Power Cord is disconnected from the Mains). Never use a polish or a strong detergent as this will damage the finish of the cabinet.
This equipment has been designed and manufactured to meet the highest international
standards, but like any electrical apparatus which is operated at mains voltage, care must be taken if you are to obtain the best results and safety is to be assured. This is particularly important with audio equipment.
DO . . . Read the operating instructions before you attempt to use the equipment.
DO . . . Ensure that all electrical connections (including the mains plug, extension on leads and interconnections between pieces of equipment) are properly made and in accordance with the manufacturer's instructions. Check that the mains fuse rating is correct.
DO... Always consult your dealer if you are ever in doubt about the installation, operation or safety of your equipment. He is the best person to advise you.
DONT... Obstruct the necessary all-round ventilation - especially DON't stand the sot close to curtains or on soft furnishing such as carpets. Overheating can cause unnecessary damage and shorten the life of the set.
- Remember that to obtain the best performance and lasting satisfaction from your equipment, have it regularly maintained by a reliable service organization. Ensure that it is correctly used by all the family.
ABOVE ALL:-
- Never let children push anything into holes or slots in the case - this could result in an electric shock;
- Never guess or take chances with electrical equipment of any kind - it is better to be safe than sorry!
IMPORTANT
Since movement of the CD mechanism and the sensitive circuitry may cause interference to a radio tuner nearby switch this unit off while operating other radio devices.
This product utilizes a laser
Danger - Invisible laser radiation when opened and interlock failed or defeated. Avoid direct exposure to the beam.
Caution - Use of controls, adjustments, or procedures not listed in this manual may result in hazardous radiation exposure.
Most records, compact discs, audio and video cassettes, radio and television broadcasts contain material which is the subject of copyright. It is unlawful to record such material in any form whatsoever, whether on disc or tape, without the permission of the copyright owner concerned.
Any person who makes a recording of such material without the consent of the copyright owner infringes copyright and may be liable, to pay substantial damages to the copyright owner, and in some cases to criminal prosecution.
EnglishEn
SPECIFICATIONS
GENERAL
Power Requirement AC 230V-50Hz
DC 12V UM-1/D x 8pcs
Power consumption 40 Watts
Weight. 3.5 kg
Dimensions. 513 (L) x 287(W) x 162 (H) mm
Operation temperature. +5^ + 35^
RECEIVER SECTION
Receiving Bands. FMONLY
Frequency Range. FM 87.5 - 108 MHz
COMPACT DISC SECTION
Optical Pickup. 3-Beam Laser
Frequency Response 100Hz-16KHz
AUDIOSECTION
Power output 8W x 2 (RMS)
ACCESSIONS
Instruction Booklet 1
Remote Handset. 1
AC Cord 1
Specifications are subject to change for continuous improvement, we reserve the rights to modification without prior notice.
SICHERHEITSHINWEISE

Riguardo I Compact Discs
CUIDADO Y MANUTENSION
Pickup Laser 3-Beam Laser