
CDR-265U - Cd player/recorder ROADSTAR - Free user manual and instructions
Find the device manual for free CDR-265U ROADSTAR in PDF.


| Product Type | CD Player/Recorder |
| Brand | Roadstar |
| Model | CDR-265U |
| Supported Formats | Audio CD, CD-R, CD-RW |
| Main Functions | CD audio playback and recording |
| Connections | RCA audio output, audio input (RCA), headphone jack |
| Power Supply | 230 V ~ 50 Hz |
| Dimensions (approx.) | 430 x 280 x 100 mm |
| Weight (approx.) | 2.5 kg |
| Power Consumption (approx.) | 15 W |
| Included Accessories | RCA audio cable, remote control |
| Care and Cleaning | Clean with a soft dry cloth. Do not use liquid or abrasive products. |
| Safety | Do not expose to moisture. Unplug before cleaning. Do not open the casing. |
| Spare parts and repairability | Have any repairs done by a certified professional. No consumer spare parts available. |
| Use | Household |
Frequently Asked Questions - CDR-265U ROADSTAR
User questions about CDR-265U ROADSTAR
0 question about this device. Answer the ones you know or ask your own.
Ask a new question about this device
Download the instructions for your Cd player/recorder in PDF format for free! Find your manual CDR-265U - ROADSTAR and take your electronic device back in hand. On this page are published all the documents necessary for the use of your device. CDR-265U by ROADSTAR.
USER MANUAL CDR-265U ROADSTAR
PORTABLE STEREO FM/FM-STEREO RADIO-PLAYER WITH CD/CD-R/CD-RW/MP3 PLAYBACK, USB / AUX-IN.
CDR-265U
Instruction manual Bedienungsanleitung Manuel d'instructions Manuale d'istruzioni Manual de instrucciones Manual de instruções
www.roadstar.com
Roadstar Management SA, via Passeggiata 7 CH 6883 Novazzano (Switzerland)


is a registered Trademark of Roadstar S.A. - Switzerland All rights reserved


INDEX
| English | Page | 1 |
| Deutsch | Seite | 9 |
| Français | Page | 17 |
| Italiano | Pagina | 25 |
| Español | Página | 33 |
| Portuguès | Pagina | 41 |

- Your new unit was manufactured and assembledhr neues Gerät wurde unter Beachtung der strengen under strict ROADSTAR quality control. ROADSTAR-Qualitätsvorschriften gefertigt. Thank-you for purchasing our product for your wülsicanken Ihnen für den Kauf unseres Produktes enjoyment. und wünschen Ihnen optimalen Hörgenuss. Bitte Before operating the unit, please read this instrußen Sie diese Bedienungsanleitung durch, und tion manual carefully. Keep it also handy for funben Sie sie auf, um jederzeit darin nachschlagen future references. zu können.
- Votre nouvel appareil a été fabriqué et monté in vostro nuovo apparecchio è stato prodotto ed étant soumis aux nombreux tests ROADSTAR. Ansembiato sotto lo stretto controllo di qualità espérons que cet appareil vous donnera entière ROADSTAR. isfaction. Vi ringraziamo di aver acquistato un nostro prodotto Avant de vous adonner à ces activités, veuillez più il vostro piacere d'ascolto. attentivement ce manuel d'instructions. Conservez Prima di procedere all'utilizzo dell'apparecchio, à portée de main à fin de référence ultérieure. leggete attentamente il manuale d'istruzioni e tenetelo sempre a portata di mano per futuri
- Vuestro nuevo sistema ha sido construido según rìsimenti.
normas estrictas de control de calidad ROADSTAR.
Le felicitamos y le damos las gracias por su Seccidovo aparelho foi construído e montado sob o de este aparado. Por favor leer el manual antes do controle de qualidade da ROADSTAR, poner en funcionamiento el equipo y guardar a agradecemos por ter comprado nosso produto para documentación en case de que se necesite a sua diversão. nuevamente. Antes de usar esta unidade é necessário ler com
atenção este manual de instruções pare que possa ser usada apropriadamente; mantenha o manual ao seu alcance para outras informações.

WARNINGS-
 | The exclamation point within the triangle is a warning sign alerting the user of important instructions accompanying the product. |
 | The lightening flash with arrowhead symbol within the triangle is a warning sign alerting the user of “dangerous voltage” inside the unit. |
 | To reduce the risk of electric shock, do not remove the cover. No user serviceable parts inside the unit. Refer all servicing to qualified personnel. |
 | This unit employs a laser. Only a qualified service person should remove the cover or attempt to service this device, due to possible eye injury. |
 | Invisible laser radiation when the unit is opened or interlocks defeated. Avoid exposure to laser beam. Use of controls, adjustments or procedures other than those specified herein may result in hazardous radiation exposure. |
 | This unit operates on 230V~50Hz. If the unit is not used for a long period of time, remove the plug from the AC mains. |
 | This unit must not be exposed to moisture or rain. |
 | Ensure all connections are properly made before operating the unit. |
 | This unit should be positioned so that it is properly ventilated. Avoid placing it, for example, close to curtains, on the carpet or in a built-in installation such as a bookcase. |
 | Do not expose this unit to direct sunlight or heat radiating sources. |
 | Make sure all batteries are inserted according to the proper polarity. Do not mix old batteries with new ones. |
 | If the unit is not used for a long period of time (more than 1 month), remove all batteries from their compartment to avoid possible leaking. |
CONNECTING TO POWER
Before switching on make sure that the voltage of your electricity supply is the same as that indicated on the rating plate. For your own safety read the following instructions carefully before attempting to connect this unit to the mains.
This unit is designed to operate on AC 230V 50Hz current only. Connecting it to otherpower sources may damage the unit.
Caution
To prevent electric shock disconnect from the mains before removing cover. No user serviceable parts inside. Refer servicing to qualified service personnel.
Safety Precaution
Do not allow this unit to be exposed to rain or moisture.
Mains Supply: AC230 Volts / 50Hz - AC only

POWER SUPPLY
- Remove the stereo carefully from the box, retaining the packaging for future use. - Please read this instruction book carefully before operating this unit.
AC Power Operation
- Plug the supplied AC power cord into the AC power socket on the back of this portable stereo. Connect the AC Power Cord to your AC household mains outlet and switch on the mains supply. Make sure the voltage is compatible.
Battery Operation
- Remove mains lead from the unit for battery operation.
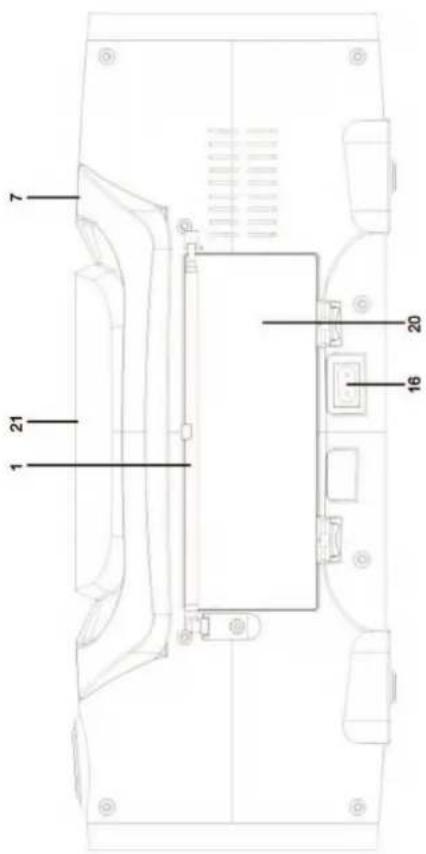
- Open the Battery Compartment (20) at the back of the stereo and insert 6 UM-2 batteries following the polarity diagram shown inside the battery compartment. - Batteries should be removed from the compartment if the unit is not to be
some time. - Flat batteries should be removed from the unit to avoid leakage.
RADIO OPERATION
- Press Function (9) and set the Function Select the TUNER function.
- Tune to the desired radio station by turning the Tuning control (5).
- Adjust the Volume (8) control to the desired level.
- To turn off the radio, press the Stand-By button (2).
Antenna
For FM reception there is a built-in telescopic FM antenna (1) at the rear of the uni the antenna and move it around to obtain the best reception.
Playability of self-made CDs on Roadstar CD drive mechanisms.
CD-R/CD-RW in CD-DA and in MP3 format can be played back. However occur, due to differences in the quality of the media as well as the character of the recording, that individual self-made CDs cannot be read. This does not indicate an incorrect function of the playback unit in these cases.
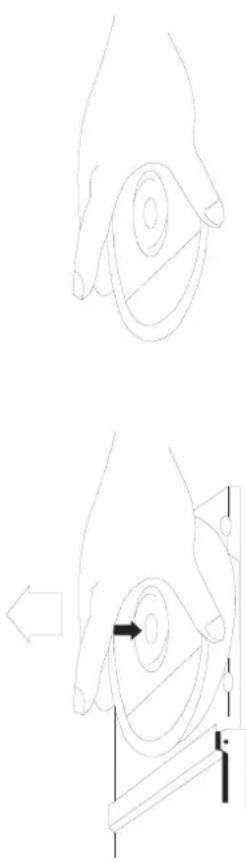
- To remove a disc from its storage case, press down on the centre of the case a disc out, holding it carefully by the edges.
natural_image
Line drawings of two hands holding a circular object with a downward arrow, no text or symbols present- Fingerprints and dust should be carefully wiped off the disc's recorded surface with soft cloth. Unlike conventional records, compact discs have no grooves to collect c and microscopic debris so gently wiping with a soft cloth should remove most par Wipe in a straight line from the inside to the outside of the disc. Small dust par light stains will have absolutely no effect on reproduction quality. - Never use chemicals such as cleaning sprays, antistatic sprays, benzine, or thinners to clean compact discs. These chemicals can irreparably damage the disc's surface.
LOCATING A PARTICULAR TRACK OR POINT OF THE TRACK
• Discs should be returned to their cases after use. This avoids serious scratches that
could cause the Laser pickup to skip.
- Do not expose disces to direct sunlight, high humidity, or high temperatures for extended
periods. Long exposure to high temperatures can warp the disic.
• Do not stick paper or write anything with a balloon pen on the label side of the disc.
CD/MP3/USB PLAYBACK
Loading and Unloading Compact Discs
-
Press the Function Selector (9) to select CD function.
-
Open the disc compartment by pushing the CD OPEN corner (6).
-
When the door has opened, remove a disc from its case and play
compartment with the label side facing up. Locate 3" discs, on the central spindle in the
compartment.
- Close the door by pressing on the corner of the CD door.
The total number of tracks appears on the display: Press PLAY/PAUSE Button (11) (17)
During playback, the actual track appears.
-
Adjust the VOLUME control to your desired listening level.
-
To stop playback temporarily, press the PLAY/PAUSE (11) button (17) once. The Play
indicator will flash on the display. Press the PLAY/PAUSE (◄ 11) button again to resume
playback.
-
To stop playback, press the STOP (■) (19) button once.
-
To switch OFF the unit press the Stand-By button (2).

Concerning Compact Discs
Only compact discs identified with this mark can be used with
this player.
[EMPTY]
REPEAT PLAYBACK WITH CD/USB-MPS
-
Press the PLAY/PAUSE button (17)
-
To repeat the same track, press the P-MODE button (11) once. The indicator.
, compare on the display.
P-MODE button (11) button 4 times more to cancel single repeat. The indicator disappears from the display.
The CD will start single repeat playback until STOP button (19) is pressed. Press
3. To repeat the entire FOLDER, press the P-MODE button (11) twice. will
appear FOLDER on the display (MP3 mode only).
Press the P-MODE button (11) button 3 times more to cancel all discarded. The indicator FOLDER disappears from the display.
- To repeat the entire disc, press the P-MODE button (11) 3 times. <> will appear on the display.
Press the P-MODE button repeatedly until the indicator (<) disappears from the display to cancel all repeat.
Notes: • When the CD door is accidentally opened during playback, "OPEN" will appear on • Wait until the disc is fully stopped before opening the CD (21) • Compartment. This unit can play 3" (8cm) single CDs without an adaptor.
-
Press the Function Selector (9) to select USB. Loading MP3 files from a USB memory static
-
Press the PLAY/PAUSE/USB button (17) few seconds until USB is shown on the display.
- Connect the MP3 player to the USB port to switch it on.
- Once playing, the USB MP3 track can be selected in the same way as the C tracks.
- Press the PLAY/PAUSE/USB button (17) few seconds until USB is shown on the display.

| RANDOM PLAY WITH CD / USB | |
| 1. Press the P-MODE button (11)4 times to enter the Random mode. “RAND” appears on the display, then press PLAY/PAUSE button (17) to start playback in Random order.2. Press SKIP Forward button (13) to go to next Random track.3. Press the P-MODE button repeatedly until “RAND” disappears from the display to return to the Normal Playback mode.PROGRAMMED PLAYBACK FOR CD/USBINCD1. Press the PLAY/PAUSE button (17) and after 5 seconds the STOP button (19).2. Press the PROGRAM button (12). The track number “P01” will appear and “P” will appear on the display indicating the first selection.3. Press SKIP Back (◀) or SKIP Forward (▶) button to select the desired track to be programmed. The track number which will be programmed will appears on the display.4. Press once the PROGRAM button (11). to enter the track into memory. “P02” will appear.5. Repeat the steps 3 and 4 to program up to 20 tracks in CD or 99 tracks in MP3.6. Press PLAY/PAUSE (▶II) button (10) once to start programmed playback.7. To cancel programmed playback, press the STOP button (19) twice.Note: During program playback, if you wish to repeat the entire programmed playback, press the P-MODE button (11) repeatedly until the indicator ⟷ appears in the display.(18) FOLDER + / +10 and FOLDER - / - 10 FUNCTIONTo select a song/track which number exceeds 10, press the FOLDER/10+ button each time to skip forward 10 tracks, then press the (▶) button to select desired track.To select a desired folder, press and hold the FOLDER/10+ button each time to skip forward a folder, then press the (▶) button to select desired track.ANTI-SHOCK FUNCTION• If in use, the player is likely to receive shocks or vibrations (i.e. whilst walking or in a moving vehicle), The ANTI-SHOCK function is active to provide uninterrupted playback when power on. | Should the player receive shocks for more than 8 seconds continuously in CD playl or 30 seconds in MP3 playback, the sound can mute for a very short while and resume once the player has stabilised from the shock.Notes:The Anti-shock function will not correct the errors arising from the use of defective scratched or dirty discs.IMPORTANT! During CD/MP3 playback, the ANTI-SHOCK function is always ON and this function can not be disactivated.AUX-INSet the Funtion Selector (9) to CD/MP3/USB/AUX position.Source should have a 3.5mm diameter stereo plug. When Audio is connected (10), it can be ear from the speakers (other sources will be automatically disconnected).HEADPHONE OUTPUTUse this output (22) to connect an Headphone.IMPORTANSince movement of the CD mechanism and the sensitive circuitry may cause interferer to a radio tuner nearby switch this unit off while operating other radio devices.This product utilizes a laserDanger - Invisible laser radiation when opened and interlock failed or defeated. Avoid direct exposure to the beam.Caution - Use of controls, adjustments, or procedures not listed in this manual may run in hazardous radiation exposure.SPECIFICATIONSAC: 230V ~50HzBatteries: 6 x UM-2Radio Frequency CoverageFM: 87.5 -108 MHzGeneralAUX-IN: 3.5mm stereo jack plugCD PlayerPick Up: 3-Beam. Semiconductor LaserEncoding: 16-Bit LinearNote: Specifications and the design are subject to possible modifications without notice due to improvement. |
RANDOM PLAY WITH CD / USB
PROGRAMMED PLAYBACK FOR CD/USB
SICHERHEITSHINWEISE
natural_image
Line drawings of two hands holding circular objects, one with a black arrow indicating a point (no text or symbols)Batterybetrieb
WIEDERHOLTE WIEDERGABE IN CD/USB
Deutsch 15
natural_image
Line drawings of two hands holding circular components with a downward arrow, no text or symbols presentThe Ground Truth image displays a single, continuous horizontal line, which is a stylistic or background element (like a ruled paper line). According to Rule 2, such lines must be ignored by the OCR result. The provided OCR content is "____", which consists of underscores. Underscores are not equivalent to a horizontal line in this context; they represent placeholder blanks, not stylistic lines. Since the OCR output incorrectly rendered a stylistic line as underscores (which should be ignored), this violates the rule that stylistic lines must be transcribed. Therefore, the OCR result is inconsistent with the Ground Truth.
natural_image
Line drawing showing two hands holding a circular device with an upward arrow and a downward arrow, no text or symbols present.m = 311
do en o
[Non-Text]
producirs
production prin, quo
mi que,
cas de la
puedan
natural_image
Line drawings of two hands holding a circular object with a downward arrow, no text or symbols presentThe following table provides the information and opinions of a specific entity, including estimates, forecasts, and estimates related to the financial situation.
The Ground Truth image displays a single, solid horizontal line. According to Rule 2 (UNDERSCORE & LINE RULES), if the GT contains lines used for stylistic emphasis or as background elements (like a ruled line on paper), the OCR result must ignore them. The line in the GT is clearly a stylistic or background line, not a placeholder for text. Therefore, the OCR should not have output any underscores. Outputting `____` constitutes an error under Rule 2, as it hallucinates placeholder symbols where none are semantically intended. Hence, the OCR result is inconsistent with the Ground Truth.
The Ground Truth image displays a single, solid horizontal line. According to Rule 2 (UNDERSCORE & LINE RULES), this is a stylistic or background line, not a placeholder underscore. Therefore, the OCR result must ignore it and output nothing or only meaningful text. The provided OCR content is "____", which consists of four underscores. This is an incorrect interpretation of the line as a placeholder, violating the rule that stylistic lines must be ignored. The OCR has hallucinated underscores where none should exist based on the GT's visual context. Hence, the OCR result is inconsistent with the Ground Truth.
The Ground Truth image displays a single, solid horizontal line. According to Rule 2 (UNDERSCORE & LINE RULES), this is a stylistic or background line, not a placeholder underscore. Therefore, the OCR result must ignore it and output nothing or only meaningful text. The provided OCR content is "____", which consists of four underscores. This is an incorrect interpretation of the line as a placeholder, violating the rule that stylistic lines must be ignored. The OCR has hallucinated underscores where none should exist based on the GT's visual context. Hence, the OCR result is inconsistent with the Ground Truth.
natural_image
Illustration of a hand pressing down on a mechanical component with an arrow indicating motion (no text or symbols)


- CDR-265U
- www.roadstar.com
- WARNINGS-
- CONNECTING TO POWER
- Caution
- Safety Precaution
- POWER SUPPLY
- AC Power Operation
- Battery Operation
- RADIO OPERATION
- Antenna
- Playability of self-made CDs on Roadstar CD drive mechanisms.
- LOCATING A PARTICULAR TRACK OR POINT OF THE TRACK
- CD/MP3/USB PLAYBACK
- Loading and Unloading Compact Discs
- Concerning Compact Discs
- REPEAT PLAYBACK WITH CD/USB-MPS
- To repeat the entire FOLDER, press the P-MODE button (11) twice. will
- RANDOM PLAY WITH CD / USB
- PROGRAMMED PLAYBACK FOR CD/USB
- SICHERHEITSHINWEISE
- Batterybetrieb
- WIEDERHOLTE WIEDERGABE IN CD/USB
- Deutsch 15
Brand : ROADSTAR
Model : CDR-265U
Category : Cd player/recorder