HT 993 - Speaker AKAI - Free user manual and instructions
Find the device manual for free HT 993 AKAI in PDF.
User questions about HT 993 AKAI
0 question about this device. Answer the ones you know or ask your own.
Ask a new question about this device
Download the instructions for your Speaker in PDF format for free! Find your manual HT 993 - AKAI and take your electronic device back in hand. On this page are published all the documents necessary for the use of your device. HT 993 by AKAI.
USER MANUAL HT 993 AKAI
natural_image
Black rectangular object with textured surface, no visible text or symbolsHT993
natural_image
Illustration of a modern TV setup with a flat-screen monitor and a rectangular base (no text or symbols)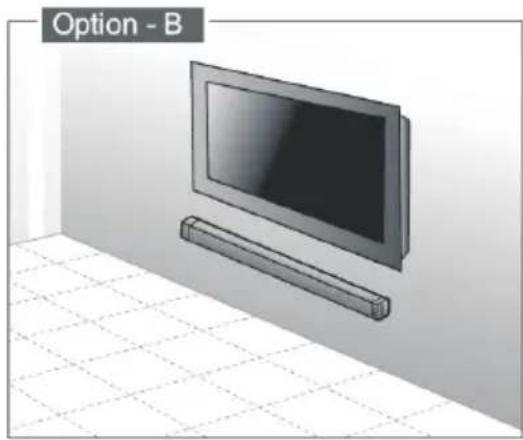
natural_image
Illustration of a flat-screen TV mounted on a wall-mounted shelf, with no visible text or symbols.Thank you for purchasing the AKAI HT993 BLUETOOTH SOUNDBAR.
This is your assurance of quality, performance and value. Our engineers have included many useful and convenient features in this product. Please be sure to read this instruction. Manual completely to make sure you are getting the maximum benefit from each feature.
This product was manufactured using the highest quality components and standards of workmanship. It was tested by inspectors and found to be in perfect working order before it left our factory. If, after reading this manual, you experience any problems with the operation of this product, please refer to the instructions for obtaining services at the end of this Manual. For future reference, record the serial number in the space provided.
Model No: AKAI HT993
Serial Number:
WARNINGS


The lightning flash is intended to alert the user to the presence of dangerous voltage within the product's enclosure, and touching the inner parts may result in a risk of electric shock to persons.

The exclamation point within an equilateral triangle is intended to alert the user to the presence of important operating and maintenance (servicing) instructions in the literature accompanying the appliance.
To reduce the risk of electric shock or fire, do not open the cover. Refer servicing to qualified service personnel.
IMPORTANT!
It is recommended not to leave a mobile phone near the unit in order to avoid electromagnetic interference in the speakers

This equipment is a Class II or double insulated electrical appliance. It has been designed in such a way that it does not require a safety connection to electrical earth.
IMPORTANT SAFETY INSTRUCTIONS
I. Read these instructions - All the safety and operating instructions should be read before this product is operated.
-
Keep these instructions - The safety and retained foroperating instructions should be future reference.
-
Heed all warnings - All warnings on the appliance and in the operating instructions should be adhered to.
-
Follow all instructions - All operating and use instructions should be followed.
-
Do not use this apparatus near water - The appliance should not be used near water or moisture - for example, in a wet basement or near a swimming pool and the like.
-
Clean only with a dry cloth.
-
Do not block any ventilation openings. Install in accordance with the manufacturer's instructions.
-
Do not install near any heat sources such as other apparatus radiators, heaters, stoves, or that produce heat.(including amplifiers)
-
Do not defeat the safety purpose of the polarized or grounding plug. A polarized plug has two blades with one wider than the other.
A grounding plug has two blades and a third grounding prong. The wide blade or the third prong is provided for your safety. If the provided plug does not fit into your outlet, consult an electrician for replacement of the obsolete outlet.
- Protect the power cord from being walked on or pinched, particularly at plugs, convenience receptacles and at the point where they exit from the apparatus.
II. Only use attachments/accessories specified by the manufacturer.
- Use only with the cart, stand, tripod, bracket, or table specified by the

manufacturer, or sold with the apparatus.
When a cart or rack is used, use caution when moving the cart/apparatus combination to avoid injury from tip-over.
-
Unplug the apparatus during lightning stormsor when unused for long periods of time.
-
Refer all servicing to qualified personnel.
Servicing is required when the apparatus has been damaged in any way, such as power supply cord or plug is damaged, liquid has been spilled or objects have fallen into the apparatus, the unit has been exposed to rain or moisture, does not operate normally, or has been dropped.
CAUTIONS
- Use of controls or adjustments or performance of procedures other than those described herein, may result in hazardous radiation exposure other unsafe operation.
- To reduce the risk of fire or electric shock, do not expose this apparatus to rain or moisture.
The apparatus must not be exposed to dripping or splashing and objects filled with liquids.
such as vases, must not be placed on apparatus.
- The mains plug/appliance coupler is used as the disconnect device, the disconnect device must remain readily operable.
- Danger of explosion if battery is incorrectly replaced.
- Replace only with the same or equivalent type.
WARNING
-
The battery (battery or batteries or battery pack) must not be exposed to excessive heat such as sunshine, fire or the like.
-
Before operating this system, check the voltage of this system to see if it is identical to the voltage of your local power supply.
-
The ventilation should not be impeded by itemscovering the ventilation openings with such curtains etc.as newspaper, table-cloths, Make 20 cm of spacesure there is at least above and at space on eachleast 5cm of side of the unit.
-
Do not place this unit close to strong magnetic fields.
-
Do not place the unit on the amplifier or receiver.
-
Do not place this unit close to damp areas as the moisture will affect the life of the laser head.
-
Should any solid object or liquid fall into the system, unplug the system and have it checked by qualified personnel before operating it any further.
-
Do not attempt to clean the unit with chemical solvents as this might damage the finish. Use a clean, dry or slightly damp cloth.
-
When removing the power plug from the wall outlet, always pull directly on the plug, never yank on the cord.
-
No naked flame sources, such as lighted candles, should be placed on the apparatus.
II. Changes or modifications to this unit not expressly approved by the party responsible for compliance will void the user's authority to operate the equipment.
■ The marking label is pasted on the back or the underside of the equipment.
DO NOT INGEST BATTERY, CHEMICAL BURN HAZARD
The remote control supplied with this product contains a coin/button cell battery. If the coin/button cell battery is swallowed, it can cause sever internal burns in just 2 hours and lead to death. Keep new and used batteries away from children. If the battery compartment does not close securely, stop using the product and keep it away from children. If you think batteries might have been swallowed or placed inside any part of the body, seek immediate medical attention.
PREPARATION FOR USE
Unpacking and set up
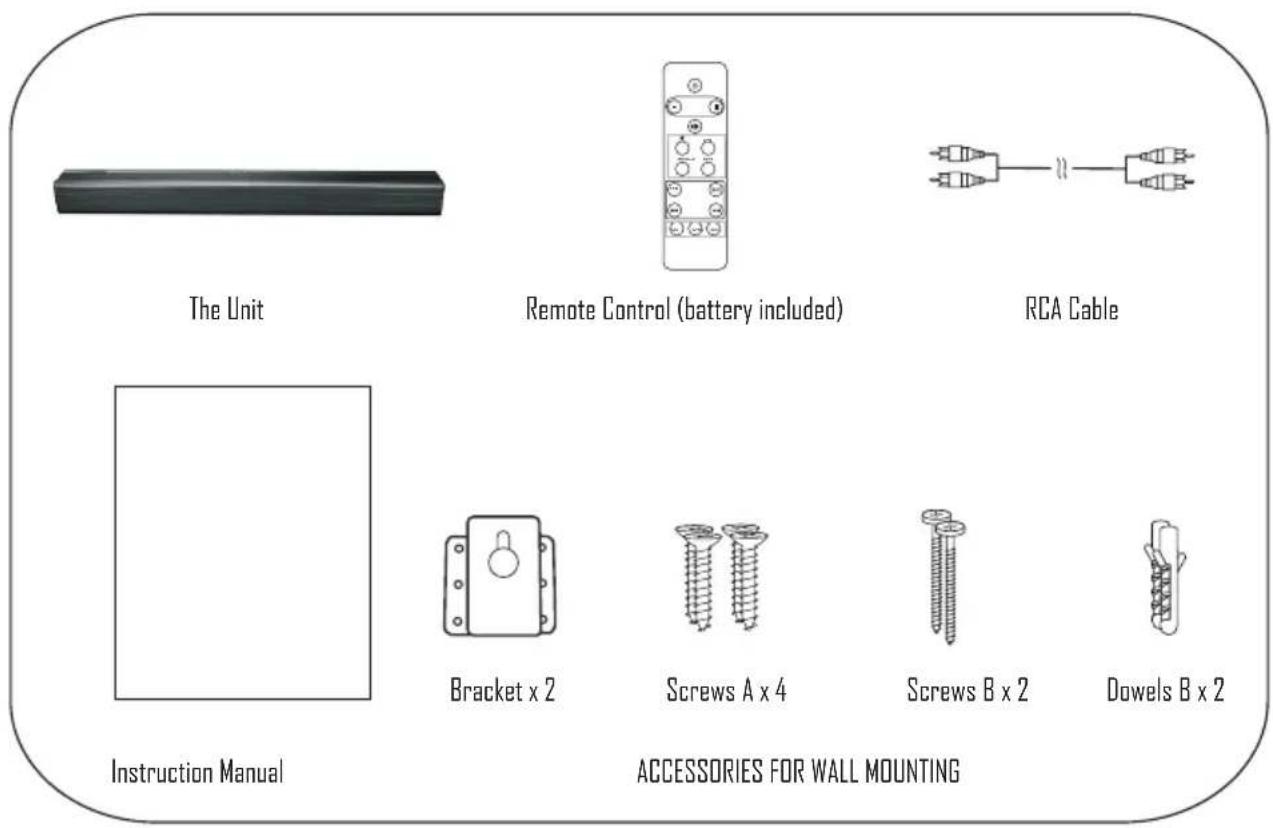
- Carefully remove all the components from the carton and remove all packing materials from the components.
■ Make sure noting is accidentally discarded with the packing materials. - Save the carton and the packing materials, if possible, in the unlikely event that the unit ever needs material is the only to be returned for service. Using the original carton and packing proper way to protect the unit from shipping damage.
■ Unwind the AC power cord on the back of the main unit and extend it to its full length.
PLACEMENT AND WALL MOUNTING
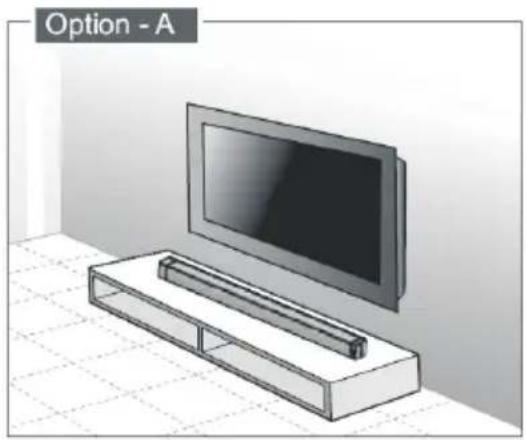
Placement
A - If your TV is placed on a table, you can place the unit on the table directly in front of the TV stand, centered with the TV screen.
B - If your TV is attached to a wall, you can mount the unit on the wall directly below the TV screen.
natural_image
3D illustration of a modern TV setup with a flat-screen monitor and a rectangular base (no text or symbols)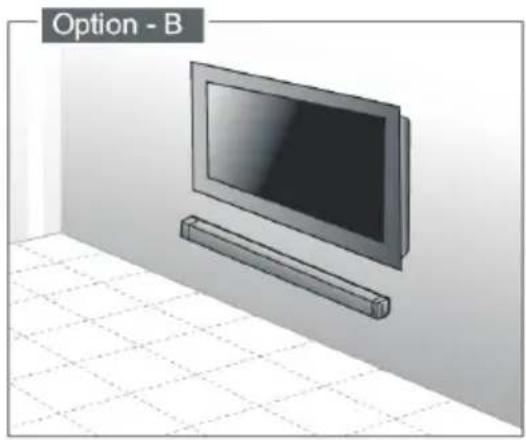
natural_image
Illustration of a flat-screen TV mounted on a wall-mounted shelf, placed on a tiled floor (no text or symbols)Wall Mounting (if using option-B)
Note
Assembly is required. Installation must be carried out by qualified personnel only. Incorrect assembly can intend to install this result in severe personal injury and property damage (if you product yourself, you wiring and plumbing that may must check for installations such as electrical be buried inside the wall). The supplied wall brackets are only for use on vertical walls constructed from solid brick, solid concrete, solid wood, and solid wooden battens. It is the installer's responsibility to verify that the wall will safely support the total load of the Soundbar and wall brackets. Additional tools (not included) are required for the installation. Do not overtighten screws. Keep this instruction manual for future reference.
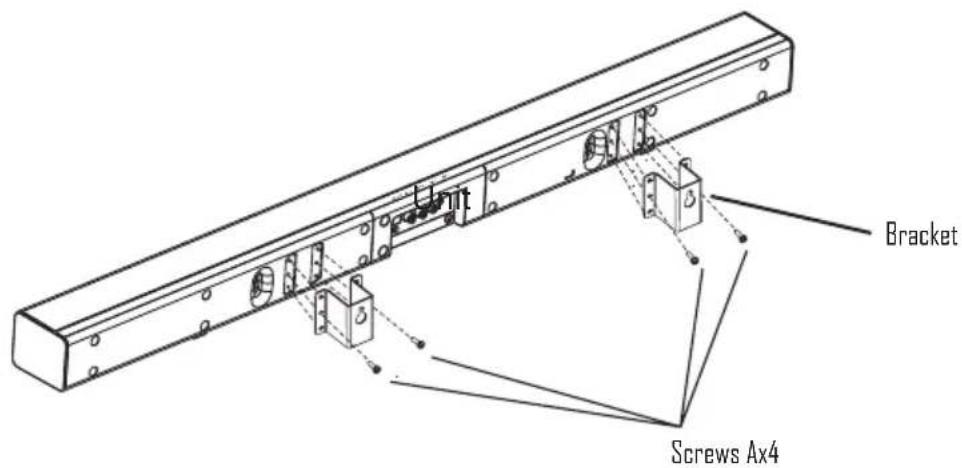
1.Parts
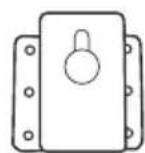
Bracket x 2
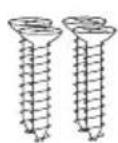
Screws A x 4
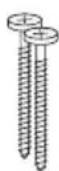
Screws B x 2
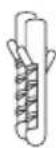
Dowels B x 2
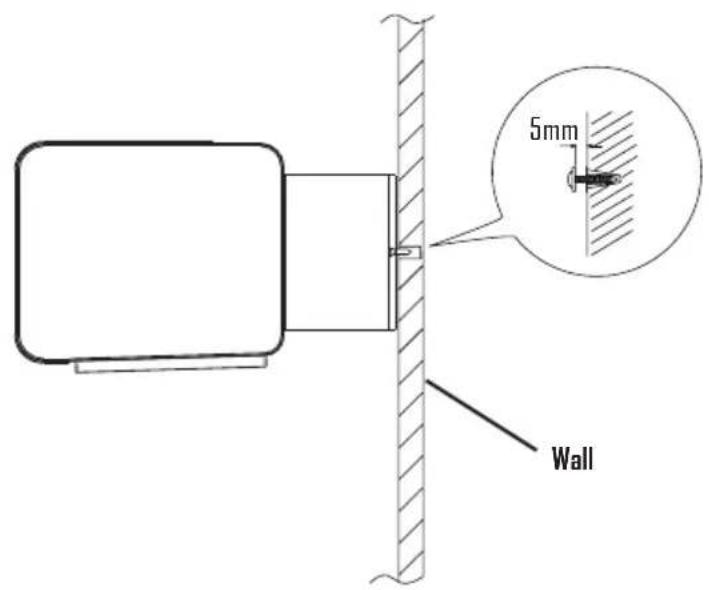
- Drill holes, install dowels B x 2, screws B x 2
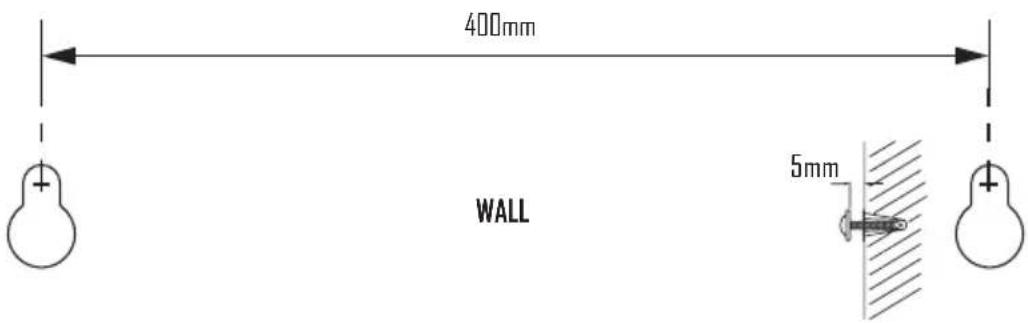
- Install screws A.
- Hang the unit.
IDENTIFYING THE PARTS
Main Unit
Top view

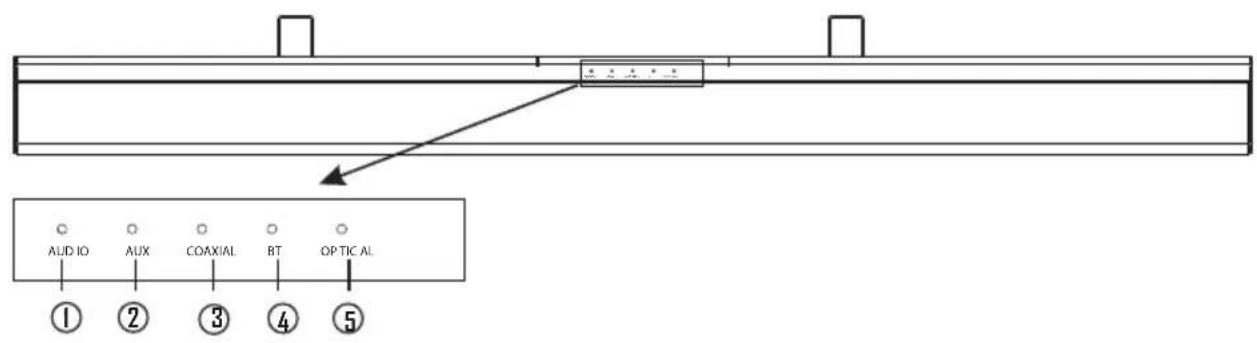
Front view

natural_image
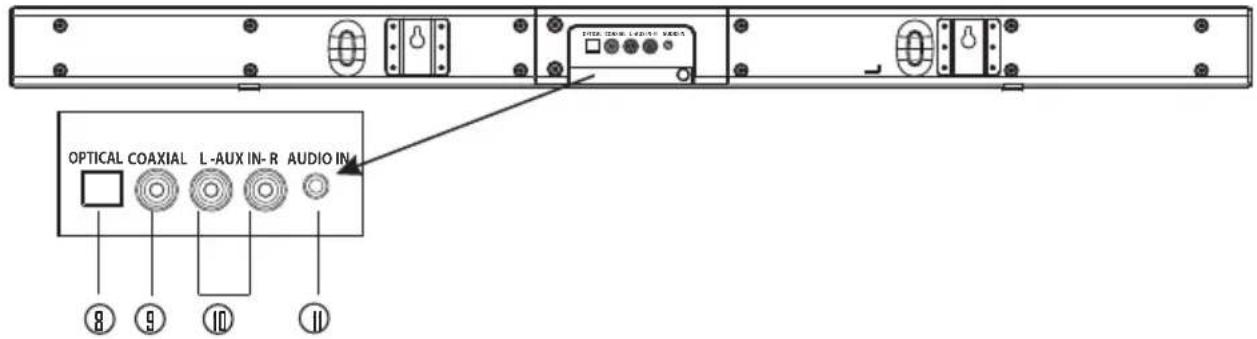
Simple line drawing of a rectangular frame with two circular symbols and two square markers, no text or labels present.Back view
- AUDIO indicator
- AUX indicator
- COAXIAL indicator
- BT indicator
- OPTICAL indicator
- Standby indicator
-
Remote Control sensor
-
OPTICAL socket
- COAXIAL socket
- AUX IN (L/R) socket
- AUDIO IN socket
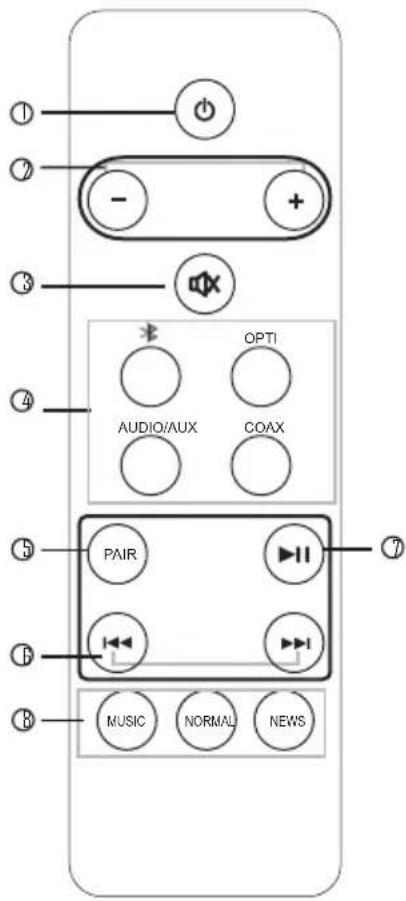
REMOTE CONTROL
1. ⏻
- Switch the unit between ON and STANDBY modes.
2. VOL+/VOL-
■ Increase/decrease the volume level.
3. MUTE
- Mute or resume the sound.
4. \*/OPTI/AUDIO /AUX/COAX
- Press the corresponding AUDIO SOURCE (Bluetooth, Optical, Audio/Aux (L/R) or COAXIAL) according to your desired Audio source.
5. PAIR
Press and hold the button to activate the ■ pairing function in Bluetooth and/or disconnect the existing paired Bluetooth device.
6. ◀◀/▶▶
■ To select previous/next track in Bluetooth.
7. ▶II
■ Play/pause in Bluetooth.
8. MUSIC/NORMAL/NEWS
■ Select a preset sound effect.
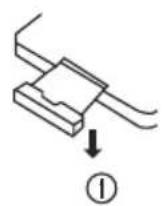
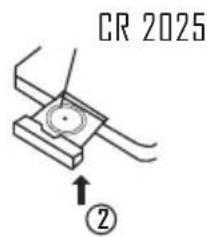
Remote Control Battery Replacement
I. Replace the remote control battery when it no longer operates the unit, or the range is reduced considerably.
2. Use only CR2025 3V lithium battery (supplied)
3. Bear in mind that lighting & other room, conditions, in addition to battery age, can affect the operating range of an infrared remote control.
4. Battery disposal:
Batteries and rechargeable batteries are prohibited to dispose into household waste.
Battery Installation / Removal
I. Remove the battery compartment cover.
Remote Control Operation Range
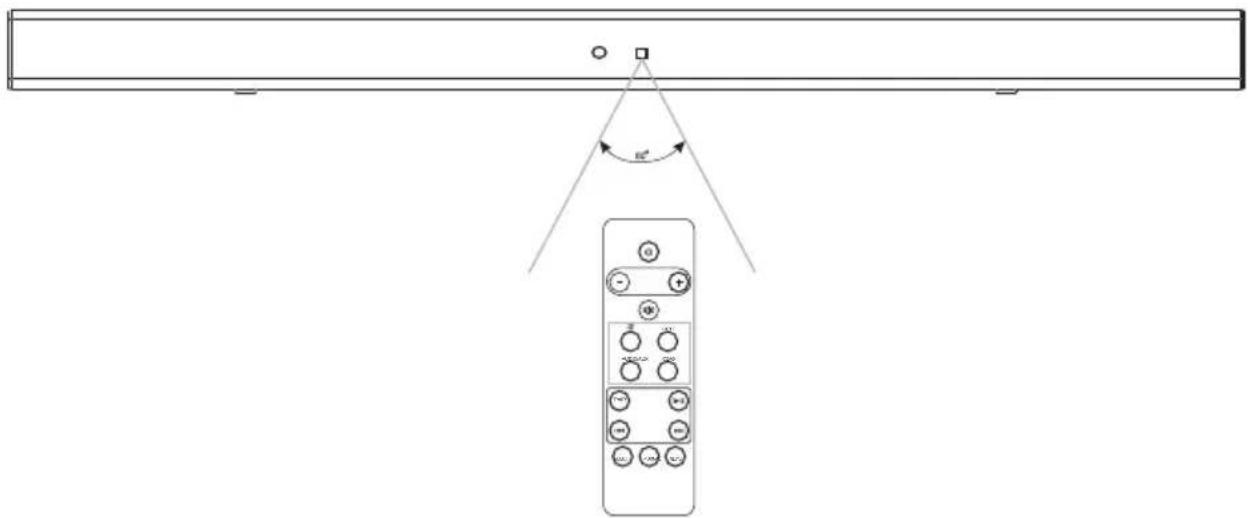
- The remote control sensor on the front unit is sensitive to the remote control's commands up to a maximum of 6 metres away and within a maximum of a 60^ arc.
- Please note that the operating distance may vary depending on the brightness of the room.
Precautions Concerning Batteries
- When the Remote Control is not to be used for a long time (more than a month), remove the battery from the Remote Control to prevent it from leaking.
- If the batteries leak, wipe away the leakage inside the battery compartment and replace the batteries with new ones.
- Do not use any batteries other than those specified.
- Do not heat or disassemble batteries.
Never throw them in fire or water.
- Do not carry or store batteries with other metallic objects. Doing so could cause batteries to short circuit, leak or explode.
- Never recharge a battery unless it is confirmed to be a rechargeable type.
CONNECTIONS
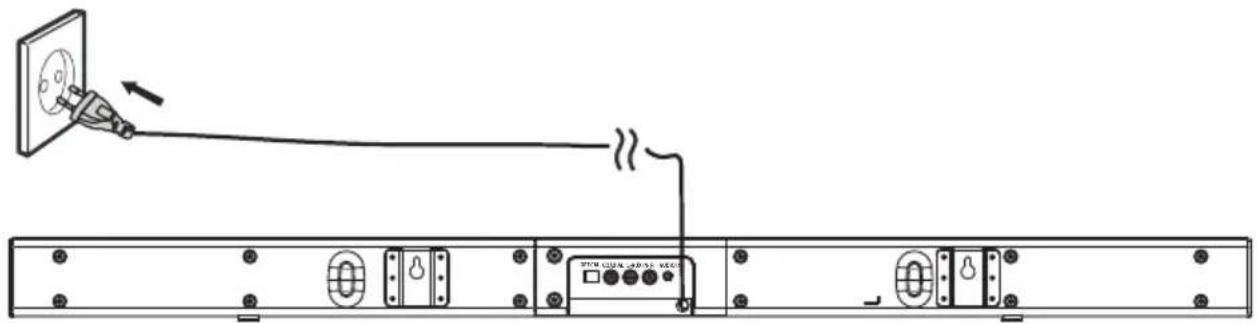
Connect Power
Caution:
- Risk of product damage! Ensure that the power supply voltage corresponds to the voltage printed on the rating label on the back or on the underside of the unit.
- Before connecting the AC power cord, ensure that you have completed all other connections.
- Be sure to unplug the power cord from the outlet when the system is not in use for an extended period of time.
- Connect the AC power cord to the wall socket.
Digital inputs connection
Connecting DVD player/TV outputs to digital inputs from the sound board.
- Remove the protective cap of the OPTICAL socket. Use the optical cable (not supplied) to connect the OPTICAL output socket from the DVD player/TV with the input socket from the sound board.
- Use the COAXIAL cable (not supplied) to connect the COAXIAL output socket from the DVD player/TV with the input socket from the sound board.
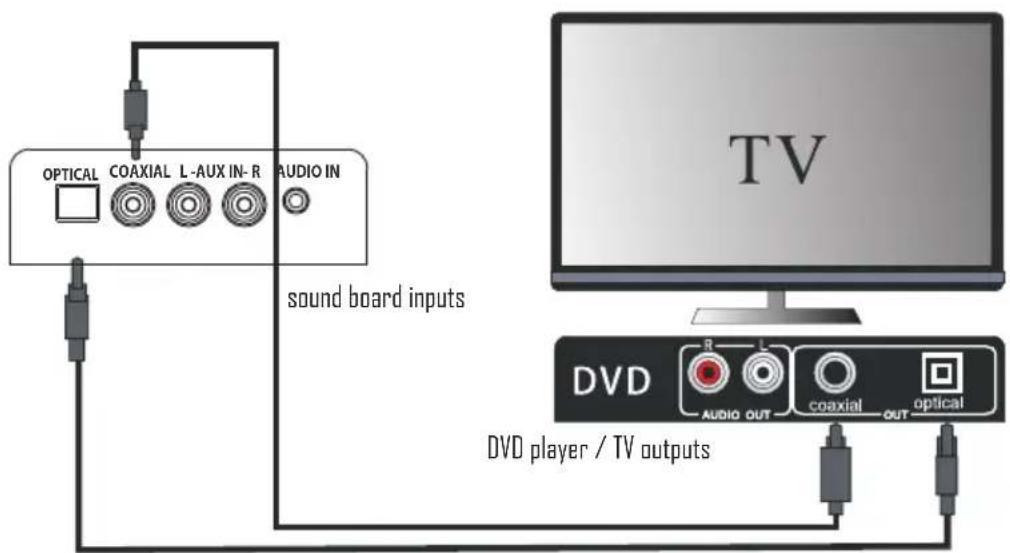
Tip
If there is no sound coming out of the sound board and the indicator lights up make sure that the audio setting of your source player(e.g.DVD player, game player, TV) is set to PCM with COAXIAL input. If there is no sound output and the OPTICAL indicator lights up, ensure that the audio setting of the input source(e.g.TV,game console,DVD palyer,TV) is set to PCM with OPTICAL input.
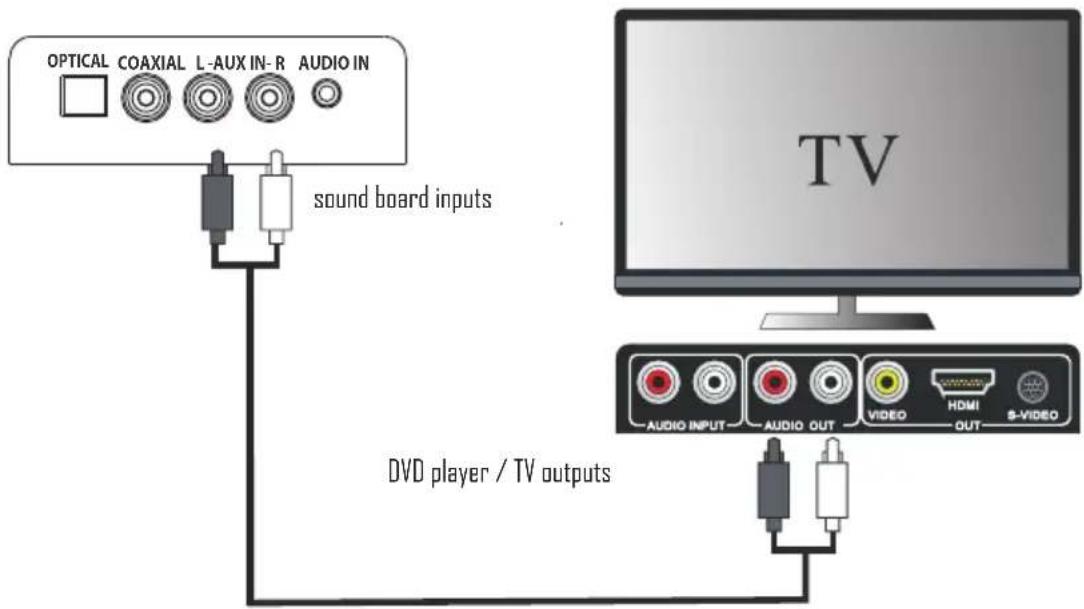
Analogue inputs connection
Connecting DVD player/TV outputs to analogue inputs from the sound board.
- Use the supplied RCA audio cable to connect the DVD player/TV outputs with the AUX(L/R) input socket from the sound board.
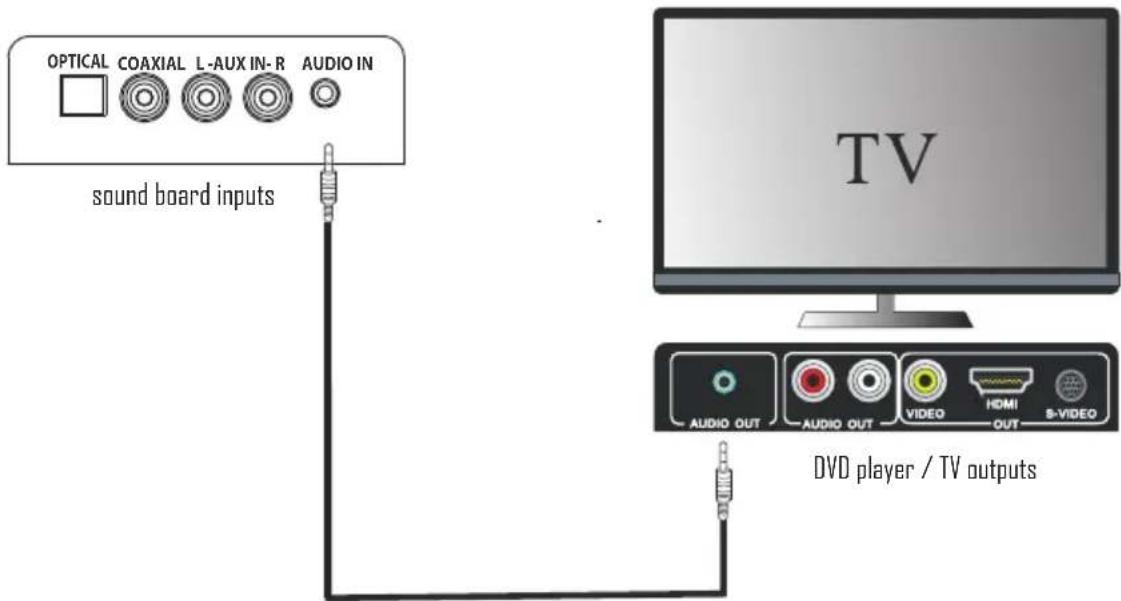
Connecting DVD player/TV outputs to analogue inputs from the sound board.
- Use a line-in audio cable (Φ 3.5mm) (not supplied) to connect the DVD player/TV outputs with the AUDIO input socket from the sound board-( or to connect an external audio device headphone socket to this AUDIO IN socket on the unit, such as MP3 player, Ipod®, or Iphone®, etc...).
GENERAL OPERATION
Standby/ON
When you connect the unit for the first time to the mains socket, it will be in switch ON mode automatically.
- Press the ⏻ button to switch the main unit in STANDBY mode, the POWER indicator will be red.
- Press the ⏻ button again to switch the unit back into ON mode, and the POWER indicator will be Green.
- Disconnect the mains plug from the mains socket if you want to switch OFF the unit completely.
Select the Play Mode
Press the ⚠,OPTI ,COAX, AUDIO and AUX button on the remote control to select the desired audio source.
Note:
- If there is no signal, the unit will automatically switch off within 19 minutes to save energy.
Adjust the Volume
- Press the VOL +/- buttons to adjust the volume.
- If you want to turn off the sound, press the MUTE button on the remote control. Press the MUTE button again or press the VOL+/- button to resume normal listening.
Noted please, if you adjusted volume above 26, then power off and power on again, volume will restored to factory setting automatically.
Select the Sound Effect
While playing, press the MUSIC (recommended for listening to music or video, NORMAL (no effect) or NEWS (recommended for listening to News) button on the remote control to select the desired preset equalizer.
- Press the AUX, AUDIO, COAX and OPTI button on the remote control to select the desired source.
- Operate your audio device directly for playback features.
- Press the VOL +/- button to adjust the volume to your desired level.
BLUETOOTH OPERATION
You can listen to tracks from a media device if it is connected to the unit via Bluetooth.
Pair Bluetooth-enabled Devices.
You need to pair your Bluetooth device with this unit before you connect them for the first time.
In order to avoid interferences, please de-activate Wi-Fi on your device (Smartphone, tablet, etc...) when playing music using Bluetooth.
Pair Bluetooth-enabled Devices
Note:
- The operational range between this unit and a Bluetooth device is approximately 10 meters (without any object between the Bluetooth device and the unit).
- Before you connect a Bluetooth device to this unit, ensure that you know the device's capabilities.
- Any obstacle between this unit and the Bluetooth device can reduce the operational range.
-
If the signal strength is weak, your Bluetooth device may disconnect, but it will re-enter automatically into pairing mode.
-
During ON mode, press the ➤ button on the remote control to select the Bluetooth mode. If the unit is not paired to any Bluetooth device, the system enters automatically into pairing mode; or you need to press and hold the PAIR button to start pairing.
- Activate the Bluetooth function on your device and select the search mode. "HT993" will appear on your Bluetooth device.
- To disconnect the Bluetooth function, switch to another function on the unit or disable the function from your Bluetooth device.
Tips:
- If there is already an existing connection, press the PAIR button on the remote control to re-activate the pairing mode. The existing connection will be interrupted.
- The unit will also be disconnected when your device is moved beyond the operational range.
· If you want to reconnect your device to this unit, place it within the operational range. - If the device is moved beyond the operational range, when it is brought back, please check if the device is still connected to the unit.
- If the connection is lost, follow the above instructions to pair your device again to this unit.
Listen to Music from Bluetooth Device
- If the connected Bluetooth device supports Advanced Audio Distribution Profile (A2DP), you can listen to the music stored on the device through the player.
-
If the device also supports Audio Video Remote Control Profile (AVRCP), you can use the player's remote control to play music stored on the device.
-
Pair your device with the player.
- Play music via your device (if it supports A2DP).
- Use supplied remote control to control play (if it supports AVRCP).
- To pause/resume play, press the ▶button.
- To skip to a track, press the ◀◀▶buttons.
Important note - ENERGY SAVING mode :
This device is equipped with an energy saving mode: if no signal is given during 19 minutes the device will switch automatically into standby mode in order to save energy (ERP 2 standard). Please note that low volume setting in the audio source may be recognized as "no audio signal": this will affect the capability of signal detection from the device and can also originate an automatic switch into standby mode. If this happens please reactivate the audio signal transmission or increase the volume setting on the audio source player (MP3 player, etc.), in order to resume playback. Please contact the local service center if the problem remains.
TROUBLE SHOOTING
To keep the warranty valid, never try to repair the system by yourself. If you encounter problems when using this unit, check the following points before requesting service.
No power
- Ensure that the mains cable is connected securely.
■ Make sure that the unit is switched on.
The remote control does not function
- Use the remote control near to the unit.
- Point the remote control at the remote control sensor on the unit.
- Replace the batteries in the remote control with new ones.
- Remove any obstacles between the remote control and the unit.
Loud hum or noise is heard
- The plugs and sockets are dirty. Wipe them with a cloth slightly moistened with an appropriate non-abrasive cleaning solution.
The unit does not respond when pressing any buttons. - The unit may freeze up during use. Switch off and then switch on the unit again at the mains socket to reset it.
No sound output
■ Make sure that the unit is not muted. Press MUTE or VOL + to resume normal listening.
- Ensure that the audio setting of the input source (e.g. TV, game console, DVD player, etc.) is set to PCM mode while using Optical connection.
I can't find the Bluetooth name of this unit on my Bluetooth device for Bluetooth pairing
■ Ensure that the unit is switched on.
■ Ensure that the Bluetooth function is activated on your Bluetooth device.
- The unit has a Bluetooth function that can receive a signal within 10 metres. Keep a distance within 10 metres both devices.
The unit switches off automatically during playing
- Please increase the volume level on your input source player like DVD player/TV ect.
Interferences in Speakers
- Check that you have not left a mobile phone near the unit.
TECHNICAL SPECIFICATIONS
| Power Supply: | AC100-240V~50/60Hz |
| Power Consumption: | 10 Watt |
| Power consumption(standby mode): | < 0.5 Watt |
| Input sensitivity: | 500mV |
| Speaker Impedance: | 8 Ohm |
| S/N(A Weight): | 80dB |
| Power Output(total): | 100W |
| THD(1kHz, 1W): | 0.5% |
| Frequency Response: | 40Hz~20KHz |
| Dimensions: | 900x57x70mm |
| Bluetooth version: | V3.0 |
| Work range: | approx.10metres |
| Transmission frequency: | 2.402~24.80GHz |
| Protocols: | A2DP/AVRCP |
STANDARD ACCESSORIES
| Remote Control | x 1pc |
| Instruction Manual | x 1pc |
| RCA cable(White&Red) | x 1pc |
| Bracket | x 2pcs |
| Screws A | x 4pcs |
| Screws B | x 2pcs |
| Dowels B | x 2pcs |
IMPORTANT:
Due to continual revision and improvement on our products design, specifications are subject to change without further notice.
EXCLUSIVE IMPORTER
This product was imported by the Company: DEMSA S.A.S.
For any questions concerning the conformity of the product, thank you to send your request to:
DEMSA S.A.S.
END OF LIFE DISPOSAL
Warning! This logo set on the product means that the recycling of this apparatus comes within the framework of the Directive 2002/96/CE of January 27, 2003 concerning the Waste of Electrical and Electronic Equipment (WEEE).
This symbol means that used electrical and electronic products should not be mixed with general household waste. There is a separate collection system for these products.
If you want to dispose of this equipment, please do not use the ordinary dust bin!
- The presence of dangerous substances in the electrical and electronic equipments can have potential consequences on the environment and human health in the cycle of reprocessing this product.
- Therefore, at the end of its lifetime, this product shall not be disposed with other non-recycled waste. Used electrical and electronic equipment must be treated separately and in accordance with legislation that requires proper treatment, recovery and recycling of used electrical and electronic equipment.
- Local authorities and resellers have set special procedures for the purpose of collecting and recycling this product (please contact your local authority for further details). You have the obligation to use the selective waste collection systems put in place by your local authority.
- If your used electrical or electronic equipment has batteries or accumulators, please dispose of these separately beforehand according to local requirements.
- By disposing of this product correctly you will help ensure that the waste undergoes the necessary treatment, recovery and recycling and thus prevent potential negative effects on the environment and human health which could otherwise arise due to inappropriate waste handling.
We company DEMSA SAS hereby states that the unit under cofaphiae with 1998 essential requirements and other relevant provisions of the Council Directive R&TTE 1999/05/CE. The Declaration of Conformity is available on request at the website www.akai-france.com (heading: Contact).

This unit complies with European Council Directive 2006 / 95 CE (Electromagnetic Compatibility & Low Voltage Directives)
END OF LIFE DISPOSAL
natural_image
Illustration of a modern TV setup with a flat-screen monitor and a rectangular base (no text or symbols)
natural_image
Illustration of a flat-screen TV mounted on a wall-mounted shelf, with no visible text or symbols.BESCHRIJVING VAN APPARAAT
Aanzicht van boven
Vooraanzicht

Achteraanzicht
I. AUDIO Indicator
2. AUX Indicator
3. COAXIAAL Indicator
4. BT (Bluetooth) Indicator
5. OPTISCH Indicator
6. Standby Indicator
7. Afstandsbedieningssensor
Audio of Auxiliary mode.
natural_image
Illustration of a modern TV set mounted on a rectangular base, placed on a tiled floor (no text or symbols)
natural_image
Illustration of a flat-screen TV mounted on a wall-mounted shelf, with no visible text or symbols.WANDMONTAGE (Option B)
natural_image
Black rectangular object with textured surface, no visible text or symbolsHt993