TB34247 - Speaker AKAI - Free user manual and instructions
Find the device manual for free TB34247 AKAI in PDF.

| Product Type | Bluetooth soundbar with wireless subwoofer |
| Brand | AKAI |
| Model | TB34247 |
| Output Power (soundbar) | 50 W x 2 |
| Output Power (subwoofer) | 100 W |
| Frequency Response (soundbar) | 200 Hz - 20 kHz |
| Frequency Response (subwoofer) | 40 Hz - 200 Hz |
| Impedance (soundbar) | 8 Ω |
| Impedance (subwoofer) | 4 Ω |
| Audio Input Sensitivity | 700 mV |
| Total Harmonic Distortion | 1% (1 kHz, 1 W) |
| Power Supply | AC 220-240 V ~ 50/60 Hz |
| Power Consumption | 30 W |
| Wireless Connectivity | Bluetooth (range 8 m) |
| Audio Inputs | Optical, AUX (RCA), MP3 Link (3.5 mm) |
| Dimensions (soundbar) | 1065 x 60 x 62 mm |
| Dimensions (subwoofer) | 465 x 255 x 95 mm |
| Included Accessories | Remote control, RCA cable, subwoofer power cable, manual |
| Preset Equalizer | Movie, Music, Flat (EQ off) |
| Auto Standby | Yes (after 15 minutes of inactivity) |
| Wall Mounting | Possible (brackets included) |
| Protection Class | Class II (double insulation) |
Frequently Asked Questions - TB34247 AKAI
User questions about TB34247 AKAI
0 question about this device. Answer the ones you know or ask your own.
Ask a new question about this device
Download the instructions for your Speaker in PDF format for free! Find your manual TB34247 - AKAI and take your electronic device back in hand. On this page are published all the documents necessary for the use of your device. TB34247 by AKAI.
USER MANUAL TB34247 AKAI
Important Safety Instructions 19
Safety 19
Warning 20
Placement and Mounting 21
Placement 21
Wall Mounting 21
Identifying the Parts 23
Main Unit 23
Wireless Subwoofer 24
Remote Control 24
Prepare the Remote Control 25
Replace the Remote Control Battery 25
Connections 26
Use the OPTICAL Socket 26
Use the AUX Socket 26
Use the MP3 Link Socket 27
Connect Power 27
Pairing the Wireless Subwoofer with the
Main Unit 28
Automatic pairing 28
Manual pairing 28
Basic Operation 29
Standby/ON 29
Select Modes 29
Adjust the Volume 29
Select a Preset Sound Effect 29
Aux/Mp3 Link/Optical Operation 30
Play with Bluetooth Device 30
Pair Bluetooth-enabled Devices 30
Listen to Music from Bluetooth Device 31
Troubleshooting 31
Specifications 32
Standard Accessories 32
End of Life Disposal 33
Inhoud
NL
VOORDAT WE BEGINNEN 34
EXCLUSIEF IMPORTEUR 34
Specifications techniques
La barre de son
Alimentation AC220-240V\~ 50/60Hz
Consommation 30 W
Cable audio 3.5mm - 3.5mm .x1
Support mural. x2
IMPORTANT :
Thank you for purchasing the AKAI TB342-47 : a BT Sound Bar with wireless subwoofer.
This is your assurance of quality, performance and value. This product was manufactured using the highest quality components and standards of workmanship. Our engineers have included many useful and convenient features in this product. Please be sure to read this instruction Manual completely to make sure you are getting the maximum benefit from each feature. It was tested by inspectors and found to be in perfect working order before it left our factory. If, after reading this manual, you experience any problems with the operation of this product, please refer to the instructions for obtaining services at the end of this Manual.
For future reference, record the serial number in the space provided.
Model No:AKAI TB342-47
Serial Number:
Exclusive Importer
This product was imported by the Company: DEMSA S.A.S.
For any questions concerning the conformity of the product, thank you to send your request to:
DEMSA S.A.S.
The lightning flash with arrowhead symbol, within an equilateral triangle, is intended to alert the user to the presence of uninsulated "dangerous voltage" within the product's enclosure that may be of sufficient magnitude as to constitute a risk of electric shock to persons.

The exclamation point within an equilateral triangle is intended to alert the user to the presence of important operating and maintenance (servicing) instructions in the literature accompanying the appliance.
Safety
1 Read these instructions - All the safety and operating instructions should be read before this product is operated.
2 Keep these instructions - The safety and operating instructions should be retained for future reference.
3 Heed all warnings - All warnings on the appliance and in the operating instructions should be adhered to.
4 Follow all instructions - All operating and use instructions should be followed.
5 Do not use this apparatus near water - The appliance should not be used near water or moisture - for example, in a wet basement or near a swimming pool and the like.
6 Clean only with a dry cloth.
7 Do not block any ventilation openings. Install in accordance with the manufacturer's instructions.
8 Do not install near any heat sources such as radiators, heaters, stoves, or other apparatus (including amplifiers) that produce heat.
9. Do not defeat the safety purpose of the polarized or grounding plug. A polarized plug has two blades with one wider than the other. A grounding plug has two blades and a third grounding prong. The wide blade or the third prong is provided for your safety. If the provided plug does not fit into your outlet, consult an electrician for replacement of the obsolete outlet.
10 Protect the power cord from being walked on or pinched, particularly at plugs, convenience receptacles and at the point where they exit from the apparatus.
11 Only use attachments/accessories specified by the manufacturer.
12 Use only with the cart, stand, tripod, bracket, or table specified by the manufacturer, or sold with the apparatus. When a cart or rack is used, use caution when moving the cart/ apparatus combination to avoid injury from tip-over.
13 Unplug the apparatus during lightning storms or when unused for long periods of time.
14 Refer all servicing to qualified personnel. Servicing is required when the apparatus has been damaged in any way, such as power supply cord or plug is damaged, liquid has been spilled or objects have fallen into the apparatus, the unit has been exposed to rain or moisture, does not operate normally, or has been dropped.
15 This equipment is a Class II or double insulated electrical appliance. It has been designed in such a way that it does not require a safety connection to electrical earth.
Caution:
- Use of controls or adjustments or performance of procedures other than those described herein, may result in hazardous radiation exposure or other unsafe operation.
- To reduce the risk of fire or electric shock, do not expose this apparatus to rain or moisture. The apparatus must not be exposed to dripping or splashing and objects filled with liquids, such as vases, must not be placed on apparatus.
- The mains plug/appliance coupler is used as the disconnect device, the disconnect device must remain readily operable.
- Danger of explosion if battery is incorrectly replaced.
- Replace only with the same or equivalent type.
Warning
1 The battery (battery or batteries or battery pack) must not be exposed to excessive heat such as sunshine, fire or the like.
2 Before operating this system, check the voltage of this system to see if it is identical to the voltage of your local power supply.
3 The ventilation should not be impeded by covering the ventilation openings with items such as newspaper, table-cloths, curtains etc. Make sure there is at least 20cm of space above and at least 5cm of space on each side of the unit.
4 Do not place this unit close to strong magnetic fields.
5 Do not place the unit on the amplifier or receiver.
6 Do not place this unit close to damp areas as the moisture will affect the life of the laser head.
7 Should any solid object or liquid fall into the system, unplug the system and have it checked by qualified personnel before operating it any further.
8 Do not attempt to clean the unit with chemical solvents as this might damage the finish. Use a clean, dry or slightly damp cloth.
9 When removing the power plug from the wall outlet, always pull directly on the plug, never yank on the cord.
10 No naked flame sources, such as lighted candles, should be placed on the apparatus.
11 Changes or modifications to this unit not expressly approved by the party responsible for compliance will void the user's authority to operate the equipment.
- The marking label is pasted on the back or the underside of the equipment.
DO NOT INGEST BATTERY, CHEMICAL BURN HAZARD
The remote control supplied with this product contains a coin button cell battery. If the coin button cell battery is swallowed, it can cause sever internal burns in just 2 hours and lead to death. Keep new and used batteries away from children. If the battery compartment does not close securely, stop using the product and keep it away from children. If you think batteries might have been swallowed or placed inside any part of the body, seek immediate medical attention.
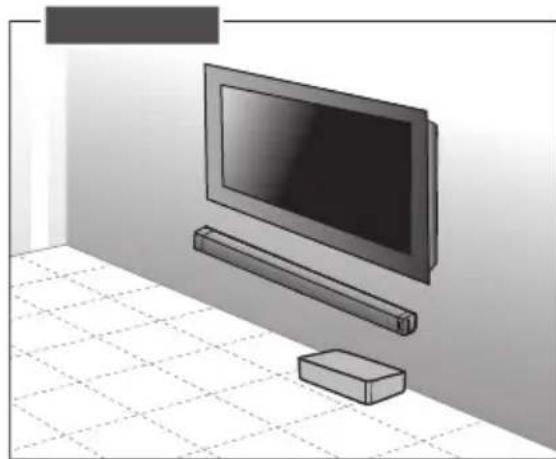
Placement
A If your TV is placed on a table, you can place the unit on the table directly in front of the TV stand, centered with the TV screen.
B If your TV is attached to a wall, you can mount the unit on the wall directly below the TV screen.
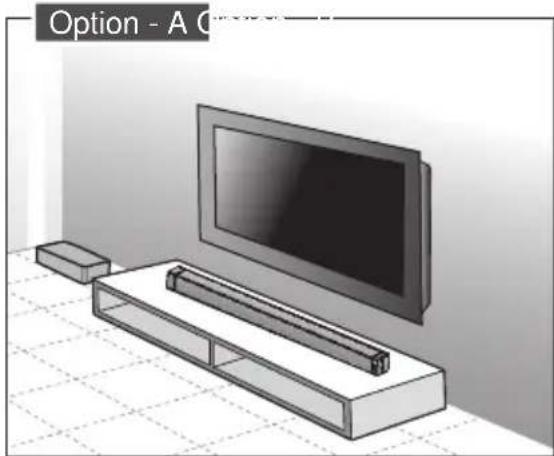
GB
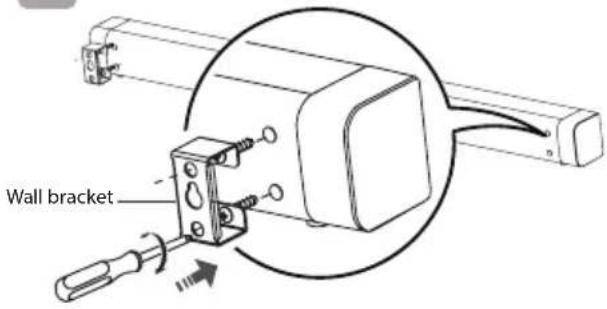
Wall Mounting (if using option-B)
Note:
- Installation must be carried out by qualified personnel only. Incorrect assembly can result in severe personal injury and property damage (if you intend to install this product yourself, you must check for installations such as electrical wiring and plumbing that may be buried inside the wall). It is the installer's responsibility to verify that the wall will safely support the total load of the unit and wall brackets.
Additional tools (not included) are required for the installation.
Do not overtighten screws. - Keep this instruction manual for future reference.
Use an electronic stud finder to check the wall type before drilling and mounting
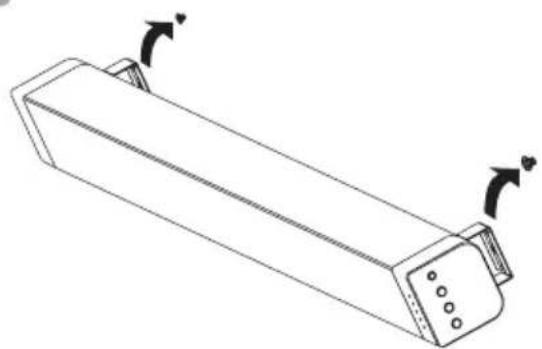
1 Remove the screws from the main unit.
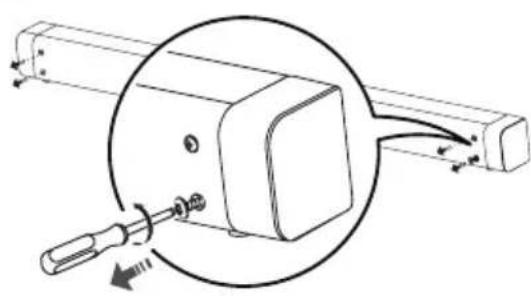
2 Attach the wall brackets to the main unit with the screws removed from the main unit.
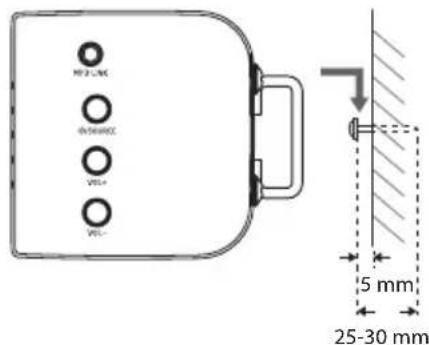
3 Drill 2 parallel holes (0 3-8 mm each according to wall type) in the wall. The distance between the holes should be 979mm .
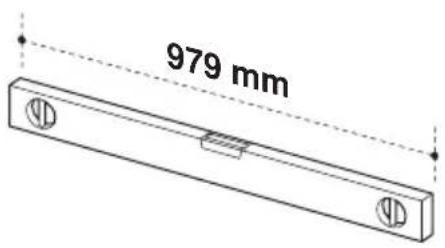
4 Firmly fix 1 dowel into each hole in the wall if necessary.
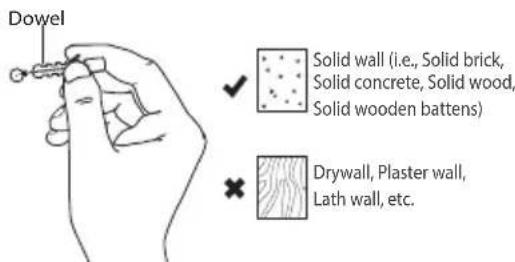
Leave a 5 mm gap between the wall and the screw's head. Lift the unit with the attached wall brackets over the heads of the screws and slot into place.
Main Unit

1 Speakers
2 Remote Control Sensor
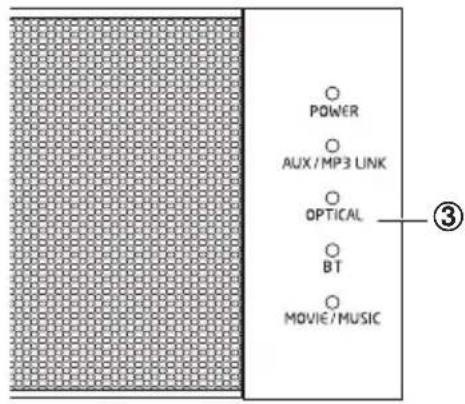
3 LED Indicatoren
- POWER:
In STANDBY mode: Light up red.
AUX/MP3 LINK
In AUX mode: Light turn on.
In MP3 LINK mode: Light flash.
OPTICAL:
Sound output available: Light turn on.
Sound output unavailable: Light flash.
BT (Bluetooth):
Bluetooth playing mode: Light turn on.
Bluetooth pairing mode: Light flash.
MOVIE/MUSIC:
In MOVIE mode: Light turn on.
In MUSIC mode: Light flash.
In FLAT mode: Light turn off.
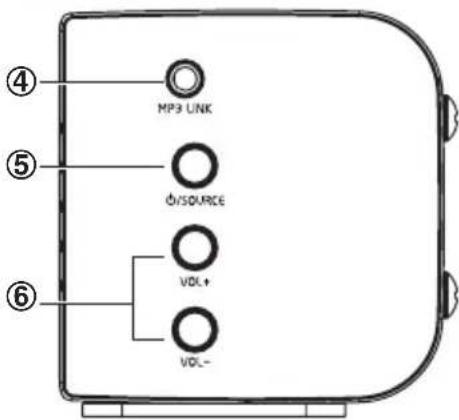
4 MP3 LINK Socket
Connect to an external audio device.
5 /SOURCE
Press this button to turn ON or press and hold to Standby mode.
Select the play function.
6 VOL+/VOL-
Increase/decrease the volume level.
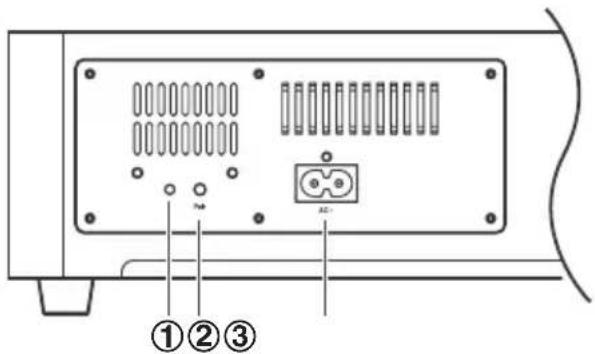
7 OPTICAL Socket
Connect to an external audio device.
8 AUX (L/R) Socket
Connect to an external audio device.
9 Power Cord
Front View
Side View

Rear View
Wireless Subwoofer
1 PAIR Indicator Light
Pair indicator lights up when the pairing succeeds.
2 PAIR button
Connect to the main unit.
3 AC~Socket
Connect to power.
Remote Control
1
Switch the unit between ON and STANDBY mode.
2 SOURCE
Switches the modes.
3 VOL+/VOL-
Adjust the volume.
4 1
In Bluetooth mode, skip to previous/next audio file.
5
In Bluetooth mode, start or pause playback.
6 BT PAIR
Activate the pairing function in Bluetooth mode and disconnect the existing paired Bluetooth device.
7 MUTE
Mute or resume the sound.
8 EQ
Select a preset sound effect.
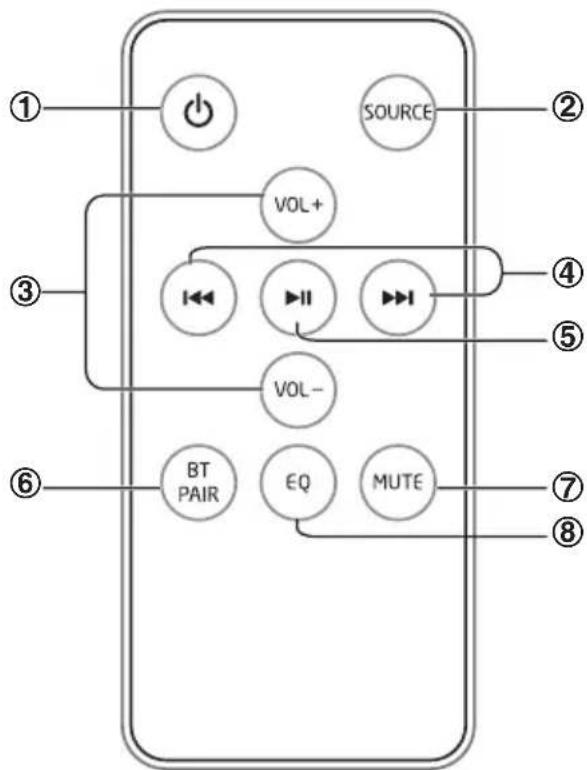
The provided Remote Control allows the unit to be operated from a distance.
- Even if the Remote Control is operated within the effective range (6m), remote control operation may be impossible if there are any obstacles between the unit and the remote control.
- If the Remote Control is operated near other products which generate infrared rays, or if other remote control devices using infra-red rays are used near the unit, it may operate incorrectly. Conversely, the other products may operate incorrectly.
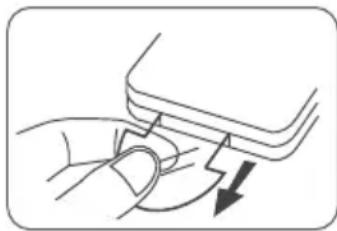
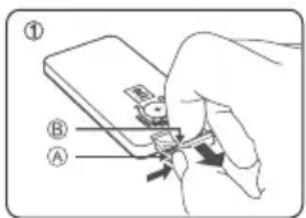
First-time use:
The unit has a pre-installed lithium CR2025 battery. Remove the protective tab to activate the remote control battery.
Replace the Remote Control Battery
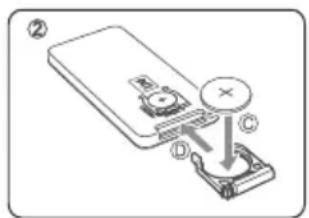
1 Pull out the battery tray and remove the old battery.
2 Place a new CR2025 battery into the battery tray with correct polarity (+/-) as indicated.
3 Insert the battery tray back into the slot.
Precautions Concerning Batteries
1 When the Remote Control is not to be used for a long time (more than a month), remove the battery from the Remote Control to prevent it from leaking.
2 If the batteries leak, wipe away the leakage inside the battery compartment and replace the batteries with new ones.
3 Do not use any batteries other than those specified.
4 Do not heat or disassemble batteries.
Never throw them in fire or water.
5 Do not carry or store batteries with other metallic objects. Doing so could cause batteries to short circuit, leak or explode.
6 Never recharge a battery unless it is confirmed to be a rechargeable type.
Use the OPTICAL Socket
- Remove the protective cap of the OPTICAL socket, then connect an OPTICAL cable (not supplied) to the TV's OPTICAL OUT socket and the OPTICAL socket on the unit.
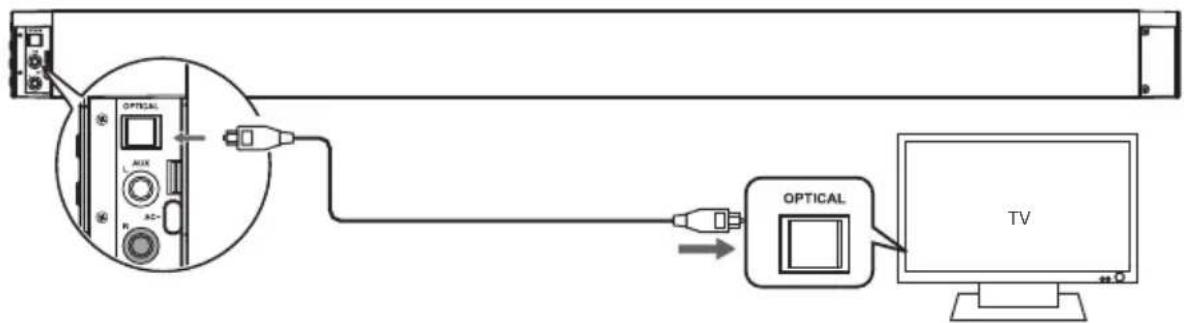
Tip: If there is no sound come out of the soundbar and the indicator light flash fast. Make sure the audio setting of your source player (e.g. DVD player, game player, TV) is setted to PCM with optical output.
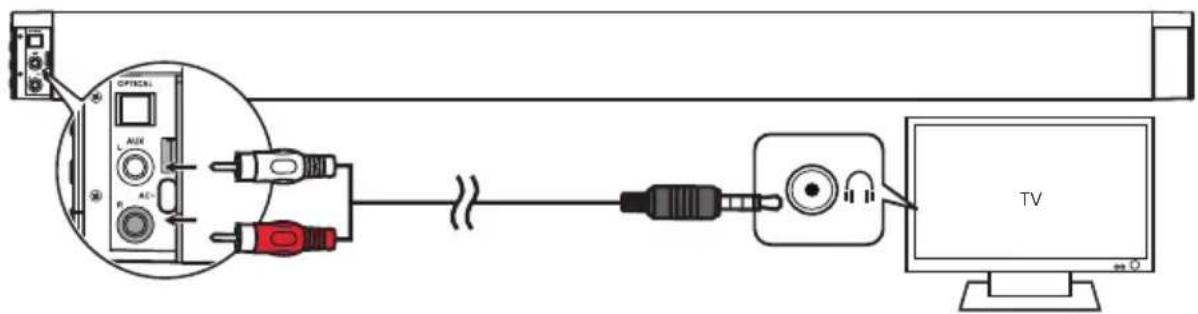
Use the AUX Socket
A. Use a RCA to RCA audio cable (supplied) to connect the TV's audio output sockets to the AUX (R/L) socket on the unit.
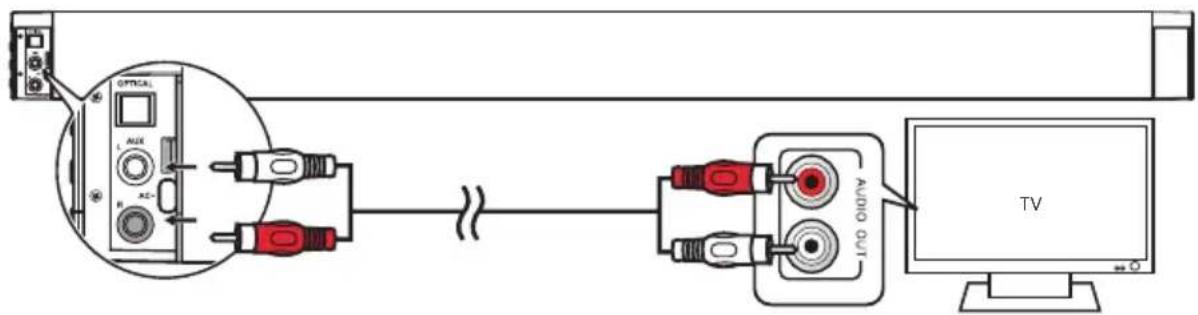
B. Use a RCA to 3.5mm audio cable (not supplied) to connect the TV's head phone socket to the AUX (R/L) socket on the unit.
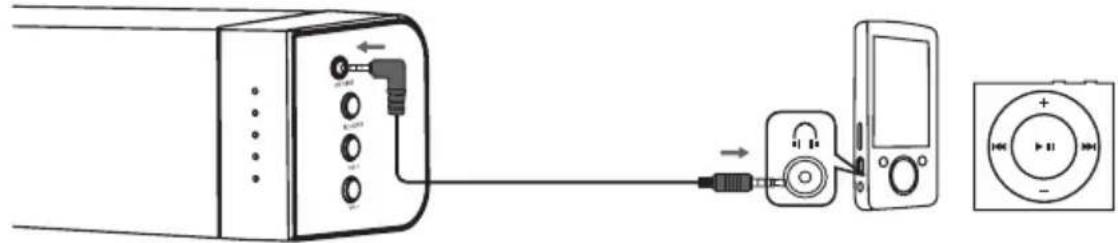
Use the MP3 Link Socket
- Use a 3.5mm to 3.5mm audio cable (supplied) to connect the external audio device headphone socket to the MP3 LINK socket on the unit.
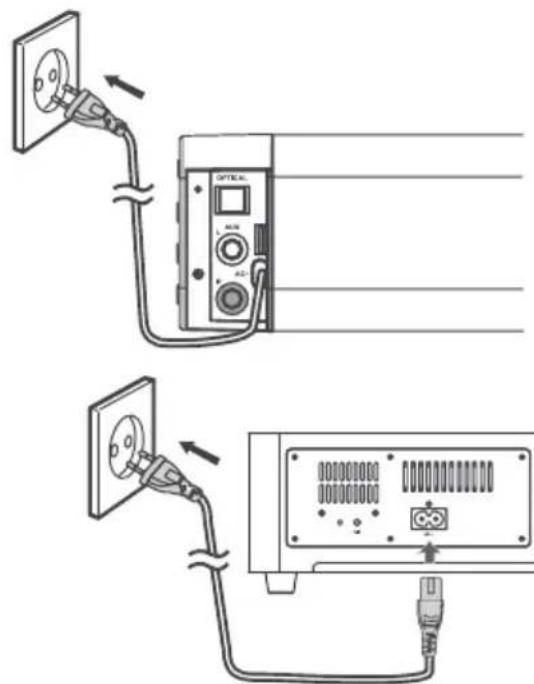
Connect Power
Before connecting the AC power cord, ensure you have completed all other connections.
Risk of product damage! Ensure that the power supply voltage corresponds to the voltage printed on the back or the underside of the unit.
- Connect the mains plug of the main unit to a mains socket.
- Connect the mains cable to the AC~ Socket of the subwoofer and then into a mains socket.
Automatic pairing
The subwoofer and soundbar will automatically pair when both units are plugged into the mains sockets and turned on. No cable is needed for connecting the two units.
- When the subwoofer is pairing with the main unit, the Pair Indicator will flash.
- When the subwoofer is paired with the main unit, the Pair Indicator will light up.
NOTE:
- Do not press the Pair button on the rear of the subwoofer, except for manual pairing.
- If the automatic pairing fails, pair the subwoofer with the main unit manually.
Manual pairing
- Ensure that all the cables are well connected and the main unit is in Standby mode.
- Press and hold the Pair button on the rear of the subwoofer for a few seconds. The subwoofer will enter the pairing mode and the Pair Indicator will blink quickly.
- Press the SOURCE button on the main unit or the button on the remote control to switch the main unit on.
- After the wireless connection succeeded, the Pair Indicator will light up.
- If the Pair indicator blinks, the wireless connection has failed. Unplug the cable of the subwoofer and then reconnect the main cable after 3 minutes. Repeat step 1 4 .
NOTE:
1 If the wireless connection fails again, check if there is conflict or strong interference (for example, interference from an electronic device) around your location. Remove these conflicts or strong interferences and repeat the above procedures.
2 The subwoofer should be within 6m of the soundbar in an open area.
3 If a TV or an external device is connected, the main unit and the subwoofer will switch on automatically when the TV or the external device is switched on.
4 If the TV or the external unit is disconnected or switched off, the main unit and the subwoofer will switch off automatically after 15 minutes.
5 If the volume on the TV or an external device is too low, the main unit and the subwoofer will switch off after 15 minutes.
6 If the main unit is not connected with the subwoofer and it is in On mode, the POWER Indicator will flash. Follow step 1 ~ 4 above to pair the subwoofer to the main unit.
Standby/ON
When you first connect the main unit to the mains socket, the main unit will be in Standby mode. The POWER Indicator will light up red.
- Press the /SOURCE button on the main unit or the button on the remote control to switch the main unit on. The status indicator of the last used mode will light up.
- Press and hold the SOURCE button on the main unit or press the button on the remote control to switch the main unit back to Standby mode. The POWER Indicator will light up red.
- Disconnect the mains plug from the mains socket if you want to switch the unit off completely.
- When the unit volume is close to mute or is idle for approximately 15 minutes, it will automatically switch to Standby mode.
Select Modes
Press the / SOURCE button on the main unit or the SOURCE button on the remote control repeatedly to switch between AUX, MP3 LINK, OPTICAL and BLUETOOTH mode.
- When AUX mode is selected, the AUX/MP3 LINK Indicator will light up steadily.
- When MP3 LINK mode is selected, the AUX/MP3 LINK Indicator will flash.
Adjust the Volume
- Press the VOL + / - button to adjust the volume.
- If you wish to turn the sound off, press the MUTE button on the remote control. Press the MUTE Button again or press the VOL +/- button to resume normal listening.
While adjusting the volume, the status indicator flashes quickly. - While the volume level reaches its maximum level, if you press the VOL + button again, the status indicator flashes once. While the volume level reaches its minimum level, if you press the VOL - button again, the status indicator flashes once.
Select a Preset Sound Effect
While playing, press the EQ button on the remote control to select between preset equalisers: Movie (recommended for viewing movies), Music (recommended for listening to music) and default setting (EQ mode off).
- When Movie EQ is selected, the MOVIE/MUSIC Indicator will light up steadily.
- When Music EQ is selected, the MOVIE/MUSIC Indicator will flash.
- When EQ mode is off, the MOVIE/MUSIC Indicator will turn off.
While using the OPTICAL or AUX connection, Movie EQ will be automatically selected. - While using the MP3 LINK connection or in BLUETOOTH operation, Music EQ will be automatically selected.
1 Ensure that the unit is connected to the TV or audio device.
2 While in ON mode, press the SOURCE button repeatedly on the main unit or the SOURCE button on the remote contro to select AUX or MP3 LINK or OPTICAL Mode.
3. Operate your audio device directly for playback features.
4 Press the VOL + / - button to adjust the volume to your desired level.
Play with Bluetooth Device
You can listen to tracks from a media device if connected to the unit via Bluetooth.
Pair Bluetooth-enabled Devices
The first time you connect your Bluetooth device to this player, you need to pair your device to this player.
Note:
- The operational range between this player and a Bluetooth device is approximately 8 meters (without any object between the Bluetooth device and the unit).
- Before you connect a Bluetooth device to this unit, ensure you know the device's capabilities.
- Compatibility with all Bluetooth devices is not guaranteed.
- Any obstacle between this unit and a Bluetooth device can reduce the operational range.
- If the signal strength is weak, your Bluetooth receiver may disconnect, but it will re-enter pairing mode automatically.
1 During ON mode, press the SOURCE button repeatedly on the unit or the SOURCE button on the remote control to select Bluetooth mode. The BT indicator will flash slowly.
2 The system has entered pairing mode.
- Or press the BT PAIR button on the remote control to be searchable. The BT indicator will flash rapidly.
3 Activate your Bluetooth device and select the search mode. "TB342-47" will appear on your Bluetooth device list.
4 Select "TB342-47" in the pairing list. The BT indicator will light up solidly while the pairing succeeds.
5 To disconnect the Bluetooth function, switch to another function on the unit or disable the function from your Bluetooth device.
Tips:
1 Enter 0000 for the password if necessary.
2 If there is an existing connection, press the BT PAIR button on the remote control to re-activate the pairing mode, the connection will be interrupted.
3 If no other Bluetooth device pairs with this player within two minutes, the player will recover its previous connection.
4 The player will also be disconnected when your device is moved beyond the operational range.
5 If you want to reconnect your device to this player, place it within the operational range.
6 If the device is moved beyond the operational range, when it is brought back, please check if the device is still connected to the player.
Play with Bluetooth Device
7 If the connection is lost, follow the instructions above to pair your device to the player again.
Listen to Music from Bluetooth Device
- If the connected Bluetooth device supports Advanced Audio Distribution Profile (A2DP), you can listen to the music stored on the device through the player.
-
If the device also supports Audio Video Remote Control Profile (AVRCP), you can use the player's remote control to play music stored on the device.
-
Pair your device with the player.
- Play music via your device (if it supports A2DP).
-
Use supplied remote control to control play (if it supports AVRCP).
-
To pause/resume play, press the button.
- To skip to a track, press the I I, I buttons.
Troubleshooting
To keep the warranty valid, never try to repair the system yourself. If you encounter problems when using this unit, check the following points before requesting service.
No power
- Ensure that the AC cord of the apparatus is properly connected.
- Ensure that there is power at the AC outlet.
- Press standby button to turn the unit on.
Remote control does not work
- Before you press any SOURCE button, first select the correct source.
- Reduce the distance between the remote control and the unit.
- Insert the battery with its polarities (+ / -) aligned as indicated.
- Replace the battery.
- Aim the remote control directly at the sensor on the front of the unit.
No response from the unit
- Disconnect and reconnect the AC power plug, then turn the unit on again.
I can't find the Bluetooth name of this unit on my Bluetooth device for Bluetooth pairing
- Ensure the Bluetooth function is activated on your Bluetooth device.
- Ensure you have paired the unit with your Bluetooth device.
Soundbar
Power requirements.. AC220-240V\~ 50/60Hz
Power consumption. 30 W
Output power .50 W X 2
Total harmonic distortion. 1% (1kHz,1W)
Audio input sensitivity. 700mV
Frequency Response. 200 Hz - 20 KHz
Impedance. 8Ω
Dimension (W× H× D) 1065 x 62 x 60 mm
Subwoofer
Power requirements AC220-240V\~ 50/60Hz
Power consumption 30 W
Output power 100 W
Frequency response 40 Hz - 200 Hz
Impedance 4Ω
Dimension (W× H× D) 465x255x82mm
Remote Control
Distance 6m
Angle 30
Standard Accessories
Remote Control . 1
Instruction Manual. 1
Subwoofer AC power cord. x 1
RCA - RCA audio Cable. x 1
3.5mm - 3.5mm audio Cable . x 1
Wall bracket . 2
IMPORTANT:
Design and specifications are subject to change without notice.
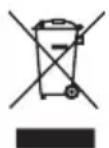
Warning! This logo set on the product means that the recycling of this apparatus comes within the framework of the Directive 2002/96/CE of January 27, 2003 concerning the Waste of Electrical and Electronic Equipment (WEEE).
This symbol means that used electrical and electronic products should not be mixed with general household wste. There is a separate collection system for these products.
If you want to dispose of this equipment, please do not use the ordinary dust bin!
- The presence of dangerous substances in the electrical and electronic equipments can have potential consequences on the environment and human health in the cycle of reprocessing this product.
- Therefore, at the end of its lifetime, this product shall not be disposed with other non-recycled waste. Used electrical and electronic equipment must be treated separately and in accordance with legislation that requires proper treatment, recovery and recycling of used electrical and electronic equipment.
- Local authorities and resellers have set special procedures for the purpose of collecting and recycling this product (please contact your local authority for further details). You have the obligation to use the selective waste collection systems put in place by your local authority.
- If your used electrical or electronic equipment has batteries or accumulators, please dispose of these separately beforehand according to local requirements.
- By disposing of this product correctly you will help ensure that the waste undergoes the necessary treatment, recovery and recycling and thus prevent potential negative effects on the environment and human health which could otherwise arise due to inappropriate waste handling.

This unit complies with European Council Directive 2006 / 95 CE (Electromagnetic Compatibility & Low Voltage Directives)