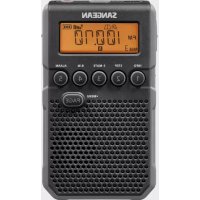
DCR9 - Alarm clock radio SANGEAN - Free user manual and instructions
Find the device manual for free DCR9 SANGEAN in PDF.

| Product type | Clock radio |
| Brand | Sangean |
| Model | DCR9 |
| FM frequency range | 87.5 - 108 MHz |
| DAB frequency range | Band III 174.928 - 239.200 MHz, Band L 1452 - 1492 MHz (DCR-209 only) |
| Speaker | 77 mm (3 inches), 8 ohms |
| Output power | 0.9 Watts |
| Power supply | 100 V - 240 V AC |
| Main functions | DAB+ and FM reception, radio and tone alarm, programmable sleep timer, 5 presets per band, adjustable backlight display (8 levels) |
| Headphone jack | 3.5 mm diameter |
| Antenna | Telescopic antenna (can be replaced with a wired antenna) |
| Weight | Approx. 0.5 kg |
| Dimensions (approx.) | 200 x 120 x 80 mm |
| Maintenance and cleaning | Clean only with a dry cloth |
| Safety | Do not expose to water, moisture, or temperatures above 70 °C |
| Spare parts and repairability | Optional wired antenna, wrench for lock nut supplied for telescopic antenna replacement |
| General information | Recommended use of DAB band for better quality and less interference |
Frequently Asked Questions - DCR9 SANGEAN
User questions about DCR9 SANGEAN
0 question about this device. Answer the ones you know or ask your own.
Ask a new question about this device
Download the instructions for your Alarm clock radio in PDF format for free! Find your manual DCR9 - SANGEAN and take your electronic device back in hand. On this page are published all the documents necessary for the use of your device. DCR9 by SANGEAN.
USER MANUAL DCR9 SANGEAN
Operatinginstruction GB
Mode d'emploi F
Please read this manual before use
Contents
IMPORTANT SAFETY INSTRUCTIONS....2
Controls....3-4
Mainsoperation....5
Operatingyourradio-DAB....6
Selectingastation-DAB....7
Secondaryservices-DAB....8
Displaymodes-DAB....8
Finding new stations - DAB 9
Autoselect-DAB....9
Manualtuning-DAB....10
Signal strength display - DAB 10
Operatingyourradio-FM....11
Manualtuning-FM....12
Displaymodes-FM....13
FMstereolmono....13
Presettingstations-FM....14
Recallingapresetstation-DABandFM....14
Systemreset....15
SelectLbandchannelsforCanada(DCR-209only)....15
Settingthealarmtime....16
Selectingalarmtype....17
Cancellingalarms....18
Snoozefunction....18
Sleeptimer....19
Headphone socket 20
Displaybacklight....20
Aerials....21
Specifications....21
Circuitfeatures....21
General....22
IMPORTANT SAFETY INSTRUCTIONS
-
Read these instructions.
-
Keep these instructions.
-
Heed all warnings.
-
Follow all instructions.
-
Do not use this apparatus near water.
-
Clean only with dry cloth.
-
Do not block any ventilation openings. Install in accordance with the manufacturer's instructions.
-
Do not install near any heat sources such as radiators, heat registers, stoves, or other apparatus (including amplifiers) that produce heat.
-
Do not defeat the safety purpose of the polarized or grounding-type plug. A polarized plug has two blades with one wider than the other. A grounding type plug has two blades and a third grounding prong. The wide blade or the third prong are provided for your safety. If the provided plug does not fit into your outlet, consult an electrician for replacement of the obsolete outlet.
-
Protect the power cord from being walked on or pinched particularly at plugs, convenience receptacles, and the point where they exit from the apparatus.
-
Only use attachments/accessories specified by the manufacturer.
-
Use only with the cart, stand, tripod, bracket, or table specified by the manufacturer, or sold with the apparatus. When a cart is used, use caution when moving the cart/apparatus combination to avoid injury from tip-over.
-
Unplug this apparatus during lightning storms or when unused for long periods of time.
-
Refer all servicing to qualified service personnel. Servicing is required when the apparatus has been damaged in any way, such as power-supply cord or plug is damaged. liquid has been spilled or objects have fallen into the apparatus, the apparatus has been exposed to rain or moisture, does not operate normally, or has been dropped.
-
To Reduce the Risk of Fire or Electric Shock, Do not Expose This Appliance To Rain or Moisture.
-
The Shock Hazard Marking and Associated Graphical Symbol is provided on the bottom panel of unit.
-
Apparatus shall not be exposed to dripping or splashing and no objects filled with liquids, shall not be placed on the apparatus.
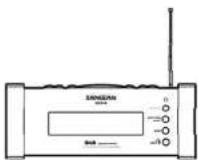
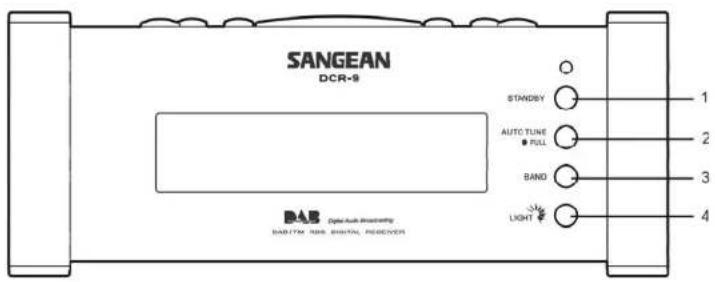
Controls(Front)
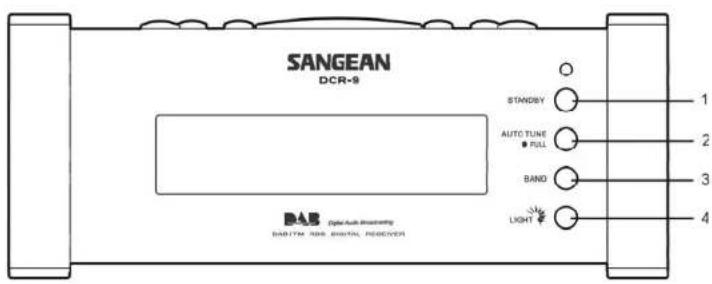
- StandBy button
- Autotune button
- Waveband button
- Light button
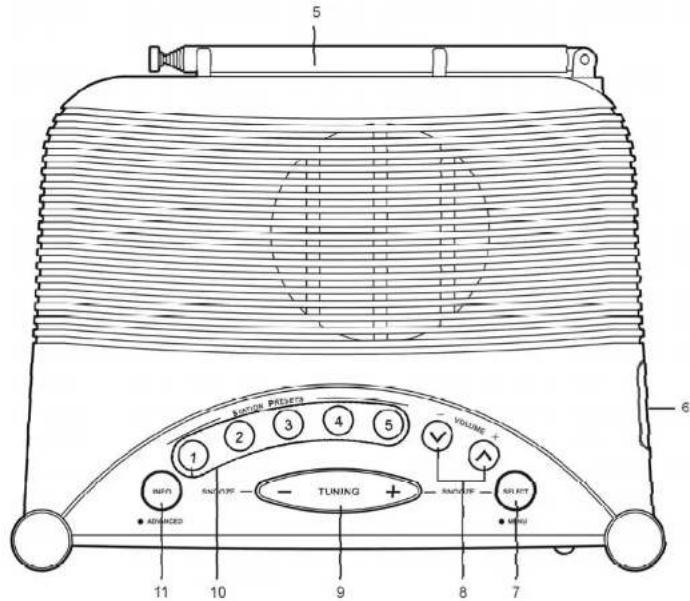
Controls(Top)
GB
- Telescopic aerial
- Headphone socket
- Select button
- Volume up/down buttons
- Tuning up/down buttons
- Preset buttons
- Info button
Mainsoperation
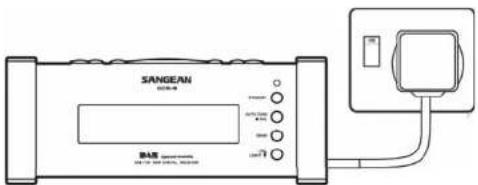
- Place the unit on a flat surface. Plug the mains lead into a wall socket and switch on the wall socket.
- The display will show "DAB digital radio" for a few seconds before returning to clock display.
- The clock time will be automatically set after your clock radio has been has been tuned to a DAB station for a few minutes.
Operatingyourradio-DAB
- Fully extend the telescopic aerial.
- Press the StandBy button to switch on your radio.
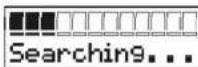
- If this is the first time the radio is used a quick scan DAB channels will be carried out. The display will show "Autotune Quick scan". If the radio has been used before the last used station will be selected.
- During Autotune as each group of stations is detected the bottom line of the display will show its name and the station count will be updated. The top line of the display shows a bargraph indicating progress of the Autotune.
- When the Auto tune is complete the first station (in numeric-alpha order 0...9...A...Z) will be selected.
- If the station list is still empty after the Autotune your radio will display "No Signal".
- If no signals are found it may be necessary to relocate your radio to as position giving better reception.
STANDBY

Autotune
Quick scan
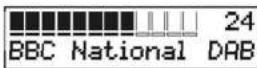


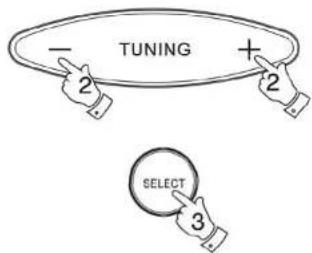
Selectingastation-DAB
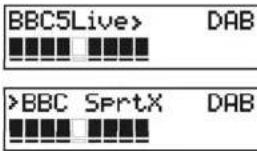
- The top line of the display shows the name of the station currently selected.
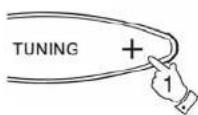
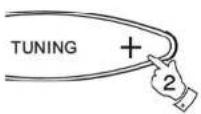
- Press the Tuning up or down buttons to step through the list of available stations.
- Press and release the Select button to select the station. The display may show "Tuning" while your radio finds the new station.
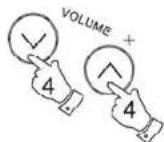
- Adjust the Volumecontrol to the required setting.
Note: If after selecting a station the display shows "Not Available" it may be necessary to relocate your radio to a position giving better reception.


Secondaryservices-DAB
- Certain radio stations have one or more secondary services associated with them. If a station has a secondary service associated with it the display will show "next to the station name on the station list. The secondary service will then appear immediately after the primary service as you move through the tuning list.
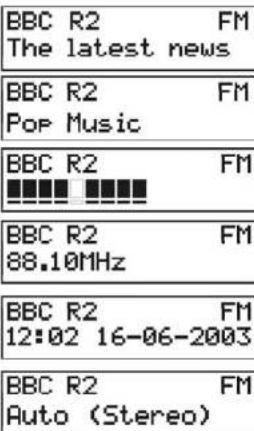
Displaymodes-DAB
Your radio has five display modes:-
- Press the Info button to cycle through the various modes.
a. Scrolling text Displays scrolling text messages such as artist/track name, phone in number, etc.
b. Programme type Displays type of station being listened to e.g. Pop, Classic, News, etc.
c. Multiplex Name Displays name of multiplex to which current station belongs.
d. Signal strength Displays signal strength for station being listened to.
e. Time and date Displays current time and date.

GB
a BBC 7 DAB Just a Minute...
BBC 7 DAB Culture
BBC 7 DAB BBC National DAB
d BBC 7 DAB
BBC 7 DAB 19:17 08-06-2003
Findingnewstations-DAB
As time passes new stations may become available. To find new stations proceed as follows:-
- Press and release the AutoTunebutton, the display will show "Autotune Quick Scan". Your radio will perform a scan of the DAB frequencies. As new stations are found the station counter on the right-hand side of the display will increase and stations will be added to the list
- To carry out a full scan of the entire DAB Band III frequencies press and hold down the AutoTune button for more than 2 seconds and then release. The display will show "Autotune Full scan". As new stations are found the station counter on the right-hand side of the display will increase and stations will be added to the list
AUTO TUNE ● FULL

Autotune Quick scan
AUTO TUNE FULL

BBC National 24 DAB
Autotune Full scan
Autoselect-DAB
As an alternative to pressing the tuning control to select a station your radio can be set so as to automatically select a station.
- Press either the Tuningupordownbuttons a few times, immediately press and hold in the Select button until the display shows "Autoselect ON".
- Scroll through the tuning list using the Tuning up or down buttons until the station you require is visible on the display, after a few seconds your radio will automatically select the station shown on the display.
- To switch off Autoselect press either the Tuning up or down buttons a few times, immediately press and hold in the Select button until the display shows "Autoselect OFF".
Autoselect ON
BBC 7 DAB BBC National DAB

Autoselect OFF
ManualTuning-DAB
Manual tuning allows you to tune directly to the various DAB Band III channels.
- Press and hold in the Select button until the display shows "Manual tune".
- Press the Tuningupordownbuttonsto find the required DAB channel.
- Press and release the Select button to select the channel.
- Press the Tuning up or down buttons to select the stations contained within the Multiplex for the selected DAB channel.
- Press and release the Select button to return to normal tuning mode.

Manual tune
12B 225.648 MHz BBC National DAB
BBC 7 MAN BBC National DAB
BBC 7 DAB BBC National DAB
GB
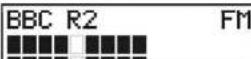
Signalstrengthdisplay-DAB
- Repeatedly press and release the Info button until the lower line of the display shows signal strength.
- Position your radio and angle the telescopic aerial for best reception using the signal strength display as a guide. Move your radio around and position so as to give maximum number of black rectangles on signal strength display.
- The clear unfilled rectangle indicates minimum signal level required for satisfactory reception.

BBC 7 DAB
Operatingyourradio-FM
- Fully extend the telescopic aerial.
- Press the StandBy button to switch on your radio. The display will show "DAB digital radio" for a few seconds.
- Press the Band button to select the FM band.
- Press and immediately release the Auto Tune button, your radio will scan in an upwards direction (low frequency to high frequency) and stop automatically when it finds a station of sufficient strength.
- After a few seconds the display will update and show station name.
- To find other stations press and release the AutoTune button as before.
- To scan the FM band in a downwards direction (high frequency to low frequency) press and hold down the AutoTune button for 0.5 seconds and then release.
- When the waveband end is reached your radio will recommend tuning from the opposite waveband end.
- Adjust the Volumecontrol to the required settings.
- To switch off your radio press the StandBy button.
STANDBY

BAND

AUTO TUNE ● FULL


STANDBY

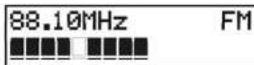
Manualtuning-FM
- Press the StandBybuttonto switch on your radio.
- Press the FMIDAB button to select the FM band. Fully extend the Telescopicaerial.
- Press the Tuning up or down buttons to tune to a station. The frequency will change in steps of 50kHz.
- When the waveband end is reached the radio will recommence tuning from the opposite waveband end.
- Set the Volumecontrol to the desired setting.
- To switch off your radio press the StandBy button.
STANDBY

BAND


GB
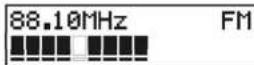
STANDBY

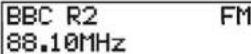
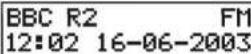
Displaymodes-FM
On FM the bottom line of the display can be set to any of the following modes:-
- Press the Infobutton to cycle through the various modes.
a. Scrolling text Displays scrolling text messages such as artist/track name, phone in number etc.
b. Program Type Displays type of station being listened to e.g. Pop, Classic, News, etc.
c. Signal strength Displays signal strength for station being listened to.
d. Time and date Displays current time and date.
e. Frequency Displays frequency of the station being listened to.
f. Audio mode Display shows Auto (stereo) or mono.

a
b

C
d
e
f
FMStereo/Mono
-
If a station being received is weak some hiss may be audible. To reduce the hiss press and hold in the Select button until the display shows "Audio mode : mono" your radio will switch to mono mode.
-
To return to stereo mode press and hold in the Select button until the display shows "Audio mode:Auto", your radio will switch to stereo mode.
Note: FM stereo is only available when using earphone/headphones


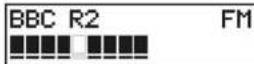
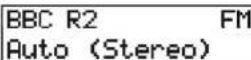
Presettingstations-DABandFM
There are 5 memory presets for each of the 2 wavebands.
- Press the StandBy button switch on the radio.
- Tune to the required station as previously described.
- Press and hold down the required Preset button until the display shows e.g. "Preset 1 stored". The station will be stored under the chosen preset button. Repeat this procedure for the remaining presets.
- Stations stored in preset memories may be overwritten by following the above procedure.
STANDBY

flowchart
graph TD
    A["1"] --> B["2"]
    B --> C["3"]
    C --> D["4"]
    D --> E["5"]
BBC R2 DAB Preset 1 stored
GB
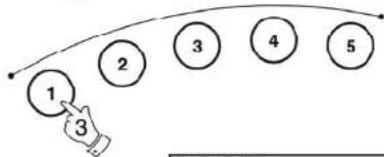
Recallingapresetstation-DABandFM
- Press the StandBy button to switch on the radio.
- Select the required waveband by pressing the Bandbutton.
- Momentarily press the required Preset button, your radio will tune to the station stored in preset memory.
STANDEY

flowchart
graph TD
    A["1"] --> B["2"]
    B --> C["3"]
    C --> D["4"]
    D --> E["5"]
1Xtra DAB BBC National DAB
Systemreset
If your radio fails to operate correctly, or some digits on the display are missing or incomplete carry out the following procedure.
- Press and hold in the Infobutton until the display shows the software version.
- Press the Info button twice the display will show System reset.
- Press in and release the Select button to select System reset.
- If DAB was used last then a "Quick scan" of the DAB band will be performed, otherwise a "Quick scan" will be carried out the next time the DAB band is selected.


System reset
Autotune Quick scan


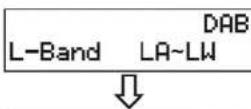
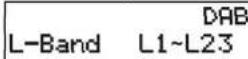
SelectLbandchannelsforCanada(DCR-209only)
L band channels in Canada and Europe are different. Initial setting for L band channels of this receiver is for Europe (Quick scan 10A-LK and Full scan 5A-LW). For Canada, following steps should be taken to select suitable L band channels in Canada (Quick scan L1-L23 and 5A-L23 full scan).
- Press and hold the Info button until display shows software version.
- Press the Info button twice, the display will show L band.
- Press Select button to change the L band channels LA-LW (for Europe) to be L1-L23 (for Canada).


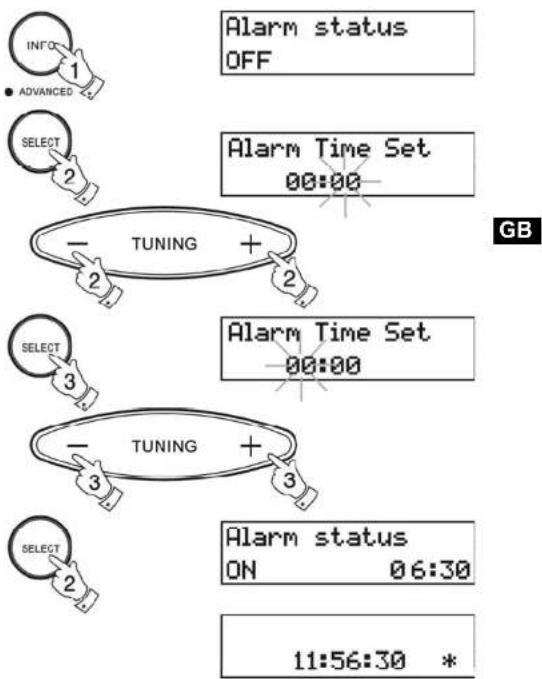
Settingthealarmtime
- Repeatedly press and release the Info button until the display shows AlarmStatus.
- Press the Select button the display will show Alarm Time Set. The minutes digits will begin to flash in the display. Set the required minute using the TuningUp/Downbuttons.
- Press the Select button. The hours digits will begin to flash in the display. Set the required hour using the Tuning Up/Down buttons.
- Press the Select button to confirm the alarm setting. The display will show Alarm Status On together with the alarm time. After a few seconds the display will revert to showing real time.
A * symbol will appear in the display indicating that the alarm is active.
Note: Alarmtimes areset using 24Hrformate. g. 2:30PM is entered as 14:30
flowchart
graph TD
    A["INFO"] --> B["1"]
    C["ADVANCED"] --> D["2"]
    E["SELECT"] --> F["2"]
    G["TUNING"] --> H["+"]
    I["SELECT"] --> J["3"]
    K["TUNING"] --> L["+"]
    M["SELECT"] --> N["2"]
    O["Alarm status OFF"] --> P["Alarm Time Set 00:00"]
    Q["Alarm status ON 06:30"] --> R["11:56:30 *"]
Selectingalarmtype
Your clock radio can be set so as to wake you to either radio or beep type alarm.
- Repeatedly press and release the Info button until the display shows AlarmStatus.
- Press either the Tuning Up or Down buttons to enter alarm type setting.
- Press the Selectbutton to change between Radio and Beep alarms.
- Press the Info button to confirm the selection.
Note: when alarm is set to wake by radio your clock radio switchontothelastusedstation.

Alarm status ON 06:30

Alarm Type RADIO

Alarm Type BEEP

Cancellingalarms
- Whilst an alarm is sounding it can be cancelled for 24 hours by pressing the Standbybutton.
- To permanently cancel an alarm proceed as follows:-
- Repeatedly press and release the Info button until the display shows AlarmStatus.
- Press the Select button to change alarm status to OFF.
STANDBY


Alarm status ON 06:30

GB
Alarm status OFF
Snoozefunction
- The radio or beep alarm can be silenced for 5 minutes by pressing the Tuning Up/Down or Select buttons. The display will show .Z *
- This sequence can be repeated during the 1 hour radio or 30 minute beep alarm period.

06:30:30 z*
Sleeptimer
The sleep timer can only be set when the power (Standby) is on.
- Repeatedly press and release the Infobutton until the display shows SleepStatus.
- Press the Select button to select Sleep On.
- Select the required sleep time (1-99 minutes) using the Tuning Up orDownbuttons.
- Press the Select button to confirm the sleep timer setting.
- Thedisplaywillshowsleeptimebeforereturningtonormal radiodisplay.Theradiowillswitchoffafterthesleeptime haselapsed.

Sleep status OFF

Sleep status ON
Sleep Timer Set 10 min

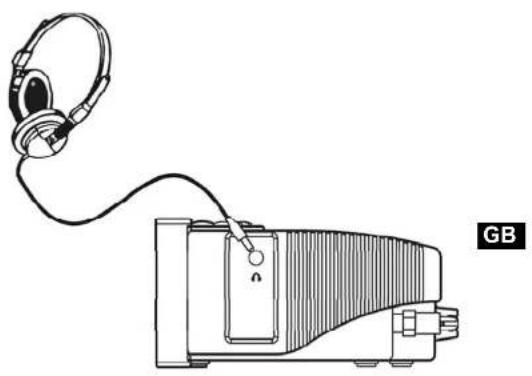
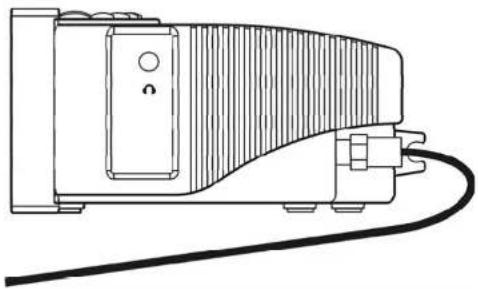
Headphonesocket
A 3.5mm Headphone Socket located on the right-hand end of your radio is provided for use with either headphones or an earpiece. Inserting a plug automatically mutes the internal loudspeaker.
natural_image
Line drawing of a handheld electronic device connected to a speaker (no text or symbols)Displaybacklight
- The display backlight has eight levels including off and can be set by repeatedly pressing and releasing the Light button.

Aerials
As supplied your clock radio is fitted with a telescopic aerial. Should this prove inconvenient a separate wire aerial can be fitted in place of the telescopic aerial.
A spanner is provided to allow removal of the telescopic aerial. The wire aerial can then be plugged in place of the telescopic aerial.
Note : In areas where signals are weak the wire aerial may not prove to be as effective as the telescopic aerial.
natural_image
Line drawing of a mechanical device with a curved top and connected cables (no text or symbols)Specifications
PowerRequirements
Mains AC 230 volts, 50Hz only

FrequencyCoverage
FM 87.5 - 108MHz
DAB
Band 3 174.928 - 239.200MHz
L Band 1452 - 1492MHz(DCR-209)only
CircuitFeatures
Loudspeaker 77mm(3 inches), 8ohms
Output Power 0.9 Watts
Headphone socket 3.5mm dia
Aerial System FM Telescopic aerial or alternative wire aerial
DAB Telescopic aerial or alternative wire aerial
General
Do not allow this unit to be exposed to moisture (e.g. dripping or splashing) or to temperatures exceeding 70 degrees centigrade. It is recommended that the DAB band be used wherever possible as better results in terms of quality and freedom from interference will usually be obtained than on the FM band.


natural_image
Simple line drawing of an umbrella inside a circle with raindrops (no text or symbols)GB


Tabledesmatières
IMPORTANTESMESURESDESÉCURITÉ....25
Commandes....26-27
Commandes(Faceavant)
F
natural_image
Line drawing of a portable electronic device with headphones and a cable, no text or symbols presentnatural_image
Line drawing of a mechanical device with a curved top and connected cables (no text or symbols)F
Spécifications
Alimentationrequire
Réseau électrique
CA 230 volts, 50Hz Oniquement

natural_image
Simple line drawing of an umbrella inside a circle with vertical lines (no text or symbols)

Contenido
natural_image
Line drawing of a portable electronic device with headphones connected to a cable (no text or symbols)natural_image
Line drawing of a mechanical device with a curved top and connected cables (no text or symbols)Especificaciones

natural_image
Simple line drawing of an umbrella inside a circle with raindrops (no text or symbols)E


Inhoud
BELANGRIJKE VEILIGHEIDSINSTRUCTIES.... 71
Besturingen....72-73
Netvoeding....74
Uw radio besturen - DAB 75
Vooraf ingestelde stations - FM 83
Specifications....90
Circuitkenmerken....90
Algemeen....91
BELANGRIJKEVEILIGHEIDSINSTRUCTIES
natural_image
Line drawing of a portable electronic device with headphones and a cable, no text or symbols presentWeergaveachterlicht
natural_image
Line drawing of a mechanical device with a curved top and connected cables (no text or symbols)Specifications
PowerRequirements
Netvoeding
Frequentiedekking
AC 230 volt, 50Hz alleen
FM 87.5 - 108MHz
DAB
Band 3 174.928 - 239.200MHz
L Band 1452 - 1492MHz
(DCR-209)alleen
Circuitkenmerken
Luidspreker
77 mm (3 inches), 8 ohms
Uitvoervermogen
0.9 Watt
Mof koptelefoon
3.5mm dia
Antennesysteem

natural_image
Simple line drawing of an umbrella inside a circle with vertical lines (no text or symbols)


Inhalt
natural_image
Line drawing of a portable electronic device with headphones connected to a cable (no text or symbols)natural_image
Line drawing of a mechanical device with a curved top and connected cables (no text or symbols)TechnischeDaten
Stromversorgung
Netzbetrieb
230 V m/s 50 Hz

natural_image
Simple line drawing of an umbrella inside a circle with raindrops (no text or symbols)