USER MANUAL DT800 SANGEAN
MIX
Paper | Supporting
responsible forestry
FSC™ C200879
3A81h0110001A
CE
SANGEAN
SINCE 1974
DT-800
GB Operating instructions .... 02 - 15
natural_image
Line drawing of a portable electronic device with a display and control buttons (no text or symbols)
Important safety instructions
- Read and understand all safety and operating instructions before the radio is operated.
- Retain instructions: The safety and operating instructions should be retained for further reference.
- Heed warnings. All warnings on your radio and operating instructions should be followed.
- Follow all operations and use instructions.
- Water and moisture: Your radio should not be used near water. Do not use near a bathtub, washbowl, laundry tub, kitchen sink, wet basement, swimming pool, etc.
- Unplug the radio from the AC power outlet before cleaning. Use only a damp cloth for cleaning the exterior of the radio.
- Do not place the radio on an unstable cart, stand, bracket or table. The radio may fall, causing serious personal injury and damage to the radio.
- Ventilation: This radio should be situated so that its location or position does not interfere with its proper ventilation. For example, the radio should not be used on a bed, sofa, rug or other soft surfaces that may block the ventilation openings. It should not be placed in a built-in situation like a cabinet that may reduce air flow through the ventilation openings.
- Power sources: The radio should be operated only from the type of power source indicated on the marking label. If you are not sure of the type of power supply to your home, consult your radio dealer or power company.
- AC adaptor: The AC adaptor should be positioned so it is not walked on, pinched, or items placed on top of it. Pay particular attention to wires at the plug end, receptacles, Wall Outlet and the point where they exit from the unit. Unplug the AC adaptor by gripping the adaptor, not the wire. Operate the radio using only the current type of power source indicated. If you are not sure of the type of power supply to your home, consult your dealer or local power company.
- Do not overload wall outlets or extension cords. This can result in a risk of fire or electrical shock. Never insert objects of any kind into the radio. The objects may touch dangerous voltage points or short out parts. This could cause a fire or electrical shock.
- If the radio is left unattended or unused for long periods of time, unplug it from the wall outlet. This will prevent damage caused by lightning or power line surges.
- If the radio is left unattended and not used for a long period of time, remove the batteries. The batteries may leak and damage your radio.
-
Do not attempt to service the radio yourself. Removing the cover may expose you to dangerous voltage, and will void the warranty. Refer all servicing to authorized service personnel.
-
Never push objects of any kind into this radio through openings as they may touch dangerous voltage points or short-out parts that could result in a fire or electric shock. Never spill liquid of any kind into the product.
- The radio should be serviced by qualified service personnel when:
The power supply cord or the plug has been damaged.
Objects have fallen or liquid had been spilled into the radio.
The radio has been exposed to rain or water.
The radio does not appear to operate normally or exhibits a marked change in performance.
The radio has been dropped, or the enclosure damaged.
- To prevent possible hearing damage, do not listen at high volume levels for long periods.
Important Notes:
- It is recommended to purchase an adapter from SANGEAN that matches the power range indicated on the gift box.
- When using a non-SANGEAN adapter, the functionality of the radio may be affected, such as the reception of radio stations.
- When using an adapter that does not fall within the power range indicated on the gift box, please pay attention to the following:
(a) A higher-power PD adapter may be used, but the radio functionality, such as receiving radio stations, may be impacted.
(b) A lower-power adapter should not be used to avoid unforeseen risks.
- Recharge the batteries at least every 2 months to help extend battery life.
- Make sure the Battery Select switch inside the battery compartment is set to the "NiMH" position.
- Put the batteries in the compartment while paying attention to the correct polarity of the batteries (+ and -) as described inside the battery compartment.
- First use: Charge new batteries in one continuous, uninterrupted, charge until they are full. This first charge may take longer than normal. For longer battery life it is advised to always recharge in one continuous, uninterrupted charge until batteries are full, do not recharge again while the batteries are still full.
- New batteries will only reach their full capacity after some time of use (several charge and discharge cycles).
- Leave the complete group of batteries in place inside the radio and do not use these batteries or a few of them for other purposes. This will result in a mix of (fully) charged and (partly) empty batteries. This can seriously damage the batteries and radio when recharged.
- It is advised to only charge batteries at room temperature between 5 degrees C – 35 degrees C. In lower or higher temperatures full charge may not be achieved.
- Depending on the capacity of the batteries, charging from "empty" to "full" can take several hours, even up to 7 hours or more.
- Do not charge batteries when the radio is hot or exposed to heat or heat sources.
- It is advised to clean the metal contacts of the batteries and of the charger inside the radio e.g. with a contact-spray from time to time.
- Do not use a mix of old and new rechargeable batteries.
- Do not use a mix of rechargeable and non-rechargeable batteries.
- Do not use a mix of full and empty rechargeable batteries.
- Do not use batteries that have a different mAh capacity.
- Do not use damaged, deformed or leaking batteries.
- Battery level indication is an approximate indication only and can vary with battery type that is used.
- Batteries can become hot during charging.
- In cold conditions the capacity of batteries will be much lower than when used at normal room temperature.
- Batteries (if supplied with the radio), as being consumables, do not fall under the warranty conditions of the radio.
- Batteries should not be disposed of by incineration or with household waste.
- Disposable batteries should be taken to a suitable recycling center if possible.
- CAUTION: "Risk of explosion if the battery is replaced by an incorrect type."
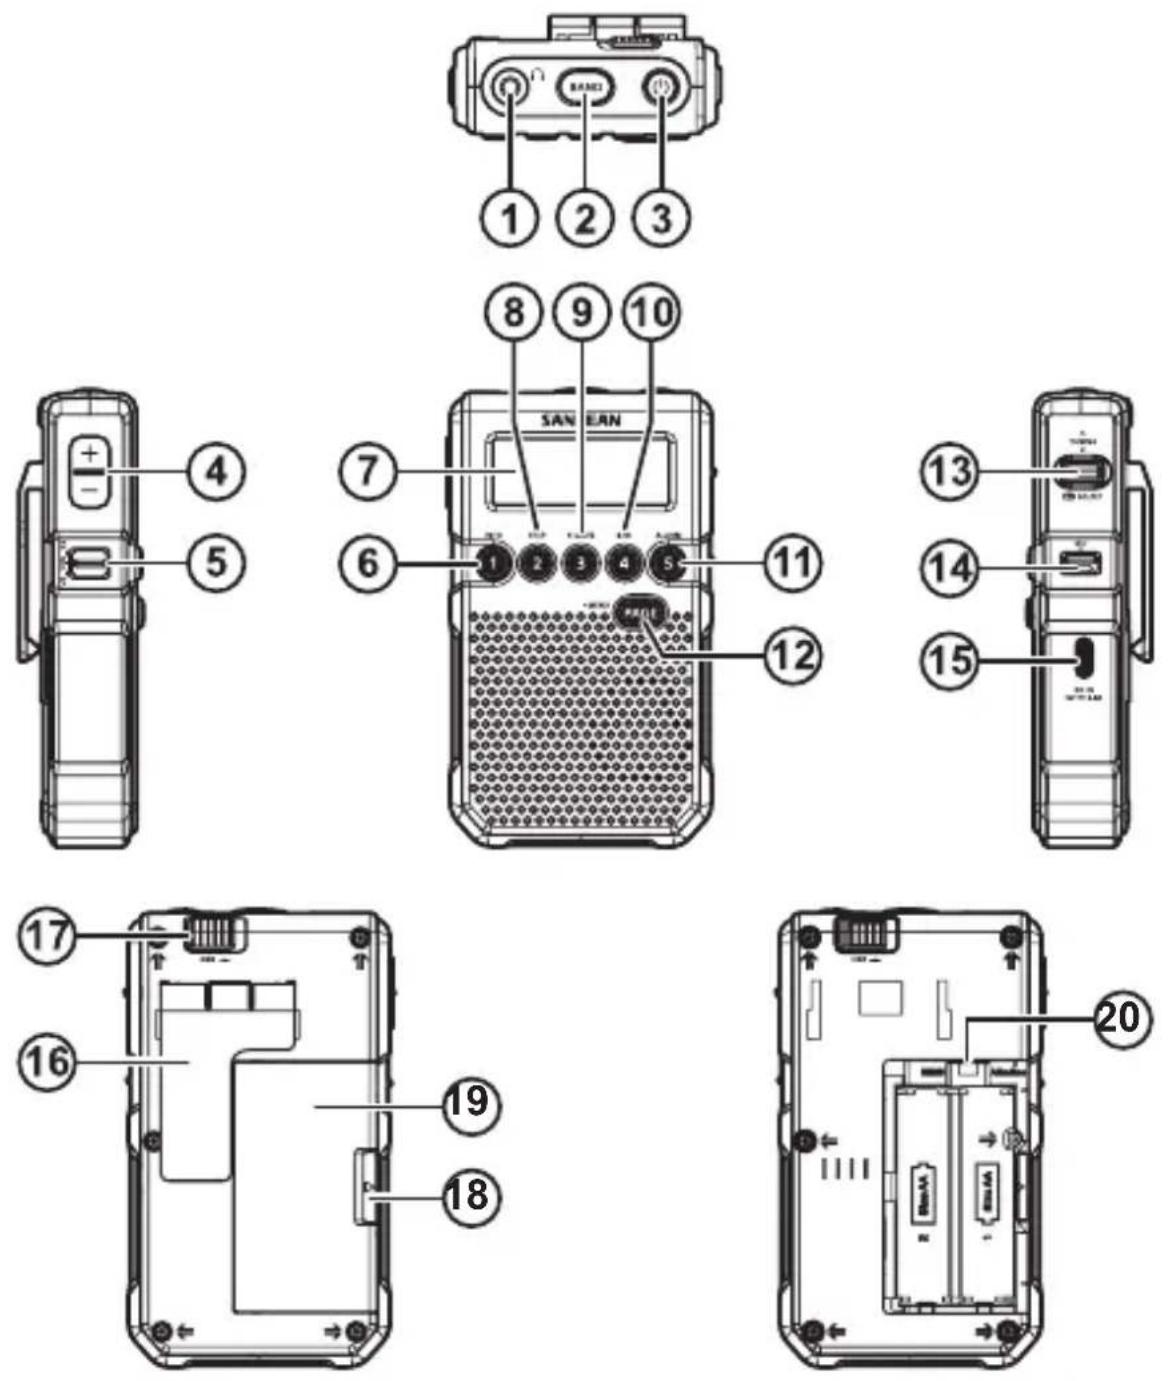
Controls
① Earphone / FM Antenna jack
The earphones also act as the FM antenna when plugged into the earphone jack. While listening via speaker, you may plug the supplied FM wire antenna into the earphones jack and set the ST / MO / SP switch to SP position.
② Band / WX Alert set button – to switch radio bands and set weather alert time period (USA version only).
③ Power switch and auto timer button – When the Power is switched on, the auto off symbol will appear on the display, the radio will turn off at selected auto off time period (see MENU TIME 90 for auto off settings). When the radio is switched off, hold the Power button for more than 2 seconds until the symbol is removed from the display and a beep is heard to cancel auto timer off.
④ Volume Control
⑤ Stereo / Mono / Speaker selection – while listening to FM via speaker, you may plug the supplied FM wire antenna into the earphones jack and set ST / MO / SP switch to SP position
⑥ Preset 1 / Information button
⑦ Display
⑧ Preset 2 / Tuning step button
⑨ Preset 3 / soft mute on / off button
⑩ Preset 4 / Band Width narrow / wide selection
⑪ Preset 5 / Alarm on / off selection
⑫ Preset PAGE / MENU button
⑬ TUNING / SELECT button – by pressing the TUNING button in it becomes the SELECT button.
⑭ Lock Switch – The Lock switch prevents accidental changing of any of the radio setting. Slide the lock switch to the up 'locked' position the symbol will appear in the display. The power and all other buttons will be disabled.
⑮ USB charging socket
⑯ Belt clip
⑰ DBB on / off – enable or disable Deep Bass Booster (for earphones use only)
18 Battery cover opening
⑲ Battery cover
⑳ Battery type switch – located inside the battery compartment
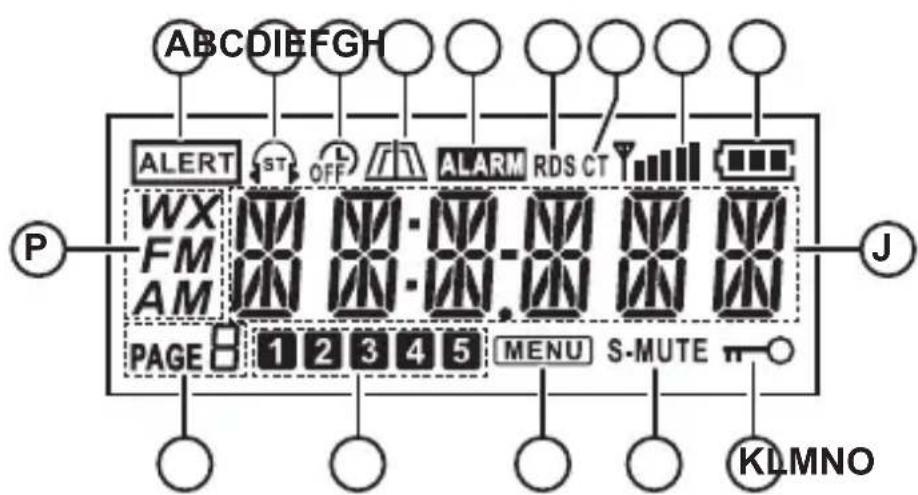
LCD display
Ⓐ Weather alert indicator (USA version only)
B Stereo tuning indicator
© Auto shut off timer indicator
(D) Narrow / Wide band width indicator
E Alarm indicator
F RDS station
© CT (auto clock set time)
H Station signal strength indicator
① Battery power indicator
J Time and radio frequency
K Lock button activated
L Soft mute indicator
M MENU indicator
N Memory preset
© Memory preset page
P Band indicator
Using the AC adaptor (not supplied in some markets)
- Place your radio on a flat surface.
- Insert the USB plug into the USB charging socket.
- Plug the AC adaptor into a standard wall outlet. Whenever the AC adaptor is used with the radio, it will take over power rather than from the batteries.
The AC adaptor should be disconnected from the power supply and the radio when not in use.
IMPORTANT: The AC adaptor is used as the means of connecting the radio to your power supply. The AC socket used for the radio must remain accessible during normal use. In order to disconnect the radio from your main power supply completely, the AC adaptor should be removed from the wall outlet completely.
Battery operation
Battery installation using alkaline batteries
- The Battery cover is located on the back of the radio, following the arrow directions slide the battery cover switch to the right side, the battery cover will pop out to allow battery installation.
- Insert two UM3 (AA size) alkaline batteries into the spaces in the compartment. Ensure all batteries are inserted with correct polarity as shown on the back of the radio. Then replace the battery cover.
IMPORTANT:
- When using alkaline batteries, the battery switch in the battery compartment must be placed in the Charge Off / Alkaline position. Failure to do so could result in serious damage to the batteries or radio.
- When the batteries are exhausted, an E will flash on the display. The radio will then switch itself off. It may not be possible to switch the radio back on until the batteries are replaced or until the radio is connected to a supplied power source.
- If the radio is not to be used for an extended period of time it is recommended that the batteries be removed from the radio.
We recommend that the DT-800 be used with the supplied AC adaptor whenever possible. If extended listening using batteries is anticipated then the use of rechargeable batteries is recommended.
Battery operation using rechargeable batteries
- Remove the battery cover by sliding the cover in the direction of the arrow.
- Slide the switch inside the battery compartment to the Charge On / NiMH position.
- Insert two rechargeable UM3 (AA size) batteries into the spaces in the compartment. Ensure all batteries are inserted with correct polarity. The radio is designed to be used with Nickel Metal Hydride (NiMH) rechargeable batteries.
- Plug the AC adaptor into your radio and then plug the AC adaptor into your wall outlet.
- The Display will cycle through the battery icon indicating batteries are charging. Batteries will be fully charged in about 7 hours depending on the battery capacity. The battery symbol will stop cycling through and will show the full battery icon when battery charging is completed.
NOTE: The radio is equipped with a battery auto check feature during charging. The Display will show BT1-NG or, BT2-NG or both with an empty battery icon indicating the rechargeable batteries have malfunctioned. Replace the batteries according to the display information. If display shows CHECK with empty battery icon, please check both batteries and the supplied AC power adaptor.
IMPORTANT: When using rechargeable batteries, the battery switch must be placed in Charge On / NiMH position. Batteries will only be charged when the radio is switched off and connected to the AC adaptor.
IMPORTANT: Use only supplied AC power adaptor to power the radio or charge the rechargeable batteries to avoid possible interference while listening to the radio.
When the batteries are exhausted, an E will flash on the display. The radio will then switch itself off. It may not be possible to switch the radio back on until the batteries are recharged or until the radio is connected to the AC adaptor.
If the radio is not to be used for any extended period of time it is recommended that the batteries be removed from the radio.
IMPORTANT: The batteries should not be exposed to excessive heat such as direct sunlight, fire etc. After use, disposable batteries should be taken to a suitable recycling center. Batteries should not be disposed of by incineration.
Lock switch
The Lock switch is used to prevent unintentional operation of your radio.
- Set the Lock switch located on the right of your radio to the 'Lock' position 📄. The power and all other buttons will be disabled, this will prevent accidental operation when your radio is packed in a suitcase or travel bag. Display will show lock icon 📄
- To release the lock, slide the lock switch down to the unlock position; the lock icon will disappear from the display.
Setting Clock Time
Upon initial use of the radio after the batteries have been installed or the AC adaptor is plugged in, the display will flash. Press the SELECT button
then press TUNING up / down button to select required hour time, press the SELECT button again to confirm hour setting. The Display will flash the minute digits. Press the TUNING up / down button to select the required minute time then press the SELECT button to complete the time setting. The Display will then show the current time.
Setting auto clock time – with RDS CT
This radio features RDS CT auto clock time. The clock can be adjusted automatically each time you tune to an FM station that has RDS CT service. You must select the clock set to Auto to enable auto clock set time.
While radio is on or off, press and hold the PAGE / MENU button until the display flashes MENU and a beep is heard to enter the MENU. When the display is flashing MENU, press the TUNING button up or down to find CLKSET, press the SELECT button to enter the clock set mode and press the TUNING up or down button to find AUTO then press the SELECT button again to select AUTO clock set. RDS CT will appear on the display for a few seconds and then the real time clock will appear.
Turn on the radio and find an FM station with RDS CT service. The display will show the clock time and RDS CT icon indicating the real time is auto set by RDS CT service.
NOTE: Once you select CLKSET to AUTO, the real time clock cannot be adjusted manually.
Tuning the radio
Stereo / Mono / Speaker selection
For speaker listening, plug in the supplied FM wire antenna into earphone jack for better FM reception; be sure to slide the stereo / mono / speaker switch to SP position.
For earbud or headphone listening, plug in your earbuds or headphones into the earphones jack, this will mute the speaker.
If the FM reception is generally good, slide the ST / MO / SP switch to ST (stereo) position to get stereo sound. If the radio signal is weak, slide the switch to MO (mono) to force the radio to play the station in mono in order to reduce the level of audio noise.
There is a built-in ferrite bar antenna for AM. Rotate the radio if necessary for better reception.
ATS tuning – Auto Tuning System
The radio features an Auto Tuning System (ATS) that will automatically store radio stations into the memory presets on the FM and AM band upon the signal strength of the incoming stations. ATS FM / ATS AM can be operated only when the radio is on.
Turn on the radio, select either the FM or AM band by pressing the BAND button. Press and hold the PAGE / MENU button to enter the MENU setting, the display will flash MENU, press the Tuning up / down button, cycle through and find ATS FM (for FM listening) or ATS AM (for AM listening) then press the SELECT button to confirm the ATS setting. The radio will start the Auto Tuning System (ATS), and store the found stations based upon the signal strength into the memory presets. The radio allows a maximum of 20 presets in 4 memory pages both on the FM and AM bands. The Weather band does not feature Auto Tuning System.
Seek Tuning
- Turn your radio on by pressing and releasing the Power button located on the top of the radio.
- Select the desired band by pressing the Band selector button.
- Press the tuning button up or down then press the SELECT button to confirm seek tuning, radio will seek and stop at the next active signal station.
- Repeat as many times as desired.
Manual Tuning
- Turn your radio on by pressing and releasing the Power button.
- Select the desired band by pressing the Band selector button.
- Press the Tuning button up or down repeatedly until the desired frequency is found.
Preset memory stations
The radio has 20 memory presets each for AM and FM bands, 5 memory presets in weather band (USA version only) a total of 45 memory presets (40 presets for EU version only). The preset stations can be stored into 4 memory pages and 5 presets in each memory page for both the AM and FM bands. The Weather band (USA version only) has no memory page.
- Tune to your desired station using either ATS, Seek Tuning or Manual Tuning as described above.
- Press and release the PAGE button and cycle through the memory page 1-4 to select the required memory page you'd like to store the station in. The Weather band (USA version only) has no memory page.
- Press and hold the desired preset button (1-5) until display memory digit stops flashing and a beep is heard. The radio station is stored into the selected memory preset. The Display will appear with the memory page and preset number.
Recall memory station
To recall stations already programmed into the memory presets.
- Turn your radio on and select the required frequency band.
- Select the memory preset page by pressing the PAGE button and cycling through until you find the page you want.
- Press the desired preset button (1-5) to recall required preset station.
Edit memory preset stations
To move a preset station to another preset position (e.g. from P1 to P5), recall the preset station P1 following the above recall memory station, the display will flash P1, press and hold the new position P5 until a beep is heard indicating the preset station has been changed.
NOTE: The preset stations can not be deleted but can be overwritten.
Weather Band and weather alert operation (USA version only)
- Turn the radio on, press the BAND button to get the weather band. The display will show WX and channel number. Press the Tuning Up or Down button to cycle through 1ch to 7 ch. Most of the areas in the US can only get one weather band channel. The channel with broadcasting service is normally the local weather station in your area.
1ch to 7ch frequencies are:
162.400 162.425 162.450 162.475 162.500 162.525 162.550
To get your local weather station information, you can visit NOAA's website at http://www.nws.noaa.gov/nwr
To get a better signal, it is recommended to plug in the supplied FM wire antenna into the earphones jack.
- When the radio is in the weather band mode, press and hold the BAND button until ALERT appears on the display. Continuously press and hold the BAND button, this will cycle through the required 2-4-6-8-16 H (hour) of ALERT time. Release the BAND button when the required alert time is chosen. The Display will appear with ALERT indicating the weather alert function is activated.
- When the weather alert sounds, press any button to enter the weather band.
- When the set Alert time has elapsed, the Alert is deactivated and ALERT disappears from display.
- To cancel a weather alert, press and hold the BAND button until the display appears OFF and ALERT disappears from display.
Settings are available in the MENU. MENU settings can be done with the radio on or off.
Press and hold the PAGE (MENU) button to enter the MENU setting, the display will flash MENU.
Press the TUNING button up or down to cycle through P01 → RESET → ALMSET → CLKSET → 12/24 H → TIM 90 → BEEP → LIGHT → ATS FM (or ATS AM) → AM 10k (AM 9k for EU version) → FM 100k → 87-108.
• P01 to review software version.
- To RESET your radio – Press the SELECT button then press the TUNING up or down button to select reset. Press the SELECT button to select YES to RESET the radio. It will erase all saved settings and preset memory stations. All settings will revert to factory default.
- CLK SET (clock set) –When the display flashes MENU and CLKSET appears, press the SELECT button, the display will flash the Hour digit with AM or PM (12 hour format), press the TUNING up or down button to select the required hour, press the SELECT button again to confirm the hour setting. The Display will flash the minute digits, press the TUNING up or down button to select the required minute then press the SELECT button to confirm the real time clock setting. The Display will show the real time when the clock set is completed. Flashing MENU will disappear from display.
- ALMSET (alarm set) –When the display flashes MENU and ALMSET appears, press the SELECT button to set the required alarm clock time, the display will flash the hour digits, press the TUNING up or down button to select the
required alarm hour. Press the SELECT button again to confirm the alarm hour setting. The Display will flash the minute digits; press the TUNING up or down button to select the required alarm minute then press the SELECT button to complete the alarm time clock setting. The Display will show the ALARM icon indicating the alarm clock time is set.
When the alarm is active, it can be cancelled by pressing the Power button. To cancel the Alarm setting, press and hold the PAGE / MENU button to enter the MENU and ALMSET, press and release Preset 5 / Alarm button, the ALARM icon will disappear from the display indicating the Alarm set has been cancelled. You may press and release the PAGE / MENU button back for real time.
NOTE: Only after the real time clock is set, you are able to enter ALMSET (alarm time set) mode.
- 12/24 H – (12 hour or 24 hour clock format) – Press the SELECT button and press the TUNING up or down button to select CLK 12H or CLK 24H. Press the SELECT button to confirm 12 hour or 24 hour clock format.
- TIM 90 (Auto Off) – Press the SELECT button, the display will flash 90 (radio auto off at 90 minutes of operation). Press the TUNING up or down button to cycle through 90-120-OFF-15-30-45-60-90. Press the SELECT button to select the auto off timer time. The Auto off symbol will appear on the display. You can select OFF for non-stop radio listening, or the radio will turn itself off at the selected auto timer time. Press the Power button to continue listening.
- BEEP – Press the SELECT button, then the TUNING up or down button to select Beep ON or OFF during radio operation that requires press and hold buttons to activate e.g. enter MENU, memory preset stations etc. Press the SELECT button to confirm Beep setting.
- LIGHT – Press the SELECT button then TUNING up or down button to select the display illumination time of 10S (seconds) -20S-30S-OFF after last radio operation. Select OFF if you do not want the display illuminated during radio operation to help extend battery life.
- ATS FM / ATS AM – see operation on ATS- Auto Tuning System described above. ATS FM / ATS AM can be operated only when the radio is on.
- AM 10k – AM tuning steps vary by countries. The AM tuning steps in Northern America and Latin America are 10 kHz / tuning steps while other countries are 9kHz. Press the SELECT button then TUNING up or down button to select either 10k or 9k AM tuning step. Press the SELECT button to confirm AM tuning step setting.
- FM 100k – FM tuning step in Northern America and Latin America are normally 200kHz and 100kHz for other countries. Following the same procedures of selecting the AM tuning steps to select FM tuning step to be 50kHz, 100kHz or 200kHz.
- 87-108 – Select FM band frequency coverage. FM band frequency coverage is normally 87.50-108 MHz for most countries; however for some countries like
Japan and Russia, they may have various frequency coverage. Following the same procedures as above to cycle through and set the required FM frequency coverage to be 87-108, 76-90, 76-108 or 64-108 MHz.
Additional features and controls
The radio has additional features and controls using multi-functional preset 1-5 buttons.
Turn the radio on and tune to a radio station. Press and hold the PAGE / MENU button to enter the MENU. The display will flash the MENU icon and a beep is heard.
INFO (preset button 1) – When the display flashes the MENU icon, press and release the INFO button repeatedly to cycle through real time, alarm time, radio frequency and radio station name (station with RDS service only).
STEP (preset button 2) – When the display flashes MENU, press and release the STEP button to change AM or FM tuning step from current use. Change AM 9k or 10k tuning step to 1k tuning step, change FM tuning step 200k to 100k, 100k to 50k and 50k to 10k tuning step depending on the area the was radio sold in. Press and release the PAGE / MENU button again to confirm the tuning step change.
S-MUTE (preset button 3) – Soft Mute enable and disable - If you dislike the white noise between stations, or noise from weak signal stations you can mute this. When the display flashes MENU, press and release the S-MUTE button to enable or disable the soft mute function. The S-MUTE icon will appear on the display if the soft mute feature is selected.
B.W. (Band Width) – While listening to an FM station and there is interference from neighboring stations or while listening to an AM station with high frequency noise, when the display flashes MENU, press and release the B.W. button to select band width to Narrow, the display will appear with (narrow) or (wide). Press and release the PAGE / MENU button to confirm radio band width change.
Specifications
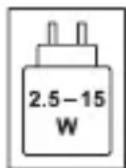
| Power Requirement | AC Power Adapter (not supplied in some markets) |
| INPUT: 100-240 V ~ 50/60 Hz 0.68A MAX |
| OUTPUT: 5V / 2.4A |
|
| Batteries | 2 x AA / LR6 / UM-3 or 2 x Ni-MH rechargeable batteries. |
|
| Battery Life | Approx. 35hours of listening with the speaker at normal volume level. |
| Approx. 70hours of listening with headphones for 4hours a day at normal volume level. |
|
| Rechargeable battery charging time | approx. 7hours. |
|
| Battery life and battery charging time depend on selected battery capacity. |
|
| Frequency Coverage |
| FM 87.50-108 MHz | |
| AM | 522-1710 kHz (9k tuning step) |
| 520-1710 kHz (10k tuning step) |
| WX (USA version only) 1-7 ch with alert |
|
| Circuit Features |
| Headphones 32ohm | |
| Output Power 1mW for headphones and 100mW for speaker |
| Speaker 8ohm, 28mm diameter | |
|
| Operating temperature range | 0°C to +35°C |
| Information on Power Consumption |
| Power standby | The device has a standby mode with a power consumption of less than 0.8W. |
| ※ The barcode label on the product is defined as below: |
 | 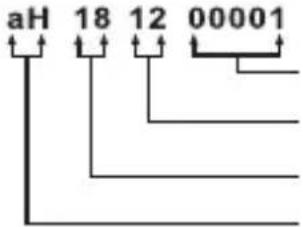 | Serial numberProduction monthProduction yearProduct code |
Sangean reserves the right to amend the specifications without notice.


RECYCLING This product bears the selective sorting symbol for Waste electrical and electronic equipment (WEEE). This means that this product must be handled pursuant to European directive 2012/19/EU in order to be recycled or dismantled to minimize its impact on the environment.