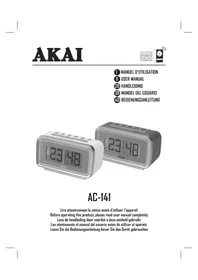
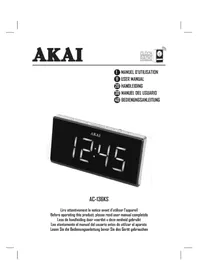
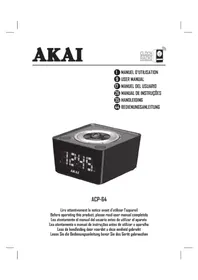
ACI7T - Alarm clock radio AKAI - Free user manual and instructions
Find the device manual for free ACI7T AKAI in PDF.
User questions about ACI7T AKAI
0 question about this device. Answer the ones you know or ask your own.
Ask a new question about this device
Download the instructions for your Alarm clock radio in PDF format for free! Find your manual ACI7T - AKAI and take your electronic device back in hand. On this page are published all the documents necessary for the use of your device. ACI7T by AKAI.
USER MANUAL ACI7T AKAI
natural_image
Smartphone displaying an Akai brand electronic device with a digital clock showing 06:56, no visible text or symbols on the device itself.ACI-7T
Lire attentivement la notice avant d'utiliser l'appareil. Before operating this product, please read completely the manual. Antes de utilizar el producto, por favor lea íntegramente el manual de usuario.

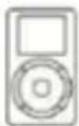
iPod is a trademark of Apple Inc., registered in the U.S. and other countries. iPod shown not included.
"Made for iPod" means that an electronic accessory has been designed to connect specifically to iPod and has been certified by the developer to meet Apple performance standards. Apple is not responsible for the operation of this device or its compliance with safety and regulatory standards.

iPhone is a trademark of Apple Inc., iPhone shown is not included.
"Works with iPhone" means that an electronic accessory has been designed to connect specifically to iPhone and has been certified by the developer to meet Apple performance standards. Apple is not responsible for the operation of this device or its compliance with safety and regulatory standards.
text_image
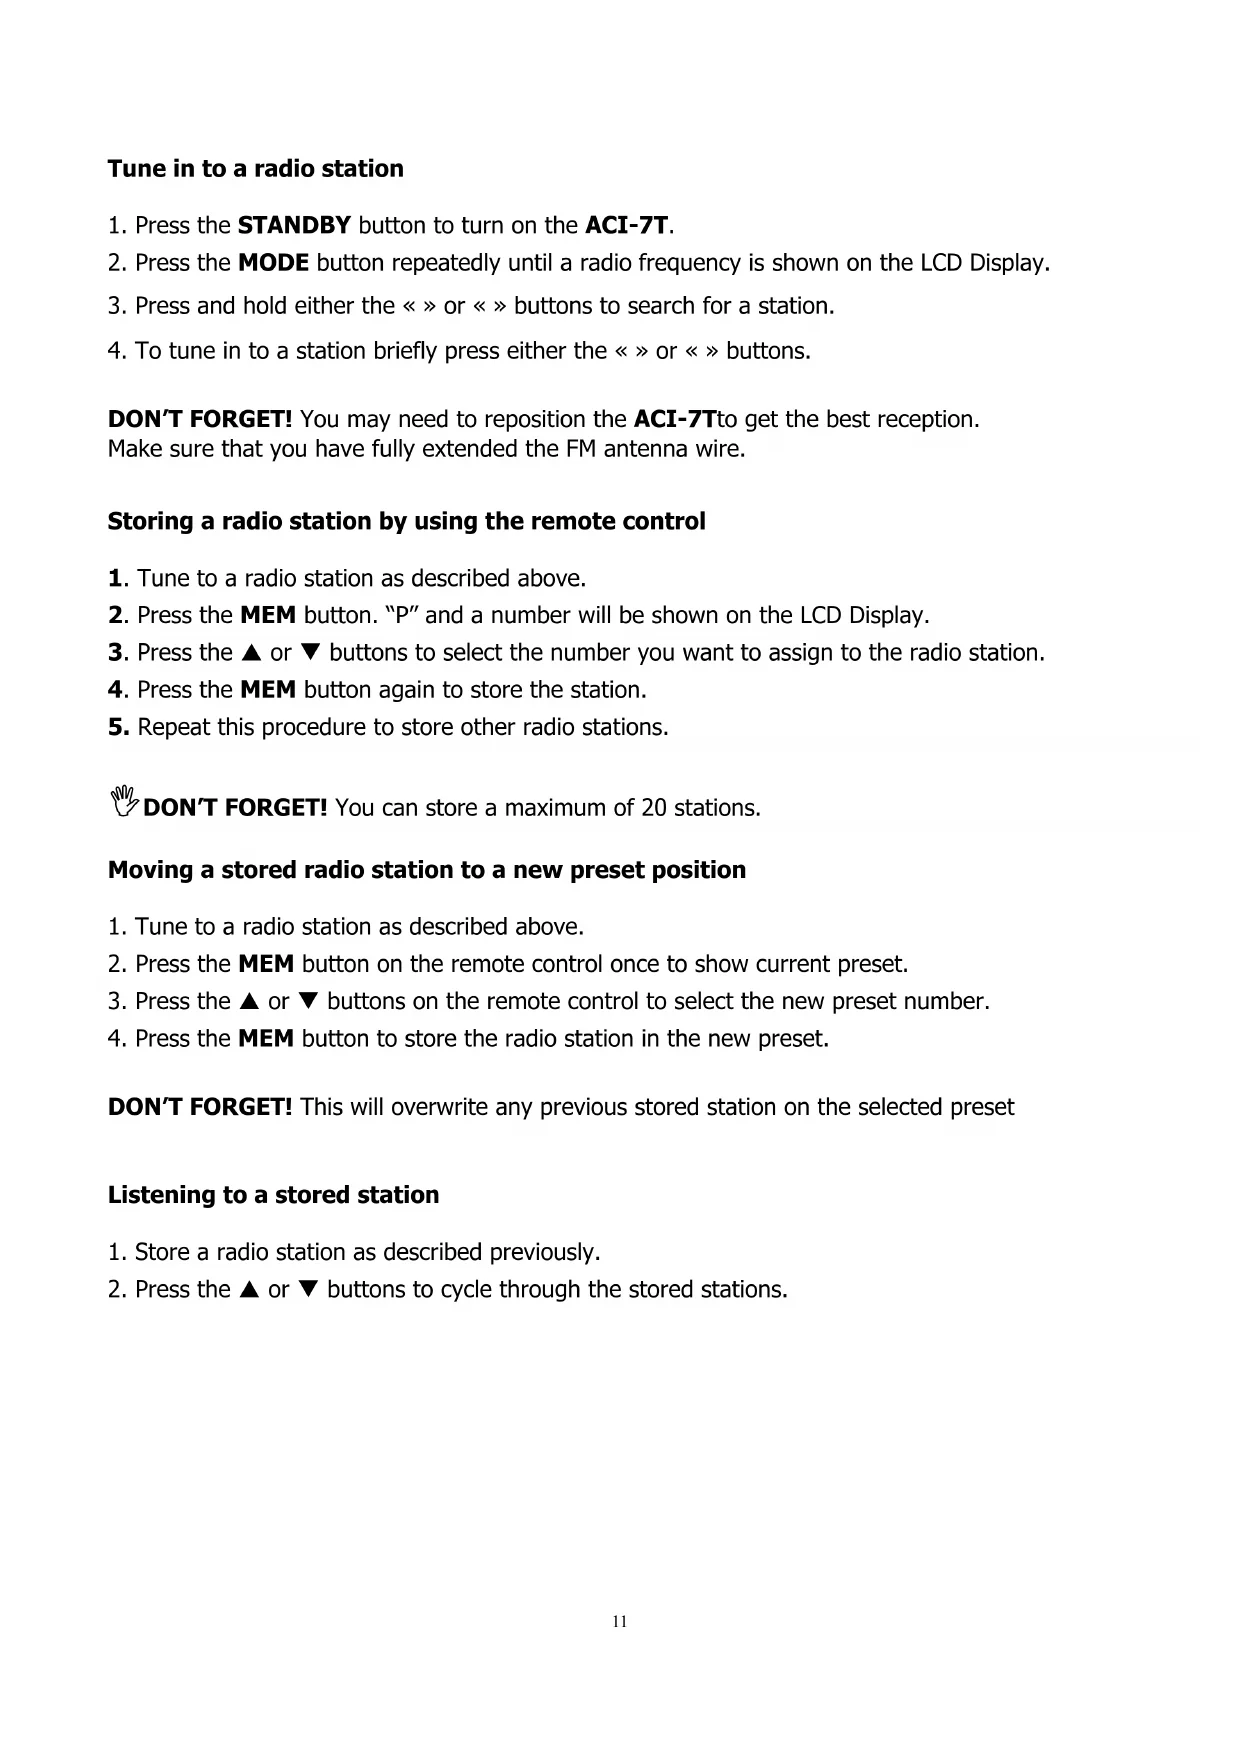
ECRAN LCDDESCRIPTION DE L'ECRAN LCD & INDICATEURS
text_image
MODE INDICATOR : iPod-FM -AUX VOLUME LEVEL INDICATOR ALARM « ON » INDICATOR AM/PM INDICATOR iPod FM AUX VOL PM 08:30 RADIO BUZZER ST MHz INDICATOR OF ALARM VOLUME LEVEL WAKE TO INDICATOR IPOD-RADIO-BUZZER STEREO INDICATOR RADIO FREQUENCY INDICATOR TIME & ALARM DISPLAY BA
text_image
1 2 3 4 5 6 7 8 9 10 SLEEP 11 12 13 14 15 16 17 18 MENU MODE OK SLEEP ALARM WAKE TOnatural_image
Simple line drawing of a rectangular device with a scroll and arrow indicating direction (no text or symbols)text_image
Rotation | StationStation d'accueil
1st + 2nd generation
5GB 10GB 20GB

Made for iPod
4th generation
20GB

Made for iPod
4th generation
40GB

Made for iPod
4th generation
(color display)
20GB 30GB

Made for iPod classic
80GB 160GB (2007)

Made for iPod classic
160GB (2009)

Made for iPod nano
1st generation
1GB 2GB 4GB

Made for iPod nano
2nd generation
(aluminum)
2GB 4GB 8GB

Made for iPod touch
1st generation
8GB 16GB 32GB

Made for iPod touch
2nd generation
8GB 16GB 32GB
Made for iPod touch
3rd generation
32GB 64GB

Made for iPod touch
4th generation
8GB 32GB 64GB

Made for iPod
4th generation
(color display)
40GB 60GB

Made for iPod
5th generation
(video)
30GB

Made for iPod
5th generation
(video)
60GB 80GB

Made for iPod mini
4GB 6GB

Made for iPod nano
3rd generation (video)
4GB 8GB

Made for iPod nano
4th generation (video)
8GB 16GB
Made for iPod nano
5th generation (video camera)
8GB 16GB

Made for iPod nano
6th generation
8GB 16GB

Made for iPhone
4GB 8GB 16GB

Made for iPhone 3G
8GB 16GB

Made for iPhone 3GS
8GB 16GB 32GB

Made for iPhone 4
16GB 32GB
GUIDE DE DEPANNAGE
natural_image
Symbol of a trash bin crossed out by two crossed lines, with no text or labels present.« Made for iPod » et « Made for iPhone » mean that an electronic accessory has been designed to connect specifically to iPod®, or iPhone®, respectively, and has been certificated by the developers to meet Apple performance standards. Apple is not responsible for the operation of this device of its compliance with safety and regulatory standards. Please note that the use of this accessory with iPod®, or iPhone may affect wireless performance.
iPhone®, iPod®, iPod®Roals@cnano, and iPod® touch are trademarks of Apple Inc., registered in the U.S. and other countries.
TABLE OF CONTENTS
Before we begin....1
Important safety instructions 2
Maintenance ....3
Preparation for use ....4
Battery back-up system....5
Description of the unit and controls 6
Display indicators 7
Description of the remote control....8
Setting and Basic operations ....9
Radio operation ....11
IPod® operation 12
Connecting to external devices 13
Table of compatibly iPod® and iPhone® 14
Trouble Shooting 15
Technical Specifications....16
IMPORTANT: Please read all instructions carefully before use and keep it for future reference
BEFORE WE BEGIN
Thank you for purchasing the AKAI ACI-7T an Alarm Clock with FM Radio function & iPod® & iPhone® Docking station. This is your assurance of quality, performance and value. Our engineers have included many useful and convenient features in this product. Please be sure to read this instruction Manual completely to make sure you are getting the maximum benefit from each feature.
This product was manufactured using the highest quality components and standards of workmanship. It was tested by inspectors and found to be in perfect working order before it left our factory. If, after reading this manual, you experience any problems with the operation of this product, please refer to the instructions for obtaining services at the end of this Manual.
For future reference, record the serial number in the space provided.
Model No: ACI-7T
Serial Number:
IMPORTANT SAFETY INSTRUCTIONS

CAUTION
RISK OF ELECTRIC SHOCK DO NOT OPEN

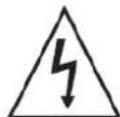
The lightning flash with arrowhead symbol within an equilateral triangle is intended to alert the user to the presence of uninsulated dangerous voltage within the product enclosure that may be of sufficient magnitude to constitute a risk of electric shock to persons.

The exclamation point within an equilateral triangle is intended to alert the user to the presence of important operating and maintenance (servicing) instructions in the literature accompanying the appliance.
- READ INSTRUCTIONS -- All the safety and operating instructions should be read before the product is operated.
- RETAIN INSTRUCTIONS -- The safety and operating instructions should be retained for future reference.
- HEED WARNINGS --- All warnings on the product and in the operating instructions should be adhered to.
- FOLLOW INSTRUCTIONS -- All operating and use instructions should be followed.
- CLEANING --- Unplug this product from the wall outlet before cleaning. Do not use liquid cleaners or aerosol cleaners. Uses a damp cloth for cleaning.
- ATTACHMENTS --- Do not use attachments not recommended by the product manufacturer as they may cause hazards.
- WATER AND MOISTURE --- Do not use this product near water - for example, near a bath tub , wash bowl, kitchen sink, or lau ndry tub; in a wet basement; or near a swimming pool; and the like.
- ACCESSORIES --- Do not place this product on an unstable cart, stand, tripod, bracket, or table.
The product may fall, causing serious injury to a child or adult, and serious damage to the ptoduct. Use only with a cart, stand, tripod, bracket, or table recommended by the manufacturer, or sold with the product. Any mounting of the product should follow the manufacturer instructions, and should use a mounting accessory recommended by the manufacturer.
A Product and Cart Combination Should Be Moved with Care - Quick stops, excessive force and uneven surfaces may cause the product and cart combination to overturn.

-
VENTILATION --- Slots and openings in the cabinet are provided for ventilation and to ensure reliable operation of the product and to protect it from overheating, and these openings must not be blocked or covered. The openings should never be blocked by placing the product on a bed, sofa, rug or other similar surface. This product should not be placed in a built-in installation, such as a bookcase or rack, unless proper ventilation is provided or the manufacturer* instructions have been adhered to.
-
POWER SOURCES --- This product should be operated only from the type of power source indicated on the marking label. If you are not sure of the type of power supply to your home, consult your product dealer or local power company. For products intended to operate from battery power, or other sources, refer to the operating instructions.
-
GROUNDING OR POLARIZATION --- This product may be equipped with a polarized alternating-current line plug (a plug having one blade wider than the other). This plug will fit into the power outlet only one way. This is a safety feature: If you are unable to insert the plug fully into the outlet, try reversing the plug. If the plug should still fail to fit, contact your electrician to replace your obsolete outlet. Do not defeat the safety purpose of the polarized plug.
-
POWER-CORD PROTECTION --- Power-supply cords should be routed so that they are not likely to be walked on or pinched by items placed upon or against them, paying particular attention to cords at plugs, convenience receptacles, and the point where exit from the product.
-
NON-USE PERIODS --- The power cord of the product should be unplugged from the outlet when left unused for long periods of time.
-
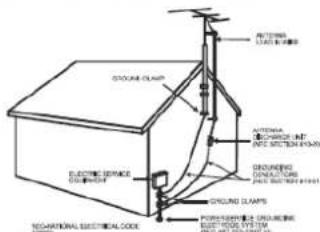
OUTDOOR ANTENNA GROUNDING --- If an outside antenna or cable system is connected to the product, be sure the antenna or cable system is grounded so as to provide some protection against voltage surges and built-up static charges.
Article 810 of the National Electrical Code, ANSI/NFPA 70, provides information with regard to proper grounding of the mast and supporting structure, grounding of the lead-in wire to an antenna discharge unit, size of grounding conductors, location of antenna-discharge unit, connection to grounding electrodes, and requirements for the grounding electrode. See Figure 1.
text_image
BOTTOM SLAMS STOCKEEL CLAMP ELECTRIC SERVICE CLOTHING GROUND SLAMPS FLOORING CLOTHING ELECTRIC SYSTEM TECHNATIONAL ELECTRICAL CODE ANTHEMA CORIANDER UNIT (24) ELECTRIC SLAMPS GROUNDING CONSTRUCTION (24) ELECTRIC SLAMPS-
LIGHTNING --- For added protection for this product during a lightning storm, or when it is left unattended and unused for long periods of time, unplug it from the wall outlet and disconnect the antenna or cable system. This will present damage to the product due to lightening and power-line surges.
-
POWER LINES — An outside antenna system should not be located in the vicinity of overhead power lines or other electric light or power circuits, or where it can fall into such power lines or other electric light or power circuits, or where 'it can fall into such power lines or circuits. When installing an outside antenna system, extreme care should be taken to keep from touching such power lines or circuits as contact with them might be fatal.
-
OVERLOADING --- Do not overload wall outlets, extension cords, or integral convenience receptacles as this can result in a risk of fire or electric shock.
-
OBJECT AND LIQUID ENTRY --- Never push objects of any kind into this product through openings as they may touch dangerous voltage points or short-out parts that could result in a fire or electric shock. Never spill liquid of any kind on the product.
-
SERVICING - Do not attempt to service this product yourself as opening or removing covers may expose you to dangerous voltage or other hazards. Refer all servicing to qualified service personnel.
-
DAMAGES REQUIRING SERVICE - Unplug this product from the wall outlet and refer servicing to qualified service personnel under the following conditions.
a) When the power-supply cord or plug is damaged.
b) If liquid has been spilled, or objects have fallen into the product.
c) If the product has been exposed to rain or water.
d) If the product does not operate normally by following the operating instructions. Adjust only those controls that are covered by the operating instructions as an improving adjustment of other controls may result in damage and will often require extensive work by a qualified technician to restore the product to its normal operation.
e) When the product exhibits a distinct change in performance - this indicates a need for service.
-
REPLACEMENT PARTS - When replacement parts are required, be sure the service technician has used replacement parts specified by the manufacturer or have the same characteristics as the original part, Unauthorized substitutions may result in fire, electric shock or other hazards.
-
SAFETY CHECK - Upon completion of any service or repair to this product, ask the service technician to perform safety checks to determine that the product is in proper operating condition.
-
HEAT - The product should be situated away from heat sources such as radiators, heat registers, stoves or other products (including amplifiers) that produce heat.
Establish a safe sound level
Over time your hearing will adapt to continuous loud sounds and will give the impression that the volume has in fact been reduced. What seems normal to you may in fact be harmful. To guard against this before your hearing adapts, set the volume to a low level.
Slowly increase the level until you can hear comfortably and clearly and without distortion. Damage to your hearing is accumulative and is irreversible. Any ringing or discomfort in the ears indicates that the volume is too loud.
Once you have established a comfortable listening level, do not increase the sound level.
MAINTENANCE
Cleaning the Unit
- To prevent fire or shock hazard, disconnect your unit from the mains power source when cleaning.
- If the cabinet becomes dusty wipe it with a soft dry cloth. Do not use any wax or polish sprays on the cabinet.
- If the cabinet becomes dirty or smudged with fingerprints, it may be cleaned with a soft cloth slightly dampened with a mild soap and water solution. Never use abrasive cloths or polishes, and these will damage the finish of your unit.
Caution: Never allow any water or other liquids to get inside the unit while cleaning.
PREPARATION FOR USE
UNPACKING AND SET UP
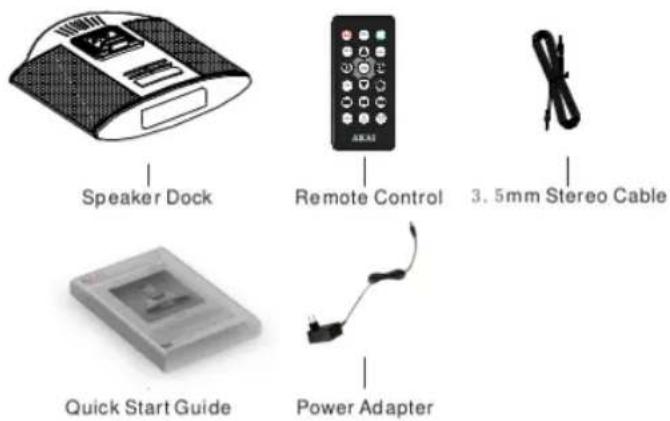
text_image
Speaker Dock Remote Control 3.5mm Stereo Cable Quick Start Guide Power Adapter- Carefully remove all the components from the carton and remove all packing materials from the components. Make sure noting is accidentally discarded with the packing materials.
- Save the carton and the packing materials, if possible, in the unlikely event that the unit ever needs to be returned for service. Using the original carton and packing material is the only proper way to protect the unit from shipping damage.
BATTERY BACK-UP SYSTEM
This system includes a battery back-up circuit that will maintain the time and alarm settings, and the preset tuner memories, in the event of a temporary power interruption. The battery back-up system requires 2x LR-03 /AAA not supplied. If the back-up battery is not installed, or the battery is exhausted, and the AC power supply is interrupted, the time, alarm, and preset memory stations will be lost. It will be necessary to reset the unit when the power is restored.
The Battery Back-Up compartment is located on the bottom cabinet.
Battery Precautions
Follow these precautions when using a battery in this device.
- Warning -Danger of explosion if battery is incorrectly replaced. Replace only with the same or equivalent type.
- Use only the size and type of battery specified.
- Be sure to follow the correct polarity when installing the battery as indicated in the Battery Compartment. A reversed battery may cause damage to the device.
- If the device is not to be used for a long period of time, remove the battery to prevent damage or injury from possible battery leakage.
- Do not try to recharge a battery not intended to be recharged; it can overheat and rupture. (Follow battery manufacturer's directions.)
- Battery shall not be exposed to excessive heat such as sunshine, fire or the like.
Using The AC Adaptor
Connect the small female plug of the AC adaptor to the DC In Jack on the back panel. Connect the housing of the AC adaptor to the 230V AC outlet.
DESCRIPTION OF UNIT AND CONTROLS
Top view
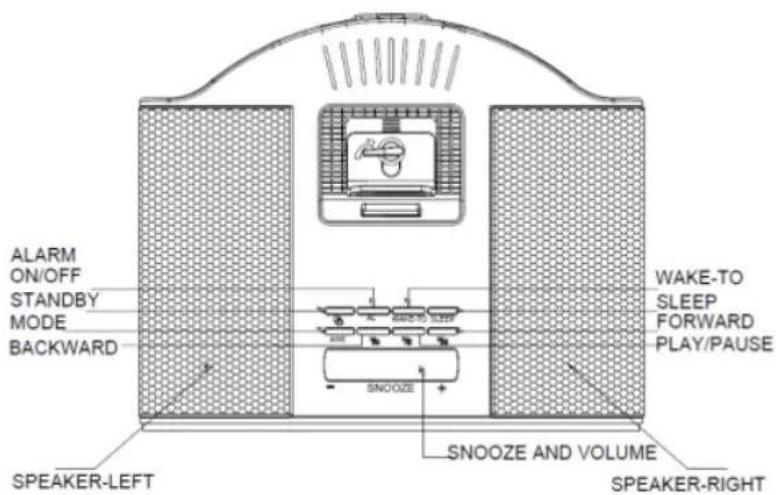
text_image
ALARM ON/OFF STANDBY MODE BACKWARD SNOOZE SNOOZE AND VOLUME SPEAKER-LEFT WAKE-TO SLEEP FORWARD PLAY/PAUSE SPEAKER-RIGHTBottom view
DESCRIPTION OF REMOTE CONTROL
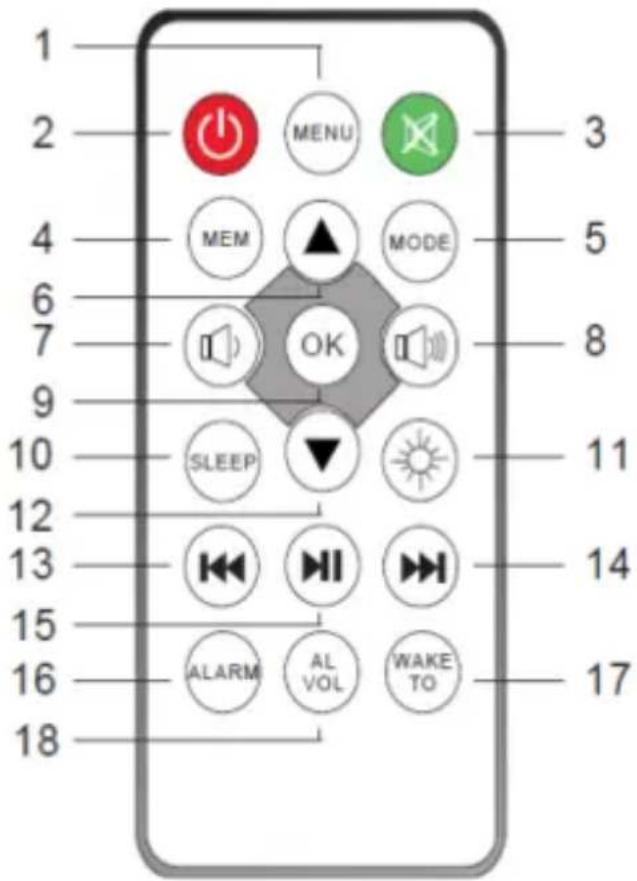
text_image
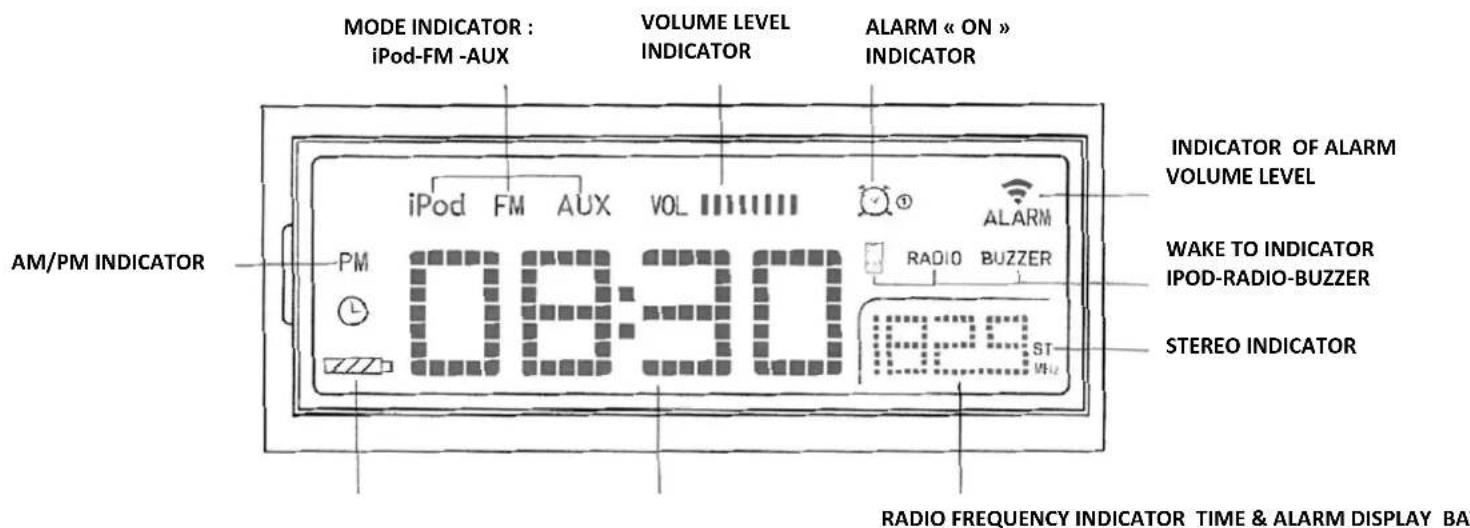
1 2 3 4 5 MEM MODE 6 7 OK 8 9 SLEEP 10 11 12 13 14 15 16 ALARM WAKE TO 17 181- MENU button
2- STANDBY button
3- MUTE button
4- MEMORY button
-To store the radio stations-
5- MODE button
6- UP ARROW ▲ button
7- VOLUME DOWN button
8- VOLUME UP button
9- OK button- To confirm selection-
10- SLEEP button
11-DIMMER button
12-DOWN ARROW ▼ button
13-REWIND button
14-FORWARD button
15- PLAY-PAUSE button
16-ALARM button
17-WAKE TO button
18- ALARM/VOL button
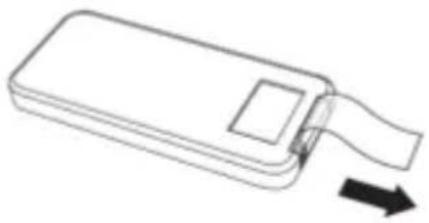
Using the Remote Control
The CR2025 lithium battery is already installed in the remote control. Pull out the small mylar insulation tab as shown in the illustration to begin using the remote control.
natural_image
Simple line drawing of a rectangular device with a scroll and arrow indicating direction (no text or symbols)To use the remote controller, point the remote control transmitter on the front panel of the main unit and press the desired button. Please note that bright sunlight or artificial light may interfere with the proper operation of the remote control.
Battery Replacement
When the remote operation becomes weak or intermittent, it is time to replace the remote control battery. Pull out the battery holder, remove the old battery and install a new CR2025 battery in the holder as shown in the illustration. Slide the holder back into the remote control.
NOTE: If the battery is installed incorrectly the remote control will not work.
- To turn on the Speaker, press the ⏻ button on the top panel of the unit or on the remote control.
- To turn off the Speaker, press again on the ⏻ button again.
Adjusting the Volume
- Press the «-» or «+» buttons on the ACI-7T on the top panel of the unit or press the "☐" or "☐" buttons on the remote control to increase or decrease the volume level.
MUTE Button (On Remote Control Only)
- You can also press the MUTE button on the remote control to turn off the sound temporarily, for example, to answer the telephone.
Press the MUTE button again to cancel the mute function and restore the sound.
The mute function will also be cancelled automatically by pressing the VOLUME "or" button on the remote control or + or - buttons on the top panel of the unit.
Mode
The ACI-7T has three modes of operation which are:
- Press the DIMMER button on the remote control repeatedly to cycle through the 4 display brightness settings.
Setting Clock
Setting the alarm
- Make sure the ACI-7T is powered on before setting the alarm.
- Press and hold the ALARM/SET button which is located on the backside of the unit. An alarm clock icon 📋 and the alarm time "00 : 00" appear on the LCD display.
- Press the «-» or «++» buttons to change the minutes.
- Press the « M » or « M » buttons to change the hour.
- Once the alarm setting has been confirmed, press the ALARM button, or wait for a few seconds and the ACI-7T will return to the previous mode.
- Press briefly the ALARM button on the unit or 📊 on remote control button to turn the alarm mode on or off.
DON'T FORGET!
The alarm will wake you up with the sound of the last mode selected; You can select the wake-up type by pressing the WAKE-TO button.
There are 3 types: "IPOD", "RADIO", "BUZZER", the icon referring to your selection will appear on the display as: RADIO BUZZER
DON'T FORGET! Press on "ALARM VOL" on the back of the unit or ☑ button on remote control to increase or decrease the volume of alarm.
There are 3 grades for selecting; the indicator is in the top right corner of display as: ALARM
Snooze mode
- When the alarm sounds, you can press SNOOZE or MUTE buttons (except the POWER button) to activate the SNOOZE function.
Tune in to a radio station
- Press the STANDBY button to turn on the ACI-7T.
- Press the MODE button repeatedly until a radio frequency is shown on the LCD Display.
- Press and hold either the « » or « » buttons to search for a station.
- To tune in to a station briefly press either the « » or « » buttons.
DON'T FORGET! You may need to reposition the ACI-7Tto get the best reception.
Make sure that you have fully extended the FM antenna wire.
Storing a radio station by using the remote control
- Tune to a radio station as described above.
- Press the MEM button. "P" and a number will be shown on the LCD Display.
- Press the ▲ or ▼ buttons to select the number you want to assign to the radio station.
- Press the MEM button again to store the station.
- Repeat this procedure to store other radio stations.

DON'T FORGET! You can store a maximum of 20 stations.
Moving a stored radio station to a new preset position
- Tune to a radio station as described above.
- Press the MEM button on the remote control once to show current preset.
- Press the ▲ or ▼ buttons on the remote control to select the new preset number.
- Press the MEM button to store the radio station in the new preset.
DON'T FORGET! This will overwrite any previous stored station on the selected preset
Listening to a stored station
- Store a radio station as described previously.
- Press the ▲ or ▼ buttons to cycle through the stored stations.
Any iPod®/iPhone® can be connected to the Speaker Dock to allow all your songs to be played through the speakers. Please refer the compatibility table for iPod® and iPhone® on page 17.
Description of iPod® & iPhone Docking Station
rubber mat
knob ipod docking fixing panel (it can move front or back)
1) Turn the adjusting knob in reverse to remove the fixing panel.
2) Moving the fixing panel back makes the gap between iPod docking and fixing panel becomes big.
3) Put the iPod®/iPhone® into the docking station.
4) Move the fixing panel front to make the iPod®/iPhone® close to the rubber matt.
5) Rotate the knob in clockwise direction to fix the fixing panel.
iPod®/iPhone®
You can dock an iPod®/iPhone® with the Speaker and listen to all your favorite songs through the ACI-7T's speakers. With the iPod®/iPhone® docking station, you can control all the basic functions of the iPod®/iPhone® by using the main unit or the remote Control.
DON'T FORGET! If you use an iPhone®, there is an authentication time of around 3 seconds. After authenticating, iPhone® and the ACI-7T are synchronizing.
Selecting iPod Mode
- Press the STANDBY button to turn on the Speaker.
- Press the MODE button repeatedly until "iPod" is displayed on the LCD Display.
- Carefully insert your iPod® or iPhone® into the docking station as described as above.
- When iPod® or iPhone® is connected to the docking station in iPod mode, iPod will play automatically after authenticating.
DON'T FORGET! The iPod battery is automatically charged when the ACI-7T is in standby mode.
Menu Navigation
You can access the menu system of your iPod® using the Remote Control.
- To access the iPod menu system, press the MENU button.
- Use the ▲ or ▼ buttons to highlight the menu options.
- Use the OK button to select a menu option.
Aux Mode
Other audio devices, such as an MP3 player can be connected to your ACI-7T. There is a 3.5mm cable to connect to the 3.5mm socket which is located on the rear panel
- Press the MODE button repeatedly until AUX is shown on the LCD Display.
- Adjust the volume to the target level. If the volume level seems low, try to adjust the volume control of the connected audio device.
3.5mm Stereo Cable (provided)
Made for iPod
1st + 2nd generation
5GB 10GB 20GB

Made for iPod
4th generation
20GB

Made for iPod
4th generation
40GB

Made for iPod
4th generation
(color display)
20GB 30GB

Made for iPod classic
80GB 160GB (2007)

Made for iPod classic
160GB (2009)

Made for iPod nano
1st generation
1GB 2GB 4GB

Made for iPod nano
2nd generation
(aluminum)
2GB 4GB 8GB

Made for iPod touch
1st generation
8GB 16GB 32GB

Made for iPod touch
2nd generation
8GB 16GB 32GB

Made for iPod touch
3rd generation
32GB 64GB

Made for iPod touch
4th generation
8GB 32GB 64GB

Made for iPod
4th generation
(color display)
40GB 60GB

Made for iPod
5th generation
(video)
30GB

Made for iPod
5th generation
(video)
60GB 80GB

Made for iPod mini
4GB 6GB

Made for iPod nano
3rd generation
(video)
4GB 8GB

Made for iPod nano
4th generation (video)
8GB 16GB

Made for iPod nano
5th generation (video camera)
8GB 16GB

Made for iPod nano
6th generation
8GB 16GB

Made for iPhone
4GB 8GB 16GB

Made for iPhone 3G
8GB 16GB

Made for iPhone 3GS
8GB 16GB 32GB

Made for iPhone 4
16GB 32GB
TROUBLE SHOOTING GUIDE
| Problem | Possible Cause | Solution |
| Radio sound distorted. | 1. The station is not tuned in.2. There is a poor signal in the area. | 1. Fine tune the station.2. Reposition the Speaker Dock. |
| No radio sound. | 1. The Speaker is not in tuner mode.2. The volume has been muted or is on the minimum setting. | 1. Press the MODE button until Tuner is selected.2. Adjust the volume level. |
| The iPod will not play | 1. The Speaker is not in iPod mode.2. The iPod is not connected correctly. | 1. Press the MODE button until iPod is selected.2. Reconnect the iPod. |
| No iPod sound. | 1. The Speaker is not in iPod mode.2. The volume has been muted or is on the minimum setting. | 1. Press the MODE button until iPod is selected.2. Adjust the volume level. |
| If none of the above can solve your problems, perform a reset as described on page 11. | ||
TECHNICAL SPECIFICATIONS
| Model Number | • ACI-7T |
| Power Supply | • AC ~ 100-240V 50/60Hz DC 9V1.2A |
| Power consumption | • 13.5 W |
| Standby power consumption | • 0.7 W |
| Radio Frequency Coverage | • FM: 87.5MHz - 108 MHz |
| Speaker Side | • 2" × 2 |
| Impedance | • 4^*2 |
| Power Output RMS | • 3.5W^*2 |
| Power Output MAX | • 7W x 2 |
| Frequency Response | • 95HZ-20KHZ |
| Net Weight | • 0.5KG |
| Dimensions | • 185× 60× 150mm (W × H × D) |
IMPORTANT: Due to continual revision and improvement on our products design, specifications are subject to change without further notice.
END OF LIFE DISPOSAL

Warning! This logo set on the product means that the recycling of this apparatus comes within the framework of the Directive 2002/96/CE of January 27, 2003 concerning the Waste of Electrical and Electronic Equipment (WEEE). This symbol means that used electrical and electronic products should not be mixed with general household waste. There is a separate collection system for these products.
If you want to dispose of this equipment, please do not use the ordinary dust bin!
- The presence of dangerous substances in the electrical and electronic equipments can have potential consequences on the environment and human health in the cycle of reprocessing this product.
- Therefore, at the end of its lifetime, this product shall not be disposed with other non-recycled waste. Used electrical and electronic equipment must be treated separately and in accordance with legislation that requires proper treatment, recovery and recycling of used electrical and electronic equipment.
- Local authorities and resellers have set special procedures for the purpose of collecting and recycling this product (please contact your local authority for further details). You have the obligation to use the selective waste collection systems put in place by your local authority.
- If your used electrical or electronic equipment has batteries or accumulators, please dispose of these separately beforehand according to local requirements.
- By disposing of this product correctly you will help ensure that the waste undergoes the necessary treatment, recovery and recycling and thus prevent potential negative effects on the environment and human health which could otherwise arise due to inappropriate waste handling.

natural_image
Simple line drawing of a cable being connected to an electrical outlet (no text or symbols)NOTAS:
text_image
LCD DISPLAYnatural_image
Simple line drawing of a rectangular device with a scroll and arrow indicating direction (no text or symbols)1st + 2nd generation
5GB 10GB 20GB

Made for iPod
4th generation
20GB

Made for iPod
4th generation
40GB

Made for iPod
4th generation
(color display)
20GB 30GB

Made for iPod classic
80GB 160GB (2007)

Made for iPod classic
160GB (2009)

Made for iPod nano
1st generation
1GB 2GB 4GB

Made for iPod nano
2nd generation
(aluminum)
2GB 4GB 8GB

Made for iPod touch
1st generation
8GB 16GB 32GB

Made for iPod touch
2nd generation
8GB 16GB 32GB

Made for iPod touch
3rd generation
32GB 64GB

Made for iPod touch
4th generation
8GB 32GB 64GB

Made for iPod
4th generation
(color display)
40GB 60GB

Made for iPod
5th generation
(video)
30GB

Made for iPod
5th generation
(video)
60GB 80GB

Made for iPod mini
4GB 6GB

Made for iPod nano
3rd generation
(video)
4GB 8GB

Made for iPod nano
4th generation (video)
8GB 16GB

Made for iPod nano
5th generation (video camera)
8GB 16GB

Made for iPod nano
6th generation
8GB 16GB

Made for iPhone
4GB 8GB 16GB

Made for iPhone 3G
8GB 16GB

Made for iPhone 3GS
8GB 16GB 32GB

Made for iPhone 4
16GB 32GB