AC151 - Alarm clock radio AKAI - Free user manual and instructions
Find the device manual for free AC151 AKAI in PDF.
| Product type | Radio alarm clock with LED lamp and multi-color night light |
| Brand | AKAI |
| Model | AC151 |
| Dimensions (L x H x D) | 60 x 180 x 100 mm |
| Net weight | 410 g |
| Power supply | AC 100-240 V, 50/60 Hz; DC 5 V / 1.5 A adapter included |
| Backup battery | 1 CR2032 lithium coin cell battery (not included) |
| Power consumption | 5 W in operation; less than 1 W in standby |
| FM radio frequency | 87.5 – 108 MHz |
| Audio output power | 0.3 W RMS |
| Radio memory | 10 preset stations |
| Alarms | Dual alarm with choice of beep (buzzer) or radio; gradual light wake-up possible |
| Special functions | Snooze (9 min repeat), Sleep (delayed shut-off 15-90 min), Nap (10-90 min), DST (daylight saving time), cyclic display of time/temperature, brightness dimmer (2 levels) |
| LED lamp | Bedside lamp with adjustable intensity; lifespan 20,000 h |
| Multi-color night light | On/off via dedicated button; lifespan 20,000 h |
| Connectivity | Auxiliary input (LINE-IN) 3.5 mm jack; USB charging port (5 V / 1 A max) |
| Thermometer | Indoor thermometer with display in °C or °F |
| Maintenance and cleaning | Clean with a soft cloth and mild non-abrasive detergent; do not use solvents |
| Safety | Class II appliance (double insulation); do not open; do not expose to water or flames; unplug before maintenance |
| Spare parts and repairability | CR2032 battery replaceable by user; specific AC adapter; no user-serviceable internal parts |
| General information | Imported by DEMSA S.A.S., 28 Boulevard Zéphirin Camélinat, 92230 Gennevilliers, France |
Frequently Asked Questions - AC151 AKAI
User questions about AC151 AKAI
0 question about this device. Answer the ones you know or ask your own.
Ask a new question about this device
Download the instructions for your Alarm clock radio in PDF format for free! Find your manual AC151 - AKAI and take your electronic device back in hand. On this page are published all the documents necessary for the use of your device. AC151 by AKAI.
USER MANUAL AC151 AKAI
natural_image
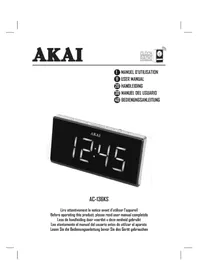
White digital alarm clock with '12:38' and 'AKAI' label (no additional text or symbols)AC-151
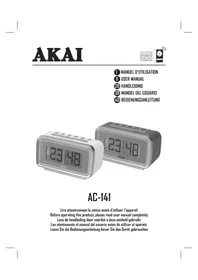
Lire attentivement la notice avant d'utiliser l'appareil Before operating this product, please read user manual completely Less de handleiding door voordat u deze eenheid gebruikt Lea atentamente el manual del usuario antes de utilizar el aparato Lesen Sie die Bedienungsanleitung bevor Sie das Gerät gebrauchen
Avant de commencer
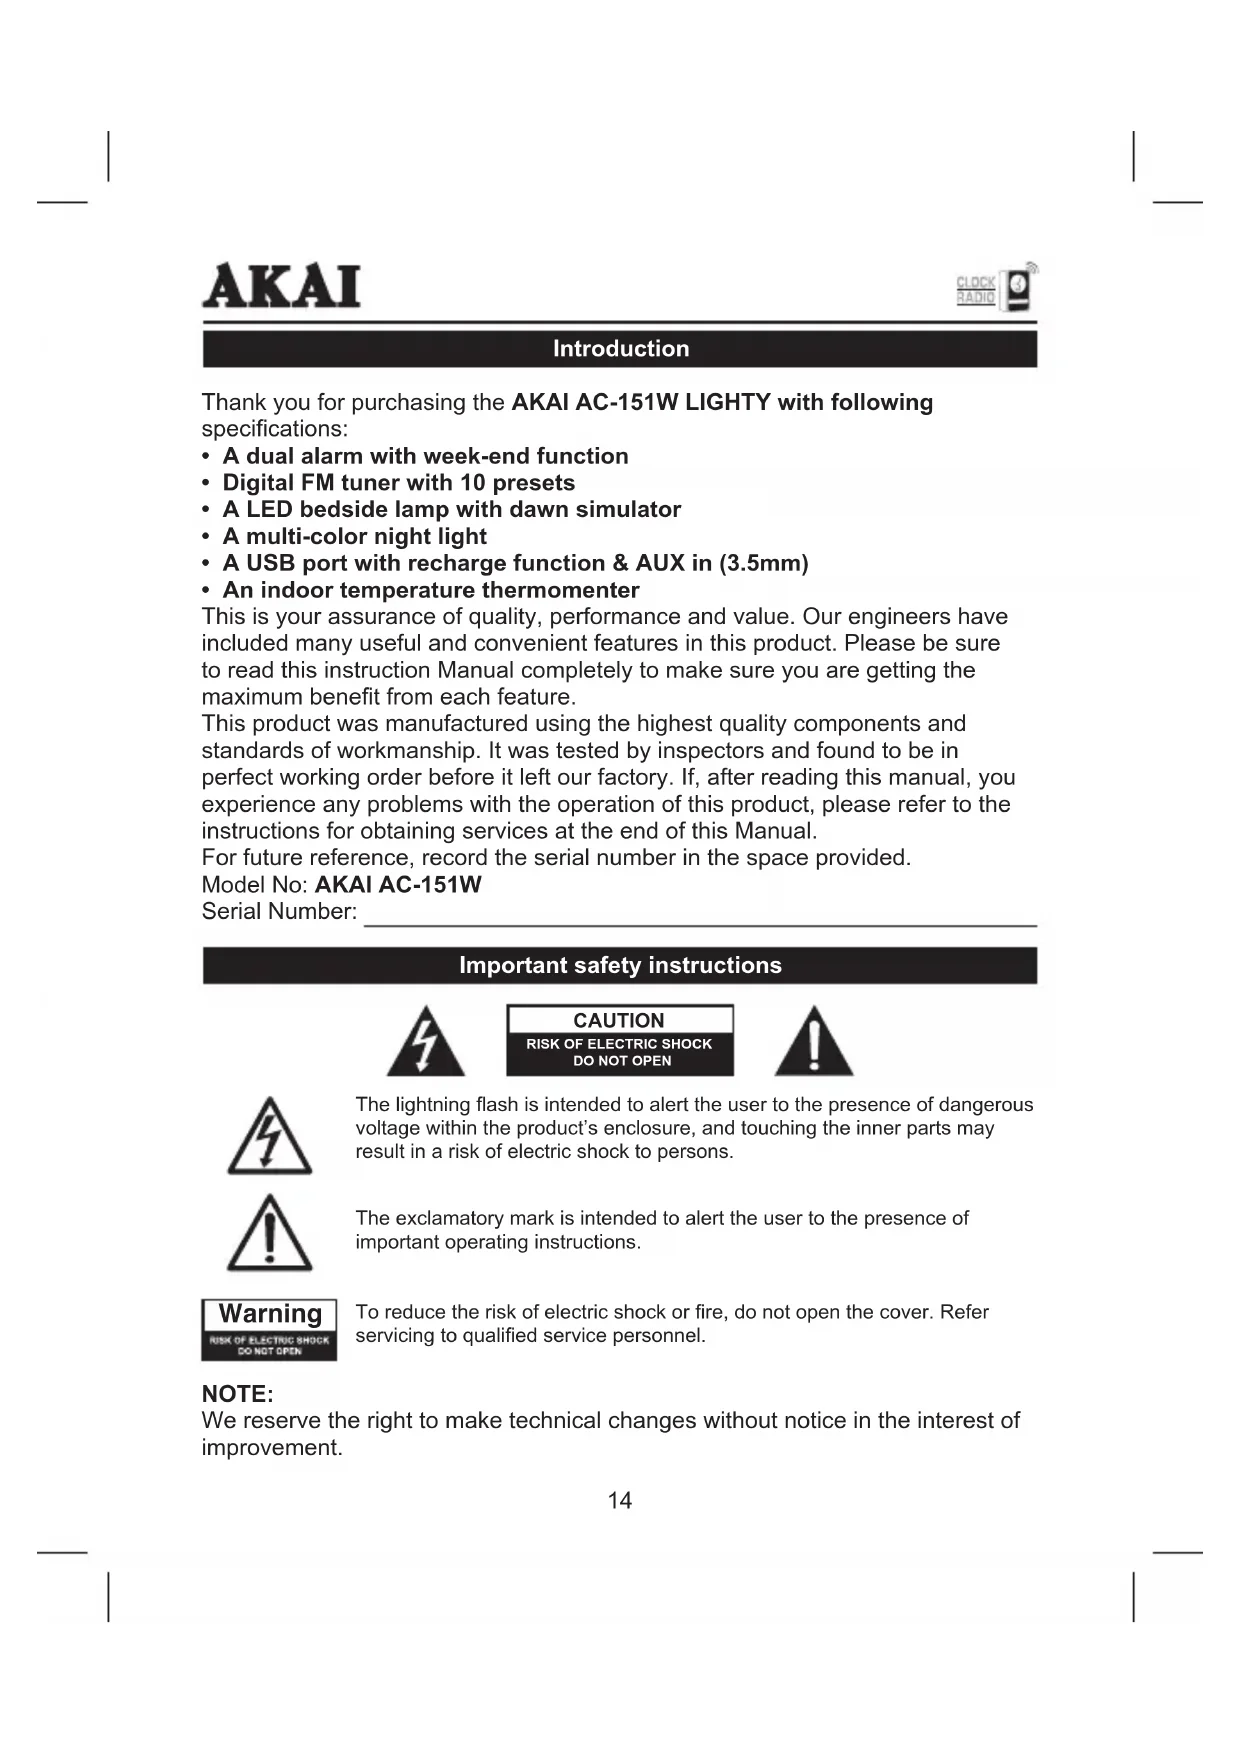
Thank you for purchasing the AKAI AC-151W LIGHTY with following specifications:
• A dual alarm with week-end function
• Digital FM tuner with 10 presets
• A LED bedside lamp with dawn simulator
• A multi-color night light
• An indoor temperature thermometer
• A USB port with recharge function & AUX in (3.5mm)
This is your assurance of quality, performance and value. Our engineers have included many useful and convenient features in this product. Please be sure to read this instruction Manual completely to make sure you are getting the maximum benefit from each feature.
This product was manufactured using the highest quality components and standards of workmanship. It was tested by inspectors and found to be in perfect working order before it left our factory. If, after reading this manual, you experience any problems with the operation of this product, please refer to the instructions for obtaining services at the end of this Manual.
For future reference, record the serial number in the space provided.
Model No: AKAI AC-151W
Serial Number:
Important safety instructions

CAUTION
RISK OF ELECTRIC SHOCK
DO NOT OPEN


The lightning flash is intended to alert the user to the presence of dangerous voltage within the product's enclosure, and touching the inner parts may result in a risk of electric shock to persons.

The exclamatory mark is intended to alert the user to the presence of important operating instructions.

To reduce the risk of electric shock or fire, do not open the cover. Refer servicing to qualified service personnel.
NOTE:
We reserve the right to make technical changes without notice in the interest of improvement.
CAUTION
Danger of explosion if battery is incorrectly replaced. Replace only with the same or equivalent type of battery.
IMPORTANT!
It is recommended not to leave a mobile phone near the unit in order to avoid electromagnetic interference in the speakers

equipment is a Class II or double insulated electrical appliance. It been designed in such a way that it does not require a safety election to electrical earth.
Important safety instructions
- No naked flame sources, such as lighted candles, should be placed on the apparatus.
- Do not place the product in closed bookcases or racks without proper ventilation.
- The mains plug is used as the disconnect device, the disconnect device shall remain readily operable.
- The ventilation should not be impeded by covering the ventilation openings with items, such as newspapers, table-cloths, curtains, etc.
- It shall not be exposed to dripping or splashing and that no objects filled with liquids, such as vases, shall be placed on the apparatus.
- Do not connect FM antenna to outside antenna.
- The unit should not be exposed to direct sunlight, very high or low temperature, moisture, vibrations or placed in dusty environment.
- Do not use abrasive, benzene, thinner or other solvents to clean the surface of the unit. To clean, wipe it will mild non-abrasive detergent solution and clean soft cloth.
- Never attempt to insert wires, pins or other such objects into the vents or opening of the unit.
- Batteries shall not be exposed to excessive heat such as sunshine, fire or the like.
- Attention should be drawn to the environmental aspects of battery disposal.
- Do not dispose this product into usual household garbage at the end of its lifecycle; hand it over to a collection center for recycling the electrical and electronic appliances. By recycling, some of the materials can be reused. You are making an important contribution to protect our environment. Please inquire your community administration for the authorized disposal center.
- For indoor use only
- Do not open. No user replaceable parts inside, refer servicing to qualified service personnel.
Power supply & battery backup
Preparation for use
Power adaptor connection: The clock radio unit can be powered by an external AC-DC adaptor, required the output DC 5V 1500mA (included). Plug the AC-DC adaptor to a household outlet AC source.
Battery backup system
- This unit is equipped with a battery backup system; it requires a 3V flat lithium battery CR2032 (not included).
- Open the battery compartment by unscrewing the lid with a small screwdriver.
- Insert the battery in the battery compartment, making certain that the positive and negative (+and-) battery terminals are attached to the corresponding terminals on the plate in the battery compartment.
- Screw the lid of the battery compartment to close.
Note: If an AC power failure occurs, the clock automatically switches to the battery power supply, the clock and timer memory continue running. When the AC power resumes, the clock switches back to AC again.
Battery care
- Use only the size and type of batteries specified.
- If the unit is not to be used for an extended period of time, remove the battery. Old or leaking batteries can cause damage to the unit.
- Do not try to recharge batteries not intended to be recharged; they can overheat and rupture (Follow battery manufacturer's directions).
- Do not dispose of batteries in fire, batteries may leak or explode.
Description of the product & functions controls
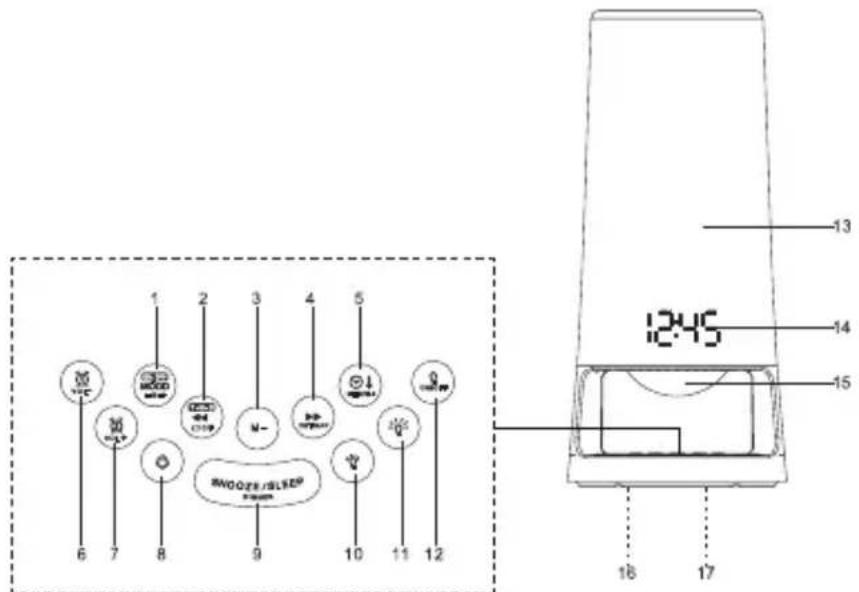
1. ON-OFF/MOOD LIGHT
Allows you to turn on or off the nightlight multi colors
-
Y-M-D / ◀C-F :
-
Allows you to set YEAR-MONTH-DAY
- Backward Research (radio station & alarm clock settings)
- Enable - disable DISPLAY LOOP
-
Set indoor temperature in Celsius or Fahrenheit
-
MEMORY -
-
▶/ DST /NAP
-
Forward research (radio station & alarm clock settings)
• DAYLIGHT SAVING TIME Setting -
Allows you to set the NAP function
-
⚙️ ↓ MEMORY / MEMORY+
-
Allows you to set the Time
• Display indoor temperature - Allows you to preset radio stations
-
Select the preset station
-
VOL -
• ALARM 1 SETTING
• Decrease volume level
- VOL +
• ALARM 2 SETTING
- Increase volume level
8. ⏻ON / OFF
9. SNOOZE / SLEEP / DIMMER
- Activate the SNOOZE function
- Set SLEEP function
-
Set the brightness of the LED display
-
🙏: Allows you to set the light intensity to low
- 🙏: Allows you to set the light intensity to high
- ☐ : Turn on / off lamp
- Lamp Shade
- Display
- Mood Light
- Battery compartment (bottom of the unit)
- Rating label (BOTTOM OF UNIT)
Description of the product & Location of controls
Description of display indicators
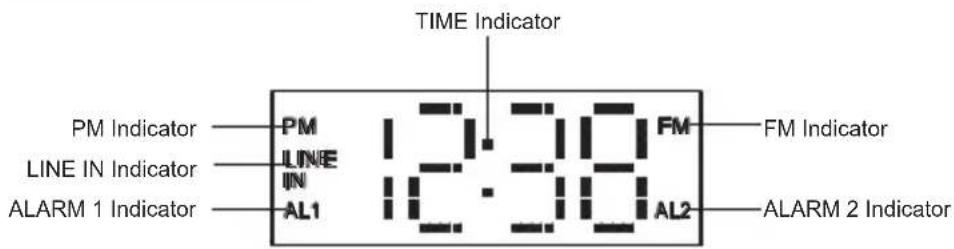
DAY IndicatorMONTH Indicator TEMPERATURE Indicator
Time & Calendar settings
Setting Time and Calendar
Press ⬇(5) button in normal mode and keep depress over 2 seconds to enter time set mode, after enter the setting mode, press ⬇(5) button to change the mode cycle as follows :
Normal → Year → Month → Day → 12/24 H → Real time Hour → Real time Min → Normal
ACTION (DURING DATA ADJUSTMENT)
- Press ◀(2) button to adjust data backward.
- Press ▶(4) button to adjust data forward.
- Keep depress ◀ or ▶ button for 2 seconds to enable auto forward.
- Use (5) button to confirm each setting.
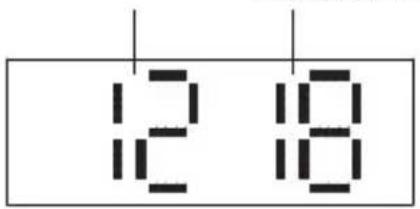
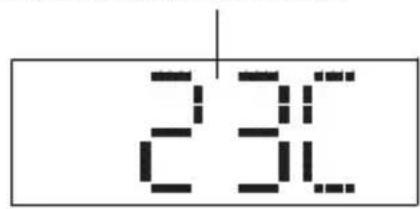
□ Display loop function
- In radio off mode, press and hold the ☐ button (2) for about 3 seconds until ON appears in the LED DISPLAY.
- The display will alternate between the current Time for 10 seconds and temperature for 5 seconds as follows:
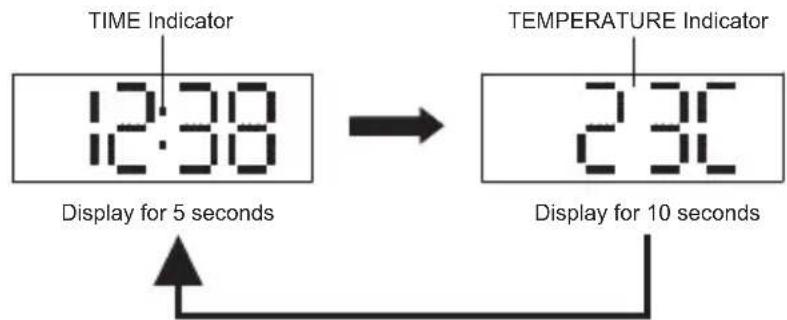
To cancel this display loop function, press and hold the button (2) for about 3 seconds until OFF appears on the LED DISPLAY. The display will switch back to normal time display.
DIMMER CONTROL
The DIMMER button (9) allows you to set the brightness of the LED display to high and low 2 levels (low & high).
- The clock display with dimmer low is the default setting.
- It will consume more power if you set the clock display with dimmer higher.
Alarm settings
Press the alarm set button ☐(6) or ☐(7) during normal mode to show the alarm time. Afterwards keep depress the alarm set button (6/7) over 2 seconds to enter the alarm set mode. After enter the setting mode, press the alarm set button (6/7) to change the mode cycle as follows:
Normal → AL 1 Hour → AL 1 Min → AL 1 weekday Alarm → AL 1 wake beep → AL 1 wake radio → AL 1 wake radio volume → Light → Light intensity → Normal.
Normal → AL 2 Hour → AL 2 Min → AL 2 weekday Alarm → AL 2 wake beep → AL 2 wake radio → AL 2 wake radio volume → Light → Light intensity → Normal.
Select the alarm weekday mode as follows
1-5: Monday to Friday
1-7: Whole week
6-7: Saturday & Sunday
1-1: One day of week
Action (during data adjustments)
- Press ◀ button (2) to adjust data backward.
- Press ▶ button (4) to adjust data forward.
- Keep depress ◀or ▶button for 2 seconds to enable auto forward.
- Press (6) or (7) to confirm each setting.
Alarm duration
Beep alarm or radio alarm will continue output for 30 minutes if no key press, then it will stop automatically and wait for same alarm time on next day.
Enable/disable the alarm
Press and hold the ⏻(6) or ⏻(7) button to enable or disable the alarm. Once the alarm is activated, AL1 or AL2 will be appeared on the display.
Alarm wake-up light
The light will come on 30 minutes before the set alarm time. The light will start out at a low level and increase gradually to the set max level.
Wake up by radio or buzzer with mood light
Even you did not press the "ON" button of mood light, when the alarm on, the mood light will also come with the alarm.
SNOOZE Function
When alarm rings, press SNOOZE button (9) to activate the snooze function, Beep alarm or Radio alarm will stop.
Note: The interval time of the Snooze is 9 minute (not include second offset)
SNOOZE will continue unless press ⏻ button (8) to alarm off of buzzer alarm or Radio Alarm stop automatically after 30 minutes.
- The indicators AL1 / AL2 flash on the display while the SNOOZE function is enabled. Once the SNOOZE function is off, the indicators AL1 / AL2 stop flashing and light up on the display.
RADIO mode
Playing the radio
-
Press the ⏻ button (8) to turn the unit on.
-
Use the ◀◀(2) & ▶▶(4) button to select the desired radio station. If you press and hold the Tune + or Tune – button for one second, then release, the unit will automatically scan to the next broadcasting station.
-
Press the ⏻ button (8) to turn the radio OFF.
NOTE: Ensure that the FM antenna is completely unrolled and extended for best FM reception.
To set/recall the radio presets
- Press the ⬤button (8) to turn the unit ON.
- Use the ◀◀(2) & ▶▶(4) button to select the desired radio station.
- Press and hold the MEM/M+ (5); "P01" will blink in the display.
- Use the ◀◀(2) & ▶▶(4) button to select the desired preset station (P01-P10)
- Press the MEM/M+ (5) button again to set the preset.
- Repeat steps 2 through 5 to set more presets.
- The unit can preset 10 stations totally for FM.
- When "P01-P10" is blinking, press the ◀◀(2) & ▶▶(4) button to select the preset number.
- To recall a preset station, press MEM/M+ (5) button to select the preset number.
SLEEP operation
When listening to radio, press SLEEP button (9) to enter sleep mode. You can just adjust the sleep timer from 90 minutes to 15 minutes by pressing the SLEEP button (9). The unit will automatically turn off after the selected time.
Other functions
NAP Timer function (count down timer)
In radio off mode, press NAP button (4) to turn on NAP mode, the NAP time N90 will keep by 5 seconds, within 5 seconds and press NAP button (4) button can change the duration from 90 min – 10 min.
The alarm buzzer will sound for 30 min and then shut off automatically.
To stop the alarm buzzer, press the ⏻ button (8).
Press the NAP button (4) has no effect during alarm operation.
Press ⏻ button (8) to cancel NAP function.
Note: When using the NAP alarm the wake up light function is inactive.
Daylight saving time (DST) mode
For countries with daylight saving time (DST) (one hour of difference between summer time and winter time), this clock radio offers you DST option to adjust summer time.
In standby mode, press and hold for 2 seconds the DST button (4).
The clock advances by one hour. To exit DST mode, repeat the above operation.
MOOD-LIGHTS
Press the MOOD LIGHT ON-OFF button (1) to turn on or turn off the mood-lights (15).
Turn on the light and adjust the level of light intensity
To light the lamp, press ⚙ ON/OFF (12). Press again to turn it off.
Press button ⚙(10) to increase the level of light intensity.
Press button ⚙(11) to decrease the level of light intensity.
Auxiliary input
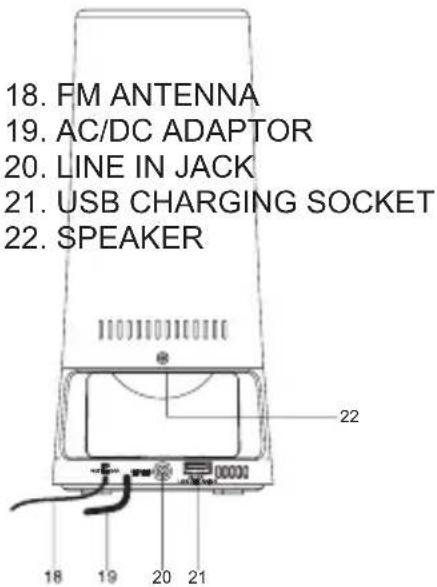
This function requires a 3.5mm audio cable (not included).
-
Connect the 3.5mm audio cable to the Line In on the unit and an audio output on an MP3 player or other audio source.
-
Press the ON/OFF button (8) to turn the unit ON.
-
Use the native controls on the connected MP3 player or other audio source to play and control audio played through the clock radio.
USB charging socket
USB devices: DC 5V
The unit can charge for mobile phone via USB cable (the USB cable is not be supplied).
Reset
If the system does not respond or exhibits erratic or intermittent operation, you may have experienced an electrostatic discharge (ESD) or a power surge that triggered the internal microcontroller to shut down automatically. If this occurs, simply disconnect the ac power cord and remove the system backup battery, wait for at least 3 minutes and then setup the unit again as if it is a brand new unit.
NOTE
If you replace the battery, do not disconnect AC plug from AC outlet. Otherwise, current time and alarm will be initialized.
Power consumption in working mode 5 W
Power consumption in standby mode <1 W
Radio Frequency range FM 87.5 - 108 MHz
Audio output 0.3W RMS
Battery backup 3V (CR2032 Flat Lithium battery x 1)
Net Weight 410 g
Dimensions 60 x 180 x 100 mm
Temperature Sensor Range: 32 °F to 122 °F (0°C to +50°C)
The lamp & mood night life time 20000h
IMPORTANT:
Due to continual revision and improvement on our products design, specifications are subject to change without further notice.
EXCLUSIVE IMPORTER
This product was imported by the Company: DEMSA S.A.S.
For any questions concerning the conformity of the product, thank you to send your request to:
DEMSA S.A.S. 28, Boulevard Zéphirin Camélinat 92230 GENNEVILLIERS FRANCE
END OF LIFE DISPOSAL
Warning! This logo set on the product means that the recycling of this apparatus comes within the framework of the Directive 2002/96/CE of January 27, 2003 concerning the Waste of Electrical and Electronic Equipment (WEEE).
This symbol means that used electrical and electronic products should not be mixed with general household waste. There is a separate collection system for these products.
If you want to dispose of this equipment, please do not use the ordinary dust bin!
- The presence of dangerous substances in the electrical and electronic equipments can have potential consequences on the environment and human health in the cycle of reprocessing this product.
- Therefore, at the end of its lifetime, this product shall not be disposed with other non-recycled waste. Used electrical and electronic equipment must be treated separately and in accordance with legislation that requires proper treatment, recovery and recycling of used electrical and electronic equipment.
- Local authorities and resellers have set special procedures for the purpose of collecting and recycling this product (please contact your local authority for further details). You have the obligation to use the selective waste collection systems put in place by your local authority.
- If your used electrical or electronic equipment has batteries or accumulators, please dispose of these separately beforehand according to local requirements.
- By disposing of this product correctly you will help ensure that the waste undergoes the necessary treatment, recovery and recycling and thus prevent potential negative effects on the environment and human health which could otherwise arise due to inappropriate waste handling.

This unit complies with European Council Directive 2006 / 95 CE (Electromagnetic Compatibility & Low Voltage Directives)
Inleiding
natural_image
White digital alarm clock with '12:30' and 'AKAI' branding (no additional text or symbols visible)AC-151