CDCL72MT - Radio MT Logic - Free user manual and instructions
Find the device manual for free CDCL72MT MT Logic in PDF.
| Product type | Radio alarm clock with CD player |
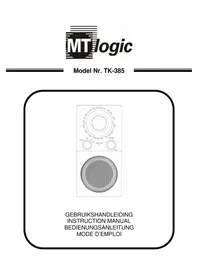
| Brand | MT Logic |
| Model | CDCL72MT |
| Power supply | 230V AC |
| Clock backup battery | 2 AA batteries (not included) |
| Remote control battery | 2 AAA batteries (not included) |
| Radio bands | FM |
| Number of FM presets | 12 |
| Compatible CD formats | CD, CD-R, CD-RW |
| Timer (countdown) | Up to 120 minutes |
| CD player functions | Play, pause, stop, skip, search, repeat (1/all), random, program (20 tracks) |
| Auxiliary input | 3.5 mm AUX IN jack |
| Display | LCD screen |
| Remote control | Yes, with magnetic plate |
| Speaker type | Built-in speaker |
| Antenna | FM wire antenna |
| Housing material | Plastic |
| Color | Black (estimate) |
| Dimensions (approx.) | Approx. 20 x 10 x 15 cm |
| Weight (approx.) | Approx. 0.5 kg |
| Laser class | Class 1 |
| Safety | Do not expose to moisture, do not open the casing |
| Maintenance | Clean with a soft, dry cloth |
Frequently Asked Questions - CDCL72MT MT Logic
User questions about CDCL72MT MT Logic
0 question about this device. Answer the ones you know or ask your own.
Ask a new question about this device
Download the instructions for your Radio in PDF format for free! Find your manual CDCL72MT - MT Logic and take your electronic device back in hand. On this page are published all the documents necessary for the use of your device. CDCL72MT by MT Logic.
USER MANUAL CDCL72MT MT Logic
The apparatus should not be exposed to dripping or splashing and that no objects filled with liquids, such as vases, shall be placed on the apparatus.
The ventilation should not be impeded by covering the ventilation openings with items, such as newspapers, table-cloths, curtains, etc.
To reduce the risk of fire, do not place any heating or cooking equipment beneath this apparatus.
No naked flame sources, such as lit candles, should be placed under or near the apparatus.
The mains plug is used as the disconnect device, the disconnect device should remain readily operate.
In order to disconnect the apparatus from the mains completely, the mains plug should be disconnected from the mains socket outlet completely.
Battery shall not be exposed to excessive heat such as sunshine, fire or the like.
CAUTION
Since the CD circuitry may cause interference to other radio tuners nearby, switch this unit off when not in use or move it away from the affected radio tuner.

The lightning flash with arrowhead symbol, within an equilateral triangle, is intended to alert the user to the presence of uninsulated "dangerous voltage" within the product's enclosure that may be of sufficient magnitude to constitute a risk of electric shock to persons.
CAUTION
RISK OF ELECTRIC SHOCK DO NOT OPEN
WARNING: TO REDUCE THE RISK OF ELECTRIC SHOCK, DO NOT REMOVE COVER (OR BACK). NO USER-SERVICEABLE PARTS ARE INSIDE. REFER SERVICING TO A QUALIFIED SERVICE PERSONNEL.

The exclamation point within an equilateral triangle is intended to alert the user to presence of important operating and maintenance (servicing) instructions in the literature accompanying the apparatus.
DANGER

INvisible LASER RADIATION WHEN OPEN
AND INTERLOCK Failed OR DEFEATED. AVOID
DIRECT EXPOSURE TO LASER BEAM.
LASER SAFETY
This unit employs an optical laser beam system in the CD mechanism, designed with built-in safeguards. Do not attempt to disassemble, refer to qualified service personnel. Exposure to this invisible laser light beam may be harmful to the human eye.
THIS IS A CLASS-1 LASER PRODUCT. USE OF CONTROLS, OR ADJUSTMENTS OR PROCEDURES OTHER THAN THOSE SPECIFIED HEREIN, MAY RESULT IN HAZARDOUS LASER LIGHT BEAM EXPOSURE.
Instructions on environment protection

Do not dispose of this product in the usual household garbage at the end of its life circle; hand it over at a collection point for the recycling of electrical and electronic appliances. the symbol on the product, the instructions for use of the packing will inform about the methods for disposal.
The materials are recyclable as mentioned in its marking. By recycling material recycling or other forms of re-utilization of old appliances, you are making an important contribution to protect our environment.
Please inquire at the community administration for the authorized disposal location.

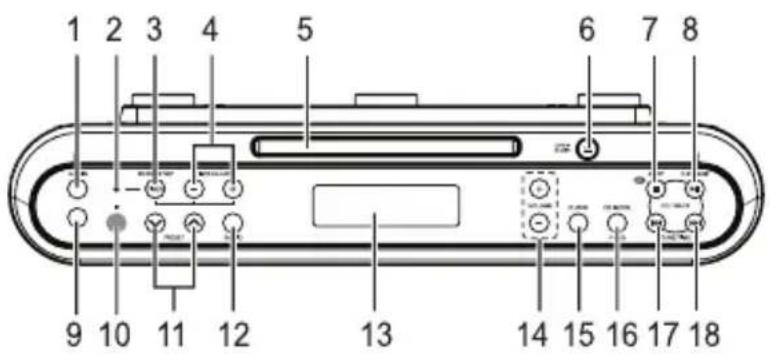
LOCATION OF CONTROLS AND INDICATORS
Front view
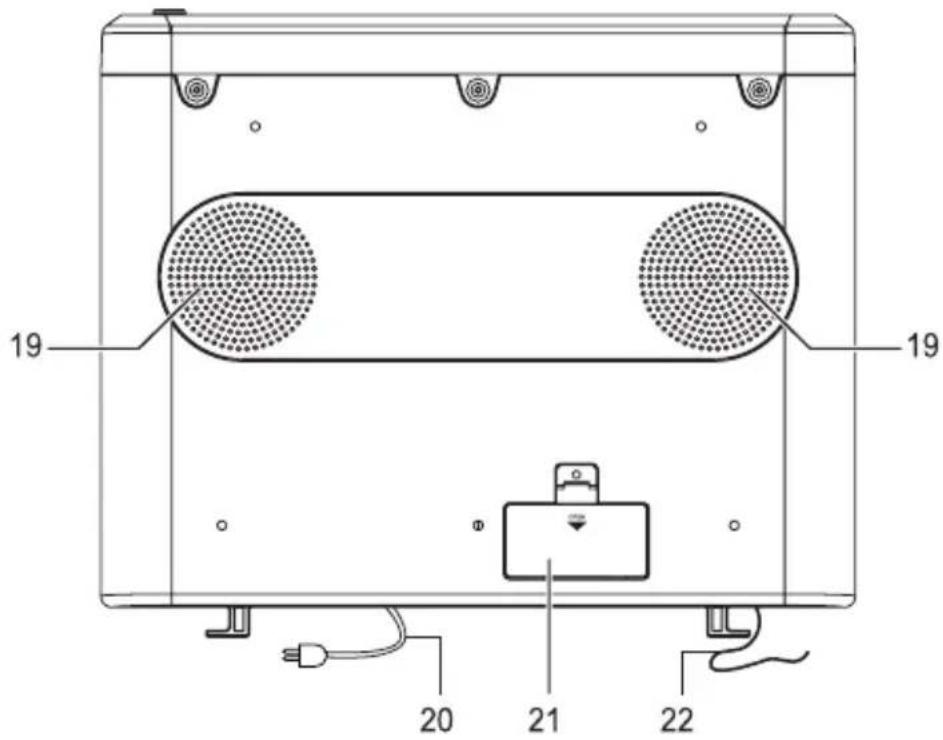
Bottom view
- AUX IN, ON Button
- Timer Indicator
- Timer Start/Stop Button
- Timer Adjust - / + Buttons
- CD Door
- CD Tray Open / Close Button
- CD Stop / Off Button
- CD ON, Play / Pause Button
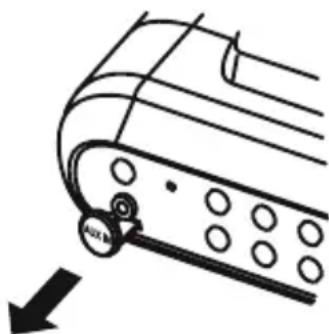
- AUX IN Jack
- Remote Sensor
- Radio Preset Up / Down Buttons (
- Radio On
-
LCD Display
-
Volume - / + Button
- Clock Button
- CD Mode / Program Button
- CD: Skip/Search Previous
Radio : Tuning –
Time: Time -
- CD : Skip/Search Next
Radio:Tuning ^+
Time: Time + - Speakers
- AC Power Cord
- Battery Compartment Door
- FM wire Antenna
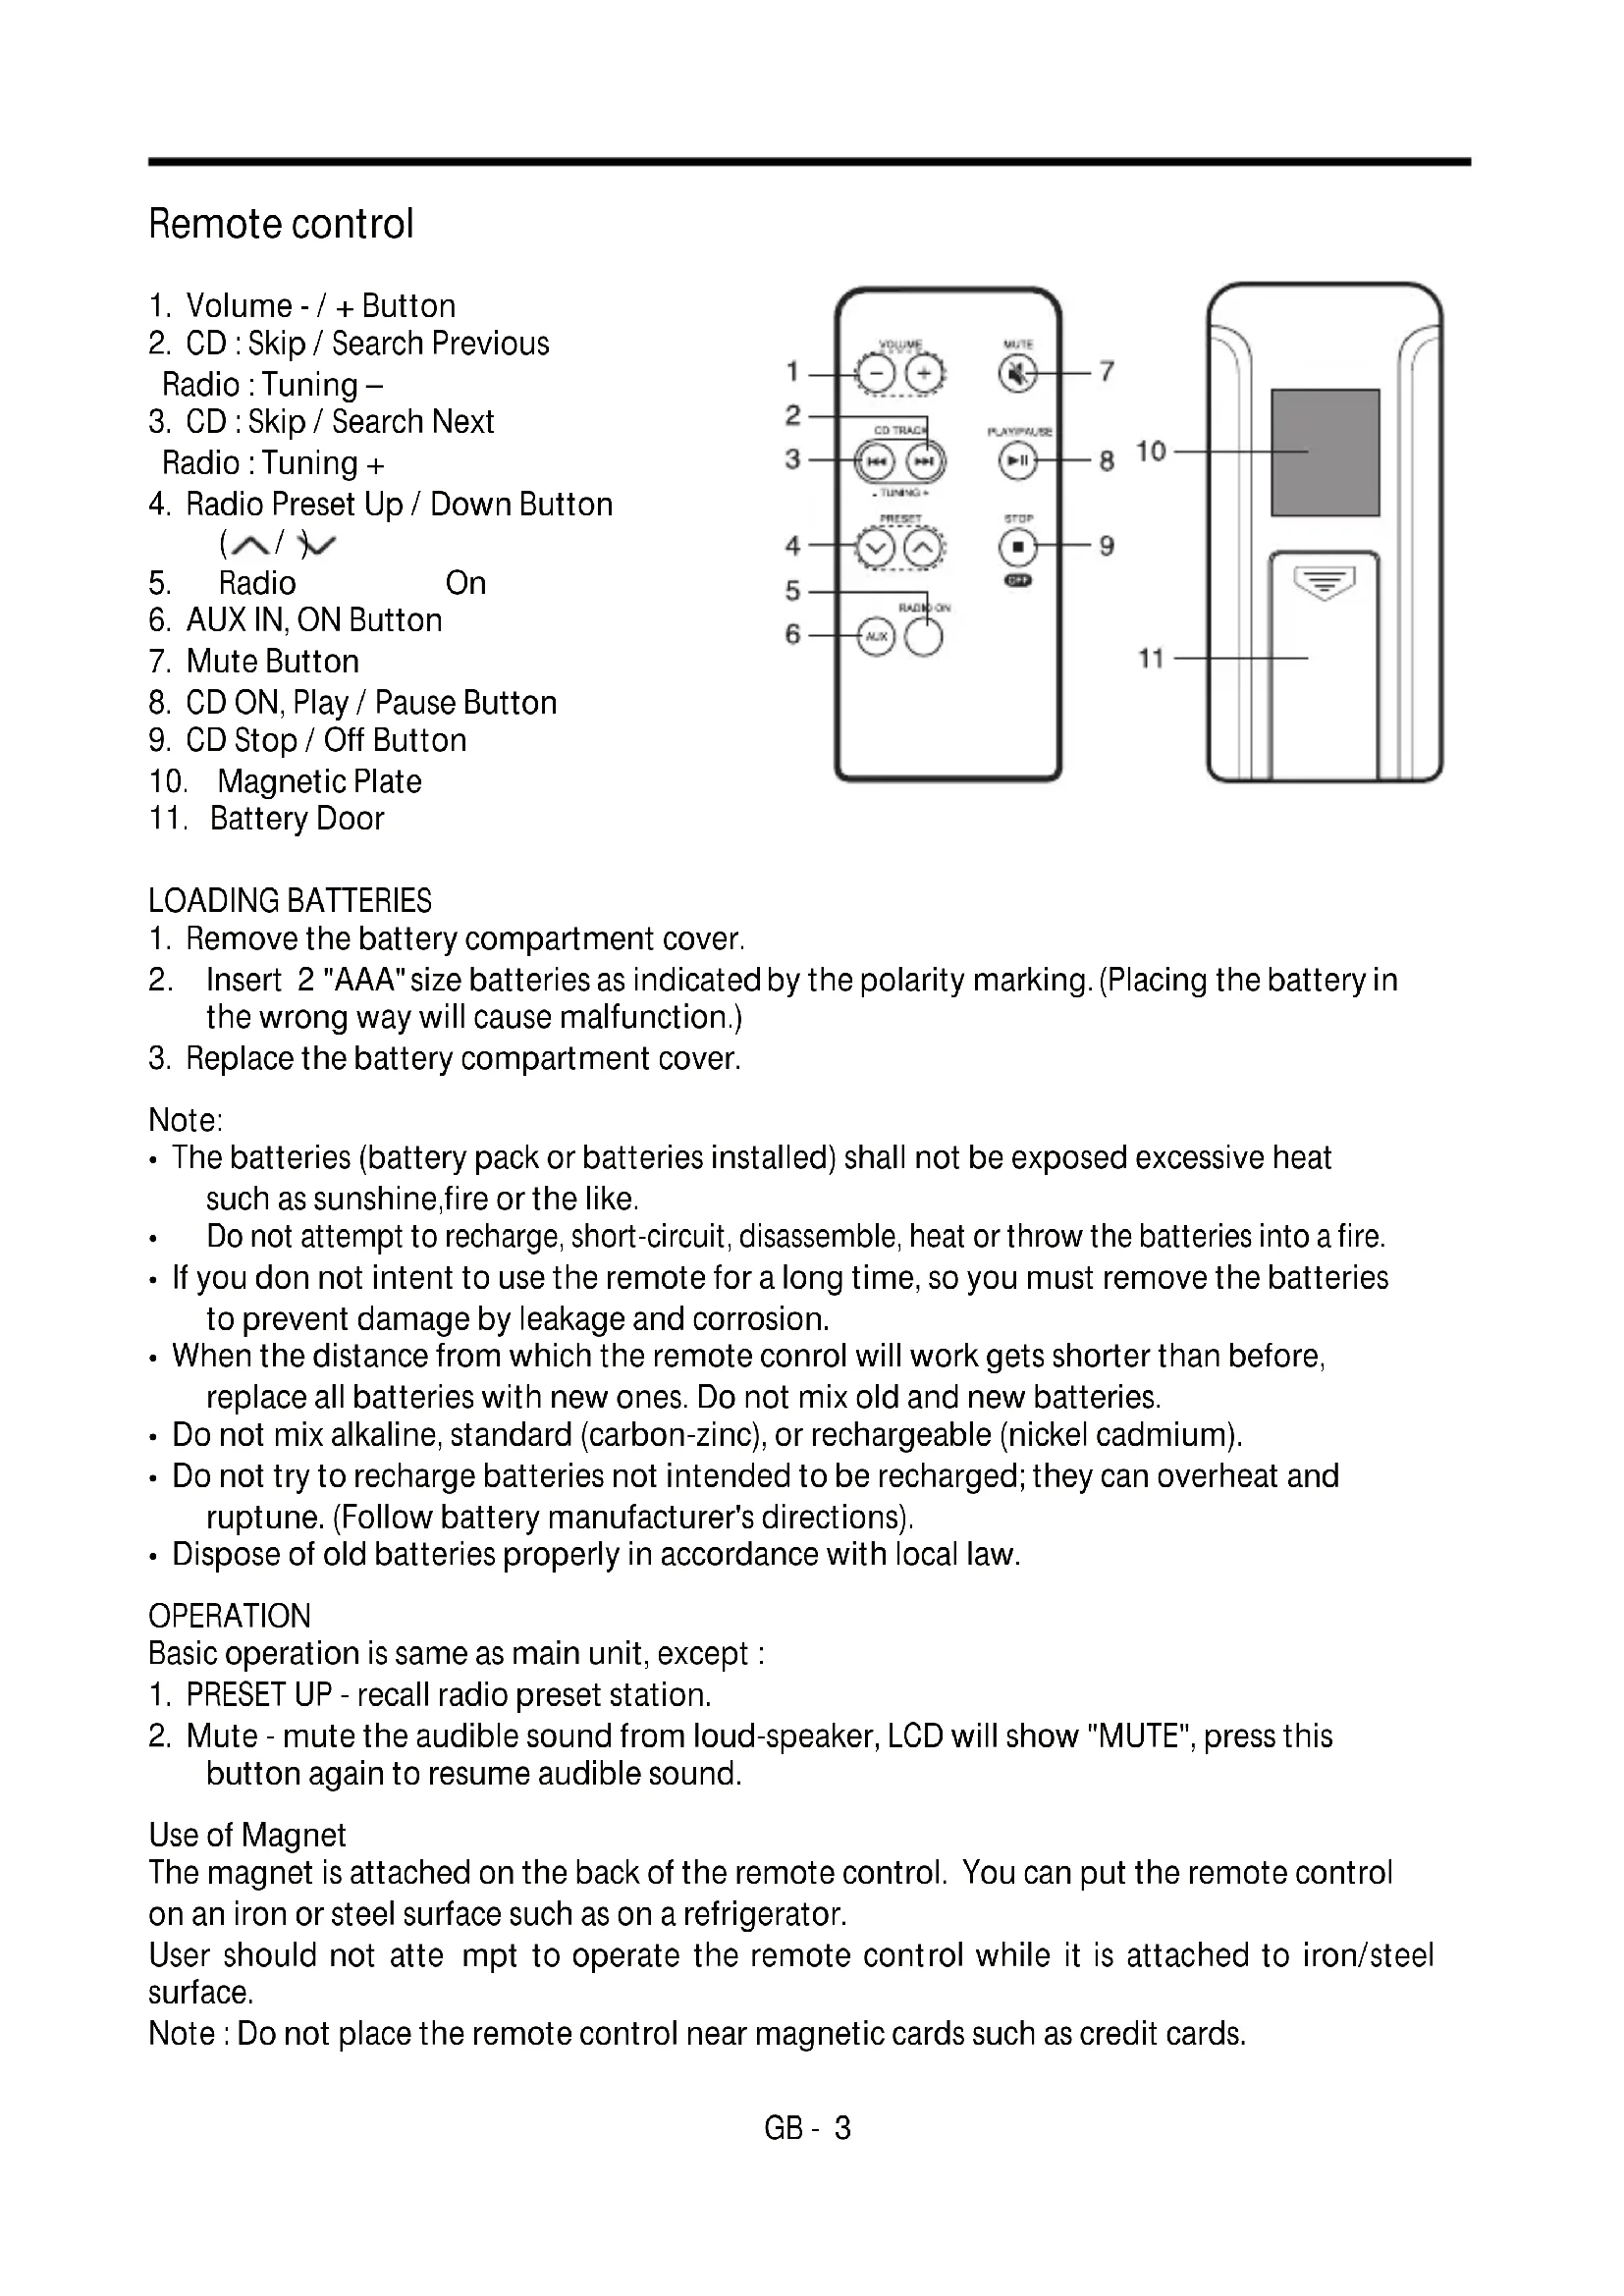
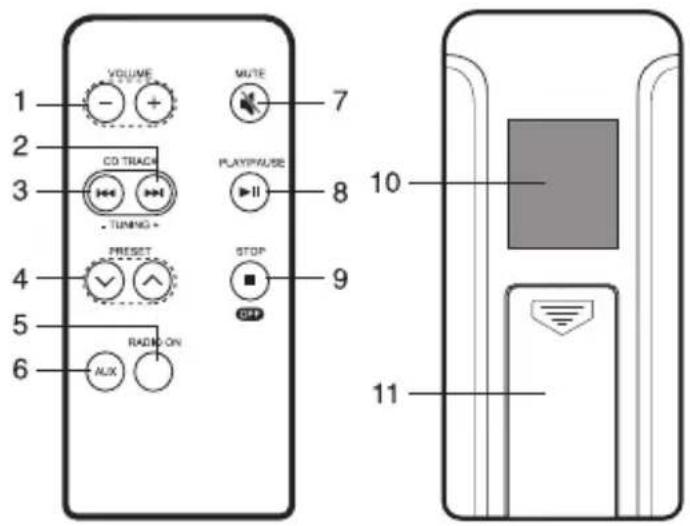
Remote control

- Volume - / + Button
- CD:Skip/Search Previous
Radio : Tuning – - CD:Skip/Search Next
Radio : Tuning + - Radio Preset Up / Down Button
- Radio On
- AUX IN, ON Button
- Mute Button
- CD ON, Play / Pause Button
- CD Stop / Off Button
- Magnetic Plate
- Battery Door
LOADING BATTERIES
- Remove the battery compartment cover.
- Insert 2 "AAA" size batteries as indicated by the polarity marking. (Placing the battery in the wrong way will cause malfunction.)
- Replace the battery compartment cover.
Note:
- The batteries (battery pack or batteries installed) shall not be exposed excessive heat such as sunshine, fire or the like.
Do not attempt to recharge, short-circuit, disassemble, heat or throw the batteries into a fire. - If you don't intend to use the remote for a long time, so you must remove the batteries to prevent damage by leakage and corrosion.
- When the distance from which the remote control will work gets shorter than before, replace all batteries with new ones. Do not mix old and new batteries.
- Do not mix alkaline, standard (carbon-zinc), or rechargeable (nickel cadmium).
- Do not try to recharge batteries not intended to be recharged; they can overheat and rupture. (Follow battery manufacturer's directions).
- Dispose of old batteries properly in accordance with local law.
OPERATION
Basic operation is same as main unit, except :
- PRESET UP - recall radio preset station.
- Mute - mute the audible sound from loud-speaker, LCD will show "MUTE", press this button again to resume audible sound.
Use of Magnet
The magnet is attached on the back of the remote control. You can put the remote control on an iron or steel surface such as on a refrigerator.
User should not attempt to operate the remote control while it is attached to iron/steel surface.
Note : Do not place the remote control near magnetic cards such as credit cards.
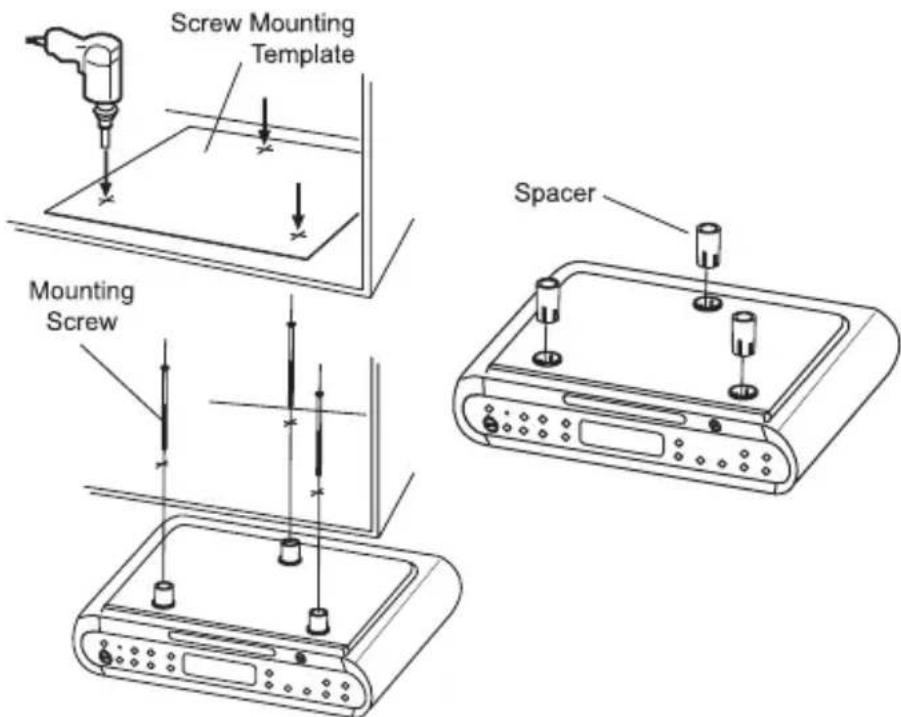
PREPARATION FOR USE
INSTALLING THE UNIT UNDER A CABINET
-
Mark the position of the 3 holes by using the supplied template. Use a drill to make the holes.
-
When the cabinet door overhangs the shelf and obstructs the unit, you can adjust the unit/shelf height.
-
Install the unit with the supplied mounting screws.
Caution:
Please read the following before installing the unit.
- Since the unit is heavy, be careful when installing the unit.
- To reduce the risk of fire, do not place any heating or cooking appliance beneath this unit.
- Install the unit so that its AC power cord can be connected directly to a wall outlet. Do not use a converter or extension cord.
- Be sure that the AC power cord has no slack when using the unit. If the AC power cord has some slack, wind it up to the cord hook until the cord has no slack.
Install the unit as far as possible from a source of noise. (for example, refrigerator, microwave oven, fluorescent lamp, etc.)
- Use tools carefully while installing of the unit.
- To reduce the risk of fire or electric shock, do not touch the AC power cord with wet hands.
MAIN POWER SUPPLY
- Check that the power voltage as shown on the type plate (at the base of the set) corresponds to your local power voltage. If it does not, consult your dealer or service organization.
- Connect the power cord to the wall outlet, for AC power supply. As soon as you insert the power plug into the wall outlet, the display time will flash and show 00:00. Please see below how to set the correct time.
POWER FAILURE
If power failure occurs, the unit will switch off. As soon as the power supply returns, will flash and display, indicating that you must reset the correct time.
BATTERY BACK-UP SYSTEM
2 "AA" size batteries (not included) can be inserted into the battery compartment to, in the event of a power failure, provide sufficient power to maintain the time. When AC power is restored, the correct time will be restored and will not require resetting.
- Neither the display nor the unit will operate until the unit is connected to an AC outlet. BATTERY WILL ONLY RESTORE CLOCK SETTINGS WHEN AC POWER IS RESTORED.
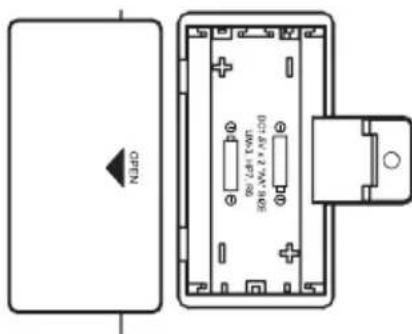
- Replace the battery once per year. The service of the battery depends on how often and for how long the power supply fails. This varies from one region to another.
Note: Always check the time and reset if necessary after a power-failure.
CLOCK
Setting the current time at power off mode
-
Press and hold CLOCK button for a few seconds. A tone will sound and the hour digit will start to flash on the display.
-
Press TUNE/TIME + or - button until the correct hour.
-
Press CLOCK once. A tone will sound and the minute digit will flash.

- Repeat step 2 to set the minutes.

After setting the minutes, press CLOCK. Two tones will be heard and normal operation will begin.
To set the current time rapidly, hold down TUNE/TIME + or -.
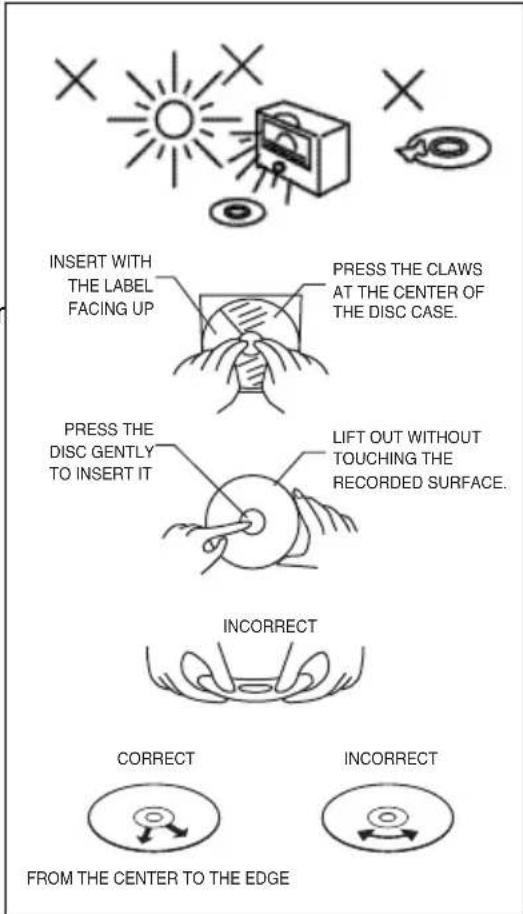
TIPS ON HANDLING COMPACT DISCS
Discs should be handled with care. Dirt, dust, scratches and warps can cause the sound to skip during play deteriorating the sound quality. The following guidelines will help ensure maximum enjoyment from your CD collection:
- Only use discs bearing the audio compact disc identification logo.

- During non-use periods, always store CDs in their protective case.
- To keep discs clean, always handle by the edge. DO NOT touch surface, stick paper on surface or stick tape on its surface. Fingerprints and dust should be carefully wiped off with a soft cloth. Wipe in a straight motion from the inside out.
- Do not use cleaning chemicals such as: benzine, thinner, alcohol, cleaning or anti-static sprays. These may permanently damage the disc's plastic surface.
- Do not write or stick anything on either side of the disc, especially the non-label side.
- To prevent wapping of the disc, do not expose it to direct sunlight, extreme temperatures, heat sources, or humidity for any extended period of time.
- Dirty, scratched or warped discs may cause skipping or noise.
CAUTION
TO AVOID DAMAGE TO YOUR DISC AND/OR PLAYER, ALWAYS MAKE SURE THE DISC HAS FULLY STOPPED ROTATING BEFORE OPENING THE DISC COMPARTMENT DOOR.

CD PLAYER OPERATION
- Press PLAY/PAUSE button once to turn on CD power, "CD" will light up on the LCD.
-
To open the CD tray, press OPEN/CLOSE button once.
-
NOTE: Pressing the Open/CLOSE button at any time will automatically switch the unit to the CD function and open the CD tray EXCEPT when the timer alarm is sounding.
-
Place a compact disc on the tray with label side facing upward.
-
To close the CD compartment, push OPEN/CLOSE button once.
-
The CD player scans the contents of the CD and the total track number will be displayed.
-
If no CD inside, LCD will show "no".
- Press▶PLAY/PAUSE button to start playback from track no. 1. The display will indicate the playback track number.
- Adjust the sound level by pressing VOLUME + / - buttons (Maximum volume is "20").
- To pause playback, press▶PLAY/PAUSE button. Press▶PLAY/PAUSE button again to resume playback.
- Press TOP button to stop playback.
- To switch off the CD power, press the STOP button again.
Note : CD playback will also stop when :
- The CD has reached the end.
- The CD door is open.
- The RADIO or AUX IN button is pressed once.
SKIP/SEARCH(I)
Selecting a different track during playback.
- You can jump to the next track by pressing button once. If you want to skip more than one track, press button more than once until the display shows the desired track number.
- If you want to repeat the current track from the beginning, press button once. If you want to play one of the previous track, press button more than once until the display shows the required track number.
Starting with a particular track
- In the STOP mode, you can select a desired track using the I or button.
- Press▶PLAY/PAUSE button to start playback.
Searching for a passage within a track
You can search for a passage within a track. The CD audio sound will be muted during search track.
-
Keep the I or button pressed during playback, and release the button.
-
Normal CD playback will resume from this point.


CD MODE/PROGRAM
REPEAT 1
- During CD playback, press CD MODE/PROGRAM button once. The REPEAT 1 indicator will come on and the current track will play repeatedly.
REPEAT ALL
During CD playback, press CD MODE / PROGRAM button twice. The REPEAT ALL indicator will come on and all tracks will play repeatedly.
RANDOM PLAY
During CD playback, press CD MODE / PROGRAM button three times. The RDM indicator will flash and tracks will begin playing in random order.
PROGRAM
Programming track number at STOP mode.
You may store up to 20 tracks in the memory in any sequence.
You may store any track more than once.
- Press the CD MODE / PROGRAM button, the PGM indicator flashes and P01 is shown.
- Press or to select the desired track
- When the desired track is displayed, press CD MODE / PROGRAM button to register. The next program no. display will change to P02.
- Repeat step 2 and 3 to program the order of more tracks up to 20 tracks can be programmed into memory.
Program Play
Press▶PLAY/PAUSE button, the PGM indicator will turn on and start to play the desired tracks.
To clear programmed tracks
- Press STOP button before program play, or
- Press STOP button twice during program play, or
- Open CD door or
- Press RADIO ON button once
AUX IN OPERATION
Caution: Turn off power and unplug the power cord before connection.
Connect to other audio equipment, including video recorder to provide sound output for other audio equipment.
Preparation
- Connect these audio equipments "LINE OUTPUT" to "AUX IN" socket of the unit through an audio cable (not included).
- Press the AUX IN / ON button once to turn on power and into AUX IN mode.
- The AUX indicator will light up on the LCD.
- Press VOLUME +/- button to increase or decrease sound level.
- To turn the unit off after use, simply press the button once.
STOP/OFF
RADIO OPERATION

- Press RADIO ON button once to turn on radio power, RADIO will light up on the LCD.
- Press the TUNE/TIME button + or - momentarily (less than 0.5 sec.) to step up or down the receiving frequency in order to select the desired station.
- For auto tuning, keep pressing the TUNE/TIME button + or - (more than 0.5 sec.) until the displayed frequency starts to change, then release the button. Tuning will stop automatically when a station is received.
- Adjust the sound level by pressing VOLUME + / - buttons.
- To turn the unit off after use, simply press STOP/OFF button once.
NOTE: After radio frequency is displayed for about 10 seconds, the LCD will show the current time. Pressing the RADIO ON button once will show radio frequency again.
Improving the reception
- Extend the FM wire antenna which is located on the back of unit, and change its position until the best FM reception is found.
- Install the unit as far as possible from a source of noise. (for example : refrigerator, microwave oven, fluorescent lamp, etc.)
PRESET STATIONS
- Press the RADIO ON button.
- When the desired station is tuned, press CD MODE / PROGRAM button to enter saving mode.
- The preset location will flash on the LCD, press PRESET
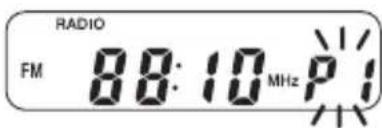
button to select preset channel.
- Press CD MODE / PROGRAM button again to save into memory. If it has previously set, the former station is replaced.
- Repeat step 1 ~ 4 to store more preset stations.
NOTE: The preset memory can store a maximum of 12 stations for FM band
RECALL A PRESET STATION
To recall any preset stations within the selection, simply press the PRESET / buttons until the preset radio frequency appears on the display.
TIMER OPERATION (Count-down timer)
- TIMER SETTING
- Press TIMERADJUST + or - to desired count-down time, the maximum count-down time is 120 minutes, with a 1 minute interval selection.
- Press the TIMER button once to start counting, the timer indicator will light up.
-
When the timer has been set and is counting, the LCD will show the count-down, however, current time, radio frequency and CD playing track can also be displayed by pressing:
-
CLOCK button once to show current time and CD playing track when unit is in CD play mode.
- CLOCK button once to show current time when unit is in radio on mode.
- RADIO ON button once to show current radio frequency when unit is in radio on mode.
-
CLOCK button once to show current time when unit is in stop/off mode.
-
About 5 seconds later, LCD will resume to show timer count-down.
-
To cancel timer operation, simply press TIMER button once, the timer indicator will turn off.
-
When desired time has elapsed, refer to below section for details.
-
Timer can be set and operated in OFF mode or CD PLAY / RADIO ON / AUX IN mode.
-In OFF mode:
When the desired time has elapsed, a beep sound will be heard and the timer indicator will flash for about 60 minutes. This alert can be stopped at any time by pressing the TIMER button once.
In CD PLAY/RADIO ON/AUX IN mode:
When the desired time has elapsed, a beep sound will be heard and the TIMER indicator will flash for about 60 minutes. When the alarm sounds, the sound level of CD PLAY / RADIO or AUX IN will be lowered automatically. This alert can be stopped at any time by pressing the TIMER button once. When the alert stops, the sound level of CD PLAY / RADIO or AUX IN will return to the original level.
IMPORTANT
Note: Although this CD player can read CD-R and CD-RW discs - in addition to normal CD's - the playability of CD-R and CD-RW discs may be affected by the type of software that was used to create the discs, as well as the quality and condition of the blank media you are using. 100% playability cannot be guaranteed. This is not an indication of a problem with the player.