
SGXCA900 - Meter PIONEER - Free user manual and instructions
Find the device manual for free SGXCA900 PIONEER in PDF.
| Product Type | Cyclocomputer (bike computer) |
| Brand | Pioneer |
| Model | SGX-CA900 |
| Display | 2.2-inch QVGA (320x240) resistive touchscreen |
| Built-in Memory | 8 GB flash (approx. 6 GB user-accessible) |
| Positioning | GPS (latitude/longitude) + air pressure sensor (altitude) |
| Wireless Sensor Protocol | ANT+™ (compatible with speed, cadence, heart rate, power, pedaling monitor sensors) |
| Water Resistance | IPX-6 (water-resistant) |
| Battery Type | Lithium-ion (rechargeable) |
| Battery Life | Approx. 12 hours (at brightness level 5) |
| Charging Time | Approx. 4 hours (via USB, 5V/500mA) |
| Operating Temperature | -10°C to 50°C (14°F to 122°F) |
| Charging Temperature Range | 0°C to 40°C (32°F to 104°F) |
| Key Features | CycloMeter data display, ride logging, GPS tracking, auto pause/resume, customizable data fields, firmware updates, ANT+ sensor pairing |
| Included Accessories | Bracket, bolt, USB cable, strap, Quick Start Guide, Important Information, Warranty Card |
| Maintenance | Clean with soft dry cloth; avoid solvents; store in cool, dark place after discharging |
| Safety Precautions | Use only on paved roads for recreational/training; not for racing; charge only in specified temperature range |
| Repairability | Battery removable for disposal; other repairs by dealer; forced reset available |
Frequently Asked Questions - SGXCA900 PIONEER
User questions about SGXCA900 PIONEER
0 question about this device. Answer the ones you know or ask your own.
Ask a new question about this device
Download the instructions for your Meter in PDF format for free! Find your manual SGXCA900 - PIONEER and take your electronic device back in hand. On this page are published all the documents necessary for the use of your device. SGXCA900 by PIONEER.
USER MANUAL SGXCA900 PIONEER
Please read the Important Information for the User in the product box for product warnings and other important safety information.
EN
DE
FR
NL
IT
ES
EN
ouonpon
Table of Contents
Introduction
Overview of this Manual 3
Features 4
Getting Started
Checking Accessories/Part Names
and Functions 5
Accessories. 5
Part Names and Functions 5
Charging 7
Charging the Device 7
Checking the Battery Level. 9
Installation
Installation on Your Bike 10
Installing the Device 10
Installing the Sensors 14
Basic Operations
Basic Operation 15
How to Operate the Touch Panel. 15
Turning the Power On/Off 16
Initial Setup 16
Pairing the Sensors 17
Workout 19
Basic Flow of the Workout 19
Logging Start/Stop 19
Saving Log Data 20
Backing up Log Data to a PC 20
CycloMeter 21
Viewing the Screen and Operating 21
Specifications/Support
Troubleshooting 23
About Error Messages 25
Care, Maintenance, and Storage ....26
Removing the Battery 26
Specifications 28
Overview of this Manual
The manuals provided with the Cyclocomputer consist of the Quick Start Guide (this manual), the User's Guide, and Important Information for the User.
Quick Start Guide (this manual)
The Quick Start Guide explains the basic operations of the Cyclocomputer.
Installing the device on your bike
Basic operations
User's Guide
[For American Users] http://www.pioneerelectronics.com
[For Canadian Users] http://www.pioneerelectronics.ca
[For European Users] http://www.pioneer.eu
The User's Guide explains how to operate the device in detail. Customizing the CycloMeter (applications) display Customizing the device settings System settings Firmware update etc.
Important Information for the User
Important Information for the User provides detailed information related to safety.
About the Cyclo-Sphere analyzing service
cyclo-sphere.com
You can analyze trip data in more detail by updating the log data saved in the device with the Cyclo-Sphere.
For details, refer to the User's Guide.
Internet Explorer 9- Opera
Features
Trip Data Display (CycloMeter)
CycloMeter displays detailed trip data like speed, power, and cadence with figures and graphs. By using one of the products in the Pedaling Monitor Sensor SGY-PM900 series, CycloMeter can display torque efficiency and power vectors by pedal rotation angles.
You can customize the data units, categories, and layouts that CycloMeter displays.
Log Function
The device records a log of your ride, things like elapsed time and a wide variety of other sensor information.
GPS tracking and location information are also logged for detailed analysis of training sessions.
Auto Pause / Resume can be programmed to automatically sync with bike motion.
Updates
Various applications may be available in the future through firmware update. Refer to the SGX-CA900 support page about firmware updates and adding applications.
[For American Users] http://www.pioneerelectronics.com
[For Canadian Users (ENGLISH)] http://www.pioneerelectronics.ca/POCEN/Support
[For Canadian Users (FRENCH)] http://www.pioneerelectronics.ca/POCFR/Soutien
[For European Users] http://www.pioneer.eu/eur/support/page.html
This product is designed to be used for recreational cycling and cycle training applications only and is not designed to withstand racing conditions.
Additionally, this product is designed to be used while cycling on paved roads only. Any damage or malfunction arising from use in racing or riding on dirt roads, cobblestone or any other unpaved roads will not be covered by the manufacturer's limited warranty.
Checking Accessories/Part Names and Functions
EN
Accessories
This product contains the following parts.
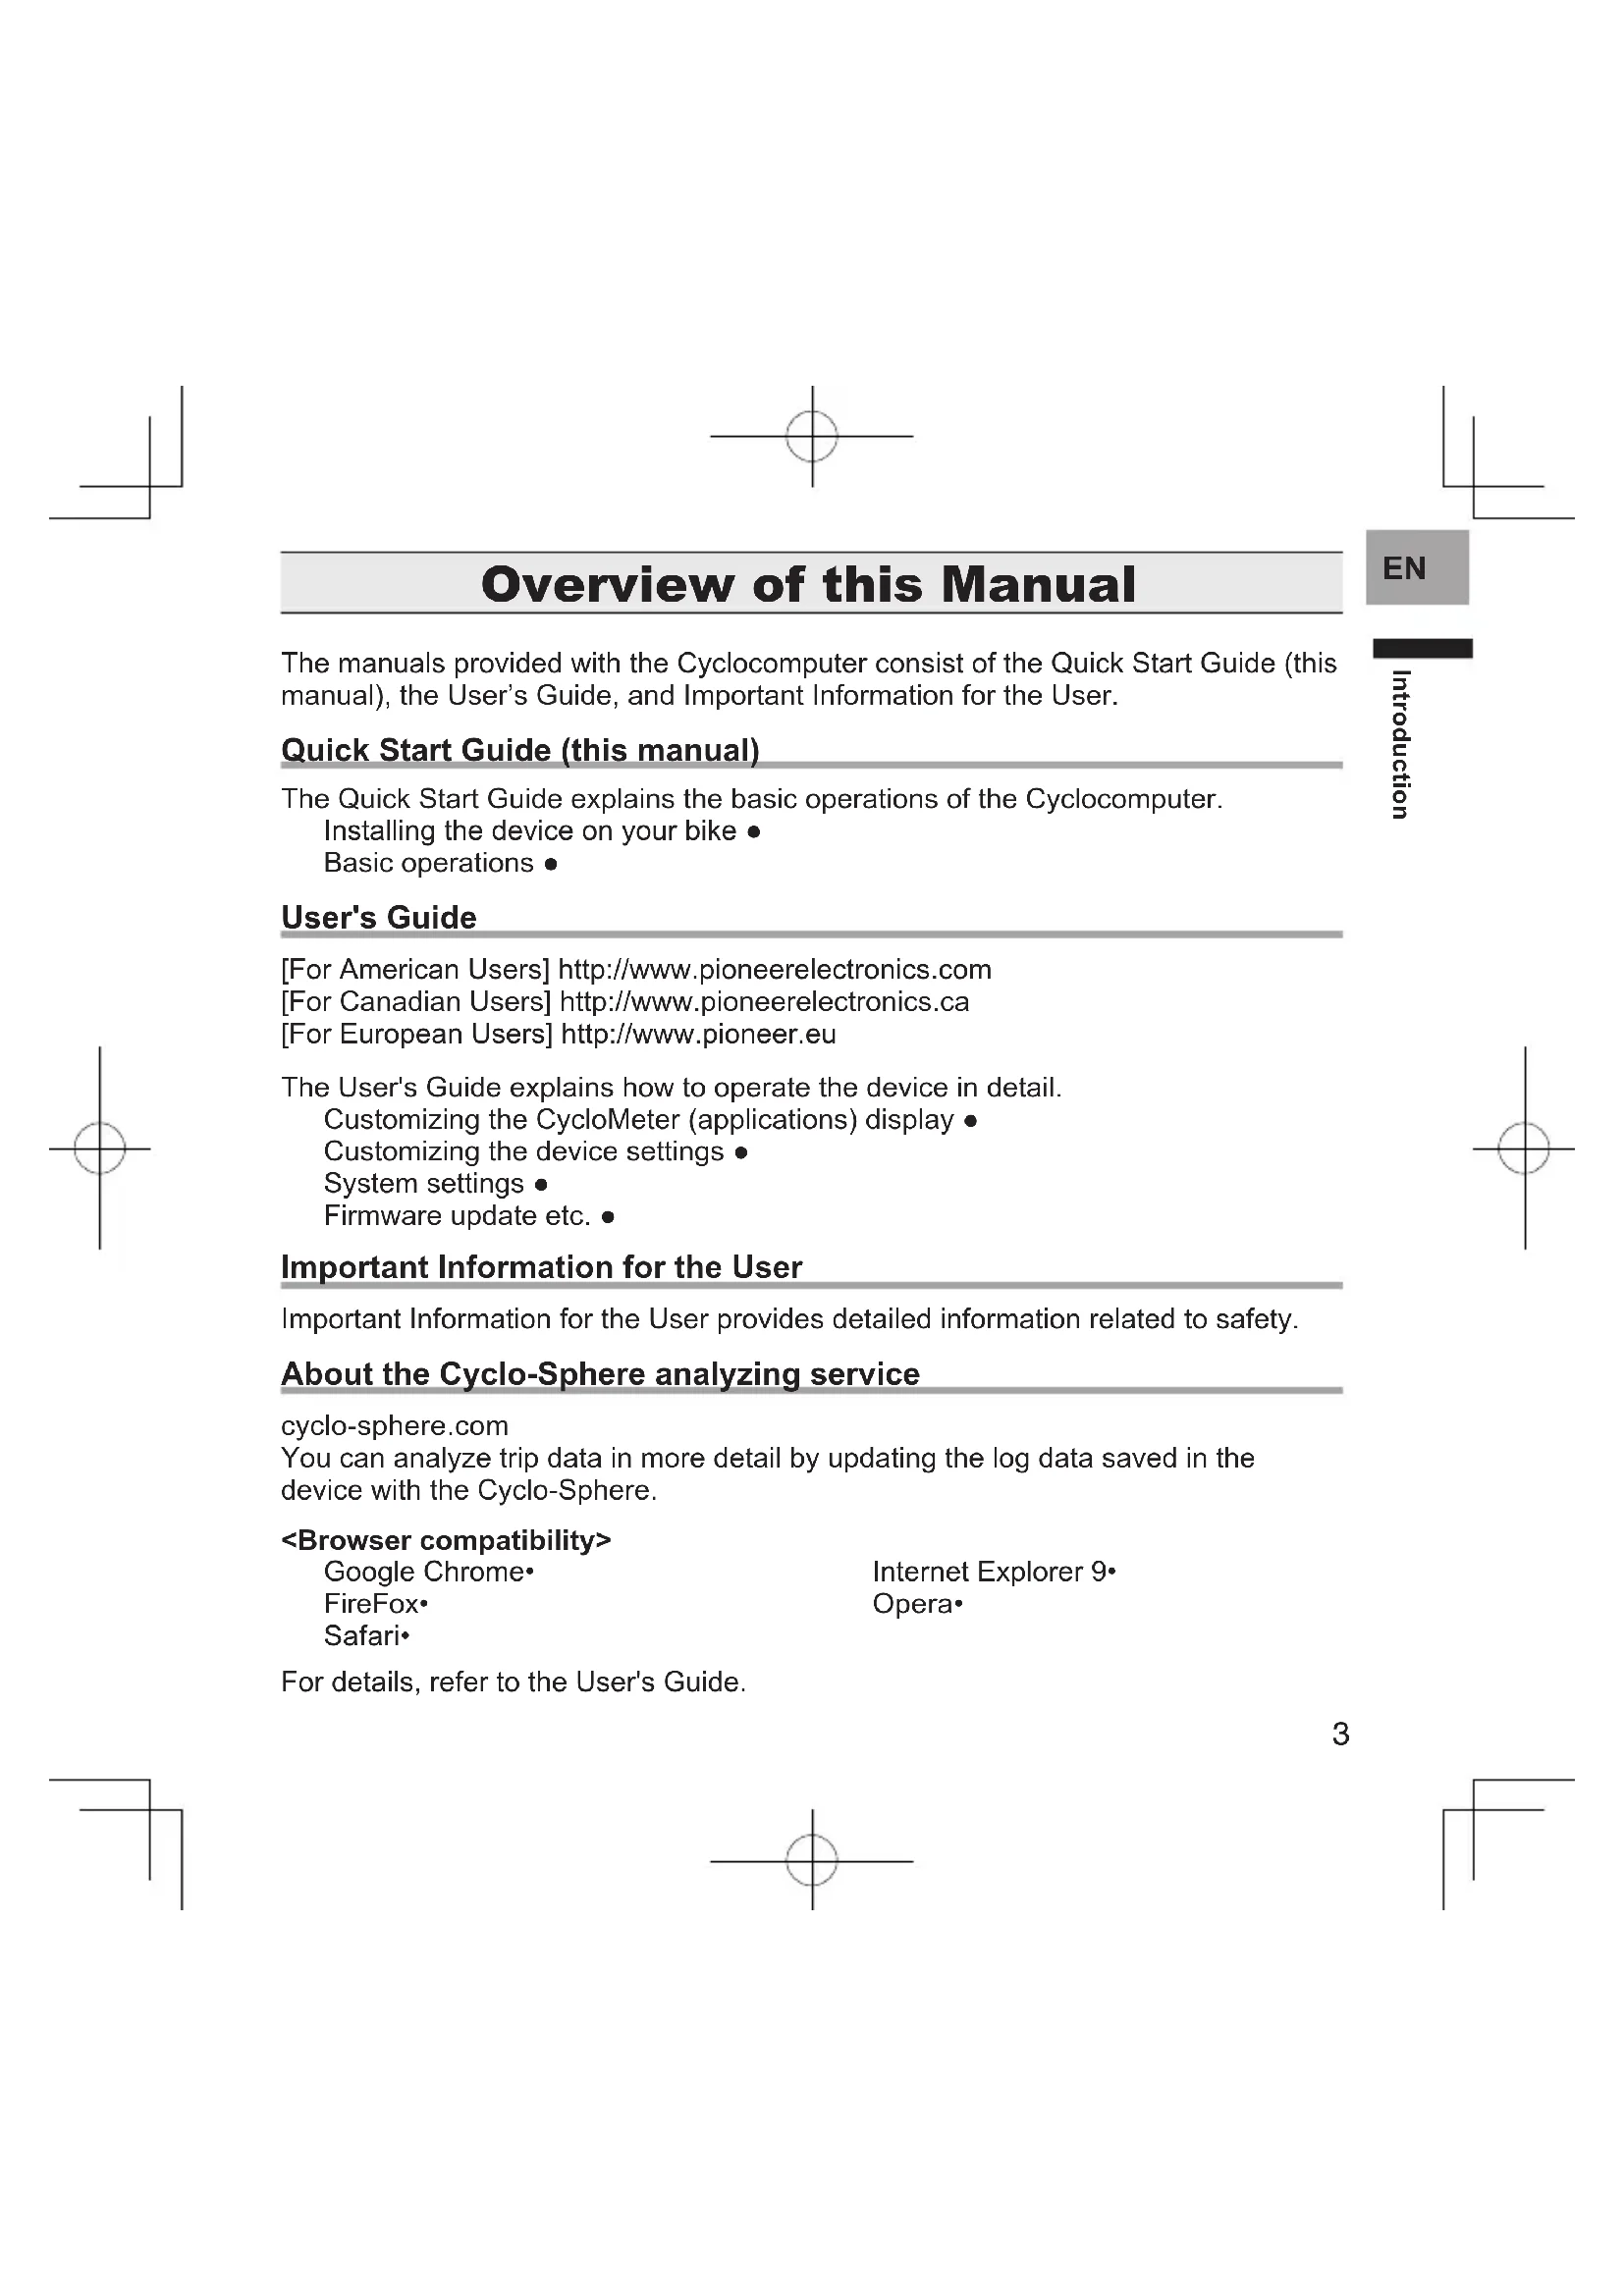
Main unit
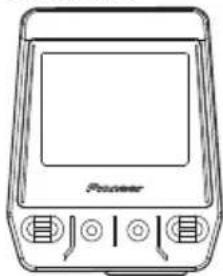
Bracket / bolt x 1
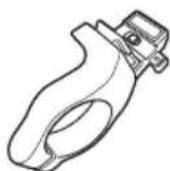
USB cable
Strap
Quick Start Guide (this manual) Important Information for the User Warranty Card
Part Names and Functions
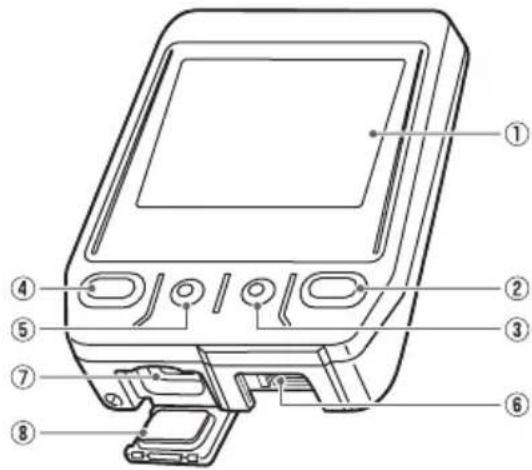
Front View
① Display (touch panel)
Touch the screen to select an item or switch screens.
② [START/STOP] button
Press the [START/STOP] button to start or stop logging. Press the [START/STOP] button for more than two seconds to turn the power on or off.
(3) BACK) button
Press the BACK) button to go back to the previous screen. Press the BACK) button on the main screen of the applications to display the home screen of the device.
Checking Accessories/Part Names and Functions
④ [LAP] button
Press the [LAP] button during logging to record a lap.
Press the [LAP] button for more than one second to reset the timer and record the log.
For details, refer to page 16.
⑤ ENU) button
Press the (MENU) button to display the menu screen. Press the (MENU) button for more than one second to lock or unlock the touch panel.
Bracket installation slot
Use the bracket installation slot to attach the device to the bracket fixed to your bike.
⑦ USB connector
Connect the USB cable to charge the device or transfer data to your PC.
USB connector cover
Securely close the USB connector cover when not charging the battery or transferring data to your PC.
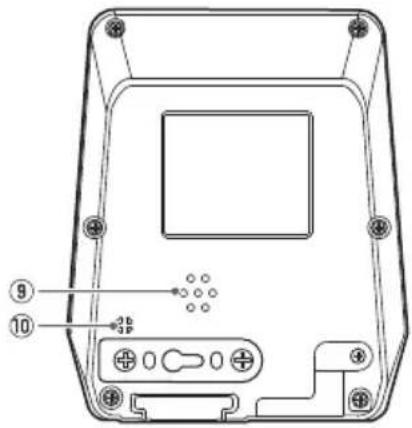
Back View
Speaker
Provides audible alerts and input confirmation.
Air pressure sensor
Do not block the sensor or the device will not operate properly.
Charging
The device is not charged at the time of purchase. Charge the device with the provided USB cable before using it.
Charging the Device
1 Open the USB connector cover.
2 Connect the provided USB cable to the USB connector on the bottom of the device.
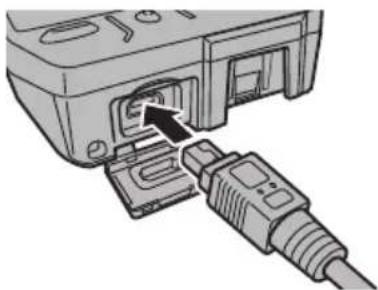
3 Turn your PC on and connect the USB cable to an open USB port on your PC.
The device starts charging.
The device turns off
To Power Up
Press the [START/STOP] button for more than 2 seconds to turn on the device for use.
Press the [START/STOP] button for more than 2 seconds again to turn off the device. Charging time is shorter if the device is turned off.
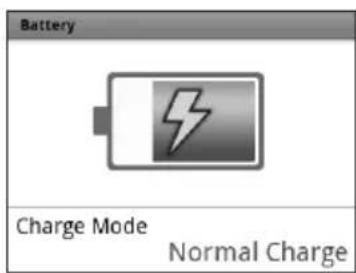
① Chargingicon
Charging
Fully charged
It takes about 4 hours to charge fully (normal charging). The device will automatically stop charging once the battery is 100% fully charged.
When the device is turned off, the screen turns dark after 5 seconds.
Touch the touch panel to check the battery level.
For the sake of safety, the device will not charge when outside the temperature range of 0^
40^ .When the devices internal temperature is too high, full charge may not be achieved. In this case, turn off the device, allow it to cool down and then recharge it.
Connect the provided USB cable directly to the USB port of your PC. If the device is connected via a USB hub, it may not charge to full capacity.
Make sure that the USB output of your PC accepts 5V / 500mA .
Do not unplug the USB cable, shut down the PC or use sleep mode while the device is transferring data as it may corrupt the data in the device.
4 Unplug the USB cable from the USB port.
Once data transfer is complete and the battery is fully charged, disconnect the USB cable from the PC first, then from the device.
5 Close the USB connector cover.
To ensure water resistant performance, firmly close the USB cover.
Checking the Battery Level
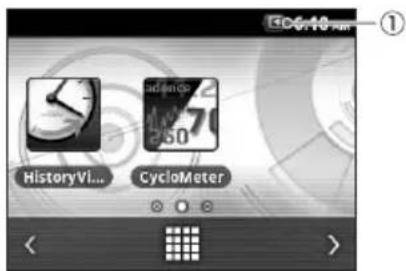
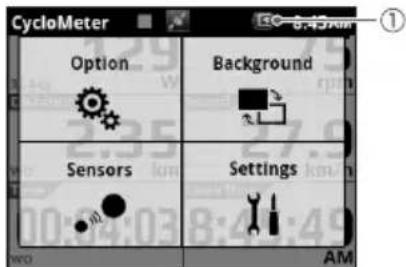
You can check the battery level with the battery icon on the status bar of the home screen and the menu screen.
Operating Time Indicator
A fully charged battery can run for approximately 12 hours (brightness 5).
Operating times may vary depending on the operating conditions. If the operating time is abnormally short, the battery may need to be replaced. For details, please visit our website.
① Battery icon
When the battery is running low on power, a warning screen will appear "Battery Level Decreasing." If not recharged, the device will shut down automatically.
EN
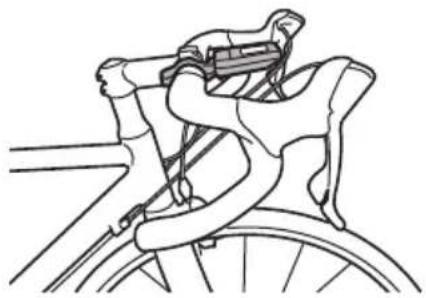
Installation on Your Bike
Mount the Cyclocomputer on your bike.
Caution
- When you mount the Cyclocomputer on your bike, be sure your bike is in a stable position to prevent it from falling.
ou
Installing the Device
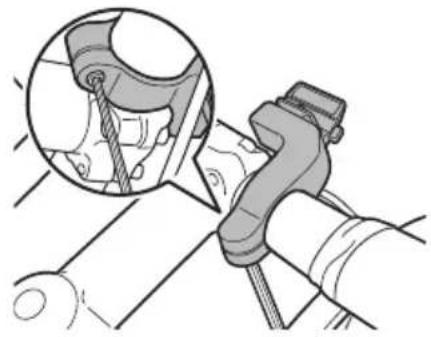
1 Remove the bolt from the bracket. Remove the bolt from the bracket using a 3mm hex wrench.

① hexwrench
Be careful not to lose the removed bolt.
2 Mount the bracket on the handlebar of your bike.

Be careful not to pinch your finger when mounting the bracket on the bike.
10
3 Secure the bracket with the bolt.
Apply anti-seize compound like a grease to the bolt.
Adjust the bracket horizontally from the stem, insert the bolt into the hole and tighten lightly.
4 Check the position of the fixed lever on the bracket.
Check the red circle on the right side of the fixed lever. If you do not see it, the device cannot be attached. If the red circle is hidden, push the fixed lever into the right.
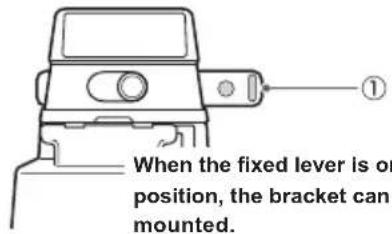
① Fixed lever
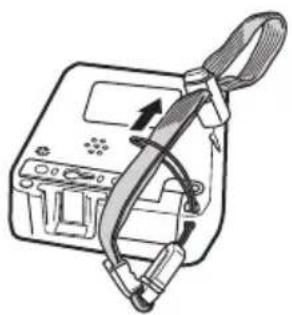
5 Attach the strap to the device.
Lace the strap through the device holes for the strap.
Installation on Your Bike
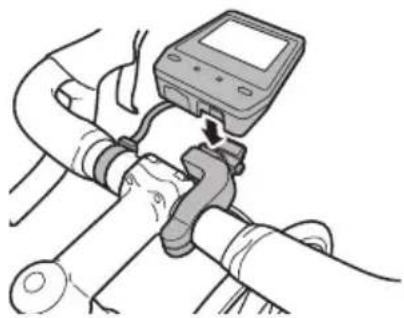
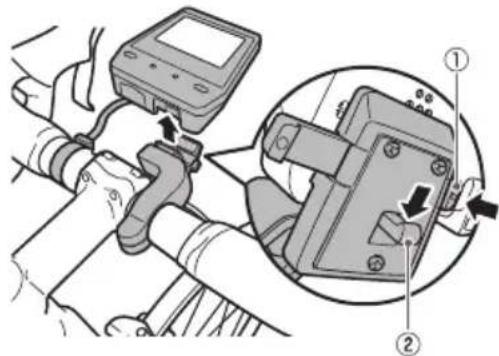
6 Attach the device to the bracket.
Fasten the strap to the handlebars. Set the tip of the bracket in the bracket slot on the device and push the device until it clicks.

7 Push the fixed lever into the left.
Push the fixed lever until the red circle on the right side is hidden.
Push the fixed lever to
the direction of the arrow.
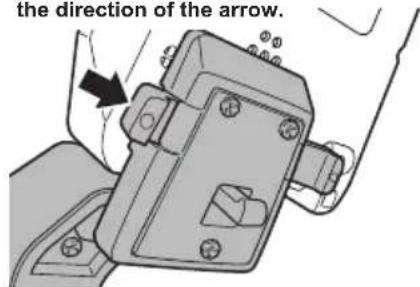
Before riding with the device, make sure that the fixed lever red circle is hidden.
8 Adjust the angle of the device, and then tighten the bracket.
If the device is not aligned to the center of the handlebars or not horizontal to the stem, loosen the bolt and realign the bracket.
After adjusting the angle, clamp the temporary joint bolt and tighten the bracket.
Use a tool that can measure the torque to tighten the bolts.
Tightening torque: 1.2 N·m
Front view
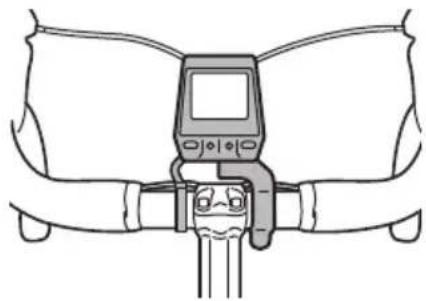
Side view
Installation on Your Bike
To detach the device
To detach the device from the handlebar mount, press the fixed lever to the right, a red circle will appear next to the device when unlocked. Pull back on the unlock lever on the bracket and lift the device.
① Fixed lever
② Unlock lever
Installing the Sensors
This device is compatible with ANT + ^TM sensors mounted on your bike. Refer to the users manual of your ANT+ sensors for installation instructions.
This product is ANT+TM certified. Visit http://www.thisant.com/direction/ for a list of compatible products and apps.

Basic Operation
How to Operate the Touch Panel
The display of this device is a touch panel for direct operation.
Tap
Quickly touch an item on the screen to select or confirm it.
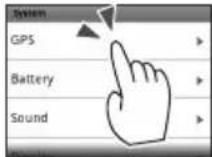
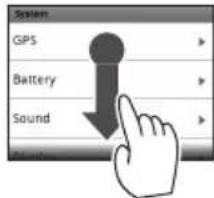
Swipe
Move your finger in a vertical or horizontal direction on the screen. Do this to switch screens or scroll.
Long touch
Touch and hold an item on the screen.
Do this to open the pop-up menus.
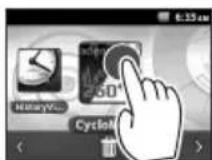
Drag
To move an item on the screen, simply touch the item with your finger and move it to the new location.
Precautions when using the touch panel
Do not use a hard or sharp object to operate the touch panel, doing so may damage it.
Do not use commercially available protective sheets or films as they may interfere with normal operation and cause the device not to operate correctly.
You can operate the touch panel while wearing gloves. Apply slightly more pressure than usual.
EN
Basic Operation
Turning the Power On/Off
Turn the device on
1 Press the [START/STOP] button for at least two seconds.
The CycloMeter will start after the opening message has been displayed.
First time power up will automatically display the setup screen.
Turn the device off
1 Press the [START/STOP] button for at least two seconds.
A power down message appears and the system will power off.
Initial Setup
When you turn the device on for the first time, the Initial Setup screen is displayed.
You can change the settings at any time.
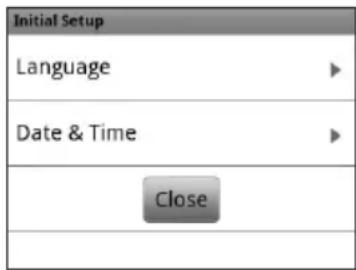
1 Tap [Language] and select a language.
Drag the screen and tap the language that you want to display.
The following steps explain the procedure when you select [English].
2 Tap [Date & Time] and set the date and the time.
Touch the BACK) button after you've completed your settings.
| Time Zone | Select a time zone. |
| Date Enter the date. | |
| Time Enter the time. | |
| 24-Hour Format | Check the box to display time in 24 hour format. |
| Date Format | Select the date format. |
3 Tap [Close].
The Initial Setup is finished and CycloMeter starts.
Pairing the Sensors
Pair the SGY-PM900 Pedaling Monitor Sensor or other ANT+ sensors to the device.
Before pairing the sensors
Make sure that the sensors that you want to pair are activated. If more than one sensor is activated, bring the device close to the sensor or specify the device number to pair. Refer to the User's Guide about how to specify the device number. If you use the speed sensor sold separately and the wheel circumference is different, set the wheel circumference. The wheel circumference is set to 2096 mm by default. For details, refer to the Users Guide.
1 Mount the sensors on your bike. For details about how to mount sensors, refer to the user's manual of your sensors.
2 Press the MENU) button on the main screen of the CycloMeter.
3 Tap [Sensors] - [Connect New].
4 Enter your sensors' information. Tap [Device Type] to select the type of sensor(s) you wish to pair.
Types of compatible sensors:
SpeedSensor
CadenceSensor
Speed & Cadence Sensor
Heart Rate Monitor
PowerMeter
Pedaling Monitor L
Pedaling Monitor R
5 Tap [Search].
The message "Searching Please wait." appears. If the sensors are paired, the information from the sensors is displayed.
6 Confirm the information from the sensors.
Confirm that "OK" is displayed in the [Error Rate] area.
If "NG" is displayed in the [Error - Rate] area, the sensor information is not received properly due to a communication error. Make sure that the sensor is activated, bring the device closer to the sensor and try pairing again.
You may not pair with the sensor due to the influence of the 2.4 GHz frequency band. If "NG" is displayed even if the device is moved closer to the sensor and paired with it, try again someplace where there is no interference from microwaves, radio waves, or wireless equipment.
Workout
This device is designed to log a variety of sensor data as well as GPS location data during your workout. In this device, the beginning of the training to the end of the training is called " workout".

Basic Flow of the Workout
Logging Start/Stop
1 Press the [START/STOP] button to start logging. [Timer Started] is displayed.
2 Press the [START/STOP] button to stop logging. [Timer Stopped] is displayed.
- You can start and stop logging at any time while the device is turned on except while the device is connected to a PC or during setting initialization. If the [LAP] button is pressed during logging, a lap is recorded.
EN
Exercise
Saving Log Data
After your have completed your ride, reset the timer to save the log data to the built-in flash memory.
1 Press the [LAP] button for more than one second.
The log data is saved, and the timer is reset.
The log data is saved in the ".\Pioneer\Log" folder.
Log data is not saved to the built-in flash memory until the timer is reset.
Backing up Log Data to a PC
You can transfer the log data in the built-in flash memory of the device to your PC.
Transferred data can be analyzed using the Pioneer™ Cyclo-Sphere web service.
1 Connect the device to your PC with the provided USB cable.
The PC recognizes the device as a mass storage device.
Refer to page 7 about connecting the device and your PC.
2 Select the data you want to transfer, and then save it anywhere on the PC.
The log data is saved in the "...Pioneer\ Log" folder.
Save it anywhere on the PC.
The file name is the date and hour that the training log started.
(e.g., LOG_2013_04_01_08_20.db)
CycloMeter
CycloMeter is the main application on this device. It provides the trip data of your bike ride. When the device is turned on, CycloMeter is activated first. For details about CycloMeter, refer to the User's Guide.
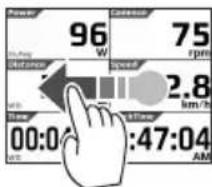
Viewing the Screen and Operating
The CycloMeter screen consists of pages and data fields. A variety of information is displayed as a data field on the page.
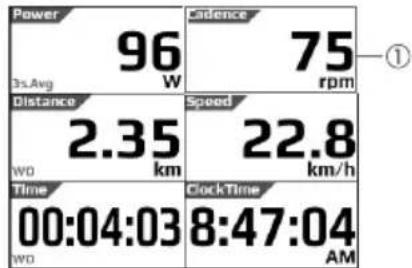
Data Fields Display the information name, type, unit etc.
You can customize the type of data fields and their layout on the pages. For further details, refer to the User's Guide.
Changing Pages
Swipe the screen right or left to change the pages.There are 6 pages by default.
Changing Brightness
Swipe the screen up or down to adjust the brightness. 10 levels are provided.

EN
CycloMeter
Zooming Data Fields
Tap data field to zoom in. Tap it again or press the BACK) button to return to the page display.

e e
When the [ ] mark is displayed on the right, left, top or bottom of the screen, swipe the screen in the direction of the mark to change the units and kinds of data fields.
22
Troubleshooting
If you have problems with your device, check the following items. If you cannot find the problem, refer to the User's Guide. If a solution to your problem cannot be found here, contact your dealer.
Will not power up
| Cause Solution | |
| The battery is not charged. Charge the battery. | |
| The temperature of the device may be too high or low. | Wait until the device is within standard operating temperature ranges. |
The operation button or the touch panel is not responding.
| Cause Solution | |
| There are numerous possibilities for non-operation. | Push the [START/STOP] button and [LAP] button at the same time for more than 10 seconds to try the forced reset. After the forced reset, set the [Date & Time]. (page 17) The log data and setting data will not be deleted by a forced reset. Do not do a forced reset if the device has no malfunction. |
The touch panel is not responding.
| Cause Solution | |
| The touch panel cannot sense your input. | The device has a resistive touch panel. Resistive touch panels require a slightly stronger touch than capacitive touch panels. |
| The touch panel is locked. | Push and hold the (MENU) button to unlock. When unlock is displayed, it is unlocked. |
EN
Troubleshooting
You do not know how to initialize.
| Cause Solution | |
| - Tap [System]-[Setting Manager]-[Initialize] from the home screen to initialize. Refer to the User's Guide for details. If you initialize, the ride log data will be deleted. Save the data to a PC before initialization. | |
Sensor information is not displayed.
| Cause Solution | |
| The sensor is not paired. Check that the sensor is paired to the device properly. If you use the pedaling monitor sensor SGY-PM900, refer to the User's Manual of the SGY-PM900 and Installation Manual. | |
| The sensor battery is almost empty. Replace the battery with a new one. Refer to the user's manual of the sensor about how to replace the battery. | |
| Cause Solution | |
| Reception is poor when inside a room or in areas surrounded by mountains.It may take a few minutes to display the latitude and longitude when you use the device the first time. | Use the device outside in an open area.When you use the device for the first time, you may need to allow extra time. |
About Error Messages
| Message Cause Solution | ||
| Outside Charging Temperature Range | You tried to charge the battery outside the charging temperature range of 0°C to 40°C. You cannot charge the battery outside the charging temperature range of 0°C to 40°C for safety reasons. The device may not have charged even though the outside temperature is below 40°C. This happens because the device heats up when the battery is charging. | Charge the battery in the charging temperature range of 0°C to 40°C. If you turn off the device when the battery is charging, the temperature does not rise. (page 7) |
| Storage space is getting low. Please remove unnecessary data. | There is not enough free memory in the device system area. | Transfer the ride log data to a PC. Delete the data in the built-in flash memory from the PC. (page 20) |
| Battery level is low. Please connect power supply. Updating will start after fully charged. | The device can be updated only when it is fully charged to prevent update failures. | Charge the battery of the device. When it is finished, the device starts updating automatically. |
modns
soneeyoe
Care, Maintenance, and Storage
Make sure that the power of the device is turned off before cleaning.
Use a commercial cleaning cloth to clean the display.
- Use a soft dry cloth or a cloth that has been dampened and wrung out to wipe the device or the bracket.
- Do not use benzene, paint thinner, or other volatile chemicals, cleansers, or chemically treated cloths. Doing so could damage the product or cause the paint to peel.
- Discharge the battery and store the device in a cool and dark place if being stored for a long period of time.
Removing the Battery
Remove the lithium-ion battery by the following procedures to dispose of the device.
Please use caution when removing the battery. Please never attempt to disassemble the device except when you dispose of the battery.
- Remove the screw of the device.
Use a Phillips-head screwdriver and remove the screws (6) from the back of the device.

- Remove the back cover of the device and the lithium-ion battery cable from the substrate.
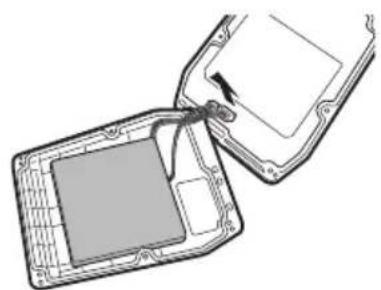
- Remove the lithium-ion battery from the back cover.
Remove the tape that holds the lithium-ion battery to remove the battery.
Be careful not to damage the lithium-ion battery.
[For American Users, Canadian Users]
Follow applicable laws and regulations for transport, shipping, and disposal of batteries. For details on recycling the lithium-ion battery, please contact a government recycling agency, your waste-disposal service, or visit reputable online recycling sources such as www.batteryrecycling.com
Water resistant: This device has a water resistance rating of IPX-6.
Communications method (sensors): ANT+ wireless
Positioning system (latitude, longitude): GPS
Positioning system (altitude): Air pressure sensor
Display: QVGA 320x240 pixel, horizontal 2.2 inch outdoor type
Touch panel (resistive touch display)
Built-in flash memory: 8 GB (user available capacity 6 GB)
Operation temperature: -10 to 50^
Power requirement: DC 5V
Battery type: Lithium-ion battery
Battery operating time: Approximately 12 hours (brightness 5)
Charging time: Approximately 4 hours (normal charge)
Accessories: Bracket, Bolt, USB cable, Strap, Quick Start Guide, Warranty card, Important Information for the User
- The battery operating time may decrease depending on the operating conditions.
- ANT+ is a wireless personal network protocol with very low power requirements using the 2.4 GHz frequency band.
For more information, visit http://www.thisant.com/
Specifications and design are subject to change without notice. - Illustrations used in this manual may be different from the actual device.
![PIONEER SGXCA900 - [For American Users, Canadian Users] - 1](/content/2026/02/373802/images/266dbe6174e3bb954569df3e2f19f5800e306c3e4269fbdd28429d60dd19c9d7.jpg)
![PIONEER SGXCA900 - [For American Users, Canadian Users] - 2](/content/2026/02/373802/images/6ecff63438284372e51f370ea54bf55b1ae80b7a1f8e38bafcc7fb8a60d2b0d6.jpg)
![PIONEER SGXCA900 - [For American Users, Canadian Users] - 3](/content/2026/02/373802/images/54c0b616977477e4ddf18a0ae4fce225c09ef1d6906ef6a6b02e020c8dbff7b1.jpg)
![PIONEER SGXCA900 - [For American Users, Canadian Users] - 4](/content/2026/02/373802/images/469b9002de323360cc639d355a290f59eaa05ba96e750734a39115798a7dda5f.jpg)
![PIONEER SGXCA900 - [For American Users, Canadian Users] - 5](/content/2026/02/373802/images/079d7f49601c10d313a799798dc353928d6c3d48c6ae3fbd0840ef5e04689fbe.jpg)
![PIONEER SGXCA900 - [For American Users, Canadian Users] - 6](/content/2026/02/373802/images/71c9924028896073dc6d02e7b19d993ba54feeb2c985b6cbf244583a43d02777.jpg)
![PIONEER SGXCA900 - [For American Users, Canadian Users] - 7](/content/2026/02/373802/images/a0eb4f7a46176dcdcc00f31862c58305d64cb6a31d86a4a31d760e2a5c83b05d.jpg)
![PIONEER SGXCA900 - [For American Users, Canadian Users] - 8](/content/2026/02/373802/images/c0d3b33cc51e64d632fd49cb27a058af9f42549779939b63e978ee67c1a3aa85.jpg)
DE
Suny
Inhalt
Einführung
Visit www.pioneer.eu to register your product.
PIONEER ELECTRONICS (USA) INC.
P.O.Box 1540, Long Beach, California, 90801-1540,U.S.A.
TEL: (800) 421-1404
PIONEER ELECTRONICS OF CANADA INC.
340 Ferrier Street, Unit 2, Markham, Ontario, L3R 2Z5, Canada
TEL: 1-877-283-5901
TEL: 905-479-4411
PIONEER EUROPE NV
Haven 1087, Keetberglaan 1, B-9120 Melsele, Belgium/Belgique
TEL: +32 (0)3570 05 11
©2012 PIONEER CORPORATION.
All rights reserved.

- EN
- ouonpon
- Table of Contents
- Introduction
- Getting Started
- Installation
- Basic Operations
- Specifications/Support
- Overview of this Manual
- Quick Start Guide (this manual)
- User's Guide
- Important Information for the User
- About the Cyclo-Sphere analyzing service
- Features
- Trip Data Display (CycloMeter)
- Log Function
- Updates
- Checking Accessories/Part Names and Functions
- Accessories
- Strap
- Part Names and Functions
- ④ [LAP] button
- ⑤ ENU) button
- Bracket installation slot
- ⑦ USB connector
- USB connector cover
- Speaker
- Air pressure sensor
- Charging
- Charging the Device
- The device turns off
- To Power Up
- Unplug the USB cable from the USB port.
- Close the USB connector cover.
- Checking the Battery Level
- Operating Time Indicator
- ① Battery icon
- Installation on Your Bike
- Caution
- Installing the Device
- Secure the bracket with the bolt.
- Check the position of the fixed lever on the bracket.
- Attach the strap to the device.
- Attach the device to the bracket.
- Push the fixed lever into the left.
- Adjust the angle of the device, and then tighten the bracket.
- Front view
- To detach the device
- Installing the Sensors
- Basic Operation
- How to Operate the Touch Panel
- Precautions when using the touch panel
- Turning the Power On/Off
- Turn the device on
- Turn the device off
- Initial Setup
- Tap [Date & Time] and set the date and the time.
- Tap [Close].
- Pairing the Sensors
- Before pairing the sensors
- Workout
- Logging Start/Stop
- Saving Log Data
- Press the [LAP] button for more than one second.
- Backing up Log Data to a PC
- Connect the device to your PC with the provided USB cable.
- Select the data you want to transfer, and then save it anywhere on the PC.
- CycloMeter
- Viewing the Screen and Operating
- Changing Pages
- Changing Brightness
- Zooming Data Fields
- Troubleshooting
- Care, Maintenance, and Storage
- Removing the Battery
- [For American Users, Canadian Users]
- DE
- Suny
- Inhalt
- Einführung
- PIONEER ELECTRONICS (USA) INC.
- PIONEER ELECTRONICS OF CANADA INC.
- PIONEER EUROPE NV
Brand : PIONEER
Model : SGXCA900
Category : Meter