
5MA46500 - Microwave Oven BLAUPUNKT - Free user manual and instructions
Find the device manual for free 5MA46500 BLAUPUNKT in PDF.

| Product type | Built-in microwave oven |
| Brand | Blaupunkt |
| Model | 5MA46500 |
| Power supply | 220-230 V, 50 Hz, 16 A |
| Microwave power | 900 W |
| Microwave frequency | 2450 MHz |
| Cooking modes | Microwave, Convection, Grill, Air pulse grill, Pizza position, MicroCombi |
| Automatic programs | 15 programs (defrosting and cooking) |
| Capacity | Approximately 25 L |
| Dimensions (H x W x D) | Approximately 450 x 595 x 550 mm |
| Net weight | Approximately 20 kg |
| Included accessories | Turntable, low rack, high rack |
| Safety | Child safety, automatic safety cut-off, door lock |
| Maintenance | Clean with soapy water and a soft cloth; avoid abrasive cleaners |
| After-sales service | Contact customer service for repairs; E and FD numbers on the rating plate |
Frequently Asked Questions - 5MA46500 BLAUPUNKT
User questions about 5MA46500 BLAUPUNKT
0 question about this device. Answer the ones you know or ask your own.
Ask a new question about this device
Download the instructions for your Microwave Oven in PDF format for free! Find your manual 5MA46500 - BLAUPUNKT and take your electronic device back in hand. On this page are published all the documents necessary for the use of your device. 5MA46500 by BLAUPUNKT.
USER MANUAL 5MA46500 BLAUPUNKT
Important safety information. 23
Installation and connection. 25
Your new appliance. 26
Before using the appliance for the first time 27
Switching the appliance on and off 27
The microwave 28
Setting the oven. 28
Microwave combi operation 29
Childproof lock 30
Basic settings 30
Automatic safety cut-out 31
Care and cleaning 31
Malfunction table. 31
After-sales service 32
Energy and environment tips. 33
Automatic programmes 33
Tested for you in our cooking studio 34
Acrylamide in foodstuffs 42
Test dishes. 43
Important safety information
Read these instructions carefully. Only then will you be able to operate your appliance safely and correctly. Retain the instruction manual for future use or for subsequent owners.
This appliance is only intended to be fully fitted in a kitchen. Observe the special installation instructions.
Check the appliance for damage after unpacking it. Do not connect the appliance if it has been damaged in transport.
Only a licensed professional may connect appliances without plugs. Damage caused by incorrect connection is not covered under warranty.
This appliance is intended for domestic use only. The appliance must only be used for the preparation of food and drink. The appliance must be supervised during operation. Only use this appliance indoors.
This appliance may be used by children over the age of 8 years old and by persons with reduced physical, sensory or mental capabilities or by persons with a lack of experience or knowledge if they are supervised or are instructed by a person responsible for their safety how to use the appliance safely and have understood the associated hazards.
Children must not play with, on, or around the appliance. Children must not clean the appliance or carry out general maintenance unless they are at least 8 years old and are being supervised.
Keep children below the age of 8 years old at a safe distance from the appliance and power cable.
Always insert the accessories into the cooking compartment correctly. See
"Description of accessories in the instruction manual.
Risk of fire!
- Combustible items stored in the cooking compartment may catch fire. Never store combustible items in the cooking compartment. Never open the appliance door if there is smoke inside. Switch off the appliance and unplug it from the mains or switch off the circuit breaker in the fuse box.
- Using the appliance for anything other than its intended purpose is dangerous and may cause damage. The following is not permitted: drying out food or clothing, heating slippers, grain or cereal pillows, sponges, damp cleaning cloths or similar.
For example, heated slippers and grain or cereal pillows may catch fire, even several hours after they have been heated. The appliance must only be used for the preparation of food and drinks.
- Food may catch fire. Never heat food in heat-retaining packages.
Do not leave food heating unattended in containers made of plastic, paper or other combustible materials.
Do not select a microwave power or time setting that is higher than necessary. Follow the information provided in this instruction manual.
Never use the microwave to dry food. Never defrost or heat food with a low water content, e.g. bread, at too high a microwave power or for too long. - Cooking oil may catch fire. Never use the microwave to heat cooking oil on its own.
Risk of explosion!
Liquids and other food may explode when in containers that have been tightly sealed. Never heat liquids or other food in containers that have been tightly sealed.
Risk of serious damage to health!
- The surface of the appliance may become damaged if it is not cleaned properly. Microwave energy may escape. Clean the appliance on a regular basis, and remove any food residue immediately. Always keep the cooking compartment, door seal, door and door stop clean; see also section Care and cleaning.
- Microwave energy may escape if the cooking compartment door or the door seal is damaged. Never use the appliance if the cooking compartment door or the door seal is damaged. Contact the after-sales service.
- Microwave energy will escape from appliances that do not have any casing. Never remove the casing. For any maintenance or repair work, contact the after-sales service.
Risk of electric shock!
- Incorrect repairs are dangerous. Repairs may only be carried out and damaged power cables replaced by one of our trained after-sales technicians. If the appliance is defective, unplug the appliance from the mains or switch off the circuit breaker in the fuse box. Contact the after-sales service.
- The cable insulation on electrical appliances may melt when touching hot parts of the appliance. Never bring electrical appliance cables into contact with hot parts of the appliance.
- Do not use any high-pressure cleaners or steam cleaners, which can result in an electric shock.
Penetrating moisture may cause electric shock. Never subject the appliance to intense heat or humidity. Only use this appliance indoors. - A defective appliance may cause electric shock. Never switch on a defective appliance. Unplug the appliance from the mains or switch off the circuit breaker in the fuse box. Contact the after-sales service.
The appliance is a high-voltage appliance. Never remove the casing.
Risk of burns!
- The appliance becomes very hot. Never touch the interior surfaces of the cooking compartment or the heating elements. Always allow the appliance to cool down. Keep children at a safe distance.
- Accessories and ovenware become very hot. Always use oven gloves to remove accessories or ovenware from the cooking compartment.
- Alcoholic vapours may catch fire in the hot cooking compartment. Never prepare food containing large quantities of drinks with a high alcohol content. Only use small quantities of drinks with a high alcohol content. Open the appliance door with care.
- Foods with peel or skin may burst or explode during, or even after, heating. Never cook eggs in their shells or reheat hard-boiled eggs. Never cook shellfish or crustaceans. Always prick the yolk when baking or poaching eggs. The skin of foods that have a peel or skin, such as apples, tomatoes, potatoes and sausages, may burst. Before heating, prick the peel or skin.
- Heat is not distributed evenly through baby food. Never heat baby food in closed containers. Always remove the lid or teat. Stir or shake well after the food has been heated. Check the temperature of the food before it is given to the child.
- Heated food gives off heat. The ovenware may become hot. Always use oven gloves to remove ovenware or accessories from the cooking compartment.
- Airtight packaging may burst when food is heated. Always observe the instructions on the packaging. Always use oven gloves to remove dishes from the cooking compartment.
Risk of scalding!
- When you open the appliance door, hot steam may escape. Open the appliance door with care. Keep children at a safe distance.
Water in a hot cooking compartment may create hot steam. Never pour water into the hot cooking compartment. - There is a possibility of delayed boiling when a liquid is heated. This means that the liquid reaches boiling temperature without the usual steam bubbles rising to the surface. Even if the container only vibrates a little, the hot liquid may suddenly boil over and spatter. When
heating, always place a spoon in the container. This will prevent delayed boiling.
Risk of injury!
- Scratched glass in the appliance door may develop into a crack. Do not use a glass scraper, sharp or abrasive cleaning aids or detergents.
- Unsuitable ovenware may crack. Porcelain or ceramic ovenware can have small perforations in the handles or lids. These perforations conceal a cavity below. Any moisture that penetrates this cavity could cause the ovenware to crack. Only use microwave-safe ovenware.
Causes of damage
Caution!
Creation of sparks: Metal - e.g. a spoon in a glass - must be kept at least 2 cm from the oven walls and the inside of the door. Sparks could irreparably damage the glass on the inside of the door.
Water in the hot cooking compartment: Never pour water into the hot cooking compartment. This will cause steam. The temperature change can cause damage.
- Moist food: Do not store moist food in the closed cooking compartment for long periods.
Do not use the appliance to store food. This can lead to corrosion.
Cooling with the appliance door open: Only leave the cooking compartment to cool with the door closed. Do not trap anything in the appliance door. Even if the door is only slightly ajar, the fronts of adjacent units may be damaged over time.
Heavily soiled seal: If the seal is very dirty, the appliance door will no longer close properly during operation. The fronts of adjacent units could be damaged. Always keep the seal clean.
- Operating the microwave without food: Operating the appliance without food in the cooking compartment may lead to overloading. Never switch on the appliance unless there is food in the cooking compartment. An exception to this rule is a short crockery test (see the section "Microwave, suitable crockery").
- Using the appliance door for standing on or placing objects on: Do not stand or place anything on the open appliance door. Do not place ovenware or accessories on the appliance door.
- Transporting the appliance: Do not carry or hold the appliance by the door handle. The door handle cannot support the weight of the appliance and could break.
- Microwave popcorn: Never set the microwave power too high. Use a power setting no higher than 600 watts. Always place the popcorn bag on a glass plate. The disc may jump if overloaded.
Liquid that has boiled over must not be allowed to run through the turntable drive into the interior of the appliance. Monitor the cooking process. Choose a shorter cooking time initially, and increase the cooking time as required.
Never use the microwave oven without the turntable.
Installation and connection
Please observe the special installation instructions.
The appliance is fitted with a plug and must only be connected to a properly-installed earthed socket. The fuse protection must be rated at 16 amperes (L or B circuit breakers). The mains voltage must correspond to the voltage specified on the rating plate.
The socket must be installed and the power cable replaced by a qualified electrician only. If the plug is no longer accessible following installation, an all-pin disconnecting device must be present on the installation side, with a contact gap of at least 3 mm.
Multiple plugs, plug bars and extension leads must not be used. Overloading can result in a risk of fire.
Your new appliance
Use this section to familiarise yourself with your new appliance. The control panel and the individual operating controls are
explained. You will find information on the cooking compartment and the accessories.

Control panel
Buttons
Sensors are located under the individual buttons. They respond when you touch them gently with your finger.
If you cannot make a setting, you will hear a short signal.
Symbol Button function
| ① | Main switch Switches the appliance on and off; ends appliance operation |
| ② | Microwave Selects the microwave |
| ③ | Oven Selects types of heating for the oven |
| °C Temperature Selects the temperature | |
| ④ | Cooking time Touch briefly: Selects the cooking time Touch and hold (switched-off appliance):Selects the basic settings |
| → | Childproof lock Activates/deactivates the child-proof lock |
| ⑥ | Automatic programmes Selects a preset programme |
Rotary selector Changes values for the clock, cooking time, weight, etc. Press on the rotary selector to pop it in or out
Symbol Button function
| Kg Weight Selects a weight for a pro- gramme | |
| Rapid heat-up Shortens the preheat time | |
| Start/Pause button Starts and interrupts operation |
Cooking compartment
The cooling fan for the cooking compartment switches on and off as required. Hot air escapes via the ventilation slots above and below the appliance door.
Caution!
Do not cover the ventilation slots. Otherwise, the appliance will overheat.
Notes
The cooling fan continues to run for a certain time after operation.
Condensation may appear in the cooking compartment and on the door window. This is normal and does not adversely affect appliance operation. Once the cooking compartment has cooled down, you can wipe away the condensation.
- When you open the oven door, the oven lamp switches on for 10 minutes.
Accessories
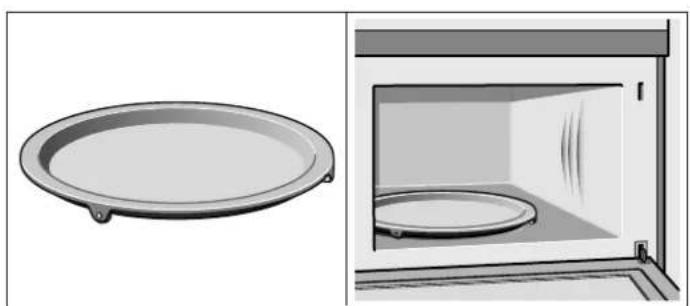
Turntable
As a surface for the wire rack.
Food which particularly requires a lot of heat from underneath can be prepared directly on the turntable.
The turntable can turn clockwise or anti-clockwise, and is cut resistant. You can cut pizza into slices on the turntable itself. Place the turntable on the drive in the centre of the cooking compartment. Ensure that it is properly fitted.
Never use the microwave without the turntable.
The turntable can withstand max. 5kg
The turntable must turn when using all types of heating.

Lower wire rack
For the microwave and for baking and roasting in the oven.
Higher wire rack
For grilling, e.g. steaks, sausages and for toasting bread.
As a support for shallow dishes.
Before using the appliance for the first time
This section tells you everything you need to do before using the appliance for the first time.
Set the clock
Heat up the cooking compartment
Clean the accessories
- Read the safety information at the start of the instructions for use. This is very important.
Setting the clock
Once your appliance has been connected, the time 00:00 flashes in the display panel.
- Turn the rotary selector to set the clock.
- Touch the button to save the setting.
The setting is also automatically accepted after 10 seconds.
Changing the clock
The appliance must be switched off.
- Touch the button to select the clock.
- Turn the rotary selector to set the clock.
- Touch the button to save the setting.
Cleaning the accessories
Before you use the accessories for the first time, clean them thoroughly with hot soapy water and a soft dish cloth.
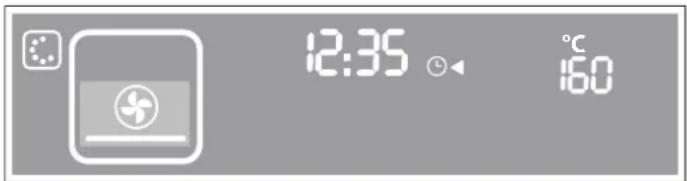
Heating up the cooking compartment
Heat the cooking compartment with the turntable inserted at 230^ and Hot air for 30 minutes to remove the new smell. Also, switch on the rapid heat-up function.
Keep the kitchen ventilated while the appliance is heating up.
Note: Make sure that the cooking compartment contains no leftover packaging, e.g. polystyrene pellets.
- Touch the ① button to switch on the appliance.
- Touch the button to select the oven.
- Turn the rotary selector clockwise, until Hot air appears.
- Touch the ^ C button and use the rotary selector to set 230^
- Touch the button and use the rotary selector to set 30 minutes.
- Touch the button to select rapid heat-up.
- Touch the button to start rapid heat-up. As soon as the set temperature is reached, a signal sounds and the display flashes.
- Touch the button to start the appliance.
After 30 minutes, the oven switches off automatically.
Switching the appliance on and off
You can switch the oven on and off with the ① button.
Switching on
Press the ① button.
The appliance is in microwave mode.
The button lights up.

Select the desired function:
按钮 microwave
- button - types of heating for the oven
按钮 automaticprogrammes
A description of how to make settings is provided in the individual sections.
Switching off
Press the ① button to switch off the appliance.
The microwave
Microwaves are converted to heat in foodstuffs. The microwave can be used solo, i.e. on its own, or in combination with a different type of heating. You will find information about ovenware and how to set the microwave.
Note:
In the Tested for you in our cooking studio section, you will find examples for defrosting, heating and cooking with the microwave oven.
Notes regarding ovenware
Suitable ovenware
Suitable dishes are heat-resistant ovenware made of glass, glass ceramic, porcelain, ceramic or heat-resistant plastic. These materials allow microwaves to pass through.
You can also use serving dishes. This saves you having to transfer food from one dish to another. You should only use ovenware with decorative gold or silver trim if the manufacturer guarantees that they are suitable for use in microwaves.
Unsuitable ovenware
Metal ovenware is unsuitable. Metal does not allow microwaves to pass through. Food in covered metal containers will remain cold.
Caution!
Creation of sparks: metal - e.g. a spoon in a glass - must be kept at least 2cm from the oven walls and the inside of the door. Sparks could destroy the glass on the inside of the door.
Ovenware test
Do not switch on the microwave unless there is food inside. The following ovenware test is the only exception to this rule.
Perform the following test if you are unsure whether your ovenware is suitable for use in the microwave:
-
Heat the empty ovenware at maximum power for 12 to 1 minute.
-
Check the temperature occasionally during that time.
The ovenware should still be cold or warm to the touch.
The ovenware is unsuitable if it becomes hot or sparks are generated.
Microwave power settings
You can set five different power settings for your microwave.
90 W For defrosting delicate foods
180 W For defrosting and continued cooking
360 W For cooking meat and heating delicate foods
600 W For heating and cooking food
900 watts For heating liquids
Note: The microwave power can be set to 900 watts for a maximum of 30 minutes. A cooking time of 90 minutes is possible with all other power settings.
Operating the microwave
Example in picture:
Setting the microwave at 600W for 30 minutes.
- Touch the ① button to switch on the appliance.
The appliance automatically switches to microwave mode.
The button lights up. - Turn the rotary selector to set a power level.

- Touch the button and set the cooking time using the rotary selector.

- Touch the button to start the appliance.
The microwave starts and switches off automatically when the set cooking time has elapsed.
Correcting the settings
After the microwave has started, you can correct the cooking time using the rotary selector. To correct the power level, touch the button and turn the rotary selector.
To delete all settings, touch and hold the button for 4 seconds. You can then set a new operating mode and cooking time.
Pause
Touch the button once or open the appliance door. The appliance interrupts operation. Close the microwave door and touch the button to continue operation.
When the cooking time has elapsed
A signal sounds. Open the appliance door and carefully remove the cookware with oven gloves. Touch the ① button to switch off the appliance.
Cancelling operation
Touch the ① button to cancel operation and switch off the appliance.
Setting the oven
In this section, you will find information about
which types of heating are available in your oven
how you set a type of heating and a temperature
and how you set rapid heating
Types of heating
There are several types of heating for you to choose from. You can therefore select the best method for cooking any dish.
| Types of heating Application | |
| ® | Hot air for baking and roasting; particularly suitable for use in combination with the microwave |
| ¶ | Hot air grilling for grilling poultry and larger pieces of meat. |
| ® | Pizza setting for frozen ready-made products and dishes which require a lot of heat from underneath |
| ® | Grill for grilling steaks, sausages, fish and bread at three different levels |
Setting the type of heating and temperature
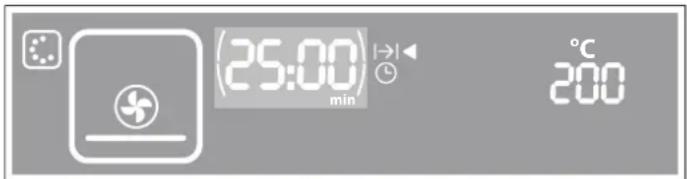
Example in picture:
Setting the microwave to Pizza setting at 200^ for 25 minutes.
- Touch the ① button to switch on the appliance.
The appliance is in microwave mode. The button lights up. - Touch the button to select the oven.
The button lights up.
- Turn the rotary selector to set a type of heating.
- Touch the button and set the temperature using the rotary selector.

- Touch the button and set the cooking time using the rotary selector.
Note: For instructions on how to shorten the heating-up time, please see Rapid heat-up.
- Touch the button to start the appliance.
The appliance heats up and switches off automatically when the set cooking time has elapsed.
Operating without a cooking time
You can also start the appliance without setting a cooking time.
Correcting the settings
After the microwave has started, you can correct the following settings at any time, using the rotary selector:
Touch the button - correct the temperature
Touch the button - correct the cooking time
To delete all settings, touch and hold the button for 4 seconds. You can then set a new type of heating, temperature and cooking time.
Pause
Touch the button once or open the appliance door. The appliance interrupts operation. Close the microwave door and touch the button to continue operation.
When the cooking time has elapsed
A signal sounds. Open the appliance door and carefully remove the cookware with oven gloves. Touch the ① button to switch off the appliance.
Cancelling operation
Touch the ① button to cancel operation and switch off the appliance.
Rapid heat-up
For the Hot air, Hot air grilling and Pizza setting types of heating, you can switch on the rapid heat-up function. Set rapid heat-up before you start the appliance.
Note: During rapid heat-up, do not place any food in the cooking compartment.
- Set the type of heating and temperature.
- Touch the button.
The button lights up for 4 seconds. The symbol appears in the display.
- Touch the button to start rapid heat-up.
The appliance heats up. Once the set temperature is reached, a signal sounds. The symbol in the display flashes.
- Place the food in the cooking compartment.
- Touch the button to start the appliance.
If you have set a cooking time, it will begin to count down.
Microwave combi operation
This involves the simultaneous operation of one type of heating with the microwave. Using the microwave makes your meals ready more quickly, and still browns them nicely.
All microwave power settings, except for 900 watts, can be combined with a type of heating.
Observe the instructions on ovenware in the Microwave section.
Setting Microwave Combi operation
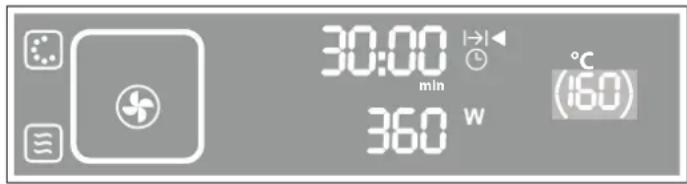
Example in picture:
Set the microwave at 360W combined with hot air at 160^ for 30 minutes.
- Touch the ① button to switch on the appliance.
The appliance is in microwave mode. The button lights up. -
Turn the rotary selector to set a power level.
-
Touch the button and set the cooking time using the rotary selector.

- Touch the button and set the type of heating using the rotary selector.
- Touch the button and set the temperature using the rotary selector.
- Touch the button to start the appliance.
You can also set the oven first, and then set the microwave using the button.
Correcting the settings
After the microwave has started, you can correct the following settings at any time, using the rotary selector:
Touch the button - correct the temperature
Touch the button - correct the cooking time
Touch the button - change the microwave power level
To delete all settings, touch and hold the button for 4 seconds. You can then set a new type of heating, temperature and cooking time.
Pause
Touch the button once or open the appliance door. The appliance interrupts operation. Close the microwave door and touch the button to continue operation.
When the cooking time has elapsed
A signal sounds. Open the appliance door and carefully remove the cookware with oven gloves. Touch the ① button to switch off the appliance.
Cancelling operation
Touch the ① button to cancel operation and switch off the appliance.
Childproof lock
The appliance has a childproof lock to prevent children from switching it on by accident or changing an operation that is already in progress.
Activating the childproof lock
Press and hold the -O button for 4 seconds.
The O symbol appears in the display panel for 10 seconds. The appliance is locked.
Releasing the lock
Touch and hold the button for 4 seconds to unlock the appliance again.
A signal sounds. The appliance is unlocked.
Note: If you activate the childproof lock while the appliance is in operation, you can only interrupt (▶II button) or end ( ① button) operation.
Basic settings
Your appliance has various basic settings, which you can adjust to suit your needs at any time.
Note: In the table, you will find all the basic settings and options for changing them. Only the basic settings that correspond to the features of your specific appliance are displayed.
| Basic setting Function Options | ||
| C11 | Clock display when the oven is switched off | C11 = off |
| C12 = on | ||
| C22 | Signal duration Audible signal after a time has elapsed | C21 = 10 seconds |
| C22 = 1 minute | ||
| C23 = 3 minutes | ||
| C31 | Button tone Confirmation tone when a button is pressed | C31 = on |
| C32 = off | ||
Changing the basic settings
In the table above you can see which basic settings can be changed.
- Touch the ① button to switch off the appliance.
- Press and hold the button for approx. 4 seconds. The first basic setting appears in the display.
- Touch the button repeatedly until the required basic setting is displayed.
- Change the basic setting by turning the rotary selector.
Note: You can now select other basic settings with the button and change them with the rotary selector.
- Press and hold the button for approx. 4 seconds or the setting will be automatically accepted after 30 seconds.
All changes are saved.
Automatic safety cut-out
The automatic safety cut-out is activated if your appliance is operating for a long time with no cooking time having been set. The time at which your appliance switches itself off depends on the set type of heating and temperature.
Example: If your oven is operating with Hot air at 160^ , it will automatically switch off after approx. 5 hours.
±b^2 appears in the display panel. The appliance switches off. Touch any button or turn the rotary selector.
Care and cleaning
With careful care and cleaning your microwave oven will retain its looks and remain good order. We will explain here how you should care for and clean your appliance correctly.

Risk of electric shock!
Do not use any high-pressure cleaners or steam cleaners, which can result in an electric shock.

Risk of burns!
Never clean the appliance immediately after switching off. Let the appliance cool down.

Risk of serious damage to health!
Microwave energy may escape if the cooking compartment door or the door seal is damaged. Never use the appliance if the cooking compartment door or the door seal is damaged. Contact the after-sales service.
Notes
Slight differences in colour on the front of the appliance are caused by the use of different materials, such as glass, plastic and metal.
- Shadows on the door panel which look like streaks, are caused by reflections made by the oven light.
Unpleasant odours, e.g. after fish has been prepared, can be removed very easily. Add a few drops of lemon juice to a cup of water. Place a spoon into the container as well, to prevent delayed boiling. Heat the water for 1 to 2 minutes at maximum microwave power.
Cleaning agents
To ensure that the different surfaces are not damaged by using the wrong cleaning agent, observe the information in the table. Do not use
sharp or abrasive cleaning agents,
metal or glass scrapers to clean the glass in the appliance door.
metal or glass scrapers to clean the door seal,
- hard scouring pads and sponges,
cleaning agents with high concentrations of alcohol.
Wash new sponge cloths thoroughly before use.
Allow all surfaces to dry thoroughly before using the appliance again.
| Area Cleaning agents | |
| Appliance front Hot soapy water:Clean with a dish cloth and dry with a soft cloth. Do not use glass cleaners or metal or glass scrapers for cleaning. | |
| Appliance front with stainless steel | Hot soapy water:Clean with a dish cloth and dry with a soft cloth. Remove flecks of limescale, grease, starch and albumin (e.g. egg white) immediately. Corrosion can form under such residues. Special stainless steel cleaning agents can be obtained from the after-sales service or from specialist shops. Do not use glass cleaners or metal or glass scrapers for cleaning. |
| Cooking compartment | Hot soapy water or a vinegar solution: Clean with a dish cloth and dry with a soft cloth. If the oven is very dirty: Do not use oven spray or other aggressive oven cleaners or abrasive materials. Scouring pads, rough sponges and pan cleaners are also unsuitable. These items scratch the surface. Allow the interior surfaces to dry thoroughly. |
| Recess in cooking compartment | Damp cloth: Ensure that no water seeps through the turntable drive into the appliance interior. |
| Wire racks Hot soapy water: Clean using stainless steel cleaning agent or in the dishwasher. | |
| Door panels Glass cleaner: Clean with a dish cloth. Do not use a glass scraper. | |
| Seal Hot soapy water: Clean with a dish cloth, do not scour. Do not use a metal or glass scraper for cleaning. | |
Malfunction table
Malfunctions often have simple explanations. Please refer to the malfunction table before calling the after-sales service.
If a meal does not turn out exactly as you wanted, refer to the Tested for you in our cooking studio section, where you will find plenty of cooking tips and tricks.
Risk of electric shock!
Incorrect repairs are dangerous. Repairs may only be carried out and damaged power cables replaced by one of our trained after-sales technicians. If the appliance is defective, unplug the appliance from the mains or switch off the circuit breaker in the fuse box. Contact the after-sales service.
Malfunction table
Problem Possible cause Remedy/information
| The appliance does not work. Faulty circuit breaker Look in the fuse box and check that the circuit breaker is in working order. | ||
| Power cut Check whether the kitchen light works. | ||
| Plug not plugged in Plug it in. | ||
| The appliance does not work. →0 appears in the display panel. | Childproof lock is active Deactivate the childproof lock (see the Childproof lock section). | |
| 00:00 flashes in the display panel | Power cut Set the current time. | |
| The microwave does not switch on | Door not fully closed Check whether food remains or foreign material is trapped in the door. | |
| It takes longer than before for the food to heat up in the microwave | The selected microwave power setting is too low. | Select a higher power setting. |
| A larger amount than usual has been placed in the appliance. | Double the amount = almost double the time | |
| The food was colder than usual. Stir or turn the food during cooking | ||
| The turntable is making a scratch- ing or grinding noise. | There is dirt or a foreign object in the area around the turntable drive. | Clean the rollers under the turntable and the indentation in the cooking compartment. |
| A particular type of heating or power level cannot be set. | The temperature, microwave power level or combination setting is not possible for this type of heating. | Choose permitted settings. |
| The appliance can be set, but does not heat up. A "D" appears in the display panel | The appliance is in demo mode. To deactivate demo mode: | |
| 1. Select the Hot air heating type and a temperature of 50 °C. | ||
| 2. Touch and hold the button for at least 4 seconds, then release. The display panel flashes. | ||
| 3. Touch the button again within 4 seconds. The "D" disappears from the display panel. Demo mode is deactivated. | ||
Error messages with E
| Error message Possible cause Note / remedy | ||
| E1 or E4 | The thermal safety switch-off function has been activated. | Call the after-sales service. |
| E2 | The automatic safety switch-off function has been activated. | Touch any button or turn the rotary selector. |
| E3 | The oven is malfunctioning. | Call the after-sales service. |
| E11 | Moisture in the control panel. | Allow the control panel to dry. |
| E17 | Rapid heating has failed. | Call the after-sales service. |
After-sales service
Our after-sales service is there for you if your appliance needs to be repaired. We will always find the right solution in order to avoid unnecessary visits from a service technician.
E number and FD number
When calling us, please give the product number (E no.) and the production number (FD no.) so that we can provide you with the correct advice. The rating plate containing these numbers is found on the side of the oven door. You can make a note of the number of your appliance and the telephone number of the after-sales service in the space below to save time should it be required.
E no.
FD no.
After-sales service
Please note that there will be a fee for a visit by a service technician in the event of a malfunction, even during the warranty period.
After-sales contact details for all countries can be found in the attached after-sales service directory.
Technical data
| Power supply | 220-230 V, 50 Hz |
| Microwave power setting | 900 W |
| Microwave frequency | 2,450 MHz |
Fuse
16 A
Energy and environment tips
Here you can find tips on how to save energy when baking and roasting and how to dispose of your appliance properly.
Saving energy
Only preheat the oven if this is specified in the recipe or in the operating instruction tables.
Use dark, black lacquered or enamelled baking tins. They absorb the heat particularly well.
- Open the oven door as infrequently as possible while you are cooking, baking or roasting.
It is best to bake several cakes one after the other. The oven is still warm. This reduces the baking time for the second cake. You can also place two loaf tins next to each other.
For longer cooking times, you can switch the oven off 10 minutes before the end of the cooking time and use the residual heat to finish cooking.
Environmentally-friendly disposal
Dispose of packaging in an environmentally-friendly manner.
This appliance is labelled in accordance with European Directive 2012/19/EU concerning used electrical and electronic appliances (waste electrical and electronic equipment - WEEE). The guideline determines the framework for the return and recycling of used appliances as applicable throughout the EU.
Automatic programmes
The automatic programmes enable you to prepare food very easily. You select the programme and enter the weight of your food. The automatic programme makes the optimum setting. You can select from 15 programmes.
Notes
- You can affix the enclosed programme overview on the inside of the door.
Always place the food in the cold cooking compartment.
Setting a programme
Select a suitable programme from the programme tables. Observe the instructions for the programmes.
Example in diagram: Defrosting 350g of minced meat using programme P01.
- Touch the ① button to switch on the appliance. The appliance is in microwave mode. The ③ button lights up.
- Touch the button to select the automatic programmes. In the display panel, the first programme PQ appears together with a suggested weight and corresponding programme duration.
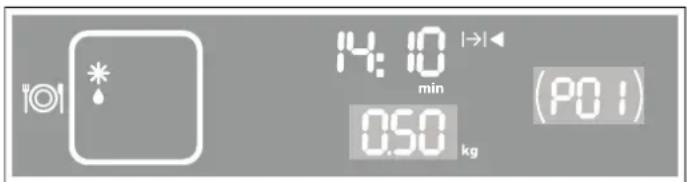
- Turn the rotary selector to set the programme.
- Touch the button and set the weight of your food using the rotary selector.
- Touch the button to start the programme.

For many programmes, a signal sounds after a certain time. Open the appliance door and stir the food or turn the meat or poultry. Close the appliance door and touch the button. The programme starts again.
Deleting the settings
To delete all settings, touch and hold the button for 4 seconds. You can then set a new operating mode and a new programme.
Pause
Touch the button once or open the appliance door. The appliance interrupts operation. Close the microwave door and touch the button to continue operation.
When the cooking time has elapsed
A signal sounds. Open the appliance door and carefully remove the cookware with oven gloves. Touch the ① button to switch off the appliance.
Cancelling the programme
Touch the ① button to cancel operation and switch off the appliance.
Defrosting and cooking with the automatic programmes
You can use the 4 defrosting programmes to defrost meat, poultry and bread.
With the 3 cooking programmes, you can cook rice, potatoes or vegetables.
Notes
Take the food out of its packaging and weigh it. If it is not possible to enter the exact weight, you should round it up or down.
Put the food in a microwaveable shallow dish, e.g. a glass or porcelain plate, but do not cover.
Place the food in the cold cooking compartment.
A table of suitable types of food with appropriate weight ranges and the accessories required can be found in the section after the tips.
It is not possible to set a weight outside the weight range.
Defrost
Notes
If possible, freeze and store food flat and in portions at - 18^
Put the frozen food on shallow tableware, e.g. a glass or porcelain plate.
Place the ovenware on the lower wire rack.
Liquid will be produced when defrosting meat or poultry. Drain off this liquid when you turn the food. Under no circumstances should it be used for other purposes or be allowed to come into contact with other foods.
After turning, remove any minced meat that has already defrosted.
- When defrosting chicken and chicken portions (P03), a signal will sound on two occasions to indicate that the food should be turned.
Resting time
The defrosted food should be left to stand for an additional 10-30 minutes until it reaches an even temperature.
Large pieces of meat require a longer standing time than smaller pieces. Flat pieces of meat and items made from minced meat should be separated from each other before leaving to stand.
After this time, you can continue to prepare the food, even though thick pieces of meat may still be frozen in the middle. The giblets can be removed from poultry at this point.
Programme no. Weight range in kg
| Defrost | ||
| 01 | Minced meat 0.20 - 1.00 | |
| 02 | Pieces of meat 0.20 - 1.00 | |
| 03 | Chicken, chicken portions | 0.40 - 1.80 |
| 04 | Bread 0.20 - 1.00 | |
Cooking
Place the ovenware on the lower wire rack.
Rice (P05)
Notes
The food must be cooked in microwaveable cookware with a lid. For rice, you should use a large, deep dish.
- Do not use boil-in-the-bag rice. Rice foams a lot during cooking. Enter the uncooked weight (without liquid). Add two to two and a half times the amount of liquid to the rice.
Potatoes (P06)
Note: Boiled potatoes:
Cut into pieces of equal size. Add a little salt and 1 tablespoon of water for every 100g of potatoes.
Vegetables (P07)
Notes
Fresh vegetables:
Cut into equal sized pieces. Add 1 tablespoon of water for every 100g of vegetables.
Resting time
Once the programme has finished, stir the food again. You should leave it to stand for another 5-10 minutes until it reaches an even temperature.
The cooking result will depend on the quality and consistency of the food.
| Programme no. Weight range in kg |
| Cooking |
| 05 Rice 0.05 - 0.20 |
| 06 Potato 0.15 - 1.00 |
| 07 Vegetables 0.15 - 1.00 |
Combi cooking
Lamb, medium (P12)
Ideal for a shoulder joint or boned leg of lamb.
Meat loaf (P13)
The programme is suitable for meat loaves not more than 7cm in height.
Fish, whole (P14)
Scale the fish beforehand. Place the fish in the ovenware in its swimming position.
Rice stew (P15)
Only enter the weight of the rice. Ideal for rise stews with vegetables, fish or poultry. Only use fresh ingredients. Use a high-sided dish with a lid.
Resting time
Once the programme has finished, the food should be allowed to rest for another 5-10 minutes so it reaches an even temperature.
| Programme no. | Weight range in kg | |
| Combi-cooking | ||
| 08 | Bake, frozen* (up to 3 cm in height) | 0.40 - 1.20 |
| 09 Chicken, whole* 0.50 - 2.00 | ||
| 10 Sirloin, medium* | 0.50 - 1.50 | |
| 11 Pork neck joint | 0.50 - 2.00 | |
| 12 Lamb, medium | 0.80 - 2.00 | |
| 13 Meat loaf* | 0.50 - 1.50 | |
| 14 Fish, whole | 0.30 - 1.00 | |
| 15 | Rice stew using fresh ingre- dients | 0.05 - 0.20 |
- Use ovenware without a lid
Tested for you in our cooking studio
Here you will find a selection of recipes and the ideal settings for them. We will show you which type of heating and which temperature or microwave power setting is best for your meal. You can find information about suitable accessories and the
height at which they should be inserted. There are also tips about ovenware and preparation methods.
Notes
The values in the table always apply to food placed into the cooking compartment when it is cold and empty. Only preheat the appliance if the table specifies that you should do so. Before using the appliance, remove all accessories from the cooking compartment that you will not be using.
- Do not line the accessories with greaseproof paper until after they have been preheated.
The times specified in the tables are only guidelines. They will depend on the quality and composition of the food.
- Use the accessories supplied. Additional accessories may be obtained from specialist retailers or from the after-sales service.
Always use an oven cloth or oven gloves when taking accessories or ovenware out of the cooking compartment.
Defrosting, heating up and cooking with the microwave
The following tables provide you with numerous options and settings for the microwave.
The times specified in the tables are only guidelines. They may vary according to the ovenware used, the quality, temperature and consistency of the food.
Time ranges are often specified in the tables. Set the shortest time first and then extend the time if necessary.
It may be that you have different quantities from those specified in the tables. A rule of thumb can be applied: Double amount - just under double the cooking time, half amount - half the cooking time.
Place the ovenware in the centre of the lower wire rack. The food will then absorb the microwaves from all sides.
Defrosting
Notes
- Place the frozen food in an open container on the wire rack.
- Delicate parts such as the legs and wings of chicken or fatty outer layers of roasts can be covered with small pieces of aluminium foil. The foil must not touch the cooking compartment walls. You can remove the foil half way through the defrosting time.
Turn or stir the food once or twice during the defrosting time. Large pieces of food should be turned several times. When turning, remove any liquid that has resulted from defrosting. - Leave defrosted items to stand at room temperature for a further 10 to 60 minutes so that the temperature can stabilise. The giblets can be removed from poultry at this point.
| Defrost Weight Microwave power setting in watts, cooking time in minutes | Notes | |
| Whole pieces of meat (beef, veal or pork - on the bone or boned) | 800 g 180 W, 15 mins + 90 W, 10-20 mins Turn several times | |
| 1 kg 180 W, 20 mins + 90 W, 15-25 mins | ||
| 1.5 kg 180 W, 30 mins + 90 W, 20-30 mins | ||
| Meat in pieces or slices of beef, veal or pork | 200 g 180 W, 3 mins + 90 W, 10-15 mins Separate any defrosted parts when turning | |
| 500 g 180 W, 5 mins + 90 W, 15-20 mins | ||
| 800 g 180 W, 8 mins + 90 W, 15-20 mins | ||
| Minced meat, mixed 200 g 90 W, 10-15 mins Freeze food flat if possible | ||
| 500 g 180 W, 5 mins + 90 W, 10-15 mins | Turn several times, remove any defrosted meat | |
| 800 g 180 W, 8 mins + 90 W, 15-20 mins | ||
| Poultry or poultry portions 600 g 180 W, 8 mins + 90 W, 10-15 mins Turn during cooking. | ||
| 1.2 kg 180 W, 15 mins + 90 W, 25-30 mins | ||
| Duck 2 kg 180 W, 20 mins + 90 W, 30-40 mins Turn several times | ||
| Fish fillet, fish steak or slices 400 g 180 W, 5 mins + 90 W, 10-15 mins Separate any defrosted parts | ||
| Whole fish 300 g 180 W, 3 mins + 90 W, 10-15 mins - | ||
| 600 g 180 W, 8 mins + 90 W, 10-15 mins | ||
| Vegetables, e.g. peas 300 g 180 W, 10-15 mins | Stir carefully during defrosting. | |
| 600 g 180 W, 10 mins + 90 W, 10-15 mins | ||
| Fruit, e.g. raspberries | 300 g 180 W, 7-10 mins | Stir carefully during defrosting and separate any defrosted parts |
| 500 g 180 W, 8 mins + 90 W, 5-10 mins | ||
| Butter, defrosting | 125 g 180 W, 1 mins + 90 W, 2-4 mins | Remove all packaging |
| 250 g 360 W, 1 min + 90 W, 2-4 mins | ||
| Loaf of bread 500 g 180 W, 6 mins | + 90 W, 5-10 mins Turn during cooking. | |
| 1 kg 180 W, 12 mins + 90 W, 15-25 mins | ||
| Cakes, dry, e.g. sponge cake | 500 g 90 W, 15-20 mins Only for cakes without icing, cream or 750 g 180 W, 5 mins + 90 W, 10-15 mins | crème pâtissière, separate the pieces of cake. |
| Cakes, moist, e.g. fruit flan, cheese- cake | 500 g 180 W, 5 mins + 90 W, 10-15 mins Only for cakes without icing, cream or 750 g 180 W, 7 mins + 90 W, 10-15 mins | gelatine |
Defrosting, heating up or cooking frozen food
Notes
Take ready meals out of the packaging. They will heat up more quickly and evenly in microwaveable ovenware. The
different components of the meal may not require the same amount of time to heat up.
- Food which lies flat will cook more quickly than food which is piled high. You should therefore distribute the food so that it is as flat as possible in the ovenware. Different foodstuffs should not be placed in layers on top of one another.
Always cover the food. If you do not have a suitable cover for your ovenware, use a plate or special microwave foil.
Stir or turn the food 2 or 3 times during cooking.
After heating, allow the food to stand for a further 2 to 5 minutes so that it can achieve an even temperature.
Always use an oven cloth or oven gloves when removing plates from the oven.
This will help the food retain its own distinct taste, so it will require less seasoning.
| Defrosting, heating up or cooking frozen food | Weight Microwave power setting in watts, cooking time in minutes | Notes |
| Menu, plated meal, ready meal 300-400 g 600 W, 10-15 mins Take meal out of packaging; cover food to heat | ||
| Soup 400-500 g 600 W, 8-10 mins Ovenware with lid | ||
| Stews 500 g 600 W, 10-15 mins Ovenware with lid | ||
| 1 kg 600 W, 20-25 mins | ||
| Slices or pieces of meat in sauce, e.g. goulash | 500 g 600 W, 15-20 mins Ovenware with lid | |
| 1 kg 600 W, 25-30 mins | ||
| Fish, e.g. fillet steaks 400 g 600 W, 10-15 mins Covered | ||
| 800 g 600 W, 18-20 mins | ||
| Side dishes, e.g. rice, pasta 250 g 600 W, 2-5 mins Ovenware with lid; add liquid | ||
| 500 g 600 W, 8-10 mins | ||
| Vegetables, e.g. peas, broccoli, carrots | 300 g 600 W, 8-10 mins Ovenware with lid; add 1 tbsp of water | |
| 600 g 600 W, 15-20 mins | ||
| Creamed spinach 450 g 600 W, 11-16 mins Cook without additional water | ||
Heating food
Risk of scalding!
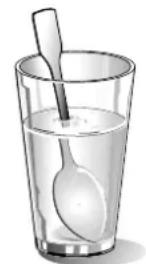
There is a possibility of delayed boiling when a liquid is heated. This means that the liquid reaches boiling temperature without the usual steam bubbles rising to the surface. Even if the container only moves a little, the hot liquid can suddenly boil over and spatter. When heating liquids, always place a spoon in the container. This will prevent delayed boiling.

Caution!
Metal - e.g. a spoon in a glass - must be kept at least 2cm from the oven walls and the inside of the door. Sparks could irreparably damage the glass on the inside of the door.
Notes
Take ready meals out of the packaging. They will heat up more quickly and evenly in microwaveable ovenware. The different components of the meal may not require the same amount of time to heat up.
Always cover the food. If you do not have a suitable cover for your container, use a plate or special microwave foil.
- Stir or turn the food several times during the heating time. Check the temperature.
After heating, allow the food to stand for a further 2 to 5 minutes so that it can achieve an even temperature.
Always use an oven cloth or oven gloves when removing plates from the oven.
| Heating food Weight | Microwave power setting in watts, cooking time in minutes | Notes | |
| Menu, plated meal, ready meal | 350-500 g | 600 W, 5-10 mins | Take meal out of packaging, cover food to heat |
| Drinks | 150 ml | 900 W, 1-2 mins | Caution! |
| 300 ml | 900 W, 2-3 mins | Place a spoon in the glass. Do not over-heat alcoholic drinks. Check during heat- ing | |
| 500 ml | 900 W, 3-4 mins | ||
| Baby food, e.g. baby bottle | 50 ml | 360 W, approx. 1 min | Place baby bottles on the cooking com- partment floor without the teat or lid. Shake or stir well after heating. You must check the temperature |
| 100 ml | 360 W, 1-2 mins | ||
| 200 ml | 360 W, 2-3 mins | ||
| Soup | |||
| 1 cup | 175 g | 900 W, 2-3 mins | |
| 2 cups | 175 g each | 900 W, 4-5 mins | |
| 4 cups | 175 g each | 900 W, 5-6 mins | |
| Slices or pieces of meat in sauce, e.g. goulash | 500 g | 600 W, 10-15 mins | Covered |
| Stew | 400 g | 600 W, 5-10 mins | Ovenware with lid |
| 800 g | 600 W, 10-15 mins | ||
| Heating food Weight Microwave power setting in watts, cooking time in minutes | Notes | ||
| Vegetables 150 g 600 W, 2-3 mins Add a little liquid | |||
| 300 g 600 W, 3-5 mins | |||
| Cooking food | |||
| Notes | ■ This will help the food retain its own distinct taste, so it will require less seasoning. | ||
| ■ Food which lies flat will cook more quickly than food which is piled high. You should therefore distribute the food so that it is as flat as possible in the ovenware. Different foodstuffs should not be placed in layers on top of one another. | ■ After cooking, allow the food to stand for a further 2 to 5 minutes so that it can achieve an even temperature. | ||
| ■ Always use an oven cloth or oven gloves when removing plates from the oven. | |||
| ■ Cook the food in ovenware with a lid. If you do not have a suitable lid for your ovenware, use a plate or special microwave foil. | |||
| Cooking food Weight Microwave power in watts, Cooking time in minutes | Notes | |
| Whole chicken, fresh, no giblets | 1.5 kg 600 W, 30-35 mins Turn halfway through the cooking time | |
| Fish fillet, fresh 400 g 600 W, 5-10 mins - | ||
| Fresh vegetables 250 g 600 W, 5-10 mins Cut into equal-sized pieces; add 1 to 2 tbsp | ||
| 500 g 600 W, 10-15 mins | water per 100 g; stir during cooking | |
| Potatoes 250 g 600 W, 8-10 mins Cut into equal-sized pieces; add 1 to 2 tbsp | ||
| 500 g 600 W, 11-14 mins | water per 100 g; stir during cooking | |
| 750 g 600 W, 15-22 mins | ||
| Rice | 125 g | Add double the quantity of liquid and use deep ovenware with a lid |
| 250 g 600 W, 10-12 mins + 180 W, 20-25 mins | ||
| Sweet foods, e.g. blanc mange (instant) | 500 ml | Stir 2 to 3 times with an egg whisk while heating |
| Fruit, compote | 500 g 600 W, 9-12 mins - | |
Popcorn for the microwave
Notes
Use heat-resistant, flat glass ovenware, e.g. the lid of an ovenproof dish, a glass plate or a glass tray (Pyrex)
Always place the ovenware on the wire rack.
Do not use porcelain or overly curved plates.
Make the settings as described in the table. You can adjust the timings according to product and amount.
So that the popcorn doesn't burn, briefly take the popcorn bag out of the oven after 1 minute and 30 seconds and shake it. Take care as the bag will be hot!
Risk of scalding!
- Open the popcorn bag carefully as hot steam may be released.
- Never set the microwave to full power.
| Weight | Accessories | Microwave power in watts, Cooking time in minutes | |
| Popcorn for the microwave | 1 bag, 100 g | Ovenware, wire rack | 600 W, 3-5 mins |
Microwave tips
| You cannot find any information about the settings for the quantity of food you have prepared. | Increase or reduce the cooking times using the following rule of thumb: Double the amount \( = \) almost double the cooking time Half the amount \( = \) half the cooking time |
| The food has become too dry. | Next time, set a shorter cooking time or select a lower microwave power setting. Cover the food and add more liquid. |
| When the time has elapsed, the food is not defrosted, hot or cooked. | Set a longer time. Large quantities and food which is piled high require longer times. |
| When the time has elapsed, the food is overheated at the edge but not done in the middle. | Stir it during the cooking time and next time, select a lower micro- wave power setting and a longer cooking time. |
| After defrosting, the poultry or meat is defrosted on the out- side but not defrosted in the middle. | Next time, select a lower microwave power setting. If you are defrosting a large quantity, turn it several times. |
Cakes and pastries
About the tables
Notes
The times given apply to food placed in a cold oven.
The temperature and baking time depend on the consistency and amount of the mixture. This is why temperature ranges are given in the tables. Begin with the lower temperature and, if necessary, use a higher setting the next time, since a lower temperature results in more even browning.
Additional information can be found in the Baking tips section following the tables.
Always place the cake tin in the centre of the lower wire rack.
Baking tins
Note: It is best to use dark-coloured metal baking tins.
Hot air
Pizza setting
| Cakes in tins Accessories Type of | heating | Temperature °C | Microwave power in watts | Cooking time in minutes | |
| Sponge cake, simple Ring tin/round tin | ◎ | 170-180 90 40-50 | |||
| Sponge cake, delicate (e.g. sand cake)* Ring tin/round tin | ◎ | 150-170 - 70-90 | |||
| Sponge flan base Flan tin | ◎ | 160-180 - 30-40 | |||
| Delicate fruit flan, sponge Springform/ring tin | ◎ | 170-180 90 35-45 | |||
| Sponge base, 2 eggs Flan tin | ◎ | 160-170 - 20-25 | |||
| Sponge flan, 6 eggs Dark springform cake tin | ◎ | 170-180 - 35-45 | |||
| Shortcrust pastry base with crust Dark springform cake tin | ◎ | 170-190 - 30-40 | |||
| Fruit tart/cheesecake with pastry base* Dark springform cake tin | ◎ | 170-190 180 | 35-45 | ||
| Swiss flan** | Dark springform cake tin | ◎ | 190-200 - 45-55 | ||
| Ring cake | Ring cake tin | ◎ | 170-180 90 40-50 | ||
| Pizza, thin base, light topping** | Round pizza tray | ◎ | 220-230 - 15-25 | ||
| Savoury cakes | Dark springform cake tin | ◎ | 200-220 - 50-60 | ||
| Nut cake | Dark springform cake tin | ◎ | 170-180 90 35-45 | ||
| Yeast dough with dry topping | Round pizza tray | ◎ | 160-180 - 50-60 | ||
| Yeast dough with moist topping | Round pizza tray | ◎ | 170-190 - 55-65 | ||
| Plaited loaf with 500 g flour | Round pizza tray | ◎ | 170-190 - 35-45 | ||
| Stollen with 500 g flour | Round pizza tray | ◎ | 160-180 - 60-70 | ||
| Strudel, sweet | Round pizza tray | ◎ | 190-210 180 | 35-45 | |
- Allow cake to cool in the oven for approx. 20 minutes.
** Place the tin on the turntable.
Hot air
| Small baked items | Accessories | Type of heating | Temperature in \( {}^{ \circ }\mathrm{C} \) | Cooking time in minutes |
| Biscuits | Round pizza tray | ④ | 150-170 | 25-35 |
| Macaroons | Round pizza tray | ④ | 110-130 | 35-45 |
| Meringue | Round pizza tray | ④ | 100 | 80-100 |
| Muffins | Muffin tray on wire rack | ④ | 160-180 | 35-40 |
| Choux pastry | Round pizza tray | ④ | 200-220 | 35-45 |
| Puff pastry | Round pizza tray | ④ | 190-200 | 35-45 |
| Leavened cake | Round pizza tray | ④ | 200-220 | 25-35 |
Hot air
Pizza setting
| Bread and rolls | Accessories | Type of heating | Temperature in °C | Cooking time in minutes |
| Sourdough bread with 1.2 kg flour | Round pizza tray | ® | 210-230 | 50-60 |
| Flatbread* | Round pizza tray | ® | 220-230 | 25-35 |
| Bread rolls | Round pizza tray | ® | 210-230 | 25-35 |
| Rolls made with sweet yeast dough | Round pizza tray | ® | 200-220 | 15-25 |
- Place the tin directly on the turntable.
Baking tips
| You want to bake according to your own recipe. | Use similar items in the baking tables as a guide. |
| Use baking tins made of silicone, glass, plastic or ceramic materials. | The baking tin must be heat-resistant up to 250 °C. Cakes in these baking tins will be less brown. When using the microwave, the cooking time will be shorter than the time shown in the table. |
| How to establish whether sponge cake is baked through. | Approximately 10 minutes before the end of the baking time specified in the recipe, poke the cake with a cocktail stick at its highest point. If the cocktail stick comes out clean, the cake is ready. |
| The cake collapses. Use less liquid next time or set the oven temperature 10 degrees lower and extend the baking time. Observe the specified mixing times in the recipe. | |
| The cake has risen in the middle but is lower around the edge. | Only grease the base of the springform cake tin. After baking, loosen the cake carefully with a knife. |
| The cake is too dark. Select a lower temperature and bake the cake for a little longer. | |
| The cake is too dry. When it is done, make small holes in the cake using a toothpick. Then drizzle fruit juice or an alcoholic beverage over it. Next time, select a temperature 10 degrees higher and reduce the baking time. | |
| The bread or cake (e.g. cheesecake) looks good, but is soggy on the inside (sticky, streaked with water). | Use slightly less fluid next time and bake for slightly longer at a lower temperature. When baking cakes with a moist topping, bake the base first, cover with almonds or bread crumbs and then add the topping. Please follow the recipe and follow the baking times. |
| The cake cannot be turned out of the dish when it is turned upside down. | After baking, allow the cake to cool for a further 5 to 10 minutes, then it will be easier to turn out of the tin. If it still sticks, carefully loosen the cake around the edges using a knife. Turn the cake tin upside down again and cover it several times with a cold, wet cloth. Next time, grease the tin well and sprinkle some bread crumbs into it. |
| You have measured the temperature of the oven using your own meat thermometer and found there is a discrepancy. | The oven temperature is measured by the manufacturer after a specified period of time using a test rack in the centre of the cooking compartment. Ovenware and accessories affect the temperature measurement, so there will always be some discrepancy when you measure the temperature yourself. |
| Sparks are generated between the tin and the wire rack. | Check that the tin is clean on the outside. Change the position of the tin in the cooking compartment. If this does not help, continue baking but without the microwave. The baking time will then be longer. |
Roasting and grilling
About the tables
The temperature and roasting time depend on the type and amount of food being cooked. This is why temperature ranges are given in the tables. Begin with the lower temperature and, if necessary, use a higher setting the next time,
For more information, see the section entitled Tips for grilling and roasting which follows the tables.
Ovenware
You may use any heat-resistant ovenware which is suitable for use in a microwave. Metal roasting dishes are not suitable for roasting with microwaves.
The ovenware can become very hot. Use oven gloves to take the ovenware out of the oven.
Place hot glass ovenware on a dry kitchen towel after they have been removed from the oven. The glass could crack if placed on a cold or wet surface.
Tips for roasting
Use a deep roasting dish for roasting meat and poultry.
Check that your ovenware fits in the cooking compartment. It should not be too big.
Meat:
Cover approx. two thirds of the ovenware base with liquid. Add a little more liquid for pot roasts. Turn pieces of meat halfway through the cooking time. When the roast is ready, turn off the oven and allow it to rest for an additional 10 minutes. This allows better distribution of the meat juices.
Poultry:
Turn the pieces of meat after 2/3 of the cooking time has elapsed.
Tips for grilling
Notes
Always keep the oven door closed when grilling and do not preheat.
As far as possible, the pieces of food you are grilling should be of equal thickness. Steaks should be at least 2 to 3cm thick. This will allow them to brown evenly and remain succulent and juicy. Do not add salt to steaks until they have been grilled.
Use tongs to turn the pieces of food you are grilling. If you pierce the meat with a fork, the juices will run out and it will become dry.
Dark meat, e.g. beef, browns more quickly than lightercoloured meat such as veal or pork. When grilling lightcoloured meat or fish, these often only brown slightly on the surface, although they are cooked and juicy on the inside.
The grill element switches off and on again automatically. This is normal. The grill setting determines how frequently this will happen.
Beef
Notes
Turn pot-roasted beef after 1/3 and 2/3 of the cooking time. Finally, allow to stand for approx. a further 10 minutes.
Turn fillet of beef and sirloin halfway through the cooking time. Finally, allow to stand for approx. a further 10 minutes.
Turn steaks after 2/3 of the cooking time.
Hot air
Hot air grilling
Grill
| Beef Accessories Type of heating | Temperature in °C, grill setting | Microwave power in watts | Cooking time in minutes |
| Pot-roasted beef, approx. 1 kg Ovenware with lid | 180-200 - 120-130 | ||
| Fillet of beef, medium, Ovenware without lid | 180-200 90 30-40 | ||
| approx. 1 kg | |||
| Sirloin, medium, approx. 1 kg Ovenware without lid | 210-230 180 30-40 | ||
| Steaks, medium, 3 cm thick Higher wire rack | 3 - each side: approx. 10-15 |
Veal
Hot air
Note: Turn joints and knuckle of veal halfway through the cooking time. Finally, allow to stand for approx. a further 10 minutes.
| Veal | Accessories | Type of heating | Temperature °C | Cooking time in minutes |
| Joint of veal, approx. 1 kg | Ovenware with lid | ® | 180-200 110-130 | |
| Knuckle of veal, approx. 1.5 kg | Ovenware with lid | ® | 200-220 120-130 |
Pork
Notes
Turn lean joints of pork and rindless joints halfway through the cooking time. Finally, allow to stand for approx. a further 10 minutes.
- Place the joint in the ovenware rind-side down. Cut into the rind. Turn the joint approximately halfway through the cooking time. Finally, allow to stand for approx. a further 10 minutes.
- Do not turn fillet of pork or smoke-cured pork chops. Finally, allow to stand for approx. a further 5 minutes.
Turn the neck of pork after 23 of the cooking time.
Hot air grilling
Hot air
Grill
| Pork | Accessories | Type of heating | Temperature in °C, grill setting | Microwave power in watts | Cooking time in minutes |
| Joint without rind (e.g. neck of pork), approx. 750 g | Ovenware with lid* | ‡ | 220-230 | 180 | 40-50 |
| Pork roast with rind (e.g. shoulder), approx. 1.5 kg | Ovenware without lid* | ‡ | 190-210 | - | 130-150 |
| Fillet of pork, approx. 500 g | Ovenware with lid* | ‡ | 220-230 | 90 | 25-30 |
| Joint of pork, lean, approx. 1 kg | Ovenware with lid* | ‡ | 210-230 | 90 | 60-80 |
| Smoked pork on the bone, approx. 1 kg | Ovenware without lid* | - | - | 360 | 40-45 |
| Neck of pork, 2 cm thick | ‡ | 3 | - | 1st side: approx. 15-202nd side: approx. 10-15 |
- Lower wire rack
** Higher wire rack
Lamb
Hot air
Note: Turn the leg of lamp halfway through the cooking time.
Hot air grilling
| Lamb and game | Accessories | Type of heating | Temperature °C Cooking time in minutes | |
| Saddle of lamb on the bone, approx. 1 kg | Ovenware without lid | ⊕ | 210-230 | 40-50 |
| Leg of lamb, boned, medium, approx. 1.5 kg | Ovenware with lid | ⊕ | 190-210 | 90-100 |
Miscellaneous
Turn the sausages after 2/3 of the cooking time.
Notes
Hot air grilling
Grill
Finally, allow the meat loaf to stand for approx. a further 10 minutes.
| Miscellaneous | Accessories Type of heating | Temperature °C | Microwave power in watts | Cooking time in minutes |
| Meat loaf made from approx. 1 kg of meat | Ovenware without lid, lower wire rack | 180-200 | 600 + 180 | 10 + 40-50 |
| 4 to 6 grilled sausages, approx. 150 g each | Higher wire rack | 3 | - each side: approx. 10-15 | |
Poultry
Notes
Place whole chickens and chicken breasts breast-side down. Turn after 2/3 of the cooking time.
Place poulard breast-side down. Turn after 30 minutes and set the microwave power to 180 watts.
Place half chickens and chicken portions skin-side up. Do not turn.
Turn the duck and goose breast skin-side up. Do not turn.
- Turn goose legs halfway through the cooking time. Prick the skin.
Place turkey breast and thighs skin-side down. Turn after 2/3 of the cooking time.
Hot air grilling
Hot air
Grill
| Poultry Accessories Type of | heating | Temperature in °C, grill setting | Microwave power in watts | Cooking time in minutes |
| Chicken, whole, approx. 1.2 kg Ovenware with lid | ¥ | 220-230 360 | 35-45 | |
| Poulard, whole, approx. 1.6 kg Ovenware with lid | ¥ | 220-230 360 | 30 | |
| 180 | 20-30 | |||
| Chicken, halves, 500 g each Ovenware without lid | ¥ | 180-200 360 | 30-35 | |
| Chicken portions, approx. 800 g Ovenware without lid | ® | 210-230 360 | 20-30 | |
| Chicken breast with skin and bones, 2 pieces, approx. 350-450 g | Ovenware without lid | 190-210 180 | 30-40 | |
| Duck breast with skin, 2 pieces, 300-400 g each | Ovenware without lid | 3 90 20-30 | ||
| Goose breast, 2 pieces, 500 g each Ovenware without lid | ¥ | 210-230 90 | 25-30 | |
| Goose legs, 4 pieces, approx. 1.5 kg Ovenware without lid | ® | 210-230 180 | 30-40 | |
| Turkey breast, approx. 1 kg | Ovenware with lid | 200-220 - | 90-100 | |
| Turkey drumsticks, approx. 1.3 kg | Ovenware with lid | 200-220 180 | 50-60 |
Fish
Notes
For grilling, place the whole fish, e.g. trout, onto the middle of the higher wire rack.
Grease the wire rack with oil beforehand.
Grill
| Fish | Accessories | Type of heating | Temperature °C | Cooking time in minutes |
| Fish steak, e.g. salmon, 3 cm thick, grilled | Higher wire rack | □ | 3 | 20-25 |
| Whole fish, 2-3 pieces, 300 g each, grilled | Higher wire rack | □ | 3 | 20-30 |
Tips for roasting and grilling
| The table does not contain information for the weight of the joint. | For small roasts, select a higher temperature and a shorter cooking time. For larger roasts, select a lower temperature and a longer cooking time. |
| How to tell when the roast is ready. | Use a meat thermometer (available from specialist shops) or carry out a “spoon test”. Press down on the roast with a spoon. If it feels firm, it is ready. If the spoon can be pressed in, it needs to be cooked for a little longer. |
| The roast looks good but the juices are burnt. | Next time, use a smaller roasting dish or add more liquid. |
| The roast looks good but the juices are too clear and watery. | Next time, use a larger roasting dish and add less liquid. |
| The roast is not well-done enough. | Carve the roast. Prepare the gravy in the roasting dish and place the slices of roast meat in the gravy. Finish cooking the meat using the microwave only. |
Bakes, gratins, toast with toppings
Notes
The values in the table apply to food placed in a cold oven.
For bakes, potato gratins and lasagne, use a microwaveable, heat-resistant ovenproof dish 4 to 5cm deep.
Place the bake on the lower wire rack.
Leave bakes and gratins to cook in the oven for a further 5 minutes after switching off.
Cheese on toast: Pre-toast slices of bread.
Hot air grilling
Hot air
Grill
| Bakes, gratins, toast with toppings Accessories Type of | heating | Temperature in °C, grill setting | Microwave power in watts | Cooking time in minutes |
| Bake, sweet, approx. 1.5 kg Ovenware with lid | ♀ | 140-160 360 25-35 | ||
| Savoury bake, made with cooked ingredients, approx. 1 kg | Ovenware without lid | ♀ | 150-170 600 20-25 | |
| Lasagne, fresh Ovenware without lid | ♀ | 200-220 360 25-35 | ||
| Potato gratin made from raw ingredients, approx. 1.1 kg | Ovenware without lid | ♀ | 180-200 600 25-30 | |
| Toast with topping, 4 slices Higher wire rack | ♀ | 3 - 8-10 |
Convenience products, frozen
Notes
Observe the instructions on the packaging.
The values in the table apply to food placed in a cold oven.
- Do not lay chips, croquettes or potato robstis on top of each other. Turn half way through the cooking time.
Place the food directly on the turntable.
Pizza setting
Microwave
Hot air
| Convenience products | Accessories | Type of heating | Temperature °C | Microwave power in watts | Cooking time in minutes |
| Pizza with thin base* Turntable | # | 220-230 | - | 10-15 | |
| Pizza with deep-pan base | Turntable | # | - | 600 | 3 |
| # | 220-230 | - | 13-18 | ||
| Mini pizza* | Turntable | # | 220-230 | - | 10-15 |
| Pizza baguette* | Turntable | # | - | 600 | 2 |
| # | 220-230 | - | 13-18 | ||
| Chips | Turntable | # | 220-230 | - | 8-13 |
| Croquettes* | Turntable | # | 210-220 | - | 13-18 |
| Rösti, stuffed potato pockets | Turntable | # | 200-220 | - | 25-35 |
| Part-cooked rolls or baguette | Lower wire rack | # | 170-180 | - | 13-18 |
| Fish fingers | Turntable | # | 210-230 | - | 10-20 |
| Chicken goujons, nuggets | Turntable | # | 200-220 | - | 15-20 |
| Strudel | Turntable | # | 210-220 | 180 | 20-30 |
| Lasagne** | Lower wire rack | # | 220-230 | 600 | 12-17 |
- Preheat the cooking compartment for 5 minutes, then place the food on the hot turntable.
** Place the food in suitable, heat-resistant ovenware.
Acrylamide in foodstuffs
Which foods are affected?
Acrylamide is mainly produced in grain and potato products that are heated to high temperatures, such as potato crisps, chips, toast, bread rolls, bread.
| Tips for keeping acrylamide to a minimum when preparing food | |
| General | Keep cooking times to a minimum. Cook meals until they are golden brown, but not too dark. Large, thick pieces of food contain less acrylamide. |
| Baking | With Hot air, max. 180 °C. |
| Biscuits | With Hot air, max. 170 °C. Egg white and egg yolk reduce the forma- tion of acrylamide. |
Test dishes
The quality and function of microwave combination appliances are tested by testing institutes using the following dishes.
In accordance with the standards EN 60705, IEC 60705 or DIN 44547 and EN 60350 (2009)
Defrosting with the microwave
| Dish Microwave power setting in watts, cooking time in minutes | Note |
| Meat 180 W, 5 mins + 90 W, 10-15 mins Place the Pyrex dish with a 22 cm diameter on the lower wire rack. After approx. 13 minutes, remove the defrosted meat. | |
Microwave cooking
| Dish Microwave power setting in watts, cooking time in minutes | Note |
| Custard 600 W, 10-13 mins + 180 W, 25-30 mins Place the Pyrex dish with dimensions 24 x 19 cm on the lower wire rack. | |
| Sponge 600 W, 9-10 mins Place the Pyrex dish with a 22 cm diameter on the lower wire rack. | |
| Meat loaf 600 W, 18-23 mins Place the 28 cm Pyrex dish on the lower wire rack. | |
Pizza setting
Hot air grilling
Hot air
Combined microwave cooking
| Dish Microwave power setting in watts, cooking time in minutes | Type of heating | Temperature °C | Note | |
| Potato gratin 600 W, 25-30 mins | ® | 210-230 Place the Pyrex dish with a 22 cm diameter on the lower wire rack. | ||
| Cake | 180 W, 15-20 mins | ® | 180-200 Place the Pyrex dish with a 22 cm diameter on the lower wire rack. | |
| Chicken | 360 W, 35-40 mins | ★ | 200-220 | Turn after ½s of the cooking time. |
Baking
Note: The values in the table apply to food placed in a cold oven.
Hot air
Pizza setting
| Ovenware | Type of heating | Temperature °C | Baking time in minutes | |
| Hot water sponge cake | Springform cake tin, dia. 26 cm, lower wire rack | ® | 160-180 | 30-40 |
| Apple pie | Springform cake tin, dia. 20 cm, lower wire rack | ® | 190-210 | 50-60 |
Grilling
Grill
| Dish | Accessories Type of | heating | Grill setting | Cooking time in minutes |
| Toast | Higher wire rack | □ | 3 4-5 | |
| Beefburgers, x 9 | Higher wire rack | □ | 3 30-35 |
Compartment de cuisson
Chauffer le compartment de cuisson
Voor u in once kookstudio getest. 78
Acrylamide in levensmiddelen 86
Testgerechten 86
Voor u in once kookstudio getest.


- Important safety information
- Risk of fire!
- Risk of explosion!
- Risk of serious damage to health!
- Risk of electric shock!
- Risk of burns!
- Risk of scalding!
- Risk of injury!
- Causes of damage
- Caution!
- Installation and connection
- Your new appliance
- Buttons
- Cooking compartment
- Notes
- Turntable
- Lower wire rack
- Higher wire rack
- Before using the appliance for the first time
- Setting the clock
- Changing the clock
- Cleaning the accessories
- Heating up the cooking compartment
- Switching the appliance on and off
- Switching on
- Select the desired function:
- Switching off
- The microwave
- Note:
- Notes regarding ovenware
- Suitable ovenware
- Unsuitable ovenware
- Ovenware test
- Microwave power settings
- Operating the microwave
- Correcting the settings
- Pause
- When the cooking time has elapsed
- Cancelling operation
- Setting the oven
- Types of heating
- Setting the type of heating and temperature
- Operating without a cooking time
- Rapid heat-up
- Microwave combi operation
- Setting Microwave Combi operation
- Childproof lock
- Activating the childproof lock
- Releasing the lock
- Basic settings
- Changing the basic settings
- Automatic safety cut-out
- Care and cleaning
- Cleaning agents
- Malfunction table
- After-sales service
- E number and FD number
- Technical data
- Energy and environment tips
- Saving energy
- Environmentally-friendly disposal
- Automatic programmes
- Setting a programme
- Deleting the settings
- Cancelling the programme
- Defrosting and cooking with the automatic programmes
- Defrost
- Resting time
- Cooking
- Rice (P05)
- Potatoes (P06)
- Vegetables (P07)
- Combi cooking
- Lamb, medium (P12)
- Meat loaf (P13)
- Fish, whole (P14)
- Rice stew (P15)
- Tested for you in our cooking studio
- Defrosting, heating up and cooking with the microwave
- Defrosting
- Defrosting, heating up or cooking frozen food
- Heating food
- Popcorn for the microwave
- Cakes and pastries
- About the tables
- Baking tins
- Baking tips
- Roasting and grilling
- Ovenware
- Tips for roasting
- Meat:
- Poultry:
- Tips for grilling
- Beef
- Veal
- Pork
- Lamb
- Miscellaneous
- Poultry
- Fish
- Tips for roasting and grilling
- Bakes, gratins, toast with toppings
- Convenience products, frozen
- Acrylamide in foodstuffs
- Which foods are affected?
- Test dishes
- Baking
- Grilling
- Compartment de cuisson
- Chauffer le compartment de cuisson
- Voor u in once kookstudio getest.
Brand : BLAUPUNKT
Model : 5MA46500
Category : Microwave Oven