
MD 16752 - Microwaves MEDION - Free user manual and instructions
Find the device manual for free MD 16752 MEDION in PDF.
| Product Type | Microwave combined with grill |
| Technology | Inverter |
| Microwave output power | 900 W |
| Grill power | 1000 W |
| Microwave consumption | 1380 W |
| Supply voltage | 230 V / 50 Hz |
| Microwave frequency | 2450 MHz |
| Automatic programs | 8 programs: Vegetables, Drinks, Noodles, Popcorn, Pizza, Potatoes, Meat, Fish |
| Cooking modes | Microwave, Grill, Combi, Defrost (weight/time), Auto cook |
| Additional functions | Quick start, Timer, Child lock, Memory (2 consecutive programs) |
| Included accessories | Turntable, roller ring, rack, opening suction pad |
| Cleaning | Washable glass turntable, washable rack, interior cleaning with damp cloth |
| Safety | Child lock, auto shut-off, overheating protection |
| Warranty | 24 months |
| After-sales service | Hotline France: 0892 23 73 83 (€0.34/min), Belgium: 0900-51111 (€0.45/min), Luxembourg: 34-20808664 (toll-free call) |
Frequently Asked Questions - MD 16752 MEDION
User questions about MD 16752 MEDION
0 question about this device. Answer the ones you know or ask your own.
Ask a new question about this device
Download the instructions for your Microwaves in PDF format for free! Find your manual MD 16752 - MEDION and take your electronic device back in hand. On this page are published all the documents necessary for the use of your device. MD 16752 by MEDION.
USER MANUAL MD 16752 MEDION
Abmessungen (B x H x T) in cm
Gerat: 512 × 422 × 306 ~mm
m = 311 ;
Appareil
Dimensions (I x H x P)/poids
Appareil: 512 × 422 × 306 ~mm
Contenance: 25 litres
Poids net: 11,6 kg
www.medion.com/conformity.
16. Kolofon
Copyright © 2015
17.1.3. Service-hotline
1. About these instructions 157
1.1. Symbols and key words used in these instructions 157
2. Package contents 158
3. Proper use 158
4. Safety information 159
4.1. Unpacking the appliance 159
4.2. General safety instructions 160
4.3. Hot surfaces 161
4.4. Special safety instructions for handling microwaves 163
4.5. Safety information for heating liquids 164
4.6. Cleaning and caring for the appliance 165
5. About microwaves 166
5.1. Inverter technology 166
5.2. The effect of microwaves on foodstuffs 166
5.3. The microwave oven 166
6. Cooking and heating up in the microwave 167
6.1. General notes 167
6.2. Microwave-suitable materials 167
6.3. Unsuitable materials 169
7. Overview of the appliance 170
7.1. Description of parts 170
7.2. Controls 171
8. Before first use 172
8.1. Setting up the appliance 172
8.2. Heating the appliance while empty 172
8.3.Inserting accessories 173
9. Operation 173
9.1. Setting the clock time 173
9.2.Child lock 173
9.3. Setting the kitchen timer (countdown) 174
9.4. End of the cooking process 174
9.5. Interrupting a programme 174
9.6. Cooking with microwaves 175
9.7. Quick start 175
9.8. Grill mode 175
9.9. Combi mode: microwave and grill 176
9.10.Defrosting according to weight 176
9.11.Defrosting according to time 177
9.12. Using multiple programmes 177
9.13. Memory function 177
9.14. Automatic cooking 178
- Cleaning and care 183
- End of operation 184
- Troubleshooting 184
- Disposal 184
- Declaration of conformity 185
- Legal notice 186
- Service Address 189
1. About these instructions

Read the safety instructions carefully before using the appliance for the first time. Note the warnings on the appliance and in the operating instructions.
Always keep the operating instructions close to hand. If you sell the appliance or give it away, make sure you also hand over these instructions and the warranty card.
1.1. Symbols and key words used in these instructions

DANGER!
Warning of immediate mortal danger!
WARNING!
Warning of possible risk of fatal injury and/or serious irreversible injuries!

WARNING!
Warning: danger due to hot surfaces!

CAUTION!
Please follow the instructions to prevent injuries and property damage!
ATTENTION!
Please follow the instructions to avoid property damage!

NOTICE!
Additional information on using the product.

NOTICE!
Please follow the instructions in the operating instructions!
- Bullet point/information on operating steps and results
Tasks to be performed
2. Package contents
After unpacking the product, please ensure that the following parts have been supplied:
- Microwave MD 16752
- Rotary plate, incl. roller ring
- Grill rack
- Suction opener
- Instructions and warranty documents
3. Proper use
This appliance may only be used for heating up appropriate foodstuffs in microwave-suitable containers and dishes. The microwave is designed for warming up food and drinks. Dry-ing food or clothing and the warming of heating pads, slippers, sponges, damp cleaning cloths and similar items can lead to injuries, inflammation or fire. Do not use the appliance outdoors. This appliance is intended to be used in private households or for similar household applications, for example
-in kitchens for employees in shops, offices and other commercial areas;
-on agricultural estates;
-by customers in hotels, motels and other residential facilities;
-in bed & breakfast accommodation.
The appliance is not suitable for commercial or industrial use.
Please note that we shall not be liable in cases of improper use:
- Do not modify the appliance without our consent and do not use any auxiliary equipment that we have not approved or supplied.
- Use only spare parts and accessories that we have supplied or approved.
- Heed all the information in these operating instructions, especially the safety information. Any other use is deemed improper and can cause personal injury or property damage.
- Do not expose the appliance to any extreme conditions. The
following should be avoided:
-High levels of humidity or moisture
-Extremely high or low temperatures
-Direct sunlight
-Naked flames
4. Safety information

WARNING!
Risk of injury due to improper handling.
-
Store the appliance and its accessories in a place beyond the reach of children.
-
This appliance may be used by children over the age of 8 and by persons with reduced physical, sensory or mental abilities or by those without experience and/or knowledge, if they are supervised or have been instructed in the safe use of the appliance and have understood the dangers that result from it. Children must not be allowed to play with the appliance. Cleaning and user maintenance must not be carried out by children, unless they are aged 8 or over and are supervised.
- Children younger than 8 should be kept away from the appliance and the mains cable.
4.1. Unpacking the appliance

WARNING!
Risk of suffocation.
- Keep any plastic sheet used in packaging away from children.

WARNING!
Risk of injury from electric shock or microwave radiation.
- Check the mains cable for damage before using the microwave for the first time and after every use.
- Do not use the appliance if the microwave or the mains cable are visibly damage.
- If you find transport damage, contact the Medion Service Centre at once.
4.2. General safety instructions
- Only connect the microwave to a properly installed and earthed power socket with a voltage of 230V 50Hz that has at least a 16 Amp fuse. Do not use any extension cables.

WARNING!
Risk of injury from electric shock or microwave radiation.
- Microwave radiation can leak to the outside if the appliance is damaged. Damage to the mains cable may result in an electric shock.
- If the housing, panels, door, door seals or the door catch are damaged, do not use the microwave under any circumstances. Immediately remove the plug from the mains socket in this case.
- Do not make any unauthorised modifications to the appliance or try to open it and/or repair it yourself.
- Do not remove any of the microwave's internal panels or the inner coating of the viewing window as this could lead to microwave radiation leakage.
- In order to reduce risks: have the microwave and the mains cable repaired exclusively by a specialist workshop or contact your Medion Service Centre.

IMPORTANT
Risk of damage to the appliance due to improper installation.
- The microwave is designed as a free-standing appliance. Do not integrate it into kitchen units.
- Ensure that the mains cable is undamaged and does not run underneath the appliance or over any hot surfaces or sharp edges.
- Set up the microwave on a level, stable surface, which is able to carry the weight of the appliance as well as the maximum weight of the food which is to be prepared within it.
- Only set up the microwave in a safe, dry environment.
- The microwave must be positioned so that the rear of the appliance is facing a wall.
- Protect the microwave against water droplets or spray. If the microwave nevertheless comes into contact with water, disconnect the plug from the mains socket immediately.
- Do not set up the microwave near to heat sources.
- Sensitive surfaces on the rotary plate. Avoid contact with acidic foodstuffs. The rotary plate could be damaged.
4.3. Hot surfaces
WARNING!
Risk of injury through burning on hot surfaces.
-
Do not touch the housing.
-
In combi or grill mode, children may only use the appliance under the supervision of adults because of the high temperatures.
- After cooking in grill mode, the rotary plate will become very hot! Always use a protective cloth or heat-resistant oven gloves when removing the rotary plate from the cooking area.

WARNING! There is a risk of explosion.
Do not heat any mixture of water with oil or fat in the microwave.
WARNING! Risk of fire due to very hot surfaces on the appliance.
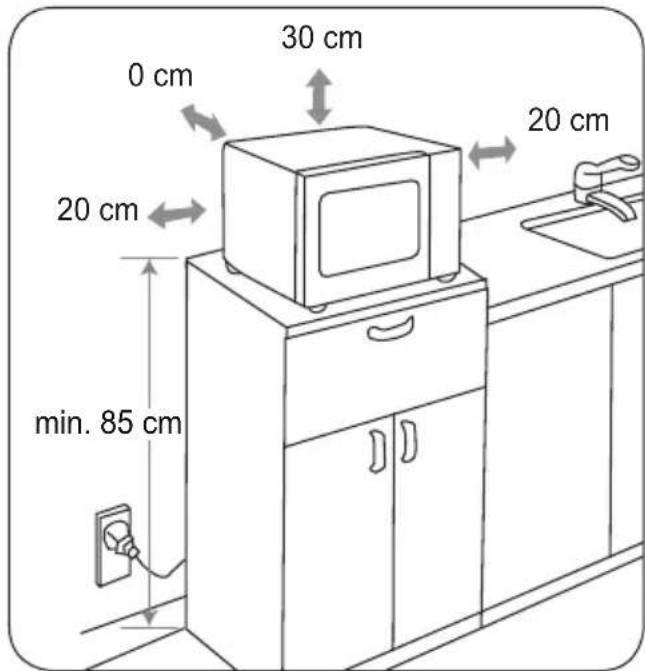
- Do not place any objects on the microwave. To ensure adequate ventilation, a minimum safe clearance distance of 30cm to the top and 20 cm on both sides must be observed. Do not cover or block the openings on the appliance.
- Never leave the appliance unattended during operation.
- The microwave is not designed to be operated with an external timer or a separate remote control system.

WARNING! Risk of fire due to very high temperatures.
- If heating up or cooking food in flammable materials such as plastic or paper containers, never leave the microwave unattended.
- This appliance may only be used for heating up appropriate foodstuffs in microwave-suitable containers and dishes. Do not use baking paper in grill or combi modes.
- Do not warm up or attempt to dry any flammable materials (no clothes, no heating pads, slippers, sponges, damp cleaning cloths or similar) in the appliance.
- Do not prepare any food containing alcohol. Do not use the
apppliance to fry food or heat oil!
- Evenly load the rotary plate so that it does not touch the inner metal wall of the appliance during operation to avoid any sparks.
- If you see smoke, keep the door closed to prevent fire from breaking out, or to smother flames which have already broken out. Immediately turn off the appliance with the Stop/Cancel button and disconnect the mains plug.
4.4. Special safety instructions for handling microwaves

WARNING!
Risk of injury due to bursting containers.
- Do not heat food or liquids in tightly closed containers! These could burst in the appliance or result in injuries when opening them. Always remove the lid from closable containers such as baby bottles.
WARNING!
Risk of injury through burning.
- Food prepared in the microwave may have been heated unevenly. Check the temperature of the food before eating it. In the case of baby food and baby bottles, always stir or shake the baby food before checking the temperature to avoid burns.
- Do not heat up eggs in their shells or whole, pre-boiled eggs in the microwave because they could explode during cooking or even after they have been removed from the appliance. Only heat up eggs in microwave-suitable containers specially designed for this purpose.
- Pierce food with a closed skin such as tomatoes, sausages, aubergines or similar before cooking in order to avoid them bursting.

IMPORTANT
Risk of damage to the appliance.
- Never operate the appliance without the rotary plate and never use it in microwave mode without food in the cooking area.
- Only use the accessories supplied or those that are described as suitable in these operating instructions.
- Never use dishes with metal trimmings, metal utensils or the grill rack in microwave mode as this may lead to sparks that could damage the appliance and/or the dishes.
- Use microwave-suitable dishes. Look for markings such as "Microwave-suitable" or "For the microwave" when purchasing dishes.
4.5. Safety information for heating liquids

WARNING!
Risk of injury through burning.
- When warming up liquids in the microwave, so-called "delayed boiling" can occur, i.e. the liquid has reached boiling temperature without beginning to bubble as boiling liquids normally do. Agitation, for instance when removing the liquid from the appliance, can lead to a sudden boiling up of the liquid. Liquid could suddenly spurt out of the container.
- Do not use any tall, thin containers.
- Place a glass or ceramic rod in the container when warming up the liquid in order to prevent any belated boiling of the liquid. Wait for a short while after warming, carefully tap the container and stir the liquid before removing it from the cooking area.
4.6. Cleaning and caring for the appliance

IMPORTANT Risk of damage to the appliance.
- Sensitive surfaces on the rotary plate. Avoid contact with acidic foodstuffs. The rotary plate could be damaged.
- Poor appliance hygiene can lead to damage to the surfaces, which in turn can reduce the lifespan of the appliance and even lead to dangerous situations.
- Clean the appliance regularly and remove food residues.
- Observe the instructions for cleaning the appliance when cleaning the door seals, the interior cooking space and the neighbouring parts, see "10. Cleaning and care" on page 183.
5. About microwaves
Microwaves are high-frequency electromagnetic waves that have a warming effect on the food within the oven. Microwaves heat all non-metallic objects. Therefore, do not use any metallic objects in microwave mode. This heating effect works better the higher the water content of the foodstuff.
To ensure optimal distribution of heat, let food stand for a minute or two in the microwave after cooking.
5.1. Inverter technology
In contrast to conventional microwaves, a steady stream of microwave energy is emitted with inverter technology.
This is a faster and gentler way of defrosting and cooking meals and food.
5.2. The effect of microwaves on foodstuffs
- Microwaves penetrate foodstuffs to a depth of around 3cm.
- They heat up water, fat and sugar molecules (foodstuffs with a higher water content are heated more intensively).
- This heat then works its way – slowly – throughout the food and has a defrost-ing, heating and cooking effect on the food.
- The cooking space and the air within are not heated (the food container is heated mainly by the hot food itself).
Each foodstuff requires a certain amount of energy to cook or defrost. As a rule of thumb we can say: high output - short time or low output - long time.
5.3. The microwave oven
- A microwave generator, the so-called magnetron, generates the microwaves and directs them into the cooking area.
- The inner walls and the viewing window reflect the microwaves inwards so that they cannot escape from the interior.
- The microwave output and the cooking time can be set in several steps.
- After the cooking time has elapsed, or when the door is opened, the magnetron turns off immediately.
6. Cooking and heating up in the microwave
6.1. General notes
- To arrange food so that it cooks properly, place the food with the largest pieces towards the outer edge.
Note the exact cooking or heating times. - Choose the shortest available cooking or heating time and extend it if necessary.

WARNING!
There is a risk of fire.
Overcooked food can start to smoke or even catch fire.
- Cover food during cooking or heating with a cover that is suitable for the microwave. Covering the food helps avoid splashes; furthermore the food is more evenly cooked.
- Foods such as chicken pieces or hamburgers should be turned once during cooking to speed up cooking. Larger pieces such as joints or roasting chickens must be turned at least once.
- It is also important to reposition food, e.g. with meatballs: After half of the cooking time has expired, the food should be repositioned from top to bottom and from the middle to the outside.
- After heating, stir the food if possible to ensure even temperatures, otherwise let the food stand for a short time.
6.2. Microwave-suitable materials
You can buy special dishes and accessories for your microwave. Look for markings such as "Microwave-suitable" or "For the microwave". You can also use your existing dishes - if the material is suitable.
6.2.1. Suitable materials
- Porcelain, glass ceramic and heatproof glass.
- Plastics which are heatproof and microwave-suitable (Attention: plastics may become discoloured by foods or become warped by the heat)
Baking paper.
ATTENTION!
Risk of fire due to very high temperatures.
Do not use porcelain, ceramic or plastic containers in grill or combi mode. Cling film should also not be used. Due to the very high temperatures the materials could break, warp or even melt.
6.2.2. Materials that are partially suitable
- Stoneware and ceramics. Use clay containers only for defrosting and for short cooking times because the air and water content of the material could cause the clay to crack or break.
- Dishes with gold or silver décor should only be used if they have been labelled "microwave-suitable" by the manufacturer.
- Never use aluminium foil in large quantities. It can however be used e.g. in small pieces to cover sensitive parts. You can also cover the corners of containers to prevent overcooking as the microwave energy is primarily concentrated on the corners. Maintain a distance of 2.5cm between the foil and the internal wall.
- Aluminium containers (e.g. those for ready-to-serve meals) are suitable, but they must be at least 3cm high to be used in the microwave.
6.2.3. Overview of suitable materials
The following list is a general guide to help you choose the correct cooking dishes:
| Cooking dishes Microwave Grill Combi mode | |||
| Heatproof glass Yes Yes Yes | |||
| Non-heatproof glass No No No | |||
| Heatproof ceramic | Yes Yes Yes | ||
| Microwave-suitable plastic dishes | Yes No No | ||
| Kitchen paper | Yes No No | ||
| Metal insert | No Yes No | ||
| Grill rack, included in delivery | No Yes No | ||
| Aluminium foil/containers | Limited suitability | Yes | Limited suitability |
*Combi mode: Microwave + Grill
6.2.4. Size and shape of microwave-suitable containers
Flat, broad containers are better than narrow, tall ones. "Flat" foods can be cooked more evenly.
Round or oval containers are better than angular ones. There is a danger of local overheating in the corners.
6.3. Unsuitable materials
- Metal, i.e. metal pots, pans and lids.

ATTENTION!
Metal in the cooking space can lead to sparks! These can damage the appliance or the viewing window!
-
Therefore, only use the supplied grill rack in grill mode.
-
Dishes with metal parts (handles, decoration or bottoms) or with gold or silver décor can also lead to sparks in microwave mode.
- Crystal or lead crystal can shatter, coloured glass may become discoloured.
- Any materials which are not heatproof can lose shape or even burn.

NOTE
To test whether a dish is suitable for use in the microwave, put some wa
ter in the container and place it in the microwave. Press 2 × on the button. The appliance will now operate in microwave mode for 1 minute. If you ascertain that the container is hotter than the food, then it is not suitable for the microwave. Microwave-suitable dishes are only warmed by the heat of the food.

WARNING!
As soon as you notice sparks, flashes or even fire, then turn off the microwave immediately using the button.
7. Overview of the appliance
7.1. Description of parts
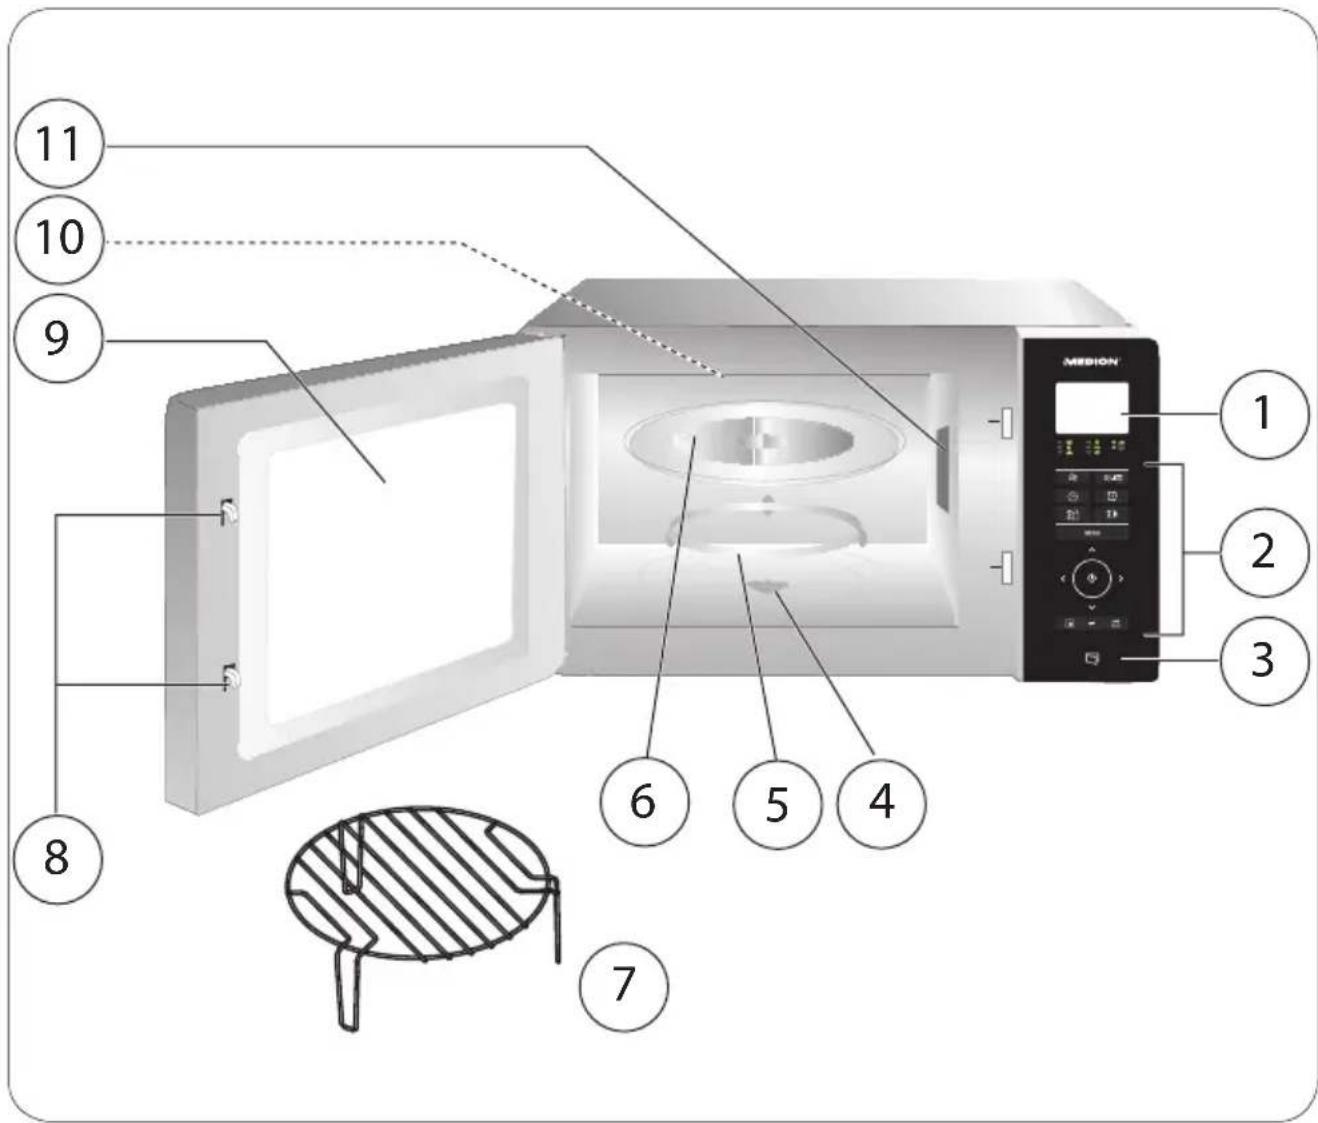
1) Display
2) Operating field
3) Door opener
4) Drive axis
5) Roller ring
6) Rotary plate
7) Grill rack
8) Door lock
9) Viewing window
10) Grill heating element
11) Magnetron cover DO NOT REMOVE!
7.2. Controls
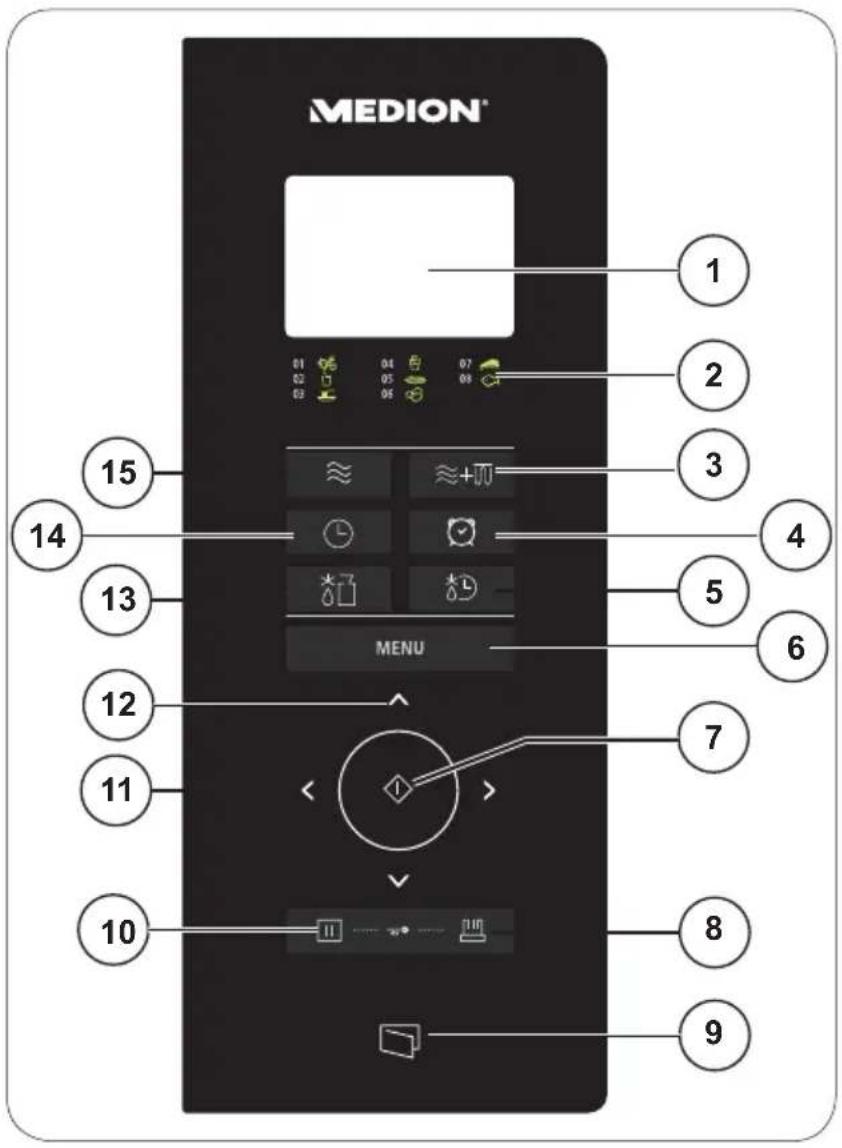
1) Display
2) Key for automatic programmes
3) Set combi mode microwave + grill
4) Set kitchen timer
5) Set defrosting mode according to time
6) Set automatic programmes
7) Start appliance; confirm entry; start automatic programme
8) Use multiple programmes (memory function)
9) Open door
10) Cancel entry; press once: briefly interrupt programme, press twice: prematurely end programme; press longer: activate/deactivate child lock
11) Set hours/minutes/weight
12) Set seconds
13) Set defrosting mode according to weight
8.1. Setting up the appliance
Ensure that all packaging materials have been removed from inside the appliance and the interior of the door.

ATTENTION!
The side cover (11) in the interior of the oven is not part of the packaging and should not be removed!

WARNING!
Check the microwave for any damage – e.g. if the door is crooked or bent, door seals and other seals are damaged, hinges and the closing mechanism are defective or loose, or if the interior of the appliance or the door are dented or damaged. If you discover any damage, do not use the microwave. In this case, please contact the Medion Service Centre.
- Do not place the microwave near to any heat sources, in a location prone to wetness or high humidity, or in the immediate vicinity of flammable materials.
- The feet and the spacer on the rear of the appliance must not be removed as this may impair the cooling of the appliance.

ATTENTION!
The microwave has been designed for household use and may not be used outside!
- Connect the microwave to a convenient and easily accessible 230V 50Hz earthed power socket.
8.2. Heating the appliance while empty
Before using the microwave, you must first heat it up whilst empty in order to remove any manufacturing residues. Turn on the appliance without any food and without accessories as described below in grill mode:
- Open the door and remove any remaining packaging or accessories from the oven.
Close the door.
Press the ≈ + button until is shown on the display.
Confirm your selection by pressing the button.
Press the button repeatedly until you have set a cooking time of 10 minutes.
Press the button to start the heating process.

NOTE
During this initial heating period you may notice faint odours. These smells are not dangerous and will disappear after a short time. Ensure adequate ventilation e.g. by opening a window.
After 10 minutes, the appliance turns itself off automatically. Wait until it has completely cooled down.
- Remove the plug from the mains socket and then clean the appliance once more inside and out with a damp cloth and dry the microwave off carefully.
8.3. Inserting accessories
When you have heated the microwave once in an empty state as described above, it may no longer be used without the rotary plate inserted properly.
Place the roller ring into the recess at the bottom of the cooking space.
Place the rotary plate over the centre of the drive axis.
9. Operation
Every time a button is pressed you will hear a beep to confirm.
9.1. Setting the clock time
When the microwave is used for the first time or the power supply has been interrupted, the screen shows welcome. After a button has been pressed, 00:00 is displayed and the time (24 hour display) must be set.
Press the button once.
The hour display flashes.
Press the or buttons to set the hour.
Press the button.
The minute display flashes.
Press the or buttons to set the minutes.
Press the button again.
The time is now set.
9.2. Child lock
In order to activate the child lock, press the button and hold it down for approx. 3 seconds. You will hear a beep and the display will show the lock symbol. The microwave buttons will now have no function.
To deactivate the child lock, press and hold down the button again for 3 seconds until you hear a beep and the lock symbol disappears from the display. All
functions are now available again.
9.3. Setting the kitchen timer (countdown)
Press the button.
KT 00:00 will flash on the display.
Press the or buttons to set the desired time in minutes.
Press the or buttons to set the seconds.
The longest time that can be set is 95 minutes.
Press the button. The countdown starts. An acoustic signal will sound after the countdown has expired.

NOTE
In order to end the countdown prematurely, press the button.
The kitchen timer can only be used when there is no cooking programme running.
9.4. End of the cooking process
At the end of every cooking process, you will hear a number of beeps and END will be shown on the display. The cooking process is now finished. This message will also disappear from the display after a short period and the time will be shown again on the display. The interior lighting in the microwave will automatically switch on and off when the door is opened or closed.
CAUTION!
There is a risk of injury through burning on hot surfaces.
As the food or containers may be very hot, always use oven gloves or a protective cloth when removing food from the oven.
9.5. Interrupting a programme
If you want to turn or stir the food, for instance midway through the cooking process, it is often necessary to interrupt the programme.
- Open the door or press the button once to interrupt the programme. The remaining cooking time is still shown on the display.
Once you have closed the door again, press the button to resume the cooking process.
Press the button twice in order to prematurely stop the programme completely.
9.6. Cooking with microwaves
To cook with microwave energy alone, proceed as follows:
Press the ≈ button once or repeatedly to select the power output level as shown in the following table:
| Press the按钮 | Readout on the display | Output in watts |
| 1 x P 100 900 | ||
| 2 x P80 700 | ||
| 3 x P50 450 | ||
| 4 x P30 270 | ||
| 5 x P 10 90 |
Confirm your selection by pressing the button.
Press the
Start the cooking process by pressing the button.
9.7. Quick start
If you press the button without previously setting the power output level, the cooking programme will start 30 seconds at the maximum level (900 watts) in microwave mode.
The longest cooking time is 95 minutes.
Press the button repeatedly until the desired cooking time is displayed (each time the button is pressed it extends the cooking time by 30 seconds).
The cooking process starts immediately.
9.8. Grill mode
The grill function is particularly useful for thinly sliced meat, steaks, mince, kebabs, sausages or chicken pieces. It is also suitable for grilled sandwiches and gratins.
In grill mode, you can use the grill stand supplied for cooking suitable foods.
The longest grilling time is 95 minutes.
CAUTION!
There is a risk of fire due to the hot surfaces.
Note the minimum safe distances between the appliance and the wall, and under no circumstances cover the ventilation slots. Do not place any objects on the appliance.
Press the ≈ + button until 6 for grill mode is shown on the display.
Confirm your selection by pressing the button.
Press the
Press the button to start the heating process.

NOTE
After half of the time has elapsed, you should turn over the food to optimise the cooking process (see "9.5. Interrupting a programme" on page 174). Open the door and turn over the food. Then press the button again to continue with the cooking programme.
9.9. Combi mode: microwave and grill
The appliance can be operated in both microwave and grill modes together. The maximum cooking time for all programmes is 95 minutes.
Press the ≈ + button two or three times and select the programme option. The following programme options are available:
| Press the ≈+∞ button | Function/output in % Display | |
| 2 x Microwave (50%) and grill (100%) C1 H50 | ||
| 3 x Microwave (30%) and grill (100%) C2 H30 |
Confirm your selection by pressing the button.
Press the
Press the button to start the heating process.

NOTE
If required, open the door after about half of the set cooking time has elapsed and turn over the food to guarantee even cooking.
9.10. Defrosting according to weight
You can set the defrosting programme based on the weight of the food. Weights from 100g to 2000g can be set.
Place the frozen food in a suitable container into the oven and close the door.
Press the 3 button to start the appliance in defrosting mode according to weight.
and the weight will be shown on the display.
Press the or buttons to set the weight of the food.
Press the button. The programme starts.

NOTE
If required, open the door after about half of the time has elapsed and turn over the food to guarantee even defrosting.
9.11. Defrosting according to time
You can set the duration of the defrosting programme. The longest defrosting time is 95 minutes.
Place the frozen food in a suitable container into the oven and close the door.
Press the button to start the appliance in defrosting mode according to time.
TO 00.00 appears on the display.
Press the
Press the button. The programme starts.

NOTE
If required, open the door after about half of the time has elapsed and turn over the food to guarantee even defrosting.
9.12. Using multiple programmes
The appliance can carry out multiple programmes consecutively. Up to 2 programme sequences can be programmed to run automatically.
Set each cooking programme as described but only press the button when the last cooking programme has been set.
Example:
You want to defrost food with a defrosting programme and then subsequently start the grill programme.
- Set the defrosting programme as described in "9.10. Defrosting according to weight" on page 176 without subsequently pressing the button.
Then set the grill programme as described in "9.8. Grill mode" on page 175.
Now press the button to start the programmes.
Both programmes will now run consecutively.
9.13. Memory function
You can save three different processes consisting of two cooking programmes each.
Press the button once or repeatedly to select MEMORY1, MEMORY2 or MEMORY3.
Set the desired sequence of the two cooking programmes as described above.

NOTE
Only defrosting according to time is possible using the memory function.
Press the button to start the preselected programmes.
The last sequence saved for the memory spaces MEMORY1, MEMORY2 or MEMORY3 will run when the relevant memory space is selected.
Start the selected sequence MEMORY1, MEMORY2 or MEMORY3 by pressing the button.
9.14. Automatic cooking
In automatic cooking, it is not necessary to enter the cooking time or power output level. The microwave automatically works out the values depending on the food being cooked and its weight.
In the table, you can see an overview of the automatic programmes with the readout shown on the display.
| Programme Readout on the display | |
| 01 | Vegetables VEGETR3 |
| 02 | Drinks BEVERAG |
| 03 | Pasta PASTR |
| 04 | Popcorn POPCORN |
| 05 | Pizza PIZZR |
| 06 | Potatoes POTRTO |
| 07 | Meat MERT |
| 08 | Fish FISH |
9.14.1. Setting an automatic programme
In standby mode, press the MENU button once or repeatedly to select an automatic programme. Press the button to confirm the selection.
Now select the desired weight or amount. Press the or buttons here until the desired portion size is displayed. The weight/amount will be shown on the display. The amounts can be set in line with the following table:
| Programme Weight | |||
| 01% | Vegetables (g) | 200 | 300 |
| 400 | |||
| Programme Weight | ||||
| 02 | Drinks (120 ml contain- ers) | 1 container 2 conta- ainers 3 container | ||
| 03 | Pasta (g) | 50 g (+450 ml water) | 100 g (+800 ml water) | |
| 04 | Popcorn (g) | 50 85 100 | ||
| 05 | Pizza (g) | 200 400 | ||
| 06 | Potatoes (g) | 200 400 600 | ||
| 07 | Meat (g) | 250 350 450 | ||
| 08 | Fish (g) | 250 350 450 | ||
Press the button to start the cooking process.
The cooking programme will end automatically, END will be displayed and five beeps will sound.
If the food is not fully cooked, cook it for a few minutes more in microwave or grill mode. If you finish cooking using the grill function, the level of browning of the food will increase.

WARNING!
There is a risk of fire.
Do not leave the appliance unattended during operation.
- When using programmes including the grill mode, under no circumstances use lids or dishes that are not heatproof as these could melt or catch fire!
CAUTION!
There is a risk of injury through burning on hot surfaces.
After cooking in grill mode, the rotary plate is very hot.
- Therefore, always use oven gloves or a protective cloth when removing it from the oven.

NOTE
Please bear in mind that the size, form and sort of food can influence the cooking results.
9.14.2. Programme A-1: Vegetables
This programme uses microwave mode. Use a microwave-suitable container for heating the vegetables.
Place the vegetables in the container with a little water.
Place the container in the middle of the rotary plate.
- Select the vegetable programme by pressing the MENU button.
Press the button to confirm the selection.
Press the < or > buttons to set the weight of the vegetables (200-400 g).
Start the cooking programme for vegetables by pressing the button.
If the vegetables are not fully cooked after cooking, start another cooking process in microwave mode (as described from "9.6. Cooking with microwaves" on page 175).
9.14.3. Programme A-2: Drinks
This programme uses microwave mode. Use a microwave-suitable container for heating the drinks.
- Place the drink that you want to heat up on the rotary plate in the oven. If you place multiple containers in the microwave oven then please ensure that the containers are not touching each other.
- Select the drinks programme by pressing the MENU button repeatedly.
Press the button to confirm the selection.
Press the
- Start the cooking programme for drinks by pressing the button. If the drink/drinks is/are not hot enough, start another cooking process in microwave mode (as described from "9.6. Cooking with microwaves" on page 175).
9.14.4. Programme A-3: Pasta
This programme uses microwave mode.
When cooking pasta, use a high container otherwise there is a risk of overcooking. Use as much water as for conventional cooking.
Place the container holding the pasta in the middle of the rotary plate.
- Select the pasta programme by pressing the MENU button repeatedly.
Press the button to confirm the selection.
Press the or buttons to set the weight of the pasta (50-100 g).
Start the cooking programme for pasta by pressing the button.
If the pasta is still too hard after cooking, start another cooking process in microwave mode (as described from Page 175).
9.14.5. Programme A-4: Popcorn
This programme uses microwave mode.
Use standard popcorn packaging that is designed for producing popcorn in a mi
crowave.
Place the packaging onto the rotary plate.
- Select the popcorn programme by pressing the MENU button repeatedly.
Press the button to confirm the selection.
Press the < or > buttons to set the weight of the popcorn (50-100 g).
Start the cooking programme for popcorn by pressing the button.
If the popcorn has not completely popped after the cooking time has elapsed, start another cooking process in microwave mode (as described from "9.6. Cooking with microwaves" on page 175).
9.14.6. Programme A-5: Pizza
This programme uses both microwave and grill modes and is designed to reheat pizza.

ATTENTION!
Do not use any covers as the appliance operates in grill mode in this programme.
Place the pizza onto the rotary plate supplied.
- Select the pizza programme by pressing the MENU button repeatedly.
Press the button to confirm the selection.
Press the < or > buttons to set the weight of the pizza (200-400 g).
Start the cooking programme for pizza by pressing the button.
If the pizza is not hot enough after heating, start another cooking process in microwave mode (as described from "9.6. Cooking with microwaves" on page 175).
9.14.7. Programme A-6: Potatoes
This programme uses the microwave mode. Use a microwave-suitable container for heating the food. We recommend using unpeeled potatoes for cooking. Prick a few holes in the skins of the potatoes.
- Place the unpeeled potatoes in the container. Use potatoes that are, as far as possible, similarly sized. If possible, the potatoes should not touch each other.
Place the container in the middle of the rotary plate. - Select the potatoes programme by pressing the MENU button repeatedly.
Press the button to confirm the selection.
Press the < or > buttons to set the weight of the potatoes (200-600 g).
Start the cooking programme for potatoes by pressing the button.
If the potatoes are not fully cooked after cooking, start another cooking process in microwave mode (as described from "9.6. Cooking with microwaves" on page 175).
9.14.8. Programme A-7: Meat
This programme uses microwave mode. Use a microwave-suitable container.
- Place the meat on a plate that is suitable for microwave cooking. Season the meat as required. Place the plate in the middle of the rotary plate.
- Select the meat programme by pressing the MENU button repeatedly.
Press the button to confirm the selection.
Press the or buttons to set the weight of the meat (250-450 g).
Start the cooking programme for meat by pressing the button.
If the meat is not thoroughly cooked using this programme or you want to brown the meat, start another cooking process in the combi mode microwave + grill (as described from "9.9. Combi mode: microwave and grill" on page 176).

ATTENTION!
- Do not use any covers as the appliance operates in grill mode in this programme.

NOTE:
If you are cooking beef and you prefer your beef well-done, select a weight level that is higher than the actual weight of the food.
9.14.9. Programme A-8: Fish
This programme uses microwave mode. Use a microwave-suitable container.
- Place the fish on a plate that is suitable for microwave cooking. Season the fish as required. Place the plate in the middle of the rotary plate.
- Select the fish programme by pressing the MENU button repeatedly.
Press the button to confirm the selection.
Press the or buttons to set the weight of the fish (250-450 g).
Start the cooking programme for fish by pressing the button.
If the fish is not thoroughly cooked using this programme or you want to brown it, start another cooking process in the combi mode microwave + grill (as described from "9.9. Combi mode: microwave and grill" on page 176).

ATTENTION!
- Do not use any covers as the appliance operates in grill mode in this programme.
10. Cleaning and care

WARNING!
Risk of injury from electric shock.
- Switch the microwave off and pull the plug from the mains socket before cleaning.
Poor appliance hygiene can lead to damage to the surfaces, which in turn can reduce the lifespan of the appliance and even result in dangerous situations. Therefore, clean the microwave regularly and remove all remaining food.
- Keep the interior of the microwave clean. Wipe away splashes or spilled liquids that attach to the microwave walls with a damp cloth. A mild cleaning solution can be used for serious dirt. Do not use any abrasive cleaners or a sharp metal scraper for cleaning the viewing window on the appliance door because they can scratch the surface and destroy the glass.
- Do not use a steam cleaner. Surfaces could get damaged.
- The external surfaces should be cleaned with a damp cloth. In order to prevent damage to the microwave's internal operating parts, avoid allowing water to penetrate into the ventilation openings.
- Parts of the door, the viewing window, and especially the seal and the closing mechanism should be cleaned carefully with a mild detergent solution. Take great care not to damage these parts.
- Do not let the control panel get wet. Clean with a soft, damp cloth. When cleaning the control panel, leave the door of the microwave open to prevent the appliance being switched on by accident.
- If steam collects inside or on the external areas, wipe it away with a soft cloth.
- Steam may occur if the microwave is used with high humidity; this is normal.
- The glass rotating plate must be removed occasionally for cleaning. Wash the plate in warm water with a mild soap solution or in the dishwasher.
- Then dry the rotary plate thoroughly with a soft cloth.
- Simply wipe the floor of the microwave with a mild cleaning solution.
- Wash the grill rack where required in warm water with a mild soap solution. Allow stubborn dirt to soak for a few minutes.
- Lingering odours in the microwave can be removed by placing a glass of water with the juice and rind of a lemon into a deep container that is suitable for microwave use and heating for 5 minutes. Wipe out thoroughly and dry with a soft cloth.
- If you have to replace the light in the microwave, please contact a qualified specialist workshop or Medion Service.
11. End of operation
A number of beeps will sound when the cooking process is complete. Open the door and remove the cooked food. The time will be displayed and the appliance will now be in standby mode.
If you want to completely switch off the appliance or do not intend to use it for a long period of time, pull out the plug from the mains socket and store the appliance in a dry location.
12. Troubleshooting
| Problem Possible cause Solution | ||
| The appliance will not start | The mains plug is not properly inserted. | Pull out the plug, wait 10 seconds and then plug it back in again. |
| The fuse is blown or the power interrupter has tripped. | Replace the fuse or reset the power interrupter (contact our service centre to do this). | |
| The socket is defective. | Check the socket by plugging in another appliance. | |
| The appliance does not warm up. | The door is not closed. Close | Close the door. |
| The door will not open | The power supply has been interrupted | Restore the power supply. If necessary, use the suction opener to open the door. |
13. Disposal
Appliance
At the end of its life ensure that the appliance is disposed of in an environmentally appropriate manner. This may be a local collection point for old appliances. Seek the advice of your local authority about the local options for disposing of waste.
Before disposal cut off the cable.

Packaging
Your microwave is wrapped in packaging to protect it against transportation damage. Packaging materials are raw materials and can therefore be reused or recycled.
Technical data
Nominal voltage 230V 50Hz
Power output
Microwave: 1380 W
Grill: 1000 W
Nominal output voltage (microwave): 900 W
Microwave frequency: 2450 MHz
Dimensions (W x H x D) in cm
Appliance: 512 × 422 × 306 ~mm
Cooking area volume: 25 litres
Net weight: 11.6kg
Subject to technical modifications!
14. Declaration of conformity
CE
Medion AG hereby declares that the product MD 16752 conforms to the following European requirements:
EMC Directive 2004/108/EC
- Ecodesign Directive 2009/125/EC
RoHS Directive 2011/65/EU
Full declarations of conformity are available at www.medion.com/conformity.
15. Legal notice
Copyright © 2015
All rights reserved.
This operating manual is protected by copyright.
Mechanical, electronic and any other form of reproduction is prohibited without the written permission of the manufacturer
Copyright is owned by the company:
Medion AG
Am Zehnhof 77
45307 Essen
Germany
The operating manual can be reordered via the service hotline and is available for download via the service portal at www.medion.com/gb/service/start/.
You can also scan the QR code above and download the operating manual onto your mobile device via the service portal.
General Warranty Conditions

15.1. General information
The warranty period is 24 months and begins on the day the product is purchased. The warranty covers all types of material and product damage that could occur during normal use.
Please keep your original proof of purchase in a safe place. The warranty provider reserves the right to refuse to confirm the status of the warranty or to carry out a repair under warranty if a valid proof of purchase cannot be produced.
If it is necessary to return your device for repair, please ensure that it is suitably packaged for transportation. Unless otherwise specified, you shall bear the costs for sending the device and the transport risk. The warranty provider does not assume any liability for additional materials sent with the product that do not belong to the original package contents supplied with the product.
Please enclose as much information as possible about the fault when sending the device to the warranty provider. In order to make a valid claim under warranty and before returning the device, please contact the Service Hotline operated by the warranty provider or the Service Portal. They will provide you with information on how to proceed further.
This warranty has no effect on your statutory warranty rights and is subject to the laws of the country in which the first purchase of the product was made by the end customer.
15.1.1. Scope
In the event of a fault on your product that is covered by this warranty, the warranty provider guarantees to repair or replace the product. The decision about whether to repair or replace the device is taken by the warranty provider. Therefore, the warranty provider can at its own discretion decide to replace a device submitted for repair
under warranty with a refurbished device of the same quality.
No warranty is provided for batteries or rechargeable batteries or for consumable materials i.e. parts which have to be replaced at regular intervals during the normal use of the product e.g. video projector lamps.
A pixel error (permanently coloured, light or dark point in an image) is not generally considered a fault. Please refer to the information provided in the manual for this product for the precise number of permissible defects in the image.
The warranty provider gives no warranty for burnt-in images on plasma or LCD devices that result from the improper use of the device. Please refer to the information provided in the manual for this product for precise instructions on operating your plasma or LCD device.
The warranty does not cover errors relating to the playback of data media that have been created in an incompatible format or as a result of using unsuitable software. If it is discovered during the repair that the fault concerned is not covered under warranty, the warranty provider reserves the right to invoice the customer for the costs already incurred in the form of a flat-rate handling charge, as well as to charge the customer for the materials and labour required for the repair after submitting a cost estimate. You will be informed in advance as the customer about these repair charges; you are responsible for accepting or rejecting the repair process.
15.1.2. Exclusions
Malfunctions and damage to the device caused by external influences, accidental damage, improper use, changes made to the product, modifications, upgrades, the use of third-party parts, neglect, viruses or software faults, improper transport, improper packaging or loss during the return of the product are not covered by the warranty issued by the warranty provider.
The warranty will be invalidated if the fault to the device is caused by maintenance or repair carried out by someone other than a service partner authorized by the warranty provider. The warranty will also be invalidated if labels or serial numbers on the device or a component of the device have been modified or made illegible.
15.1.3. Service Hotline
Before sending the device to the warranty provider, you must contact us via the Service Hotline or the Service Portal. This ensures that you receive further information on how to make a valid claim under warranty.
The use of the hotline may be subject to a charge.
The Service Hotline should under no circumstances be considered a substitute for user training for software and hardware or reading the manual, nor does it provide support for third-party products.
15.2. Special warranty conditions for PC, notebook, pocket PC (PDA), devices with navigation functions (PNA), telephone devices, mobile telephones and devices with a memory function
Should any of the supplied options (e.g. memory cards, etc.) have a fault, you are entitled to a repair or replacement. The warranty covers material and labour costs for restoring the functionality of the product concerned.
The warranty can be invalidated if any damage to the product itself or the supplied options results from the addition of any hardware to your product that is not produced or distributed by the warranty provider.
A limited warranty is provided for supplied software. This applies to a pre-installed operating system and also to supplied programs. For software supplied with the device by the warranty provider, a warranty is issued that any data media, e.g. discs and CD-ROMs on which the software is supplied, shall be free from faults in terms of their materials and workmanship for a period of 90 days following purchase. In the event of a faulty data medium being supplied, the warranty provider shall replace the faulty data medium free of charge; any further claims are excluded. Excluding the warranty for data media, all software is supplied without warranty. Furthermore, it is not warranted that this software shall function without interruption or errors or that it will meet your requirements. In the case of map material supplied for a device with navigation functions, no warranty is provided for its completeness.
It may be necessary to delete all data from the device in order to repair it. Please ensure that you have a backup copy for all of the data on the device before sending back the device. We expressly point out that the factory settings will be restored in the event of a repair. The warranty provider assumes no liability for the cost of a software configuration, lost revenue, loss of data or software, or other consequential damages.
15.3. Special warranty conditions for repair on site or replacement on site
If there is an entitlement to on-site repair or replacement, the specific warranty terms and conditions for on-site repair or replacement shall apply to your product.
The following provisions must be ensured by you for carrying out repairs or replacements on site:
- Personnel from the warranty provider who arrive at your premises for the above-mentioned purpose must have unrestricted, safe and immediate access to the devices.
- Telecommunication facilities required by these personnel for the proper execution of your order, for testing and diagnostic purposes or for remedying faults must be provided by you at your own expense.
-
You shall be personally responsible for restoring your own application software after completion of the service by the warranty provider.
-
You shall be personally responsible for configuring and connecting any existing external devices after completion of the service by the warranty provider.
- The free cancellation period for repairs or replacements on site is at least 48 hours, thereafter we shall invoice you for any costs resulting from a late or missing cancellation.
16. Service Address
0333 3213106 01793 715716
(costs:local)
Mo - Fr: 08:00 - 20:00
Sa - Su: 10:00 - 16:00
www.medion.co.uk
@ Please use the contact form at www.medion.com/contact
MEDION


- Abmessungen (B x H x T) in cm
- Appareil
- Dimensions (I x H x P)/poids
- Kolofon
- Service-hotline
- About these instructions 157
- Package contents 158
- Proper use 158
- Safety information 159
- About microwaves 166
- Cooking and heating up in the microwave 167
- Overview of the appliance 170
- Before first use 172
- Operation 173
- About these instructions
- Symbols and key words used in these instructions
- DANGER!
- WARNING!
- CAUTION!
- ATTENTION!
- NOTICE!
- Package contents
- Proper use
- Safety information
- Risk of injury due to improper handling.
- Unpacking the appliance
- Risk of suffocation.
- Risk of injury from electric shock or microwave radiation.
- General safety instructions
- IMPORTANT
- Risk of damage to the appliance due to improper installation.
- Hot surfaces
- Risk of injury through burning on hot surfaces.
- WARNING! There is a risk of explosion.
- WARNING! Risk of fire due to very hot surfaces on the appliance.
- WARNING! Risk of fire due to very high temperatures.
- Special safety instructions for handling microwaves
- Risk of injury due to bursting containers.
- Risk of injury through burning.
- Risk of damage to the appliance.
- Safety information for heating liquids
- Cleaning and caring for the appliance
- IMPORTANT Risk of damage to the appliance.
- About microwaves
- Inverter technology
- The effect of microwaves on foodstuffs
- The microwave oven
- Cooking and heating up in the microwave
- General notes
- There is a risk of fire.
- Microwave-suitable materials
- Suitable materials
- Risk of fire due to very high temperatures.
- Materials that are partially suitable
- Overview of suitable materials
- Size and shape of microwave-suitable containers
- Unsuitable materials
- Metal in the cooking space can lead to sparks! These can damage the appliance or the viewing window!
- NOTE
- Overview of the appliance
- Description of parts
- Controls
- Setting up the appliance
- Heating the appliance while empty
- Inserting accessories
- Operation
- Setting the clock time
- Child lock
- Setting the kitchen timer (countdown)
- End of the cooking process
- There is a risk of injury through burning on hot surfaces.
- Interrupting a programme
- Cooking with microwaves
- Quick start
- Grill mode
- There is a risk of fire due to the hot surfaces.
- Combi mode: microwave and grill
- Defrosting according to weight
- Defrosting according to time
- Using multiple programmes
- Example:
- Memory function
- Automatic cooking
- Setting an automatic programme
- Programme A-1: Vegetables
- Programme A-2: Drinks
- Programme A-3: Pasta
- Programme A-4: Popcorn
- crowave.
- Programme A-5: Pizza
- Programme A-6: Potatoes
- Programme A-7: Meat
- NOTE:
- Programme A-8: Fish
- Cleaning and care
- Risk of injury from electric shock.
- End of operation
- Troubleshooting
- Disposal
- Appliance
- Packaging
- Technical data
- Power output
- Dimensions (W x H x D) in cm
- Declaration of conformity
- CE
- Legal notice
- Germany
- General information
- Scope
- Exclusions
- Service Hotline
- Special warranty conditions for PC, notebook, pocket PC (PDA), devices with navigation functions (PNA), telephone devices, mobile telephones and devices with a memory function
- Special warranty conditions for repair on site or replacement on site
- Service Address
- MEDION
Brand : MEDION
Model : MD 16752
Category : Microwaves