Watch & Care V90 - Baby monitors AUDIOLINE - Free user manual and instructions
Find the device manual for free Watch & Care V90 AUDIOLINE in PDF.
User questions about Watch & Care V90 AUDIOLINE
0 question about this device. Answer the ones you know or ask your own.
Ask a new question about this device
Download the instructions for your Baby monitors in PDF format for free! Find your manual Watch & Care V90 - AUDIOLINE and take your electronic device back in hand. On this page are published all the documents necessary for the use of your device. Watch & Care V90 by AUDIOLINE.
USER MANUAL Watch & Care V90 AUDIOLINE
Operating Instructions
Mode d'emploi
Istruzioni d'uso
Watch & Care V90
D
GB
FR
IT
Bedienelemente 2
Operating Elements 2
Starting Up 3
Checking the package contents 3
Putting the receiver into service 3
Installing the battery 3
Operating with a power adapter plug 4
Charging the battery 4
4. Putting the transmitter into service 4
Operating the Transmitter 5
Switching the transmitter on/off 5
Aligning the transmitter 5
Night vision 5
Setting the loudspeaker volume 5
Operating the Receiver 6
Switching the receiver on/off 6
Display icons 6
Turn on or off the screen / Video/Audio switching 6
Intercom function 6
Setting the volume 6
Setting the zoom 6
Setting the brightness 7
Setting the sound sensitivity 7
Setting the sound activation 7
Selecting the transmitter (camera) 7
Putting an additional transmitter (camera) into service 7
Appendix 8
Safety Information 8
Intended use 8
Installation location and safety information 8
Power adapter plug 8
Rechargeable batteries 9
Medical equipment 9
Disposal 9
Helpline 9
Troubleshooting guide - Problems and solutions 9
Declaration of conformity 10
Maintenance 10
Technical data 11
Guarantee 11
GB
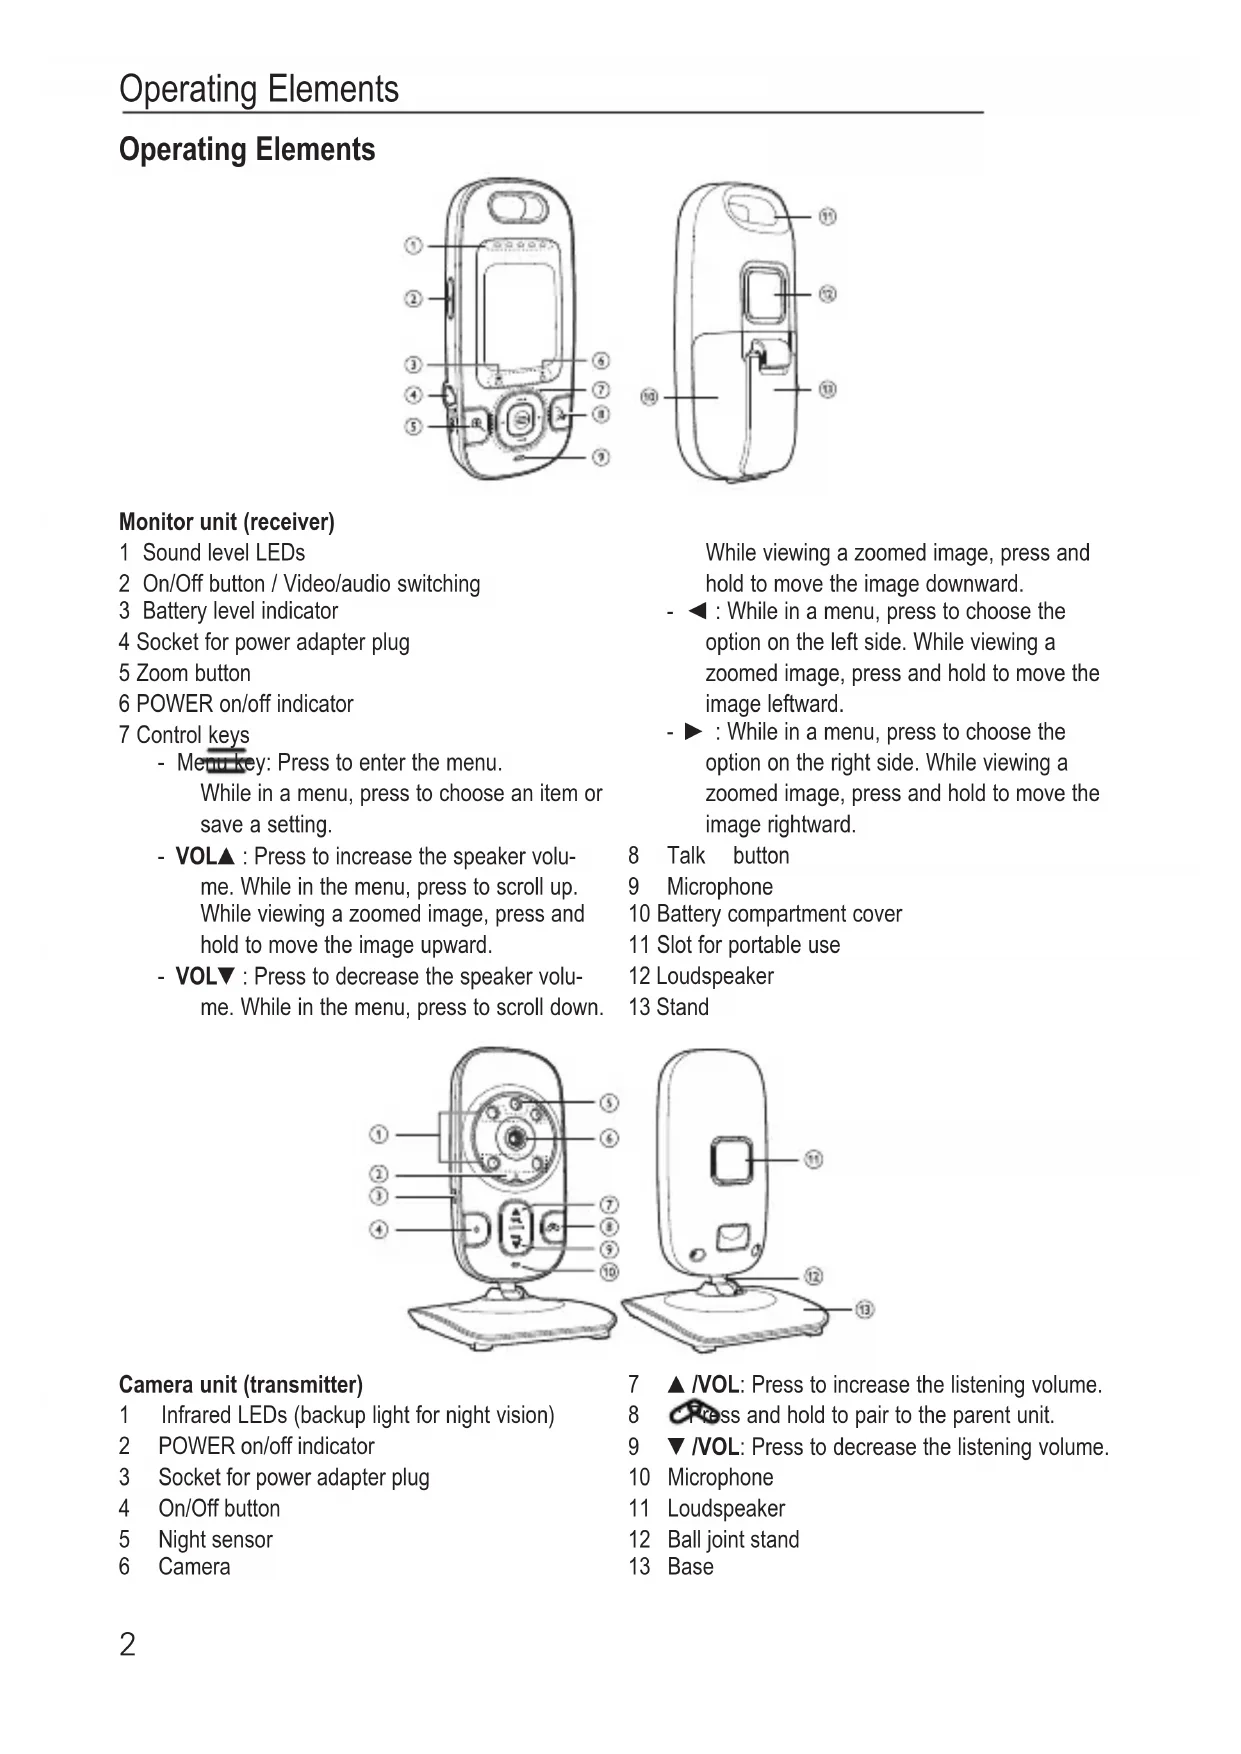
Operating Elements
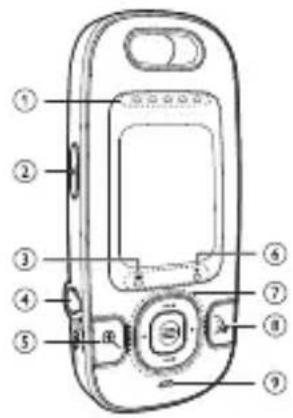

Monitor unit (receiver)
1 Sound level LEDs
2 On/Off button / Video.audio switching
3 Battery level indicator
4 Socket for power adapter plug
5 Zoom button
6 POWER on/off indicator
7 Control keys
- Menu key: Press to enter the menu. While in a menu, press to choose an item or save a setting.
- VOLA : Press to increase the speaker volume. While in the menu, press to scroll up. While viewing a zoomed image, press and hold to move the image upward.
- VOL: Press to decrease the speaker volume. While in the menu, press to scroll down.
While viewing a zoomed image, press and hold to move the image downward.
- : While in a menu, press to choose the option on the left side. While viewing a zoomed image, press and hold to move the image leftward.
- : While in a menu, press to choose the option on the right side. While viewing a zoomed image, press and hold to move the image rightward.
8 Talk button
9 Microphone
10 Battery compartment cover
11 Slot for portable use
12 Loudspeaker
13 Stand
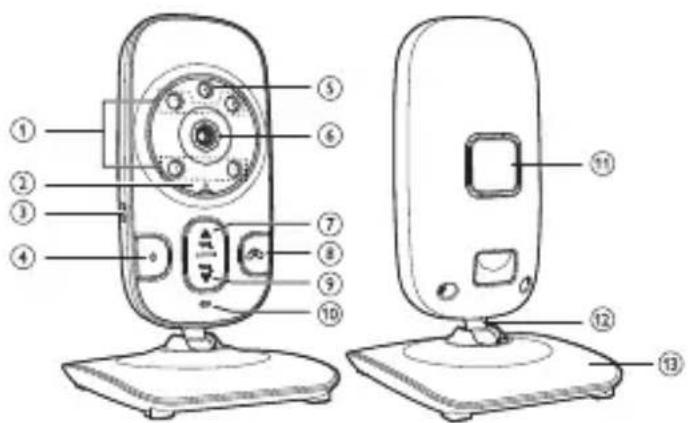
Camera unit (transmitter)
1 Infrared LEDs (backup light for night vision)
2 POWER on/off indicator
3 Socket for power adapter plug
4 On/Off button
5 Night sensor
6 Camera
7 VOL: Press to increase the listening volume.
8 Press and hold to pair to the parent unit.
9 VOL: Press to decrease the listening volume.
10 Microphone
11 Loudspeaker
12 Ball joint stand
13 Base
Starting Up
Important: please make sure you've read the safety information on page 8 before you set up your system.
Checking the package contents
The package contains:
1 Monitor unit (receiver) 1 Camera unit (transmitter)
1 Rechargeable battery pack for the receiver 1 Power adapter plug for the transmitter
1 Power adapter plug for the receiver 1 Operating manual
Putting the receiver into service
You can power up the parent unit by connecting it to AC power or to the rechargeable battery provided. Even if the parent unit is connected to AC power, it is recommended you also install the battery. This guarantees continual operation in case of a power outage.
Installing the battery
Install the battery as shown below. Only use the rechargeable battery pack supplied or similar ones.
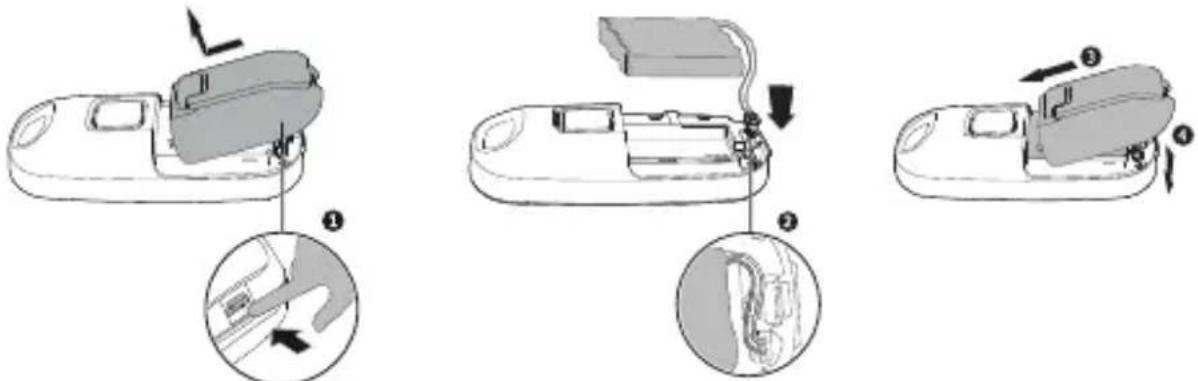
1 Push the detent of the battery compartment cover and lift the cover to open.
2 Plug the battery connector securely into the socket.
The connector is polarized.
Arrange the battery wire to avoid it obstructing the battery cover when closing.
3 Align the battery compartment cover against the battery compartment.
4 Push the battery compartment cover down and click into place.
The battery pack charges directly in the device when the AC adapter is connected.
While charging, the battery icon lights up. When the battery has very little charge, the battery icon flashes. The battery must be charged.
The battery icon goes off when the battery is fully charged.
As operation time is limited by battery power, wherever possible operate the device using the power supply.
Note: During long periods of disuse, remove the battery from the device in order to prevent any leakage from the battery.
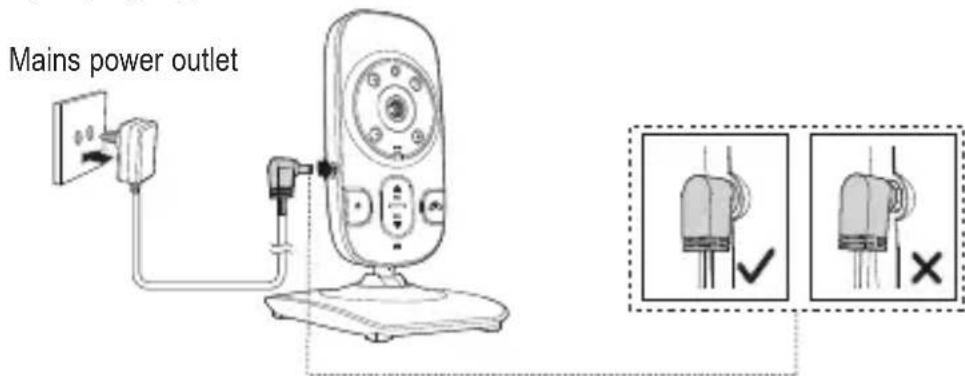
Operating with a power adapter plug
Connect the receiver as illustrated in the diagram. For safety reasons, only use the power adapter plug supplied.

Charging the battery
Once you have connected the parent unit and installed its battery, press the On/Off button to turn it on. The battery icon in the display indicates the battery status.
No battery is installed but operates using AC power, or the battery has been installed incorrectly.
- Install the battery. Charge without interruption (at least 30 minutes).
The battery has very little charge.
- Charge without interruption (at least 30 minutes).
The battery is fully charged.
Note:
- The battery is fully charged after 12 hours of continuous charging.
- It takes longer to charge the battery when the parent unit is turned on.
- The standby time varies depending on the sensitivity level you set, your actual use and the age of the battery..
Putting the transmitter into service
Connect the transmitter (camera) as illustrated in the diagram. For safety reasons, only use the power adapter plug supplied.
Operating the Transmitter
Check the transmitter and receiver are working properly each time before the equipment is put into operation.
Switching the transmitter on/off
Press and hold the On/Off button for approx. 3 seconds.
The POWER on/off indicator will flash until the connection to the receiver is established. Then the LED will light constantly.
To switch the unit off, press and hold the On/Off button for approx. 3 seconds.
Aligning the transmitter
Attention: Position the transmitter with a minimum distance of 1 m to other electronic devices, otherwise there is a risk of mutual disturbance. Point the upper section of the transmitter towards the baby or object you want to monitor. Check that the baby or object is suitably displayed on the receiver.
Night vision
The transmitter is equipped with infrared diodes. This enables the transmission of pictures from areas which are not illuminated. The night vision function is activated automatically when the light conditions make it necessary.
When the night-time vision function is activated, the screen display on the receiver turns to black and white.
Setting the loudspeaker volume
You can adjust the volume of the voice playback in your baby's room on the transmitter (camera) Press /VOL to increase the volume or /VOL to decrease the volume.
Operating the Receiver
Attention: Position the transmitter with a minimum distance of 1 m to other electronic devices, otherwise there is a risk of mutual disturbance. Point the upper section of the transmitter towards the baby or object you want to monitor. Check that the baby or object is suitably displayed on the receiver.
Switching the receiver on/off
Press and hold the On/Off button for approx. 3 seconds.
The POWER on/off indicator will flash until the connection to the transmitter (camera) is established.
Then the LED will light constantly and you will see the picture on the screen.
To switch the unit off, press and hold the On/Off button for approx. 3 seconds.
Display icons
Connection status: The more bars that are displayed, the better the connection is.
- The link between the transmitter and the receiver is lost.
- The receiver is searching for a transmitter.
Current view status (x = Number of the transmitter that is being viewed: 1...4).
The camera has zoomed in.
Volume is turned off.
Sound activation is on.
Battery status.
Turn on or off the screen / Video/Audio switching
You can turn on or off the parent unit screen without powering off the parent unit to save battery power. You can still hear sound from the baby unit.
Press the On/Off button briefly.
For switching the display on again press the On/Off button again briefly.
Intercom function
Press and hold the Talk button. The speaker on the transmitter (camera) is turned on and you can talk to your child or anybody else who is in the same room as the camera. While the Talk button is being pressed, you cannot hear any noise from the baby's room.
Setting the volume
Press VOL▲ to increase the volume or VOL▼ to decrease the volume. If the volume is set to “zero” the display shows
Setting the zoom
Press to zoom in on the image. Press and hold to move the selection: VOL (up), VOL (down), (to the left) or (to the right). Press again to deactivate the zoom function.
Setting the brightness
Press the Menu key.
Press VOL or VOL to select
Press or to select the desired brightness.
Press the Menu key.
Setting the sound sensitivity
You can adjust the microphone sensitivity of the transmitter. The higher the sensitivity level, the more sensitive the transmitter is in detecting sounds for transmitting to the receiver.
Press the Menu key.
Press VOL or VOL to select
Press (\triangleleft) or (\triangleright) to select the desired sensitivity (highest sensitivity level: (\nmid \text{一} \mid \cdot \cdot \cdot \cdot \cdot \cdot \cdot \cdot \cdot \cdot \cdot \cdot \cdot \cdot \cdot \cdot \cdot \cdot \cdot \cdot \cdot \cdot \cdot \cdot \cdot \cdot \cdot \cdot \cdot \cdot \cdot \cdot \cdot \cdot
Press the Menu key.
Note that when the highest sensitivity level (5) is selected then this will override the sound activation function and the screen on the parent unit will remain active continuously.
The default setting is level 4.
Setting the sound activation
The receiver continuously monitors the sound level in your baby's room. When the sound activation mode is on, the receiver screen turns on when the transmitter detects a sound.
As long as no sound is detected within 50 seconds, the receiver screen is off to save power. When your baby starts to cry, the sound activation triggers the receiver screen automatically turns on.
Press the Menu key.
Press VOL or VOL to select
Press or to switch the sound activation on () or off (×) .
Press the Menu key.
Selecting the transmitter (camera)
If two or more transmitters (cameras) are registered to your receiver, you can select the active cameraor start automatic switching (Patrol Mode).
Press the Menu key.
Press VOL or VOLV to select
Press or to change the active camera (1, 2, 3 or 4) or start the Patrol Mode (4). If you select
Patrol Mode to view the images, the screen switches to view another transmitter automatically after some time. The switching is in chronological order: 1...4.
Press the Menu key.
Putting an additional transmitter (camera) into service
The receiver allows you the possibility to register up to four transmitters (cameras) simultaneously, and to manually change or automatically switch between them.
The delivered camera is already registered with your receiver.
Press Menu/Select.
Press VOL or VOL to select ^+ and press the Menu key.
Follow the full instructions that accompany your new transmitter (camera).
Appendix
Safety Information
Please read this operating instruction manual thoroughly.
Intended use
The surveillance system has been developed to monitor rooms. The transmitter sends acoustic and video signals from its point of installation to the receiver. Any other use is considered unintended use. The use of this equipment does not substitute personal supervision, e.g. of a child. Users are not relieved of their personal liability. Unauthorized modification or reconstruction is not permitted. Under no circumstances open the device or complete any repair work yourself.
Installation location and safety information
- Never lay the transmitter in a baby's/child's bed or playpen.
- Ensure that the transmitter and power cable are out of reach of babies/children, i.e. they are at least one meter away.
- Pay attention that the components are sufficiently well-ventilated when in operation. Do not lay a cushion, towel or such over the devices.
- The devices are not intended for medical purposes. Warning and signal tones from respiratory or heartbeat monitoring equipment are not transmitted.
- The installation location plays a decisive role in ensuring proper operation. Therefore, maintain a distance of at least one meter from other electronic equipment, such as microwave ovens or hi-fi devices, otherwise they could cause mutual interference/faults.
- Prevent excessive exposure to smoke, dust, vibration, chemicals, moisture, heat and direct sunlight. Do not use the equipment in potentially explosive areas.
Power adapter plug
Attention: Only use the power adapter plugs contained in the material supplied since other power adapter plugs could damage the surveillance system. Ensure access to the power adapter plug is not obstructed by furniture or such.
When using the equipment with a power adapter plug, pay attention that the plug and cable are in perfect condition. Kinked or worn cable represents the risk of a fatal accident!
The power adapter plug supplied fulfils the ecodesign requirements of the European Union (Directive 2005/32/EC). This means that, both in an operating state and in an idling state, the power consumption is considerably lower compared to power adapter plugs with an older design.

Energiesparend
Ecoenomert License
Arispargnol
Energy efficient
Rechargeable batteries
Attention: Never throw batteries into a fire. Only use batteries of the same type! Pay attention to correct polarity.
Medical equipment
Attention: Never use the devices in the vicinity of medical equipment. Effects on such equipment cannot be fully ruled out.
Disposal
In order to dispose of your device, take it to a collection point provided by your local public waste authorities (e.g. recycling centre). According to laws on the disposal of electronic and electrical devices, owners are obliged to dispose of old electronic and electrical devices in a separate waste container. The adjacent symbol indicates that the device must not be disposed of in normal domestic waste!
Batteries represent a hazard to health and the environment! Never open, damage or swallow batteries or allow them to pollute the environment. They may contain toxic, ecologically hazardous heavy metals. You are legally obliged to dispose of power packs and batteries at the point of sale or in the corresponding containers provided at collection points provided by local public waste authorities. Disposal is free of charge. The adjacent symbols indicate that the batteries must not be disposed of in normal domestic waste and must be brought to collection points provided by local public waste authorities.
Packaging materials must be disposed of according to local regulations.

Helpline
Should problems arise with the device, please refer to the following information first. In the case of technical problems, contact our Hotline. Please refer to our website www.audioline.de for the telephone number.
In the case of claims under the terms of guarantee, contact your sales outlet. There is a 2 year period of guarantee.
Troubleshooting guide - Problems and solutions
Equipment does not function
- Transmitter and/or receiver are not switched on.
- The battery pack is empty or defective.
- The power adapter plugs are not connected.
No reception
- Transmitter and receiver are not registered.
- Transmitter is too far from object being monitored, e.g. baby. Observe the minimum distance of one meter.
The receiver and transmitter are too far apart.
The sound sensitivity is set too low.
Reception interference
- The receiver and transmitter are too far apart.
- The battery power is too low.
- Other electronic devices are causing interference in the field of transmission.
Howling or squealing noise (acoustic feedback)
- Increase the distance between receiver and transmitter.
- Reduce the volume on the receiver.
Noise
- The battery power is too low.
Picture but no sound transmission
Volume setting is too low.
Picture is in black and white
The night vision function is active.
The battery pack in the receiver is not charged
- The power adapter plug is not connected.
Declaration of conformity

This device fulfils the requirements stipulated in the EU directive:
1999/5 EU directive on radio equipment and telecommunications terminal
equipment and the mutual recognition of their conformity.
Conformity with the above mentioned directive is confirmed by the CE symbol on the device.
To view the complete Declaration of Conformity, please refer to the free download available on our website www.audioline.de
Maintenance
- Clean the housing surfaces with a soft, fluff-free cloth.
- Never use cleaning agents or solvents.
Technical data
Camera (transmitter) Socket: 6 V DC
Sensor: 1 night light sensor
IR diodes: 4
Monitor (receiver) Screen: 2" LC colour display / 176 x 220 px
Socket: 6 V DC
Power supply (receiver) Power adapter plug,
input: 100-240 VAC, 50-60Hz, 150 mA
output: 6 VDC, 600 mA
or NiMh battery pack 3.6 Volt
Initial charging time for battery Up to 16 h
Power supply (transmitter) Power adapter plug,
input: 100-240 VAC, 50-60Hz, 150 mA
output: 6 VDC, 600 mA
Range Up to 300 meters under optimum conditions. Range is
reduced in buildings through walls, doors etc.
Frequency range 2407.5 - 2475 MHz
Permissible ambient temperature 0^ to 40^
Guarantee
AUDIOLINE equipment is produced and tested according to the latest production methods. Carefully selected materials and highly developed technology ensure perfect functioning and a long service life. The terms of guarantee do not apply to the batteries or power packs used in the products. The period of guarantee is 24 months from the date of purchase.
All deficiencies related to material or manufacturing errors within the period of guarantee will be redressed free of charge. Rights to claims under the terms of guarantee are annulled following tampering by the purchaser or third parties. Damage caused as the result of improper handling or operation, incorrect positioning or storage, improper connection or installation or Acts of God and other external influences are excluded from the terms of guarantee. In the case of complaints, we reserve the right to repair defect parts, replace them or replace the entire device. Replaced parts or devices become our property. Rights to compensation in the case of damage are excluded where there is no evidence of intent or gross negligence by the manufacturer.
If your device does show signs of a defect within the period of guarantee, please contact the sales outlet where you purchased the AUDIOLINE device, producing the purchase receipt as evidence. All claims under the terms of guarantee in accordance with this agreement can only be asserted at the sales outlet. No claims under the terms of guarantee can be asserted after a period of two years from the date of purchase and hand-over of the product.
entree:100-240VAC,50-60Hz,150mA
sortie:6VDC,600mA
entree:100-240VAC,50-60Hz,150mA
sortie:6VDC,600mA
In the event of technical problems, you can contact our hotline service.
For the telephone number please refer to our website www.audioline.de.