AHX13BE - Air conditioner SHARP - Free user manual and instructions
Find the device manual for free AHX13BE SHARP in PDF.



| Brand | Sharp |
| Model | AHX13BE |
| Product type | Split air conditioner (indoor and outdoor units) |
| Main functions | Cooling, ventilation, dehumidification (DRY mode), auto mode |
| Cooling capacity | Not specified (refer to rating plate) |
| Power supply | 230 V / 50 Hz |
| Maximum current | 9 A (setting H) / 7 A (setting L) |
| Remote control | Yes, with LCD display and range of 7 meters |
| Timer | Programmable on/off timer in 10-minute steps, 1-hour off timer |
| Full Power function | Yes (Full Power) for rapid cooling |
| Air flow direction | Motorized vertical (auto swing or fixed position), manual horizontal |
| Air filter | Washable filters, cleaning recommended every 2 weeks |
| Air purification filter (optional) | Type AZ-F900B, lifespan 3 to 6 months |
| Safety | Grounding mandatory, leakage circuit breaker recommended, automatic shutdown in case of anomaly |
| Maintenance and cleaning | Clean filters with warm water and mild detergent, wipe the unit with a soft cloth |
| Repairability | Have installation, disassembly and repair done by a qualified technician |
| Package contents | Indoor unit, outdoor unit, remote control, batteries, user manual |
| Weight | Not specified |
| Dimensions | Not specified |
Frequently Asked Questions - AHX13BE SHARP
User questions about AHX13BE SHARP
0 question about this device. Answer the ones you know or ask your own.
Ask a new question about this device
Download the instructions for your Air conditioner in PDF format for free! Find your manual AHX13BE - SHARP and take your electronic device back in hand. On this page are published all the documents necessary for the use of your device. AHX13BE by SHARP.
USER MANUAL AHX13BE SHARP
Thank you for purchasing a SHARP air conditioner. Please read this manual carefully before operating the product.
CONTENTS
PRECAUTIONS E-1
- ADDITIONAL NOTES ON OPERATION ....E-3
TIPS ON SAVING ENERGY E-3
PART NAMES.. E-4
- USING THE REMOTE CONTROL E-6
BASIC OPERATION E-8
ADJUSTING THE AIR FLOW DIRECTION.E-10
FULL POWER OPERATION E-11
- ONE-HOUR OFF TIMER E-11
- TIMER OPERATION. E-12
AUXILIARY MODE E-14 - POWER SELECTOR E-14
- OPTION KIT. E-14
MAINTENANCE E-15
BEFORE CALLING FOR SERVICE ... E-16
PRECAUTIONS
WARNING FOR USE
1 Do not pull or deform the power supply cord. Pulling and misuse of the power supply cord can result in damage to the unit and cause electrical shock.
2 Be careful not to expose your body directly to the outlet air for a long time. It may affect your physical conditions.
3 When using the air conditioner for infants, children, elderly, bedridden, or disabled people make sure the room temperature is suitable for those in the room.
4 Never insert objects into the unit. Inserting objects can result in injury due to the high speed rotation of internal fans.
5 Ground the air conditioner without fail. Do not connect the grounding wire to gas pipe, water pipe, lightning rod or telephone grounding wire. Incomplete grounding may cause electric shock.
If anything is abnormal with the air conditioner (ex. a burning smell), stop the operation immediately and turn the circuit breaker OFF.
7 Follow local rules and regulations for power supply cord cabling. Improper cable connection can cause the power supply cord, plug and the electrical outlet to overheat and cause fire.
Use only the manufacture-specified power cord for replacement. Replacement should be performed by a qualified technician or a service person.
WARNING FOR INSTALLATION / REMOVAL / REPAIR
- Do not attempt to install/remove/repair the unit by yourself. Incorrect work will cause electric shock, water leak, fire etc. Consult your dealer or other qualified service personnel for the installation/removal/repair of the unit.

This equipment complies with the requirements of Directives 89/336/EEC and 73/23/ EEC as amended by 93/68/EEC.
PRECAUTIONS
CAUTIONS FOR USE
1 Open a window or door periodically to ventilate the room, especially when using gas appliances. Insufficient ventilation may cause oxygen shortage.
2 Do not operate the buttons with wet hand. It may cause electric shock.
3 For safety, turn the circuit breaker off when not using the unit for an extended period of time.
4 Check the outdoor unit mounting rack periodically for wear and to make sure it is firmly in place.
5 Do not put anything on the outdoor unit nor step on it. The object or the person may fall down or drop, causing injury.
6 This unit is designed for residential use. Do not use for other applications such as in a kennel or greenhouse to raise animals or grow plants.
7 Do not place a vessel with water on the unit. If water penetrates into the unit, electrical insulations may deteriorate and cause electric shock.
8 Do not block the air inlets nor outlets of the unit. It may cause insufficient performance or troubles.
9 Be sure to stop the operation and turn the circuit breaker off before performing any maintenance or cleaning. A fan is rotating inside the unit and you may get injured.
10 Do not splash or pour water directly on the unit. Water can cause electrical shock or equipment damage.
11 This appliance is not intended for use by young children or infirm persons without supervision. Young children should be supervised to ensure that they do not play with the appliance.
CAUTIONS FOR LOCATION / INSTALLATION
- Make sure to connect the air conditioner to power supply of the rated voltage and frequency.
Use of a power supply with improper voltage and frequency can result in equipment damage and possible fire. - Do not install the unit in a place where inflammable gas may leak. It may cause fire.
Install the unit in a place with minimal dust, fumes and moisture in the air. - Arrange the drain hose to ensure smooth drainage. Insufficient drainage may cause wetting of the room, furniture etc.
- Make sure a leak breaker or a circuit breaker is installed, depending on the installation location, to avoid electrical shock.
ADDITIONAL NOTES ON OPERATION
D.B. = Dry-bulb
W.B. = Wet-bulb
The built-in protective device may prevent the unit from operating when used out of this range.
- Condensation may form on the air outlet if the unit operates continuously in the COOL or DRY mode when humidity is over 80 percent.
WHEN POWER FAILURE OCCURS
This air conditioner has a memory function to store settings when a power failure occurs.
After power recovery, the unit will automatically re-start in the same settings which were active before the power failure, except for timer settings.
If the timers were set before a power failure, they will need to be re-set after power recovery.
NOTES FOR MODELS AY-X08BE/AY-X10BE/AY-X13BE
PREHEATING FUNCTION
In the HEAT operation, the indoor fan may not start for two to five minutes after the unit is turned on to prevent cold air from blowing out of the unit.
DE-ICING FUNCTION
- When ice forms on the heat exchanger in the outdoor unit during the HEAT operation, an automatic de-icer provides heat for about 5 to 10 minutes to remove the ice. During de-icing, the inside and outside fans stop operating.
- After de-icing is completed, the unit automatically resumes operation in the HEAT mode.
HEATING EFFICIENCY
- The unit employs a heat pump that draws heat from the outside air and releases it into the room. The outside air temperature therefore greatly affects the heating efficiency.
- If the heating efficiency is reduced due to low outside temperatures, use an additional heater.
It takes time to warm up and heat the entire room because of the forced air circulation system.
TIPS ON SAVING ENERGY
Below are some simple ways to save energy when you use your air conditioner.
SET THE CORRECT TEMPERATURE
- Setting the thermostat 1^ higher than the desired temperature in the COOL mode (and 2^ lower in the HEAT mode with models AY-X08BE/AY-X10BE/AY-X13BE) will save approximately 10 percent in power consumption.
- Setting the temperature lower than necessary during cooling operation will result in increased power consumption.
BLOCK DIRECT SUNLIGHT AND PREVENT DRAFTS
- Blocking direct sunlight during cooling operation will reduce power consumption.
- Close the windows and doors during cooling operation (and heating operation with models AY-X08BE/AY-X10BE/AY-X13BE).
SET PROPER AIR FLOW DIRECTION TO OBTAIN THE BEST AIR CIRCULATION
KEEP FILTER CLEAN TO ENSURE THE MOST EFFICIENT OPERATION MAKE MOST OF THE TIMER OFF FUNCTION
DISCONNECT THE POWER CORD WHEN THE UNIT IS NOT USED FOR AN EXTENDED PERIOD OF TIME
- The indoor unit still consumes a small amount of power when it is not operating.

INDOOR UNIT
① Inlet(Air)
② Open Panel
③ Air Filters
④ POWER SELECTOR SWITCH (only for AY-X13BE/AH-X13BE)
⑤ AUX. Button
⑥ RECEIVER Window
⑦ Power Supply Cord
⑧ Indicator Panel
⑨ Vertical Adjustment Louvres
⑩ Horizontal Adjustment Louvres
① Outlet (Air)
Remote Control
⑬ POWER MONITOR
⑭ TEMPERATURE INDICATOR
OUTDOOR Temp. Lamp (green
ROOM Temp. Lamp (green
⑰ TIMER Lamp (orange)
18 OPERATION Lamp (red)
OUTDOOR UNIT

NOTE: Actual units might vary slightly from those shown above.
19 Inlet(Air)
20 Refrigerant Tube and Interconnecting Cord
② Drainage Hose
② Outlet(Air)

REMOTE CONTROL
① TRANSMITTER
② DISPLAY (Liquid Crystal Display)
(3) THERMO. (Thermostat) Button
④ FULL POWER OPERATION Button
⑤ DISPLAY Button
⑥ ON/OFF Button
⑦ MODE Button
FAN Button
⑨ TIMER OFF Button (for setting the timer)
⑩ SWING Button
⑪ ONE-HOUR OFF TIMER Button
⑫ TIMER SET/CANCEL Button
⑬ TIMER ON Button (for setting the timer)
④ TIME ADVANCE Button
⑤ CLOCK Button
⑥ Indicates BATTERY COMPARTMENT is below this mark
⑦ TIME REVERSE Button
(The heat mode symbol S provided only on models AY-X08BE/AY-X10BE/AY-X13BE)
L.C.D. REMOTE CONTROL DISPLAY
THERMOSTAT SETTING FOR AUTO AND DRY MODES
⑨ TEMPERATURE SYMBOL
② TRANSMITTING SYMBOL
② MODE SYMBOLS

: AUTO : DRY


:HEAT:FAN ONLY (only for AY-X08BE/ AY-X10BE/AY-X13BE)


:COOL
2 TEMPERATURE INDICATOR
23 FULL POWER OPERATION MODE SYMBOL
24 FAN SPEED SYMBOLS

:AUTO:LOW


:HIGH:SOFT

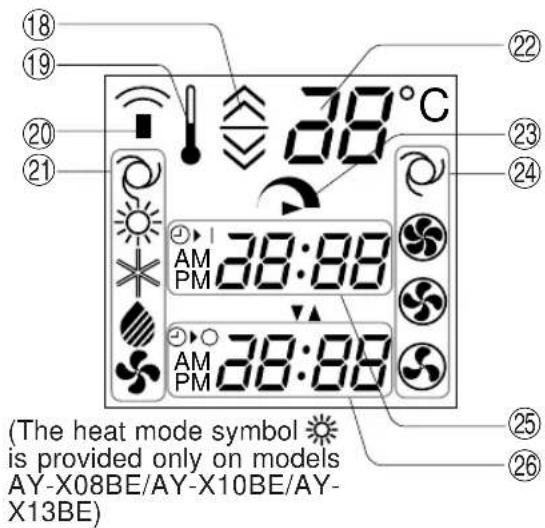
② TIMER ON INDICATOR/CLOCK Indicates the on timer preset time current time.
② TIMER OFF INDICATOR Indicates the preset time for off timer or one-hour off timer.
LOADING BATTERIES Use two size-AAA (R03) batteries.
1 Remove the remote control cover.
2 Insert batteries in the compartment, making sure the and polarities are correctly aligned.
- The display indicates "AM 6:00" when batteries are properly installed.
3 Reinstall the cover.

NOTES:
- The battery life is approximately one year in normal use.
- When you replace the batteries, always change both batteries, and make sure they are the same type.
- If the remote control does not operate properly after replacing the batteries, take out the batteries and reinstall them again after 30 seconds.
- If you will not be using the unit for a long time, remove the batteries from the remote control.
HOW TO USE THE REMOTE CONTROL
Point the remote control towards the unit's signal receiver window and press the desired button. The unit generates a beep when it receives the signal.
Make sure there is no curtain or other object between the remote control and the unit.
- The remote control can send signals from up to 7 metres away.


CAUTION
- Do not allow the signal receiver window to receive strong direct sunlight, since it can adversely affect its operation. If the signal receiver window is exposed to direct sunlight, close a curtain to block the light.
- Using a fluorescent lamp with a quick starter in the same room may interfere with transmission of the signal.
- The unit can be affected by signals transmitted from the remote control of a television, VCR or other equipment used in the same room.
- Do not leave the remote control in direct sunlight or near a heater. Also, protect the unit and remote control from moisture and shock which can discolour or damage them.
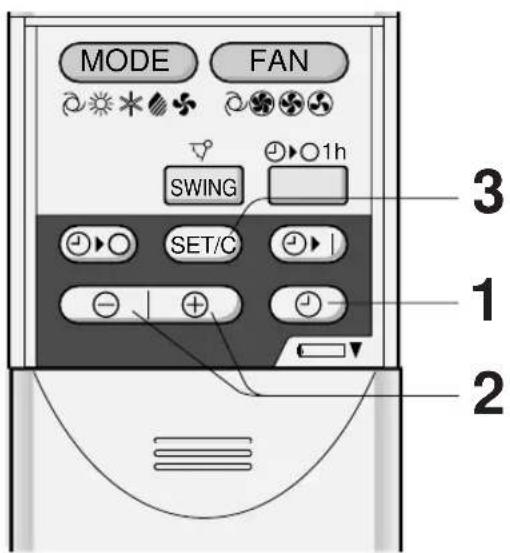
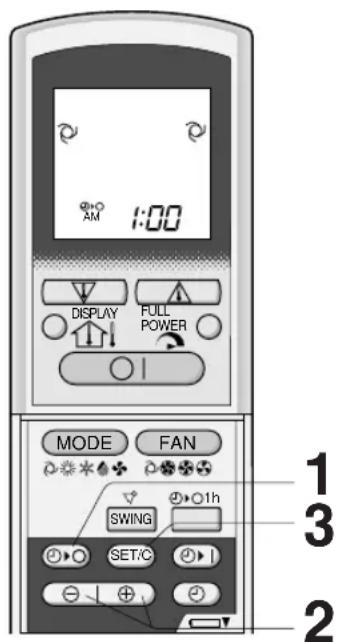
SET CURRENT CLOCK TIME
There are two clock modes: 12-hour mode and 24-hour mode.
(The heat mode symbol provided only on models AY-X08BE/AY-X10BE/AY-X13BE)
Example: 5 o'clock in the afternoon
| Clock | Display |
| 12-hour mode P | M 5:00 |
| 24-hour mode 1 | 7:00 |
1 To set to the 12-hour mode, press the CLOCK button once in the first step. To set to the 24-hour mode, press the CLOCK button twice in the first step.
2 Press the TIME ADVANCE or REVERSE button to set the current time. Keep the button pressed to advance or reverse the time display quickly.
3 Press the SET/C button. The colon (·) blinks to indicate that the clock is functioning.
NOTE:
The current time cannot be set when the timer is operating.

(The heat mode symbol provided only on models AY-X08BE/AY-X10BE/AY-X13BE)

TIPS ABOUT AUTO MODE
In the AUTO mode, the temperature setting and mode are automatically selected according to the room temperature and outdoor temperature when the unit is turned on.
Modes and Temperature Settings for Models AH-X08BE/AH-X10BE/AH-X13BE

indoortemp.
(°C) the figures in ( ) are temperature settings
Modes and Temperature Settings for Models AY-X08BE/AY-X10BE/AY-X13BE

indoor temp. (°C)
the figures in ( ) are temperature settings
During operation, if the outdoor temperature changes, the temperature settings will automatically slide as shown in the chart.
MODE CHANGEOVER (only for models AY-X08BE/AY-X10BE/AY-X13BE)
During seasons when you need COOLING at daytime and HEATING at night, or if the room temperature should become extremely higher than the temperature setting, due to supplementary heating equipment, the mode will automatically switch between HEAT and COOL mode to keep the comfortable room temperature.
TIPS ABOUT INDICATOR PANEL
The indicator panel will change each time you press the DISPLAY button in the following manner.
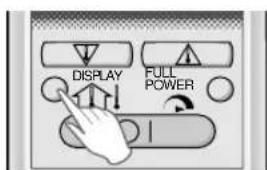
The room temperature and POWER MONITOR are displayed.

The outdoor temperature and POWER MONITOR are displayed.
No display.
POWER MONITOR
When the room temperature or the outdoor temperature is displayed, the POWER MONITOR will light up in 4 levels (3 levels for DRY mode), to indicate the operation power.
When the air conditioner is operating at maximum power in the COOL (and HEAT for AY-X08BE/AY-X10BE/AY-X13BE) mode, "Power" will light and "Eco" will turn off on the indicator panel.
NOTES:
- The displayed temperatures are rough estimates and may vary from the actual temperatures.
- Temperature display ranges
Room temperature: 0^ 40^ (Lis displayed when less than 0^ and when higher than 40^ )
Outdoor temperature: -9^ 45^ (displays when less than -9^ and when higher than 45^ )
- -- is displayed during the first minute of operation while the temperatures are being detected.
- Only the room temperature can be displayed when the unit is not in operation.
VERTICAL AIR FLOW DIRECTION
The air flow direction is automatically preset in each mode as follows for optimum comfort:
| COOL and DRY mode Horizontal air flow | |
| FAN ONLY (and HEAT for AY-X08BE/AY-X10BE/AY-X13BE) mode | Diagonal air flow |
HOW TO ADJUST THE AIR FLOW DIRECTION
Press the SWING button on the remote control once.
The vertical adjustment louvre will change its angle continuously.
Press the SWING button again when the vertical adjustment louvre is at the desired position.
The louvre will stop moving within the range shown in the diagram.
- The adjusted position will be memorized and will be automatically set to the same position when operated the next time.
Adjustment range
COOL and DRY mode
FAN ONLY (and HEAT for AY-X08BE/AY-X10BE/AY-X13BE) mode

The adjustment range is narrower the SWING range in order to prevent condensation from dripping.

The range is wide so the air flow can be directed toward the floor.
HORIZONTAL AIR FLOW DIRECTION
Hold the horizontal adjustment louvre as shown in the diagram and adjust the air flow direction.


CAUTION
Never attempt to adjust the vertical adjustment louvres manually.
- Manual adjustment of the vertical adjustment louvre can cause the unit to malfunction when the remote control is used for the adjustment.
- When the vertical adjustment louvre is positioned at the lowest position in the COOL or DRY mode for an extended period of time, condensation may result.
In this operation, the air conditioner works at maximum power to make the room cool (or warm with models AY-X08BE/AY-X10BE/AY-X13BE) so rapidly that you can use it just after you come home.

1 To activate the FULL POWER operation, press the FULL POWER button during operation.
The remote control will display
- the temperature display will go off.
TO CANCEL
Press the FULL POWER button again.
- FULL POWER operation will also be cancelled when the operation mode is changed, or when the unit is turned off.
NOTES:
- You cannot use the FULL POWER operation during the FAN ONLY mode.
- You cannot set the temperature during the FULL POWER operation.
ONE-HOUR OFF TIMER
When the ONE-HOUR OFF TIMER is set, the unit will stop operating after one hour.

1 Press the ONE-HOUR OFF TIMER button.
- The remote control displays "1 h".
- The orange TIMER lamp ( ① on the unit will light up.
- The unit will stop operating after one hour.
TO CANCEL
Press the TIMER CANCEL (SET/C) button.
The orange TIMER lamp ( on the unit will turn off.
Or, turn the unit off by pressing the ON/OFF button.
- The red OPERATION lamp ( and the orange TIMER lamp ( on the unit will turn off.
(The heat mode symbol is provided only on models AY-X08BE/AY-X10BE/AY-X13BE)
NOTES:
- The ONE-HOUR OFF TIMER operation has priority over TIMER ON and TIMER OFF operations.
- When the ONE-HOUR OFF TIMER is set while the unit is not operating, the unit will operate for an hour with the formerly set condition.
- If you wish to operate the unit for another hour before the ONE-HOUR OFF TIMER activates, press the ONE-HOUR OFF TIMER button again during operation.
- If TIMER ON and/or TIMER OFF are set, TIMER CANCEL button cancels every setting.
NOTE:
Before setting the timer, make sure the clock is properly set with the current time.
TIMER OFF
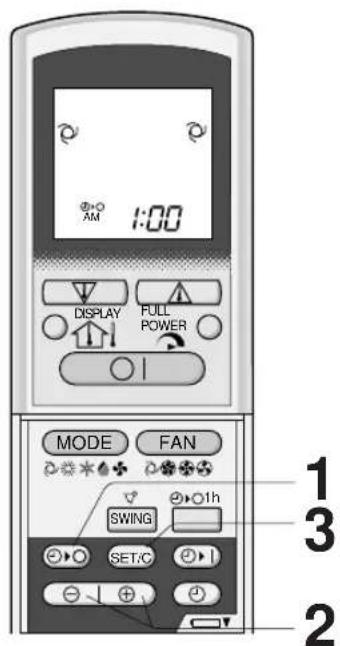
(The heat mode symbol S provided only on models AY-X08BE/AY-X10BE/AY-X13BE)
1 Press the TIMER OFF ( button.
2 The TIMER OFF indicator will blink; press the TIME ADVANCE or REVERSE buttons to set the desired time. (The time can be set in 10-minute increments.)
3 Point the remote control at the signal receiver window on the unit and press the TIMER SET (SET/C) button.
- The orange TIMER lamp ( Ⓞ ) on the unit will light.
The unit will generate a beep when it receives the signal.
When the TIMER OFF mode is set, the temperature setting is automatically adjusted to prevent the room from becoming excessively hot or too cold while you sleep. (Auto Sleep function)
COOL/DRY MODE:
One hour after the time operation begins, the temperature setting rises 1^ higher than the original thermostat setting.
HEAT MODE: (only for models AY-X08BE/AY-X10BE/AY-X13BE)
One hour after the timer operation begins, the temperature setting drops 3^ lower than the original thermostat setting.
NOTE:
The Auto Sleep function will not activate during the FAN ONLY mode.
TO CANCEL TIMER MODE
Press the TIMER CANCEL (SET/C) button.
- The orange TIMER lamp ( Ⓞ ) on the unit will turn off.
- The current clock time will be displayed on the remote control.

(The heat mode symbol is provided only on models AY-X08BE/AY-X10BE/AY-X13BE)
NOTE:
- If any TIMER ON, TIMER OFF and ONE-HOUR OFF TIMER are set, the TIMER CANCEL button cancels all settings.
TO CHANGE TIME SETTING
Cancel the TIMER setting first, then set it again.
TIMER ON

1 Press the TIMER ON ( button.
2 The TIMER ON indicator will blink; press the TIME ADVANCE or REVERSE buttons to set the desired time. (The time can be set in 10-minute increments.)
3 Point the remote control at the signal receiver window on the unit and press the TIMER SET (SET/C) button.
- The orange TIMER lamp ( ) on the unit will light.
- The unit will generate a beep when it receives the signal.
4 Select the operation condition.
- The unit will turn on prior to the set time to allow the room to reach the desired temperature by the programmed time. (Awaking function)
(The heat mode symbol is provided only on models AY-X08BE/AY-X10BE/AY-X13BE)
COMBINED USE OF ON AND OFF TIMERS
You can use the ON and OFF timers in combination.

Example:
To stop operation at 11:00 p.m. and resume operation (With the same mode and temperature settings) to bring the room temperature to the desired level by 7:00 a.m.
1 Set the TIMER OFF to 11:00 p.m. during operation.
2 Set the TIMER ON to 7:00 a.m.
The arrow ( or ) between the TIMER ON indicator and the TIMER OFF indicator shows which timer will activate first.
NOTES:
- You cannot programme the ON-TIMER and OFF-TIMER to operate the unit at different temperatures or other settings.
- Either timer can be programmed to activate prior the other.
AUXILIARY MODE
Use this mode when the remote control is not available.
TO TURN ON
Lift the front panel of the indoor unit and press the AUX. button on the operation panel.
- The red OPERATION lamp ( ] ) on the unit will light and the unit will start operating in the AUTO mode.
- The fan speed and temperature setting are set to AUTO.
TO TURN OFF
Press the AUX. button on the operation panel again.
- The red OPERATION lamp ( ) on the unit will turn off.

NOTE:
If the AUX. button is pressed during normal operation, the unit will turn off.
POWER SELECTOR (only for models AY-X13BE/AH-X13BE)
When installing the air-conditioner to a residence with small electrical current capacity, switch the POWER SELECTOR to "L". The air conditioner will operate with reduced power, and the circuit breaker tripping or fuse blowing caused by excess power consumption can be avoided.
- COOLING or HEATING (for model AY-X13BE) capacity will be reduced when operating at "L" setting.
- Consult your dealer or qualified technician if continuous breaker tripping or fuse blowing is experienced even by switching to "L" setting.
| AH-X13BE AY-X13BE | ||
| Maximum ampere at "H" setting | 9A 12A | |
| Maximum ampere at "L" setting | 7A 8A | |

OPTION KIT
Air Purifying Filter
During operation of the air conditioner, the air purifying filter removes dust and tobacco smoke from the air and discharges clean air.
The apatite antibacterial material used in the air purifying filter suppresses activities of adsorbed viruses and other germs.
The replacement period for the disposable type is approximately 3~6 months.
Contact your dealer for the purchase of this option.

Type AZ-F900B
CAUTION
Be sure to disconnect the power cord from the wall outlet or turn off the circuit breaker before performing any maintenance.
CLEANING THE FILTERS The air filters should be cleaned every two weeks.
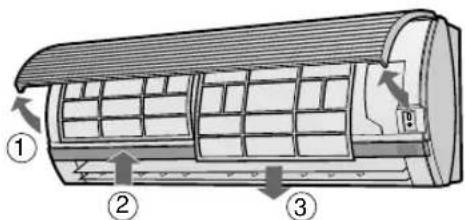
1 TURN OFF THE UNIT
2REMOVE THE FILTERS
1 Lift the open panel.
2 Push the air filters up slightly to unlock them.
3 Pull the air filters down to remove them.
3 CLEAN THE FILTERS
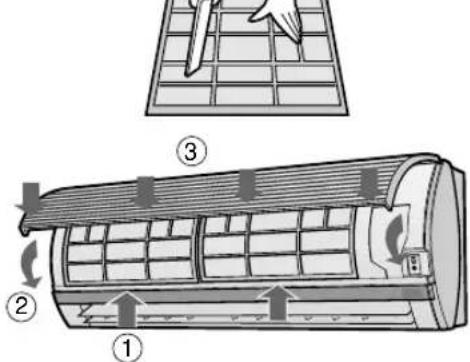
Use a vacuum cleaner to remove dust. If the filters are dirty, wash them with warm water and a mild detergent. Dry filters in the shade before reinstalling.
4 REINSTALL THE FILTERS
1 Reinstall the filters in the original positions.
2 Close the front panel.
3 Push the center part of the panel firmly to lock it in place.
CLEANING THE UNIT AND THE REMOTE CONTROL
CAUTION
- Wipe them with a soft cloth.
- Do not directly splash or pour water on them. We can cause electrical shock or equipment damage.
- Do not use hot water, thinner, abrasive powders or strong solvents.
MAINTENANCE AFTER AIR CONDITIONER SEASON
1 Operate the unit in the FAN ONLY mode for about half a day to allow the mechanism to thoroughly dry.
2 Stop the operation and unplug the unit. Turn off the circuit breaker, if you have one exclusively for the air conditioner.
3 Clean the filters, then reinstall them.
MAINTENANCE BEFORE AIR CONDITIONER SEASON
1 Make sure that the air filters are not dirty.
2 Make sure that nothing obstructs the air inlet or outlet.
CAUTION
3 Check the outdoor mounting rack periodically for wear and to make sure it is firmly in place.
BEFORE CALLING FOR SERVICE
The following conditions do not denote equipment malfunctions
| UNIT DOES NOT OPERATE The unit will not operate if it is turned on immediately after it is turned off. The unit will not operate immediately after the mode is changed. This is to protect the internal mechanisms. Wait 3 minutes before operating the unit. | SWISHING NOISE The soft, swishing noise is the sound of the refrigerant flowing inside the unit. |
| UNIT DOES NOT SEND OUT WARM AIR (Models AY-X08BE/AY-X10BE/AY-X13BE) The unit is preheating or de-icing. | WATER VAPOUR • In the COOL and DRY operation, water vapour can sometimes be seen at the air outlet due to the difference between the room air temperature and the air discharged by the unit. • In the HEAT operation, water vapour may flow out of the outdoor unit during de-icing. (Only in models AY-X08BE/AY-X10BE/AY-X13BE) |
| ODORS Carpet and furniture odors that entered into the unit and the air conditioner's inner component odors at the early stage of installation may be sent out from the unit. | |
| CRACKING NOISE The unit may produce a cracking noise. This sound is generated by the friction of the front panel and other components expanding or connecting due to a temperature change. | THE OUT DOOR UNIT DOES NOT STOP After stopping the operation, the outdoor unit will rotate its' fan for about a minute to cool down the unit. |
If the unit appears to be malfunctioning, check the following points before calling for service.
| IF THE UNIT FAILS TO OPERATE |
| Check to see if the circuit breaker has tripped or the fuse has blown. |
| IF THE UNIT FAILS TO COOL (OR HEAT) THE ROOM EFFECTIVELY | ||
| Check the filters. If dirty, clean them. | Check the outdoor unit to make sure nothing is blocking the air inlet or outlet. | Check the thermostat is proper setting. |
| Make sure windows and doors are closed tightly. | A large number of people in the room can prevent the unit from achieving the desired temperature. | Check whether any heat-generating appliances are operating in the room. |
| IF THE UNIT FAILS TO RECEIVE THE REMOTE CONTROL SIGNAL | ||
| Check whether the remote control batteries have become old and weak. | Try to send the signal again with the remote control pointed properly towards the unit's signal receiver window. | Check whether the remote control batteries are installed with the polarities properly aligned. |
Please call for service when OPERATION Lamp, TIMER Lamp and TEMPERATURE INDICATOR on the indicator panel blink.
MISESENGARDEPOURL'INSTALLATION/LADEPOSE/LAREPARATION
D.B. = Sec W.B. = Humide
EN CAS DE PANNE DE COURANT
H, anevpyoioe Tn movaiaovtao To nKpo ENAPEHNAYH2 (ON/OFF).
H Kokkivn Iuxvia AEITOYPTIAZ () kai noptokaI Iuxvia XPONOIAKONTH ( tno movadaa 0a oBnoouv.
(To 10a o toupyia 8epuavon npextal movo sta movtla AYX08BE/AY-X10BE/AY-X13BE)
ZHMEIΩSEIEZ:
- O XPONOAIAKONTH ANENEPRONOHHS MIAΩ ΜPAN Μρonyεια Ε Μχεημ Μιλειουργεσ ENEPRONOHΣH ΜXPONOAIAKONTH και ANENEPRONOHΣH ΜXPONOAIAKONTH.
- Otav pu o XPONOIAKONTHS ANENEPRONOHMSIAQPAOTav n vada Aitoupyei, n vada aAa Aitoupynoe iia ma npoyouevnpuoi.
Eav 0e1e1e va aeitoupynoeTe Tn movada yia aAanmu npiv ano tnv evepyonoiOn Tou XPONODIAKONTH ANENEPRONOIHHE MIAO PAAS, nieote naI to nAaKtpo Tou XPONODIAKONTH ANENEPRONOIH2H MIAO OPAKata Tn diapkeia TNO Aetoupyia.
Eav puOIOIH XPONOIAKONTH ka/ n ANENEPRONOHX XPONDAIAKONTH, to nKTpo TIMER CANCEL akupwvei oεσ tio puOioεio.
AEITOYPTIA ME XPONODIAKONTH
\SHMEIΩΣEIZ:
PivpuOioeToXpovobiaKoTn,8eBaiwOeIe oTo poAo iva puOmuEvo 0otv Tpexouoa wpa.
ANENEPRONOIHxXPONOIAKoTH
TIAAANAH THE PYOMIEHSE THOPAE
Akupwotε npwa tη puθμion tou XPONOIAKONTH, επειτα puθμioTe Tn πaλι.
ENEPTONOIHxPONODIAKONTTH

(To oujbo loa aeitoupyiao eepuavano napexetai movo ota movtela AY- X08BE/AY-X10BE/AY-X13BE)
VOORZORGSGMAATREGELEN
WAARSCHUWINGEN BIJ HET GEBRUK
VOORZORGSGMAATREGELEN
WAARSCHUWINGEN BIJ HET GEBRUK
WAARSCHUWINGEN BIJ DE PLAATSING / INSTALLATIE
KOELEN/DROGEN-FUNCTIE:
BIR SAAT SONRA KAPANMA AYARI

- CONTENTS
- PRECAUTIONS
- WARNING FOR USE
- WARNING FOR INSTALLATION / REMOVAL / REPAIR
- CAUTIONS FOR USE
- CAUTIONS FOR LOCATION / INSTALLATION
- ADDITIONAL NOTES ON OPERATION
- WHEN POWER FAILURE OCCURS
- NOTES FOR MODELS AY-X08BE/AY-X10BE/AY-X13BE
- PREHEATING FUNCTION
- DE-ICING FUNCTION
- HEATING EFFICIENCY
- TIPS ON SAVING ENERGY
- SET THE CORRECT TEMPERATURE
- BLOCK DIRECT SUNLIGHT AND PREVENT DRAFTS
- SET PROPER AIR FLOW DIRECTION TO OBTAIN THE BEST AIR CIRCULATION
- KEEP FILTER CLEAN TO ENSURE THE MOST EFFICIENT OPERATION MAKE MOST OF THE TIMER OFF FUNCTION
- DISCONNECT THE POWER CORD WHEN THE UNIT IS NOT USED FOR AN EXTENDED PERIOD OF TIME
- L.C.D. REMOTE CONTROL DISPLAY
- LOADING BATTERIES Use two size-AAA (R03) batteries.
- NOTES:
- HOW TO USE THE REMOTE CONTROL
- CAUTION
- SET CURRENT CLOCK TIME
- NOTE:
- TIPS ABOUT AUTO MODE
- MODE CHANGEOVER (only for models AY-X08BE/AY-X10BE/AY-X13BE)
- TIPS ABOUT INDICATOR PANEL
- POWER MONITOR
- VERTICAL AIR FLOW DIRECTION
- HOW TO ADJUST THE AIR FLOW DIRECTION
- Adjustment range
- HORIZONTAL AIR FLOW DIRECTION
- TO CANCEL
- ONE-HOUR OFF TIMER
- TIMER OFF
- COOL/DRY MODE:
- HEAT MODE: (only for models AY-X08BE/AY-X10BE/AY-X13BE)
- TO CANCEL TIMER MODE
- TO CHANGE TIME SETTING
- TIMER ON
- COMBINED USE OF ON AND OFF TIMERS
- Example:
- AUXILIARY MODE
- TO TURN ON
- TO TURN OFF
- POWER SELECTOR (only for models AY-X13BE/AH-X13BE)
- OPTION KIT
- Air Purifying Filter
- CLEANING THE FILTERS The air filters should be cleaned every two weeks.
- CLEANING THE UNIT AND THE REMOTE CONTROL
- MAINTENANCE AFTER AIR CONDITIONER SEASON
- MAINTENANCE BEFORE AIR CONDITIONER SEASON
- BEFORE CALLING FOR SERVICE
- The following conditions do not denote equipment malfunctions
- MISESENGARDEPOURL'INSTALLATION/LADEPOSE/LAREPARATION
- EN CAS DE PANNE DE COURANT
- ZHMEIΩSEIEZ:
- AEITOYPTIA ME XPONODIAKONTH
- \SHMEIΩΣEIZ:
- ANENEPRONOIHxXPONOIAKoTH
- TIAAANAH THE PYOMIEHSE THOPAE
- ENEPTONOIHxPONODIAKONTTH
- VOORZORGSGMAATREGELEN
- WAARSCHUWINGEN BIJ HET GEBRUK
- WAARSCHUWINGEN BIJ DE PLAATSING / INSTALLATIE
- KOELEN/DROGEN-FUNCTIE:
- BIR SAAT SONRA KAPANMA AYARI
Brand : SHARP
Model : AHX13BE
Category : Air conditioner