UM130.3 AA - Fridge AMICA - Free user manual and instructions
Find the device manual for free UM130.3 AA AMICA in PDF.
Download the instructions for your Fridge in PDF format for free! Find your manual UM130.3 AA - AMICA and take your electronic device back in hand. On this page are published all the documents necessary for the use of your device. UM130.3 AA by AMICA.
USER MANUAL UM130.3 AA AMICA
INSTALLATION AND OPERATING CONDITIONS OF THE APPLIANCE 24
Thisfridge-freezerisintendedforhouseholduseonly.
The manufacturer reserves the right to introduce modications, which do not affect the operation of the appliance.
EN DearCustomer,
This fridge-freezer combines exceptional user-friendliness and excellent efciency. Prior to dispatch, each unit was carefully
checked for its safety and operating capabilities.
Before starting the appliance, please read this Operating Manual carefully
was den Schutz der Ozon-
Anti-bacteria System
pełen komfort ko rzy sta nia z naszego wyrobu.24
l TheManufacturershallnotbeheldlia-
blefordamagearisingfromthefailure
toobservetheinstructionscontained
lThis appliance is not intended for use
by persons (including children) with
limited physical or mental capabilities
and persons who lack experience or
familiarity with the appliance..
l Donotallowunattendedchildren
tousetheappliance.Do not allow
themtoplaywiththeappliance.They
must not climb inside the drawers
andswingonthedoors.
lThe appliance operates properly at the
ST ambient temperature (see table with
technical specication). Do not use it in
the cellar, unheated summer cottage
during autumn and winter.
lWhen placing, moving, lifting the ap-
pliance, do not hold the door han- dles,
do not pull the condenser at the rear
part of the refrigerator and do not touch
the compressor unit.
occur,theapplianceshouldbeswit-
itsre-placementintherightposition
l Pull the plug out from the mains socket
before each maintenance activity. Do
not pull on the cord, but hold the body
of the plug instead.
l The “cracking” sound, which the
appliance may emit is caused by the
expansion and contraction of parts as
a result of temperature variations.
l For safety reasons do not repair the
appliance yourself. Repairs car- ried out
by persons who do not have the requ-
ired qualications may result in serious
danger for the user of the appliance.
l Air the room in which the appliance is
placed for a few minutes (the size of the
room for a product containing isobutha-
ne/R600a must be at least 4m
damage to the cooling system.
lDo not refreeze partly thawed pro-
l Do not store beverages in bottles and
cans, especially carbonated be- vera-
ges, in the freezer chamber. The cans
and the bottles may explode.
lDonotputfrozenproducts,takenout
lMake sure you do not damage the
cooling system, by puncturing the
refrigerant pipes in the evaporator or
breaking the pipes. The refrige- rant
is ammable. If the refrigerant makes
contact with the eyes, rinse them with
clean water and call for medical assi-
GUIDELINES CONCERNING THE SA-
FETY OF USE INSTALLATION AND OPERATING CONDITIONS OF THE APPLIANCE
Installationbeforeusingtheappliancefor
l Take the product out of the package, re- move
the scotch tape protecting the door and the equ-
ipment. Any remaining adhesive stains may be
removed with a mild washing agent.
l Do not throw away the polystyrene elements of
the packaging. If it is necessary to transport the
fridge-freezer, pack it in the polystyrene elements
and lm as well as protect ing it with scotch tape
l Clean the interior surface of the fridge- freezer
and the elements of the equipment with a washing
agent dissolved in lukewarm water, then wipe it
l Place the fridge-freezer on an even, at and stable
surface, in dry, aired and shaded room, far from
the heat sources such as: oven, hob, central
heating radiators, central heating pipes, hot water
Anti-bacteriaSystem
The Antibacteria System protects foods and
products inside the- refrigerator from bacteria and
mould which may cause unpleasant smells and
shorten storage time. The Antibacteria System pro-
longs the freshness of food. The special material
used to construct the fridge liner prevents bacterial,
microorganism and mould growth.
Minimumdistancesfromtheheat
- from the electric gas and other
- from oil or coal red ovens - 300
- from built-in ovens - 50 mm
If there is no possibility of ensuring the above- men-
tioned distances, provide an appropriate insulation
lThis appliance should be connected to AC 230V
50Hz supply socket. The socket must be tted
properly, and must be supplied with an earthing
conduit and a 10A fuse.
lIt is a legal requirement that the appliance is pro-
perly earthed. The manufacturer will not be held
liable for any damage or injury which may result
from the failure to full this requirement.
Do not use adapters, multiple sockets and
two-wire extension leads. If it is necessary
to use the extension lead, it must be equ-
ipped with a protection ring and a single
socket and must have a VDE/GS safety
lIf an extension lead is used (with a protec- tion ring
and safety certicate), its socket must be located
at a safe distance, away from the sinks, and must
not be in a place where it could be ooded by
water or waste water.
lSee the type plate at the lower part of the internal
wall of the appliance for detailed specica- tions.
Disconnectingthemains
lMake sure the appliance can be easily disconnec-
ted from the mains, either by pulling the plug out
of the mains socket, or by switching the two-pole
l Ontheexteriorsurfaceoftheproductmaybea
protectivefoil,thisfoilsshouldberemoved.
l Make sure the appliance is placed in a horizontal
position by screwing in the 2 adju- stable front legs
2. Temperature adjustment knob
Temperatureadjustment
Turning the knob to a different setting changes the temperature in the fridge-freezer.
Available knob settings:
• appliance switched off - OFF setting
• maximum temperature - 1 setting
Temperatureinsidethefridge/freezerchamber
Do not change the temperature settings due to the change in the season of the year. The ambient temperature
increase will be detected by the sensor and the compressor will be switched on automatically for a longer
period of time in order to maintain the temperature set inside the chambers.
Minorchangesintemperature
The slight changes in temperature are perfectly normal and may occur, for instance during the storage of great
quantities of fresh products in the fridge, or when the door is open for a longer period of time. This will not affect
the condition of the stored foodstuff, and the temperature will quickly return to its set value.
OPERATION AND FUNCTIONS EN27
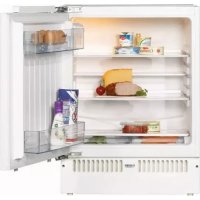
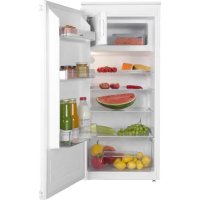
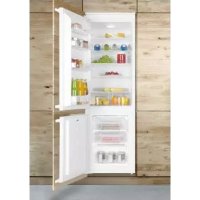
Storageoffoodinthefridge-freezer
Observethefollowingrecommen-dationsto
ensurethefoodremainsfresh.
lThe products should be placed on plates, in con-
tainers or packed in food wrap. Di- stribute them
evenly l over the shelves.
l If the food contacts the rear wall, it may cause
frosting or wetting of the products.
l Do not put dishes with hot food t into the
l Products which absorb avours easily such as
butter, milk, white cheese and products with intense
avour, such as sh, smoked meat, hard cheese
must be placed on shelves, packed in food wrap or
in tightly sealed containers.
l The storage of vegetables containing signicant
quantities of water will cause the deposition of
condensation on the vegetable containers, it
does not impact on the proper functioning of the
l Before putting the vegetables into the fridge, dry
l Excessive moisture shortens the shelf life of vege-
tables, especially the leafed vegeta- bles.
l Do not wash the vegetables before storing in the
refrigerator. Washing removes the natural protec-
tion, therefore it is better to wash the vegetables
directly before con- sumption.
lPractically all the food products, except for ve-
getables consumed raw, such as lettuce can be
l Only food products of the highest quality, divided
into small portions for single use, should be fro-
lProducts should be packed in materials that are
odourless, resistant to air and moisture pene-
tration, and not susceptible to fat. Plastic bags,
polyethylene and aluminium sheets are the best
l The packaging should be tight and should stick
to the frozen products. Do not use glass conta-
l Keep fresh and warm foodstuff at am- bient
temperature away from the products, which have
already been frozen.
l We advise you not to place more of fresh food
at a time to the freezer per day (see table witch
technical specication).
lIn order to maintain optimum quality of the frozen
food, reorganise the food that is in the middle of
the freezer, so that it does not touch the products
that are not yet frozen.
l It is recommended that you move the already fro-
zen products to one side and place the fresh pro-
ducts that are to be frozen on the opposite side, as
close to the rear and side walls as possible.
l To freezing products, use space marked (*/***).
lBearinmindthatthetemperatureinthefre-
ezerisaffectedbyseveralfactors,including
theambienttemperatureandthequantityof
foodproductsinthechamber,thefrequency
ofopeningthedoor,theamountoffrostinthe
freezer,andthethermostatsetting.
The storage time for frozen products depends on
their quality before freezing when fresh, and on the
storage temperature. The following storage periods
are recommended when the temperature of -18°C
or lower is maintained:
USING THE REFRIGERATOR EFFICIENTLY Practicaleverydaytips
lDo not place fridges or freezers next to radiators,
heaters, stoves or in direct sunlight.
l Make sure that air vents are not covered up and
clean the dust off them once or twice a year.
l Select the right temperature: 6to8°Cinyour
refrigerator and -18°C in your freezer is suf-
l When on holiday, turn up the temperature in your
l Only open your fridge or freezer when necessary.
It helps if you know what food each contains and
where it is located. Return food to the fridge or
freezer as soon as possible after you have used
it so that it does not warm up too much.
l Wipe the inside of your fridge regularly with a
cloth soaked in a mild detergent. Appliances
which are not self-defrosting will require regular
defrosting. Do not allow frost layers thicker than
l Keep the seal around the door clean, otherwise
it will not shut properly. Always replace broken
Understandingthestars
*Temperature is at least -6°C; sufcient to store
frozen food for about a week. Drawers or com-
partments marked with one star used to be a
feature of (mostly) cheaper fridges.
** Food can be stored at -12°C or below for 1-2
weeks without losing its taste. Not suitable for
*** This rating is mainly used to store foods at -18°C
or below. Can also be used to freeze up to 1
kilogram of fresh food.
**** This appliance is suitable for storing foods at
-18°C or below and freezing larger quantities
Storagezonesintherefrigerator
l Due to the natural circulation of the air in the
appliance, there are different temperature zones
in the refrigerator chamber.
l The coldest area is directly above the vegetables
drawers. Use this area for all delicate and highly
perishable food e.g.
- Fish, meat, poultry
- Sausage products, ready meals
- Dishes or baked goods containing eggs or
- Fresh dough, cake mixtures
- Pre-packed vegetable and other fresh food with
a label stating it should be kept at a temperature
l The warmest area is in the top section of the
door. Use this for storing butter and cheese.
Foodthatshouldnotbestoredina
l Not all food is suitable for storing in the refrige-
rator, particularly:
- Fruit and vegetables which are sensitive to
cold, such as bananas, avocado, papaya, pas-
sion fruit, aubergines, peppers, tomatoes and
- Fruit which is not yet ripe
Exampleofstoringthefood-seegure9.
l Do not use defrosting aerosols. They may cause
the formation of an explosive mixture, or contain
solvents which may damage the plastic com-
ponents of the appliance and even be harmful
l Make sure the water used for cleaning does not
ow into the evaporation container through the
l The whole appliance, except for the door gasket
must be cleaned with a mild cleaning detergent.
The door gasket should be cleaned with water
l Wash all the accessories (vegetable containers,
door shelves, glass shelves, etc.).
Defrostingthefreezer
lIt is recommended to combine defrosting the
appliance with washing it.
l Excessive accumulation of ice on the freezing
areas impairs the appliance’s freezing capacity
and increases the energy consumption.
l Defrost the appliance at least once or twice a
l If there is food in the freezer, set the knob to the
max. position about 4 hours before the planned
defrosting. This will ensure the possibility of
storing the food at the ambient temperature for a
l After taking the food out of the freezer, put it in a
container, wrap it with several layers of paper, a
blanket and store it at a cool place.
l The defrosting operation should last as short as
possible. Long storage of food at the ambient
temperature shortens their shelf life.
Defrostingthefridge
Frost settles on the rear wall of the fridge chamber. It
is removed automatically. During the defrosting, the
condensate, which contains contaminants may clog the
opening in the through. Should it occur, carefully unclog
the opening with the cleaning plug (g. 10).
l The appliance operates in cycles: it refrigerates
(then the frost settles on the rear wall), and de-
frosts (water ows down the rear wall)
DEFROSTING,WASHINGANDMAINTENANCE Disconnectthe appliance from the
freezerbyanymeans.
Inordertodefrostthefreezerchamber,youmust
takethefollowingsteps:
l Set the knob at ”OFF” / "0" position, take out the
plug from the mains socket.
l Open the door and remove the food from the
l After about 0.5h, it is possible to remove the white
frost or water from the smooth wall surfaces (g.
l Wash the interior of the freezer and wipe it dry.
l Switch on the appliance as per the relevant point
Takingoutandputtingintheshelves
Slide the shelf out, then slide it in as much as po-
ssible so that its clamp could t the guide groove
l Set the knob to ”0” / "OFF" position and unplug
the appliance from the mains socket.
l Remove the bulb cover (Fig. 14).
l Replace the bulb with a new one observing the
following paramters: 220-240 V, max. 10 W, E14
thread, maximum bulb dimensions: diameter – 26
l Put the caver back.
applyonlythebulbsofparametersgivenabove.
Takingoutandputtinginthedoorshelf
Lift the door shelf, remove it and put it back from
the top into its required position (g. 15).
The electric circuit is disrupted - check whether the plug is properly inserted
- check whether the power cable of the ap-
pliance is not damaged
- check whether there is voltage in the
socket, by plugging another appliance, e.g.
- check whether the appliance is switched
on by setting the thermostat to a position
The bulb is loose or fused (only applian-
ces with bulb lightning type)
- t the bulb correctly or replace it (see section
above “Replacing the interior light bulb)
the appliance is not
Incorrect setting of the adjustment knob - reset the knob to a higher position
The ambient temperature is higher or
lower than the climate range from table
with technical specication
- the appliance is adapted to operation in
the climate range from table with technical
The appliance is located in a sunlit place
or near heat sources
- move the appliance to another place. Obse-
rve the guidelines contained in the manual
Too much warm food loaded at a time - wait 72 hours until the food becomes cool
(freezes) and the required temperature is
reached inside the chamber
Internal air circulation obstructed - place the food and containers in such a
way that they do not touch the rear wall of
The air circulation at the back of the
appliance is obstructed
- move the appliance min. 30 mm away from
The door of the frid- ge/freezer is ope-
ned too often and/or remains open for
- reduce the frequency of opening the door
and/or shorten the time when door remains
The door does not close completely - place the food and containers so that they
would not interfere with door closed
The compressor is switched on too
- check whether the ambient temperature is
not lower than climate class
Incorrect setting of the adjustment knob - reset the knob to a lower position
See. ”Temperature inside the appliance
is not low enough for description of
other possible causes
See. ”Temperature inside the appliance
is not low enough for description of other
The water discharge opening is clogged
(depending on the model)
- clean the discharge opening (see the ope-
rating manual – chapter entitled ”Defrosting
Internal air circulation obstructed - place the food and containers in such a
way as that they do not touch the rear wall
Incorrect levelling of the appliance - level the appliance properly
The appliance is touching furniture and/
- place the appliance at a location that
ensures proper clearances around it
Certain sounds can be heard during normal use of the refrigerator, which do not affect its correct operation.
Sounds,whichcanbeeasilyprevented:
lnoise caused by the appliance which is not level - adjust the position with the adjustable turn-in front
feet. Alternatively, place pads made of soft material under the rear rollers, especially when the appliance is
ltouching the adjacent piece of furniture - move the refrigerator away.
lcreaking of the drawers or shelves - take out and put back the drawer or shelf.
lsounds of clinking bottles - move bottles apart.
Sounds heard during normal use are mainly due to operation of the thermostat, compressor (switching on)
and cooling system (thermal expansion and contraction of the radiator caused by ow of the cooling agent).
EN ENVIRONMENTAL PROTECTION Ozonelayerprotection
The refrigerants and fo-
aming agents, which are
100% free of FCKW and FKW
have been used for manufac-
turing our pro- duct. Therefore
we are helping to protect the
ozone layer and prevent the in-
crease of greenhouse effects.
Also, the innovative technology
and environmentally friendly in-
sulation help in reducing ener-
Recyclingofthepackaging
Our packaging are made of
environmentally friendly mate-
rials, which can be reused:
l The external packaging is made of cardboard/
lThe FCKW free shape of foamed polystyre-
lPolyethylene (PE) foils and bags
Elimination/disposaloftheequipment
If the appliance is no longer in use, cut the connecting
cable off the used equipment before its scrapping.
Also, remove the appliance lock or render it useless
so that the appliance presents no danger to children
while being stored for di- sposal.
This appliance is marked with a
symbol of the crossed out waste
container in conformance with
the European Directive 2002/96/
EC. Such marking informs that
the equipment may not be kept
together with other waste coming
from the household after the pe-
riod of its use. The user is obliged
to dispose of the appliance at the
waste collection point. The local
waste collection points, shops and communal units
form an appropriate system enabling the disposal of
Handling the used electrical and electronic equip-
ment properly contributes to the avoidance of con-
sequences harmful to the human health and natural
environment, resulting from the presence of hazard-
ous substances and improper storage and process-
ing of such equipment.32
The information about the climate range of the appliance is provided on the rated plate. It
indicates at which ambient temperature (that is, room temperature, in which the appliance is
working) the operation of the appliance is optimal (proper).
EN Climaterange Permissibleambient
SN from +10°C to +32°C N from +16°C to +32°C ST from +16°C to +38°C T from +16°C to +43°C Manufacturer’sdeclaration
The manufacturer hereby declares that the appliance fulls the requirements of the following
European directives:
l The Low Voltage Directive 2006/95/EC,
l The Electromagnetic Compatibility Directive 2004/108/EC,
and therefore it has been marked with a and assigned a declaration of conformity, which is
made available to the market supervising authorities.
Anti-bacteria System
Glass shelf over the vegetable container 1
Type of lighting Bulb
1 Low temperature chamber
4 Glass shelf over the vegetable container
A++/A+ (=low consumption) to G (=high consumption).
The energy consumption refers to the yearly consumption in kWh, indicated according to DIN EN 153.
Deviations may occur in the practical operation of the appliance, depending on the use and place of its
*= storage room of approximately. -6°C
(**) = storage room of approximately. -12°C
(***) = freezing storage room of approximately -18°C
(*/***) = freezing storage room of approximately -18°C or below
Climate range means that your set temperature is maintained at ”normal” ambient temperature. Should the
room temperture drop signicantly below the dened scope, the appliance does not work so often and the
undesirable temperature increase may occure.
TYPE UM130.3 AA / UKS 16158
Type of the appliance Refrigerator-freezer
Annual power consumption
Storage time (hrs), at no power supply
Appliance weight (kg) ~34,6568
6. Remove the two screws, which attach the lower hinge to the appliance door (Fig. 5). Take
special care and hold the appliance door with the other hand.
7. Holding the door, swing the lower door hinge away from the door using the other hand, then
detach the door from the appliance body (Fig. 6).
8. Remove the two screws , which attach the upper hinge to the body and the two screws hol-
ding the lower hinge to the appliance body (Fig. 7).
9. Screw the upper and lower hinge on the opposite side of the appliance body using suitable
screws (Fig. 8). Upper hinge should be mounted on the other side of the appliance as the lower
hinge. The lower hinge should be mounted on the other side of the appliance as the upper
With the hinges open, hold the door parallel to the appliance body and screw the hinges to the
door using suitable screws while taking proper care.
10. Make sure that the door is properly aligned with the appliance body (Fig. 9).
INSTALLATION OF THE APPLIANCE Installation of the appliance should be performed by a qualied installer. The appliance should be
placed in furniture case (Fig. 10). Once the appliance is placed correctly, adjust the height of the ap-
pliance by turning the 4 adjustable feet as appropriate. If necessary, adjacent Amica appliances sho-
uld be braced with a bracket xed by screws and tted in furniture (Fig. 11). There is a special strip
at the top of the appliance. Attach it to the underside of the cabinet with appropriate screws supplied
with the assembly kit (Fig. 16). Decorative strip must not block the vents located in the bottom casing
unit, the strip must be cut to size (Fig. 17). The depth of the bottom casing unit can be adjusted by
moving it forwards or backwards. Once properly adjusted, tighten the mounting screws (located in
the openings on both sides of the casing unit) with a cross-head screwdriver. This will permanently
attach the casing unit (Fig. 18).
FITTING FURNITURE BOARD TO APPLIANCE DOOR Place the mounting bracket on furniture board and position it accordingly (Fig. 12). The distance between
the furniture board and the underside of the worktop should be 5 mm (Fig. 13). Attach the mounting
bracket using suitable screws supplied in the installation kit. Pull out the mounting bracket cover and
screw in the two special screws (2) in the appliance doors(Fig. 14). Attach furniture board with the xed
mounting bracket to the appliance door. Secure the furniture board with suitable nuts (item 3, Figure
14). Make sure the furniture board assembly is positioned correctly relative to the appliance (Fig. 15).
Using the supplied screws, attach the furniture board assembly to the bottom of the appliance door
(Fig. 15). Replace the mounting bracket cover in its original location.
1. Unplug the appliance before reversing the door opening direction.
2. Remove food from the appliance.
3. Remove caps on the front of the refrigerator body (Fig. 1, Fig 2).
4. Remove the two screws, which attach the upper hinge to the appliance door (Fig. 3). Take spe-
cial care and hold the appliance door vertically.
5. Holding the door, swing the upper door hinge away from the door using the other hand (Fig. 4).
Beespeciallycarefulduringthisstep,asthehingemaycloseandcauseinjury.77