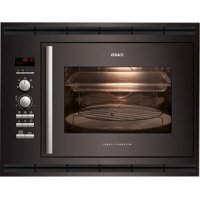
KE7415001M - Four AEG - Free user manual and instructions
Find the device manual for free KE7415001M AEG in PDF.
Download the instructions for your Four in PDF format for free! Find your manual KE7415001M - AEG and take your electronic device back in hand. On this page are published all the documents necessary for the use of your device. KE7415001M by AEG.
USER MANUAL KE7415001M AEG
INBOUWOVEN EINBAUBACKOFEN HORNO INTEGRADO2
FOR PERFECT RESULTS Thank you for choosing this AEG product. We have
created it to give you impeccable performance for many
years, with innovative technologies that help make
life simpler - features you might not fi nd on ordinary
appliances. Please spend a few minutes reading to get
the very best from it.
ACCESSORIES AND CONSUMABLES In the AEG webshop, you’ll fi nd everything you need
to keep all your AEG appliances looking spotless
and working perfectly. Along with a wide range of
accessories designed and built to the high quality
standards you would expect, from specialist cookware
to cutlery baskets, from bottle holders to delicate
Visit the webshop at:
www.aeg-electrolux.com/shop3
Environments concerns
The following symbols are used in this
Subject to change without notice.
Environmental information.
General information and tips.
Important information concerning
your personal safety and information
on how to avoid damaging the
SAFETY INFORMATION In the interest of your safety and to ensure the correct use, before installing and fi rst
using the appliance, read this user manual carefully, including its hints and warnings. To
avoid unnecessary mistakes and accidents, it is important to ensure that all people using
the appliance are thoroughly familiar with its operation and safety features.
Save these instructions and make sure that they remain with the appliance if it is
moved or sold, so that everyone using it through its life will be properly informed
on appliance use and safety.
• The oven must not be operated with the door open.
• The manufacturer will not be held responsible if this oven is used for anything other
than domestic purposes.
• Only use the oven when it is installed within kitchen units.
• Do not store oils, fats or infl ammable materials inside the oven, as it could be
dangerous if the oven is switched on.
• Do not lean or sit on the open door of the oven as it could damage the door and be
• Do not cover the bottom of the oven with aluminium foil, as it could affect cooking
and damage the interior enamelling of the oven.
• To use the oven, insert the Deep Roasting Pan or rack supplied onto the side guides
inside the oven. The Deep Roasting Pans and racks are fi tted with a system to facilitate
partial extraction and make handling easier.
• Do not put containers or food on the fl oor of the oven. Always use the Deep Roasting
Pans and Wire Shelfs.
• Do not spill water on the fl oor of the oven while it is working as this could damage the
• While using the oven, open the door as little as possible to reduce electricity
• Use protective gloves if you need to work inside the hot oven.
• To cool the oven, open the door to allow ventilation and odours to escape from inside.
• In recipes with a high liquid content, it is normal for condensation to form on the oven
• The appliance is not intended for use by young children or infi rm persons without
supervision. Young children should be supervised to ensure they do not play with the
• Do not allow children to approach the oven while it is in use, as high temperatures can
• Check your oven for any transport damage. Never connect a damaged machine. If your
oven is damaged contact your supplier.
• All packaging must be removed before use.
• Any electrical work required to install this appliance must be carried out by a qualifi ed
and competent person.5
• For safety reasons it is dangerous to alter the specifi cations or attempt to modify this
• Never use the oven if the electrical supply cable is damaged; or if the control panel,
work top or plinth area are damaged such that the inside of the appliance is freely
accessible. Contact your local Service Force centre, in order to avoid hazard.
• All sides of the oven must never be drilled to prevent damage to hydraulic and electric
For electrical connection carefully follow the instructions given in specifi c paragraphs.
Shelf Support Runners
Oven Shelf Runner (KE 7415001)
2 side rails with 1 telescopic runners.
CONTROL PANEL The oven will only work if the time of day has been set.
However, the oven can also be operated without any programme.
To switch appliance on or off
To Select oven functions
To set temperature and time values or defrosting level
To switch light on or off
It is used for sponges and cakes where the heat received must be
uniform to achieve a spongy texture.
Heat only from beneath. Suitable for heating dishes and raising pastry
Special for roasts. It can be used for any piece, whatever its size.
For preparing dishes with superfi cial roasting.
It allows the outer layer to be browned without affecting the inside of
the food. Ideal for fl at food, such as steaks, ribs, fi sh, toast.
Allows greater surfaces to be prepared, than with the grill, together with
higher power reducing the time required for browning of the food.
Allows uniform roasting at the same time as surface browning. Ideal
for grills. Special for large volume pieces, such as poultry game etc. It
is recommended to put the item on a rack with a Deep Roasting Pan
beneath to collect the stock and juices.
Suitable for roasts and cakes. The fan spreads the heat evenly throughout
the inside of the oven to reduce cooking time and temperature.
The fan distributes the heat produced by an element located at the rear
Due to the uniform heat distribution, it allows roasting and baking to
take place at two heights at the same time.
Flashes when setting temperature is carried out.
Illuminates when a programmed cooking duration is set and will start
fl ashing when the cooking time is over.
Illuminates when a programmed end of cooking is set and will start
fl ashing when the cooking time is over.
Illuminates when the minute minder alarm is set.
Flashes when setting the time of day is carried out.8
Recommendations for Defrosting Food
The defrost function works by means of a 2-level system of hot air. HI is for meats in
general and LO is for fi sh, cakes, pastries and bread. When selecting the defrost function,
select HI or LO on the temperature display by pressing on the temperature button and
• Unpackaged food should be placed on the oven Deep Roasting Pan or on a dish.
• Defrost large pieces of meat or fi sh by placing them over the Wire Shelf with a Deep
Roasting Pan underneath to collect any liquid.
• Meat and fi sh do not need to be completely thawed before cooking. Condiments can
be added once the surface is soft.
• Food should always be cooked after defrosting.
• Do not refreeze defrosted food.
See the following chart for defrosting times and temperature levels:
FOOD LO LEVEL Weight Time
HI LEVEL Weight Time
Minced meat 1 Kg 120 min
While using the Grill, Dual Grill or Dual Grill with fan, the door must be kept closed.
Ideal for baking pizzas, pies, and fruit tarts or sponges.
Designed to cook casseroles, stews, etc, in the traditional way, and for all
recipes specifying long cooking times and low heat.
For the best results, we recommend using covered casserole pans with
lids, fi rst making sure that they can be used in the oven.
For defrosting e.g. gateaux and fl ans, butter, bread, fruit or other frozen
BEFORE USING FOR THE FIRST TIME Carefully read this Instruction Manual to achieve the best results from your oven. Due
to the manufacturing process there may be residues of grease and other substances. To
eliminate these, proceed as follows:
• Remove all the packaging material, including the protective plastic, if included.
or function at 200ºC for one hour. To do so, consult the feature list
provided with this manual.
• To cool the oven open the door to allow ventilation and odours to escape from inside.
• After cooling, clean the oven and the accessories.
During the fi rst use, fumes and odours may occur and the kitchen should therefore be
USING THE OVEN In the event of a power failure, all the settings (time of day, programme setting or
programme in operation) will be cancelled. When the power is restored, the numbers in
the display will fl ash, and the clock/timer has to be reset.
The electronic clock features Touch-Control technology. To operate, simply touch the
glass control symbols with your fi ngertip.
The touch control sensitivity continuously adapts to changing conditions. Ensure that the
glass front of the control panel is clean and free of any obstacles when turning on the
If the clock does not respond correctly when you touch the glass, you will need to turn
off the oven for a few seconds and then turn it back on. By doing this, the buttons adjust
automatically and will react once more to fi ngertip control.
Setting the Electronic Clock
When turning your oven on, you will see the clock fl ashing 12:00 . Set the clock by
symbols on the glass.
You will hear 2 beeps confi rming the time has been set.
If you want to change the time, turn the oven off. Touch the clock button until the
Change the time by touching the buttons. The two beeps you hear after that will
confi rm the new time has been set.
After setting the clock, the oven is ready for use:
1 Press the On button .
2 Press to select the desired cooking
3 The temperature display will show the preset
temperature for that cooking function.
Press on the temperature button
change it. Select the desired temperature by
pressing on the buttons.
4 The top oven cavity will start to heat up.
will start the fast preheating function for a few minutes.
The oven will beep when it reaches the selected temperature.
This preheating function turns on the turbo motor at the back of the top oven cavity.
5 During oven heating, the temperature
degree symbol on the temperature display
will fl ash to show that the food is being
6 Press on the Off button to stop cooking.
When cooking has fi nished, you will notice that oven cooling feature will work until the
temperature inside the oven has been suitably lowered.
The inside light will go on:
– When the oven door is open. If the door is not
closed after a certain time, the light will turn
off to reduce power consumption.
– When any cooking function is selected. The
light will turn off after a certain time.
If you want to turn the light on during cooking,
just touch the Oven Light button . If you want
to turn off the light press the the Oven Light button .11
Electronic clock functions
Electronic programmer functions
Cooking Duration This function allows you to programme cooking time length, after which
the oven will turn off automatically.
Programming Cooking Time:
1 Press on the clock button
. The symbol will light up.
2 Select the cooking time by pressing the
3 Two consecutive beeps will then sound and the display will show the
remaining cooking time. The symbol
will fl ash slowly to indicate
that the oven will switch itself automatically.
4 Select a cooking function and temperature.
5 Once the cooking time is complete, the oven will turn off, an alarm
symbol will fl ash more quickly.
6 Press on any button on the control panel to stop the alarm.
You can change the programmed time whenever you want by touching
and then on the buttons.
The two beeps you hear after that will confi rm the new time has been set.
End of cooking This function allows you to programme the time for cooking to stop,
after which the oven will turn off automatically.
Programming the Cooking Stop Time:
1 Press on the clock button
several times until the symbol lights
2 Select the cooking stop time by pressing the
3 Two consecutive beeps will then sound and the display will show the
remaining cooking time. The
symbol will fl ash slowly to indicate
that the oven will switch itself automatically.
4 Select a cooking function and temperature.
5 Once it is the set time, the oven will turn off, an alarm will sound and
symbol will fl ash more quickly.
6 Press on any button on the control panel to stop the alarm.
You can change the programmed cooking stop time at any moment by
pressing on the clock button
until the symbol fl ashes and then
buttons. The two beeps you hear after that will
confi rm the new time has been set.
You can use this function even if you are already cooking with the oven.
If this is the case, follow all of the above instructions except No. 4.12
This function allows both cooking time length and the stop time to be
programmed. With this function, the oven switches on automatically at
the set time and operates for the cooking time it has been programmed
for. It switches itself off automatically at the entered stop time.
1 Press on the clock button
. The symbol will light up.
2 Select the cooking time by pressing the
3 Two consecutive beeps will then sound, and the display will show the
remaining cooking time. The
symbol will fl ash slowly.
4 Press on the clock button
several times until the symbol
5 Select the cooking stop time by pressing the
6 This will be confi rmed by two beeps. The current time will show on
symbol will remain lit.
7 Select a cooking function and temperature.
8 The oven will remain off, with the
fl ashing slowly. The clock will show the current time and the inside
light will remain off. The oven is now programmed.
9 When it is time to start cooking, the oven will switch on and will
operate for the programmed cooking time. The time function display
will show the remaining cooking time.
10 Once the set time is reached, the oven will turn off, an alarm will
and symbols will fl ash.
11 Press on any button on the control panel to stop the alarm.
If you wish to change the cooking stop time while cooking is in
progress, press on the clock button until the
You can then change the cooking stop time by pressing on the
The two beeps you hear after that will confi rm the new time has been set.
Minute minder A beep will go sound when the set time has fi nished, whether the oven is
Programming the Minute Minder:
1 Press on the minute minder button
. The symbol lights up.
2 Select the length of time after which you want the alarm to sound by
3 You will then hear two beeps; the display will show the time left be-
fore the alarm sounds and the symbol
will fl ash slowly, indicating
that the timer has been set.
4 Once the programmed time has passed, an alarm will sound and the
will begin to fl ash more quickly.
5 Press on any button on the control panel to stop the alarm.
You can change the programmed time whenever you want by touching
the minute minder button
until the symbol fl ashes, and then
buttons. The two beeps you hear after that will
confi rm the new time has been set.
COOKING TABLES The Cooking Tables show examples of temperature ranges and approximate cooking
times. The cooking mode depends on the model.
For the best results we recommend the oven to be preheated with the function
Baked rice 1,0 Lower
CHILD LOCK FUNCTION This function locks the oven, preventing small
children from playing with it.
To turn on the function, press on the
buttons until you hear a long beep.
The oven is now locked.
If the oven is Off the word SAFE appears on the
When the oven is on all the buttons keys are
locked except the Off button .
To switch off the child lock, touch the and buttons simultaneously until you hear a
long beep and SAFE goes out in the display.
OVEN SAFETY CUT-OUT If not switched off after a certain time, or if the temperature is not modifi ed, the oven
switches off automatically.
The oven switches itself off when the oven temperature is:
50-120ºC after 12,5 hours
120-200ºC after 8,5 hours
200-250ºC after 5,5 hours
Press any button for using the appliance after a safety cut out.
The safety cut-out is cancelled if the clock function DURATION or END is set.
WATER CLEANING FUNCTION About this function
In order to keep you appliance working properly it should be regularly cleaned to prevent
any build up of food, deposits or greases. This function can help to make the cleaning
process easier and more convenient for you.
By using heat, Steam and few drops of washing up liquid food deposit are loosened and
softened enough to make their removal much easier-eliminating the need to scrub the
enamel and avoid any scratches on the surface.
• Remove all internal components (side shelves support/Wire Shelfs/pans ) before use.
• Put 500 ml approximately of water with a few drops of washing up liquid added into
a large absorbent sponge which is placed on the base of the oven cavity.
• If the oven cavity is heavily soiled, you may want to leave the solution to soak for a
• Close the oven door
• Select the “Bottom” function at a temperature of 220°C
• Select with the Timer a period of 5 minutes18
• After the cycle is fi nished please wait 15 minutes before opening the door.
• Make sure that the appliance is switched off.
• Use the large absorbent sponge to remove any excess of water from the base of the
• You can now clean the inside of the oven
• Make sure at the end to dry all the inside and the surround of the appliance,
particularly the door seals.
CARE AND CLEANING Caution!
Before carrying out any work, the appliance must be disconnected from the mains
Cleaning the Inside of the Oven
• The inside of the oven should be cleaned to remove food and grease deposits, which
can give off smoke or odours and cause stains to appear.
• With the oven cold and for enamelled surfaces (e.g. the fl oor of the oven) use a nylon
brush or sponge with warm soapy water. If using special oven cleaning products, use
only on enamelled surfaces and follow the manufacturer’s instructions.
Do not clean the inside of your oven with a steam or pressurised water jet. Do not use
either metallic scouring pads or any material that could scratch the enamel.
Cleaning the Oven Exterior and Accessories
Clean the outside of the oven and the accessories with warm soapy water or with a mild
Never use metallic scouring pads or commercial or scouring powders that could scratch
the enamel. For stainless steel surfaces, proceed with care and only use sponges or cloths
that cannot scratch them.
To clean the outside of the oven do not attempt to remove the controls, as for this, the
oven has to be fi rst removed from the kitchen unit.19
Cleaning the Large Interior Glass Door
Be careful: the oven door closes when the interior glass is removed.
1. Open the oven door.
2. Pull the glass upwards from the bottom (A).
3. The interior glass is now free. Remove it.
4. Clean the interior glass and the inside of the
5. Insert the supports on the interior glass
into the grooves at the top of the door (B).
6. Lower the glass into the door (C).
7. The glass is fi xed to the door by pressing the
two lower supports (D) while pushing the
glass into the door (E).
Changing the oven bulb
To change the bulb, fi rst ensure that the oven is
disconnected from the power supply.
1. Ease out the Shelf Support Runnerss,
releasing them from the bolt (F).
Enviroments concerns
2. Loosen the lens from the lamp holder with
the help of the appropriate tool. Exchange
3. Replace the lens, making sure it fi ts in the
correct position without forcing it.
The replacement bulb must be temperature resistant to 300 °C. These can be ordered
from the Technical Service Department.
ENVIROMENTS CONCERNS The symbol on the product or on its packaging indicates that this product may not be
treated as household waste. Instead it shall be handed over to the applicable collection
point for the recycling of electrical and electronic equipment. By ensuring this product
is disposed of correctly, you will help prevent potential negative consequences for the
environment and human health, wich could otherwise be caused by inappropriate waste
handling of this product. Please contact your local city offi ce, your household waste
disposal service or the shop where you purchased the product.
Ecological Packaging
The packaging materials are completely recyclable and can be used again. Check with
your local authority on the regulations for disposing of this material.
If the appliance is not working correctly, please check the following before contacting
If, despite these recommendations, the problem continues, contact our Technical
TECHNICAL DATA If the equipment does not work, please contact the Technical Service Department and advise
them of the problem, indicating:
1. Serial number (S-No)
2. Appliance model. (Model)
You will fi nd this information on the rating plate on the lower part of the oven when the
The item that you have bought meets the European directives on electrical material safety
(73/23/CEE) and electromagnetic compatibility (89/336/CEE).
INSTALLATION This information is intended for the installer, as the person responsible for assembly and
electrical connection. If you install the oven yourself, the manufacturer will not be held
responsible for any possible damage.
Installation must only be performed by a fully qualifi ed electrician who must ensure
regulations laid down for installation are observed.
The oven does not work
The inside light of the
Steam and condensation
settle on the food and in
The oven fan is noisy
Check its assembly in accordance with the instruction manual.
Smoke is given off while
This is normal during its first use.
Periodically clean the oven.
Reduce the amount of grease or oil added to the Deep
Expected cooking results
Do not use higher temperature settings than those in the cooking tables.
Review the cooking tables to obtain guidance on
the working of your oven.
When the cooking process is completed, do not leave the
dishes standing in the oven for longer than 15-20 minutes.
The display shows “12.00”
Check that shelves and bakeware are not vibrating in contact
Check the connection to the electrical circuit.
Check the fuses and current limiter of your installation.
Ensure the clock is in the manual or programmed mode.
Check the position of the function and temperature selectors
Before Installation. Comments
• To unpack the oven, pull the tab located on the lower part of the box.
• A niche is required in the kitchen unit as per the dimensions shown on the fi gure,
providing a minimum depth of 580 mm. (See fi gures describing oven fi tting on the
• To fi t multifunction ovens in their locations, the back part of the unit, must not have
any projections (reinforcements, pipes, sockets, etc).
• The adhesive used for the plastic covering of kitchen furniture must be able to
withstand temperatures up to 85ºC.
Electrical Connection. Legal Requirements
The installer must check that:
• The voltage and cycles of the mains supply correspond to that indicated on the rating
• The electrical installation can stand the maximum power indicated on the rating plate.
• The connection diagram is shown in the
• The electrical connection has adequate earthing in accordance with regulations in
• The connection must be carried out with an omnipolar switch, of an adequate size for
the current drawn. There must be a minimum aperture between contacts of 3 mm to
enable disconnection in the case of emergency, cleaning or bulb exchange.
Under no circumstances must the earth wire pass through this switch.
After connecting the electricity, check that all the electrical parts of the oven are
working.23 InstallationInstalling the OvenFor all ovens and after carrying out the electrical connection, 1. Introduce the oven into the kitchen unit, taking care not to trap the cable.2. Fix the oven to the unit by means of the 2 screws supplied via the holes that can be seen when the door is opened.3. Check that the oven housing is not in contact with the sides of the unit and that there is at least 2 mm separating the neighbouring units. 60
www.aeg-electrolux.com/shop25
élément saillant (renforts, tuyaux, prises, etc).
www.aeg-electrolux.com/shop47
www.aeg-electrolux.com/shop69
www.aeg-electrolux.com/shop91