FSN 1660 - Fridge BLOMBERG - Free user manual and instructions
Find the device manual for free FSN 1660 BLOMBERG in PDF.
User questions about FSN 1660 BLOMBERG
0 question about this device. Answer the ones you know or ask your own.
Ask a new question about this device
Download the instructions for your Fridge in PDF format for free! Find your manual FSN 1660 - BLOMBERG and take your electronic device back in hand. On this page are published all the documents necessary for the use of your device. FSN 1660 by BLOMBERG.
USER MANUAL FSN 1660 BLOMBERG
Technical Features /1
Electrical requirements /2
Transportation instructions /2
Installation instructions /2
Temperature control and adjustment /3
Before operating /3
Indicator lights/4
Storing frozen food/4
Freezing fresh food /4
Fast freeze /4
Making ice cubes /5
Getting to know your appliance /5
Defrosting /6
Cleaning and care /6
Repositioning the door /7
Do's and don'ts /7
Trouble - shooting /8
NL Inhoud 26-33
Notice installation/19
Hnctpykun no TpaHcnoptnpoBke/70
HHTpyKnn no yCTaHOBKe/70
KohtpObnHnHaCtpoKaTeMnePaTypb/71
Ipeep Hauanom 3Kcnnyataunn/71
XpaHHeHne 3amOpOKeHHbIX npOdyKToB/72
3amopaxhaanhe cbexnx npdykTob/72
BbICTpa 3aMOp03ka/72
PnroToBneHne Ky6KOB nbda/73
O3haKOMnEHHe c npH6opom/73
Pa3mOpaxnBaanHe/74
3amaHa nAmnoQn BnyTppeHHero
OCBeueHn74
Yn7yoxo/74
IpeceTaHOBka DBepeh/75
Hryxno Hero Henb3a denatb/75
YcTpaHHeHn HenonaoK/76
YbKaMaembl nokyntenb/77-79
FSM 1660
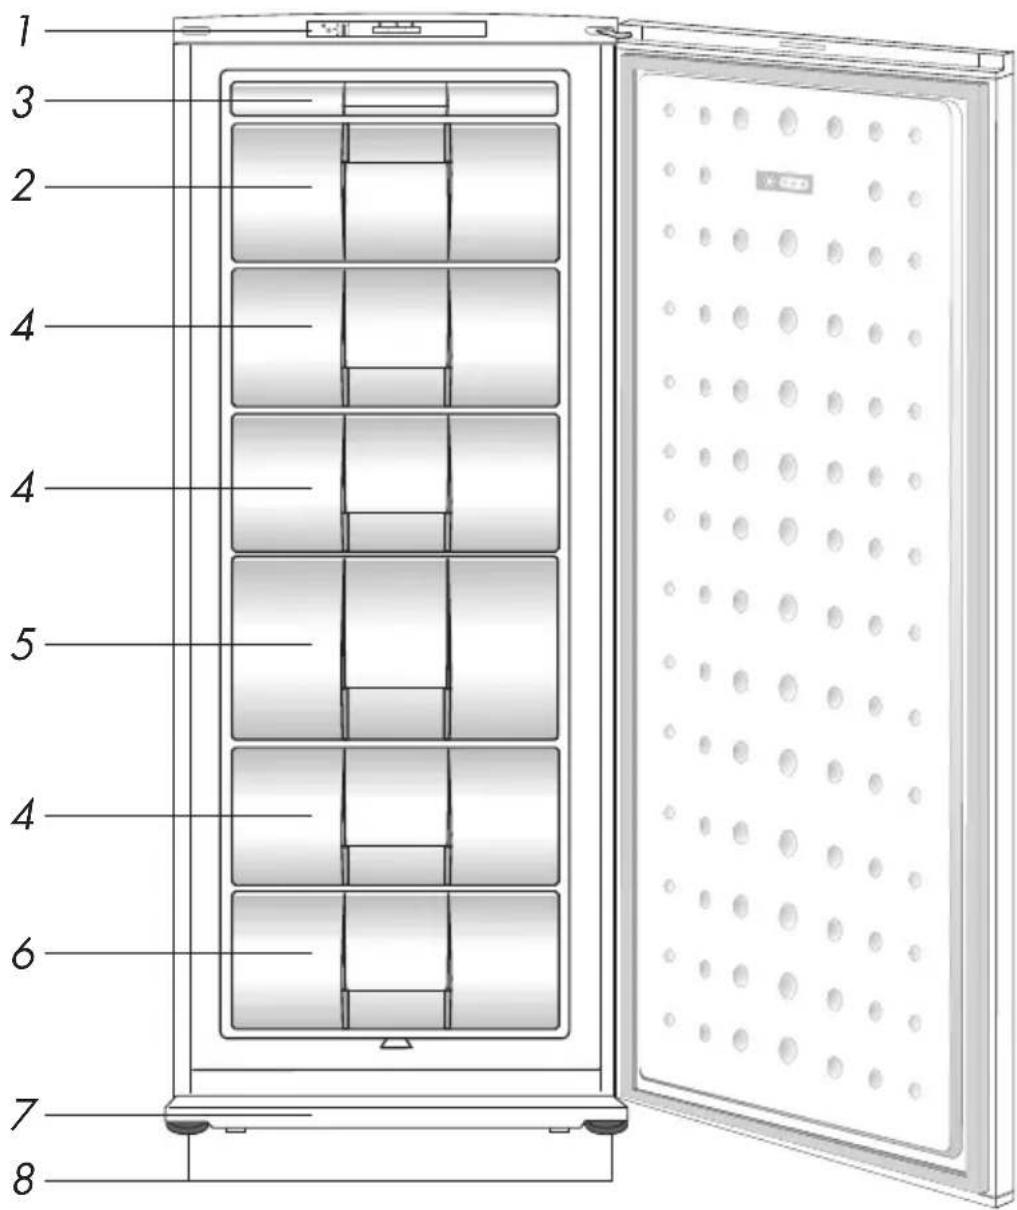
Fig. 1 - A
FSM 1670
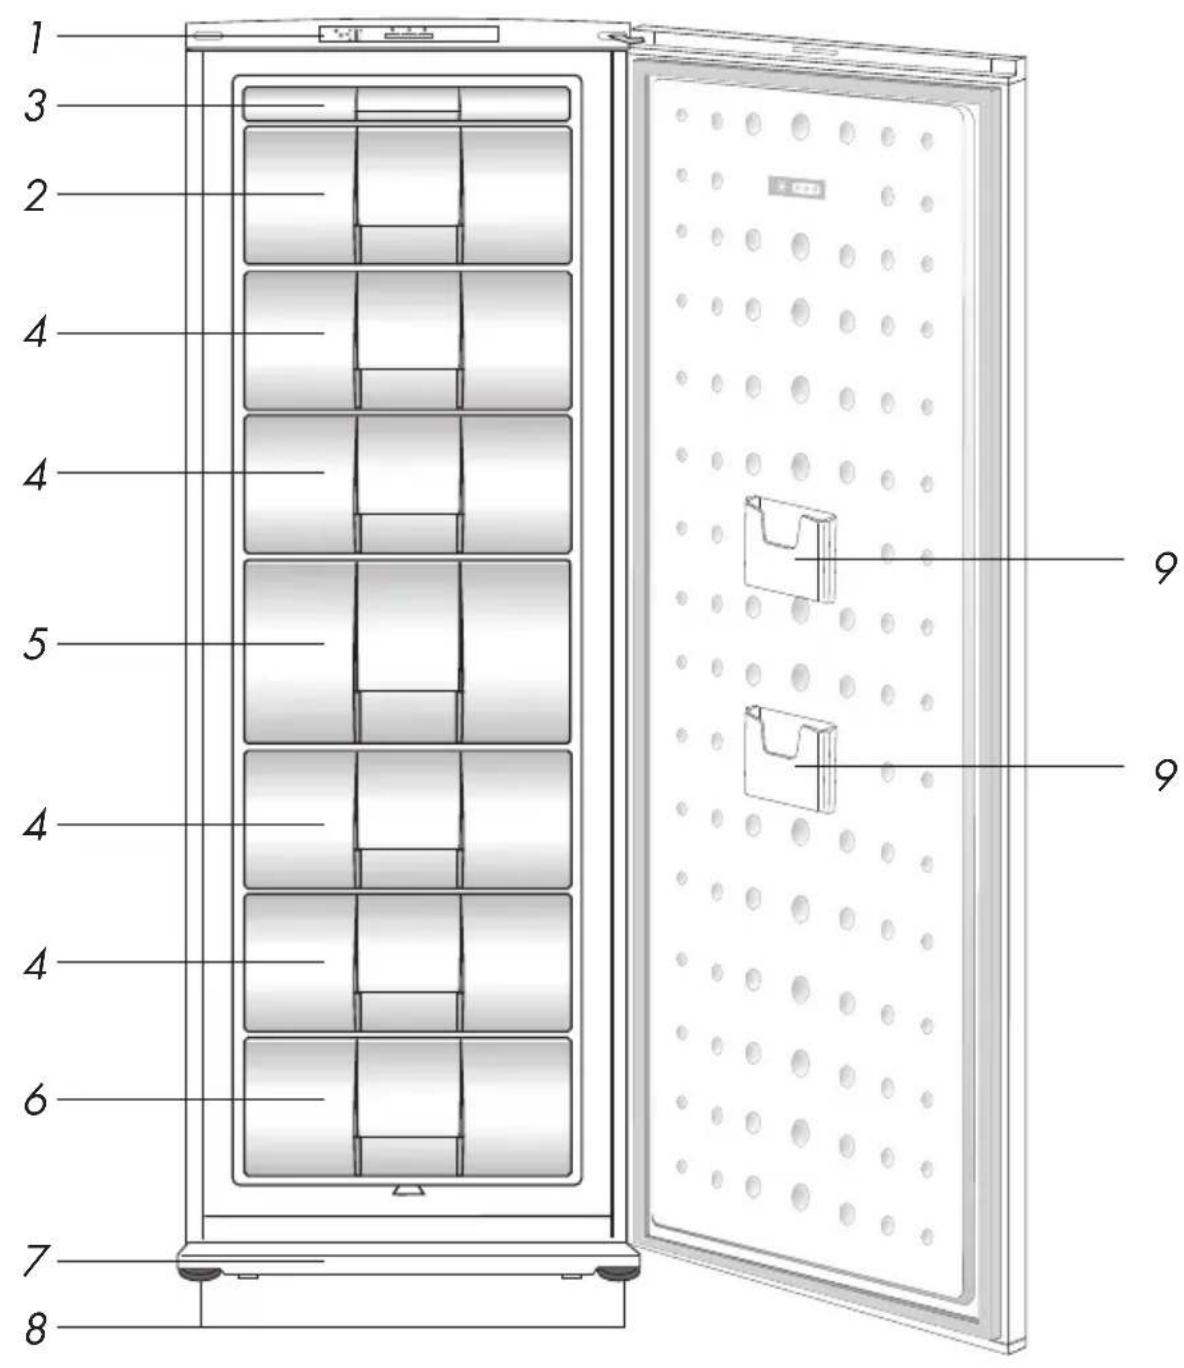
Fig. 1 - B

45123
Fig. 2
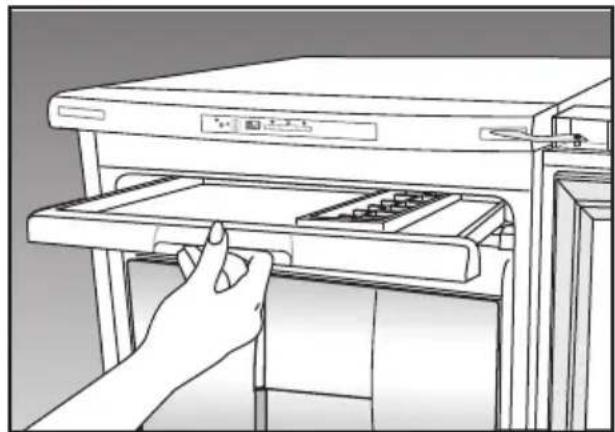
Fig. 3
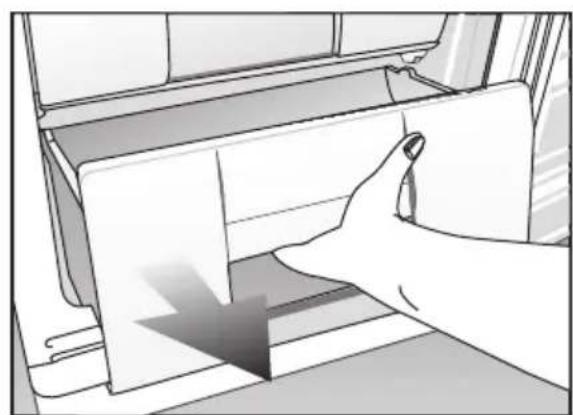
Fig. 4
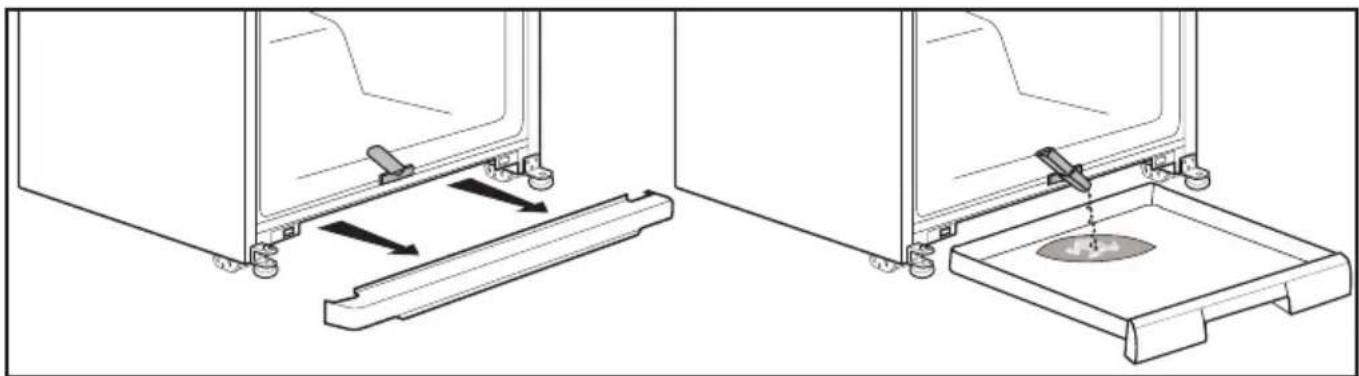
Fig. 5
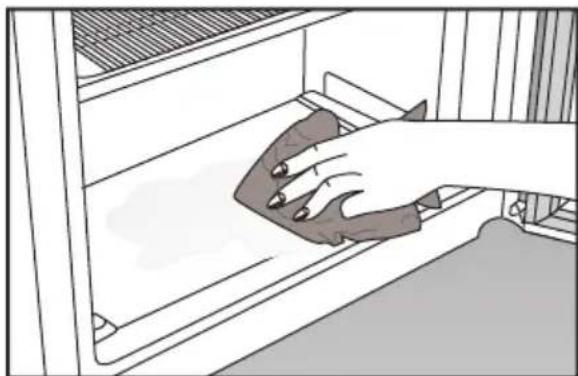
Fig. 6
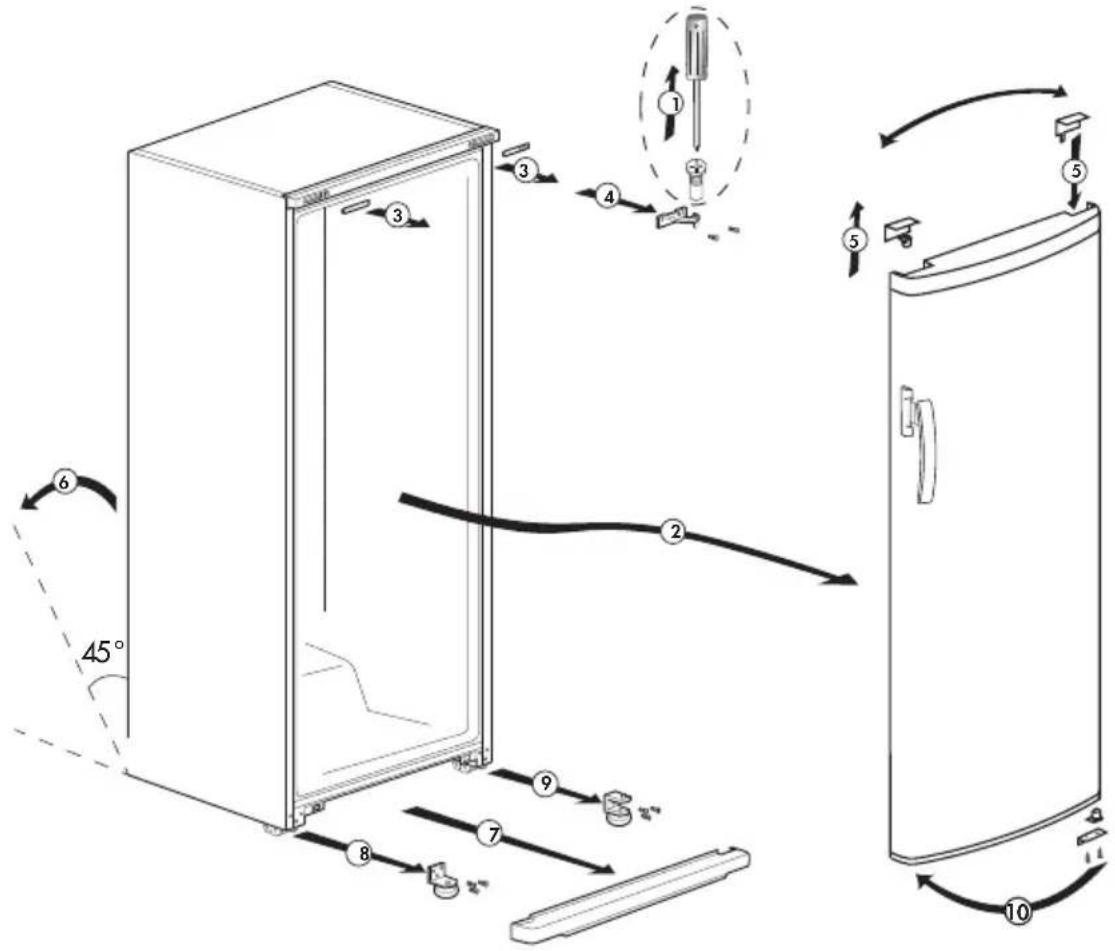
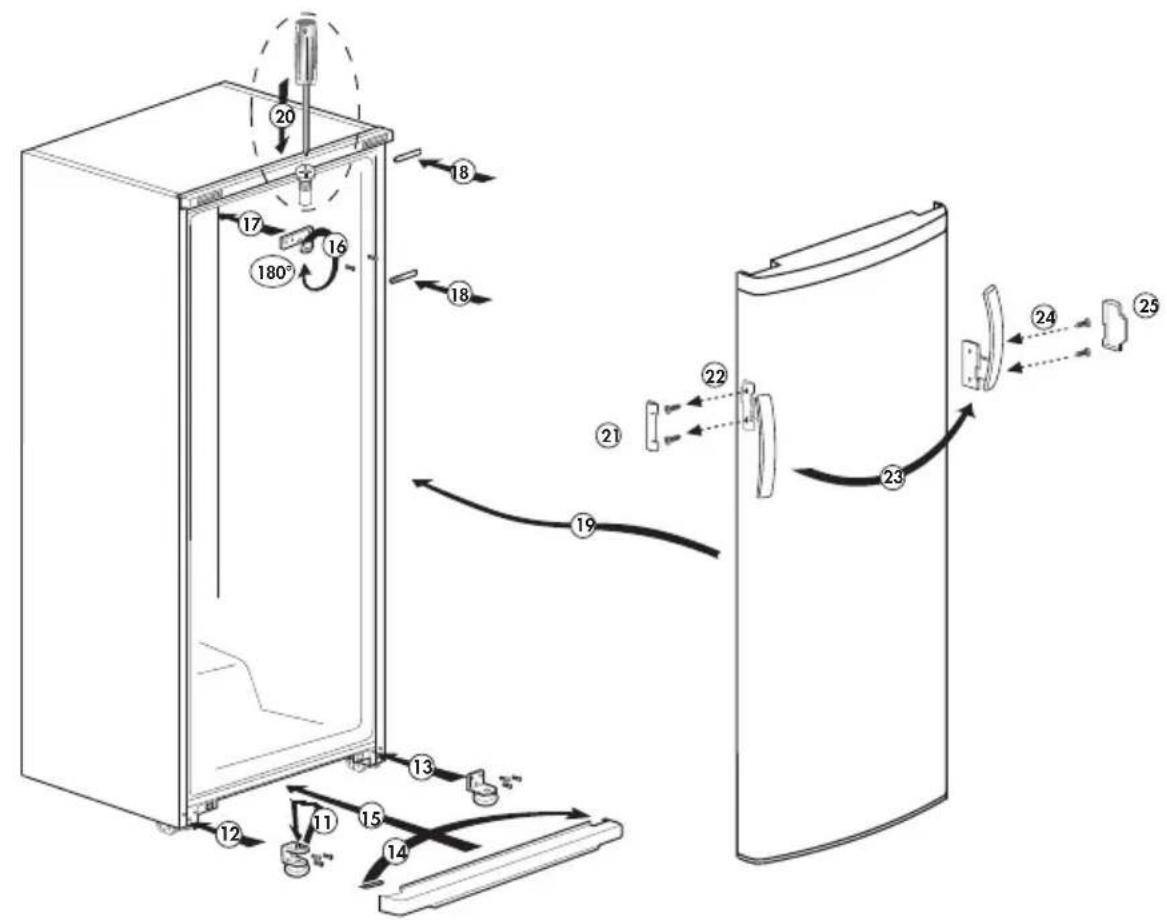
Fig. 7
Congratulations on your choice of a Blomberg
Appliance, designed to give you many years of service.
Safety first!
Do not connect your appliance to the electricity supply until all packing and transit protectors have been removed.
-
Leave to stand for at least 4 hours before switching on, to allow compressor oil to settle, if transported horizontally.
-
If you are discarding an old appliance with a lock or latch fitted to the door, ensure that it is left in a safe condition to prevent the entrapment of children.
-
This appliance must only be used for its intended purpose i.e. the storing and freezing of edible foodstuff.
-
Do not dispose of the appliance on a fire. Your appliance contains non CFC substances in the insulation which are flammable. We suggest you contact your local authority for information on disposal and available facilities.
-
We do not recommend use of this appliance in an unbeated, cold room. (e.g. garage, conservatory, annex, shed, out-house etc.)
To obtain the best possible performance and trouble free operation from your appliance it is very important to read these instructions carefully. Failure to observe these instructions may invalidate your right to free service during the guarantee period.
Please keep these instructions in a safe place for easy reference.
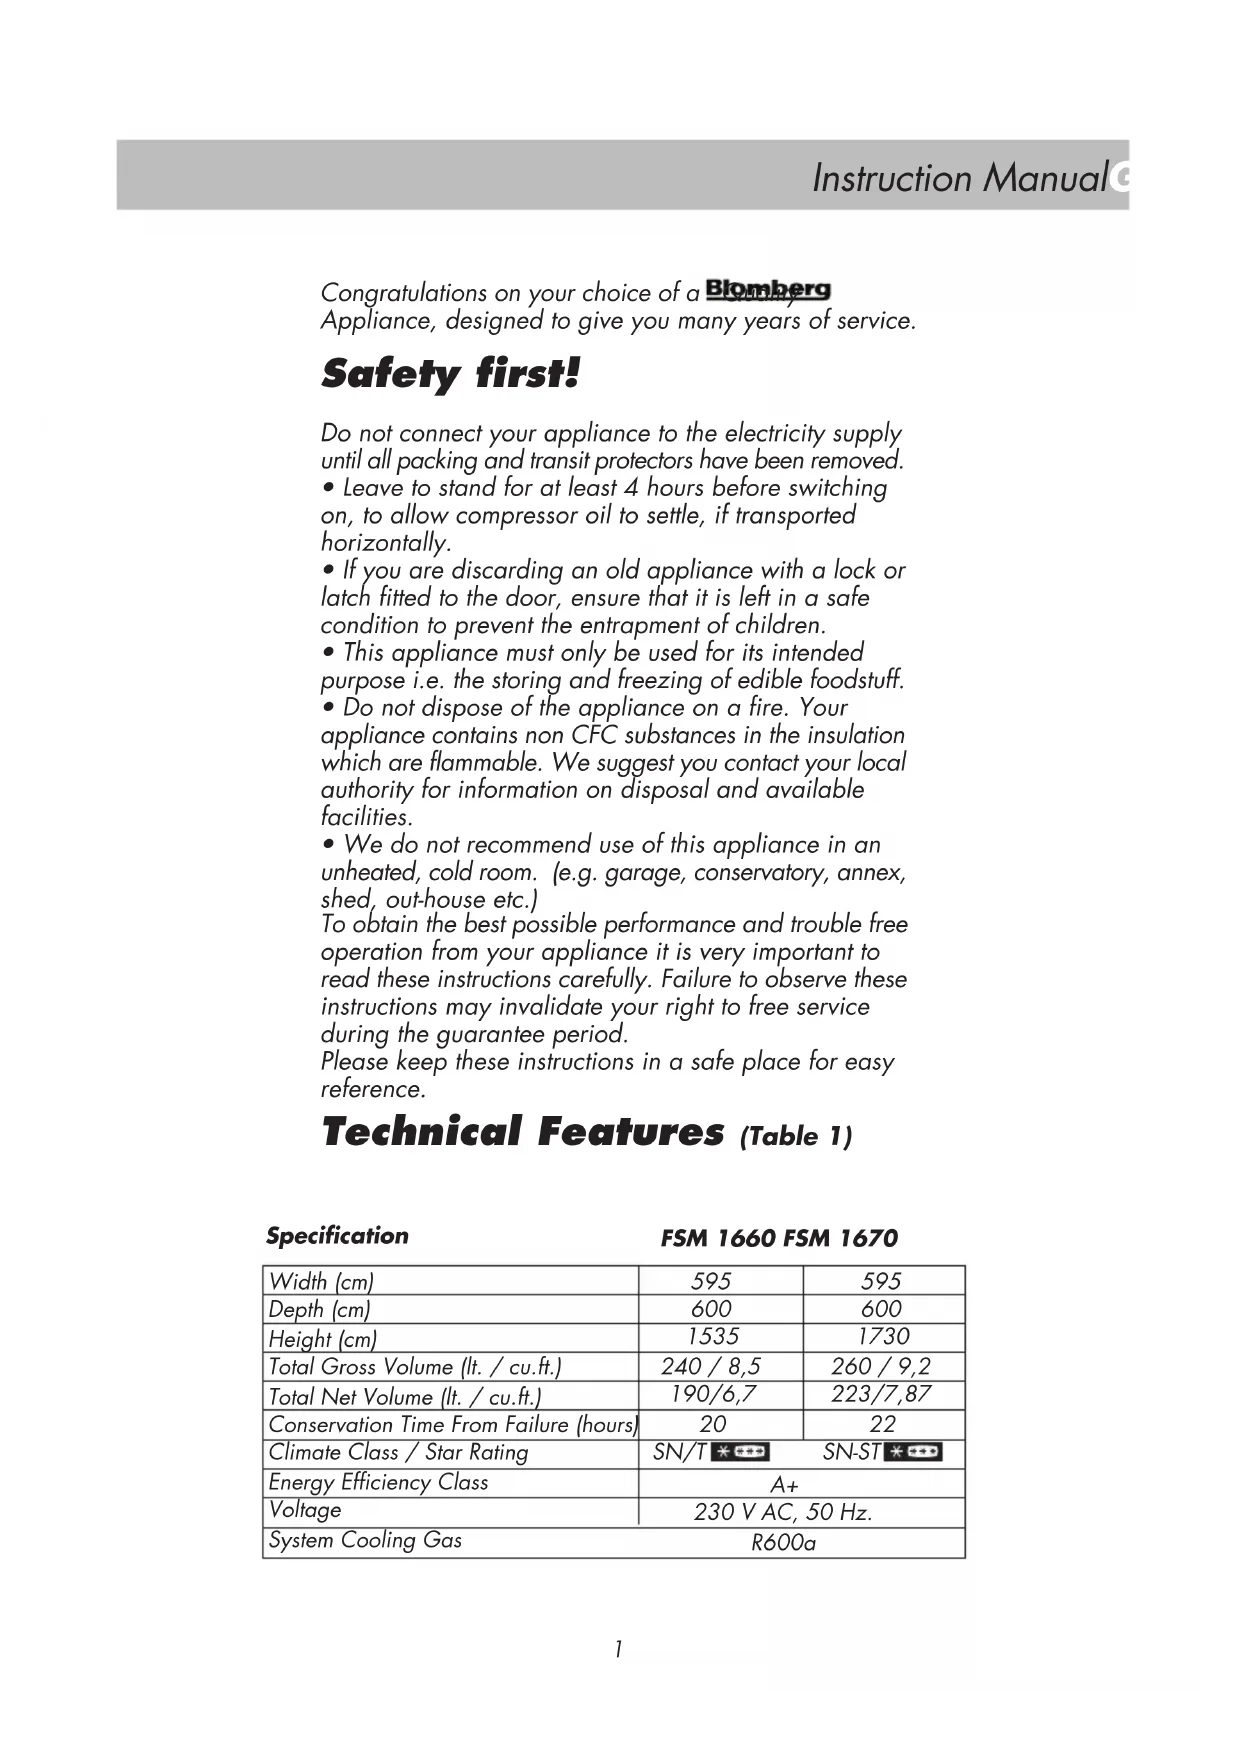
Technical Features (Table 1)
Specification
FSM 1660 FSM 1670
| Width (cm) | 595 | 595 |
| Depth (cm) | 600 | 600 |
| Height (cm) | 1535 | 1730 |
| Total Gross Volume (lt. / cu.ft.) | 240 / 8,5 | 260 / 9,2 |
| Total Net Volume (lt. / cu.ft.) | 190/6,7 | 223/7,87 |
| Conservation Time From Failure (hours) | 20 | 22 |
| Climate Class / Star Rating | SN/T * SN-ST | |
| Energy Efficiency Class | A+ | |
| Voltage | 230 V AC, 50 Hz. | |
| System Cooling Gas R600a | ||
Electrical requirements
Before inserting the plug into the wall socket make sure that the voltage and the frequency shown in the rating plate inside the appliance corresponds to your electricity supply.
We recommend that this appliance be connected to the mains supply via a suitably switched and fused socket in a readily accessible position.
Warning! This appliance must be earthed.
Repairs to electrical equipment should only be performed by a qualified technician. Incorrect repairs carried out by an unqualified person carry risks that may have critical consequences for the user of the appliance.
-
Do not dispose of the appliance on a fire. At Blomberg, the care and protection of our environment is an ongoing commitment. This appliance which is among the latest range introduced is particularly environment friendly. Your appliance contains non CFC/HFC natural substances in the cooling system (called R600a) and the insulation (called cyclopentane) which are potentially flammable if exposed to fire. Therefore, take care not to damage, the cooling circuit/ pipes of the appliance in transportation and in use. In case of a damage do not expose the appliance to fire, potential ignition source and immediately ventilate the room where the appliance is situated.
-
We suggest you contact your local authority for disposal information and facilities available.
WARNING- Keep ventilation openings, in the appliance enclosure or in the built-in structure, clear of obstruction.
WARNING- Do not use mechanical devices or other means to accelerate the defrosting process, other than those recommended by the manufacturer.
WARNING- Do not damage the refrigerant circuit.
WARNING- Do not use electrical appliances inside the food storage compartments of the appliance, unless they are of the type recommended by the manufacturer.
Transportation instructions
- The appliance should be transported only in upright position. The packing as supplied must be intact during transportation.
- If during the course of transport the appliance has been positioned horizontally, it must not be operated for at least 4 hours, to allow the system to settle.
- Failure to comply with the above instructions could result in damage to the appliance, for which the manufacturer will not be liable for.
- The appliance must be protected against rain, moisture and other atmospheric influences.
Important!
- Care must be taken while cleaning/carrying the appliance not to touch the bottom of the condenser metal wires at the back of the appliance, as this could cause injury to fingers and hands.
- Do not attempt to sit or stand on top of your appliance as it is not designed for such use. You could injure yourself or damage the appliance.
- Make sure that the mains cable is not caught under the appliance during and after moving, as this could damage the cable.
- Do not allow children to play with the appliance or tamper with the controls.
Installation instructions
- Do not place the appliance near cookers or radiators or in direct sunlight, as this will cause extra strain on the appliance's functions. If installed next to a source of heat or freezer, maintain the following minimum side clearances: From Cookers 30 mm
From Radiators 300 mm
From Freezers 25 mm
- Make sure that sufficient room is provided
around the appliance to ensure free air circulation.
- Put the back airing lid to the back of your refrigerator to set the distance between the refrigerator and the wall.
- The appliance should be positioned on a smooth surface. The two front feet can be adjusted as required. To ensure that your appliance is standing upright adjust the two front feet by turning clockwise or counterclockwise, until firm contact is secured with the floor. Correct adjustment of feet prevents excessive vibration and noise.
- Refer to "Cleaning and Care" section to prepare your appliance for use.
Temperature control and adjustment
Temperature is controlled by the thermostat knob (Fig. 2). "Number 4" is the coldest setting.
The normal storage temperature of your appliance should be -18^ (0 F). If the thermostat knob is turned counter clockwise from position 1, the appliance will be switched off and "click" sound will be heard. Lower temperatures can be obtained by adjusting the thermostat knob towards Position 4.
We recommend checking the temperature with a thermometer to ensure that the storage compartments are kept to the desired temperature. Remember to take the reading immediately since the thermometer temperature will rise very rapidly after you remove it from the freezer.
Please remember that each time the door is opened cold air escapes and the internal temperature rises. Therefore never leave the door open and ensure it is closed immediately after food is put in or removed.
Before operating
Final Check
Before you start using the freezer check that:
- The feet have been adjusted for perfect levelling.
- The interior is dry and air can circulate freely at the rear.
- The interior is clean as recommended under "CLEANING AND CARE."
- The plug is inserted into the wall socket and the electricity supply is switched on. Avoid accidental disconnection by taping over the switch.
And note that:
- You will hear a noise as the compressor starts up. The liquid and gases sealed within the refrigeration system may also make some noise, whether the compressor is running or not. This is quite normal.
- If you are going to freeze fresh food, you must press the fast-freeze switch.
- We recommend setting the thermostat knob at 2 and monitoring the temperature to ensure the appliance maintains desired storage temperatures (see section "Temperature control and adjustment").
- Do not load the appliance immediately it is switched on. Wait until the correct storage temperature has been reached. We recommend that you check the temperature with an accurate thermometer (see; Temperature Control and Adjustment).
- If you find the freezer door difficult to open just after you have closed it, don't worry. This is due to the pressure difference which will equalize and allow the door to open normally after a few minutes.
- You will hear a vacuum sound just after closing the door. This is quite normal.
Indicator lights
There are three coloured indicator lights located inside the appliance which show the operating mode of the freezer (Fig. 2).
Amber Indicator (1)
Illuminates when the fast-freeze switch (4) is turned on and stays on until the fast freeze operation is deactivated manually. Fast-freeze operation is for freezing fresh food (see Freezing Fresh Food, section).
Green Indicator (2)
Illuminates when the appliance is connected to the mains and will glow as long as there is electricity present. The green indicator does not give any indication of the temperature inside the freezer.
Red Indicator (3)
Illuminates
a. When the appliance is first switched on, and will stay on until the pre-set temperature has been attained.
b. If the appliance is overloaded with fresh food.
c. If the appliance door is left open accidentally.
Thermostat knob (5)
The thermostat knob is located on the indicator light frame.
Important:
When you press the fast-freeze switch, there may be a short delay before the compressor starts to operate. This is normal and not a compressor fault.
Storing frozen food
Your freezer is suitable for the long-term storage of commercially frozen foods and also can be used to freeze and store fresh food.
Important Note:
If there is a power failure do not open the door in order to preserve interior temperature. Frozen food should not be affected if the failure lasts for less than the "conservation time from failure (hours)" declaration mentioned in the Technical Features (Table 1). If the failure is longer, then the food should be checked and either eaten immediately or cooked and then re-frozen.
Freezing fresh food
Please observe the following instructions to obtain the best results.
Do not freeze too much fresh food at the same time. The quality of the food is best preserved when it is frozen quickly.
The maximum amount of fresh food that can be frozen in 24 hrs. should not exceed the freezing capacity of your appliance.
Please avoid loading warm food into your appliance.
Fast freeze
If large amounts of fresh food is going to be frozen, push the fast freeze switch 30 hrs. before putting the fresh food in the fast freeze compartment.
It is strongly recommended to keep fast freeze switch on 24 hrs. to freeze maximum amount of fresh food declared as freezing capacity.
Take special care not to mix frozen food and fresh food.
Making ice cubes
(Fig 3)
Fill the ice - cube tray 3/4 full with water and place it in the freezer. Loosen frozen trays with a spoon handle or a similar implement; never use sharp-edged objects such as knives or forks.
Getting to know your appliance
WARNING! Below information about accessories are supplied just for reference. Below accessories may not be exactly same as the accessories of your appliance.
FSM 1660 - FSM 1670
- Control Panel
2.Flap (Fast-Freeze compartment) (190 mm. height) - Ice cube tray & Ice bank
- Big drawer (190 mm. height)
- Big drawer (250 mm. height)
- Small drawer (190 mm. height)
7.Air grille - Adjustable front feet
- Slim pack storage pocket
Defrosting
(Fig. 4, 5, 6)
Defrosting is very straightforward and without mess thanks to a special defrost water collection facility at the bottom of the freezer.
Defrost twice a year or when a frost layer of around 7mm (1/4^ ) has formed. To start the defrosting procedure, pull out the mains plug. All food should be wrapped in several layers of newspaper and stored in a cool place (e.g. fridge or larder).
Remove all freezer drawers. The special defrost collection basin collects the defrost water.
Containers of warm water may be placed carefully in the freezer to speed up the defrosting.
Do not use pointed or sharp-edged objects such as knives or forks to remove the frost.
Never use hair dryers, electrical heaters or other such electrical appliances for defrosting.
When defrosting has finished, put the accessories and food into the appliance, press the fast freeze switch and leave it on at least 24 hrs.
Cleaning and care
- We recommend that you switch off the appliance at the socket outlet and pull out the mains plug before cleaning.
- Never use any sharp instruments or abrasive substances, soap, household cleaner, detergent or wax polish for cleaning.
- Use lukewarm water to clean the cabinet of the appliance and wipe it dry.
- Use a damp cloth wrung out in a solution of one teaspoon of bicarbonate of soda to one pint of water to clean the interior and wipe it dry.
- Make sure that no water enters the temperature control box.
- If the appliance is not going to be used for a long period of time, switch it off, remove all food, clean it and leave the door ajar.
- We recommend that you polish the metal parts of the product (i.e. door exterior, cabinet sides) with a silicone wax (car polish) to protect the high quality paint finish.
- Any dust that gathers on the condenser, which is located at the back of the appliance, should be removed once a year with a vacuum cleaner.
- Check door seals regularly to ensure they are clean and free from food particles.
-
Never:
-
Clean the appliance with unsuitable material; e.g. petroleum based products.
-
Subject it to high temperatures in any way,
Scour, rub etc., with abrasive material. -
Excess deposit of ice should be removed regularly with the plastic scraper provided. Large accumulation of ice will impair the performance of the freezer.
-
To remove a drawer, pull it as far as possible, tilt it upwards and then pull it out completely.
Repositioning the door Do's and don'ts
Proceed in numerical order (Fig. 7).
Do- Check contents of the freezer at regular intervals.
Do- Clean and defrost your freezer regularly (See "Defrosting")
Do- Keep food for as short a time as possible and adhere to "Best Before" and "Use By" dates.
Do- Store commercially frozen food in accordance with the instructions given on the packets.
Do- Always choose high quality fresh food and be sure it is thoroughly clean before you freeze it.
Do- Prepare fresh food for freezing in small portions to ensure rapid freezing.
Do- Wrap all foods in aluminium foil or freezer quality polythene bags and make sure any air is excluded.
Do- Wrap frozen food immediately after purchasing and put it in to the freezer as soon as possible.
Do- Separate food in the compartments and complete the contents card. This will enable you to find food quickly and avoid excessive door opening. This will save electricity.
Don't-Leave the door open for long periods, as this will cause electricity waste and excessive ice formation.
Don't- Use sharp-edged objects such as knives
or forks to remove the ice.
Put hot food into the freezer. Let it cool down first.
Don't- Put liquid-filled bottles or sealed cans containing carbonated liquids into the freezer, as they may burst.
Don't- Store poisonous or dangerous substances in the freezer. Your freezer has been designed for the storage of edible foodstuffs only.
Don't- Exceed the maximum freezing capacity when freezing fresh food.
Don't- Consume ice-cream and water ices direct from the freezer. The low temperature may cause 'freeze burns' on lips.
Don't- Freeze fizzy drinks.
Don't- Try to keep frozen food which has thawed; it should be eaten within 24 hours or cooked and refrozen.
Don't- Remove items from the freezer with wet hands.
Don't- Close the door before replacing the fast-freeze compartment cover.
Don't- Remove the plastic cover on the rear wall.
Don't- Damage the pipes on the appliance.
Trouble - shooting
If the appliance does not operate when switched on, check;
- That the plug is inserted properly in the socket and that the power supply is on. (To check the power supply to the socket, plug in another appliance)
- Whether the fuse has blown/circuit breaker has tripped/main distribution switch has been turned off.
- That the temperature control has been set correctly.
- That the new plug is wired correctly, if you have changed the fitted, moulded plug.
If the appliance is still not operating at all after above checks, contact the dealer from whom you purchased the unit.
Please ensure that above checks have been done, as a charge will be made if no fault is found.
Specifications (Table 1)
Spcification
FSM 1660 FSM 1670
Bestilling of reservedele
Fax servicebestilling
Fax reservedelsbestilling
E-mail servicebestilling
E-mail reservedelsbestilling
BHytpn np6opa pacnoJoxeHbI Tpn cBeTHbIX
HHdkaTopa, KOToPbI e OTo6paXaOT pa6OuH peKIM
MOp03nblHo KaMepbI (pnc.2).
KeIbI nHdNkaTOp (1)
3TOT INHINKATOP BKJIOUaETCa npn BKNIOUeHHN KHOKN 6bICTPOI 3AMOP03Kn (4) n ropnt, noka onepaunie 6bICTPOI 3AMOP03Kn HE 6ydt OctAHOBNeHa BpyHyIO. Onpaunie 6bICTPOI 3AMOP03Kn ppeHa3NaHa dIra 3amopaxHBaHn CBexnx npOdyKTob (CM. pa3dJI "3amopaxHBaHne CBexnx npOdyKTob").
3eIeHbI INHdNKaTOp (2)
3TOT INHINKATOP BKIOUaETcR npn NOdkHOueHHN pnp6opa K 3JIeKTPoCeTu rOpNT npn HAnuH NJIeKTPoNTaHn. 3eJIeHbI INHINKaTOp He yKa3bIBaET Tempeatypy BHyTpN MOpO3HbHo KaMepbl.
KpacbHnHdNkTaOp (3)
3TOT HndkaTop ropnt B cneyouux cnyuax:
a.ПипервOM BKIOUeHnnp6opa n 6yET ropeTbdo DOCTNKeHn 3aDaHHoT EmnepaTpybl.
b. Ecn np6op nepepyxkeH CBexKIMn npOyKTamN
c. Ecnn DBepua np6opa cnuyauHNo octabneHa OTKpbIToN.
Pyka Tepmoctata (5)
PyuKa TepMoCTaTa pacnoJoxKeHa Ha naHei HnDnKaTopoB.
BaXHo:
Ipn HaxkataH KONK6bICTpoi 3amopo3Kn MoKeT
Ha6nOdaTbcra HeKOTopa 3aepKka 3anycka
Komnpeccopa.3To HopMaIbHO He RaBJeTc
HeNCpabHOCTbIO Komnpeccopa.
XpaHeHne 3amOpOKeHHbIX npOyKTOB
BaHaMop03HbHaKaMepaPpeHa3HaueHa dIaONrOcpoHOrO XpaHeHn IpOdyKTOB, 3aMOpOKeHHbIX B IpOMbIuHHeHbIX YcNoBnX, a TaKke IJN 3aMOp03KN XpaHeHn CBExNX PpOdyKTOB.
Baxhoe npmeuahne:
B cnyae nepe6oEB 3neKtpo3Hepn He OTkpbIaIe DBep, YTO6bl COxpaHTb BHYTpEHIO TeMnepaTpy. 3amopoxeHHble npodykbl He DOJXHbI NcnpTbC, ecnn 3neKtpuYeCTBO OTCyTCTBOBaNo MeHbWe BpemHxpaHeHHaNocNe OTKIOUeHHaNTaHHa, yKa3aHHoro B TexHHuecknx XapaKtepnctnKax (Ta6nua 1). B cnyae ecnn HAnpJxehne B ceTH OTCyTCTBOBaNo 6Oone DInTeJIbHOe BpEM, npOdyKTbI CneDyET npOBepntb N, IIn6o CbeCTb HeMeJeHHo, IN6o pInrOToBHTb N 3aTeM 3amOp03NTb 3aHOBO.
3amopaxnBaHne CBexnx npodykTOB
IJIyONyuHnHaUNyUWerope3yNbTaTApnpIepKINBaNTecb,NOXaJNyNCTa,CNeDyHOuNXNHCTpyKU.
He 3amopaxnBaIte cIIuKOM 60JIbUoe KOINueCTBO CBexnx npOyKTOB OndHOBpeMeHHo. KaueCTBO npOyKTOB COxpaHReTcI LyUwe BCero npN 6bICTPOJ 3amOp03Ke.
He npBbIaTe cyToCHo npOu3BOIDTeNbHOCTN MOpO3HbHO KaMepbI np60pa, T.e. KOJIueCTBO npOdyKTOB, KOToPOe MOpO3HbHa Ra KAmepa MoXeT 3amOpO3NTb 3a 24 Yaca.
He nomeuaine B npnbop ropnyne npodykTbI.
БыICTpaу 3amOp03Ka
Ecn Heo6xOJMo 3aMop03ntb 60nbwoe KOJIueCTBO CBeKnx IpoDyKTOB, HAXMnTe KHOKNy 6bICTPOI 3aMOp03Kn 3a 30 Yaca Do NOMEeHn CBexNX IpOdyKTOB B OTdJeHne 6bICTPOI 3aMOp03Kn.
KHONKY peKOMeHdyETcB KJIIOHTb BbIKIOUaTeIb 6bICTPO3aMOpO3KN 3a 24 Yaca Do 3aMOpO3KN MaKcHMalbHorO KOINueCTBa NpOdyKTOB, Yka3aHHoro KaK npOn3BOIDNTbHocTb No 3aMOpO3Ke.
БудTe BHHMaTeIbHbI! He cMeuBaIte yKe 3aMOpOKeHHbI e CBExNe npOdyKTbl.
PnroToBJIeHne Ky6NKOB Ibda (Pnc.3)
HanoHNHe IOTOK nla Nbda Ha 3/4 BOdo nI NOMeCTnTe B MOpO3nBHyIO KaMepy. OcBo6oNDte 3aMep3wH NToK C NOMOuSy pyKoTKn IOKKN NN DpyHM NDo6HbIM PpeMeTom; HNKOrDa He NCNoJIb3yIte dIg 3TOr OcTpbl EpMeTbl, TaKne KaK HOK INN BnKa.
O3HaKOMJIeHHe c np6Opom
BHHMaHHe! CLeDyIOUaI HOpMaUaIg O npHaJNeXHocTAX, pNBOuNTc TOnbKO dJa cnpaBKn. OnncAHHbIe HHXe npHaJNeXHocTm MOrYr HeCKoJIbKO OTnNuATbcraOT npHaJNeXHocTeB Bawero npbopa.
FSM 1660 - FSM 1670
(Pnc.1-A) (Pnc.1-B)
- NaheJIy npabJeHHa
- CTbOpka (OTdJIeHHe 6bIcTpoi 3aMopo3Kn) (BbICota 190 MM)
- IOTOK dIgIbda I KOHTeHep IJIbda
- BONBbWOBbIDBnKHOIHK (BbICota 190 MM)
- BONBbWOBBbIDBNKHOIHK (BbICOTa 250 MM)
6.MaBbBbDnKHOJHK (BbCota 190 MM)
7.Bo3dyxopacnpedeIeIteIbHapeIeTKa - PerynpemybIe nepeHne HOKKN
- KapmaH dIy xpaHeHHr TOHKx yNaKOBOK
Pa3MopaxnBaHne
(Pnc.4,5,6)
BlaorapcneuaJIbHomype3epByapyIraC6opa Taon BObl,poceccpa3MopaxnBaHn npocn He DOnKeH Bbl3BaTb 3aTpPydHeHn.
PpO3BOJNTe pa3MopaxnBaHne DbaXdbI B rOd nnn npn 6pa3OBaHH cNoR INHe TOnuHNO npIMepHO 7 MM (1/4").YTo6bHaayatb npoueDpy pa3MopaxnBaHnB, BblTaUNTe 3JIeKTPnueCKyIO BNkY.
Bce npodykTbI Heo6xOJIMO 3aBepHyTb B HeCKoJbKO cIOeB rA3eTHoH 6yMaHn I NOMEcTtB XoJOnHOe MeCTO (XoJOnJIbHnK nn KlaDoByU).
I3BJIeKInTe BCE BbIDBnXHbIe RIIKN MOpO3NlBHOI KAmepbl. TaJAA BOa CO6nPaETcB CneuaNBHom pe3epByape IIN TAION BObl.
IyckopeHn npouecca pa3MopaxNBAHn MOxHO OCTOPOXH NOmecTb EMKOCtN C TeINoB ODoB MOp03nblHyIO KaMepy.
He nCnoJb3yIte dIy ydaJIeHn IHe
ocTpOKoHeYhIe IIN OCTpblE ppeMeTbl, TaKHe KaK HOK IIN BUNKa.
HnkOrda He nCnoJb3yIte IJa pa3MopaxKuBaHHa
feHbI, 3JIeKtpo06orpeBaTeHN IpyrHe noO6HbIE np6Opbl.
IIO OKOHuaHn pa3MopaxuBaHn, NOMeCTnte npHaJnEJXHOCTn IpoDyKTbIB npN6Op, HAXMNTe KhoNky 6bICTpO 3aMOPo3Kn, N OCTaBbTe ee BKJIIOUeHHoK, KaK MInHMym, Ha 24 Yaca.
Ynctka u yxod
1.пелднayalomчntkn cneyet obra3aTeNbHO OTKIOHTb np60pHa po3eTke N BblTaunTB BNky.
2.ДЯЧСТКИнKOrДа He NcNoJb3yIte OcTpbie HNCTpyMeHTbI IIN a6pa3nBhIbe BeuecTBA,MbINO, CpeDCTBAДЯ ydaJIeHnIЯTeH,MOIOuNe CpeDCTBA IIN NOIIpyUOuNE cpeDCTBA Ha OCHOBE BOCKA.
- OuHCTnTe Kopnyc npnbopa TepnoB BDOJ n 3aTeM BbITpHTe Hacyxo.
4.ДЯ OUCNTK NODEJIENH BHYTPN XONODINbHnKa HcnoIb3yInTe TpIky,CMOeHHyIOB pactBOpe, COCToIeM N3 YaHHOJ NOKKN 6HKap6OHATA HaTPN (NHTbeBOI cOdbI)Ha NOL-NHTpa BOdbI, N 3aTeM npOTpIte NOBepxHocTn Hacyxo.
-
He donyckaTe nonadaHnB OdbI B Kopo6ky perynpoBKn TempepaTpybl.
-
Ecnn Bbl He co6npaetecb nCnoB30BaTb npn6op Ha npoTaeHnn DnnteHoro nepNoDa BpeMeHH, OTKnOHTe erO, N3BnKeHTe BCE npOdyKtbl, npOBedte uNCTky HocTaBBte DBepb npHOrkpblToH.
-
YTo6bI 3aunTnTB BbICOKokaueCTBeHHyIO OKpacky, peKOMeHdyETcra NOHPoBaTb MeTaJIINueCKne qAcTn XOJOnJIbHNka (HapxKyIO qAcTb DBePN, NaHeJI KOpnyca), pPIMehra CNIHKOHOBBI BOCK (CpeDcTBO dIg NOpNpOBKn ABTomObuNei).
8.Пьл,сКОньшуOCHa KOHDeHcaTope,KOTopbI HaxOДNTcHa 3aДHeN NaHelen np6opa,HaO pa3 B rOd ydaJIbT c NOMOuBIO nbInecocca.
- Perynpho npOBepaTe, He 3arp3HeH nH30JauHOHHbI CNoi Ha DBePn KycOyKaMn Nnui.
10.Hnkorda:
-
He qnCTHnTe np6Op c nOMoCbIO HEnoDxOaXuMaTePnaIOB,HaNPmEp,BeueCTb Ha OCHOBHeTepnoyKToB.
-
He noDBepraTe np6op BO3dEiCTBnIO BbICOKHX TemnepaTyp.
He cko6nnte, He TpuTe n T.D. npu6op a6pa3NBbIMMaTePnaJAMN.
11.И36bIToHbIe OTNoXeHnЯ Nbda cneDyET perynrpoYdaTb npn NOMOu NlactMaccOBoro ckpe6ka, BxOJaUeRoB KOMNJIeKT NOCTaBKn. 4pe3MePHoe cKoPHeHne Nbda 6ydt yxUdWt b PpOn3BOIDTeNbHOcTb MOp03NlbHoN KaMepbl.
- YTo6bI BbITaHTb BbIDBnXHOn RaNk, BbITAHTe erO, HAcKoJIbKO BO3MOxHO, HaKIOHnTe BBepx N BbIHbTe NONHOCTbIO.
IpeceTaHOBKa IBepn
DeyCTByTe Byka3aHHOM IopRKe (Pnc.7).
HTO HxHNo uero HeIb3a DeNaTb
Hyxho-perynphno npOBepTb coepkHMOe MPO3HbHO KAMEpbI.
Hyxho- perynpno nctntb npa3mopaxnBaTb MOp03nIbHyIO Kamepy (CM. "Pa3mopaxnBaHne")
Hyxho- xpaHnTb npOyKtbl KaK MOxHO MehBWee KOJIueCTBO BpeMeHN n PnPepXNBaTbcr Yka3aHHbIX CpOKOB XpaHeHn.
Hyxho- xpaHnTb npOyKtbl, 3aMOpOKeHHbIe B npOMblIeHHbIX yCIOBnX, B COOTBeTCTBm C nHCTpykQnMn, pNBEdeHHbIMn Ha ynakOBke.
Hyxho- Bcerda BbIbpaTb CBexnE BbICOKKaueCTBeHHbIe npOyKTbI IN npOBeprTb IX YNCTOTy nepeI 3aMopaxKBAHNEM.
Hyxho- cuebIO o6ecneueHn6bICTporo 3amopaxkBaHn, NOIroTaNBA Tb CBexKHe npOyKtbl IJI 3amopaxkBaHn He60JIbWMN nOpzma.
Hyxho- 3aBopayBaTb BCE npOdyKtBi B aIOMHHeByo FOIbry IIN CneuAJIbHbI NOnIaTnIeH DnMOp03NbHbIX KAMEP IN PpeIoTBpaUaTb nonaDaHne BO3dYxa.
Hyxho- 3aBopaHbTa 3amOpoxeHHbIe npOyKtbl cpa3y Xe nocne NOKyIKN I NOMeuaTbX B MOp03nIbHyIO KAMEpy KaK MoXHO 6bICptpe.
Hyxho- pa3dienrI npOyKbI NO OTdeneHnM 3aONHrTb KapTocky XpaHeHn. 3TO n03BOINT 6bICTPO HaxoNtB npOyKbI N36eKaTb 13JIuHErO OTKpbIBaHn DBePn. KpMe TOrO, 3TO n03BOINr Cbepeh 3NEkTpO3HeprnIO.
HEnb3r-oCTaBnTb DBepb HADoJIro OTKpbITOn, TaK KaK 3TO npNBeTeK NOBbiIeHNIO NOTpe6JIeHNr 3JIeKTPO3HePrrn N Upe3MePHOMy 06pa3OBAHnIO Nbda.
HEnb3r-NCNoB3OBaTbOCTpbIE npedMeTbI (HOKN, BnIK) dny ydaJeHHN IbDa. HeNb3r CTaBtB BXoJIoNlBnK rOpqHe npOdykTB.I DaTe NM Chayana OCTbITb. HeNb3r NOMeUaTb 6yTbIKN C XnIkoCTbIO nn 3AkpyTbe 6aHKn C ra3npoBaHHbIMn HAnNTkAMN B MOp03NJbHyIO Kamepy, TaK KaK OH NmMOrTy JOnHyTb.
HEnb3xpaHTB MOp03nIbHOJ KAmpe JIOBNTbIE NIN Dpyrne ONaChbE BeuecTBA. Mop03nIbHaJa KAmepa npedHa3NaHeHa TOJbKO IIN XpaHeHH PpOdyKTOB INTaHn.
Helen3- npn 3amopaxnBaHH CBexnx npOdyKTOB npeBbIaTb MaKcImaJIbHyo MOUHOCTb IIO 3amopaxnBaHHO.
Hemb3-Notpe6nTb MOpoxeHoe HxOIOHbIe HAnNTKn HeIOcpeCTBeHHo 3Mop03nJbHOaKepebl. 3TO MoKeT npBecTn K O6MopoxeHIO rY6.
Hemb3-3amopaxnBaTb ra3npoBAHHbIe HAnNTKn.
Helenb3nBtbcxpaHHTb 3amopoxeHHbI npOyKTBIOcNE TOrO, KaOH OTaJIIN; INHaO CbEcTbB TeueHne 24 YacOB IIN pInrTOBHTb IN3amOp03NTb 3aHOBO.
Hemb3y-BbIHMaTb IPOdyKTbI N3 MOpO3NJIbHO KaMepblMOKpbIMpyKaAM.
Helenb3a-3aKpbBaTbDbepuy,He yctahOBuB KpbIuKy OTdeJeHn6bICTpO 3amOp03Kn
Helenb3a- ydaTb nactNKOByIO KpbIuKy Ha 3aDHei CTehKe.
Hemb3a-NOBpeKdaTb Tpy6Kn Ha npn6ope.
YcTpaHHe HEnoJaOK
Ecn np6op He pa6oTaet nocne BKnHoueHn, npOBepbTe:
- PpaBnIbHO JN BCTaBHeHa BnIka B po3eTky, n eCTb JN B cTeH HapJxKeHne. (ДЯ npOBepKn HaNuHn HApJxKeHn NOkJIIOHTe K TOn Jxpe03eTke dpyToN np6Op.)
He nepereopen nn npedoxpaHnte/He cpa6oTajnn 3aunTHbBbIKIOUaTeJIb/He BbIKIOUeH JIN rnaBBbI paCnpedeNtEJbHbI py6NJbHK.
-Правильно Лин HabtpoeHa TempepaTpa.
HOBa Bnka npabnIbHO npncOeHHeHa,ecnBbl 3ameHnCneuaNbHyIO,NTyO BNky.
Ecnn nocne 3toro np6op BCE he pa6otaet, CBXNTecb C npoabuom np6opa.
He 3a6ydbTe BbINOJHnTb ONcaHHyo Bblwe npoBepky, TaK KaK ecJIn HeNCnPabHocTb He 6yDet O6hApYkeHa, Bam pNIDeTc BO3MeCTNTb N3dEpxkN.