
AGHCK10G - Camcorder PANASONIC - Free user manual and instructions
Find the device manual for free AGHCK10G PANASONIC in PDF.
User questions about AGHCK10G PANASONIC
0 question about this device. Answer the ones you know or ask your own.
Ask a new question about this device
Download the instructions for your Camcorder in PDF format for free! Find your manual AGHCK10G - PANASONIC and take your electronic device back in hand. On this page are published all the documents necessary for the use of your device. AGHCK10G by PANASONIC.
USER MANUAL AGHCK10G PANASONIC
indicates safety information.
WARNING:
- To reduce the risk of fire or electric shock, do not expose this equipment to rain or moisture.
- To reduce the risk of fire or electric shock, keep this equipment away from all liquids. Use and store only in locations which are not exposed to the risk of dripping or splashing liquids, and do not place any liquid containers on top of the equipment.
CAUTION:
To reduce the risk of fire or electric shock and annoying interference, use the recommended accessories only.
CAUTION:
Do not lift the unit while the tripod is attached. When the tripod is attached, its weight will also affect the unit, possibly causing the unit to break and hurting the user. To carry the unit while the tripod is attached, take hold of the tripod.
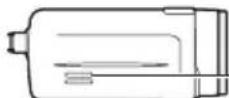
The rating plate is on the underside of the unit.
EEE Complies with Directive of Turkey.
CAUTION:
In order to maintain adequate ventilation, do not install or place this unit in a bookcase, built-in cabinet or any other confined space.
To prevent risk of electric shock or fire hazard due to overheating, ensure that curtains and any other materials do not obstruct the ventilation.
CAUTION:
Do not leave the unit in direct contact with the skin for long periods of time when in use.
Low temperature burn injuries may be suffered if the high temperature parts of this unit are in direct contact with the skin for long periods of time. When using the equipment for long periods of time, make use of the tripod.

indicates safety information.
FCC NOTICE (USA)
Note:
This equipment has been tested and found to comply with the limits for a class B digital device, pursuant to Part 15 of the FCC Rules. These limits are designed to provide reasonable protection against harmful interference in a residential installation. This equipment generates, uses, and can radiate radio frequency energy, and if not installed and used in accordance with the instructions, may cause harmful interference to radio communications. However, there is no guarantee that interference will not occur in a particular installation. If this equipment does cause harmful interference to radio or television reception, which can be determined by turning the equipment off and on, the user is encouraged to try to correct the interference by one of the following measures:
- Reorient or relocate the receiving antenna.
- Increase the separation between the equipment and receiver.
- Connect the equipment into an outlet on a circuit different from that to which the receiver is connected.
- Consult the dealer or an experienced radio/TV technician for help.
The user may find the booklet "Something About Interference" available from FCC local regional offices helpful.
Warning:
To assure continued FCC emission limit compliance, follow the attached installation instructions and the user must use only shielded interface cables when connecting to host computer or peripheral devices. Also, any unauthorized changes or modifications to this equipment could void the user's authority to operate this device.
NOTIFICATION (Canada)
This class B digital apparatus complies with Canadian ICES-003.

indicates safety information.
EMC NOTICE FOR THE PURCHASER/USER OF THE APPARATUS
1. Applicable standards and operating environment
The apparatus is compliant with:
- standards EN55103-1 and EN55103-2 1996.11, and
- electromagnetic environments E1, E2, E3 and E4
2. Pre-requisite conditions to achieving compliance with the above standards
<1> Peripheral equipment to be connected to the apparatus and special connecting cables
The purchaser/user is urged to use only equipment which has been recommended by us as peripheral equipment to be connected to the apparatus.
- The purchaser/user is urged to use only the connecting cables described below.
<2> For the connecting cables, use shielded cables which suit the intended purpose of the apparatus.
Video signal connecting cables
Use double shielded coaxial cables, which are designed for 75-ohm type high-frequency applications, for SDI (Serial Digital Interface).
Coaxial cables, which are designed for 75-ohm type high-frequency applications, are recommended for analog video signals.
Audio signal connecting cables
If your apparatus supports AES/EBU serial digital audio signals, use cables designed for AES/EBU.
Use shielded cables, which provide quality performance for high-frequency transmission applications, for analog audio signals.
- Other connecting cables (IEEE1394, USB)
Use shielded cables, which provide quality performance for high-frequency applications, as connecting cables. - When connecting to the DVI signal terminal, use a cable with a ferrite core.
If your apparatus is supplied with ferrite core(s), they must be attached on cable(s) following instructions in this manual.
3. Performance level
The performance level of the apparatus is equivalent to or better than the performance level required by these standards.
However, the apparatus may be adversely affected by interference if it is being used in an EMC environment, such as an area where strong electromagnetic fields are generated (by the presence of signal transmission towers, cellular phones, etc.). In order to minimize the adverse effects of the interference on the apparatus in cases like this, it is recommended that the following steps be taken with the apparatus being affected and with its operating environment:
- Place the apparatus at a distance from the source of the interference.
- Change the direction of the apparatus.
- Change the connection method used for the apparatus.
- Connect the apparatus to another power outlet where the power is not shared by any other appliances.
This camera head is for use with the AG-HMR10 memory card portable recorder only. It cannot be connected to any device other than the AG-HMR10.
Note concerning illustrations in these instructions
- Illustrations (such as the camera head, other devices) in these operating instructions may differ slightly from the actual devices.
References
-
References are shown as (Page E-00).
-
Model names, company names, and product names listed in these operating instructions are trademarks or registered trademarks of their respective companies.
Wiring, attaching and detaching require technical skills and experience. To ensure safety, ask the dealer from whom you purchased the product to perform these tasks. Also, make sure the camera head option cable is securely connected. See page E-9 for details.
Contents
Read this first! E-1
Operating precautions E-6
Cleaning E-7
Accessories E-8
Optional accessories E-8
Description of parts E-8
Connecting to the AG-HMR10 portable recorder E-9
Shooting. E-10
Troubleshooting E-13
Specifications E-14
Operating precautions
The camera head becomes warm during usage. This is not a defect.
Do not allow any water to get into the unit when using it in the rain or snow or at the beach.
- Failure to heed this caution will cause the unit to malfunction (and may result in irreparable damage).
The unit should be used as far as possible from sources of magnetism and electromagnetism (cell phones, microwave ovens, TVs, game machines, etc.).
- If the unit is operated on top of or close to a TV, the electromagnetism can cause distortion of audio and video.
- Strong magnetism from speakers, large motors, etc. can cause recordings to be lost and video to be distorted.
- Electromagnetic waves emitted from digital circuits, including microcomputers, can impact each other, causing distortion of audio and video.
- If the camera head is so adversely affected that it does not operate normally, remove the recorder battery and AC adaptor, reconnect them and turn the power on again.
As much as possible, avoid using the unit close to radio towers and high-voltage lines.
- If used close to these places, radio waves and high voltage can adversely affect recorded audio and video.
If using the unit at the beach or any place that is sandy or dusty, take care that sand and dust do not get inside the unit or on its terminals.
Do not allow the unit to get wet with salt water, etc.
- Sand and dust can damage the unit.
- If the unit has come in contact with salt water, wipe with a cloth that has been well wrung out, then wipe with a dry cloth.
While the camera head and recorder are connected, do not carry them by holding only the camera head or cable.
- A strong load may be applied to the camera head or cable, resulting in damage.
Operating precautions (continued)
If insect sprays or other volatile substances are being used in the area, take care that they do not come in contact with the unit.
These can warp the unit or cause the finish to come off.
- Do not leave the unit in contact with rubber or PVC products for extended periods of time.
After use, turn off the power of the recorder, and then remove the camera head option cable.
Do not point the lens at the sun.
- Doing so may damage the parts inside.
Caution regarding laser beams
- The image sensor may be damaged if it is subjected to light from a laser beam. When using the unit in locations where laser irradiation equipment is used, be careful not to allow the laser beam to shine directly on the lens.
Cleaning
When cleaning, do not use benzene or thinner.
- Using benzine or paint thinners may deform the camera head and/or cause the surface finish to peel off.
- Before proceeding with maintenance, disconnect the camera head option cable from the camera head.
- Use a soft, clean cloth to wipe the camera head. To remove stubborn dirt, wipe the camera head with a cloth moistened with kitchen detergent that has been diluted with water and then use a dry cloth to take up the remaining moisture.
Accessories Description of parts
- Lens cap
(attached to the camera head)
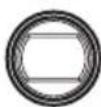
- Lens hood
(attached to the camera head)
See the right diagram for how to put on and take off the lens hood.
Optional accessories
- Camera head option cable
AG-C20003G (3 m (118-1/8 inches))
AG-C20020G (20 m (787-3/8 inches))
- Wide conversion lens
VW-W4307H-K (for high definition)
- Tele-conversion lens
VW-T4314H-K (for high definition)
-
Remove the lens hood before attaching an optional VW-T4314H-K tele-conversion lens or VW-W4307H-K wide conversion lens.
-
Attach the ND filter and MC protector to the front of the lens hood.
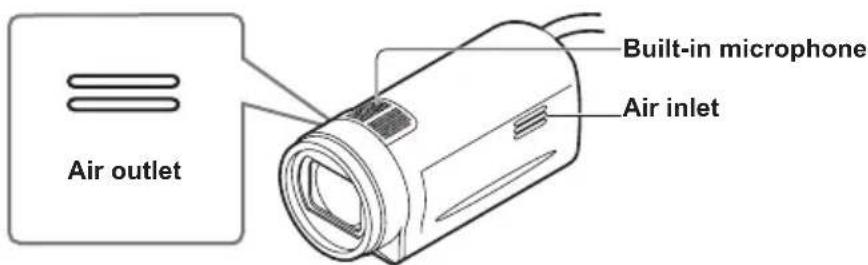
Air inlet (Page E-11)
Built-in microphone (Page E-11)
Lens
Lens hood
Take off Put on
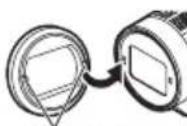
Align indentations

Tripod mounting hole
(Page E-11)
Air outlet
(Page E-11)
Camera head option cable
connector (Page E-9)
Connecting to the AG-HMR10 portable recorder
Camera head option cable connection
Be sure to turn off the power of the AG-HMR10 before connecting the camera head option cable.
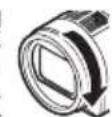
1 Align the slit A on the connector of the camera head option cable with the guide B of the camera cable connector on the camera head or the recorder, and insert the cable.
2 Turn the ring of the camera head option cable connector clockwise to connect it. Put on tightly so there is no looseness.
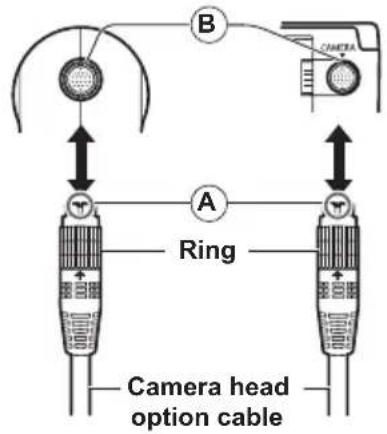
Camera head AG-HMR10
Camera head
Camera head option cable (optional)
AG-HMR10
- When the power of the AG-HMR10 is turned on after connection, the camera head power turns on and it is ready for shooting.
Camera head option cable removal
Be sure to turn off the power of the AG-HMR10 before removing the camera head option cable.
1 Turn the ring of the camera head option cable connector counter-clockwise to loosen it.
2 Hold the ring of the camera head option cable and pull it straight outwards.
Shooting
1 Press the [POWER] button of the AG-HMR10 for 2 seconds or longer to turn on the power.
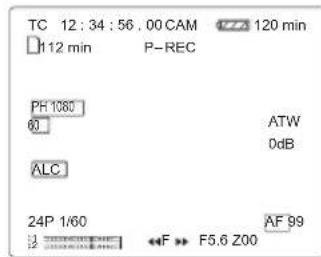
The shooting screen appears on the LCD monitor screen of the AG-HMR10.
2 Press the [REC/PAUSE] button of the AG-HMR10 to start recording.
Press the [REC/PAUSE] button again to stop recording.
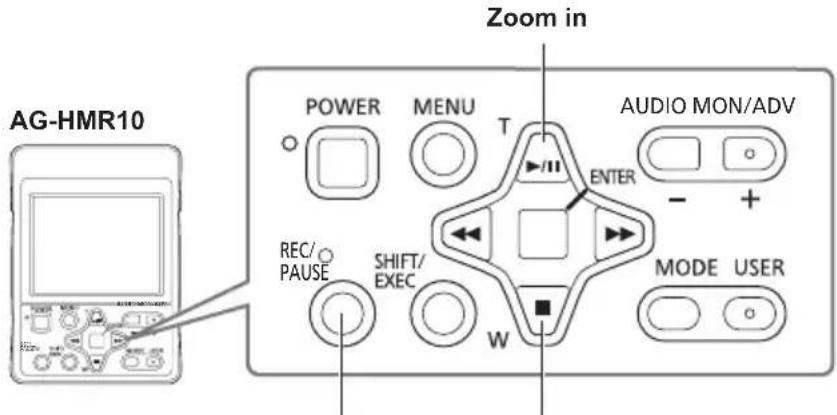
Min shooting operations
Zoom outShoot/stop
- See the operating instructions of the AG-HMR10 for shooting functions not shown above.
Shooting (continued)
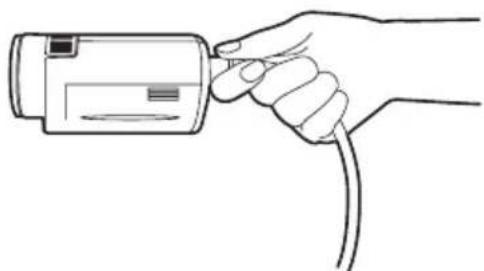
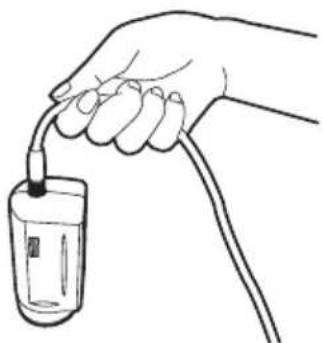
Shooting by hand
When holding the camera head by hand for shooting, make sure that your hand does not cover the air inlet, air outlet or built-in microphone.
Mounting on a tripod
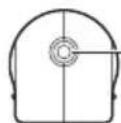
Attach the tripod to the camera head's tripod mounting hole.
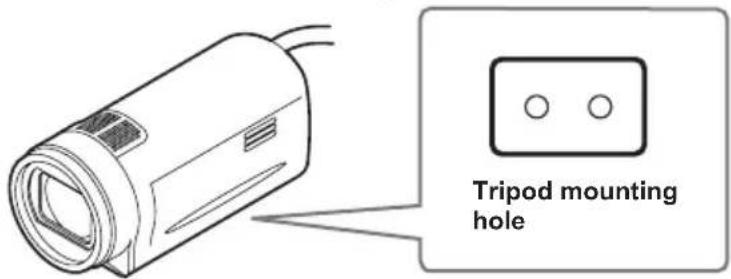
- The tripod screw hole is 5.5 ~mm deep. Do not force the screw beyond this depth when attaching the camera head to a tripod. You may damage the camera head if you use any screw other than 1/4-20UNC.
Beware of the following if fixing the camera head to something other than a tripod.
Fix the camera head securely with vinyl tape or something similar to make sure that it does not wobble.
-
Do not use tape that has a strong adhesive, because it may peel off the paint.
-
Do not cover the camera head's air inlet, air outlet or built-in microphone with the material that you use for fixing the camera head.
-
If you hold the camera head as shown in the examples below, the cable and connector will be subjected to a large load and may be damaged.
Further, the cable may disconnect and the camera head may fall, or the camera head may hit a surrounding object such as a wall, resulting in damage.
Holding or fixing by the cable only Suspendng the camera head while holding the cable only
Troubleshooting
Starting up
| Power does not come on. • Make sure the camera head option cable is connected properly. Refer to the connections on page E-9. |
| Unusual sound is heard. • Some operating sounds may be evident when powering on, switching operation modes and zooming. Sounds in such cases do not necessarily indicate a problem. |
Shooting
| Cannot start shooting. · Make sure the recorder's operation mode is CAM mode. With the recorder's power off, connect the camera head option cable correctly, and turn on the power. (Page E-9) The CAM mode will not be established even when the camera head option cable is connected while the recorder's power is on. | |
| Cannot focus automatically. | ·Make sure the camera is in auto focus mode, where you can focus automatically. ·You may be shooting a scene where it is difficult to bring the subject into focus in the auto focus mode. If this is the case, focus in the manual focus mode. It may be hard to bring the subject into focus when: ·both close and distant objects are to be shot ·shooting through a dirty window ·shooting in a dark place ·there are sparkling or shiny objects around the subject ·the subject is moving fast ·shooting a scene with minimal contrast |
| Video is distorted or not recorded. | ·Make sure the connection has been made to the recorder correctly. (Page E-9) ·Make sure the connection has been made to the recorder using the camera head option cable. (Page E-8) |
Specifications
Supply voltage
DC 8-9 V (supplied by AG-HMR10)
Power consumption 3.5 W

indicates safety information.
Ambient operating temperature
0^ to 40^ (32°F to 104°F)
Ambient operating humidity
10% to 80% (no condensation)
Weight
275 g (0.61 lb)
Dimensions (W× H× D)
53.5mm× 56mm× 123.8mm
(2-1/8 inches × 2-1/4 inches × 4-7/8 inches)
(excluding the projection part)
Image sensor
1/4.1-inch MOS type solid-state image sensor (× 3)
Lens
Optical image stabilizer lens,
Motorized 12 x zoom,
F1.8 to F2.8 (f=4.0 mm to 48 mm)
(35 mm equivalent: 40.8 mm to 490 mm)
Filter diameter
43 mm
Color separation optical system
Prism system
Weight and dimensions are approximate.
Specifications are subject to change without notice.
Information on Disposal for Users of Waste Electrical & Electronic Equipment (private households)
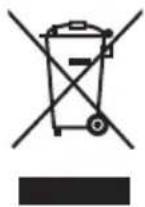
This symbol on the products and/or accompanying documents means that used electrical and electronic products should not be mixed with general household waste.
For proper treatment, recovery and recycling, please take these products to designated collection points, where they will be accepted on a free of charge basis.
Alternatively, in some countries you may be able to return your products to your local retailer upon the purchase of an equivalent new product.
Disposing of this product correctly will help to save valuable resources and prevent any potential negative effects on human health and the environment which could otherwise arise from inappropriate waste handling. Please contact your local authority for further details of your nearest designated collection point.
Penalties may be applicable for incorrect disposal of this waste, in accordance with national legislation.
For business users in the European Union
If you wish to discard electrical and electronic equipment, please contact your dealer or supplier for further information.
Information on Disposal in other Countries outside the European Union
This symbol is only valid in the European Union.
If you wish to discard this product, please contact your local authorities or dealer and ask for the correct method of disposal.
Bitteesen!
CC 8-9 V (accompagnant I'AG-HMR10)
Panasonic Broadcast & Televisions Systems Company
Unit Company of Panasonic Corporation of North America
Executive Office: One Panasonic Way 4E-7, Secaucus, NJ 07094 Tel: 201-348-7000
Eastern Zone: One Panasonic Way 4E-7, Secaucus, NJ 07094 Tel: 201-348-7196
Southeast Region: Tel: 201-392-6151
Western Zone: 3330 Cahuenga Blvd W., Los Angeles, CA 90068 Tel: 323-436-3608
Government Marketing Department:
One Panasonic Way 2E-10, Secaucus, NJ 07094 Tel: 201-348-7587
Broadcast PARTS INFORMATION & ORDERING:
9:00 a.m.-5:00 p.m.(EST) Tel:800-334-4881/24 Hr.Fax:800-334-4880
Emergency after hour parts orders Tel: 800-334-4881 e-mail: PBTSparts@us.panasonic.com
TECHNICAL SUPPORT: Emergency 24 Hour Service Tel: 800-222-0741 e-mail: PBTScervice@us.panasonic.com
Panasonic Canada Inc.
5770 Ambler Drive, Mississauga, Ontario L4W 2T3 Tel: 905-624-5010
Panasonic de Mexico S.A. De C.V.
Casa Matriz: Moras No.313 Col. Tlacoquemecatl Del Valle Del.Benito Juarez Mexico, D.F., C.P.03200
Tel:55-5488-1000 Fax:55-5575-6783
Panasonic Latin America, S.A.
P.O.Box 0816-03164 Panama, Republic of Panama Tel: +507-229-2955 Fax: 507-229-5352
Professional & Broadcast IT Systems Business Unit Europe
Panasonic AVC Systems Europe a Division of Panasonic Marketing Europe GmbH
Hagenauer Str. 43, 65203 Wiesbaden-Biebrich Deutschland Tel: +49-611-235-481
Panasonic Systems Asia Pacific (Broadcast Regional Operation Center)
2 Jalan Kilang Barat, Panasonic Building, Singapore 159346 Tel: +65-6270-0110
© Panasonic Corporation 2009

