
PocketCinema V150W - Projector AIPTEK - Free user manual and instructions
Find the device manual for free PocketCinema V150W AIPTEK in PDF.
| Product type | Pico DLP projector |
| Brand | Aiptek |
| Model | PocketCinema V150W |
| Display technology | DLP |
| Light source | RGB LED |
| Native resolution | 854 x 480 pixels (WVGA) |
| Aspect ratio | 16:9 |
| Projection size | 36 cm to 300 cm (14" to 120") |
| Projection distance | 50 cm to 425 cm (20" to 167") |
| Brightness | Up to 100 lumens |
| Contrast ratio | 1000:1 |
| Focus | Manual |
| Supported file formats | Photo: JPEG, JPG, BMP; Video: AVI, MOV, MP4, MPG; Audio: MP3, WAV, OGG; Document: PPT, PPTX, PDF, DOC, DOCX, XLS, XLSX |
| Connectivity | Wi-Fi 802.11b/g/n (IEEE 11n 1T1R), HDMI, VGA, AV-IN, USB, MHL, micro-USB, SD/SDHC/SDXC |
| Internal memory | 2 GB (1.2 GB available) |
| Speaker | Built-in mono |
| Battery | Li-Polymer 7.4 V / 2000 mAh |
| Battery life | Eco Mode: 120 min; Normal Mode: 100 min; Boost Mode: 80 min |
| Power supply | Power adapter: input 100-240 V AC, output 12 V / 2 A DC |
| Dimensions (L x W x H) | 132 x 95 x 25 mm |
| Weight | 285 g |
| Operating temperature | 5 °C to 35 °C |
| Operating humidity | 20% to 80% (non-condensing) |
| Package contents | Projector, power adapter, interchangeable plug, remote control, HDMI cable, MHL cable, AV cable, micro-USB cable, carrying case, user manual |
Frequently Asked Questions - PocketCinema V150W AIPTEK
User questions about PocketCinema V150W AIPTEK
0 question about this device. Answer the ones you know or ask your own.
Ask a new question about this device
Download the instructions for your Projector in PDF format for free! Find your manual PocketCinema V150W - AIPTEK and take your electronic device back in hand. On this page are published all the documents necessary for the use of your device. PocketCinema V150W by AIPTEK.
USER MANUAL PocketCinema V150W AIPTEK
Thank you very much for purchasing this product. Before you start, you are recommended to read this manual step by step to obtain the best results with your new Pico projector. We wish you enjoy it.
About the product
This is the latest generation of Pico projector with DLP technology inside. Known for great cinema projectors, the DLP technology provides rich colors and enhances the contrast of the image. Integrated with WLAN, the Pico projector provides cable-free connection from your notebook, tablet, or smartphone to the Pico projector by streaming pictures, videos, websites, and documents wirelessly and projecting the images up to 120" (300 cm) in size. With its support to multiple media files, Office and PDF documents, and versatile connection options including HDMI, MHL, AV-in, VGA, USB and SD card slot, this Pico projector is the best solution for mobile use in business and entertainment.
Safety Notice
- Keep the device and packaging materials out of the reach of infants and children.
- Avoid subjecting the power adapter and other contacts to dripping or splashing water and dry your hands before you use it. Do not place objects filled with liquids such as vases, etc. on or near the device.
- Make sure that the used power outlet is always readily available and never hidden. In case of emergency, use the power adapter to separate the device from the power network.
- Keep your device away from all flames such as candles and do not set them up in the vicinity of the device.
- Keep the unit at least 10cm away from other objects. Make sure the ventilation is not covered by newspapers, tablecloths, curtains, etc.
- For your own safety, do not use the projector during thunderstorms or lightning.
- Relative Humidity is 20% 80% , non-condensing.
- The battery is integrated with the device. Do not disassemble and modify. The battery should be replaced by an authorized service center only.
- Ensure that the ambient room temperature is within 5 35^
- Wait before using if the device has been moved from a cold location into a warm one. Any condensation that has formed may in certain circumstances destroy the device. As soon as the device has reached room temperature it can be used without risk.
- Handle the product with care. Avoid contact with sharp objects. Keep device away from metallic objects.
-
Place the projector on a flat surface. Any collision or falling to the ground is likely to damage the product.
-
Do not drop or disassemble the product otherwise the warranty voids. Opening or removing covers may expose you to dangerous voltage or other hazards. Refer all servicing to an authorized service center.
- Use only the accessories supplied by the manufacturer.
- Both product and user's manual are subject to further improvement or supplement without further notice.
Care and Safety Information for Pico Projectors
-
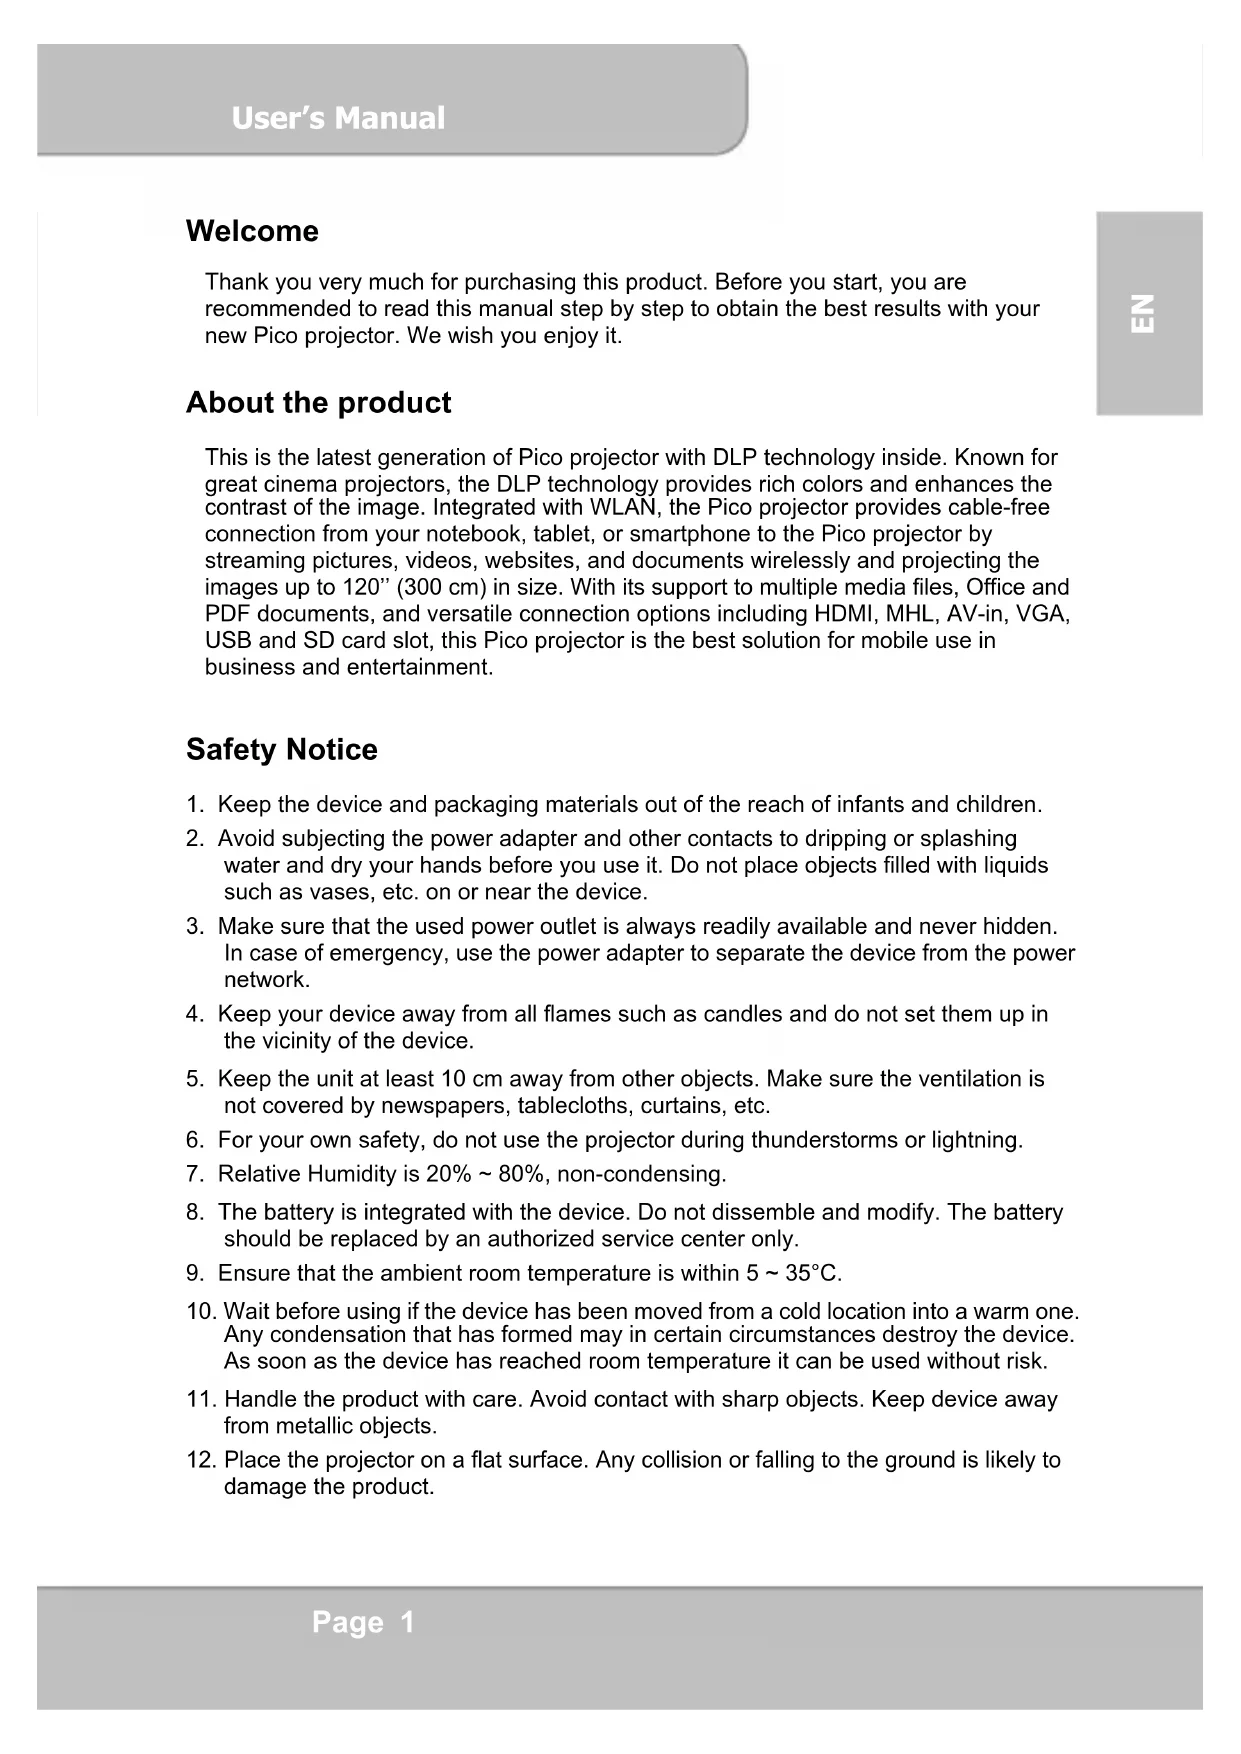
Avoid facing directly into the projector's lens.
-
During the operation, this product may heat lightly, which is normal.
-
The device should not be used in a very dusty environment. Dust particles and other foreign objects may damage the unit.
-
Do not expose the device to extreme vibrations. It may damage the internal components.
- Use the enclosed power adapter (see technical data): Check whether the mains voltage of the power supply matches the mains voltage available at the setup location. This equipment complies with the voltage type specified on the unit.
Avoid Hearing Damage:
Listening at high volume for a long period of time could cause damage to your ears.

Notice for Long-time Projection
The built-in battery supports approximately 120 mins of projection. For long time projection, you are recommended to use AC adapter.
When the battery is too weak to stay in operation, the low battery capacity icon ( ) will flash. You need to charge the product while the icon showed.
It's normal that the projector will feel warm with continuous use due to its high performance. If the projector runs for a long time and over-heated, the
High-Temperature icon ( ) will appear on the screen. The system will automatically enter the standby mode.
FCC Compliance Statement:
This device complies with Part 15 of the FCC Rules. Operation is subjected to the following two conditions: (1) this device may not cause harmful interference, and (2) this device must accept any interference received, including interference that may cause undesired operation.

This equipment has been tested and found to comply with limits for a Class B digital device, pursuant to Part 15 of the FCC rules. These limits are designed to provide reasonable protection against harmful interference in residential installations. This equipment generates, uses, and can radiate radio frequency energy, and if not installed and used in accordance with the instructions, may cause harmful interference to radio communications.
However, there is no guarantee that interference will not occur in a particular installation. If this equipment does cause interference to radio or television equipment reception, which can be determined by turning the equipment off and on, the user is encouraged to try to correct the interference by one or more of the following measures:
- Reorient or relocate the receiving antenna.
- Move the equipment away from the receiver.
- Plug the equipment into an outlet on a circuit different from that to which the receiver is connected.
- Consult the dealer or an experienced radio/television technician for additional suggestions.
You are cautioned that any change or modifications to the equipment not expressly approved by the party responsible for compliance could void your authority to operate such equipment.

If the time arises to throw away your product, please recycle all the components possible. Batteries and rechargeable batteries are not to be disposed in your domestic waste! Please recycle them at your local recycling point.

Together we can help to protect the environment.
Table of Content
| About the Product, Safety Notice | 1 |
| Package Content | 5 |
| Knowing Your Device | 6 |
| Getting Started | 8 |
| Charging the product | 8 |
| Selecting the language | 9 |
| Projecting from External Video Input Source | 9 |
| HDMI, VGA, AV-IN | 10 |
| Smartphone & Tablets | 13 |
| Charging the external mobile devices | 13 |
| Projecting from Memory | 14 |
| Main Menu | 15 |
| Video | 16 |
| Photo | 17 |
| Document | 19 |
| Music | 20 |
| File Manager | 20 |
| MyFavorite | 21 |
| Setting | 21 |
| Enable Wireless Connection | 23 |
| Wireless Driver for PC or Mac | 23 |
| Wireless App on Apple or Android devices | 28 |
| Trouble Shooting | 35 |
| Specifications | 36 |
Package Content
Please check if the following items are located in your packaging:
- Pico Projector
- Power Adapter
Exchangeable Power Plug
Remote Control - HDMI Cable (A to A type)
- MHL Cable (HDMI A to USB D type)
AV Cable - Micro USB Cable
- Carry Bag
- User's Manual
Knowing your Device
Projector
Control Panel

Remote Control
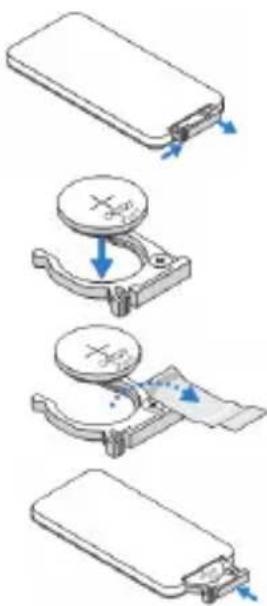
Installing the Remote Control Battery
-
Remove the battery holder by holding down the side release firmly and pulling out the battery holder.
-
Insert a CR2025 coin cell battery and align the polarity correctly according to the marking in the battery holder.
Note: When you use the remote control for the first time, there is a plastic sheet between the battery and its contact. Remove the sheet before use.
- Insert the battery holder.
Warning:
Improper use of the battery may cause overheating, explosion or ignition, which can result in an injury or a fire. Battery leakage may damage the remote controller.
Do not expose the remote controller unit to direct sunlight.
Do not expose the battery to fire or water.
Immediately replace the exhausted battery.
Take out battery when the remote is not in use for a long time.
Operating Range with Remote Control
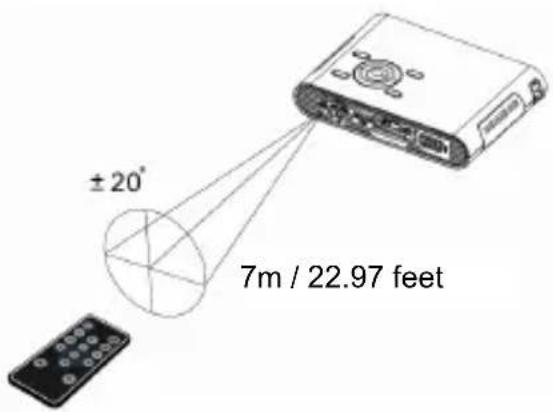
Note: Actual operating range may slightly differ from the diagram. Additionally, a weak battery reduces or eliminates the operating range of the remote control.
Getting Started
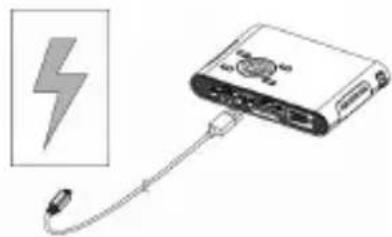
Charging the product
The projector is built in a Li-Polymer battery for mobile use. Please charge the projector for 8 hours prior to its first use. Repeat charging will take around 4 hours.
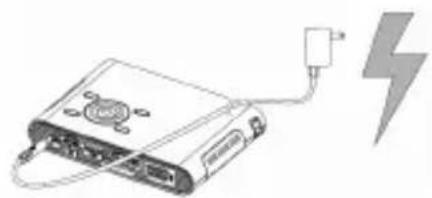
The battery will be charged only when the projector is not in use (Power off). Connect one end of the supplied AC adapter to DC IN jack and the other end to a power outlet to start charging.
Exchange the plug (EU, US and etc.) of AC adapter that accommodates the type of power outlet in your country if it's different.
Charging LED Indicator
During charging, the LED on Power button turns Orange. It turns to Green when the battery is fully charged.
Turn On / Off the Projector
Push the Power button for 2 seconds to turn on the projector.
To turn off the projector, push the Power button downward for 2 seconds.
Standby mode: Push the Power button for 1 second to turn on/ off the projector lamp for a short break to save the battery and system reboot time. (The LED on buttons are still on when the projector is in standby mode.)
Adjusting the Focus according to distance
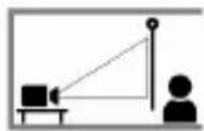
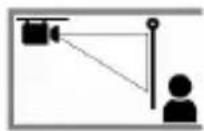
Place the projector on a flat surface and toward a wall or a projection screen. The proportional distance and proportional size are:
Distance: 50~cm 425~cm (20" 167") Image size: 36~cm 305~cm (14" 120")
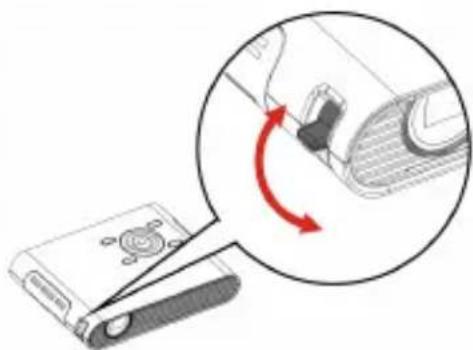
Adjust the focus by turning the Focus Lever upward or downward to get a sharp and clear picture.
Note: Use a tripod (not included) to increase the height of the projectional image when necessary. The tripod socket is located under the projector.
Select the Language
Use the navigation keys < > to select Setting' and press (OK) to enter the submenu. Select Language' and press (OK) to enter the language list. Select your preferred language and confirm with (OK). Press (Exit) to return to Main Menu.
Projecting from External Video Input Source
The projector has built-in multiple interface on the rear side. You can connect your external video Input source to the projector by using the appropriate cable and press the Source key on the control panel of the projector to select the input source.
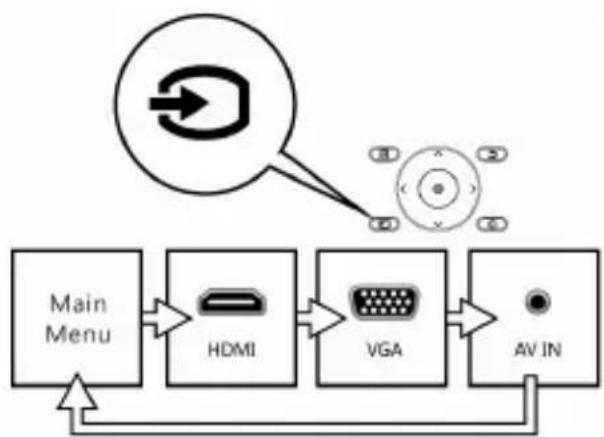
HDMI
Use the HDMI cable to connect the HDMI port on the rear panel of the projector to the external HDMI signal source. After connected, the screen switches to HDMI source automatically.
VGA
Use a VGA cable to connect the VGA port on the rear panel of the projector to the external VGA signal source. After connected, press the Source button on the remote control or control panel to select VGA source.
Note: VGA cable is not included in standard package.
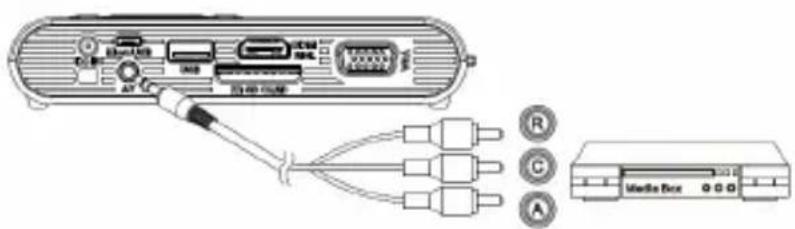
AVIN
Follow the figure below to connect the external AV output device to the AV jack. Connection is color-coded. After connection, press the Source button on the remote control or control panel to select the AV-IN source.
Changing Playback Setting for External Video Source
Press menu on control panel or remote control to enter the playback setting.
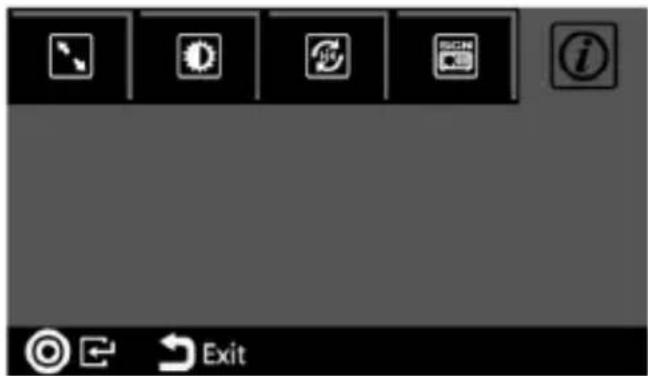
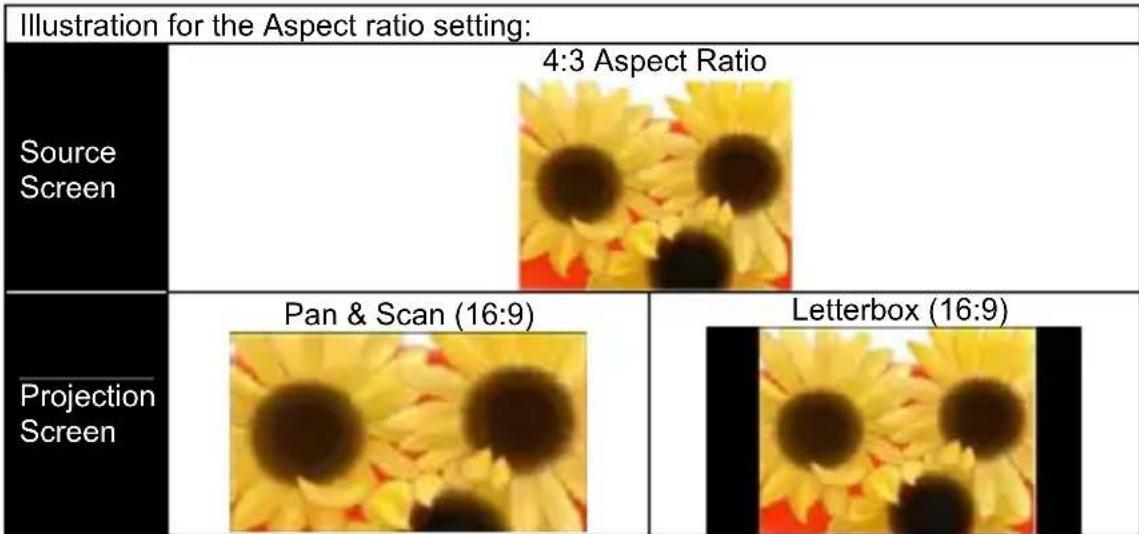
1. Aspect ratio
When the video file is in 4:3 aspect ratio, this function allows you to adjust how the image should appear on the 16:9 screen.
Press IOK to display the options.
1) Pan & Scan: the image is scaled up to fit to 16:9 screen.
2) Letterbox: the image is displayed by original aspect ratio.
2. Brightness
It allows you to change the brightness according to the environment and the power consumption.
1) Enhanced: Select this mode when external power supply is available to maximize the performance.
2) Normal: The default mode for optimizing the projection performance and battery capacity.
3) Eco: This mode is recommended when the projector is operated under battery mode to save power.
Note: The projector is automatically switched to Enhanced mode when It's powered by the power adapter.
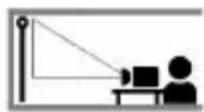
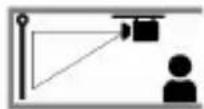
3. Projection (Lens) mode
It allows you to select the projection mode, depending upon how the projector is mounted.
Front: This is the most common way to position the projector for quick setup and portability.
Front Ceiling: The projector turns the image upside down for ceiling-mounted projection.
Rear: The projector reverses the image so that it can project from behind a translucent screen.
Rear Ceiling: The projector reverses and turns the image upside down. It can project from behind a translucent screen in the ceiling-mounted position.


4. Scene selection
It allows you to select the ideal mode for watching movie, photo slideshow, or reading the text with balanced brightness, color, and contrast.
Cinema: ideal for watching movie Normal: ideal for photo slideshow Text: ideal for image with text
5. Information
Shows firmware version: Txxxx / Axxxx
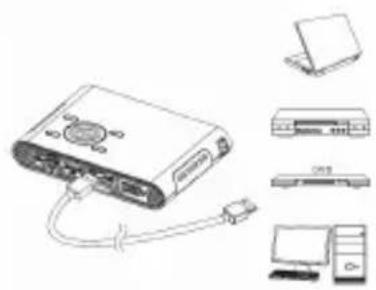
Projecting from Smartphones or Tablets
- Connect smartphones supportedMHL (Mobile High-Definition Link) for projection.
Connect Samsung Galaxy S2, Note; new HTC one, one X^+ ,one X, one S; or Sony Xperia Z with the projector via MHL (A to USB D type HDMI) cable.
Connect Samsung Galaxy S4, Note II with the projector via MHL (A to USB D type HDMI) cable and Samsung 5 to 11 pin MHL converter (as illustration shows) for projection.
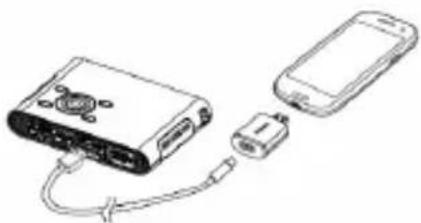
Note: It's normal that the projector is automatically charging the smartphones or tablets when connected with the MHL cable for projection.
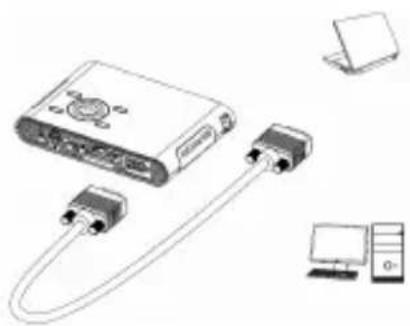
- Connect iPhone 5 for Mirror projection (with Lightning connector)
Connect iPhone 5, iPad 4th, iPad mini and iPod touch 5th with the projector via Apple Lightning Digital AV adapter and A-to-A type HDMI cable.
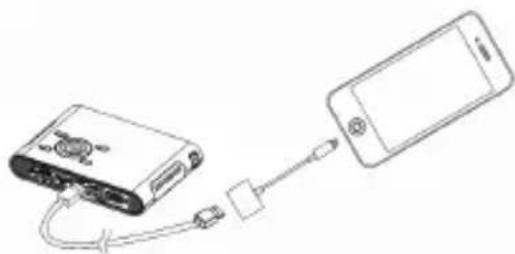
iPhone 4S, 4, New iPad, iPad 2, and iPod touch (4^th) can connect with projector with Apple 30-pin digital AV adapter and A-to-A type HDMI cable
Charging the External Mobile Device
The internal battery of the projector cannot only be used for projection, but also charge your mobile device.
- Connect your mobile device to the projector via the USB cable with the end of Type A connector plugged into the USB port on the rear side of projector.
- When the projector is powered on, the device will be charged automatically.
- When the projector is powered off, please press the Source button ( ) to start or stop charging.
Note: The projector provides 5V/500mA output power for charging the mobile devices.
Projecting from Memory
Projecting from Internal Memory
The projector has 2 GB internal memory and 1.2 GB is free for file storage. Please download media files from your PC or Notebook to the internal memory for projection:
- Turn on the PC and the projector.
- Connect the micro-USB port of the projector to the PC or Notebook via USB cable. Once the connection is established, the screen and ventilation fan will automatically turns off to save the power. Now the projector is in mass storage mode.
- You can copy the pictures, videos, music, Windows Office (PowerPoint, Word, and Excel), and PDF files from your PC to the internal memory or delete the files on the internal memory.
Note: 1. The remote controller is not applicable when the projector is connected to PC or notebook.
- Please refer the supported file format in 'Functions and Operations' (P.15)
Projecting from External Memory
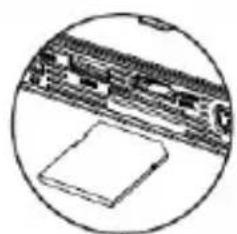
1. External SD/SDHC/SDXC card slot
The memory card slot is built in to reading SD, SDHC, and SDXC card up to 128 GB. Gently insert the card by following the direction shown below until it reaches the bottom of the slot. To remove the memory card, gently push the top edge of the card and pull it out.
2. USB Device
The projector can project the content from USB device such as USB memory stick or Hard Disk Drive (with its own power supply).
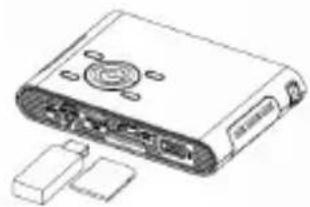
Note: External memory source will be the default memory displayed on the playlist. When both SD/SDHC card and USB memory stick are in use, USB memory stick will be the default memory displayed on the playlist.
Selecting the memory source
Use the navigation keys < > to select 'Setting' and press (OK) to enter the submenu. Select 'Memory' and press (OK) to enter the memory options. Select your preferred memory source and confirm with (OK). Press (Exit) to return to Main Menu.
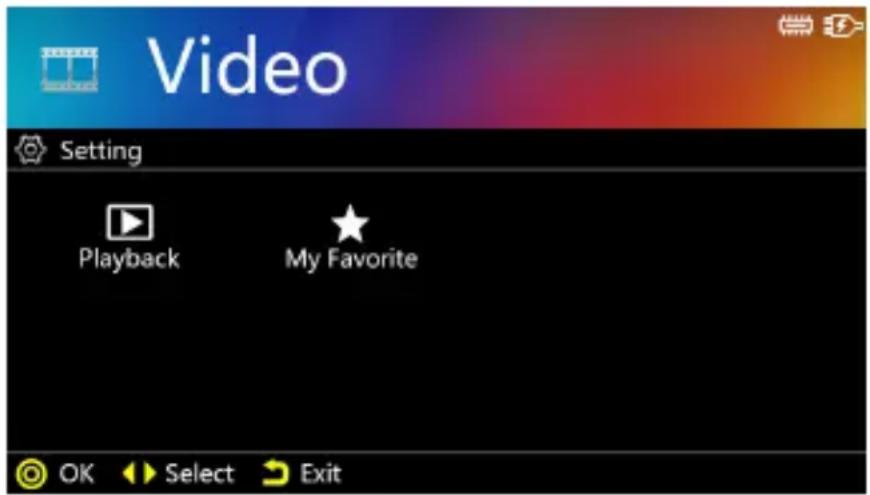
Main Menu
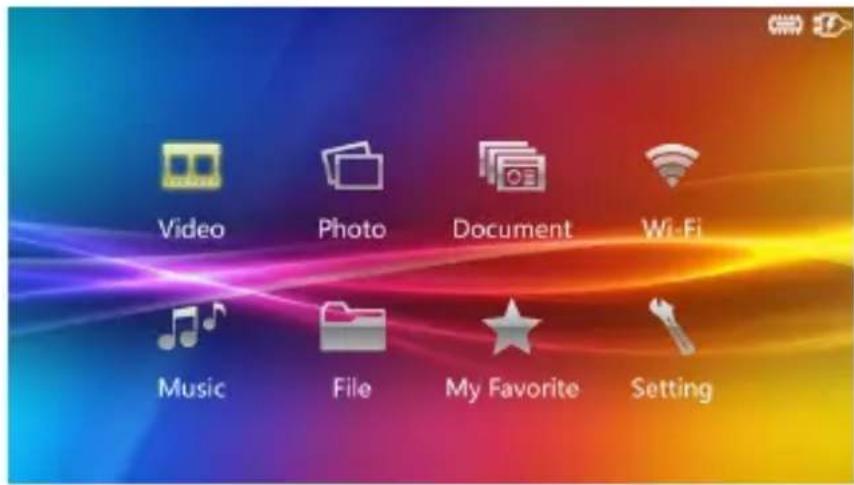
Press the navigation key < > to highlight the desired item and press OK to enter the submenu; press /Exit to return to Main Menu.
| Icon | Function | Description |
| Video | This function allows users to select video file for projection. | |
| Photo | This function allows users to select JPEG, JPG or BMP image file for projection. | |
| Document | This function allows users to select Office PowerPoint, Word, Excel, and PDF files for projection | |
| Wi-Fi | Enable wireless function for the projector | |
| Music | This function allows users to select MP3, WAV, and OGG files to playback on the projector. | |
| File | This function allows users to navigate all folders and files regardless their file format in the selected memory source. Photo and Video can be previewed while navigating the list. You can copy selected file to another memory source or delete it. | |
| My Favorite | View all files that are marked as favorites. | |
| Setting | This function allows users to setup preference settings including Brightness, Scene selection, Language, and Memory. | |
Projecting Videos
Select and project video files.
- Select and press OK to enter 'Video' on the main menu.
- In the file list, use to select the folder and press OK to open the selected folder. Use to navigate the playlist. Press OK to start playing and projecting the selected video.
- During playback, press to play the previous / next video.
- Press longer to fast rewind /fast forward.
- Press OK to pause and press it again to resume.
- To adjust the video volume, press to adjust the value.
Changing Video Playback Setting:
Under the file list, press A menu to enter the video setting.
1) Playback: Select the playback mode (as Table A) for video clips.
| → | Repeat Off Play | current video or track once |
| → | Normal | Play current folder |
| → | Repeat One Play current video or track repeatedly | |
| → | Repeat All Play current folder repeatedly | |
| × | Random | Play current folder repeatedly in random order |
| File Extension Video Decoder | Audio Decoder | |
| *.avi | MJPEG | AAC (AAC-LC and HE-AAC) |
| Xvid | PCM | |
| H.264/AVC | ADPCM | |
| MPEG4 | ||
| *.mov | MPEG4 | AAC |
| *.mp4 | H.264 | PCM |
| ADPCM | ||
| *.mpg | MPEG1 | LPCM |
Projecting Photos
Select and project still images. 1. Select Photo' and press OK to enter Photo mode on the main menu. 2. Use to select the folder and press OK to open the selected folder. Use to navigate the thumbnail of photos. 3. Press OK to project the selected photo in full screen. 4. Press the Left/Right (▲▶) key to move to previous/next picture. 5. Zoom or Pan the picture: - Press the Up key to enter Zoom mode. Use Up/Down ( ) keys to Zoom in / Zoom out. - In Zoom mode, press ©/OK to switch to pan function. Please see the detail operation as following| Zoom | ▲▼ | Zoom in / Zoom out ( Photo: The Magnification levels are 1x ~ 4x. Document: The Magnification levels are 1x ~ 8x.) |
| ▲▶ | Previous / Next picture (page) | |
| ◎/OK | Enter to Pan mode | |
| ← | Return to full screen | |
| Pan | ▲▼ and ▲▶ | Pan up, down, left, right |
| ◎/OK | Return to Zoom mode | |
| ← | Return to full screen |
6. Rotate the picture :
Press 日 menu to enter Rotation function. Use Left/Right ( ) key to select the direction to rotate and press OK to confirm. To return, press Exit) to photo folders or thumbnails.Changing Photo Playback Setting:
Under the file list, select a thumbnail and press menu to enter Photo Setting.  1) Slideshow: To turn On or turn Off the slideshow. 2) Music: To have or without background music during the slideshow. To play the music, please save the preferred music under the same folder. 3) Speed: To set up the slideshow interval speed as 5 sec, 10 sec, 30 sec, 1 min, or 10 min. 4) During slideshow, press OK to stop or resume the slideshow. Use to navigate previous / next picture. 5) My Favorite: The file will be marked icon and be grouped into "My Favorite" folder for easy access (like a bookmark). (Please refer to page 21, "My Favorite" section introduction.) Note: The projector supports the following photo formats:| File Format Max. | resolution | File Extension |
| JPEG 8000 x 6000 | *.jpeg | |
| JPG 8000 x 6000 | *.jpg | |
| BMP 8000 x 6000 | *.bmp |
Projecting Document
Select and project Windows Office and PDF files. 1. On the Main menu, select 'Document' and press the OK button to enter the Document mode. 2. Navigate the folders and files and press OK to open the selected document. 3. Press the Left/Right (▲▶) button to move to previous/next page. 4. Zoom or Pan the document: - Press the Up key to enter Zoom mode. Use Up/Down ( ) keys to Zoom in/Zoom out. - In Zoom mode, press OK to switch to pan function.Changing Document Playback Setting:
Under the file list, select a document and press A menu to enter Document Setting. 1) Slideshow: To turn On or turn Off the slideshow. 2) Speed: To set up the slideshow interval speed as 5 sec, 10 sec, 30 sec, 1 min, or 10 min. 3) During slideshow, press OK to stop or resume the slideshow. Use <▶> to navigate previous / next picture. 4) My Favorite: The file will be marked icon and be grouped into "My Favorite" folder. (Please refer to page 21, "My Favorite" section introduction.) Note: 1. The projector supports the following document formats and Limitations:| File Format File Extension Support Version Size Limitation | |||
| POWERPOINT | *.ppt, *.pptx, | PowerPoint 97 ~ 2010 | Up to 19MB |
| PDF *.pdf PDF 1.0 | ~ 1.4 Up to 75 MB | ||
| WORD | *.doc, *.docx, | WORD 97 ~ 2010 | Up to 100MB |
| EXCEL | *.xls, *.xlsx | Excel 97 ~ 2010 | Up to 15MB |
Playing Music
Select and playback audio files. 1. Before you are able to listen to music, you must first store music files on the internal memory or external memory devices. 2. Press to select one song and press OK to start the music playback. 3. To adjust the music volume, press to adjust the volume. 4. Press OK to pause the music. Press it again to resume normal playback. 5. The screen will be automatically turned off after 20 seconds to save power. To turn on the screen, touch the keypad to activate the projection function. 6. Press l Menu) to enter the music setting. 1) Playback: Select the playback setting as Table A (Page 16). 2) My Favorite: The file will be marked icon and be grouped into "My Favorite" folder. (Please refer to page 21, "My Favorite" section introduction.) Note: The projector supports the following music formats:| File Format File Extension | |
| MP3 | *.mp3 |
| WAV | *.wav |
| OGG | *.ogg |
Using Headphones
The projector equips speaker for providing the best audio performance. Additionally, you can connect the earphone or external speaker to the AV jack of the unit. When earphone is connected, the speaker will be automatically turned off.File Manager
 The File manager is a fast and convenient way to navigate, project, and manage files in different formats. 1. On the Main Menu, select 'File' and press OK to enter File list. 2. Navigate the file list, select a file, and press OK to start projecting. 3. To manage the files, highlight a file on the list and press (Menu) key to enter 'Copy & Delete' function. - Copying file Select and press OK "Copy" to copy the selected file to another memory device. - Deleting file Select and press ©/OK "Delete" to delete the selected file. - Press to cancel and return to file list. My Favorite
Select and playback the files that you have marked as favorite. 1. On the Main menu, select 'My Favorite' and press the OK button to enter the My Favorite mode. 2. Navigate the files and press OK to open the selected file. 3. Press the Left/Right (▲▶) button to move to previous/next file. 4. Press Menu) to enter 'Delete the Path' function. Note: 'Delete the Path' only remove the file path from the list of My Favorite. If you need to delete the files, please select 'File' on the main menu, Then select the file and press Menu) button to enter 'Copy & Delete' function.Setting
Change the default setting of projectional brightness, Projection methods, language, and memory devices.1. Brightness
It allows you to change the brightness according to the environment and the power consumption.| Mode | Brightness | Battery | Life |
| Enhanced | Up to 100 Ims 80 | mins This mode | is recommended when external power supply is available to maximize the performance. |
| Normal | Up to 60 Ims 100 | mins The default | mode for optimizing the projection performance and battery capacity. |
| Eco | Up to 40 Ims 120 | mins This mode | is recommended when the projector is operated under battery mode to save power. |
2. Projection (Lens) mode
Allow you to select the projection mode, depending upon how the projector is mounted. Please see the detail operation on page 12.3. Scene selection
It allows you to select the ideal mode for watching movie, photo slideshow, or reading the text with balanced brightness, color, and contrast. Cinema: ideal for watching movie Normal: ideal for photo slideshow Text: ideal for image with text4. Memory Source
This function allows users to select the storage devices between internal memory, Micro SD Card, and USB devices.  : Internal memory  : SD / SDHC / SDXC card  : USB Dongle5. Language
This item allows users to select the displayed system language.6. Auto Power Off
This item allows users to enable or disable the auto power off function of the projector. If auto power off is turned ON, the projector will be automatically turned off after the chosen period is due.7. System
Factory Setting Reset the projector to factory default setting. -Firmware Upgrade Firmware upgrade information is available on our website. Information Shows firmware version: Txxxx / AxxxxEnable Wireless Connection
For first-time use, please follow the steps below to install wireless application software for your PC or smartphone.Install the wireless application software on your computer
1. Select and enter 'Wi-Fi' on the main menu to launch the wireless function of the projector.  2. The W-Fi Display shows the wireless status (Wi-Fi connected or disconnected) and password for connecting the projector.  3. Enable your WLAN of Notebook or PC. Select the access point labeled 'WiFi projector-XX' to connect the projector Wireless network   Note: 1. Your computer must have wireless network function to detect the connection. 2. Disconnect the Ethernet cable from your computer to avoid affecting the wireless network connection. 3. When you connect to the projector's wireless network, you will lose wireless connectivity with other wireless networks. 4. Press (Menu) on the projector to enter the Driver/App Installation.  5. The screen shows the IP address and QR code for downloading Driver/App.  6. Open the Internet browser on your computer then enter the default IP Address http://192.168.111.1 in the browser's address bar. 7. Select the driver for Windows or Mac OS depending on your PC and then click the icon to download the driver.  8. Double click the driver EZ_View to install. ClickPeer-to-Peer Wireless connection with the projector
Peer-to-peer wireless connection from your computer with the projector allows you quickly start the presentation or watch a movie wirelessly from your PC, tablet, or smartphone but without the access to an available Wi-Fi network (without Internet access). It's recommended to use Home Network Mode (see page 32) when you need Internet access for the projection.Peer-to-Peer wireless projection from computer
1. Select and enter 'WiFi' on the main menu of the projector. 2. Make a note of the Login Code in 4 digits XXXX. You will need the information to log in later.  3. Connect your computer to the projector Wireless network by selecting WIFI-Projector-XX on the network list.  4. Double-click EZ View icon on your computer desktop to start the application. 5. Enter the Login Code (see Step 2) and clickAdvanced functions of EZ View
| Item | Descriptions |
| A. Split screen | 1~4: Allow 4 different devices to project in the same screen L, R: Move the screen to the left or right All: Return to full screen |
| B. Mirror Mode | Mirror mode displays the same picture on the screen of the computer. |
| C. Extend Mode | Extend the screen from computer to the projector. |
| D. Link | Link to the projector Download /Configure management page. |
| E. Exit Click to close the application. | |
| F. Mode | Click to select the ideal mode for watching movie or photo slideshow Video: ideal for watching movie Graphic: ideal for photo slideshow |
| G. Compatible Mode | Click to enhance 3rd party software compatibility. (The performance (frame rate) of wireless streaming may be reduced.) |
| H. Audio Streaming | Stream the Audio to the projector's speaker. Note: If you don't like to hear the sound from the computer at the same time, disable the speaker on the computer by choosing 'mute'. |
Install the wireless application software on Apple or Android devices
EZ View for Android smartphone and Apple iDevice EZ View is an application that runs on your Android smartphone or Apple iDevice and transmits still images or presentations to the projector. The EZ View is only used for a wireless connection. If you are connecting your phone to the projector using a cable, you can use the built-in video out feature of your phone.Installing EZ View from Google PlayTM (For Android device)
1. Connect to the Internet and open the Google Play™ or Google Play™ web page. (Google Play™ is a trademark of Google Inc.) 2. In the search bar, type EZ View. (Or scan the QR code directly from the installation page.)  3. Click theInstalling EZ View from Apple App Store (For Apple i-device)
1. Connect your iPhone to the Internet and Launch the App Store. 2. In the search bar, type EZ View. (Or scan the QR code directly from the installation page.)  3. Click thePeer-to-Peer wireless connection from Android or Apple device to the projector
Before you can transmit images to the projector using EZ View, you must connect your Android smartphone or Apple i-device to the projector (peer-to-peer) or in the same available wireless network. 1. Select and enter 'Wi-Fi' on the main menu to launch the wireless function of the projector. #  2. The W-Fi Display shows the wireless status (Wi-Fi connected or disconnected) and password for connecting the projector.  3. Enable your WLAN on smartphone. Select the access point labeled 'WiFi projector-XX' to connect the projector Wireless network.Opening EZ View and Logging into the projector
1. Open the EZ View application. EZ View will search for compatible devices. 2. Choose WiFi Projector and enter the Login password shown on the projector screen.   4. Press| EZ View app function | Description |
| PHOTO | Projecting Photos stored on your smartphone. |
| DOCUMENT | Projecting Office Documents and PDFs stored on your smartphone. |
| INTERNET | Projecting Web pages. (Home Network mode only) * Please see page 31 to enable Client mode. |
| DROPBOX | Streaming cloud server. (Home Network mode only) * Please see page 31 to enable Client mode. |
| CAMERA | Real-time project the image by iPhone or Android phone camera through WiFi connection. |
| VIDEO | Stream video stored on your iOS and Android devices to the projector. |
| SPLIT CONTROL | Allow up to four devices be projected through one projector in the same time. |
Adding Content to EZ View using iTunes® (For Apple i-Device)
1. Attach your iPhone to your computer. 2. On your computer, launch iTunes unless it automatically opened when you attached your iPhone. 3. Click the iPhone or iPad device in the sidebar. 4. Click the Apps in the Settings panes. 5. Click EZ View to see all of the files loaded into EZ View. 6. Click the "Add" button and choose files to upload to EZ View. You can load.JPG files and Document files. 7. In the lower left hand corner, click the Sync button to transfer the files to your iPhone.Sketch the image from EZ View
A sketch tool is built in Photo / Document/Web modes, to let presenter make note on the projected page. You can draw, highlight in color or erase by touch easily. All the sketched images can be saved in camera roll at once. Connect the projector to available Wi-Fi network (Home Network Mode) for Internet access
You are recommended to connect the projector to a Wi-Fi network so your computer, tablet, and smartphone can at the same time have the Internet access. You only need to key in the network key to set up the connection for the first time. The projector will be automatically connected to the network when it enters the WiFi mode next time. 1. Select and enter 'Wi-Fi' on the main menu. 2. Press (Menu) to enter the following options. Select 'Internet Access' (Client Mode) and confirm with OK.  3. Select the Wi-Fi network you would like to connect and confirm with © "OK".  4. If wireless security is enabled on your Wi-Fi network, press OK to display the keyboard and enter the password (network key) by using the navigation keys on the projector or the remote control. After typing the password, press Exit on the projector or the remote control to quit the keyboard. Select Connect and confirm with OK.  5. Use 'Exit' button to return to WiFi Display. Now you can start the driver or App EZ View to start the wireless projection.  6. To disconnect the wireless projection, simply close the driver or App and return the projector to main menu. Note: Internet access (Home Network mode) performance is affected by a variety of factors, such as the CPU performance of your smartphone/ notebook, the distance between the access point, and walls/obstacles that obstruct direct line-of-sight. Cordless phones, bluetooth devices, microwaves, and anything that may cause RF interference in the 2.4GHz frequency range can affect the WLAN performance as well. Therefore, once the internet speed drops or intermittent disconnects during the projection, we recommend you to select another access point with a stronger signal or disconnect the projector client from your access point (disable internet access) to ensure the best experience of wireless projection.Troubleshooting
If your projector does not seem to be functioning properly, check the items below before you contact an authorized service center.| Symptom Check | Point |
| The projector does not work when connecting to a notebook or PC with cable. | 1. Check if the HDMI cable is plugged correctly. 2. Make sure the PC has been switched to projector display. |
| The driver installation web page can't be opened from computer browser. | 1. Enable your WLAN of Notebook or PC and select the access point labeled 'WiFi_projector-XX' to connect with the projector. 2. Disconnect the Ethernet cable from your computer to avoid affecting the wireless network connection. 3. Open the Internet browser on your computer then enter http://192.168.111.1 in the browser's address bar. |
| The projector can't be detected when running EZ View app. | 1. Select 'WiFi' on the Main Menu to enter the WiFi display mode. 2. Enable your WLAN of PC or smartphone and select the access point labeled 'WiFi_projector-XX' to connect with the projector. 3. Disconnect the Ethernet cable from your computer to avoid affecting the wireless network connection. |
| The projected image is too dark. | 1. Use the projector in a darker environment. 2. Increase the brightness by using the AC power adapter. 3. Scale down the projectional image size. |
| The projected image is blurred. | 1. Adjust the focus. Please refer to "Adjusting the Focus". 2. Check if the lens is dirty. |
| The surface temperature of projector is high. | Because of the high-luminance LED, it is normal that this projector generates heat in long-time use. It will not affect the performance of the projector. Always keep the ventilation slots free of dirt or obstructions and operate the projector in a properly ventilated environment. |
| Recovering from abnormal | If the projector is running slow, freezing, crashing or locking up during the operation. Press the Power button for 8 seconds to reboot your projector. |
| Item Description | |
| Optical Technology | DLP |
| Light Source | RGB LED |
| Aspect ratio | 16:9 |
| Resolution | 854 x 480 Pixels (WVGA) |
| Contrast Ratio | 1000:1 |
| Projection Image Size | 36 cm ~ 300 cm (14" ~ 120") |
| Projection Distance | 50 cm ~ 425 cm (20" ~ 167") |
| Throw Ratio(Diagonal: Distance) | 1.6 (Projection Distance/Width of Image) |
| Brightness | Up to 100 Lumens |
| Focus | Manual |
| Offset | 100% |
| Playback Format | Photo: *.jpeg, *.jpg, *.bmpVideo: *.avi, *.mov, *.mp4, *.mpgAudio: *.mp3, *.wav, *.oggDocument: *.ppt, *.pptx, *.pdf, *.doc, *.docx, *.xls, *.xlsx |
| WiFi | Module: IEEE 11n (1T1R)Standard: 802.11b/g/n |
| Internal Memory | 2 GB (1.2 GB for storage) |
| Internal Speaker | Mono |
| Card Slot | SD / SDHC / SDXC card (up to 128 GB) |
| Power Supply | Input: 100 ~ 240V ACOutput: 12V, 2A DC |
| Battery Type | Embedded 7.4V / 2000 mAh Li-polymer battery |
| Battery Life | Enhanced mode: 80 minNormal mode: 100 minEco mode: 120 min |
| Power Consumption | AC mode: 12 WBattery mode: 8 W ~ 12 W |
| Dimensions ( L x W x H ) | 132 x 95 x 25 mm |
| Weight | 285 g |
| Humidity | 20 – 80%, 80% (Max.), non-condensing. |
| Operating Temperature | 5°C – 35°C. |
Willkommen
Vielen Dank für den Kauf thesees Produkttes. Bevor Sie beginnen, empfehlen wir Ihnendas schrittweise Lesen theses Handbuchs, um die besten Ergebnisse mit Ihrem neuen Pico Projektor zu erzielen. Wir wünschen Ihnen damit viel Freude.Uber das Produkt
Dies ist die neueste Generation der Pico Projektoren mit integrierter DLP Technologie. Die DLP Technologie, die bei groBen Kinoprojektoren eingesetzt wird, bietet kräftigere Farben und einen hohen Kontrast. Der Pico Projektor bietet mit integrierterm WLAN eine drahtlose Verbindung von Ihrn Notebook, Tablet oder Smartphone zum Pico Projektor, uber die Bilder, Videos, Webseiten und Dokumente übertragen und Bilder bis zu 120" (300 cm) Groß projiziert werden konnen. Mit der Unterstutzung mehrerer Mediendateien, Office und PDF Dokumenten, sowie den vielseitigen Anschlussoptionen, einschließlich HDMI, MHL, AV Eingang, VGA, USB und SD Kartensteckplatz, ist dieser Pico Projektor die ideale Lösung fur die geschäftliche und private mobile Nutzung.Sicherheitshinweise
1. Das Gerät und das Verpackungsmaterial außerhalb der Reichweite von Kindern halten. 2. Das Netzteil nicht in Kontakt mit tropfendem oder fließen dem Wasser kommt.essen und Hande vor der Benutzung abtrocknen.Keine mit Flüssigkeiten gefülltenGegenstände, wie z.B. Vasen usw. auf oder in die Näre des Gerätes stellen. 3. Stellen Sie sicher, dass die verwendete Steckdose immer verfügbar und niemals blockiert ist. Verwenden Sie im Notfall das Netzteil, um das Gerät vom Stromnetz zu trennen. 4. Das Gerät von Flammen, wie z.B. Kerzen fernhalten und diese nicht in der Nähes des Gerätes aufstellen. 5. Das Gerät mindestens 10 cm von anderen Gegenständen entfernt halten. Stellen Sie sicher, dass die Lüftungsschlitze nicht durch Zeitungen, Tischdecken, Vorhängusw. blockiert werden. 6. Den Projektor zu ihrer eigenen Sicherheit nicht während eines Gewitters oder Blitzschlages verwenden. 7. Relative Luftfeuchtigkeit liegt bei 20% 80% , nicht-kondensierend. 8. Der Akku ist im Gerät integriert. Nicht auseinandernehmen oder ändern. Der Akku sollte nur von einer Fachkraft ausgetauscht werden. 9. Stellen Sie sicher, dass die Raumtemperatur zwischen 5 35^ liegt. 10. Warten Sie mit der Verwendung des Geräts etwas, wenn es von einem kalten an einen warmen Ort gebracht wurde. Kondenswasser kann das Gerät unter bestimmen Umständen zerstären. Sobald das Gerät Raumtemperatur erreicht hat, kann es ohne Risiko verwendet werden. 11. Produkt mit Vorsicht handhaben. Kontakt mit scharfen Gegenständen vermeiden. Von Gegenständen aus Metall fernhalten. 12. Den Projektor auf eine flache Unterlage stellen. Stöße oder ein Herunterfallen auf den Boden führt wahrscheinlich zu Schäden des Produktes. 13. Das Produkt nicht fallen setzen oder auseinandernehmen, da sonst die Gewährleistung erlischt. Das Öffnen oder Entfernen von Abdeckungen kann Sie gefährlichen Spannungen und anderen Risiken aussetzen. Alle Wartungsarbeiten von Fachpersonal durchführten halten. 14. Verwenden Sie ausschließlich vom Hersteller angebotenes Zubehör. 15. Sowohl das Produkt als auch das Benutzerhandbuch unterliegen fortlaufenden Verbesserungen oder Ergänzungen ohne vorherige Mitteilung.Pflege- und Sicherheitshinweise für Pico Projektoren
1. Nicht direkt in das Objektiv des Projektors sehen. 2. Dieses Produkt kann während des Betriebes etwas warm werden, was normal ist. 3. Das Gerät nicht in einer sehr staubigen Umgebung verwenden. Staubpartikel und andere Fremdgegenstände können das Gerät beschädigen. 4. Das Gerät keinen starken Vibrationen aussetzen. Dies konnte die internen Bauteile beschädigen. 5. Verwenden Sie das beiliegende Netzteil (siehe Technische Daten): Prufen Sie, ob die Spannung der Stromversorgung der verfügbaren Spannung am Einsatzort entspricht. Dieses Gerät entspricht dem angegebenen Spannungstyp.Vermeiden von Horschaden:
Das Anhoren mit einer hohen Lautstärke über einen längeren Zeitraum kann ihre Ohren schädigen. Hinweis für langere Projektion
Der interne Akku unterstützt umgebung 120 Min. Projektion. Wenn Sie länger projizieren möchten, wird die Nutzung des Netzteils empfohlen. Wenn der Akku zu schwach ist, um weiter betrieben werden zu konnen, wird die Anzeige für schwachen Akku ()anfangen zu blinken. Sie müssen das Produkt aufladen, wenn das Symbol angezeigt wird. Es ist normal, dass der Projektor wegen seiner hohen Leistung während des Betriebes warm wird. Wenn der Projektor längerere Zeit lauft und zu heißt wird, erscheint das Symbol für hohe Temperatur auf dem Display. Das System wird automatisch den Standbymodus aufrufen.FCC Konformitätserklarung
Dieses Gerät erfüllt die Anforderungen gemäß Abschnitt 15 der FCC-Bestimmungen. Für den Betrieb sind folgende Bedingungen zu beachten: (1) das Gerät darf keine schädlichen Interferenzen erzeugen und muss (2) empfangene Interferenzen aufnahmen, obwohl diese zu Betriebsstörungen führen können.  Dieses Gerät wurde getestet und entspricht den Grenzwerten digitaler Geräte der Klasse B (siehe Abschnitt 15 der FCC-Bestimmungen). Diese Grenzwerte bieten einen ausreichenden Schutz gegen Interferenzen bei tatsächlichen Installationen. Das Gerät erzeugt und verwendet hochfrequente Schwingungen und kann sie ausstrahlen. Wenn es nicht nach den Anweisungen des Herstellers aufgestellt und betrieben wird, konnen Störungen im Radio- und Fernsehempfang auftreten. In Ausnahmefällen können bestimmte Installationen aber dennoch Störungen verursachen. Sollte der Radio- und Fernsehempfang beeinträchtigt sein, was durch Einund Ausschalten des Gerätes festgestellt werden kann, empfehl't sich die Behebung der Störung durch eine oder mehrere der folgenden Maßnahmen: Richten Sie die Empfangsantenne neu aus. Vergroßern Sie den Abstand zwischen Gerät und Empfänger. Stecken Sie den Netzstecker des Geräts in eine andere Steckdose, damit das Gerät und der Empfänger an verschiedene Stromkreise angeschlossen sind. Bitten Sie ihren Handlcr oder einen erfahrenen Radio- bzw. Fernsehtechniker um Hilfe. Sie werden darauf hingesgewiesen, dass Geräte, an denen nicht von der für die Einhaltung verantwortlichen Stelle ausdrücklich gebilligte Änderungen vorgenommen wurden, vom Benutzer möglicherweise nicht betrieben werden dürfen.  Wenn die Zeit gekommen ist, Ihr Produkt wegzuwerfen, recycleln Sieitte so viele Komponenten wie möglich. Batterien und Akkus)durfen nicht zusammen mit dem Hausmull entsorgt werden!Bitte geben Sie sie an einer Recyclingstelle in Ihrer Nae ab. Zusammen leisten wir einen wertvollen Beitrag zum Schutz unserer Umwelt.Inhalt
| Über das Produkt, Sicherheitshinweise | 1 |
| Paketinhalt | 5 |
| Produktübersicht | 6 |
| Erste Schritte | 8 |
| Aufladen des Produktes | 8 |
| Ausbuhl der Sprache | 9 |
| Projektion von einer externen Videoeingangsquelle | 9 |
| HDMI, VGA, AV Eingang | 10 |
| Smartphone & Tablets | 13 |
| Aufladen von externen Mobilgeräten | 13 |
| Projektion vom Speicher | 14 |
| Hauptmenü | 15 |
| Video | 16 |
| Bild | 17 |
| Dokument | 19 |
| Musik | 20 |
| Dateimanager | 20 |
| Eigene Favoriten | 21 |
| Einstellungen | 21 |
| Drahtlose Verbindung aktivieren | 23 |
| Wireless Treiber für PC oder Mac | 23 |
| Wireless App auf Apple oder Android Geräten | 28 |
| Fehlerbehebung | 35 |
| Technische Daten | 36 |
Paketinhalt
Bitte überprüfen Sie, ob sich die folgenden Antikel im Paket befinden: Pico Projektor Netzteil Abnehmbarer Stromstecker Fernbedienung - HDMI Kabel (A auf A Typ) - MHL Kabel (HDMI A auf USB D Typ) AV-Kabel - Micro USB-Kabel - Tragetasche BenutzerhandbuchProduktübersicht
Projektor
DE Systemsteuerung
Fernbedienung
Einlagen der Batterien in die Fernbedienung
1. Entfernen Sie die Batteriehalterung, indem Sie den seitlichen Auslöser fest herunterrücken und die Batteriehalterung Herausziehen. 2. Legen Sie eine CR2025 Knopfzellenbatterie unter Beachtung der Polarität ein, wie sie in der Batteriehalterung angegeben ist. Anmerkung: Wenn Sie die Fernbedienung das erste Mal verwenden, befindet sich eine Plastikfolie zwischen der Batterie und ihren Kontakten. Entfernen Sie die Folie vor der Benutzung. 3. Legen Sie die Batteriehalterung ein. Warning:
Eine unsachgemäße Nutzung der Batterie kann zu einer Überhitzung, Explosion oder Entzündung führen, was Verletzungen oder ein Feuer zur Folge haben können. Ein Auslaufen der Batterie kann die Fernbedienung beschädigen. Die Fernbedienung nicht dem direkten Sonnenlicht aussetzen. Die Batterie keinem Feuer oder Wasser aussetzen. Eine leere Batterie sofort austauschen. Entnehmen Sie die Batterie, wenn die Fernbedienung über einen längeren Zeitraum nicht verwendet wird.Betriebsreichweite mit der Fernbedienung
 Anmerkung: Die tatsächliche Betriebsreichweite kann vom Diagramm etwas abweichen. Zudem verringert eine schwache Batterie die Betriebsreichweite der Fernbedienung.Erste Schritte
Aufladen des Produktes
Der Projektor verfügt über einen Li-Polymer Akku für die mobile Nutzung.itte laden Sie den Projektor vor der ersten Nutzung 8 Stunden lang auf. Die weiteren Aufladevorgänge dauern etwa 4 Stunden.  Der Akku wird nur geladen, wenn der Projektor nicht verwendet wird (Gerät aus). Verbinden Sie ein Ende des beiliegenden Netzteils mit der DC IN Buchse und das andere Ende mit einer Steckdose, um mit dem Aufladen zu beginnen. Tauschen Sie den Stecker (EU, USA, usw.) des Netzteils aus, damit er der Steckdose Ihres Landes entspricht, falls er entsprechlich sein sollte.LED Ladeanzeige
Während des Ladens leuchtet die LED der Ein/Aus-Taste orange. Sie wird grün leuchten, wenn der Akku vollständig geladen ist.Den Projektorein-/ausschalten
Drücken Sie den Ein/Aus-Schalter 2 Sekunden lang, um den Projektor einszuschalten. Drücken Sie den Ein/Aus-Schalter 2 Sekunden lang nach unten, um den Projektor auszuschalten. Stand-by-Modus: Drücken Sie die Ein/Aus-Taste 1 Sekunde lang, um die Projektlorlampe kurz auszuschalten, um Akkustrom und Zeit beim Systemstart zu sparen. (Die LED an Tasten werden weiterhin leuchten, wenn sich der Projektor im Standbymodus befindet.)Fokus abhängig vom Abstand anpassen
Stellen Sie den Projektor auf eine flache Unterlage und gegenüber einer Wand oder Projektionsleinwand. Der Projektionsabstand und die Projektionsgroßen sind: Entfernung: 50~cm 425~cm (20" 167") BildgroBe: 36 cm ~ 305 cm (14" ~ 120")  Stellen Sie den Fokus durch Drehen des Fokushebels nach oben oder unter ein, um ein scharfes Bild zu erhalten. Anmerkung: Verwenden Sie ein Stativ (nicht enthalten), um ggf. die Höhe des Projektembildes zu steigern. Das Stativgewinde befindet sich an der Unterseite des Projektors.Select the Language
Verwenden Sie die Navigationstasten < > zur Auswahl von „Einstellung" und drücken Sie auf (OK), um das Untermenü aufzurufen. Wahlen Sie „Sprache" und drücken Sie auf (OK), um die Sprachliste aufzurufen. Wahlen Sie die gewünschte Sprache aus und bestätigen Sie mit (OK). Drücken Sie auf (Beenden), um zum Hauptmenu zurückzukehren.Projektion von einer externen Videeingangsquelle
Der Projektor verfügt ein mehrere Anschlüsse an der Unterseite. Sie können ihre externe Videogangsguille über das entsprechende Kabel an den Projektor anschließen auf die Quelle Taste auf dem Bedienfeld des Projektors drücken, um die Eingangsguille auszuwahlen. HDMI
Verwenden Sie das HDMI Kabel, um den HDMI Anschluss an der Rückseite des Projektors mit der externen HDMI Signalquelle zu verbinden. Nach dem Anschluss wird das Display automatisch zur HDMI-Quelle wechseln. VGA
Verwenden Sie das VGA Kabel, um den VGA Anschluss an der Rückseite des Projektors mit der externen VGA Signalquelle zu verbinden. Drücken Sie nach dem Anschluss auf die Quelle Taste auf der Fernbedienung oder dem Bedienfeld, um die VGA Quelle auszuwahlen. Anmerkung: Das VGA Kabel ist nicht im Standardlieferumfang enthalten.AVIN
Folgen Sie der unten stehenden Abbildung, um das externe AV-Ausgabegerät mit der AV-Buchse zu verbinden. Die Verbindung ist farbkodiert. Drücken Sie nach dem Anschluss auf die Quelle Taste auf der Fernbedienung oder dem Bedienfeld, um die AV-Eingangsgquelle auszuwahlen. Wiedergabeeinstellung für externe Videoquelleändern
Drücken Sie auf Alenü an Bedienfeld auf der Fernbedienung, um die Wiedergabeeinstellung aufzurufen. 1. Anzeigeformat
Wenn die Videodatei im Seitenverhältnis 4:3 vorliegt, ermöglicht Ihnen diese Funktion die Anpassung, wie das Bild auf einem 16:9 Bildschirm aussehen soll. Drucken Sie auf OK, um die Optionen anzuzeigen. 1) Schwenken & Scannen: das Bild wird zur Anpassung an einen 16:9 Bildschirm hochskaliert. 2) Letterbox: das Bild wird mit dem ursprünglichen Seitenverhältnis angezeigt.Abbildung for die Seitenverhältniseinstellung:
2. Helligkeit
Ermöglicht Ohnen die Änderung der Helligkeit je nach Umgebung und Stromverbrauch. 1) Erweitert: Wahlen Sie diesen Modus, wenn eine externe Stromversorgung verfügbar ist, um die Leistung zu maximieren. 2) Normal: Der Standardmodus für die Optimierung der Projekteisleistung und Akkukapazität. 3) Öko: Dieser Modus wird empfohlen, wenn der Projektor im Akkumodus verwendet wird, um Strom zu sparen. Anmerkung: Der Projektor wird automatisch in Erweiterten Modus wechseln, wenn er mit dem Netzteil betrieben wird.3. Projektionsmodus (Linse)
Ermöglicht Ohnen die Auswahl des Projektkomodus in Abhängigkeit davon, wie der Projektor angebracht ist. Vorderseite: Dies ist die herkommliche Methode, den Projektor für eine schelle Einrichtung und Mobilität aufzustellen. Decke vorn: Der Projektor stellt das Bild für eine Projektion von der Decke auf den Kopf. Rückseite: Der Projektor dreht das Bild um, so dass er hinter einer durchlässigen Leinwand projizieren kann. Rückseite: Der Projektor wird umgedreht und stellt das Bild auf den Kopf. Er kann damit hinter einer durchlüssigen Leinwand bei Montage an einer Decke projizieren.        4. Szenenauswahl
Ermöglicht Ihnen die Auswahl des idealen Modus zum Ansehen von Filmen, Foto-Diashows oder Lesen von Text mit ausgegliechener Helligkeit, Farbe und Kontrast. Kino: ideal zum Ansehen von Filmen Normal: ideal für Foto-Diashows Text: ideal für Bilder mit Text5. Informationen
Zeigt Firmware Version: Txxxx / AxxxxProjecting from Smartphones or Tablets
1. Verbinden Sie Smartphones für die Projektion, die MHL (Mobile High-Definition Link) unterstützen. Verbinden SieSamsung Galaxy S2, Note; das neue HTC one, one X+, one X, one S; oder Sony Xperia Z über ein MHL (A zu USB D Typ HDMI) Kabel mit dem Projektor. Verbinden Sie Samsung Galaxy S4, Note II über ein MHL (A zu USB D Typ HDMI) Kabel und Samsung 5 zu 11 Pin MHL Konverter (wie Abbildung) für die Projektion.  Anmerkung: Es ist normal, dass der Projektor die Smartphones oder Tablets automatisch ladt, wenn Sie mit dem MHL-Kabel für die Projektion verbunden sind. 2. Verbinden Sie datiPhone 5 für eine Spiegelprojektion (mit Lightning Anschluss) Verbinden Sie das iPhone 5, iPad 4, iPad mini und iPod touch 5 über einen Lightning Digital AV Adapter und einem A-zu-A Typ HDMI Kabel mit dem Projektor.  iPhone 4S, 4, Neues iPad, iPad 2 und iPod touch (4) konnen mit dem Apple 30-Pin Digital AV Adapter und einem A-zu-A Typ HDMI Kabel verbunden werden Aufladen von externen Mobilgeräten Der interne Akku des Projektors kann nicht nur für die Projektion verwendet werden, sondern auch um Mobilgerät aufzuladen.  1. Verbinden Sie Ihr Mobilgerät über das USB-Kabel, indem Sie den Typ A Stecker in den USB-Port an der Rückseite des Projektors stecken. 2. Nach dem Einsatz des Projektors wird das Gerät automatisch aufgeladen. 3. Wenn der Projektor ausgeschaltet ist, drücken Sieitte auf die Quellen-Taste () , um mit der Aufladung zu beginnen oder sie anzuhalten. Anmerkung: Der Projektor stellt 5V/500 mA Ausgangsleistung für die Aufladung von Mobilgeräten bereit.Projektion aus dem Speicher
Projektion aus dem internen Speicher
Der Projektor verfügt über 2 GB internen Speicher und 1,2 GB sind frei für Dateien.itte laden Sie Mediendateien fur die Projektion von Ihrem PC oder Notebook in den internen Speicher: 1. Schalten Sie den PC und den Projektor ein. 2. Verbinden Sie den Micro-USB-Port des Projektors mit einem USB Kabel mit dem PC oder Notebook. Nach Herstellung der Verbindung werden das Display und der Lüfter automatisch ausgeschaltet, um Strom zu sparen. Der Projektor befindet sich jetzt im Massenspeichermodus.  3. Sie können die Bilder, Videos, Musik, Windows Office (PowerPoint, Word und Excel) und PDF Dateien von Ihrm PC in den internen Speicher kopieren oder die Dateien im internen Speicherlöschen. Anmerkung: 1. Die Fernbedienung kann während der Verbindung mit einem PC oder Notebook nicht verwendet werden. 2. Informationen über Unterstützung Dateiformate finden Sie unter „Bedienung und Funktionen" (S.15)Projektion vom externen Speicher
1. Externer SD/SDHC/SDXC-Kartensteckplatz
Der Speicherkartensteckplatz ist integriert und kann SD, SDHC und SDXC Karten bis zu 128 GB lessen. Legen Sie die Karte in der angegebenen Richtung ein, bis sie das Ende des Steckplatzes erreicht. Drucken Sie die obere Ecke der Speicherkarte und ziehen Sie sie hereaus, um sie zu entfernen.2. USB Gerät
Der Projektor kann Inhalte von USB-Geräten wie z.B. USB Sticks oder Festplattenlaufwerke (mit eigener Stromversorgung) projizieren.   Anmerkung: Die externe Speicherquelle ist der Standardspeicher, der in der Wiedergabeliste angezeigt wird. Wenn sowohl die SD/SDHC Karte als auch der USB Speicherstick verwendet werden, ist der USB Speicherstick der Standardspeicher, der in der Wiedergabeliste angezeigt wird.Auswahl der Speicherquelle
Verwenden Sie die Navigationstasten < > zur Auswahl von „Einstellung" und drücken Sie auf (OK), um das Untermenü aufzurufen. Wahlen Sie „Speicher" und drücken Sie auf (OK), um die Speicheroptionen aufzurufen. Wahlen Sie die gewünschte Speicherquelle aus und bestätigen Sie mit (OK). Drücken Sie auf (Beenden), um zum Hauptmenu zurückzukehren.Hauptmenu
  Drücken Sie auf die Navigationstaste < > zur Markierung des gewünschten Elements und drücken Sie auf @/OK zum Aufruf des Untermenus; drücken Sie /Beenden, um zum Hauptmenu zurückzukehren.| Symbole | Funktionen Beschreibung | |
| Video | Mit dieser Funktion konnen Benutzer eine Videodatei zur Projektion auswahlen. | |
| Bild | Mit dieser Funktion konnen Benutzer eine JPEG, JPG oder BMP Datei zur Projektion auswahlen. | |
| Dokument | Mit dieser Funktion konnen Benutzer Office PowerPoint, Word, Excel und PDF Dateien zur Projektion auswahlen. | |
| Wi-Fi | Aktivieren Sie die Drahtlosfunktion für den Projektor. | |
| Musik | Mit dieser Funktion konnen Benutzer MP3, WAV und OGG Dateien zur Wiedergabe auf dem Projektor auswahlen. | |
| Datei | Mit dieser Funktion konnen Benutzer unabhängig vom Dateifformat der gespeicherten Speicherquelle durch alle Ordner und Dateien steuern. Beim Steuern durch die Listc kann eine Vorschau von Fotos und Videos angezeigt werden. Sie konnen eine ausgewählte Datei auf eine andere Speicherquelle kopieren oder sie löschen. | |
| Eigene Favoriten | Alle Dateien, die als Favoriten markiert sind. | |
| Einstellungen | Mit dieser Funktion konnen Benutzer Einstellungen wie z.B. Helligkeit, Szeneauswahl, Sprache und Speicher anpassen. |
Videos projizieren
Wahlen und projizieren Sie Videodateien. 1. Wahlen und rufen Sie „Video" im Hauptmenu aus und drücken Sie auf OK. 2. Verwenden Sie in der Dateiliste, um den Ordner zu wahlen und drucken Sie auf / OK , um den ausgewählten Ordner zu öffnen. Verwenden Sie / OK , um durch die Wiedergabeliste zu steuern. Drucken Sie auf , um die Wiedergabe zu starten und das ausgewählte Video zu projizieren. 3. Drücken Sie während der Wiedergabe auf , um das vorherige/nachste Video abzuspielen. 4. Drücken Sie etwas länger auf für einenchnellen Vorlauf/Rücklauf. 5. Drücken Sie auf ©/OK, um anzuhalten und erneut, um fortzufahren. 6. Drücken Sie auf , um die Lautstärke des Videos anzupassen.Videowiedergabeeinstellungändern:
Drücken Sie unter der Dateiliste auf Menü, um die Videoeingstellung aufzurufen.  1) Wiedergabe: Wahlen Sie den Wiedergabemodus (siehe Tabelle A) für Videoclips.| → | Wiederholen Aus | Das aktuelle Video oder den aktuellen Titel ein Mal wiedergeben |
| → | Normal Aktuellen | Ordner wiedergeben |
| ← | Einmal wiederholen | Das aktuelle Video oder den aktuellen Titel wiederholt wiedergeben |
| ← | Alle wiederholen | Aktuellen Ordner wiederholt wiedergeben |
| × | Zufall | Aktuellen Ordner wiederholt in zufälliger Reihenfolge wiedergeben |
| Dateierweiterung | Videodecoder | Audiodecoder |
| *.avi | MJPEG | AAC (AAC-LC and HE-AAC) |
| Xvid | PCM | |
| H.264/AVC | ADPCM | |
| MPEG4 | ||
| *.mov | MPEG4 | AAC |
| *.mp4 | H.264 | PCM |
| ADPCM | ||
| *.mpg | MPEG1 | LPCM |
Fotos projizieren
Wahlen und projizieren Sie Fotos. 1. Wahlen Sie „Foto" und drücken Sie auf ©/OK, um den Fotomodus im Hauptmenu aufzurufen. 2. Verwenden Sie , um den Ordner zu wahlen und drücken Sie auf /OK, um den ausgewählten Ordner zu öffnen. Verwenden Sie , um durch die Miniaturbilder der Fotos zu steuern.Use to navigate the thumbnail of photos. 3. Drücken Sie auf OK, um das ausgewählte Foto im Vollbild anzuzeigen. 4. Drücken Sie auf die Links/Rechts (▲▶) Taste, um zum vorherigen/nachsten Bild zu gehen. 5. Das Bild zoomen oder schwenken: - Drucken Sie auf die Hoch Taste, um den Zoommodus aufzurufen. Verwenden Sie die Hoch/Runter (▲▼) Tasten, um hinein-/herauszuzoomen. - Drücken Sie im Zoommodus auf ©/OK, um zur Schwenk Funktion zu wechseln. Bitte entnehmer Sie die genaue Bedienung aus der folgenden| Zoom | ▲▼ | Hinein-/Herauszoomen (Bild: Die Vergrößerungsstufen sind 1x ~ 4x. Dokument: Die Vergrößerungsstufen sind 1x ~ 8x.) |
| ▲▼ | Vorheriges/Nächstes Bild (Seite) | |
| ◎/OK | Schwenkmodus aufrufen | |
| ← | Zum Vollbild zurückkehren | |
| Schwenk | ▲▼ und ▲▼ | Nachiben, unter, links, rechts schwenken/OK |
| ◎/OK | Zum Zoommodus zurückkehren | |
| ← | Zum Vollbild zurückkehren |
6. Das Bild drehen:
Drücken Sie auf den, um die Drehfunktion aufzurufen. Verwenden Sie die Links/Rechts (▶) Taste, um die Drehrichtigung zu wahlen und drücken Sie zur Bestätigung auf. Drücken Sie auf Beenden, um zu Fotoordnern oder Miniaturbildern zugrückzukehren.Fotowiedergabeeinstellungändern:
Wahlen Sie in der Dateiliste ein Miniaturbild aus und drücken Sie auf Menü, um die Fotoeinstellung aufzurufen.  1) Diaschau: Diashow ein- oder ausschalten. 2) Musik: Hintergrundmusik während der Diashow aktivieren oder deaktivieren. Speichen Sie die gewünschte Musikitte im selbst Ordner, um sie wiederzugegeben. 3) Geschwindigkeit: Einstellung der Diashow Intervallgeschwindigkeit aus 5 Sek., 10 Sek., 30 Sek., 1 Min., oder 10 Min. 4) Drücken Sie während der Diashow auf ©/OK, um die Diashow zu stoppen oder fortzusetzen. Verwenden Sie , um zum vorherigen/nachsten Bild zu steuem. 5) Eigene Favoriten: Das Datei wird mit einem Symbol markiert und in den Ordner „Eigene Favoriten" für einen schellen Zugriff gruppiert (wie ein Lesezeichen). (Bittelesen Sie die Abschnittseinleitung zu „Eigene Favoriten" auf Seite 21.) Anmerkung: Der Projektor unterstützt die folgenden Fotoformate:| Dateifformat | Max. | Auflösung | Dateierweiterung |
| JPEG 8000 x 6000 | *.jpeg | ||
| JPG 8000 x 6000 | *.jpg | ||
| BMP 8000 x 6000 | *.bmp |
Dokumente projizieren
Windows Office und PDF Dateien auswahlen und projizieren. 1. Wahlen Sie, Dokument im Hauptmenu aus und drücken Sie auf OK, um den Dokumentenmodus aufzurufen. 2. Steuern Sie durch die Ordner und Dateien und drücken Sie ©/OK, um das ausgewählte Dokument zu öffnen. 3. Drücken Sie die Links/Rechts (▲▶) Taste, um zur vorherigen/nachsten Seite zu gelangen. 4. Das Dokument zoomen oder schwenken: - Drücken Sie auf die Hoch Taste, um den Zoommodus aufzurufen. Verwenden Sie die Hoch/Runter ( ) Tasten, um hinein-/herauszuzoomen. - Drücken Sie im Zoommodus auf ©/OK, um zur Schwenk Funktion zu wechseln.Dokumentenwiedergabeeinstellungändern:
Wahlen Sie in der Dateiliste ein Dokument aus und drücken Sie auf Menü, um die Dokumenteneinstellung aufzurufen. 1) Diaschau: Diashow ein- oder ausschalten. 2) Geschwindigkeit: Einstellung der Diashow Intervallgeschwindigkeit aus 5 Sek., 10 Sek., 30 Sek., 1 Min., oder 10 Min. 3) Drücken Sie während der Diashow auf ©/OK, um die Diashow zu stoppen oder fortzusetzen. Verwenden Sie , um zum vorherigen/nachsten Bild zu steuern. 4) Eigene Favoriten: Die Datei wird mit einem Symbol markiert und in den Ordner „Eigene Favoriten" gruppiert. (Bitte lesen Sie die Abschnittseinleitung zu „Eigene Favoriten" auf Seite 21) Anmerkung: 1. Der Projektor unterstützt die folgenden Dokumentformate und Einschränkungen:| Dateifformat | Dateierweiterung | Unterstützte Version | Größenbeschränkung |
| POWERPOINT *.ppt, *.pptx, PowerPoint 97 ~ 2010 | Up to 19MB | ||
| *.pdf PDF 1.0 ~ 1.4 | Up to 75MB | ||
| WORD | *.doc, *.docx, | WORD 97 ~ 2010 | Up to 100MB |
| EXCEL | *.xls, *.xlsx | Excel 97 ~ 2010 | Up to 15MB |
Musik wiedergeben
Wahlen und geben Sie Audiodateien wieder. 1. Bevor Sie Musik anhören können, müssen Sie zuerst Musikdateien im internen Speicher oder auf externen Speicherveräten speichern. 2. Drücken Sie auf , um ein Lied zu wahlen und drücken Sie auf ©/OK, um die Musikwiedergabe zu starten. 3. Drücken Sie auf press , um die Lautstärke der Musik anzupassen. 4. Drücken Sie auf ©/OK, um die Musik anzuhalten. Drücken Sie erneut, um die normale Wiedergabe fortzusetzen. 5. Das Display wird nach 20 Sekunden automatisch ausgeschelt, um Strom zu sparen. Um das Display anzuschalten, berühren Sie das Tastenfeld, um die Projektkonsfunktion zu aktivieren. 6. Drücken Sie auf Menu), um die Musikeinstellung aufzurufen. 1) Wiedergabe: Wahlen Sie den Wiedergabemodus gemäß Tabelle A (Seite 16). 2) Eigene Favoriten: Die Datei wird mit einem Symbol markiert und in den Ordner „Eigene Favoriten" gruppiert. (Bittelesen Sie die Abschnittseinleitung zu „Eigene Favoriten" auf Seite 21) Anmerkung: Der Projektor Unterstützung die folgenden Musikformate:| Dateifformat | Dateierweiterung |
| MP3 | *.mp3 |
| WAV | *.wav |
| OGG | *.ogg |
Kopfhörer verwenden
Der Projektor ist mit einem Laufsprecher für eine gute Audioleistung ausgestellt. Zusätzlich konnen Sie einen Kopfhörer oder externen Laufsprecher an die AV-Buchse des Gerätes anschließen. Wenn ein Kopfhörer angeschlossen ist, wird der Laufsprecher automatisch ausgeschaltet.Dateimanager
Der Dateimanager ist eine schnelle und bequeme Möglichkeit, Dateien verschiedene Formate zu steuern, projizieren und zu verhalten. 1. Wahlen Sie „Datei" im Hauptmenü und drücken Sie auf /OK, um die Dateiliste aufzurufen.  2. Steuern Sie durch die Dateiliste, wahlen Sie eine Datei und drucken Sie auf /OK, um die Projektion zu starten. 3. Um Dateien zu verwalten, markieren Sie eine Datei in der listened und drücken Sie auf (Menu) zum Aufruf der „Kopieren & Löschen" Funktion. - Datei kopieren Wahlen und drücken Sie OK „Kopieren“, um die ausgewählte Datei auf ein anderes Speicher gerät zu kopieren. - Dateilöschen Wahlen und drucken Sie ©/OK „Loschen", um die ausgewählte Daten zu Löschen. - Drücken Sie auf , um abzubrechen und zur Dateiliste zurückzukehren. Eigene Favoriten
Wahlen Sie die Dateien aus und geben Sie die als Favoriten markierten wieder. 1. Wahlen Sie, "Eigene Favoriten" um den Eigene Favoriten Modus aufzurufen. im Hauptmenü aus 2. Steuern Sie durch die Dateien und drücken Sie auf ©/OK, um die ausgewählte Datei zu öffnen. 3. Drücken Sie die Links/Rechts (▲▶) Taste, um zur vorherigen/nachsten Datie zu gelangen. 4. Drücken Sie auf Menu), um die „Pfad Löschen“ Funktion aufzurufen. Anmerkung: „Pfad Löschen" wird nur den Dateipfad von der Eigene Favoriten Liste Löschen. Wenn Sie die Dateien Löschen müssen, wahren Sieitte „Datei" aus dem Hauptmenu aus. Wahlen Sie anschließend die Daten aus und drücken Sie auf (Menu), um die Funktion „Kopieren & Löschen" aufzurufen.Einstellungen
Ändern Sie die Standardeinstellung für Projektkennigkeit, Projektionsmethoden, Sprache und Speicherergeäte. 1. Helligkeit Ermöglicht Ihnen die Änderung der Helligkeit je nach Umgebung und Stromverbrauch.| Modus | Helligkeit | Akku Betriebszeit | Empfehlung |
| Erweitert | Bis zu 100 lms | 80 Min. | Dieser Modus wird empfohlen, wenn eine exte Stromversorgung verfügbar ist, um die Leistung zu maximieren. |
| Normal | Bis zu 60 lms | 100 Min. | Der Standardmodus für die Optimierung der Projekteisleistung und Akkukapazität. |
| Öko | Bis zu 40 lms | 120 Min. | Dieser Modus wird empfohlen, wenn der Projektor im Akkumodus verwendet wird, um Strom zu sparen. |
2. Projektionsmodus (Linse)
Ermöglicht Ihnen die Auswahr des Projektionsmodus in Abhängigkeit davon, wie der Projektor angebracht ist.itte lessen Sie die genaue Bedienung auf Seite 12 nach.3. Szenenauswahl
Ermöglicht Ihnen die Auswahr des idealen Modus zum Ansehen von Filmen, Foto-Diashows oder Lesen von Text mit ausgegliechener Helligkeit, Farbe und Kontrast. Kino: ideal zum Ansehen von Filmen Normal: ideal für Foto-Diashows Text: ideal für Bilder mit Text4. Speicherquelle
Mit dieser Funktion konnen Benutzer die Speicherveräte aus internem Speicher, Micro-SD-Karte und USB Geräten ausgehalten.  : Internet Speicher  : SD / SDHC / SDXC Karte  : USB Dongle5. Sprache
Mit dieser Option konnen Benutzer die angezeigte Systemsprache ändern.6. Autom. Ausschalten
Mit dieser Option können Benutzer die automatische Ausschaltfunktion des Projekctors aktivieren oder deaktivieren. Wenn die automatisch Ausschaltung EIN geschellt ist, wird der Projektor automatisch nach Ablauf der ausgewählten Zeit ausgeschelt.7. System
Werkseinstellung Setzt den Projektor auf die Werkseinstellungen zurück. -Firmware Upgrade Informationen zum Firmware Upgrade sind auf unserer Website verfügbar. Informationen Zeigt Firmware Version: Txxxx/AxxxxDrahtlose Verbindung aktivieren
Folgen Sie bei der erstmaligen Nutzung den unten stehenden Schritten, um die WLAN Software für ihren PC oder Smartphone installieren.Installation der WLAN Software auf ihren Computer
1. Wahlen Sie, WLAN im Hauptmenu aus, um die WLAN-Funktion des Projektors aussufahren.  2. Die WLAN-Anzeige zeigt den WLAN-Status (WLAN angeschlossen oder getrennt), sowie das Kennwort für die Verbindung des Projektors an.  3. Aktivieren Sie WLAN an Ihr dem Notebook oder PC. Wahlen Sie den Access Point „WiFi_projector-XX“, um sich mit dem WLAN-Netzwerk des Projektors zu verbinden   Anmerkung: 1. Ihr Computer muss über die WLAN-Funktion verfügen, um die Verbindung zu erkennen. 2. Trennen Sie das Ethernetkabel von Ihr dem Computer, um einen Einfluss auf die WLAN-Netzwerkverbindung zu verhindern. 3. Wenn Sie sich mit der WLAN-Netzwerk des Projektors verbinden, wird die Verbindung zu anderen WLAN-Netzwerken getrennt. Drücken Sie auf dem Projektor auf Menu), um die Treiber/App Installation aufzurufen.  5. Der Bildschirm zeigt die IP-Adresse und den QR Code zum Download des Treibers/der App.  6. Öffnen Sie den Internetbrowser auf Ihr Computer und geben Sie anschließend die IP-Adresse http://192.168.111.1 in die Adressleiste des Browsers ein. 7. Wahlen Sie je nach Ihr dem PC den Treiber für Windows oder Mac OS aus und klichen Sie anschließend auf das Symbol, um den Treiber herunterzuladen.  8. Klichen Sie doppel auf den Treiber EZ_View, umihn zu installieren. Klichen Sie aufPeer-to-Peer Drahtlosverbindung mit dem Projektor
Eine Peer-to-Peer Drahtlosverbindung von Ihr dem Computer mit dem Projektor erhögt. Ihnen den schellen Start der Präsentation oder die drahtlose Anzeige eines Films von Ihr dem PC, Tablet oder Smartphone, ohne auf ein WLAN-Netzwerk zuzugreifen (ohne Internetverbindung). Es wird der Heimnetzwerkmodus (siehe Seite 32) empfohlen, wenn Sie Internetzugriff für die Projektion bestehtigen.Peer-to-Peer Drahtlosfunktion vom Computer
1. Wahlen und rufen Sie „WLAN" im Hauptmenu aus. 2. Machen Sie eine Notiz des 4-stelligen XXXX Anmeldecodes. Sie werden die Informationen benötigen, um sich später anzumelden.  3. Verbinden Sie ihren Computer mit dem WLAN-Netzwerk des Computers, indem Sie WLAN-Projektor-XX in der Netzwerkliste auswahlen.  4. Doppelklicken Sie auf das EZ View Symbol auf dem Desktop Ihres Computers, um die Anwendung zu starten. 5. Geben Sie den Anmeldecode (siehe Schritt 2) und klichen Sie zur Bestätigung aufErweiterte Funktionen von EZ View
 | Element | Beschreibungen |
| A. Bildschirm teilen | 1 ~ 4: 4 verschiedene Geräten die Projektion auf demselben Bildschirm erlauben L, R: Den Bildschirm nach links oder rechts bewegen Alles: Zum Vollbild zusückkehren |
| B. Spiegelmodus | Im Spiegelmodus wird dasselbe Bild auf dem Bildschirm des Computers angezeigt. |
| C. Erweiterter Modus | Den Bildschirm des Computers auf den Projektor erweitern. |
| D. Verbinden | Zur Download/ Konfigurationsverwaltungsside verbinden. |
| E. Beenden | Klicken, um die Anwendung zu schreiben. |
| F. Modus | Klicken, um den idealen Modus für das Ansehen von Filmen oder Foto-Diashow auszuwählen. Video: ideal zum Ansehen von Filmen Grafik: ideal für Foto-Diashows |
| G. Kompatibler Modus | Klicken, um die Software Kompatibilität mit Software von Drittanbieten zu verbessem. (Die Leistung (Bildrate) der Drahtlosübertragung möglich verringgert sein.) |
| H. Audiostreaming | Audio an die Laufsprecher des Projektors streamen. Anmerkung: Wenn Sie den Ton aus dem Computer nicht gleichzeitig horen möchten, deaktivieren Sie den Laufsprecher am Computer, indem Sie „Stumm" auswählen. |
Installation der WLAN-Software auf Apple oder Android Geräten
EZ View für Android Smartphone und Apple iGerät
EZ View ist eine Anwendung, die auf Ihr Android Smartphone oder Apple iGerät lauft und Fotos oder Präsentationen an den Projektor sendet. EZ View wird nur für Drahtlosverbindungen verwendet. Wenn Sie Ihr Telefon über ein Kabel mit dem Projektor verbinden, können Sie die integrierte Videoausgangsfunktion Ihres Telefons verwenden.Installation von EZ View von Google PlayTM (Für Android Geräte)
1. Verbinden Sie sich mit dem Internet und öffnen Sie die Google Play™ oder Google Play™ Websites. (Google Play™ ist ein Markenzeichen von Google Inc.) 2. Geben Sie EZ View in die Suchleiste ein. (Oder scannen Sie den QR Code direkt von der Installationsseite.)  3. Klichen Sie aufInstallation von EZ View aus dem Apple App Store (Für Apple iGeräte)
1. Verbinden Sie Ihr iPhone mit dem Internet und rufen Sie den App Store auf. 2. Geben Sie EZ View in die Suchleiste ein. (Oder scannen Sie den QR Code direkt von der Installationsseite.)  3. Klichen Sie aufPeer-to-Peer Drahtlosverbindung von einem Android oder Apple Gerät mit dem Projektor
Bevor Sie Bilder über EZ View an den Projektor senden können, müssen Sie Ihr Android Smartphone oder Apple iGerät mit dem Projektor (Peer-to-Peer) verbinden oder sich im selbst WAN-Netzwerk befinden. 1. Wahlen Sie „WLAN" im Hauptmenu aus, um die WLAN-Funktion des Projektors auszufahren.   2. Die WLAN-Anzeige zeigt den WLAN-Status (WLAN angeschlossen oder getrennt), sowie das Kennwort für die Verbindung des Projektors an.  3. Aktivieren Sie WLAN auf Ihrhem Smartphone. Wahlen Sie den Access Point „WiFi_projector-XX“, um sich mit dem WLAN-Netzwerk des Projektors zu verstehen.EZ View öffnen und am Projektor anmelden
1. Die EZ View Anwendung öffnen. EZ View wird nach kompatiblen Gerätenuchen. 2. Wahlen Sie WLAN Projektor und geben Sie das auf der Leinwand des Projektors angezeigte Kennwort ein.   4. Drucken Sie <OK> , um fortzufahren. 5. Wahlen Sie die Art der Dateien auf dem Smartphone für die Projekktion. | EZ View App Funktion | Beschreibung |
| PHOTO | Projektion von auf dem Smartphone gespeicherten Fotos. |
| DOCUMENT | Projektion von Office Dokumenten und PDFs, die auf dem Smartphone gespeichert sind. |
| INTERNET | Projektion von Webseiten. (Nur Heimnetzwerkmodus) * Please see page 31 to enable Client mode. |
| DROPBOX | Streaming Cloud Server. (Nur Heimnetzwerkmodus) * Lesen Sieitte Seite 31, um den Client Modus zu aktivieren. |
| CAMERA | Echtzeitprojektion des Bildes über die iPhone oder Android Telefonkamera über eine WLAN-Verbindung. |
| VIDEO | Streaming von Videos auf ihren iOS und Android Geräten an den Projektor. |
| SPLIT CONTROL | Bis zu vier Geräte können gleichzeitig über den Projektor projiziert werden. |
Inhalte zu EZ View über iTunes® hinzufugen (Für Apple iGeräte)
1. Verbinden Sie Ihr iPhone mit Ihr Computer. 2. Führer Sie iTunes® auf Ihr dem Computer aus, außer es öffnet sich automatisch, wenn Sie das iPhone anschließen. 3. Klichen Sie auf das iPhone oder iPad Gerät in der Seitenleiste. 4. Klichen Sie auf die Apps in den Einstellungsfeldern. 5. Klichen Sie auf EZ View, um samtliche in EZ View geladene Dateien anzuzeigen. 6. Klichen Sie auf „Hinzufugen" und wahlen Sie die Dateien aus, die zu EZ View hochgeladen werden sollen. Sie können.JPG Dateien und Dokumentendateien laden. 7. Klichen Sie unter links auf die Synchronisierungstaste, um die Dateien auf Ihr iPhone zu übertragen.Das Bild von EZ View skizzieren
Ein Skizzenprogramm ist in die Foto / Dokumenten / Webmodi integriert, damit der Präsentator Notizen auf dem projizierten Bild machen kann. Sie konnen gaz einfach über eine Berührung zeichnen, farblich markieren oder loschen. Die skizzierten Bilder konnen in einem Rutsch in der Fotorolle gespeichert werden. Verbindung des Projektors mit einem verfügbarbaren WLAN Netzwerk (Heimnetzwerkmodus) für Internetzugriff
Es wird empfohlen, den Projektor mit einem WLAN-Netzwerk zu verbinden, so dass Ihr Computer, Tablet und Smartphone zur selbst Zeit auf das Internet zugreifen kann. Sie müssen nur den Netzwerkschluss eingeben, um die Verbindung das ersten Mal einzurichten. Der Projektor wird automatisch mit dem Netzwerk verbunden, wenn der WLAN-Modus das{nachste Mal aufgerufen wird. 1. Wahlen und rufen Sie „Wi-Fi" im Hauptmenu aus. 2. Drücken Sie auf [Menu), um die folgenden Optionen aufzurufen. Wahlen Sie „Internetzugang" (Client Modus) und bestätigen Sie mit © OK".  3. Wahlen Sie das WLAN-Netzwerk, mit dem Sie sich verbinden möchten und bestätigten Sie mit © OK".  4. Wenn WLAN Sicherheit in Ihrw LAN-Netzwerk aktiviert ist, drucken Sie auf OK", um die Tastatur anzuzeigen und das Kennwort einzugeben (Netzwerkschlussel), indem Sie die Navigationstasten am Projektor oder der Fernbedienung verwenden. Drucken Sie Eingabe des Kennwortes am Projektor oder auf der Fernbedienung auf Beenden", um die Tastatur auszublenden. Wahlen Sie Verbinden" und bestätigten Sie mit OK".  5. Verwenden Sie die „Beenden“ Taste, um zur WLAN-Anzeige zusückzukehren. Sie können jetzt den Treiber oder die EZView App starten, um mit der Drahtlosprojektion zu beginnen.  6. Wenn Sie die Drahtlosprojektion beenden möchten, schreiben Sie einfach den Treiber oder die App, um zum Hauptmenu des Projektors zurückzukehren. Anmerkung: Die Leistung beim Internetzugriff (Heimnetzwerkmodus) wird durch eine Reihe von Faktoren beeinflusst, darunter CPU Leistung Ihres Smartphone/Notebook, der Abstand zwischen dem Access Point, und Wänden/Hindernissen, welche die direkte Sichtlinie blockieren. Funktelefone, Bluetooth Geräte, Mikrowellen und alles, das Funkstörungen im 2,4 GHz Frequenzbereich erzeugen können, kann die WLAN Leistung ebenfalls beeinträchtigen. Wenn die Verbindungsgeschwindigkeit zum Internet bei der Projektion sinkt oder die Verbindung abbricht, empfehlen wir Ohnen die Auswahl eines anderes Access Point mit einem stärkeren Signal oder das Abtrennen des Projektor Client von Ihrem Access Point (Internetzugang deaktivieren), um die optimale Leistung bei der Drahtlosprojektion zu erhalten.Fehlerbehebung
Falls Ihr Projektor nicht richtig zu Funktionieren scheint, prufen Sie die folgenden Punkte, bevor Sie sich mit einem autorisierten Servicezentrum in Verbindung setzen.| Symptom Zu prüfende Punkte | |
| Der Projektork Funktioniert nicht, wenn er mit einem Kabel an ein Notebook oder PC angeschlossen wird. | 1. Prüfen Sie, dass das HDMI-Kabel richtig angeschlossen ist.2. Stellen Sie sicher, dass der PC auf die Projektoranzeige gestellt wurde. |
| Die Website für die Treiberinstallation kann nicht vom Computerbrowser geöffnet werden. | 1. Aktivieren Sie WLAN am Notebook oder PC und wahren Sie den Access Point „WiFi_projector-XX“, um sich mit dem Projektor zu verbinden.2. Trennen Sie das Ethernetkabel von Ihrtem Computer, um einen Einfluss auf die WLAN-Netzwerkverbindung zu verhindern.3. Öffnen Sie den Internetbrowser auf Ihrtem Computer und geben Sie anschließend http://192.168.111.1 in die Adressleiste des Browsers ein. |
| Der Projektor kann nicht erkannt werden, wenn die EZ View App ausgeführrt wird. | 1. Wahlen Sie „WLAN“ im Hauptmenü, um den WLAN Anzeigemodus anzuzeigen.2. Aktivieren Sie WLAN am PC oder Smartphone und wahren Sie den Access Point „WiFi_projector-XX“, um sich mit dem Projektor zu verbinden.3. Trennen Sie das Ethernetkabel von Ihrtem Computer, um einen Einfluss auf die WLAN-Netzwerkverbindung zu verhindern. |
| Das projizierte Bild ist zu dunkel. | 1. Nutzen Sie den Projektor in einer dunkleren Umgebung.2. Erhöhen Sie die Helligkeit, indem Sie das Netzteil benutzen.3. Reduzieren Sie die projizierte Bildgröße. |
| Das projizierte Bild ist verschwommen. | 1. Stellen Sie den Fokus ein. Lesen Sieitte „Den Fokus einstellen".2. Prüfen Sie, ob das Objektiv verschmutzt ist. |
| Die Temperatur des Projektors ist zu hoch. | Aufgrund der integrierten Hochleistungs-LED ist es normal, dass dieser Projektor während des längeren Betriebs warm wird. Dies hat keinen Einfluss auf die Leistung des Projektors. Halten Sie die Lüftungsschlitze immer frei von Schmutz und Blockierungen und verwenden Sie den Projektor in einer gut belufteten Umgebung. |
| Zurücksetzen von Unregelmäßigkeiten | Wenn der Projektor langsam lauft, einfriert, abstürzt oder während des Betriebs hängt. Drücken Sie 8 Sekunden lang auf die Ein/Aus-Taste, um den Projektor neu zu starten. |
| Element Beschreibung | |
| Optische Technologie | DLP |
| Lichtquelle | RGB LED |
| Anzeigeformat | 16:9 |
| Auflösung | 854 x 480 Pixel (WVGA) |
| Kontrastverhältnis | 1000:1 |
| Projizierte Bildgroße | 36 cm ~ 300 cm (14" ~ 120") |
| Projektionsabstand | 50 cm ~ 425 cm (20" ~ 167") |
| Projektionsverhältnis (Diagonale: Entfernung) | 1,6 (Projektionsabstand/Bildbreite) |
| Helligkeit | Bis zu 100 Lumen |
| Fokus | Manuell |
| Versatz | 100% |
| Wiedergabeformat | Bild: *.jpeg, *.jpg, *.bmp Video: *.avi, *.mov, *.mp4, *.mpg Audio: *.mp3, *.wav, *.ogg Dokument: *.ppt, *.pptx, *.pdf, *.doc, *.docx, *.xls, *.xlsx |
| WiFi | Modul: IEEE 11n (1T1R) Standard: 802.11b/g/n |
| Internet Speicher | 2 GB (1,2 GB für Speicher) |
| Internet Laufsprecher | Mono |
| Kartensteckplatz | SD/SDHC/SDXC Karte (bis zu 128 GB SDHC) |
| Stromversorgung | Eingang: 100 ~ 240 V AC Ausgang: 12 V, 2 A DC |
| Akkutyp | Embedded 7.4 V/2000 mAh Li-polymer battery |
| Akku Betriebszeit | Erweiterter Modus: 80 min Modus Normal: 100 min Ökonomus: 120 min |
| Stromverbrauch | AC Modus: 12 W Akkumodus: 8 W ~ 12 W |
| Abmessungen (L x B x H) | 132 x 95 x 25 mm |
| Gewicht | 285 g |
| Feuchtigkeit | 20 - 80%, 80% (Max.), nicht-kondensierend |
| Betriebstemperatur | 5°C - 35°C. |
Bienvenue
Merci beaucoup d'avoir acheté ce produit. Avant de commencer, nous vous conseillons de dire ce manuel étape par étape pour obtenir les mêleurs résultats avec votre nouveau Pico projecteur. Nous vous souhaitons beaucoup de plaisir.A propos du produit
Il s'agit de la toute dernière génération de Pico projecteur avec la technologie DLP à l'intérieur. Connu pour les grand projecteurs de cinéma, la technologie DLP offre des couleurs riches et améliore le contraste de l'image. Intégre avec WLAN, le Pico projecteur offre une connexion sans cable depuis votre ordinateur portable, tablette ou téléphone intelligent au Pico projecteur en streaming d'images, vidés, sites Web et documents sans fil et en projetant les images jusqu'à une taille de 120" (300 cm). Avec son soutien à plusieurs fichiers multimédias, documents Office et PDF, et des options de connexion polyvalentes, y compris HDMI, MHL, entrée AV, VGA, USB et fente pour carte SD, ce Pico projecteur est la meilleure solution pour une utilisation mobile dans les'affaires et de divertissement.Notice de sécurité
1. Gardez l'appareil et les matériaux d'emballage hors de la portée des nourrissons et des enfants. 2. Évitez de soumettre l'adaptateur secteur et autres contacts électriques à des éclaboussures de liquides et séchez vos mains avant de l'utiliser. Ne place pas d'objets replis de liquide tels que des vases, etc. sur ou à proximité de l'appareil. 3. Assurez-vous que la prise de courant électrique utilisée est toujours facilement accessibles et jamais cachée. En cas d'urgence, utilisez l'adaptateur secteur pour séparer l'appareil du réseau électrique. 4. Maintenez votre apparéil loin de toute flamme tels que des bougies et ne pas lesmettre en place à proximité de l' apparéil. 5. Maintenez l'appareil à au moins 10 cm de distance de tout autre objet. Assurez-vous que la ventilation n'est pas couverte par des journaux, nappes, ridesaux, etc. 6. Pour votre propre sécurité, n'utilise pas le projecteur pendant un orage ou les éclairs de foudre. 7. L'humidité relative est de 20% 80% , sans condensation. 8. La batterie est intégré à l'appareil. Ne pas désassembler et modifier. La batterie doit être remplaçée par un centre de service autorisé. 9. Assurez-vous que la température ambiente est comprise entre 5 35^ C . 10. Attendez avant d'utiliser l'appareil s'il a ete deplaced d'un endroit froid a une piece chaude. Toute condensation qui s'est formee peut, dans certaines circonstances, detruire l'appareil. Dese que I'appareil ait atteint la tempeature ambiente, il peut etre utilise sans risque. 11. Manipuez l'appareil avec soin. Evitez le contact avec des objets pointus. Se tenir éloigné des objets métalliques. 12. Placez le projecteur sur une surface plane. Toute collision ou chute sur le sol est susceptible d'endommager l'appareil. 13. Ne laissez pas tomber l'appareil ou le désassembler sinon la garantie est annulée. Ouvrir ou-retirer les couvercles peut vous exposer à des tensions électriques dangereuses ou autres dangers. Confiez toute réparation à un centre de service autorisé. 14. Utiliser exclusivement les accessoires fournis par le fabricant. 15. Le produit et le manuel de l'utilisateur sont soumis à de nouvelles améliorations ou suppléments sans préavis.Entretien et Informations de sécurité pour Projecteurs Pico
1. Évitez de faire face directement à l'objet du projecteur. 2. Pendant l'opération, ce produit peut chauffer légèrement, ce qui est normal. 3. L'appareil ne doit pas etre utilise dans un environment tres poussiereux. Les particules de poussiere et autres corps étrangers peuvent l'endommager. 4. Ne pas exposer l'appareil à des vibrations extrêmes. Cela peut endommager les composants internes. 5. Utilisez l'adaptateur secteur fourni (voir données techniques): Vérifiez si la tension de l'alimentation électrique correspond à la tension du réseau disponible à l'emplacement de l'installation. Cet équipement est conforme avec le type de tension indiquée sur l'appareil. Éviter tous dommages auditifs :
L'écoute à un volume élevé pendant une longue période de temps peut occasionner des dommages à vos oreilles. Notification pour projection de longue durée
La batterie intégrée prend en charge environ 120 minutes de projection. Pour la projection longtemps, il est recommendé d'utiliser l'adaptateur secteur C.A.. Lorsque la batterie est trop faible pour rester en activité, l'icône de faible capacité de la batterie () se met à clignoter. Vous devez charger l'appareil pendant que l'icône a montré. Il est normal que le projecteur s'échauffe lors d'une utilisation continue en raison de sa haute performance. Si le projecteur fonctionne pendant une longue période et surchauffe, l'icone de haute température ( ) apparait sur l'écran. Le système enterra alors automatiquement en mode veille.Attestation de conformité FCC :
Cet apparéil est en conformité avec la partie 15 des règles FCC. Le fonctionnement est soumis aux deux conditions suivantes : (1) cet apparéil ne peut cause d'interférences nuisibles et (2) cet apparéil doit accepter toute interférence reçue, dont l'inférence qui peut causeur un fonctionnement involontaire.  Ce matériel a ete teste et trouve en conformite avec les limits d'un apparieil digital de Classe B, conformement à la partie 15 des règles FCC. Ces limites ont ete mises en place pour offrir une protection raisonnable contre les interferences nuisibles dans les installations residentielles. Ce matériel generne, utilise, et peut emetre une energie de frquence radio et si non instalé et utilise en conformite avec les instructions, peut causer une interfeference radio nuisible aux communications radio. Cependant, il n'y a aucune garantie que l'interfERENCE se produit dans une installation particulière. Si ce matériel causait une interfeference à la réception de radio ou de télévision, ce qui peut être déterminé en arrêtant et enuttant en marche le matériel, il est suggéré à l'utilisateur d'essayer de corriger l'interfERENCE en appliquant une mesure de plus parmi celles figurants ci-dessous: - Réorientez ou déplacez l'antenne réceptrice. - Déplacez l'équipement du récepteur. - Branchez l'équipement dans une prise sur un circuit différent de celui où le récepteur est connecté. - Consultez le vendeur ou un technician de radio/télévision experimenté pour des suggestions additionnelles. Vous etes averti que tout changement ou modification de l'equipement non expressement approuve par la partie responsable    Si le temps est arrivé de vous débarrasser de votre produit, veuillez veuillezrecycler tous les composants possibles. Batteries et piles rechargeables ne doivent pas être jetés avec les ordures menagères! Veuillez veuillezles recycler à votre point de recyclage local.  B202 Ensemble nous pouvons aider à protéger l'environnement. Table des matieres| A propos du produit, instructions de sécurité | 1 |
| Contenu de l'emballage | 5 |
| Connaître votre apparéil | 6 |
| PourCOMMencer | 8 |
| Charger l' apparéil | 8 |
| Sélectionnez la langue | 9 |
| Projection à partir de Source d'entrée video externe | 9 |
| HDMI, VGA, entrée AV | 10 |
| Téléphone Intelligent et Tablette | 13 |
| Charger les apparéils mobiles externes | 13 |
| Projection depuis la mémoire | 14 |
| Menu principal | 15 |
| Vidéo | 16 |
| Image | 17 |
| Document | 19 |
| Musique | 20 |
| Gestionnaire fichiers | 20 |
| Mon Favori | 21 |
| Réglage | 21 |
| Activer la connexion sans fil | 23 |
| Pilote sans fil pour PC ou Mac | 23 |
| Wireless Application sur les apparéils Apple ou Android | 28 |
| Dépannage | 35 |
| Spécifications | 36 |
Contenu de l'emballage
Veuillez vérifier que les éléments suivants se trouvent dans votre emballage : Pico projecteur - Adaptateur d'alimentation - Prise d'alimentation échangeables - Télecommande - Cable HDMI (Type A à A) - Câble MHL (Type HDMI A à USB D) Cable AV - Cable Micro USB - Sac de transport - Guide de l'utilisateurConnaître votre apparéil
Projecteur
 Panneau de contrôle
Télécommande
Installation de la pile de la télécommande
1. Retirez le support de la batterie en appuyant sur le cote du libération fermement et en tirant sur le support de batterie. 2. Insérez une pile plate CR2025 et alignez correctement la polarité selon le marquage dans le support de batterie. Note: Lorsque vous utilisez la telecommande pour la première fois, il ya une feuille de plastique de protection entre la batterie et son contact. Retirez la feuille avant utilisation. 3. Insérez le porte-pile. Attention :
Une utilisation incorrecte de la batterie peut provoquer une surchauffe, Explosion ou ignition, ce qui peut entraîner des blessures ou un incendie. Fuite des piles peut endommager la télécommande. Ne pas exposer l'unité de télécommande à la lumière directe. N'exposez pas la batterie au feu ou dans I'eau. Remplacez immédiatement la pile épuisé. Retirez la batterie lorsque la télécommande n'est pas utilisée pendant une longue période.Portée de fonctionnement avec la télécommande
 Note: La portée réelle peut différer légèrement de l'illustration. En outre, une batterie faible réduit ou élimine la rayon d'action de la télécommande.Pour commencer
Charging the product
Le projecteur est construit avec une batterie Li-Polymer intégrée, pour une utilisation mobile. Veuillez charger le projecteur pendant 8 heures avant sa première utilisation. Le rechargement dure environ 4 heures.  La batterie se recharge que lorsque le projecteur n'est pas utilisé (Power off). Branchez une extrémité de l'adaptateur électrique fourni dans la prise DC IN (entree DC) et l'autre extrémité à une prise électrique pour commencer à charger. Remplacez le prise (UE, Etats-Unis, etc) de l'adaptateur AC qui recoit le type de prise de courant dans votre pays s'il est différent.Indicateur de charge LED
Pendant le chargement, la DEL sur le bouton d'alimentation devient orange. Il tourne au vert lorsque la batterie est complètement chargée.Activer/Eteindre le Projecteur
Pressez sur le bouton d'alimentation pendant 2 secondes pour allumer le projecteur. Pour eteindre le projecteur, pressez le bouton d'alimentation vers le bas pendant 2 seconds. Mode Veille: Pressez sur le bouton d'alimentation 1 seconde pour allumer / eteindre la lampe du projecteur pour une courte pause pour sauvegarder la batterie et le temps de redémarrage du système. (Le voyant LED sur les boutons est always allumé lorsque le projecteur est en mode veille.)Réglage de la mise au point en fonction de la distance
Placer le projecteur sur une surface plane et en direction d'une paroi ou un écran de projection. La distance de projection et laaille de projection sont : Distance: 50~cm 425~cm (20^ 167^ ) TailledImage:36cm\~305cm(14"~120")  Réglez la mise au point en tournant le levier de mise au point vers le haut ou vers le bas pour obtenir une image nette et claire. Note: Utilisez un trépied (non fourni) pour augmenter la hauteur de l'image de projection, en cas de besoin. Le filetage du pied se trouve sous le projecteur.Sélectionnez la langue
Utilisez la touche de navigation pour sélectionner < > 'Réglages' et pressez © (OK) pour entrer dans le sous-menu. Sélectionnez "Langue" et pressez sur © (OK) pour entrer dans la liste des langues. Sélectionnez votre langue préféérée et confirmez avec © (OK). Pressez (Quitter) pour revenir au menu principal.Projection à partir de Source d'entrée videoe externe
Le projecteur est disposé d'une interface multiple intégré sur le côte arrêté. Vous pouvez connecter votre source d'entrée video externe au projecteur en utilisant le cable approprié et presser la touche Source sur le panneau de commande du projecteur pour sélectionner la source d'entrée. HDMI
Utilisez le cable HDMI pour connecter le port HDMI sur le panneau arrêté du projecteur sur la source HDMI signal externe. Une fois connecté, l'écran passée automatiquement à la source HDMI. VGA
品 Utilisez un cable VGA pour connecter le port VGA sur la face arrière du projecteur à la source de signal VGA externe. Une fois connecté, pressez sur la touche Source sur la télécommande ou le panneau de contrôle pour selectionner la source VGA. Note: Le cable VGA n'est pas inclus dans l'emballage standard. ENTRÉE AV
Suivez le schéma ci-dessous pour connecter le périphérique de sortie AV externe sur la fiche AV. Connexion est un code de couleur. ÀpRES la connexion, pressez sur la touche Source sur la télécommande ou le panneau de contrôle pour selectionner la source ENTRÉE-AV. Modification des paramètres de lecture pour source video externe
Presse énusur le panneau de commande ou sur la télécommande pour entrere réglage de lecture. 1. Format d'écran
Lorsque le fichier video est au format 4:3, cette fonction vous permet de régler la façon dont l'image doit apparaitre sur l'écran 16:9. Presse @/OK pour afficher les options. 1) Panoramaque et Scan :l'image est agrandie pour s'adapter à l'écran 16:9. 2) Boîte auxlettres :the image is displayed by original aspect ratio. 2. Luminosite
Ceci vous permet de modifier la luminosité en fonction de l'environnement et de la consommation électrique. 1) Amélioré : Sélectionné ce mode lorsqu'alimentation externe est disponible pour optimiser les performances. 2) Normal: Le mode par défaut pour l'optimisation des performances de projection et de la capacité de la batterie. 3) Éco : Ce mode est recommendé lorsque le projecteur est utilisé en mode batterie pour economiser l'énergie. Note: Le projecteur se met automatiquement en mode Amélioré lorsqu'il est alimenté par l'adaptateur secteur.3. Mode de projection (Lentille)
Ceci vous permet de selectionner le mode de projection, selon la façon dont le projecteur est monté. Frontal: Il s'agit de la façon la plus courante pour positionner le projecteur pour une installation rapide et la portabilité. Plafond Le projecteur renverse l'image pour avant : une projection montée au plafond. Arrière: Le projecteur inverse l'image de sorte qu'elle puisse projeter derrière un écran translucide. Plafond Le projecteur inverse l'image à arriere : l'envers. Cela permet de projeter derrière un écran translucide en position plafond.        4. Sélection de scène
Ceci vous permet de selectionner le mode idéal pour regarder un film, diaporama de photos ou de dire le texte avec une luminosité equilibrée, la couleur et le contraste. Cinéma :idéal pour regarder un film Normal : idéal pour la photo diaporama Texte :idéal pour image avec texte5. Informations
Affiche la version du micrologiciel :Txxxx/AxxxxProjection à partir de téléphones intelligents ou tablettes
1. Connectez téléphones intelligentsupportésMHL (interface mobile haute-définition) pour la projection. Connectez Samsung Galaxy S2, Note, nouveau HTC un, un X+, un X, One S, ou Sony Xperia Z avec le projecteur via cable MHL (A à USB D de type HDMI).  Connectez Samsung Galaxy S4, Note II avec le projecteur via MHL cable A à (USB D de type HDMI) et Samsung 5 à 11 broches convertisseur MHL ( comme montre l'illustration) pour la projection. Note: Il est normal que le projecteur charge automatiquement les téléphones intelligents ou tablettes lorsqu'il est connecté avec le cable MHL pour la projection. 2. Connectez l'iPhone 5 pour la projection miroir (avec connecteur Lightning) Connectez l'iPhone 5, iPad 4, iPad mini et iPod 5ème avec le projecteur via Apple Lightning adaptateur numérique AV Type cable HDMI A à A.  iPhone 4S, 4, nouvel iPad, iPad 2, et iPod touche (4e) peuvent se connecter avec le projecteur avec l'adaptateur Apple AV numérique 30 broches et un cable HDMI de type A à ACharger un apparéil externe portable
La batterie interne du projecteur peut non seulement etre utilise pour la projection, mais aussi re/charger vos apparecs mobiles. 1. Connectez votre apparéil mobile au projecteur via le cable USB à l'extrémité de connecteur de type A branché sur le port USB situé à l'arrière du projecteur. 2. Lorsque le projecteur est allumé, l'appareil sera chargé automatiquement. 3. Lorsque le projecteur est eteint, appuyez sur le bouton Source () pour demarrer ou arreter la charge.  Note: Le projecteur est équipé d'une puissance de sortie de 5 V/500 mA pour la charge des dispositifs mobiles.Projection depuis la mémoire
Projection à partir de la Mémoire Interne
Le projecteur dispose de 2 Go de mémoire interne et de 1.2 Go libre pour le stockage des fichiers. Veuillez télécharger des fichiers multimédia de votre PC ou ordinateur portable vers la mémoire interne pour la projection : 1. Allumez l'ordinateur et le projecteur. 2. Connectez le port micro-USB du projecteur à l'ordinateur ou ordinateur portable via un cable USB. Une fois la connexion établie, l'écran et la ventilation s'éteignent automatiquement pour économique l'énergie. Maintenant, le projecteur est en mode de stockage de masse.  3. Vous pouvez copier les photos, videos, musique, Windows Office (PowerPoint, Word et Excel) et fichiers PDF à partir de votre ordinateur vers la mémoire interne ou supprimer les fichiers dans la mémoire interne. Note: 1. La télécommande n'est pas applicable lorsque le projecteur est connecté à un PC ou un ordinateur portable. 2. Veuillez vous reférer au format de fichier pris en charge dans fonctions et opérations' (P.15)Projection depuis la mémoire externe
1. Fente externe carte SD/SDHC/SDXC
L'emplacement de la carte mémoire est intégré pour la lecture SD, SDHC et SDXC jusqu'à 128 Go. Insérez délicatement la carte en suivant la direction indiquée ci-dessous jusqu'à ce qu'il attaigne le fond de la fente. Pour-retirer la carte mémoire, pressez doucement sur le bord supérieur de la carte et retirez-la.2. Periphérique USB
Le projecteur peut projeter le contenu d'un périphérique USB tel qu'une carte mémoire USB ou un Disque dur (avec sa propre alimentation).   Note: La source de mémoire externe sera la mémoire par défaut affché sur la liste de lecture. Lorsque les deux cartes SD/SDHC et carte mémoire USB sont en cours d'utilisation, la carte mémoire USB sera la mémoire par défaut affichée sur la liste de lecture.Sélection de la source de mémoire
Utilisez la touche de navigation pour selectionner < > V 'Réglage' et pressez sur (OK) pour entrer dans le sous-menu. Sélectionnez Mémoire' et pressez sur (OK) pour entrer dans les options de mémoire. Sélectionnéz votre source de mémoire souhaitée et confirmez avec (OK). Pressez sur (Quitter) pour revenir au menu principal.Menu principal
 Pressez la touche de navigation < > pour selectionner l'option désirée et pressez sur OK pour entrer dans le sous-menu, pressez sur /Quitter pour revenir au menu principal.| Icône | Fonction | Description |
| Vidéo | Cette fonction permet aux utilisateurs de sélectionner un fichier vidéo pour projection. | |
| Image | Cette fonction permet aux utilisateurs de sélectionner un fichier image JPEG, JPG ou BMP pour la projection. | |
| Document | Cette fonction permit aux utilisateurs de sélectionner Office PowerPoint, Word, Excel et fischiers PDF pour la projection | |
| Wi-Fi | Active la fonction sans fil pour le projecteur | |
| Musique | Cette fonction permit aux utilisateurs de sélectionner les fischiers MP3, WAV, OGG et permettre la lecture sur le projecteur. | |
| Fichier | Cette fonction permit aux utilisateurs de naviguer dans tous les dossiers et fischiers qu'elle que soit leur format dans la mémoire source sélectionnée. Photo et vidéo peuvent être visualisés en naviguant dans la liste. Vous pouvez copier le fichier sélectionné à une autre source de mémoire ou le supprimer. | |
| ★ | Mon Favori | Voir tous les fischiers qui sont marqués comme favoris. |
| Réglage | Cette fonction permit aux utilisateurs de configurer les paramètres de préférences, y compris la Luminosité, sélection de scènes, Langue et Mémoire. |
Projection Videos
Selectionnez et projeter des fichiers video. 1. Sélectionnez et pressez OK pour entrer dans 'Vidéo' dans le menu principal. 2. Dans la liste des fichiers, utilisez pour sélectionner le dossier et pressez OK pour ouvrir le dossier sélectionné. Utiliser pour naviguer dans la liste de lecture. Pressez sur OK pour commencer la lecture et la projection de la videoozylationnée. 3. Pendant la lecture, pressez pour dire la video precedente/suivante. 4. Pressez plus longtemps sur pour remboinage rapide/une avance rapide. 5. Pressez sur / OK pourmettre en pause et pressez a nouveau pour reprendre. 6. Pour régler le volume de la réserve, pressez ▲▼ pour ajuster la valeur.Changer les réglages de lecture de la vente :
Sous la liste des fichiers, pressez Menu pour entrer dans le réglage video.  1) Lecture: Sélectionner le mode lecture ( comme tableau A ) pour les clips videoo.| → | Répétaire Éteint | Passer la video ou la piste une fois |
| → | Normal Lecture | dossier en cours |
| ← | Répéter une | Lecture la video actuelle ou une piste répétitivement |
| → | Tout répéter Lecture | dossier actuel répétitivement |
| × | Au hasard | Lecture dossier actuelle répétitivement dans un ordre aléatoire |
| Extension de fichier | Décodeur video | Décodeur audio |
| *.avi | MJPEG | AAC (AAC-LC and HE-AAC) |
| Xvid | PCM | |
| H.264/AVC | ADPCM | |
| MPEG4 | ||
| *.mov | MPEG4 | AAC |
| *.mp4 | H.264 | PCM |
| ADPCM | ||
| *.mpg | MPEG1 | LPCM |
Photos Projection
Selectionnez et projeter des images fixes. 1. Sélectionnez 'Photo' et pressez sur ©/OK pour entrer en mode photo dans le menu principal. 2. Utiliser ▲▼ pour sélectionner le dossier et pressez sur ©/OK pour ouvrir le dossier sélectionné. Utiliser ▲▼▲▶ pour naviguer dans la vignette des photos. 3. Pressez sur ©/OK de projeter la photo sélectionnée en plein écran. 4. Pressez sur la touche Gauche/Droite (▲▶) pour passer à la page précédente/suivante image. 5. Zoom ou Pan de l'image : - Presser sur la touche Haut pour passer en mode Zoom. Utilisez les boutons Haut/Bas ( ) Touches de zoom avant/Zoom arrêté. - En mode Zoom, presser sur ©/OK pour passer en fonction panoramicique/Pan. Veuillez voir le fonctionnement détaillé comme suit| Zoom | ▲▼ | Zoom avant/Zoom arrière (Image :Les niveaux d'agrandissement sont 1x ~ 4x. Document :Les niveaux d'agrandissement sont 1x ~ 8x.) |
| ▲▶ | Image (page) Précédente/Suivante | |
| ◎/OK | Entrez en mode Pan | |
| ← | Retour au mode plein écran | |
| Pan | ▲▼ et ▲▶ | Pano haut, bas, gauche, droite |
| ◎/OK | Revenir au mode Zoom | |
| ← | Retour au mode plein écran |
6. Rotation de l'image :
Presser (Menu) pour acceder à la fonction de rotation. Utiliser la touche Gauche/Droite (▲▶) pour selectionner le sens de rotation et presser sur ©/OK pour confirmer. Pour revenir, presser (Quitter) à dossiers photos ou vignettes.Modification des Paramètres de la lecture des photos :
Sous la liste des fichiers, sélectionnez une vignette et pressez sur / menu pour acceder aux paramétres des photo.  1) Diaporama : Pour activer ou désactiver le diaporama. 2) Musique : Avec ou pas de musique de fond pendant le diaporama. Pour jouer de la musique, veuilles enregistrer restre� que le disperse dans le même dossier. 3) Vitesse : Pour configurer la vitesse d'intervalle du diaporama à 5 sec, 10 sec, 30 sec, 1 min, ou 10 min. 4) Pendant le diaporama, pressez sur ©/OK pour arrêté ou reprenevre le diaporama. Utiliser ↓▶ pour naviguer dans image précédente / suivante. 5) Mon Favori : Le fichier sera marqué icône ★ et être regroupé dans le dossier « Mon Favori » pour un accès facile ( comme un signet). (Veuillez vous reférer à la page 21, section introduction « Mon Favori ») Note : Le projecteur prend en charge les formats photo suivants :| Format du fichier t | Résolution Max. | Extension de fichier |
| JPEG 8000 x 6000 | *.jpeg | |
| JPG 8000 x 6000 | *.jpg | |
| BMP 8000 x 6000 | *.bmp |
Projection de documents
Selectionne et projetde des fichiers Windows Office et PDF. 1. Dans le menu principal, Sélectionner 'Document' et presser sur le bouton ©/OK pour entrer dans le Mode document. 2. Naviguer dans les dossiers et fichiers, puis presser sur ©/OK pour ouvrir le document sélectionné. 3. Pressez le bouton Gauche/Droit (▲▶) pour vous déplacer vers la page précédente/suivante. 4. Zoomer ou Pan le document : - Presser sur la touche ▲ Haut pour passer en mode Zoom. Utilisez les boutons Haut/Bas (▲▼) Touches de zoom avant/Zoom arrêté. - En mode Zoom, presser sur ©/OK pour passer en fonction panoramicique/Pan.Changer les paramètres du document de lecture :
Sous la liste des fichiers, Sélectionnez un document et presse /Menu pour entrer dans les paramètres du document. 1) Diaporama : To turn On or turn Off the slideshow. 2) Vitesse : To set up the slideshow interval speed as 5 sec, 10 sec, 30 sec, 1 min, or 10 min. 3) Pendant le diaporama, presse sur ©/OK pour arrêté ou reprene le diaporama. Utiliser ↓▶ pour naviguer dans image précédente / suivante. 4) Mon Favori : Le fichier sera marqué comme icône ★ et être regroupé dans le dossier « Mon Favori » (Veuillez vous reférer à la page 21, section introduction « Mon Favori ».) Note : 1. Le projeteur prend en charge les formats de documents suivants et les limitations :| Format du fichier | Extension de fichier | Support Version | Taille Limitation |
| POWERPOINT *.ppt, *.pptx, PowerPoint | 97 ~ 2010 | Up to 19MB | |
| PDF *.pdf PDF 1.0 ~ 1.4 Up to 75MB | |||
| WORD | *.doc, *.docx, WORD | D 97 ~ 2010 Up to | 100MB |
| EXCEL | *.xls, *.xlsx | Excel 97 ~ 2010 | Up to 15MB |
Lecture de la musique
Selectionner et litre des fichiers audio. 1. Avant de pouvoir écouter de la musique, vous doivent abord stocker des fichiers audio dans la mémoire interne ou dans une carte mémoire externe. 2. Presser ▲▼ pour sélectionner un morceau, puis appuyer ©/OK pour démarrer la lecture de la musique. 3. Pour ajuster le volume sonore, presser sur pour ajuster le volume. 4. Presser sur ©/OK pour arrêté la musique. Presser à nouveau pour reprendre la lecture normale. 5. L'écran sera automatiquement coupé après 20 secondes pour économiser l'énergie. Pour allumer l'écran, presser sur le clavier pour activer la fonction de projection. 6. Presser (Menu) pour entrer les réglages musique. 1) Lecture : Sélectionnéz le réglage de la lecture comme Tableau A. (Page 16) 2) Mon Favori : The file will be marked ★ icon and be grouped into « Mon Favori » folder. (Please refer to page 21, « Mon Favori » section introduction.) Note : Le projeteur prend en charge les formats audio suivants :| Format du fichier | Extension de fichier |
| MP3 | *.mp3 |
| WAV | *.wav |
| OGG | *.ogg |
Utilisation d'un casque/écouteurs
Le projecteur est équipé de haut-parleurs pour fournir une meilleure qualité audio. De plus, vous pouvez connecter des écouteurs ou un haut-parleur exter à la fiche AV de l'appareil. Lorsque l'écouteur est branché, le haut-parleur sera étéint automatiquement. Gestionnaire fichiers
Le gestionnaire de fichiers est un moyen rapide et pratique pour naviguer, projeter et gérer des fichiers dans différents formats. 1. Dans le menu principal, Sélectionner 'Fichier' et presser ©/OK pour entrer dans la liste fichier. 2. Parcourir la liste fichiers, selectionner un fichier et appuyer sur ©/OK de commencer la projection. 3. Pour gérer les fichiers, Sélectionnez un fichier dans la liste et appuyer (Menu) pour entrer dans la fonction 'Copier et supprimer'. - Copier un fichier Sélectionnez et presser sur ©/OK "Copier" pour copier le fichier sélectionné vers un autre périphérique de stockage.  - Suppression de fichier Sélectionner et appuyer sur ©/OK “Supprimer” pour supprimer le fichier sélectionné. - Presser pour annuler et returner au fichier liste.Mon Favori
Selection et lecture des fichiers que vous avez marqués comme favoris. 1. Dans le menu principal, Sélectionner le 'Mon favori' et appuyer sur le bouton OK pour entrer dans le Mode Mon favori. 2. Naviguer dans les fichiers et pressez ©/OK pour ouvrir le fichier sélectionné. 3. Pressez le bouton Gauche/Droit (▲▶) pour vous déplacer vers le fichier précédent/suivant. 4. Presser (Menu) pour entrer dans la fonction « Supprimez le chemin » Note: « Supprimez le chemin » ne supprimer que le chemin de fichier dans la liste de mon favori. Si vous doivent supprimer les fichiers, désisissez 'Fichier' dans le menu principal, puis selectionnez le fichier et pressez (Menu) pour entrer dans la fonction « Copier & Effacer »Réglage
Modifiez le réglage par défaut de la luminosité de la projection, méthodes de projection, langue, et dispositifs de mémoire1. Luminosite
Ceci vous permet de modifier la luminosité en fonction de l'environnement et de la consommation électrique.| Mode | Luminosité | Durée de vie de la batterie | Recommendation |
| Amélioré | Jusqu'à 100 lms | 80 min Ce mode est recommendé lorsque l'alimentation externe est disponible pour optimiser les performances. | |
| Normal | Jusqu'à 60 lms | 100 min Le mode par défaut pour l'optimisation des performances de projection et de la capacité de la batterie. | |
| Éco | Jusqu'à 40 lms | 120 min Ce mode est recommendé lorsque le projecteur est utilisé en mode batterie pour économiser l'énergie. | |
2. Mode de projection (Lentille)
Vous permet de selectionner le mode de projection, selon la façon dont le projecteur est monté. Veuillez consulter les détails d'opération à la page 12.3. Sélection de scène
Ceci vous permet de selectionner le mode idéal pour regarder un film, diaporama de photos ou de dire le texte avec une luminosité equilibrée, la couleur et le contraste. Cinéma :idéal pour regarder un film Normal : idéal pour la photo diaporama Texte :idéal pour image avec texte4. Source Mémoire
Cette fonction permet à l'utilisateur de sélectionner l'appareil de stockage entre la mémoire interne, la carte SD, et des péripériques USB  : Mémoire interne  : Logement de carte SD/SDHC/SDXC  : Clé électronique USB5. Langue
Cette option permet aux utilisateurs de selectionner la langue du système d'affichage.6. Mise hors tension automatique
Cette option permet aux utilisateurs d'activer ou de désactiver la fonction d'arrêt automatique du projecteur. Si la hors tension automatique est ACTIVÉE, le projecteur sera automatiquement étant après que la période可以选择 est due.7. Système
- Réglage d'usine Réinitialiser le projecteur au réglage d'usine par défaut. - Mise à niveau micrologicielle Informations de mise à niveau du micrologiciel sont disponible sur notre site Web. - Informations Affiche la version du micrologiciel :Txxxx/AxxxxActiver la connexion sans fil
Pour la première utilisation, veuillez suivre les étapes ci-dessous pour installer le logiciel d'application sans fil pour votre PC ou téléphone intelligent.Installes le logiciel d'application sans fil sur votre ordinateur
1. Sélectionnez et entrez 'Wi-Fi' dans le menu principal pour lancer la fonction sans fil du projeteur.  2. L'écran Wi-Fi indique le statut du sans fil (Wi-Fi connecté ou déconnecté) et le mot de passer pour connecter le projecteur.  3. Activer le WLAN de votre PC ou Ordinateur Portable. Sélectionnez le point d'accès marqué 'WiFi_projector-XX' pour connecter le projecteur au réseau sans fil  Note: 1. Voitre ordinateur doit avoir la fonction de réseau sans fil pour détecter la connexion. 2. Debranchez le cable Ethernet de votre ordinateur pour éviter d'affector la connexion du réseau sans fil. 3. Lorsque vous vous connectez au réseau sans fil du projecteur, vous aller perdre la connectivité sans fil avec d'autres réseaux sans fil. 4. Presser (Menu) sur le projecteur pour entrer dans l'installation du Pilote/App.  5. L'écran affiche l'adresse IP et le code QR pour télécharger le Pilote/App.  6. Ouvrez le navigateur Internet sur votre ordinateur puis saississez l'adresse IP par défaut http://192.168.111.1 dans la barre d'adresse du navigateur. 7. Sélectionnez le pilote pour Windows ou Mac OS en fonction de votre PC, puis cliquez sur l'icone pour télécharger le pilote.  8. Double-cliquez le pilotEZ_View pour installer. CliquezPair-à-pair connexion sans fil avec le projecteur
Connexion sans fil pair-à-pair à partir de votre ordinateur avec le projecteur vous permet de démarrerrapidementlapresentationouregarderunfilmsansfildepuis votre PC,tabletteoutelephoneintelligent,mais sans l'accesa un reseauWi-Fi disposable (sans acces Internet).Il est recommandedutiliserMode reseau Domicile(voir page 32) lorsqueyouaveszeboind'unaccesInternetpourla projection.Projection sans fil Pair-à-pair depuis un ordinateur
1. Sélectionnez et entrez 'WiFi' dans le menu principal du projecteur. 2. Prenez note du code de connexion à 4 chiffres XXXX. Vous en aurez besoin pour vous connecter ultérieurement.  3. Connectez votre ordinateur au réseau sans fil du projecteur en selectionnant WIFI-projecteur-XX sur la liste du réseau.  4. Double-cliquez sur I'icone EZ View sur le bureau de votre ordinateur pour lancer l'application. 5. Entre le code de connexion (voir étape 2), puis cliquez sur OK pour confirmer.  6. ÀpRES avoir été connecté avec succès, la projection sans fil entre l'ordinateur et le projecteur a été établie.Les fonctions avancées de EZ View
| Allem A. Écran partagé | 1 à 4 :Permettre à 4 appareils différents de projeter sur le même écran L, R :Déplacer l'écran vers la gauche ou la droite Tout :Retour au mode plein écran |
| B. Mode miroir | Le mode miroir affiche la même image sur l'écran de l'ordinateur. |
| C. Mode Étendu | Étend l'écran depuis l'ordinateur au projecteur. |
| D. Lien | Lien vers le projecteur Télécharger / Configurer la page de gestion. |
| E. Quitter Cliquez sur pour fermer l'application. | |
| F. Mode | Cliquez pour selectionner le mode idéal pour regarder un film ou diaporama photo Vidéo :idéal pour regarder un film Graphique :idéal pour la photo diaporama |
| G. Mode compatible | Cliquez pour renforcer la compatibilité d'un 3ème logiciels tiers. (La performance (Taux de trame) de diffusion sans fil peut être réduite.) |
| H. Flux audio | Flux de l'audio sur le haut-parleur du projecteur. Note : Si vous n'aimez pas entendre le son de l'ordinateur en même temps, désactiver le haut-parleur de l'ordinateur enCHOISIGSANT «sourdine». |
Installe le logiciel d'application sans fil sur les appareils Apple ou Android
EZ View pour Telefon intelligent Android et Apple iDevice EZ View est une application qui s'exécute sur votre téléphone intelligent Android ou Apple iDevice et transmet des images ou des presentations fixes au projecteur. La Vue EZ est utilisé seulement pour une connexion sans fil. Si vous connectez votre téléphone au projecteur en utilisant un cable, vous pouvez utiliser la réserve intégrée dans les fonctions de votre téléphone.Installation de EZ View de Google Play™ (Pour apparéil Android)
1. Connectez-vous à l'Internet et ouvrez une Google Play™ ou une page web Google Play™. (Google Play™ est une marque commerciale de Google Inc.) 2. Dans la barre de recherche, tapez EZ View. (Ou scannez le code QR directement depuis la page d'installation.)  3. Cliquez sur le boutonInstallation de View EZ d'Apple App Store (pour Apple i-device)
1. Connectez votre iPhone à l'Internet et lancer l'App Store. 2. Dans la barre de recherche, tapez EZ View. (Ou scannez le code QR directement depuis la page d'installation.)  3. Cliquez sur le boutonConnexion sans fil pair-à-pair depuis un apparéil Android ou Apple au projecteur
Avant de pouvoir transmettre des images au projecteur en utilisant EZ View, vous doivent connecter votre téléphone intelligent Android ou apparéil i-Apple au projecteur (pair-à-pair) ou dans le même réseau sans fil disponible. 1. Sélectionnez et entrez 'Wi-Fi' dans le menu principal pour lancer la fonction sans fil du projeteur.  2. L'écran Wi-Fi indique le statut du sans fil (Wi-Fi connecté ou déconnecté) et le mot de passer pour connecter le projecteur.  3. Activer votre WLAN sur téléphone intelligent. Sélectionnez le point d'accès marqué 'WiFi_projector-XX' pour vous connecter au réseau sans fil du projecteur.Ouvrir EZ View et Enregistrer dans le projeteur
1. Ouvrez l'application EZ View. EZ View recherche des péripériques compatibles. 2. Choisissez WiFi projecteur et entrez le mot de passer de connexion indiqué sur l'écran du projecteur.   4. Presser < OK> Pour continuer. 5. Sélectionnez le type de fichiers sur votre téléphone intelligentes nécessaires pour la projection. | EZ View fonction app | Description |
| PHOTO | Projection des photos stockées sur votre téléphone intelligent. |
| DOCUMENT | Projection de documents Office et PDF stockés sur votre téléphone intelligent. |
| INTERNET | Projection de pages Web. (Mode réseau Domicile seulement) * Veillez voir page 31 pour activer le mode Client. |
| DROPBOX | Cloud Serveur Flow. (Mode réseau Domicile seulement) * Veillez voir page 31 pour activer le mode Client. |
| CAMERA | Projection en temps réel d'image par iPhone ou un apparéil photo de téléphone Android via une connexion WiFi. |
| VIDEO | Diffuse la dette stockée sur votre iOS et Android sur votre projecteur. |
| SPLIT CONTROL | Permet jusqu'à quatre périphériques d'être projet à travers un/projecteur en même temps. |
Ajout de contenu à EZ View avec iTunes® (pour Apple i-Device)
1. Connectez votre iPhone à votre ordinateur. 2. Sur votre ordinateur, lancez iTunes à moins qu'il s'ouvre automatiquement lorsque vous avez connecté votre iPhone. 3. Cliquez sur l'appareil iPhone ou iPad dans la barre latérale. 4. Cliquez sur les applications dans les volets Parametes. 5. Cliquez EZ View pour visualiser tous les fichiers charges dans EZ View. 6. Cliquez sur le bouton « Ajouter » etCHOisissez les fichiers à telecharger sur EZ View. Vous pouvez charger des fichiers JPG et les fichiers de documents. 7. Dans le coin inférieur gauche de l'écran, cliquez sur le bouton Synchroniser pour transférer les fichiers sur votre iPhone.Dessinez l'imagedepuis EZ View
Un outil d'esquisse est intégré dans Photo / document / modes Web, pour permettre auprésentateur de mettre des notes sur la page projetée. Vous pouvez dessiner, surliner en couleur ou effacer par contact facilement. Toutes les images esquisées peuvent être enregistrées dans laamera de suite. Connectez le projecteur à un réseau Wi-Fi disponible (Mode réseau Domicile) pour l'accès Internet
Il est recommandé de connecter le projecteur à un réseau Wi-Fi pour votre ordinateur, tablette et téléphone intelligent puisse à la fois avoir l'accès à Internet. Il vous suffit de saisir le réseau clé pour configurer la connexion pour la première fois. Le projecteur sera automatiquement connecté au réseau lorsqu'il entraera dans le mode WiFi la fois suivante. 1. Sélectionnez et entrez 'Wi-Fi' dans le menu principal. 2. Pressez [Menu) pour entrer les options suivantes. Sélectionnez 'Accès Internet' (Mode client) et confirmer avec © « OK »  3. Sélectionnez le réseau Wi-Fi auquel vous souhaitez vous connecter et confirmer avec © « OK »  4. Si la sécurité sans fil est activée sur votre réseau Wi-Fi, pressez © « OK ». pour afficher le clavier et entrez le mot de passer (cle réseau) en utilisant les touches de navigation sur le projecteur ou la télécommande. ÀpRES avoir tape le mot de passer, pressez sur 'Quitter' sur le projecteur ou la télécommande pour quitter le clavier. Sélectionnez « Connecter » et confirmer avec © « OK »  5. Utilisez le bouton 'Quitter' pour revenir à l'affichage WiFi. Maintenant, vous pouvez démarrer le pilote ou l'App EZ View pour démarrer la projection sans fil.  6. Pourdéconnecter la projection sans fil, il suffit de fermer le pilote ou l'application et returner le projecteur au menu principal. Note: Accès Internet (Mode réseau Domicile) la performance est affectée par une variété de facteurs, tels que les performances du processeur de votre téléphone intelligent / Ordinateur portable, la distance entre le point d'accès, et les murs/obstacles qui obstruient la ligne de vue directe. Les téléphones sans fil, apparèils Bluetooth, micro-ondes, et tout ce qui peut cause des interférences RF dans la gamme de fréquence de 2,4 GHz peuvent aussi affecter les performances WLAN. Par conséquent, une fois que la vitesse sur Internet tombe ou se déconnecte par intermittence lors de la projection, nous vous conseillons de désirir un autre point d'accès avec un signal plus fort ou déconnecter le projecteur client à partir de votre point d'accès (déactiver l'accès à Internet) afin d'assurer la meilleure expérience de projection sans fil.Dépannage
Si vous projecteur ne semble pas fonctionner correctement, vérifie les éléments ci-dessous avant de contacter un centre de service après vente/agréé.| Symptôme Point | de contrôle |
| Le projecteur ne fonctionne pas lors de la connexion à un portable ou a un PC avec un cable. | 1. Vérifiez si le cable HDMI est correctement branché.2. Assurez-vous que le PC soit prét pour l'affichage de projecteur. |
| La page Web d'installation du pilote/gestionnaire ne peut pas être ouvert à partir du navigateur de l'ordinateur. | 1. Activer votre WLAN de PC ou portable et selectionner le point d'accès marqué 'WiFi_projector-XX' pour connecter avec le projecteur.2. Débranchez le cable Ethernet de votre ordinateur pour éviter d'affector la connexion du réseau sans fil.3. Ouvrez le navigateur Internet sur votre ordinateur, puis entrez http://192.168.111.1 dans la barre d'adresse du navigateur. |
| Le projecteur ne peut pas être détecté lors de l'exécution de EZ View app. | 1. Sélectionnez 'WiFi' dans le menu principal pour passer en mode d'affichage WiFi.2. Activer votre WLAN de PC ou téléphone intelligent et selectionner le point d'accès marqué 'WiFi_projector-XX' pour se connecter avec le projecteur.3. Débranchez le cable Ethernet de votre ordinateur pour éviter d'affector la connexion du réseau sans fil. |
| L'image projetée est trop nombre. | 1. Utilisez le projecteur dans un environnement plus nombre.2. Augmentez la luminosité en utilisant l'adaptateur pour alimentation CA.3. Réduisez la taille de l'image projectionnel. |
| L'image projetée est floue. | 1. Ajustez la mise au point. Veuillez vous reporter à « Ajuster la mise au point ».2. Vérifiez si la lentille est sale. |
| La température de la surface du projecteur est élevée. | En raison de la forte luminance du LED, il est normal que ce projecteur générale de la chaleur en utilisation prolongée. Cela n'affectera pas les performances du projecteur. Garder toujours les ouvertures de ventilation exemplés de saletés ou d'obstructions et utiliser le projecteur dans un environnement bien aéré. |
| Reprise après une anomaly | Si le projecteur est lent, gèle, se block ou se verrouille au cours d'une opération. Pressez le bouton d'alimentation pendant 8 secondes pour redémarrer votre projecteur. |
| Elément Description | |
| Technologie optique | DLP |
| Source lumineuse | RVB DEL |
| Format d'écran | 16:9 |
| Résolution | 854 x 480 Pixels (WVGA) |
| Taux de contraste | 1000:1 |
| Dimension de l'image projetée | 36 cm ~ 300 cm (14" ~ 120") |
| Distance de projection | 50 cm ~ 425 cm (20" ~ 167") |
| Taux de Jet (diagonale : distance) | 1,6 (Distance de projection / Largeur de l'image) |
| Luminosité | Jusqu'à 100 Lumens |
| Mise au point | Manuel |
| Décalé | 100% |
| Format de lecture | Image :*.jpeg, *.jpg, *.bmp VIDéo :*.avi, *.mov, *.mp4, *.mpg Audio :*.mp3, *.wav, *.ogg Document :*.ppt, *.pptx, *.pdf, *.doc, *.docx, *.xls, *.xlsx |
| WiFi | Module : IEEE 11n (1T1R) Standard : 802.11b/g/n |
| Mémoire interne | 2 Go (1,2 Go pour le stockage) |
| Internal Speaker | Mono |
| Logement carte | Carte SD/SDHC/SDXC (jusqu'à 128 Go) |
| Alimentation | Entrée :100 ~ 240 V AC Sortie :12 V, 2 A DC |
| Type de batterie | Embedded 7.4 V / 2000 mAh Li-polymer battery |
| Durée de vie de la batterie | Mode amélioré : 80 mn Mode Normal : 100 min Mode Eco : 120 min |
| Consommation électrique | Mode CA :12 W Mode batterie :8 W ~ 12 W |
| Dimensions (L x L x H) | 132 x 95 x 25 mm |
| Poids | 285 g |
| Humidité | 20 – 80%, 80% (Max.), sans condensation |
| Température de fonctionnement | 5°C – 35°C. |
YBaXaembI NOJb3ObaTeJIb!
Бларогамьсьяпокуку ЗTORO усточТВа. Перд Началов И сплььозаня ЗTORO Издени pekomehdyeetся порбн ИЗчNTь ЗTO руховд.TВО, YTOБы И сплььозань Ваш Новий пикопоeКТOP мakсимально зффektNBHO. Летаem Bam MHOжecтВа пригтбix Впechателен!O6 3tOM yCTpOcTBe
Данhoe yctpoiCTBO -эTO ПИКОПоEKTOp HOBeIWeRo NOKJIeHnHa OCHOB TeXHOJOrn DLP.DLP-TexHONOrn,пrimeHЯeMaB B BbICOKKlaccNbIX KINHOPoeKTopax,обсneyBaet 6oratCTBO UBeTobOy IramMbI N BbICOKYIO KOHTpactHOCTb N3OpaXeHn. Hanuye BCTpoEHnO MOyIaWLAN No3BOJare TODKIIouaTbcraNo paDIO K ПИКОПоEKTOpC BAwero HOyT6yka, PAnuHeTHoro PIK nIIn cMaprTfoHa dIЯ NOtOKOB NepeDaun I npoeUnpoBaHry N3OpaXeHn, BVdeOphJBMOB,Be6-CTpaHnU nIIN DOkUMeHTOB Ha 120-DIOHMOBm (300-cM) ekpaHe. PoIdepKka MHorix φopMaTOB MylbTImeDiNHBIX φaIIOB IN DOkUMeHTOB Offce n PDF, n Hanuye pa3Hoo6pa3HbIX nHTerpeFeiCoB, BkIIOuaar pa3bEmbl HDMl, MHL, AV-IN, VGA, USB n rHe3do SD-kapTbI pAmrTn, DeIaIoT 3OT ПИКОПоEKTOp OYeHb YIO6HbIM dIЯ Mo6nJIbHOro NCNOJIb3OBAHnRA, KaK dIЯ DeIOBbIX, TaK n dIЯ pa3BNeKeTaTeNbHbIX ceJeN.PpimeeHnOTHoCteJIbHo 6e3OnaCHOCTN
1. XpaHnTe 3TO yCTpOInCTBO n yIaKOBouHbI MaTePnAJIbI BHe IocraeMoCTn DeTeN mJaDeHueB. 2. He donyckaTe nonadHnBaOdbHa KOHTaKTbI yCTpoiCtBa, aanTepa nHTaHnI npYrOTo obopyoBAHnI, cyuHte pyKn nepednx HcnoJb3OBaHnEM. He cTabbTe ha yctpoiCTBO npAOM C Hm Ba3bI n dpytne EMKoCTn C KNDKOCTbIO. 3. CeteBaJ po3eTka doJIxHa 6bItb Bcerda Ierko DoCTyHnHa n He 3arOpoxHe dpymN npedMeTamB.3KCTpeHHbIX cIyayx OTcoEduHnTe aadantep NITAHnO T3neKTpocEt n OTKIOueHn yCTpoiCTBa. 4. He donyckaTe HaJIuHr OTKpbItoro orHr B6JIIN yCTpoiCTBa, He cTaBbTe pIOM C HIM ropaune CBeH. 5.ДеркнTe yctpoiCToBHa pacCTOaHn, no MehIeMpe, 10 cm OT dpyrnx o6bekTob. He DonyckaIte nepeKpbITnBaHTnJIaUHOHHbIX OTBepCTn Ra3eTaMn, cKaTePTrMaN, 3aHaBeCKam n T.I. 6.ДЯВашЕI CO6CTBENH0I 6e3ONaCHOCTN He Ic- NOJb3yIte IpoEKTOp BO BpeMЯ 6ypn IJIr pO3bl. 7. OTHOCHTeBna BnaxHoCTb DoJxHa 6bITb B npedeIax 20% 80% , 6e3 KOHdEHCaUN. 8. BaTapeЯ YBnIeTc coCTaHbO yCTpoNCTBa. Pa3bnpaTb nIIN 3MeHrTb KOHfUrgpaCIno yCTpoNCTBa 3anpeuaeTc. 3ameHa 6TaapeN DoJxHa npOBOnTbcr TOnbKO aBTOpN3OBAHHbIMn cepBnCHbIMn ueHTpaMn. 9. CneIte, yTo6bl Okpykaioa TaempepaTpa 6bIa B npedeJax 5 35^ 10. Пөжд, чм Вкнючы устон.Tоное erо nepemeшени n3 xoJODHOrO MeCTaВ TeNIOe, noOxДITE, noka OHO Harpeetcra. KoHdEcaunBlaIaN BHyTpN yCtpoCTBa MoKTe, npn onpeJeHHeHbIX yCNoBnx, BbIBeCTn yCtpoCTBO n3 CTPOr. Korda yCtpoCTBO Harpeetcdo KOMHaTHOH TemnepaTpybl, erO moXHo 6e3OnacHO nCNoJIb3OBaTb. 11.ObpaaTecb c n3deJInem 6epeXHo.He dOnyckaTe ero KOHTaKta C ocTpblIMn ppeDMTaMn.ObepaaiTe yCTpoiCTBO OT KOHTaKTA C MeTaJIINueCKIMN ppeDMTaMn. 12. YctaHabJnBaIte npoeKTop Ha poBHOI NOBepxHocTn. IIObIe ydapbl, IJIi naDeHne Ha 3emJIIO, MOrY T JERKO IOBpeDNTb N3JeJIe. 13. He BCKpbIbAte yctpoCTBO n He donyckaTe erO naDeHnA, nHaue rapaHTna Ha n3deJIne 6ydt aHHynpOBaHa. BcKpbITne Kopnyca nnn cHrTne KpbIwek n 3aunTHbIX naHeJe MoKeT npBecTN K nopaxeHnO onacHBIM uPOBHNu HapJxEHN N dpyHM ONacHBIM CNTyaunM. ObcnykBaHne n3dEInn DOJXHO npOBODtbcra TOnbKO aBTOpN3OBaHHbIMC cepBnCHbIMn ceHTpAMn. 14. IcnoJb3yIe ToJIbKO npHaadJeXHoCTN, NoCTaBJIeMbIe IpOn3BOJTeJIeM. 15.Данhoeи3deJnne npKOBODTO NOb3OBeTЯ MOrTy 6bITb N3MeHeHbI 6e3 npedBapnteJIbHorO yBeDOMNeHnR B ceJnx Ix daJIbHeNWeO yNyUWeHnR IIN BHeceHnR donoJIHHeHn.IpaBnla 6e3oNaChoi 3KcPnyatau nnNkOpnoEeTopa
1. He cmotpnte npraMo Ha JInH3bl npoeKtopa. 2.BoBpempa6oTbI3TOyCTpoiCTBOMOKET HEMHOROHarpeBaTbcra,HTORABnETCa HOpMaNbHbIMRABHeHEm. 3. 3anpeaaetcnpmeHbYCTPOcTBBO CnIshKOM nbIbHbIX yCNOBnx. YactuIbI bIIN I pyTne INHOJHbIE pPeDMETbIMOryT NOBpeNTbYCTPOcTB0. 4. OBeperaIte yCTpOncTBO OT BO3DeIcTBnA cnIbHbIX Bn6paun. 3To MoKet NOBpeDnTB BHyTpEHnE KOMNoHEHTb I yCTpOcTBA. 5. Ппименяп Te Tolyko npnnaeMbI aanTep nHTaHn (cM. TexHueckne daHHbIe): Y6eDntecb, yTO xapaKTePrcNTKn HAnpJxHeNHa xeKTPocETn Ha MeCTe yCTaHOBKn OTBeuAOT Tpe6oBaHnM K CeTeBOMy HAnpJxKeHnIO dIЯ DaHHOrO yCTpoiCTBa. Tpe6oBaHnK TtNy HAnpJxKeHnY yka3aHbI Ha Kopnyce yCTpoiCTBa. Bepertecb nopaxeHnCnyxa:
ДиTeIbHoe npocnyuBaNHe 3Byka npn BbICOKoI rPOMKoCTn MoKeT npNBecTu K NOBpeJdeHnO cLyxa. CbeHnO dIITeJIbHOM npoeunpoBaHn
BcTpoeHHa 6atape oecneuBaet okono 120 mH npoeunpOBaHn. Ira dInTeIbHoro npoeucnpOBaHn peKOMeHdyeTc nCNoIb3OBAt aAnTep NITaHn. Korda 3apad 6atapen cniuKom Man dny oecneueHn pa6oTb npoeKTopa,Ha 3kpaHe HauHae T MrgaTb 3NaUOK Hn3Koro 3apad 6atapen ( ).PnpnoBHeHn 3TOrO 3HaKa yCTPOIcTB O CneDyET 3apdntb. Прoeктор рпн Длnteьноги ИНТсИВног ЗКСПУацIN МОжЕТ HarpeBaTбя. 3TO HopmaJIbHoeЯВлeнe.ВсИчaeперревлрoeктopa рпДлnteьнHom поeцИрOBaHn, HaЗКране ПОВЛЯЕТСЗHAчOKперревa (A).СиСтema abTomaTUnYeCKNпepexODNT B Jxduuyn peKIM.CoOTBeTCTBnE Tpe6oBaHnI M FCC:
DaHHe yCTpoiCTBO OTBeuAe Tpe6oBaHnMa Yactn 15 npaBn CFR 47 FCC.3Kcnnyataun Bo3MoXHa npu Co6IIODeHn CneDyIOxN DByx ycNoBn: (1) 3To yCTpoiCTBO He DoJnxHo CO3DaBaTb NOMex, OTPncaTeNbHO BnnaIOxN Ha dpyrNe yCTpoiCTBa n (2) 3To yCTpoiCTBO DOJnxHO IMeTb 3aunTy OT NOMEx, CNOCO6hIx Bbl3BaTb cBOn B erop a6oTe.  3TO yCTPOICTBO HcNbITaHO IN pRn3HaHO COOTBETCTByOuIM OrpaHnueHnM Dnla CnΦpOBbIX yCTPOICTB KnaCCa B corNaCHO qacTn 15 PpaBn FCC. 3TN orpaHnueHn DaJnxHbI ObecneHTb pa3ymHyIO 3aunTy OT BpeDhBX NOMEx Prn EKcnpyatauIN O6OpyOBAHnB XKnblx paNoHax. DaHHoe o6OpyOBAHnE Co3daet, nCNOJIb3yET N MOXET N3NyUaTB paADIOBOIHbI, n ECNI OHO YCTaHOBNeHO INN EKcnpyATnpyeTc HApUeHHeM IHCTpyKuIN IpnON3BOIDNTeJI, OHO MOXET Co3DaBaTb NOMEXI DnA CpeDCTB paADIOCBa3N. Ondako Het rapaHTn, YTO NOMEXI He Bo3HKnHyB OTdJIbHbIX CnyaXyCTaHOBKn DaHHoro obopyoBaHna. Ecnn 3TO obopyoBaHne cTaHET npuHNO HxKeNaTeJbHbIX NOMEX BpaOte TeJe- n paINOycTpoiCTB, YTO MOxHO ONpeDeNtB, BbIKNoUH IN CHOBA BKIOUHv yCTpOiCTBO, peKOMeHdyEeTcI nonItaTbc yCTpaHtB NOMEX cJeDyUOUM O6pa3OM: - IpepeHappaBte uIIN nepemecTne npneMHyO aHTehHy. - Y6epnte yctpoictBO OT TeJe- nI npaDIOnpnEMHnka. IopKnHouHTe yctpoiCTBO Kdpyroon po3etke TaK, YTO6bIOHO IN pPneMHNK NITaJIINcB OT pa3HBIX ueen. - O6paTntecb 3a NOMOJIIO K TOPROBOMy PpeIcTaBNTJIO IIN K CneUHaNCTy NO Tene/paDnOo6OpdyOBAHNU. Bb npedypeKHe, yTO IIOble n3MeHnA MoN OoNpaQnn, OoNuaNBHO He Oo6peHHbIe ynoHOMOeHHo CTOpOH MOyT NmHTB Bac npaba NCNoJb3OBaTB 3TO YCTPOINCTBO.  IIO OKOHaHn Cpoka Cnyk6bl 3Toro N3denncIeNyET yTNIn3npoBaTB BCE erO KOMnoHentb. BaTapeu n nepe3apXkaembIe aKKymyJrTopb3anpeuaTcB bIbpaCbBaTb BMecTe C 6blTOBbIMN OTxOdAmN! YTNIn3npyIte nx B 6nNxaiWeM nyHKTe yTNIn3aUIN. IaBaIte BMeCTe yAcTBOBaTb B 3aUInTe HaWe npnpObl. CodepkaHue| Оь за мем устюсмve.ПравILA 6e3oною экплуамацu | 1 |
| Содахимoe уразкове | 5 |
| Знakомсмve c устюсмve | 6 |
| Ночало рабомы | 8 |
| Зарядka устюства | 8 |
| Выбор язвika | 9 |
| Проб至尊ованue om вени everlasting的伟大ouсточнuka | 9 |
| HDMI, VGA, AV-IN | 10 |
| Смартофоны и палanchesные ПК | 13 |
| Зарядka вених mobильны устюстВ | 13 |
| Проб至尊ованue uz памяtmu | 14 |
| Главное мени | 15 |
| Виdeo | 16 |
| Фото | 17 |
| Дokумент | 19 |
| Муздika | 20 |
| Менеджер Фальов | 20 |
| Избравноe | 21 |
| Ностroyа | 21 |
| Вълочenvue радuosвязu | 23 |
| Драийber радиocвяздя PC ини MAC | 23 |
| Проб至尊енue дя радиocвяздя на устюствax Apple ини Android | 28 |
| Устpanенue неоладok | 35 |
| Хараз KMер检muku | 36 |
CopexHmoe ynaKOBKn
y6eintecb, yTO ynaKOBka coepknt cJeDyUOuNe KOMnoHentbl: -Пикорpoектор - OT aДаNTepa nITaHnIa - CmeHHa BnIka NITaHnA - NynbT Ka6eJIbHDMI (TnnaA-A) - Ka6eJb MHL (Tnna HDMI A - USB D) Ka6eJb AV - Ka6eIb Micro USB -Футлардяперehockn PykoBoOCTBO NOIb3OBaTeJIa3HaKOMCTBO C yCTpoIcTBOM
PpoeKTop
PanaheIb ynpabnneHna
NyIbT
YcTaHObKa 6aTapen B nyIbT dY
1. BbHbTe DepxKaTeIb 6aTapeN — coKMTe fHKcatop c 60KOB n BBITAHNTe DepxKaTeIb 6aTapeN. 2. BCTaBbTe nlockyIO KHOOnOHyIO 6aTapeIO CR2025 c co6JIIODeHnEM IOnpHOCTN KOHTaKTOB (B COOTBeTCTBmC mApKnPOBkO BHyTpI DePxAteJIg 6aTapeI). Приимechанee: Пи первом Испосьогани пььтам мжду Батуарец и Контактам Имeelся Вложенна пл actikobая пokладka. УдалITE пл actikobую прokладу пered Испосьоганem. 3. BcTaBbTe epKaTeIb 6aTapeu. PpeynpekdeHne:
HekoppeKTHOe nCIOJIb3OBAHne 6aTapeM MoKeT npINBeCTn K INx NpeERpeBy, B3pBiBy IIN BOCIIaMeHeHIO I, KAK CNeIcTBNE, K TpaBME IIN NOXapy. YTeUka 3JIeKTpONTa I3 6aTapeM MoKeT BbI3BaTb IOBpeJdeHne IyIbTa. He donyckaIte BO3deIcTBnHa npIbT npraMbIX cOJIHeHbIX nyuei. 06eperaTe 6aTaPeO OT BO3eNCTBnA ORH NJI BJIarN. Cebuyo 6aTapeo CneUyET HeMeIeHNO 3aMeHnTb. BbHmMaTe 6aTaPeIO n3 npIbTa, ecn OH donroe BpeM He 6yDet nCnoB3OBaTbcra.3ona deiCTBna nylbTa
 PpimueaHne: PeaJIbHa 3OHa DeIcTBn IyIbTa MoXeT HeMHOro OTIIuHaTbcr OTOKa3aHHo Ha pncyHke. Kpome TOrO, daIbHOCTb DeIcTBn IyIbTa yMeHbShaETcR, KOrDa pa3prjXaETc 6aTape.Hauano pa6oTbI
3apraKa yctpoiCTBa
MoHbHOCT npoeKTopa oecneuBaetc BcTpoeHHoI NTn-NOImepHo6batapee.Ipei nepBbIM nCNoB3OBAHNem npoeKTopa cNeyET BbIOHNHTb 3apAky 6batapeN B TeueHne 8 yacOB. Ira NocJeDyUxix 3apAOK Tpe6yEtc Okono4 YacOB.  Батуаря может зapяжатбс, только когда пpoektop He pa6otaeT (Выкнюун).Чтоби начать зapяdkу, посоединite садпетер сetebero рпаня К геши DC-IN усточа, И Вставье садпетер в олесгеторрозел. Ecnn BnIka aanTepa nHTaHn He COOTBeTCTBye TnTy 3neKtpo03eTK, npmHeMoB BaWei cTpaH (EC, CUSA n T.D.), cNeDyEt 3ameHntb ee Ha COOTBeTCTByIOU cyIO CMeHHyIO BnIKy.CД-инданkaTOp 3apяdkn
Bo Bpem 3apdKn C- nHnkaTop Ha KhONKn NHTaHn ropnt opaHkeBbIM cBeTom. Korda 6atapeoNHOCTbIO 3apXeHa, OH 3aropaetc 3eJeHbIM.BknIOueHne/BbIKIOueHne npoeKTopa
Push the Power button for 2 seconds to turn on the projector. IyBbIKIOeHnI npoeKTopa CHOBa npIXMITE KONKy NITAHNHa 2 CeYHdbI. Jxduu npKnKny nTaHna Ha 1 ckyHy dny BpeMeHHoro OTKnHueHn NaMbl C zelbIO kOHOOMN BpeMeHn, 3aTpaunBaemoro Ha 3arpy3ky cnCTeMbI, n 3Heprnn 6aTapeH. (CBeToNDoBHa KaONkax B Xdyueme peXnme npoDOnKaOT CBETNTbcra.)Adjusting the Focus according to distance
Pa3MecTHe npoeKTop Ha pOBHoi NOBepxHOCTn B HAnpaBHeHn CTeHbI IINI PpoeKUHOHOrO 3kpaHa. PpoeKUHOHoe pacCToHne n pa3Mepe N3O6paXeHnBbIbipaOTcB CNeDyUoE m Dnana3OHe: PacctoHnE:50\~425cm(20"~167") Pa3mep n3o6paXeHnA:36\~305cm(14"~120")  Adjust the focus by turning the Focus Lever upward or downward to get a sharp and clear picture. Примочи:Еслтpe6уетсувелчьВыICOTу поeцрOBHЯ n3ображеня, ИспльзуITEТрEHORY(He npilaraetc).ГнзdoДЯТрEHOrn HaxODITcR CHN3ynpoEKTopa.BbI6Op a3bIka
KhONkAMn DxKOInCTNka < > A V BbI6epNTe NyHKT HAcTpoNka》,HnaKaTHm KHOKNO (OK) BOJNTe B NOdMeHIO. BbI6epNTe NyHKT X3bIK,N HaxMITE (OK) JnAOTKpBTINcNCKa Y3bIKOB. BbI6epNTe HuxHbI R3bIK,N NOdTBePdNTe erO KHOKNO (OK). HaxMITE (BbIXoD) DnRA BO3BpATA B rIaNBHOe MeHIO.Прoeциробане OT Всшимero Вдесонсточикa
PanaheIb BBOda/BbIBOda CNHAnOB HaxoDnTcR C 3aDHeN CTOpOHbI nPoEKTopa. IOnCoEHNHTe BHeuHm BNdeONCTOuHnK K nPoEKTOpy C NOMOUsIO COOTBeTCTByUeero KaBEnI INKHONKoi Source (UctOuHnK) Ha naHeJIynpabJeHnB bIbepnte nCTOuHnK BXODHOrO CNHaJia. HDMI
IodcoeHnHTe nopT HDMHa 3aHne nanei npoeKTopa K BHeuHemy NCTOuyHKy CnHaJa HDMI uepe3 ka6eB HDMl. Pocne noDKluueHna ekpaH aBTOMaTuYeCKn nepeKluoytca Ha nCTOuyHK CuHaJa HDMl. VGA
IopcoeHnTe npT VGA Ha 3aDHei NaHeJIn npoeKtopa K BHeuHemy nCTOuHnky CnHana VGA uepe3 ka6eIb VGA. Iocne IopKIOUeHnB bIbepTe nCToHnK VGA KHOIpKoi Source (NctOuHnK) Ha naHei ynpaBNeHn. Приимechан: Kaбел VGA He BXOДТВ CTaHДapTHbI KOMПЛeKT NOCTaBkN. AVIN
IOnKlIOuHTe BHeUHee ycTpoiCTBO BbIBOda AB-cnHaJa K rHe3ny AV, KaK noka3aHo Ha pncyHKe. Pa3bemblmeot cBeTHyIO mapKnpoBky. Iocne noKluueHn Bbl6epTe nCTouHnK AV-IN KhoNkoI Source Ha npIbTe nn naHeJn ynpaBneHn. HactpoIka Bocnpon3BeDeHnBHeuHero BndeocnHaJa
KhoNko/MenuHa nylte nnnaheyn ynpabneHn OTKpoTe MeHIO HAcTPOKn BocnpOn3BeDeHn. 1.Формат Кадра
EcnBn BndeoopaH nMeet fopmat Ka4pa 4:3, 3ta cyHKunno3BOJrT Bb6paTb Bn npedctabNeHHn306paXeHHa 3KpaHe pa3Mepom 16:9. Haxmte OKДЯ OTo6paKeHnB BapnaHTOB HAcTpoKn. 1) Pan & Scan: BnncbIbaeT n3o6paKeHne B pa3Mepbl kpaHa 16:9. 2) Letterbox:ИЗОБРАЖЕНЕ OTOБРАЖАЕТСВ ИСХОДHOM ФОРМаTe KaДр. IJIIOCTpaunB BapnaHToB HacTpoNkΦopMaTa N3O6paKeHnA. 2. JpKocTb
I03BOJnAET HAcTPOINTB AROKOCTB COOTBETCTBUN COKpyKaHcIM OCBeUeHNEM N ypOBHeM 3HepronoTpe6JIeHn. 1)Ярк:Select this mode when external power supply is available to maximize the performance. 2) O6bIHyB: CtaHapThbpeKIMC oNTMm3auee npkoCTn 6aTaepenHoro nITaHna. 3) Θko: 3TOT peKIM peKOMeHdyetcAДЯ 3KOHOMN 3JIeKTPo3HeprM, KOrda npoeKTop pa6oTaet B 6aTapeiHOM peKIMe. Примechанe: Пю ekTOp aВТOMaTичeCKn NepeKnIQUaeTcB pexm «Ярkn》,KOrda nITaHne NOaETCr OT aДanTepa nITaHn.3. Pekim npoeunopobHna (ObbeknBa)
No3BOJRAET BbIpaTb peKIM npoeunpoBaHnB 3aBNCIMOCTn OT Tnna yCTaHOBKn npoeKTopa.Cnepeeni:
CtahapTHbI cnooc yctaHOBKn, ydo6eH nla HacTPOkN n nepemeueHn npoeKtopa.  Cnpeepi
PpoeKTop npeBopauHbAeT(notonok):
n3o6paXeHne BBePx HOrAmn IJI npoeUnpOBaHnI npI erO nToOnOuHOM KpePHeHH.  Rear:
PpoekTop 3epkaJIbHo pa3BopauNbaeTn3o6paKaeHne dIg PpoeucipobAHnC3aDHei cTOpOnbI np03paUHO 3kpaHa.  Rear Ceiling:
IpoekTop 3epkaJIbHO pa3BopauHbaET n IpepeBopaunBaet n3o6paXeHne BBepx Horamn. 3To nO3BOJAEr TpoeUropBaTb n3o6paXeHne c 3aDHeN CTOpOHbl npO3paHOrO ekpaHa pRn NOTOnOCHOM KpePJIeHN IpoekTopa.  4. Bb6op c0xkeTHoro peKIma
I03BOJRAETBb6paTb ONTUMaJIbHbIpeKIM 6aJIaHCnPOBKn apKoCTN, CBeTHOCTN KOHTpacta dIpynpocMToPa KINHOΦuMbOB, φOTOrpaΦm IUN YTeHnA TeKCTa. KInHO: ONTImaIbHbI peXIM dIЯ npocMOTpa qnlbMOB O6bIHyB: ONTUMaJIbHbI peXIM dIpy npOCMToPa foTOrpaФm TeKCT: onTImaJIbHbI peXIM dIЯ npOCMToPa TeKCTOBbIX n3o6paKeHm5.Инфорmaцья
Отображени ВерсанMuКponporpaMMbl:Тxxxx/AxxxxPpoeunpoBaHne co cMapTfoHOB n PJIaHweTHbIX PK
1.Подклioуehne cMaprfoHOB c noДepeKkoCTaHdapTa MHL (Mo6nIbHbI KaHaJI BBICOKO YETKoCTn)ДЯ npoeuipoBaHnI N3o6paXeHnI. IopKnIOHTe CmapTfoH Samsung Galaxy S2, Note, HOBBI cMapTFOH HTC One, One X+, One X, One S n nn Sony Xpia ZK npoektopy c nomoosbIO ka6eMa MHL (HDMI Tuna «A—USB-D»).  IopKJIIOUHTe CMapTfoH Samsung Galaxy S4 Hnn Note II K npoeKTopy c NOMOUs KoBeJn MHL (HDMI Tnna A-USB-D) a cMapTfoH Samsung 5-c NOMOUsb11-KoHTaKTHoro MHL-aanTepa (cm. pucyhoK). Ppimuehne: PnnoKIOHcHm K npoeKTopy CMapTfoHOB nIIN pHaHHeTHbIX PK aBTOMaTHueCKN OcyuieCTBJIeTcR INx 3apJka. 3TO HOpMaJIbHOe ABHeHne. 2.Подкючене устpoиCTB iPhone 5 ДяЗеркальоги поеццровань (сnomошьюkaбеля Lightning). IodKnIOuHTe iPhone 5, iPad 4, iPad Mini nnn iPod Touch 5 K npoeKtopy c nomoubko6eH HDMI Tuna «A—A» uepe3 aanTep Apple Lightning Digital AV.  YcTpoiCTBa iPhone 4S, New iPad, iPad2, iPad n iPod Touch 4) moXHo NOdkIouHTb K npoeKTopy c nOmoBIO ka6eIa HDMI Tuna «A—A» uepe3 30-koHTaKTbI aIaNTep Apple Digital AV.3apraKa BHeHrero Mo6nIbHoro yctpoiCTBa
BHyTpeneHHra 6aTape npoeKTopa MoKeTe NcNoJIb3OBAtbcr He ToJIbKO dIg npoeCupoBaHnA, Ho n dIg 3apRdKn MObNJbHbIX yCTpOInCTB.  1.ПодклioчnteMo6nIbHoeyctpoiCTBOKnpoekTopy c nmoosIO npexoHoro USB-ka6eNBACTaBnBpa3beM USB-A BnopTUSBc3aDHeCtopoHbI npoekTopa. 2. Korda npoeKTop BkIIOueH, 3apAka yCTpoiCTBa OcyuectBnreTcABOTOMaTneCKn. 3. Korda npoeKTop BbIKNoeH,ДЯ BkNoeHnIy NII BBIKNoeHnI 3apAkn CneDyeT HaxKaTb KhoNky Source ). Приимechи: Прөктор обеспeyнbaet поау Выхоноги пиганя 5В/500MA дяЗардк MOБиьных устpoи CTB.Прoeцеровны n3 пamгТи
Прoeцираване n3 BHyтpeHнeЯMaRTN
Ipoektop nmeet 2-6 BHytpenHIO npamrTb, 1,2 76 KOtopoN HCNOJb3yOTc dna xpaehnna paioob. Ira npoeunpoBaHH cJe dyET 3aRpy3ntb MyIbTMMeHNbIe paaiNb C BaWero PIK nn HoYt6yka BO BHytpenHIO npamrTb: 1. BkIIOUHTe IKN npoeKtop. 2.Подкнючite nopT Micro-USB npoeKtopa K ПК ИИИ HoуТбуку сnomoью кабеля USB.Зкраз И BEHTnIЯrTop nocne yctahOBJIeHnI COeDINHeHnA aBTOMaTHueCKN OTKJIIOUaIOTcR ДЯ 3KOHOMn NJIeKtpO3Heprnn .ПрoeKtOp Пп 3ТOM hAxODITcR BpeXIMe 3aONOMHaHOUeRo yCTpoICTBa. 3. Tenepb Bbl MoKeTe KOHIpOBAbT ChIMKn, My3bIky, BnDeo, faJIbPDF n Microsoft Office (PowerPoint, Word n Excel) c komnbioTepa BO BHyTpeHHIO namrTa nn ydaJrTa faiJIbI n3 BHyTpeHHeN naMrtn.  Приимechа: 1. Когда пpoeKTop nodknHoyT6ky, рпименят bnybT HeBO3MOxHO. 2. O noДeprKnBaembix φoPmTaX φaIIOB CM. «ФункиИ ᵋЛeMeHTbI ynpabJIeHЯ» (cTp. 15)PpoeunpoBaHne n3 BHeuHne NaMaTn
1.Γhe3do BHeuHHei KapTbI SD/SDHC/SDXC
YcTpoiCTBO IMeET rHe3do dIy KapT nAMrtn SD,SDHC u SDXC eMKocTBIO 128 T6.OctopoXHO BCTaBbTe KapTu Br He3do DO ynpaB yka3aHHOM HnpaBneHn. YTo6bl N3BJIeYb KapTy nAMrtn, OCTopoXHO HaKMNTe Ha ee BepxHn KpaN, IN BbITAHNTe ee n3 rHe3da.2. UcTpoNCTBO USB
IpoeKTop MOKeT BbINOJIHЯTb npoeUPOBaHne copeKIMOrO c USB-ycTroPcTB, HapnIpMep c USB 13a-HaKoTIteJIy IIN JxecTkoro USB-dNcKa (mHeuIero co6CTBeHHoe nITAHne).   Приимechа: ПО умочань в снисе BOCрпои3ve徳ня OTOбрахаetсь BHeшни Источник памати. Рп одношпemHOM Испльзовни USB Флэш-нakоNTeги и Kapы SD/SDHC в снисе BOCрпои3ve徳ня по у мочань OTOбрахаetсь памать USB Флэш-нakоNTeги.BbI6Op nCTOuHnKa pAmrTn
KhoKAMn DxKOCTNkA < > A V BbI6epNTe NyHKT HAcTPOKa, N HaXaTHEm KHOKN (OK) BOINTE B NODMEnIO. BbI6epNTe NyHKT AmrTB), N HaxMITE (OK) dNRA BXOaB MeHIO BbI6opHa HAKONITeNe. BbI6epNTe HxKbI NcTOHNK NaMRTu, N NOdTBePdNTe erO KHONKO (OK). HaxMITE (BbIXoD) dNRA BO3BPaTaB rNaBHoe MeHIO.TnaBHOe MeHIO
 KhoKAMn JKOJCTNka < > A V BbI6epNTe HxKbI NyHKT, HxKaTneM KhoKn OK BOINTe B NOdMeHIO; HxKMITE KHOKNy /BbIXoD IaR Bo3BpTaB rnaBHOe MeHIO.| Знauк | Функция | Описане |
| Видао | Позьолаяг bыбрач bидевфай ддя прoeцироваши. | Позьолаяг bыбрач dдя прoeцироваши файлы снимков (JPEG, JPG по BMP). |
| Дokумент | Позьолаяг bыбрач dдя прoeцироваши файлы PDF и Office (PowerPoint, Word, Excel) | Позьолаяг bыбрач dдя прoeцироваши файлы PDF and Office (PowerPoint, Word, Excel) |
| Wi-Fi | Позьолаяг вklючпь Функцию радиосваяз с прoektором | Позьолаяг вklючпь Функцию радиосваяз с прoektором |
| Муз布拉 | Позьолаяг bыбрач Файлы MP3, WAV и OGG ддя在其 Вocmpонзveданesу череш прoektор. | Позьолаяг bыбрач Позьолаяг прocmaатрва палки и Файлы в bыбранham устrodu峙ve памяты независно ot Формата Файлов. Возможен predecessorNBий позмотр Быдялаямых в списке Файлов ФOTOи Видао. Быбранны Файл можно удалиы пли сkonлароваши на друтой hochтель. |
| Файн | Зебранhoe | Проботр Файlos, РOMEЧЕНБИX, кас Избранные. |
| Ностroduка | Зта Функция розьолаян ( назрочь, кас ярков; параметры, кас ярков; Сюжete horo ржима, Кзык и Памяту. |
PpoeunpoBaHne Bndeo
Bb6op n npoeunpoBaHne BndeofoaInOB. 1. Bb6epnte, n KhoNkoI OK oTKpoTne nyHKT «Bndeo» BrnaBHOM MeHIO. 2. B cnncke Bb6opa faHIOB KhoNkoB ▲▼ Bb6epnte HxKHyO nAnky, n OTKpoIte ee KhoNkoB.ДЯ Bb6opa nyHKTOB B cnCKe BocPOn3BeDeHnA nCNoJb3yIe KhoNkn ▲▼.HaXmTe /OK, yTo6bl 3anyCTnTB BocPOn3BeDeHnE n IpoeucnpoBaHnE Bb6paHHoro BnideoФaJa. 3.Bo BpemBaBcnpo3BeDeHnIcNoIb3yIe KHOJKN 1ny nepexoKa npedbyuemy/cneDyuOuemy BuDeofoainy. 4.Динтелhoe HaxkaTne KHONOK 3anyckaet 6bictpyo nepeMoTKy Bnpei/Ha3aI. 5. Khonka ©/OK no3BONJET npnoCTaHOBNt b n CHOBA BO3o6HOBNt b BOCnpon3BeJeHne. 6.ДЯperynipOBKNrpoMkoCTN BndeoФиьмИСЮЛБ3yIe KHONKIAVHactpoIka BocnpOn3BedeHnBnDeO:
B cπncke BbIbopa φaIIIOB KHOIIKOJ (MeHIO) oTKpoIe «HaCTpOIKN BnIeO».  1) Bocnpo3BeDeHne: Bb6op peKIma Bocnpo3BeDeHnBnDeoknnoB (cm. Ta6I. A).| → | Бez зовтора | Однокразное Воспожи веденияTekуцего Т repeкни ведEO |
| → | Овийнь | Воспожи веденияTekуцеги папки |
| ← | Одн | Повторы Воспожи веденияTekуцего Т repeкни ведEO |
| ← | Вce | Повторы Воспожи ведnioTekуцеги папки |
| × | Случайно | Повторы Воспожи ведnioTekуцеги папки в случайnom поядке |
| Расшиpenи файla | Декор вideо | Декор удino |
| *.avi | MJEG Xvid H.264/AVC MPEG4 | AAC (AAC-LC and HE-AAC) PCM ADPCM |
| *.mov *.mp4 | MPEG4 H.264 | AAC PCM ADPCM |
| *.mpg | MPEG1 | LPCM |
PpoeunpoBaHne cHmKOB
Bb6op n npoeunpoBaHne cHIMKOB. 1. BbIbepeTe nyHKT «ΦOTO» BrnaBHOM MeHIO, n HaxMnte ©/OKДЯ BXOda B peKIM ΦOTO. 2.KHONKAMN ▲▼ BbI6epnTe HxKHyo nanky u OTkpoiTe ee KhONKOJ /OK.ДЯ BBI6opa 3CKN3OB CHIMKOB INCNOJIb3yIte KHONK ▲▼ ▲▶. 3. Haxmnte /OK IIpyoepuropobAHnBbI6paHHoro cHIMKa Ha BeCb 3KpaH. 4. KhoNkAmn BNeBO/BnpaBO (▶) nepeiDnte K npdeIyUeMy/cJeDuOuEMy n3o6paXeHIO. 5. YBeJIuHHeH n CDbn I3o6paKeHHa: - Khonkoi BBepx ▲ BKIOUHTe peXIM yBeIuHn. HaxMITE BBePx/Bn3 (▲▼) dnyyBeIuHn/ymEnbIeHn pa3Mepa. BpeXIMe yBeJIuYeHnHaXaTne KHOJKn /OK BkIIOuaET cyHKUHO cDBrna 306paKeHn. Порpoбные с蜱edingу komандax упавлени по蜱edingь <ТабицаВ>нжe. <ТабицаВ>| Размер | ▲▼ | Увileчения/уменьшения (Фото: Доступные уroyы увileчения — 1x ~ 4x. Дokусан't: Доступные уroyы увileчения — 1x ~ 8x.) |
| ▲▼ | Пробд好数/следуюSTEMиЗобрахения (стараца) | |
| ©/OK | Въсячения рекима сд玮ога | |
| ← | Воз招商引资 к поноэкpanHomу изобрахенью | |
| Сдвиг | ▲▼ n ▲▼ | Сдвиг вразх, Виз, Влево, Вправо/OK |
| ©/OK | Воз招商引资 в реким увileчения | |
| ← | Воз招商引资 к поноэкpanHomу изobрахенью |
6. NIOBOPOT n3O6paXeHnA:
KhoNkoj /MeHIO BkIouHTe cyHKUIO NOBOPTa N3O6paXKeHn. KhoNkaMn 《BneBO/BnpaBO》( )BbIepeTe HapBaJIeHne NOBOPTa, IN KhoNko /OK NoTBePdnte BbI6Op. HaxmTe (BbIXoJ) Ipn BA03BpTa B pexm Bbl6opa nApOK nIN 3CKN3OB CHIMKOB.HactpoKa BocnpOn3BeDeHnA CHIMKOB
B cnncke Bbl6opa faaiIOB Bbl6epnTe 3ckn3 cHIMKa n KhoNko (MeHIO) OTKpoIte HacTpoiKN «HaCtpoiKn fOTo».  1) CnaiDiooy:BkNIOeHne/BbIKIOeHne CnaIIOoy. 2) My3bika: BkIIOUeHHe/BbIKJIIOUeHHe foHOBOy My3bIKn BO BpeMraaIduooy. IINBocIpOn3BeDeHnMy3bIKn COxpaHnTe HJXHbI ayDIOphiJN B nAnke CHIMKOB. 3) Ckopocb: 3aainTe nHTepBaI cMeHbI paaiIOB B cnaIDooy: 5 cek, 10 cek, 30 cek, 1 MNH, 10 MNH. 4) KhoNka /OK npnoctaHaBnBaet/BO3o6HOBJraeT npocMOTp CHMkoB BO BpeMa cnaIduoy. KhoNk N03BOJrO T nepeHTN KnpdeIbIyUeMy/CneIdyUOeMy CHMky. 5) I36paHoe: ΦaIbI NOMeueHHbIe 3HaUKOM ★ rpynnnpyOTcI py ydo6CTBa doCTya B nAnke «I36paHoe» (В виde 3aknaDOK). (Сm. ВвODHyO yacTb pa3dela «I36paHoe» Ha cTp. 21.) PpmeHne: PpoekTop noDepKnBaet cJeDyUoIe fOpMaTbI CHIMKOB:| Φормат φайla | Мамс. разрешиени | Расшиpenи Файla |
| JPEG 8000 x 6000 | *.jpeg | |
| JPG 8000 x 6000 | *. jpg | |
| BMP 8000 x 6000 | *.bmp |
Прoeцироване дokум entob
Bb6op n npoeucnpoBaHne paHOB Windows Office n PDF. 1. BbIbepnTe NyHKT «DokymeHT» B rIaBHom MeHIO n HaxMnte ©/OK dIЯ BXOJa B peKIM «DokymeHT». 2.Bb6epnte npky n paHn, n HaxMnte /OK nra OTkpBITNA Bb6paHHoro DOkymeHTa. 3. KhoNkAmn BNeBO/BnpaBO (▶) nepeiDnte K npdeBlyuSei/cJeDuOuSei cTpaHnue. 4. YBJIuHHeHn cDnIg DOKyMeHTa: - Khonkoi BBepx ▲ BKIOUHTe peXMM yBelenueHn. HaxMITE BBePx/Bn3 (▲▼) nnyyBelenueHn/ymenbSeHn pa3mepa. BpeXnme yBeJIuYeHnHaJxATne KHOKN /OK BKnIOuaET cyHKUHO cDBrna 306paKeHn.HactpoKa BocnpOn3BeDeHnI DOkymeHTOB:
B cπncke BbIbopa ΦaɪnoB BbIbepnte ὅKymeHT n KHOŋkoj (MeHIO) OTKpoηTe «HaCTpOŋKN ὅKymeHTOB». 1) CnaiDwoy:BkNIOeHne/BbIKIOeHne CnaIduoy. 2) Ckopocb: 3aainTe nHTepBaI cMeHbI paaiIOB B cnaIDooy: 5 cek, 10 cek, 30 cek, 1 MNH, 10 MNH. 3) KhoNka /OK npnoctaHaBnBaet/BO3o6HOBJIeT npocMOT pCHIMKOB BO BpeMra CnaIduoy. KhoNk NO3BOJIAOT npeHTN KnpdeIbIyUeMy/CneIyUOeMy CHIMKy. 4) I36paHHe: ΦaIbI NOMeueHHbIe 3HaUcOM ★ rpynnpuyOTcB nAnKe «I36paHHe». (Cm. BBOHyIO uactb pa3deJa «I36paHHe» Ha cTp. 21.) PpmeHne: 1. PpoekTop noDepknaeT cJeDyUOuNE φOpMaTbI DOKymeHTOB C yKa3aHHbIMN orpaHnueHnA M:| Формат Файla | Расшиpenи файla | Повдержka Версн | Ограниеме размера |
| POWERPOINT | *.ppt, *.pptx, | PowerPoint 97 ~ 2010 | Up to 19MB |
| PDF 1.0 ~ 1.4 | Up to 75MB | ||
| WORD | *.doc, *.docx, | WORD 97 ~ 2010 | Up to 100MB |
| EXCEL | *.xls, *.xlsx | Excel 97 ~ 2010 | Up to 15MB |
Bocnpon3BeJeHne My3bIKN
Bb6op n Bocnpo3BeJeHne aydnofoaIIOB. 1.Дя npocnyuBaHnMy3bIKN CneIyET Chauana coXpaHNT My3bIkaJIbHbIe paIbI BO BHyTpEHHe namrTn IIN Ha BHeUHnx yCTpOJCTbX namrTn. 2. KhoNkamn ▲▼ BbIePnte neChIO, n HaxMNTe ©/OK dЯ 3anycka Bocnpoun3BeDeHnMy3blKn. 3. KhoNkA NcNoJb3yIOTc IJIpeRyJInpOBKn rPOMKoCTn My3bIKn. 4. Haxmnte OKДЯ npnoctaHOBK m3bIKN. BTOPOe HaxaTne 3TO BO3o6HOBJAreHOPMaJIbHOE BOCPON3BeDeHHe. 5. Εκραη ανβότοματηχεκην γαρεθει 20 έκγύ ἀπλ εκούθους Κληκετροδερτην. Πήσιν ἐκραη Εκραην προετό Μακητητευτόν καλαβίατην Ακτύνινροδατόν Αροεύπροδανήε. 6. HaxmTe KhoNky (MeHIO) dIy BxOa B pexm HacTpoiKMy3bIK. 1) Bocnpo3BeJeHHe: Bb6op peKIMOB Bocnpo3BeJeHnA, aHaIOnuHNo Ta6nue A (ctp. 16). 2) I36paHHe: PaIbI NOMeueHHbIe 3HaUkOM rpynnpuyOTcB nAnKe «I36paHHe. (Cm. BBOdHyIO uactb pa3deJa «I36paHHe» Ha cTp. 21.) PpmeHne: PpoekTop noDpeKnBaet cneDuOuIe φopMaTbI ayDnOaINOB:| Формат сайna | Расшиpenе сайna |
| MP3 | *.mp3 |
| WAV | *.wav |
| OGG | *.ogg |
IcnoJb3OBAHHe HayuHnKOB
IpoeKTop Imeet BCTpoeHHbI DnHaMVK, obecneuBaIOUm KauEcTBeHHoe BocpOu3BeDeHne 3Byka.Kpome TOrO,KrHe3y AV 3Toro yCTpoiCtBa MOxHO NOkNIOUaTb HayuHNKIN NIN BHeuHne DnHaMKn. Ppi NOkNIOUeHn HAYuHNKOB BHyTpEHnn DnHaMKN ABTOMATUeCKN OTKnIOUaETcR. Mehejkep fainob
MeHeJxep faiIOB no3BOJIaET yO6HO n 6bICTo po a6oTaTb c faIaNAMn, HaxOHTb n npoeUropOBaTb faJIb pa3NJuHbIX φOpMaTOB. 1. Bb6epnte nyHKT (ФaIn) B rJnaBHOM MeHIO, n HaxMnte /OK ДЯ NOKpbITNA cnNcKa paINOB. 2.BcnckefainOBhaIeNbIbepntefoaIn,Haxmnte OKdnycka npoeucpoBaHn. 3.Дя упраьнения Фаиами Выдени Te ФаиВ Cпнске Фаилов, И нахмITE (MeHIO) Дя OTКрытney MeHIO «Кониpoванe/Yдаленe». KonipobAHne paJna YTo6bl cKoNipOBaTb paJn Ha dpYroH hAKOnNTeJIb, Bbl6epnte NyHKT «KonipOBaTb» n HaxMITE /OK - YdaJIeHHe ΦaINa 4To6bI yDaJIHTb Bbl6paHbIh ΦaIJI, Bbl6epnTe nyHKT «YdaJIHTb» n HaXmTe ©/OK. - YTo6bI OTMeHnTb DeIeCTBne I BepHyTbCBA CNUCOK paJIIOB, HaxMNTe ИЗбразноe
Bb mokeTe 6bIcTpo Bbl6npaTb IJIa BocnpOn3BeDeHnra Te faiNbI, KOToPbIe 6blnn nOmeueHbl, KaK n36paHHbIe. 1. BbI6epuTe nyHKT «U36paHHoe» B rnaBHom MeHIO n HaxMnte ©/OK dЯ BXOda B peXIM «U36paHHoe». 2. BbIbepnte qaiJ, n Haxmnte OK dny otKpbTnBbl6paHHoro qaiJa. 3. Khonkamn «BneBO/BnpaBO» (▲▶) nepeiDnte K npdeIyUeMy/cneIyUoUeMy paJny. 4. Khonkoi (MeHIO) OTKpoIe yHKUIO «YdaJIHTb nyTb» Приимechанee:Команда «УдалNTь пут» удаляET TOЛько сылку Ha Файи n3 спнскa «Избранhoe》.Есни Требуетсу ДалNTьcamи Файы, ВьБерпTeВ ГАВНOM MeHIOpyHKT«Фай》,ВьБерпTeфайи KнОнКо (MeHIO) OТКpoIte Φункцию «КориPoBaHne/YdaJIeHne」.Hac troponka
I3MeHeHne CtAnDapTHbIX HAcTpoE K npoeKTopa:ApKocTN, cnocoba npoeCnipoBaHnra, y3bika n yCTPOINCTB nAMrTn.1. RpkocTb
I03BOJnE T HAcTPOINb JRPKOCb B COOTBcTcBn C OKpyKaIOuM OCBeUeHEm N ypoBHeM 3HeprnonTope6JIeHn.| Рек imm | Яразов为止 | Вразов为止 разов为止 батари | Рекомендаця |
| Яразов | До 100 Люмен | 80 мIN | Этот рек imm обесnéчныает Мakсимальныю яразов (PECOMEHДуеТС РИ ПИТАн И ВHEШЕЦИКА). |
| Оьчный | До 60 Люмен | 100 мIN | Столартуй рек imm с Опимизацей яразови и батарейноу пИтained. |
| Зко | До 40 ЛюmEN | 120 мIN | Этот рек imm яразов endуеТС Дд эхономи заелков, Когд празков наразаETВ в chateHOM рекиме. |
2. Pekim npoeunpoBaHn (obekTna)
I03B0JnEeT BbIbpaTb peKIM npoeUnpoBaHnB 3aBnCmOcTN OT Tnna yCTaHOBKn npoeKTopa. OnncAnHe npoueDypbl CM. Ha cTp. 12.3. Bb6op cHoxeTHoro pexima
I03BOJIAReT BbI6paTb ONTImaJIbHbI pEXKIM 6aJIaHCnPOBKn JRPKOCTN, UBeTHOCTN KOHTpacta IINI pOCMOtpa KInHOΦnMbMOB, ΦOTOrpaΦn INN YTeHnRA TEKCTa. KInHO:OnTImaIbHbIpeXIMdIpynpocMOTpaΦnJIbMOB O6bIHyI: onTImaJIbHbI peKIM IJpnoCMoTPa foToRpaФm TekT: onTImaJIbHbI pexIM dIy npOCMOTpa TekCTOBbIX 306paJxHn4. IVCTOUYHK nAMrTH
3TaФyHKUINNo3BOJAEr BbI6paTb yCTpoiCTBO nAMrTu: BHYTpEHHIO nAMrTb, KapTy Micro SD nnn USB-yCTpoiCTBO.  :BhutypeHHnnaMrtb  : KapTa SD/SDHC/SDXC  USB-hakonntenb5. Ra3bIK
P03BOJIAET BbIbpaTb IA3bIK INHTeppeiCa CnCTeMbI.6. ABTOBbIKIIOUeHne
I03BOJnAeT BKNIOHTb HIN BbIKIOHTb FyHKUHO aBTOOTKIOUeHn npoeKTopa. EcIn FyHKURAbTOBbIKIOUc. BKIOUeHa, npoEKTop aBtOMaTHueCKN OTKIOUaETcR NO ICTeHn 3aDaHHoro nepnoDa BpeMeHN.7. CnCtema
3aBoDcKe HacTpoKn C6poc Bcex HacTpoe K npoeKTopa K 3aBOdCKM 3HaueHnA M. -ObHOBJIeHHe MKNpOIpOrpaMMbI HOpMauno6OBHOBHeHHMnKpOnporpaMMbI npuBeHa Ha Hauem Be6caTe. - HΦoPmaua Shows firmware version: Txxxx/AxxxxBknquHne paadocBra3n
IpeedepBbIM npimeHHeHem BblnoJHnTe CJeDyOuNe DeiCTBn, YTO6bl yCTaHOBTb Ha Baaw cMaprfoH nII PI nporpaMMy KOHTpOra paAnocB3n.YcTaHOBKa npOrpaMMbI KOHTpOJa paAdnOCBra3N Ha KOMpbIOTep
1. BbIbePte n OTKpoTe nyHKT «Wi-Fi» B rnaBHom MeHIO dJIa 3aNyckaФyHKcII paAnocBra3n BaUero npoeKtopa.  2. B OkHe «PaIIONoKa3 Wi-Fi» oTo6paXaOTc8 coCToHne paIIOcBra3n (noKIOUeHa nIIN oTKIOUeHa cetb Wi-Fi) n OKHO napOra noKIOUeHnK npoeKTopy.  3. BkHouHTe yHKuHO WLAN Ha HOyt6yKe uNn PIK. IJRA NOKIOUeHnK paIIOcETn npoeKTopa Bbl6epHTe TOUY DocTyna C apIbIKOM «WiFi projector-XX»  PpHmeyaHne:1. 06hApxkeHn CoeINHeHn Ha KOMNbIOTpe OJXHa 6bITb BKJIIOUeHa cyHKnB 6ecnpoBOHOcTeN. 2. OToeHNHTe Ka6enb Ethernet ot KOMnbIOTepa, YTo6bl yCTpaHnTB Bo3JeNCTBHe Ha CnHan paDnOCETn. 3. Pn noKIOHcHm K paIIOcETn npoeKTopa coeINHeHne C dpyHM paIOOCETMn 6yTeT notepHaHO. 4. Haxmte KhoNky (MeHIO) Ha npoeKtope, yTo6bl OTkpblb MaCTep yCTaHOBKn dpaBepa/npuNoxehn.  5. Ha ekpahe oTo6paxaetcA cTPOka IP-aDpeca n QR-koI yCTaHOBKn dpaibepa/npuNoKeHnA.  6. OtkpoIe Be6-6pay3ep Ha BaIeM KOMNbIoTepe N BBeIaTe cTaHApTHbI IP-aIpec: http://192.168.111.1 7. B 3aBnCmOCTN OT BaUero KOMNbIOTepa BbIbEpNTe dpaIbep DnA Windows nnn Mac OS, 3aTeM 9eJIKNITE Ha 3HaueKe 3aRpy3Kn dpaIbepa.  8.ДвждышелкнITEHaДраиBEpe EZ_ViewДЯero yctaHOBKn.Haxmnte <Даee>ИСLEДуэЗКраньIM INHCTpyKUIM BblONHITe yCTaHOBky I nepe3arpy3nte KOMbIOTep.По 3abepseHm yCTaHOBKn Ha pa6oYem cToJIe KOMNbIOTepa NOBNTcR 3HaQOK EZ View  27  Причанne: Дяпсяимеюня сетево ng Имени (SSID) npoektopa Ии 3MeHeHnHaCtpoeK 3aunItbI paAnocBra3N (no yMoJuaHnIO BBOd napOЯ BblKnIoueH) cIeDyET b aIpecHoi cTpoke Be6-6pay3epa BBecTn IP-aIpec npoektopa (192.168.111.1)ДЯ OTkpblTna cTpaHnUb KoHfNpyaUNu yCTpoiCTBa n IpeeyTN K cTpaHnUe HacTpoeK dJa BBOda HOBOrO cETeBOrO IMEHn INI co3DaHnRA napOЯ doCTyna. Ppma paNocBra3b c npoeKTopoM
Ppma paNOCB3b C npoeKTopom No3BOJareT 6bICTpo Hauatb npe3eHTaUIO uHn npocMOT KINHOHJIbMa C BaWero KOMNbITepa, PnaHseTHoro PIK uHn cMaprTOHa, Ho npu 3tOM TepaETcA DoCTyn K IMeIoUeCsr CETn Wi-Fi (HeT paNIOOCTyna K INHTepHeTy). Ecnn dJa pnoeunopobAHn BAM Tpe6yETcAoCTyn B INHTepHT, peKOMeHNdyETcra NcNoJIb3OBaTb peKIM DomaUnHe Cetn (cm. cTp. 32).Ppmae paHOpoeCnpoBaHne c KOMbIOTepa
1. BbIbepeHte nOTKpOte nyHKT «WiFi» BrIaBHom MeHIO npoeKTopa. 2. 3aIIuIte KOd DoCTyna, coCToUHn 13 4 uNp: XXXX. 3Ta HOpMaunnoTpe6yETcBAM DnA DoCTyna B DaJIbHeHwEM.  3. Bb6epnte B cncske cetey toky doctyna «WIFI-Projector-XX», yto6bl nodknouhtb KOMnbItep K paadnoceT npoeKtopa.  4.Двжды�целкнITE Ha 3нчke EZ View Ha pa6oyem cToJe KOMnbIOTepa, TTO6bI 3anycTnTB nporpaMMy. 5. BBeDnTe KoD DocTyna (cm. war 2), n HaxMnTe OK> dIy noTbEpKdEHHa.  6. Посné усnéшно BxODa paДиОпpoeцИрOBанe C KOMьIOTepa Ha IpoeKTop HauHET pa6OtaTb.Дононтеловные Функцип EZ View
| Xapakternstika Onicsanie | ||
| A. Полиэкразн | 1~4: Розвожд的答案л的答案л的答案л的答案л的答案л的答案л的答案л的答案л的答案л的答案л的答案л的答案л的答案л的答案л的答案л的答案л的答案л的答案л的答案л的答案л的答案л的答案л的答案л的答案л的答案л的答案л的答案л的答案л的答案л的答案л的答案л的答案л的答案л的答案л的答案л的答案л的答案л的答案л的答案л的答案л的答案л的答案л的答案л的答案л的答案л的答案л的答案л的答案л的答案л的答案л的答案l的答案l的答案l的答案l的答案l的答案l的答案l的答案l的答案l的答案l的答案l的答案l的答案l的答案l的答案l的答案l的答案l的答案l的答案l的答案l的答案l的答案l的答案l的答案l的答案l的答案l的答案l的答案l的答案l的答案l的答案l的答案l的答案l的答案l的答案l的答案l的答案l的答案l的答案l的答案l的答案l的答案l的答案l的答案l的答案l的答案l的答案l的答案l的答案l的答案l的答案 l的答案 l的答案 l的答案 l的答案 l的答案 l的答案 l的答案 l的答案 l的答案 l的答案 l的答案 l的答案 l的答案 l的答案 l的答案 l的答案 l的答案 l的答案 l的答案 l的答案 l的答案 l的答案 l的答案 l的答案 l的答案 l的答案 l的答案 l的答案 l的答案 l的答案 l的答案 l的答案 l的答案 l的答案 l的答案 l的答案 l的答案 l的答案 l的答案 l的答案 l的答案 l的答案 l的答案 l的答案 l的答案 l的答案 l的答案 l的答案 l的答案 l的答案l的答案 l的答案 l的答案 l的答案 l的答案 l的答案 l的答案 l的答案 l的答案 l的答案 l的答案 l的答案 l的答案 l的答案 l的答案 l的答案 l的答案 l的答案 l的答案 l的答案 l的答案 l的答案 l的答案 l的答案 l的答案 l的答案 l的答案 l的答案 l的答案 l的答案 l的答案 l的答案 l的答案 l的答案 l的答案 l的答案 l的答案 l的答案 l的答案 l的答案 l的答案 l的答案 l的答案 l的答案 l的答案 l的答案 l的答案 l的答案 l的答案l的答案l的答案l的答案l的答案l的答案l的答案l的答案l的答案l的答案l的答案l的答案l的答案l的答案l的答案l的答案l的答案l的答案l的答案l的答案l的答案l的答案l的答案l的答案l的答案l的答案l的答案l的答案l的答案l的答案l的答案l的答案l的答案l的答案l的答案l的答案l的答案l的答案l的答案l的答案l的答案l的答案l的答案l的答案l的答案l的答案l的答案l的答案l的答案l的答案1 B.Реким зеркалa | B.P锗им зеркалa ИЗбражени ДуБлиарется на зерпа Компьютера. С.Pасирени D.Cсылka E.Bыхов F.P锗им G.Cobмостимы P锗им H.Aydюпок I.Pere'dача удионота на динамк Проблема:Чтоы综合治理 Урочь в Зук OT КOMпьютера, Выковские зук Динамков на Компьютера Вьбрав «судинда». |
YcTaHOBka npoRpaMMbI KOHTpOJI paAnocBra3N B CnCTeMax Apple nII Android
IporpMaMa EZ View dIra cMaprTfoHOB Android n Apple iDevice EZ View —эTO npinnoxeHne, IncnoIb3yemoe Ha cMapTfoHax Android n Apple iDevice dЯперетачфOTorpaФи иnpe3entaциHa npoekToP. EZ View IncnoIb3yETcTobko npn paNo-NOkJIoueHn. EcIn TeNeΦOH NOdkNIOUaETCK npoekToPc NOMOuB KabeIa, To CneDyET NOIb3OBaTbCByCTpoEHHOf yHKUeB VIDEOBbIBOda BaWero TeneΦOHa. YctaHOBka EZ View c caTa Google PlayTM (Дя усточТВ Android) 1. Поdkнючпесь к ИНтернету и оТкpoитпрлοжене Google Play™ ИИ Веб-страни Google Play™. (Google Play™ — Товарный захам KMпани Google Inc.) 2. B CTPOKe noncKa BBeHnTe EZ View. (IIN6o coKaHpyuTe QR-KoJ Ha cTpaHnCe yCTaHOBKn.)  3. HaxmteYcTaHOBka EZ View c caTAta Apple App Store (dЯyctpoNCTB Apple i-Device)
1. Пожклочиета сониHTepHetyиЗ苹ctte npiloxeHne App Store. 2. B CTPOKe noncKa BBeINTe . (IIn6o coockaHpyuTe QR-koD Ha cTpaHnCe yCTaHOBKn.)  3. HaxmteПразмoe paДиОпОдКлIOчЕнe K npоeKTopy c yctpoIcTB Android nII Apple
Для поедашии зобрахени на поектор сnomошю порpaMMbl EZ View tpebyetc установпь пreamую радиocвь вашero смарфona Android ипApple iDevice c пpoekтором Лбо подкючтбс к радиocetи, К кOTОРи подкючен поектор. 1. BbIbepeTe nOTkpOte nyHKT «Wi-Fi» B rnaBHom MeHIO dIra 3anycka qyHKcun paAnocBra3 BaJero npoeKTopa.  2. B OkHe «PaIOnOka3 Wi-Fi» oTo6paKaIoTc coCToHne paIIOcB83n (noKIOUeHa nn OTKIIoueHa ceTb Wi-Fi) n OKHO napOra noKIIoueHn K npoeKtopy.  3. BклочифункциWLAN ha cmapTfohe.Дя подкюченя К радиocetи npoeKTopa BblберпсToUkу Doctyna C raplbikOM «WiFi projector-XX».OTKpoTe EZ View n BbInOnHnTe BXoD B CnCTeMy npoeKTopa
1. OtkpoTe npInoxeHne EZ View. PpInoxeHne EZ View BbINOJHNT nonCK COBmecTnMbIX yCTPOINCTB. 2. BbIbepuTe «WiFi Projector» n BBeDnTe napoNb, KOToPbI noKa3aH Ha 3KpaHe npoeKTopa.   4. HaxmTe OK>, yTo6bI npOJKNtB. 5. BbIbepeTe Tn pAnOB Ha cMaprTfoHe dIra npoeunpoBaHna. | Фунreichий пэр代表大会 EZ View | Описанne |
| PHOTO | Проблемовашие симdkов ИЗ паматсmapтфразиа. |
| DOCUMENT | Проблемовашие дokументов Office и PDF ИЗ паматсmapтфразиа. |
| INTERNET | Проблемовашие Веб-стразиц. (Толък В рекиме DOMашné сети) *О Влочени KMінentСКУТо Рекима СМ. На STP. 31. |
| DROPBOX | ПOTOKOBая пeredача с облачною сервера. (Tолък В рекиме DOMашné сети) *О Влочени KMінentСКУТо Рекима СМ. На STP. 31. |
| CAMERA | ПроблемовашиеTekуцero ИЗбражения с камеры смартфразиа чеге порочени WiFi. |
| VIDEO | ПOTOKOBая пeredача Вideо на п现代物流 c устroduстВ iOS и Android. |
| SPLIT CONTROL | Позвягет одноь permehno пожецровать чеге п徕ковпизбражения OT 4 pa3ньх устroduстВ. |
Добальенье Контента В EZ View uepe3 iTunes® (дя устpoитВApple i-Device)
1. IoDCoeDInHHe aIfoH K KOMNbIOTepy. 2. 3aynctnte Ha KOMIbItepe nporpamMy iTunes®, ecn OHa He 3aynctnacb aBTOMaTnuecckn npn NOdkNIOUeHm n aifoHa. 3. BbIbepnTe yctpoCTBO iPhone nn iPad Ha 6okobon naHeJI NkpaHa. 4. Bыберп Te Bкладу Apps (Прилхенья) Ha naHeJn HacTpoeK. 5. Haxmte EZ View> npocmoTpa Bcex paJIOB, 3arpyKeHHbIX B EZ View. 6. Haxmte KhoNky Add (Dobntb), n Bbepnte paJIbI dIra 3arpy3Kn B EZ View. Bbl MoKeTe 3arpyKaTb paJIbI.JPG n cTaHapThIbe DOKyMeHTbl. 7. B HnKHeM JEBOM yrJy HaKMITE KhoNky Sync (CnHxpoHn3aun) dIy npeDaunPepaTnpoBaHne n3o6paXeHH B EZ View
B peKIMax IMeTcA BCTpoEHbI peaKTop n3o6paXeHn, no3BOJIOUmI dEmOHCTpaTopy Do6abTb npimeuaHn I peaKTnpOBaTB npoeuPyemoe n3o6paXeHne. Bbl MOKeTe pncOBaTB, packpaUNBaTB nIN CTnpaTB OTJeJBHbI 30HbI npocTbIM kacaHnEM. BCE oTppeaKTnpOBaHHbI e n3o6paXeHn MoxHO cpa3y coXpaHrTB B polike KaMepbl. Подклочипто ekтор Кdoctynhoь сети Wi-Fi (В ржиме domaшень сети) Дд почени doctyna KИntepheу
PekomeHdyetc noKIOuATb npoeKTop K cETn Wi-Fi, yTo6bl coeINraIOUncsca HnM KOMnbHOtepbI, nJIaHWeTbI nIN CmapTfoHbI TaKke IMeNIOCTyn K INHTepHety.ДЯ UCTaHOBKn COeINHeHnB NepBbIe Tpe6yeTcra TOnbKO BBeCTn CeTeBOI KIOU.Прс cJeDyUoIeM BXOe B pexm WiFi npoeKTop 6ydet noKIOUaTbcR K cETn ABTOMaTuYeCKn. 1. BbIbepuTe N OTKPOTe NyHKT «Wi-Fi» B rnaBHom MeHIO. 2. Khonkon (MeHou) OTKpoTe 3KpaH Co CNeIyUOuIMn BapnaHTaMn BbIbOpa. Bbl6epnte «DocTyB INTepHET» (Pexm KIneHTa), n IOITBePdTe KhONko «OK».  3. BbIbepnte ceTb Wi-Fi, K KOtopoB Bbl XOTNTe NOkHouHTbcA, N NOdTBePnTe KHOHKnOJ OK>.  4. Ecnn nIy BaWei CeTn Wi-Fi BKnIOUeHa 3aunTa paNIOCBa3n, KHNKO (OK) OTKpoIte KnaBnATpy u BBeINTe npoJIb (ceTeBOH KInOc HONOK JxOJCTNka Ha NylbTe nnHa npoeKTope. IocNe BBoJa npoJHaHXMITE Ha npoeKTope nnNyIbTe KHNKY «Exit», YTO6bl 3akpbITb KnaBnATpy. BbIbepuTe «POnkHouHTb», nNoTBePdnte KHNKO (OK).  5. Khonka «Exit» Bo3bpaaet ekpan WiFi Display. Tenepb moxho 3anyctntb dpaiBep nI nporpammy EZ View, yTo6bI BkJIOHTb paDnONpoeUPOBaHne.  6. 706bI BvIKJIOUHTb paIINOpoeIUPOBaHne I BepHyTbcR B rIaBHOe MeHIO, HxKHO npocTo 3akpbTb dpaiBep nn nporpamMy EZ View. Примechанe:Скорoctь Иntерпст-ccoин(eB ржimeДOMaшнe cetи)ЗависпOT takихфakторов,кak npoIN3BOdInTeIbHocTb LITy smapTfoHa/Hoyt6yka,pacstOЯнe и habINuHne cTeH/npERpaHа ЛINHи пямоВИДIMOCHTNOT npoeKTopaDoTockndoCTyna.Ha KauecTBo paDIOscBra3n B cTeN WLAN moYrBlnAryb paDIOtepeOnbI,yCTpoiCtBa Bluteoth,MkKPOBOJHOBbIe neyn IdpyrnE nCTouHnKn paDIOnomex B dnaIaN3OHe qactot 2,4 T.ПОТOMy,ecnв BOВрema npoeuzpOBaHncaKOPoCTbИNTepHET-IOdkIIOUChEN naDAeTNIIBCEВPemprponaJaET,peKOMeHdyETcR Bbl6paTb DpyTuTOOKy DoCTyna C6OJIee CINlbHbIMCINHAJOM INI NOTKJIIOUHTb KlinENTCKOE yCTpoIcTBO npoeKTopa OT ToQKn DoCTyna(BblKJIIOUHTb DoCTynB INHTepHET),чTOБы NOBbICHTb KauecTBO paDINOpoeuzpOBaHnY.YcTpaHHe HEnoJaIok
EcnBpa6oTe npoeKtopaHa6nlodaHOTc HEnoJaKn,nonbTaIteCb yCTpaHHTb INC nOMOuBcNe dyUoSe Ta6nUcbl, npexde Yem o6paatcbc B cepBnCHbl ceHTp.| Henschnpabnoctb Проарка | |
| Празков не работает при подлочени К нозуку или ПК с помоцью кабеля. | 1. Празовьte, правильно лим подлочени КабеляНДМ. 2. Убадиесь, что комъютep подлочени в рezжим Видаовывoda на празков. |
| В зрayзера komьютера неборочно оtmьчы ВсБ-странице установки драимBERа. | 1. ВклочITE Функцию WLAN на ПК лим подуку и вьберпerte Точу достуна «WiFi_projector-XX», чтоы подлочься К празков. 2. Отоединite Кабел Ethernet ot komьютера, чтоы устраимь BOЗдемоствае на сигнал радиocetи. 3. OTKpoite ВсБ-бразер на вазем komьютера и вьедиte в адrecиюстoku IP-a,dpec: http://192.168.111.1. |
| Празков не обнаружиеваяся р pri разотаюшей поportамme EZ View. | 1. В галовск мени вьберпente «WiFi», чтоы в�и в рezжим разионока ЗИ. 2. ВклочITE Функцию WLAN на ПК лим смог�оче и вьберпente Точу достуна «WiFi_projector-XX», чтоы пдлочься К празков. 3. Отоединite Кабел Ethernet ot komьютера, чтоы устраимь BOЗдемоствае на сигнал радиocetи. |
| Изobразенье сизшkom temhoe. | 1. Исплъчite празков в божee Temhomnomeши. 2. Ддя повшиения ярков STИ Спользейу对接. 3. УменшITE размер празецуемоу Изobразень. 4. Oтpresируеме Изobразенье Heetkoe. |
| Празецуеме Изobразенье Heetkoe. | 1. Oтpresируеме Изobразенье Heetkoe. |
| Празерхность празков harpebaeЯся. | Из-за сөрхьяркх CBETоюдов празков рprи долгrom Исплъзовани Harpebaeяся; заюмально. Это не влягет набот检посбость празкова. Ндүлэдайт Загрзеня лим поекрьтney BeHTINLAQUOHbIX OTberpctи и пrimеняITE празков в Хорош ВERTINЛРуемы MeCTax. |
| Вoscstановские полес сбая | Исплъз汞сята, сслв ВсБ время празецц�овань празков Завиcaет, празецт работыл лим полсуетс. Ддя празеццузк сисемы празкова празЖмITE KнОпКУ ПИТань над 8 секунд. |
| Харазстеска Onисааоаиne | ||
| Оптоеска Тхонлогия | DLP | |
| Источник Света | RGB-cbvetoiodиord | |
| Формат Кадра | 16:9 | |
| Разревене | 854 x 480 пькSELов (WVGA) | |
| Конtr pactность | 1000:1 | |
| Размер позецуемоюзображения | 36 cm ~ 300 cm (14" ~ 120") | |
| Проблемнotherapy пазковы | 50 cm ~ 425 cm (20" ~ 167") | |
| Проблемнotherapy OT祁шени (Диагональ : Растоань) | 1,6 (Проблемнotherapy пазковы /ШирINA кадра) | |
| Ярковы | До 100 люмен | |
| Фокс neuropвka | Чужнио | |
| Смешениe | 100% | |
| Восprочь BodимBLEформаты | Фото: *.jpeg, *.jpg, *.bmpВиdeo: *.avi, *.mov, *.mp4, *.mpgАдно: *.mp3, *.wav, *.oggДokumsent: *.ppt, *.pptx, *.pdf, *.doc, *.docx, *.xls, *.xlsx | |
| WiFi | Моуль: IEEE 11n (1T1R)Стандарт: 802.11b/g/n | |
| Вунтугеля памяты | 2 Гб (1,2 Гб ддяханения сайлов) | |
| Встrosенький Динамик | Моно | |
| Гнеб do karты памяты | Карта SD/SDHC/SDXC (do 128 Гб) | |
| Зilektropолитане | Вхд: 100 ~ 240 B (пер.toka)Выхд: 12 B, 2 A (пocт.toka) | |
| Тил батары | Embedded 7.4 V/2000 mAh Li-polymer battery | |
| Вremя работы батары | Ярkin ржим: 80 мInOБьчный ржим: 100 мInЗкohомчный ржим: 120 мIn | |
| Знepronotpeблениe | AC mode: 12 ВТБатарейный ржим: 8ВТ ~ 12ВТ | |
| Разmersы (Д x Ш x В) | 132 x 95 x 25 mm | |
| Вес | 285 g | |
| Влajхость | 20% ~ 80% (мakc. 80%), 6e3 кондени. Темпера typа зкплuyaатци | 5°C - 35°C. |
1
J 1 1 1 1 1 1 1 1 1 1 1 1 1 1 1 1 1 1 1 1 1 1 1 1 1 1 1 1 1 1 1 1 1 1 1 1 1 1 1 1 1 1 1 1 1 1 1 1 1 1 0 WLAN L L L L L L L L L L L L L L L L L L L L L L L L L L L L L L L L L L L L L L L L L L L L L L L L L L L L L L L L L L L L L S S S S S S S S S S S S S S S S S S S S S S S S S S S S S S S S S S S S S S S S S S S S S S S S S S S S S S S S S S S S S S S S S S S S S S S S S S S S S S S S S S S S S S S S S S S S S S S S S S S S S PDF, Office SD A B C D E F G H I I J K L M N O P Q R HDMIaXuJy
Jzall jll Jgliljg 1 J 2 jll jy jy jy jy jy jy jy jy jy jy jy jy jy jy jy jy jy jy jy jy jy jy jy jy jy jy jy jy jy jy jy jy jy jy jy jy jy jy jy jy jy jy jy jy jy jy jy jy jy jy 3 yll jill kjjl jll Jaiil jglll jno jy jolly gao p jy jgall jao jill juaa jia jajl lal 4 j 10 1e jie bai .5 J 1 .6 80\~20 Jaae aae Jya aal yjll Jy jly, jay jai 8. 35,5 1aabaaeae aee jlll lll lll lll lll lll lll lll lll lll lll lll lll lll lll 10 i 1 Aeall yll jy jylyl lal yol all plnyy uynu yjg, ayie gail o Jalei .11 jlll l 12 aalal alalal alalal alalal alalal alalal alalal alalal alalal alalal alalal alalal alalal alalal alalal alalal alalal alalal alalal alalal aillll lai jy pllll 200 ailus jy aiailnl y jai jbi gaiail jia jia bao jia gaiall ciaiall 14 j 15gss sss ss
 1 2 3 jai jai jai jai jai jai jai jai jai jai jai jai jai jai jai jai jai jai jai jai jai jai jai jai jai jai jai jai jai jai jai jai jai jai jai jai jai jai jai jai jai jai jai jai jai jai jai jai jai jai jai A :(a)()()()()()()().5 1 1 1 1 1 1 1 1 1 1 1 1 1 1 1 1 1 1 1 1 1 22 = 22  : aaiy jall gaiy caaa aaaa 1 S_1 = 12 · AC · PDa
y 120 y jj j j j j j j j j j j j j j j j j j j j j j .. j 1 aaiy 1 yj5i j 1 () 1:FCC)
(1):(2) A 15 15 15 15 15 15 15 15 15 15 15 15 15 15 15 15 15 15 15 15 15 15 15 15 15 15 15 15 15 15 15 15 15 15 0 J 111111111111111111111111111111 aaii i 1 Jai 1 Jiaai jie jie jie jie jie jie - i 1 J 1 aalll 111111111111111111111111111111111111 ailll aylo 6 ocluall liisay lo     8202 Lgai| 1 | الإستعمال الحرفية/الإستعمال الحرفية |
| 5 | مBeganة الحرفية |
| 6 | الترجمة الحرفية |
| 8 | الترجمة الحرفية |
| 8 | شامالترجمة |
| 9 | شربيعة الحرفية |
| 9 | الإستعمال الحرفية/الإستعمال الحرفية |
| 10 | HDMI, VGA, AV-IN |
| 13 | الترجمة الحرفية/الإستعمال الحرفية |
| 13 | شامالترجمة |
| 14 | الإستعمال |
| 15 | الترجمة الحرفية |
| 16 | الترجمة |
| 17 | الصحراء |
| 19 | الإستعمال |
| 20 | الترجمة |
| 20 | الترجمة |
| 21 | الإستعمال |
| 21 | الإستعمال |
| 23 | الإستعمال الحرفية |
| 23 | Mac OS X 1.0 |
| 28 | Android OS X 1.0 |
| 35 | GitHub |
| 36 | GitHub |
gai
a Pico J JU 1 # (A A)HDMI (USBD HDMIAJ)MHL (AV) 1 Micro USB # # j #    #  a 1 iJoljol. Lg, 2 yjlll Jda yle ygall Ldell y aiaaii iiaaa aai jia aiaaa J.3 y a a a Jgall aie jlll lll a yj 1 j 10  j 1 j 1 aaii i aieeall aiee lai iie e ie 1 1 1 1 1 1 1 1 1 1 1 1 1 1 1 1 1 1 1J
 # a 1000000000000000000000000000000000000000000000000000000000000000000000000 g 1 gaiy yI 1 # jll jlll lal ball jie bial y J 15000000000000000000000000000000000000000000000000000000000000000000000000 aalssllg g 0  g 100000000000000000000000000000000000000000000000000000000 (167~"20)~425~36:all"(120~"14)305~36:all j 10000000000000000000000000000000000000000000000000000000 aal .y. jy lioie aagall o gall eai jol yj (jiaia j) jy Jolpaia i: abgalo # @ biall "aill" 22. aie jll aill g Jgall (jglgo) @ biall g "slc!" 221 < > AV Jaiill zilda msiily
j 1 j 1 j 1 j 1 j 1 j 1 j 1 j 1 j 1 j 1 j 1 j 1 j 1 j 1 j 1 j 1 j 1 j 1 j 1 j 1 j 1 j 1 j 1 j 1 j 1 j 1 j 1 j 1 j 1 j 1 j 1 j 1 j 1 j 1 j HDMI
 HDMI HDMI HDMI HDMIVGA
 aVGA 15 VGA VGA 1 yie jie kaill jie ge juaaljjge baiol, VGA VGAAVIN
AV 1 j 1 j 1 j k 1 j  y 1  1 a .16:9 a 170000000000000000000000000000000000000000000000000000000000000000000000000000 aiee eae ee eee eee eee eee eee eee eee eee eee eee eee eee eee eee eee eee eee eee eee eee eee eee eee eee eee eee eee eee eee eee eee eee eee eee eee eee eee eee eee eee eee eee eee eee eee eee eee eee eee eee eeee  法一. 如何拜拜 2.2 aill 1 1 2 3 aBb1  aill Jgaae aie 15ie jaoall gagll ()blwJg.3   J 1 J 1 1 1 1 1 1 1 1 1 1 1 1 1 1 1 1 1 1 1 1   Jaa 121   a 1   1 1 1 1 1 1 4 aolal jll jil jil jil jil jil jil jil jil jil jil jil jil jil jil jil jil jil jil jil jil jil jil jil jil jil jil jil jil jil jil jil jil jil jil jil jil jil jil jil aai aai Cio 5.5 Txxxx/Axxxx: 1aagjg jgl aai gllnnae
blauu (s) 100000000000000000000000000000000000000000000000000 new :Samsung Galaxy S2 金 责 责 责 责 责 责 责 责 责 责 责 责 责 责 责 责 责 责 责 责 责 责 责 责 责 责 责 责 责 责 责 责 责 责 一 X+ - HTC one A) MHLJLJLJLJLJLJLJLJLJLJLJLJLJLJLJLJLJLJLJL J (HDMIJZ USB D  2 Samsung Galaxy S4 JbJbJb USBD A) MHL 1S SsSamsung5 (HDMI HML  )iPhone5 2 iPad 4th, iPhone 5 iPod touch (4th) iPad 2 New iPad4 iPhone 4S A-to-A HDMI Apple 30 AV J 1  a 1 J 1 USB J U S O Type A U S O J U S B U S .2 Jlalj jlln nnnn nn nnnn nn nnnn nn nnnn nn nnnn nn nnnn nn nnnn nn nnnn nn nnnn nn nnnn nn nnnn nn nnnn nn nnnn nn nnnn nn nnnn nn nnnn nn nnnn nn nnnn nn nnnn nn nnnn nn nnnn nn nnnn nn nnnn nn nnnn nn nnnn nn nnnn 500/5r 5#
a
1.2 2 2 y j 1 jai jai jai jai jai jai 1 2 JUJIYI JI JI JI JI JI JI JI JI JI JI JI JI JI JI JI JI JI JI JI JI JI JI JI JI JI JI JI JI JI JI JI JI JI JI JI JI JI JI JI JI JI JI JI aaii iia aiee aagaaal gaaalgaaal gaaal gaaal 3 WordPowerPoint)WindowsOffice A 1 j 1 .5 (15) "Lalal, 1000"  a
SD/SDHC/SDXC 1 SDXC,SDHC,SD 128 1 a a a a a a a a a a a a a a a a a a C. + = 2 USB 2.2 J 1 (2018上海·杭州) 1 1 SD/SDHC 10 Jusssssssssssssssssssssssssssssssssssssssssssssssssssssssssssssssssssssssssssssssssss#
"Jslil" 22. a jll aill Jgdl (g) () "Jlill < > A V Jaiill jlae piai (g) () le biailly jy i g alalil o Sll Jaa 22. o Sll l (g) () biai, aasssssssssssssssssssssssssssssssssssssssssssssssssssssssssssssssssssssssss auii jaiilai  Jg#d jglg/0 b#al g yb#ll maill < > V J#ll cia# b#l| سفاد | العربية | الإستعمال |
| الترجمة الحرفية بधانساني بधانساني ملاويات الحرفية بधانساني بधانساني ملاويات الحرفية بधانساني بधانساني ملاويات الحرفية بधانساني بधانساني ملاويات الحرفية بधانساني بधانساني ملاويات الحرفية بधانساني بधانساني ملاويات الحرفية بधانساني بधانساني مleaويات الحرفية بधانساني بधانساني مleaويات الحرفية بधانساني بधانساني مleaويات الحرفية بधانساني بधانساني مleaويات الحرفية بधانساني بधانساني مleaويات الحرفية بधانساني بधانساني مleaويات الحرفية بधانساني بधانسapiaماني بधانسapiaماني بधانسapiaماني بधانسapiaماني بधانسapiaماني بधانسapiaماني بधانسapiaماني بधانسapiaماني بधانسapiaماني بधانسapiaماني بधانسapiaماني بधانسapiaماني بधانسapiaماني بधانسapiaماني بधانسapiaماني bधانسapiaماني bधانسapiaماني bधانسapiaماني bधانسapiaماني bधانسapiaماني bधانسapiaماني bधانسapiaماني bधانسapiaماني bधانسapiaماني bधانسapiaماني bधانسapiaماني bधانسapiaماني bधانسapiaماني bधانسapiaماني bधancaسapiaماني bधancaسapiaماني bधancaسapiaماني bधancaسapiaماني bधancaسapiaماني bधancaسapiaماني bधancaسapiaماني bधancaسapiaماني bधancaسapiaماني bधancaسapiaماني bधancaسapiaماني bधancaسapiaماني bधancaسapiaماني bधancaسapiaماني bधancaسaviaماني bधancaسaviaماني bधancaسaviaماني bधancaسaviaماني bधancaسaviaماني bधancaسaviaماني bधancaسaviaماني bधancaسaviaماني bधancaسaviaماني bधancaسaviaماني bधancaسaviaماني bधancaسaviaماني bधancaسaviaماني bधancaسaviaماني bधancaسaviaم銮 bधancaسaviaم銮 bधancaسaviaم銮 bधancaسaviaم銮 bधancaسaviaم銮 bधancaسaviaم銮 bधancaسaviaم銮 bधancaسaviaم銮 bधancaسaviaم銮 bधancaسaviaم銮 bधancaسaviaم銮 bधancaسaviaم銮 bधancaسaviaم銮 bधancaسaviam銮 bधancaسaviam銮 bधancaسaviam銮 bधancaسaviam銮 bधancaسaviam銮 bधancaسaviam銮 bधancaسaviam銮 bधancaسaviam銮 bधancaسaviam銮 bधancaسaviam銮 bधancaسaviam銮 bधancaسaviam銮 bधancaسaviam銮 bधancaسaviam銮 bधancaسaviam銮bधancaسaviam銮 bधancaسaviam銮 bधancaسaviam銮 bधancaسaviam銮 bधancaسaviam銮 bधancaسaviam銮 bधancaسaviam銮 bधancaسaviam銮 bधancaسaviam銮 bधancaسaviam銮 bधancaسaviam銮 bधancaسaviam銮 bधancaسaviam銮 bधancaسaviam銮 bधuncanexsl. الإستعمال | الإستعمال | |
| Office Leila La lal lel lal lel lal lel lal lel lal lel lal lel lal lel lal lel lal lel lal lel lal lel lal lel lal lel lal lel lal lel lal lel lal lel lal lel lal lel lal lel lal lel lal lel lal lel lal lel lal lel lal le lal lal lel lal lel lal lel lal lel lal lel lal lel lal lel lal lel lal lel lal lel lal lel lal lel lal lel lal lel lal lel lal lel lal lel lal lel lal lel lal lel lal lel lal lel lal lel lal lel lal lell Excel Word PowerPoint الإستعمال | الإستعمال | |
| . محيى بधانساني بधانساني ملاويات الحرفية بधانساني بधانساني ملاويات الحرفية بधانساني bधانساني bधانساني bधانساني bधانساني bधانساني bधانساني bधانساني bधانساني bधانساني bधانساني bधانساني bधانساني bधانساني bधانساني bधانساني bधانساني bधانساني bधانساني bधانساني bधانساني OGG WAV | الإستعمال | |
| الإستعمال الترجمة الحرفية بधانساني بधانساني bधانساني bधانساني bधانساني bधانساني bधانساني bधانساني bधانساني bधانساني bधانساني bधانساني bधانساني bधانساني bधانساني bधانساني bधانساني bधانساني bधانساني bधانساني bधانسapiaماني bधancaسapiaماني bधancaسapiaماني bधancaسapiaماني bधancaسapiaماني bधancaسapiaماني bधancaسapiaماني bधancaسapiaماني bधancaسapiaماني bधancaسapiaماني bधancaسapiamاني bधancaسapiamاني bधancaسapiamاني bधancaسapiamاني bधancaسapiamاني bधancaسapiamاني bधancaسapiamاني bधancaسapiamاني bधancaسapiamاني bधancaسapiamاني bधancaسapiamاني bधancaسapiamاني bधancaسapiamاني bधancaسapiamاني bधancaسapiamاني bta,bta,bta,bta,bta,bta,bta,bta,bta,bta,bta,bta,bta,bta,bta,bta,bta,bta,bta,bta,bta,bta,bta,bta,bta,bta,bta,bta,bta,bta,bta,bta,bta,bta,bta,bta,bta,bta,bta,bta,bta,bta,bta,bta,bta,bta,bta,bta,bta,bta,bta、bta、bta、bta、bta、bta、bta、bta、bta、bta、bta、bta、bta、bta、bta、bta、bta、bta、bta、bta、bta、bta、bta、bta、bta、bta、bta、bta、bta、bta、bta、bta、bta、bta、bTA、bta、bta、bta、bta、bta、bta、bta、bta、bta、bta、bta、bta、bta、bta、bta、bta、bta、bta、bta、bta、bta、bta、bta、bta、bta、bta、bta、bta、bta、bta、bta、bta、bta | الإستعمال | |
| الإستعمال الترجمة الحرفية بधانساني بधانساني bधانساني bधانساني bधانساني bधانساني bधانساني bधانساني bधانساني bधانساني bधانساني bधانساني bधانسapiamاني bधancaسapiamاني bधancaسapiamاني bधancaسapiamاني bधancaسapiamاني bधancaسapiamاني bधancaسapiamاني bधancaسapiamاني bधancaسapiamاني bधancaسapiamاني bधancaسapiamاني bधancaسapiamاني bधancaسapiamاني bधancaسapiamاني bधancaسaviamاني bधancaسaviamاني bधancaسaviamاني bधancaسaviamاني bधancaسaviamاني bधancaسaviamاني bधancaسaviamاني bधancaسaviamاني bधancaسaviamاني bधancaسaviamاني bधancaسaviamاني bधancaسaviamاني bधancaسaviamاني bधancaسaviamاني bधancaسaviamariat b�امزه مصحيى بधانساني بधانساني bधانساني bधانساني bधانساني bधانساني bधانساني bधانساني bधانساني bधانساني bधانساني bधانساني bधانساني bधانساني bधانساني bधانساني bधانساني bधانساني bधانساني bधانسapiaماني bधancaماني bधancaماني bधancaماني bधancaماني bधancaماني bधancamاني bधancamاني bधancamاني bधancamاني bधancamاني bधancamاني bधancamاني bधancamاني bधancamاني bधancamاني bधancamاني bधancamاني bधancamاني bधancamاني bधancamاني bधancamاني bधancamاني bधancamاني bधancamاني bधancamاني bधanca mاني bधanca mاني bधanca mاني bधanca mاني bधanca mاني bधanca mاني bधanca mاني bधanca mاني bधanca mاني bधanca mاني bधanca mاني bधanca mاني bधanca mاني bधanca mاني bधanca mاني bधanca mاني bधanca mاني bधanca mاني bधanca mاني bधanca mاني bधanca,mاني bधanca mاني bधanca mاني bधanca mاني bधanca mاني bधanca mاني bधanca mاني bधanca mاني bधanca mاني bधanca mاني bधanca mاني bधanca mاني bधanca mاني bधanca mاني bधanca mاني bधanca mاني bधanca mاني bधanca mاني bधanca mاني bधanca mاني bधanca nandex الإستعمال الTRLATING | الإستعمال | |
| الإستعمال الTRLATING | الإستعمال |
#
# aaiil aaiiie 1 1 A#iul. 2 aill 1 J/1j J 1 J 1 aaiial baiial baiial 6 1 1 #  . 1 < 1 j >| الإستعمالية الحرفية الحرفية الحرفية الحرفية الحرفية الحرفية الحرفية الحرفية الحرفية الحرفية الحرفية الحرفية الحرفية الحرفية الحرفية الحرفية الحرفية الحرفية الحرفية الحرفية الحرفية الحرفية الحرفية الحرفية الحرفية الحرفية الحرفية الحرفية الحرفية الحرفية الحرفية الحرفية الحرفية الحرفiec الإستعمالية الحرفية الحرفية الحرفية الحرفية الح註冊 الإستعمالية الح註冊 الإستعمالية الح註冊 الإستعمالية الح註冊 الإستعمالية الح註冊 الإستعمالية الح註冊 الإستعمالية الح註冊 الإستعمالية الح註冊 الإستعمالية الح註冊 الإستعمالية الح註冊 الإستعمالية الح註冊 الإستعمالية الح註冊 الإستعمالية الح註冊 الإستعمالية الح註冊 الإستعمالية الح註冊 الإستعمالية EXTERN الإستعمالية EXTERN | الإستعمال الإستعمال الإستعمال الإستعمال الإستعمال الإستعمال الإستعمال الإستعمال الإستعمال الإستعمال الإستعمال الإستعمال الإستعمال الإستعمال الإستعمال الإستعمال الإستعمال الإستعمال الإستعمال الإستعمال الإستعمال الإستعمال الإستعمال الإستعمال الإستعمال الإستعمال | ☆ |
| ☆☆ | ☆ | |
| ☆☆☆☆☆ | ☆☆☆☆☆ | |
| ☆☆☆☆☆☆ | ☆☆☆☆☆☆ | |
| ☆☆☆☆☆☆☆ | ☆☆☆☆☆☆☆ | |
| ☆☆☆☆☆☆☆☆ | ☆☆☆☆☆☆☆☆ | |
| ☆☆☆☆☆☆☆☆☆ | ☆☆☆☆☆☆☆☆☆ |
| الإستعمال الحرفية | الإستعمال الحرفية | الإستعمال الحرفية |
| AAC (AAC-LC and HE-AAC) | MJPEG | *.avi |
| PCM | Xvid | |
| ADPCM | H.264/AVC | |
| MPEG4 | ||
| AAC | MPEG4 | *.mov |
| PCM | H.264 | *.mp4 |
| ADPCM | ||
| LPCM | MPEG1 | *.mpg |
| الص輯/ صيرمات الترجمة 4 الحرفية 1 مسورعاني بعبيا : مسورعاني بعبيا : مسورعاني بعبيا : مسورعاني بعبيا : مسورعاني بعبيا : مسورعاني بعبيا : مسورعاني بعبيا : مسورعاني بعبيا : مسورعاني بعبيا : مسورعاني بعبيا : مسورعاني بعبيا: | ▲▼ | / |
| الإستعمال/ ا .......... (الإستعمال) /ال .......... | ▲ ▲ | |
| الترجمة الحرفية | ◎/OK | |
| الترجمة الحرفية /ال .......... | ← | |
| الترجمة الحرفية /ال .......... /ال .......... | ▲ ▲ | |
| الترجمة الحرفية /ال .......... /ال .......... | ↓ ▲ | |
| الترجمة الح註冊 | ◎/OK | |
| الترجمة الح註冊 /ال .......... /ال .......... | ← |
| الإستعمال الحرفية | الترجمة الحرفية | الإستعمال الحرفية |
| *.jpeg | 8000 x 6000 | JPEG |
| *.jpg | 8000 x 6000 | JPG |
| *.bmp | 8000 x 6000 | BMP |
| الإستعمال | الترجمة | الترجمة الحرفية | الإستعمال |
| Up to 19MB | PowerPoint 97 ~ 2010 | *.ppt, *.pptx, | POWERPOINT |
| Up to 75MB | PDF 1.0 ~ 1.4 | ||
| Up to 100MB | WORD 97 ~ 2010 | *.doc, *.docx, | WORD |
| Up to 15MB | Excel 97 ~ 2010 | *.xls, *.xlsx | EXCEL |
g
gai gai j 1 A. a. 1234567890 gall 1000000000000000000000000000000000000000000000000000000000 all s gina bual ▲binal .gaiygal 100s gina bual.3 J 100000000000000000000000000000000000000000000 a 20 5 # aagall 1gJgdl (iia) 6 (16a)Jgjglg 1 aillgj)."gila" 120 g aagjg jaoi all ie iie eie gai gai gai gai gai gai gai gai gai gai gai gai gai gai gai gai gai gai gai gai gai gai gai gai gai gai gai gai gai gai gai gai gai gai gai gai gai (“sulio" 21 :| الإستعمال | الإستعمال |
| *.mp3 | MP3 |
| *.wav | WAV |
| *.ogg | OGG |
1
aiee e g aaii iiaai iiaai iiaai iiaai alito caiy aai 1 C  2 ) "zaiy alall wail "wai" gao/1 bao, ao 1 S_ OBC = 12 · CO · BC = 12 × CD × 5 alall "iia" jai 1/ bai 10 22 # # gaiy i gai y "gilao" 1 aal lalal gol /0 1e Jaiol, caiall Jai.2 Jill/1jlll Jilal (A) "Jullal" 4 "ilia" aal jbaa all Jaa all jlc Jall ia" aag Jao: al "bi 1 [\left( {x - {2x}}\right) t - = \frac{1}{4}{x}^{2} + \frac{25}{4}t] jlll lll jg, gnnn nnnn nn nnnn nnnn nnnn nnnn nnnn nnnn nnnn nnnn gabll .1 aalal dalee g aellg e gaae| الإستعمال | الإستعمال | الإستعمال | الإستعمال |
| الإستعمال | الإستعمال | الإستعمال | ال,entructation |
| ملاوي مصحيى بعس وعربيف الحرفية الحرفية الحرفية الحرفية | 80 | Ims 100 | م,… |
| الإستعمال | 100 | Ims 60 | ال,… |
| ال,entructuation | 120 | Ims 40 | ال,… |
gssss
JiWi-Fi 1.  aLg (Ljia Jy j Wi-Fi aai Jia) aLl all Wi-Fi aal .2  Jgll abai g. aaiil WLAN 5kuiu .3  JauyI buaia aai 1 A. 2 3 S = 12a + b + c aill/lll lal y jy jy jy jy jy jy jy jy jy jy jy jy jy jy jy jy jy jy jy jy jy jy jy jy jy jy jy jy jy jy jy jy jy jy jy jy jy jy jy jy jy jy jy jy jy jy jy jy jy jy j  .5  http://192.168.111.1 IP jge jjg jg jg jg jg jg jg jg jg jg jg jg jg jg jg jg jg jg jg jg jg jg jg jg jg jg jg jg jg jg jg jg jg jg jg jg jg jg aiaaii iMac 7 Jai jai  EzView 8 EZ View  D. a b c d e f  a (192.168.111.1) 4 (g) (j) (j) (j) (j) (j) (j) (j) J 1
a 1 a 1 a 1 a 1 a 1 a 1 a 1 a 1 a 1 a 1 a 1 a 1 a 1 a 1 a 1 a 1 a 1 a 1 a 1 a 1 a 1 a 1 a 1 a 1 a 1 a 1 a 1 a 1 a 1 a 1 a 1 a 1 a 1 a 1 aJ 1
Wif  WIFI-Projector-XX Jd jn 3.3   EZ View 4  J 6 EZ View | الإستعمال | ||
| الإستعمال الحرفية :1~4 الإستعمال الحرفية :1~4 الإستعمال الحرفية :1~4 الإستعمال الح註冊 :L,R الإستعمال الحرفية :L,R الإستعمال الح註冊 :L,R الإستعمال الح註冊 :L,R الإستعمال الح註冊 :L,R الإستعمال الح註冊 :L,R الإستعمال الح註冊 :L,R الإستعمال الح註冊 :L,R الإستعمال الح註冊 :L,R الإستعمال الح註冊 :L,R الإستعمال الح註冊 :L,R الإستعمال الح註冊 :L,R الإستعمال الح註冊 :L,R الإستعمال الح註冊 : | الإستعمال .A | |
| الإستعمال الح註冊 :L,R الإستعمال الح註冊 :L,R الإستعمال الح註冊 :L,R الإستnzture :d/الإستnzture /d/الإستnzture /d/الإستnzture /d/الإستnzture /d/ال,en الإستnzture :d/ال,en الإستnzture :d/ال,en ال,en | ال,en | . B |
| ال,en | . C | |
| ال,en | . D | |
| ال,en | . E | |
| ال,en | . F | |
| ال,en | . G | |
| ال,en | . H | |
Android 3 Apple
Apple Android EZ View
Ee View(Android j) Google PlayTM EZ View
22) Google PlayTM Google PlayTM 1 (Google Inc. Google PlayTM  EZ View # (C)| سفید | EZ-View |
| عenuine الحرفية الحرفية الحرفية الحرفية الحرفية الحرفية الحرفية الحرفية الحرفية الحرفية الحرفية الحرفية الحرفية الحرفية الحرفية الحرفية الحرفية الحرفية الحرفية الحرفية الحرفية الحرفية الحرفية الحرفية الحرفية الحرفية الحرفية الحرفية الحرفية الحرفية الحرفية الحرفية الحرفية الحرفية EXO | PHOTO |
| عenuine الحرفية الحرفية الحرفية الحرفية الحرفية EXO | DOCUMENT |
| عenuine الحرفية الحرفية الحرفية EXO. مصحيى بعبيع الحرفية EXO. مصحيى بعبيع EXO. مصحيى بعبيع EXO. مصحيى بعبيع EXO. مصحيى بعبيع EXO. مصحيى بعبيع EXO. مصحيى بعبيع EXO. مصحيى بعبيع EXO. مصحيى بعبيع EXO. مصحيى بعبيع EXO. مصحيى بعبيعEXO. مصحيى بعبيع EXO. مصحيى بعبيع EXO. مصحيى بعبيع EXO. مصحيى بعبيع EXO. مصحيى بعبيع EXO. مصحيى بعبيع EXO. مصحيى بعبيع EXO. مصحيى بعبيع EXO. مصحيى بعبيع EX0 | INTERNET |
| عenuine الحرفية الحرفية الحرفية EXO. مصحيى بعبيع EXO. مصحيى بعبيع EXO. مصحيى بعبيع EXO. مصحيى بعبيع EXO. مصحيى بعبيع EXO. مصحيى بعبيع EXO. مصحيى بعبيع EXO. مصحيى بعبيع EXO. مصحيى بtragبilibان EXO. مصحيى بعبيع EXO. مصحيى بعبيع EXO. مصحيى بعبيع EXO. مصحيى بعبيع EXO. مصحيى بعبيع EXO. مصحيى بعبيع EXO. مصحيى بعبيع EXO. مصحيى بعبيع EXO. مصحيى بعبيع ExO. مصحيى بعبيع EXO. مصحيى بعبيع EXO. مصحيى بعبيع EXO. مصحيى بعبيع EXO. مصحيى بعبيع EXO. مصحيى بعبيع EXO. مصحيى بعبيع EXO. مصحيى بعبيع EXO. مصحيى بعبيع EX O. مصحيى بعبيع EXO. مصحيى بعبيع EXO. مصحيى بعبيع EXO. مصحيى بعبيع EXO. مصحيى بعبيع EXO. مصحيى بعبيع EXO. مصحيى بعبيع EXO. مصحيى بعبيع EXO. مصحيى بعبيع EXO | DROPBOX |
| iPhone XR 2019.10.10 WiFi 802.11c Android | CAMERA |
| الله الحرفية الحرفية الحرفية EXO. مصحيى بعبيع EXO. مصحيى بعبيع EXO. مصحيى بعبيع EXO. مصحيى بعبيع EXO. مصحيى بعبيع EXO. مصحيى بعبيع EXO. مصحيى بعبيع EXO. مصحيى بعبيع EXO | VIDEO |
| الله الحرفية الحرفية الح註冊 EXO. مصحيى بعبيع EXO. مصحيى بعبيع EXO. مصحيى بعبيع EXO. مصحيى بعبيع EXO. مصحيى بعبيع EXO. مصحيى بعبيع EXO. مصحيى بعبيع EXO. مصحيى بعبيع EXO. مصحيى بعبيع-exo. مصحيى بعبيع EXO. مصحيى بعبيع EXO. مصحيى بعبيع EXO. مصحيى بعبيع EXO. مصحيى بعبيع EXO. مصحيى بعبيع EXO. مصحيى بعبيع EXO. مصحيى بعبيع EXO. مصحيى بعبيع EXO, EXO, EXO, EXO, EXO, EXO, EXO, EXO, EXO, EXO, EXO, EXO, EXO, EXO, EXO, EXO, EXO, EXO, EXO, EXO, EXO, EXO, EXO, EXO, EXO, EXO, EXO, EXO, EXO, EXO, EXO, EXO, EXO, EXO,EXO, EXO, EXO, EXO, EXO, EXO, EXO, EXO, EXO, EXO, EXO, EXO, EXO, EXO, EXO, EXO, EXO, EXO, EXO, EXO, EXO, EXO, EXO, EXO, EXO, EXO, EXO, EXO, EXO, EXO, EXO, EXO, EXO, EX0, EX0, EX0, EX0, EX0, EX0, EX0, EX0, EX0, EX0, EX0, EX0, EX0, EX0, EX0, EX0, EX0, EX0, EX0, EX0, EX0, EX0, EX0, EX0, EX0, EX0, EX0, EX0, EX0, EX0, EX0, EX0, EX0, EX0, EX0, EX0, EX0, EX0, EX0, EX0, EX0, EX0, EX0, EX0, EX0, EX0, EX0, EX0, EX0, EX0, EX0, EX0, EX0, EX0, EX0, EX0, EX0, EX0, EX0, EX0, EX0, EX0, EX0, EX0, EX0, EX0, EX0, EXO, EX0, EX0, EX0, EX0, EX0, EX0, EX0, EX0, EX0, EX0, EX0, EX0, EX0, EX0, EX0, EX0, EX0, EX0, EX0, EX0, EX0, EX0, EX0, EX0, EX0, EX0, EX0, EX0, EX0, EX0, EX0, EX0, EX0, EXO, EX0, EX0, EX0, EX0, EX0, EX0, EX0, EX0, EX0, EX0, EX0, EX0, EX0, EX0, EX0, EX0, EX0, EX0, EX0, EX0, EX0, EX0, EX0, EX0, EX0, EX0, EX0, EX0, EX0, EX0, EX0, EX0, EXO, EX0, EX0, EX0, EX0, EX0, EX0, EX0, EX0, EX0, EX0, EX0, EX0, EX0, EX0, EX0, EX0, EX0, EX0, EX0, EX0, EX0, EX0, EX0, EX0, EX0, EX0, EX0, EX0, EX0, EX0, EX0, EX0, EX0, EX0, EX0, EX0, EX0, EX0, EX0, EX0, EX0, EX0, EX0, EX0, EX0, EX0, EX0, EX0, EX0, EX0, EX0, EX0, EX0, EX0, EX0, EX0, EX0, EX0, EX0, EX0, EX0, EX0, EX0, EX0, EX0, EXO, EX0, EX0, EX0, EX0, EX0, EX0, EX0, EX0, EX0, EX0, EX0, EX0, EX0, EX0, EX0, EX0, EX0, EX0, EX0, EX0, EX0, EX0, EX0, EX0, EX0, EX0, EX0, EX0, EX0, EX0, EX0, EX0, EX0 , EX0, EX0, EX0, EX0, EX0, EX0, EX0, EX0, EX0, EX0, EX0, EX0, EX0, EX0, EX0, EX0, EX0, EX0, EX0, EX0, EX0, EX0, EX0, EX0, EX0, EX0, EX0, EX0, EX0, EX0, EX0, EX0, EX0、 EX0、 EX0、 EX0、 EX0、 EX0、 EX0、 EX0、 EX0、 EX0、 EX0、 EX0、 EX0、 EX0、 EX0、 EX0、 EX0、 EX0、 EX0、 EX0、 EX0、 EX0、 EX0、 EX0、 EX0、 EX0、 |
EZ View qubj n gall bubii
Jg Clllaxall jy ydall Laiill g yll/lll /jll all g i Jbiil 111 jll jk. jk. jk. jk. jk. jk. jk. jk. jk. jk. jk. jk. jk. jk. jk. jk. jk. jk. jk. jk. jk. jk. jk. jk. jk. jk. jk. jk. jk. jk. jk. jk. jk. jk. i 1
i 1 aaii aiaiie 1e i jai, 'Wi-Fi' 1 ()"CJyI 2   " 801 3  J 4 "8 111111111111  EZ View 5  aillll l jy jy jy jy jy jy jy jy jy jy jy jy jy jy jy jy jy jy jy jy jy jy jy jy jy jy jy jy jy jy jy jy jy jy jy jy jy jy jy jy jy jy jy jy jy jy jy jy jy jy j Jolg jn aeg gag gag gag gag gag gag gag gag gag gag gag gag gag gag gag gag gag gag gag gag gag gag gag gag gag gag gag gag gag gag gag gag gag gag gag gag gag gag gag gag gag gag gag gag gag gag gag gag gag gag g Jgssllabbsjbnjyaaell (CPU) jskal aall J 1 2.4 2 L WLAN Jgagabaiydiagai gai yall aai baial Jai all ay jui li ae jw daaie Lalic ai Jgsslll (j) Jgssll lbbnnn nn nnnnnnnnnnnnnnnnnnnnnnnnnnnnnnnnnnnnnnnnnnnnnnnnnnnnnnnnnnnnnnnnnnnnnnnnnnnnnnnnnnnnnnnnnnnnnnnnnnnnnnnnnnnnnnnnnnn sLxuJyjUaJgUaJuaJuaJuagla glaag Jbc 1 a
aiaai aiaai jay jaiy jaiy jaiy jaiy jaiy jaiy jaiy jaiy jaiy jaiy jaiy jaiy jaiy jaiy jaiy jaiy jaiy jaiy jaiy jaiy jaiy jaiy jaiy jaiy jaiy jaiy jaiy jaiy jaiy jaiy jaiy| الإستعمال | الإستعمال |
| .HDMI نص胱ملاوي بعسعة وسيلة الحرفية للاحيى محيى بعسعة الحرفية الحرفية الحرفية الحرفية الحرفية الحرفية الحرفية الحرفية الحرفية الحرفية الحرفية الحرفية الحرفية الحرفية الحرفية الحرفية الحرفية الحرفية الحرفية الحرفية الحرفية الحرفية الحرفية الحرفية الحرفية الحرفية الحرفية الحرفية الحرفية الحرفية الحرفية الحرفية الحرفية الحرفية EXHIBIT 1 | الإستعمالالإستعمالالإستعمالالإستعمالالإستعمالالإستعمالالإستعمال |
| .Şahد پوره پوره پوره پوره پوره پوره پوره پوره پوره پوره پوره پوره پوره پوره پوره پوره پوره پوره پوره پوره پوره پوره پوره پوره پوره پوره پوره پوره پوره پوره پوره پوره پوره پوره pbالعاءر پوره پوره پوره پوره پوره پوره پوره پوره پوره pbالعاءر پوره پوره پوره pbالعاءر pbالعاءر pbالعاءر pbالعاءر pbالعاءر pbالعاءر pbالعاءر pbالعاءر pbالعاءر pbالعاءر pbالعاءر pbالعاءر pbالعاءر pbالعاءر pbالعاءر pbالعاءر pbالعاءر pbالعاءر pbالعاءر pbالعاءر pbالعاء鈴 .الإستعمالالإستعمالال ☆ � � � � � � � � � � � � � � � � � � � � � � � � � � � � � � � � � � � � � � � � � � � � � � � � � � � � � � � � � � � � � � � � � � � � � � � � � � � � � � � � � � � � � � � � � � � � � � � � � � � � . � � � � � � � � � � � � � � � � � � � � � � � � � � � � � � � � � � � � � � � � � � � � � � � � � � � � � � � � � � � � � � � � � � � � � � � � � � � � � � � � � � � � � � � � � � � � � � � � � � � | |
| .WiFi رسمحالترجمة الحرفية الحرفية الحرفية الحرفية الحرفية الحرفية الحرفية الحرفية الحرفية الحرفية الحرفية الحرفية الحرفية الحرفية الحرفية الحرفية EXHIBIT 1 | EZ View � � � � � � � � � � � � � � � � � � � � � � � � � � � � � � � � � � � � � � � � � � � � � � � � � � � � � � � � � � � � � � � � � � � � � � � � � � � � � � � � � � � � � � � � � � � � � � � � � � � --- � � � � � � � � � � � � � � � � � � � � � � � � � � � � � � � � � � � � � � � � � � � � � � � � � � � � � � � � � � � � � � � � � � � � � � � � � � � � � � � � � � � � � � � � � � � � � � � � � � � {\tt L} |
| .الإستعمالالإستعمالال ☆ � � � � � � � � � � � � � � � � � � � � � � � � � � � � � � � � � � � � � � � � � � � � � � � � � � � � � � � � � � � � � � � � � � � � � � � � � � � � � � � � � � � � � � � � � � --- � � � � � � � � --- � � � � � � � � � � � � � � � � � � � � � � � � � � � � � � � � � � � � � � � � � � � � � � � � � � � � � � � � � � � � � � � � � � � � � � � � � � � � � � � � � � � � � � � � � � . EZ View � � � � � � � � � � � � � � � � � � � � � � � � � � � � � � � � � � � � � � � � � � � � � � � � � � � � � � � � � � � � � � � � � � � � � � � � � � � � � � � � � � � � � � � � � � � � � � � � � � EZ View � � � � � � � � � � � � � � � � � � � � � � � � � � � � � � � � � � � � � � � � � � � � � � � � � � � � � � � � � � � � � � � � � � � � � � � � � � � � � � � � � � � � � � � � � � � � � � � � � E Z View � � � � � � � � � � � � � � � � � � � � � � � � � � � � � � � � � � � � � � � � � � � � � � � � � � � � � � � � � � � � � � � � � � � � � E Z View � � � � � � � � � � � � � � � � � � � � � � � � � � E Z View � � � � � � � � � � � � � � � � � � � � � � � � � � � E Z View � � � � � � � � � � � � � � � � � E Z View � � � � � � � � � � � � E Z View � � � � � � � � E Z View � � � � � E Z View � E Z View � E Z View � E Z View � E Z View � E Z View � E Z View � E Z View � E Z View � E Z View � E Z View � E Z View � E Z View � E Z View � E Z View � E Z View � E Z View � E Z View � E Z View � E Z View � E Z E Z E Z E Z E Z E Z E Z E Z E Z E Z E Z E Z E Z E Z E Z E Z E Z E Z E Z E Z E Z E Z E Z E Z E Z E Z E Z E Z E Z E Z E Z E Z E Z E Z E Z E Z E Z E Z E Z E Z E Z E Z E Z E Z E Z E Z E Z E Z E Z E Z E Z E Z E Z E Z E Z E Z E Z E Z E Z E Z E Z E Z E Z E Z E Z E Z E Z F F F F F F F F F F F F F F F F F F F F F F F F F F F F F F F F F F F F F F F F F F F F F F F F F F F F F F F F F F F F F F F F F F F F F F F F F F F F F F F F F F F F F F F F F F F F F F F F F F F F E E E E E E E E E E E E E E E E E E E E E E E E E E E E E E E E E E E E E E E E E E E E E E E E E E F F F F F F F F F F F F F F F F F F F F F F F F F F F F F F F F F F F F F F F F F F F F F F F F F E F F F F F F F F F F F F F F F F F F F F F F F F F F F F F F F F F F F F F F F F F F F F F F F F F P P P P P P P P P P P P P P P P P P P P P P P P P P P P P P P P P P P P P P P P P P P P P P P P P P F F F F F F F F F F F F F F F F F F F F F F F F F F F F F F F F F F F F F F F F F F F F F F F F F P F F F F F F F F F F F F F F F F F F F F F F F F F F F F F F F F F F F F F F F F F F F F F F F F F R R R R R R R R R R R R R R R R R R R R R R R R R R R R R R R R R R R R R R R R R R R R R R R R R R F F F F F F F F F F F F F F F F F F F F F F F F F F F F F F F F F F F F F F F F F F F F F F F F F R R R R R R R R R R R R R R R R R R R R R R R R R R R R R R R R R R R R R R R R R R R R R R R R R R R |
| 咨询服务 | 咨询服务 |
| DLP | الإستعمالrivièreية |
| مإستعمال | عربية RGB |
| 16:9 | سيلة الحصيلة الحرفية |
| 854 x 480 | ب�试imonials(WVGA) |
| 1000:1 | سيلة الحرفية |
| 36 cm ~ 300 cm (14" ~ 120") | جiguaة الحصILA معربيعة |
| 50 cm ~ 425 cm (20" ~ 167") | سيلة الحرفية |
| (m—as)—ال————/عَزَس—"ال————) 1.6 | سيلة الحرفية |
| 100 100 | سيلة الحرفية |
| ب�试imonials | الإستعمال |
| 100% | جiguaة |
| *.jpeg, *.jpg, *.bmp;mpg.* ,4mp.* ,mov.* ,avi.* :禁用*.mp3,*.wav,*.oggexxlsx.* ,xls.* ,docx.* ,doc.* ,pdf.* ,pptx.* ,ppt.* :禁用* | سيلة الحرفية |
| IEEE 11n (1T1R):الترجمة الحرفية802.11b/g/n :الترجمة الحرفية | WiFi |
| (جiguaة الحرفية1.2) | الترجمة الحرفية2 |
| الإستعمال | الإستعمال |
| (عَزَس—ال————/عَزَس—SDXC) SD/SDHC/SDXC | الإستعمال |
| الترجمة الحرفية100 ~ 240 :الترجمة الحرفية12 :الترجمة | |
| 7.4 V/2000 mAh م,enساني بPTRAILIA BELEMMEN BOLD | الإستعمال |
| 80 :الترجمة الحرفية100 :الTRLAILIA BELEMMEN | الإستعمال |
| 120 :الTRLAILIA BELEMMEN | الإستعمال |
| 12 :AC :الTRLAILIA BELEMMEN | الإستعمال |
| 12 ~ 12 : AC :الTRLAILIA BELEMMEN | الإستعمال |
| 132 x 95 x 25 mm | (الإستعمال)الإستعمال |
| 285 g | الإستعمال |
| %.80 %80 - 20 | الإستعمال |
| 5°C - 35°C. | سيلة الحرفية |