
RBD2653A - Fridge ROSIERES - Free user manual and instructions
Find the device manual for free RBD2653A ROSIERES in PDF.
| Product type | Built-in refrigerator |
| Brand | Rosieres |
| Model | RBD2653A |
| Height (mm) | 1770 |
| Width (mm) | 540 |
| Depth (mm) | 550 |
| Weight (kg) | 55 |
| Power supply | 220-240 V, 50 Hz |
| Power (W) | 100 |
| Climate class | N-ST |
| Refrigerator capacity (L) | 180 |
| Freezer capacity (L) | 60 |
| Refrigerator defrost | Automatic |
| Freezer defrost | Manual (defrost at 3 mm frost) |
| Control type | Rotary thermostat |
| Door reversal | Possible (reversible hinges) |
| Included accessories | Door gasket, mounting screws, ventilation grill |
| Maintenance | Clean regularly, defrost freezer if necessary |
| Rating plate | Inside the refrigerator (top side) |
Frequently Asked Questions - RBD2653A ROSIERES
User questions about RBD2653A ROSIERES
0 question about this device. Answer the ones you know or ask your own.
Ask a new question about this device
Download the instructions for your Fridge in PDF format for free! Find your manual RBD2653A - ROSIERES and take your electronic device back in hand. On this page are published all the documents necessary for the use of your device. RBD2653A by ROSIERES.
USER MANUAL RBD2653A ROSIERES
natural_image
Simple line drawing of a two-tiered cabinet or shelf unit (no text or symbols)DOPPIA PORTA INCASSO
QUADRO COMANDI

natural_image
Line drawing of a fish inside a container with wavy walls and a diagonal line extending from the side (no text or symbols)natural_image
Line drawing of a refrigerator cabinet with shelves and doors open (no text or symbols)natural_image
Diagram of a refrigerator with two doors and an open door, showing internal compartments and directional arrows (no text or labels)natural_image
Line drawing of a refrigerator with two doors and an arrow indicating front portion (no text or symbols)natural_image
Cross-sectional diagram of a pipe or duct with contour lines and an arrow indicating direction (no text or labels)natural_image
Diagram showing a screw inserted into a wooden plank with a spiral pattern on the surface (no text or symbols)natural_image
Line drawing of a 3D rectangular box with a textured wall and corner detail (no text or symbols)natural_image
Pure technical line drawing of a rectangular frame with mounting holes and a central rectangular block (no text or symbols)ACCOPPIAMENTO DELLE ANTE DELLA COLONNA INCASSO ALLE PORTE DELL APPARECCHIO
natural_image
Technical line drawing of a mechanical component with a highlighted section and an arrow indicating direction (no text or symbols)natural_image
Technical line drawing of a mechanical component with a rod inserted into a housing (no text or symbols)natural_image
Technical line drawing of a mechanical bracket with screws inserted, showing alignment and fastening (no text or symbols)natural_image
Technical line drawing of a simple rectangular cabinet with a 50 mm height dimension label (no text or symbols beyond the measurement)BUILT-IN DOUBLE DOOR
CONTROL
PANEL
natural_image
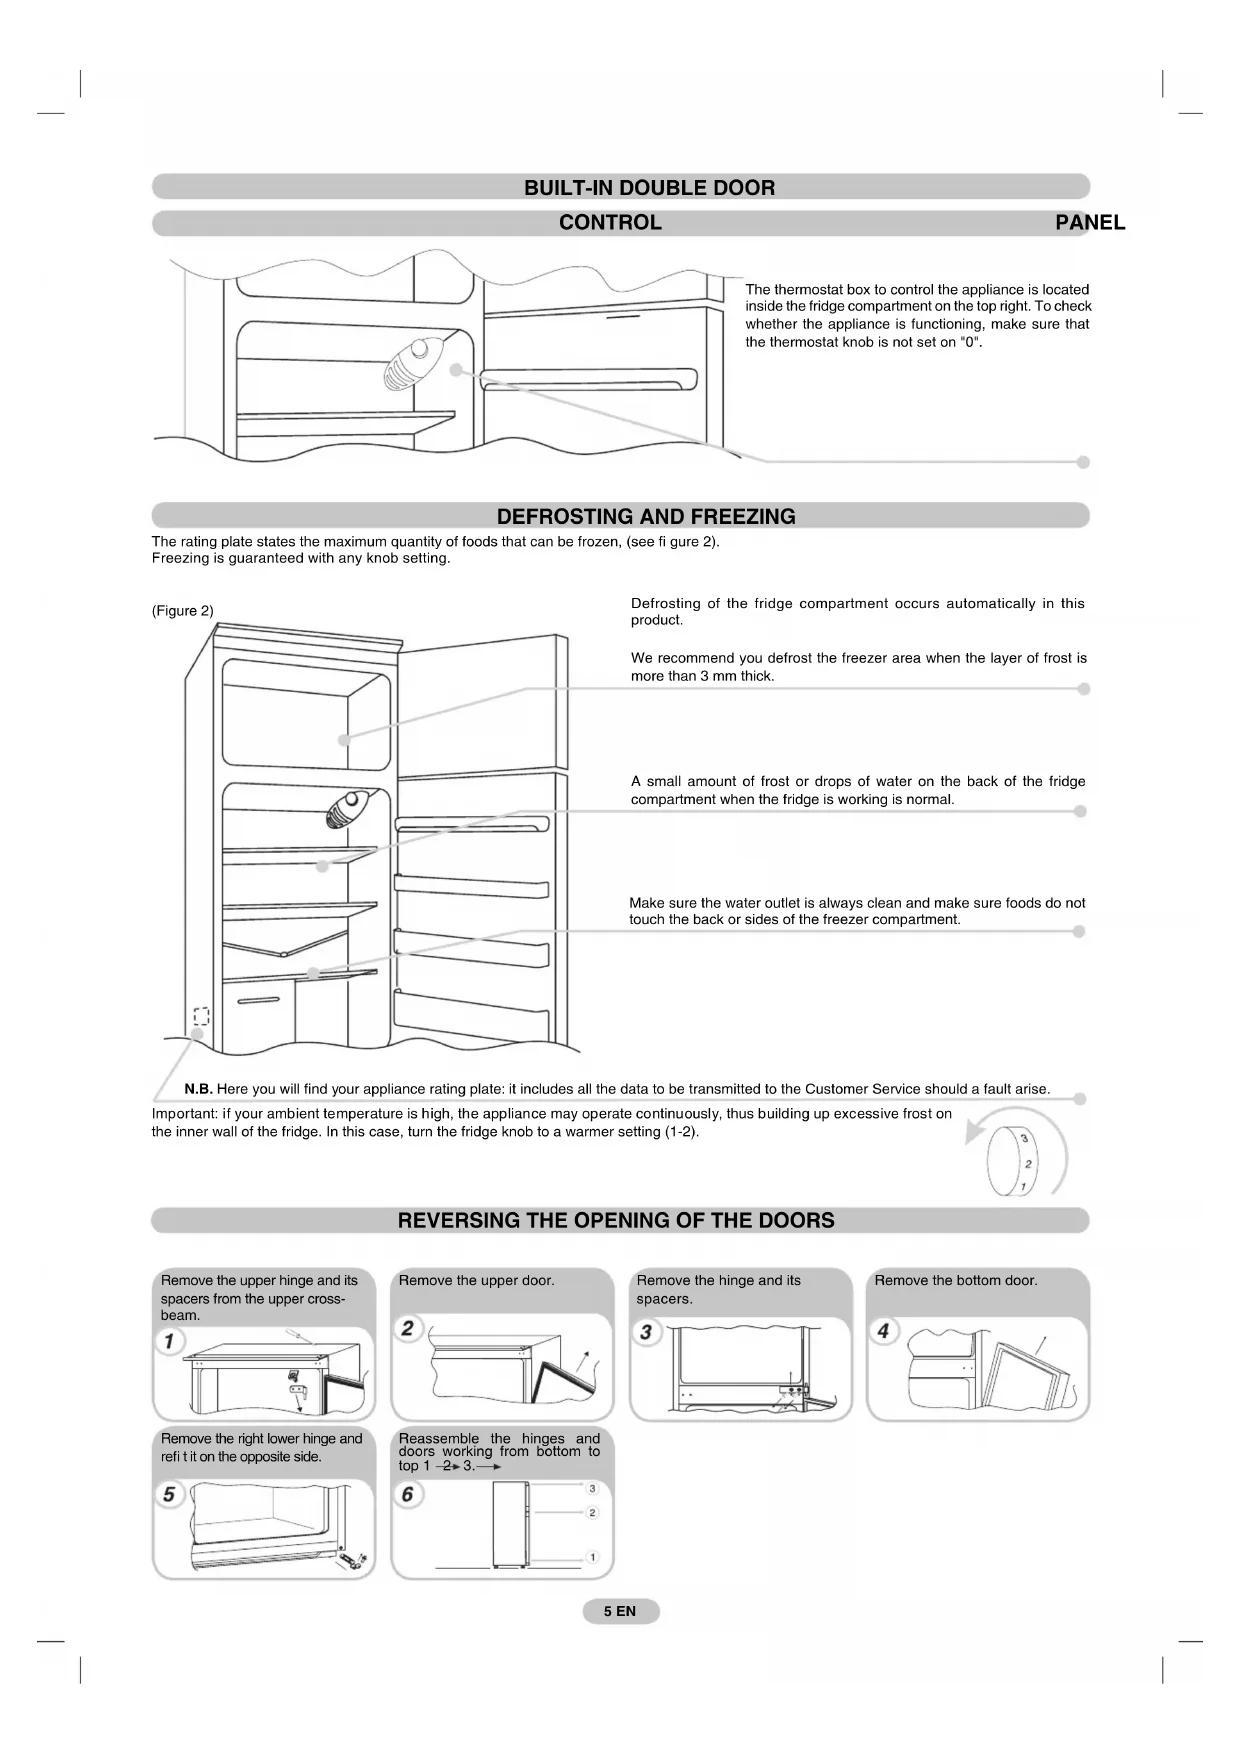
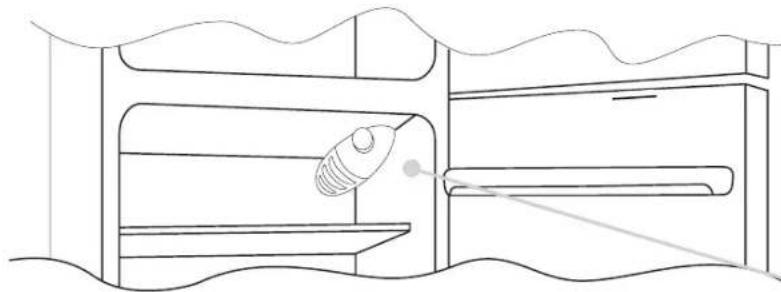
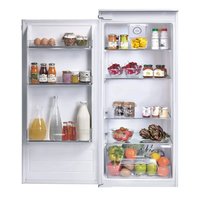
Line drawing of a fish inside a container with wavy roof and horizontal shelves (no text or symbols)The thermostat box to control the appliance is located inside the fridge compartment on the top right. To check whether the appliance is functioning, make sure that the thermostat knob is not set on "0".
DEFROSTING AND FREEZING
The rating plate states the maximum quantity of foods that can be frozen, (see figure 2). Freezing is guaranteed with any knob setting.
(Figure 2)

natural_image
Line drawing of a refrigerator with shelves open and one door opening, showing internal compartments (no text or symbols)Defrosting of the fridge compartment occurs automatically in this product.
We recommend you defrost the freezer area when the layer of frost is more than 3 mm thick.
A small amount of frost or drops of water on the back of the fridge compartment when the fridge is working is normal.
Make sure the water outlet is always clean and make sure foods do not touch the back or sides of the freezer compartment.
N.B. Here you will find your appliance rating plate: it includes all the data to be transmitted to the Customer Service should a fault arise.
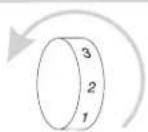
Important: if your ambient temperature is high, the appliance may operate continuously, thus building up excessive frost on the inner wall of the fridge. In this case, turn the fridge knob to a warmer setting (1-2).
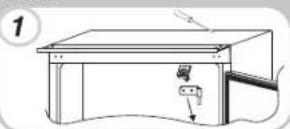
REVERSING THE OPENING OF THE DOORS
Remove the upper hinge and its spacers from the upper cross-beam.
Remove the upper door.

natural_image
Diagram of a mechanical or architectural component with a stepped profile and an arrow indicating direction (no text or symbols)Remove the hinge and its spacers.
natural_image
Simple line drawing of a water tank with a handle and outlet (no text or symbols)Remove the bottom door.
Remove the right lower hinge and refi t it on the opposite side.

natural_image
Line drawing of a rectangular enclosure with a small mechanical component nearby (no text or symbols)Reassemble the hinges and doors working from bottom to top 1-2→3.→
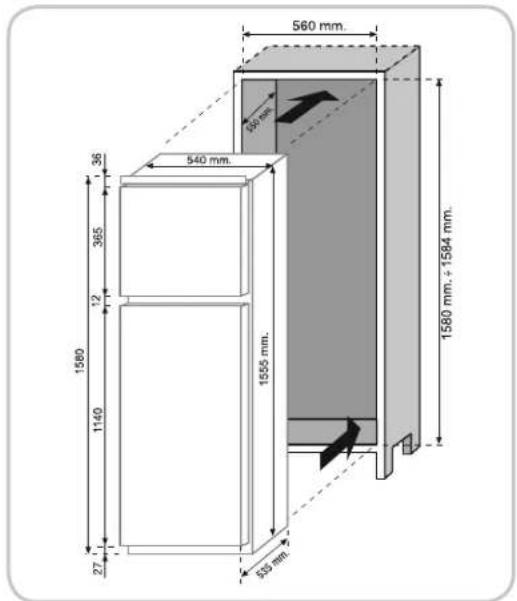
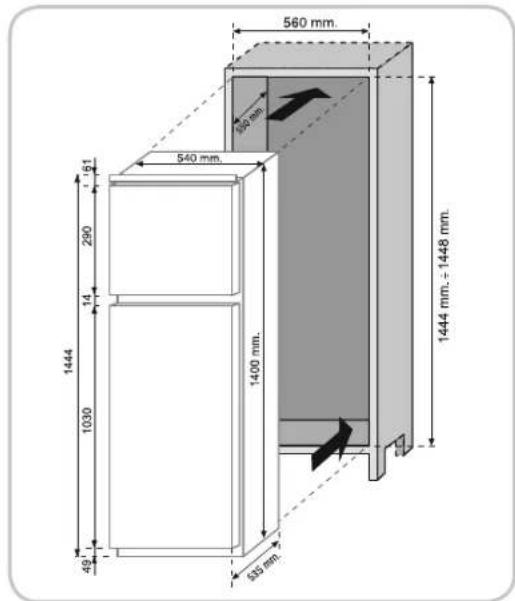
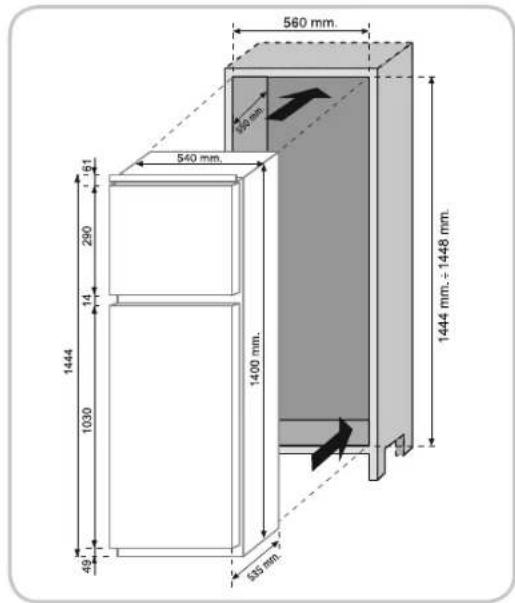
PRODUCT DIMENSIONS AND BUILT-IN COMPARTMENT
INSTALLATION OF THE APPLIANCE IN THE COLUMN
Secure the seal (supplied) to the appliance, on the opposite side from the hinges.
1
natural_image
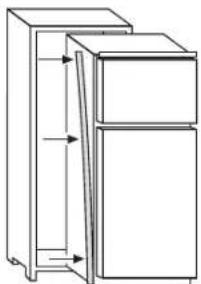
Line drawing of a refrigerator with two doors and an open door, showing internal structure (no text or symbols)Insert the appliance in the column, placing it on the opposite side of the hinges.
2
natural_image
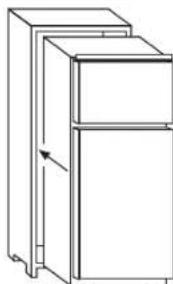
Line drawing of a refrigerator with two doors and an arrow indicating front portion (no text or symbols)Make sure the top connecting plate of the cabinet fi ts perfectly.
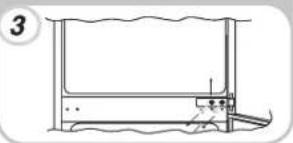
3
natural_image
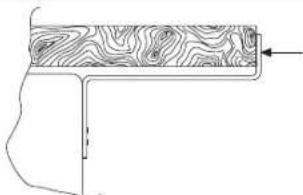
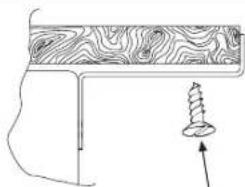
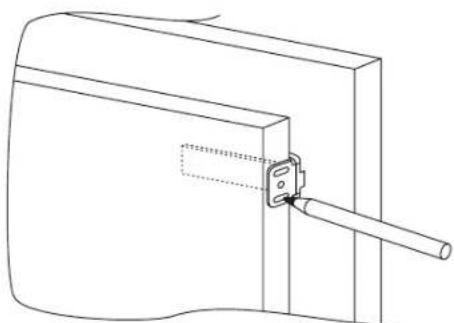
Diagram of a pipe section with contour lines and an arrow indicating direction (no text or labels)Secure the appliance upper part to the cabinet, using the supplied screws.
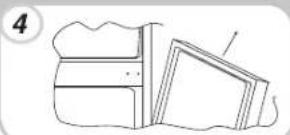
4
natural_image
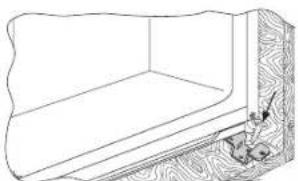
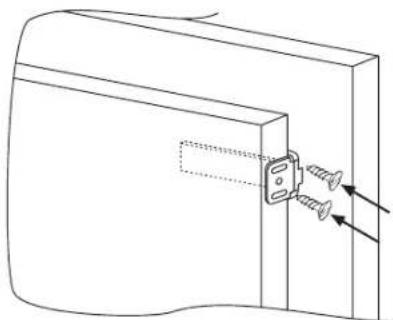
Diagram showing a screw being inserted into a wooden plank, with no text or symbols present.Secure the appliance lower part using the supplied screws.
5
natural_image
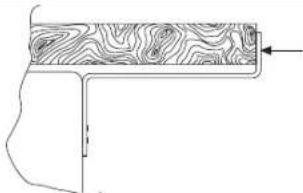
Line drawing of a 3D rectangular box with decorative wood patterns on one side (no text or symbols)Click the ventilation grill.
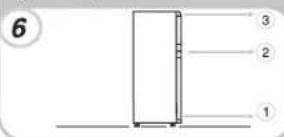
6

natural_image
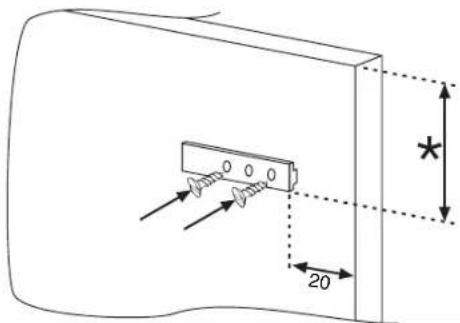
Pure technical line drawing of a rectangular frame with mounting holes and a central rectangular block (no text or symbols)COUPLING OF THE PANELS OF THE BUILT-IN COLUMN OF THE APPLIANCE DOORS
The appliance is equipped with coupling devices for the appliance doors with the column panels (loader slide).
Secure the slide in the inner part of the panel of the built-in column at the desired height and at approx. 20 mm. From the outer wire of the door.
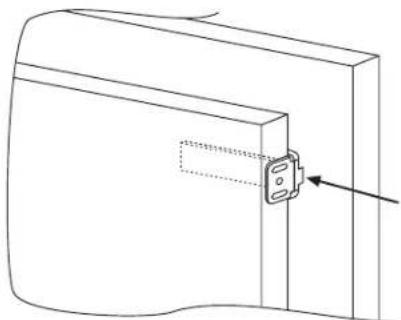
Open the doors of the built-in column and the fridge. Position the built-in loader in the slide, then fit it into the fridge door.
natural_image
Technical line drawing of a mechanical component with a highlighted connector (no text or symbols)Mark the fixing points for the screws and drill with a bit of a diameter of 2.5.
natural_image
Technical line drawing of a mechanical assembly with a rod inserted into a housing (no text or symbols)Connect the appliance door to the cabinet panel keeping the loader slots as guidelines.
natural_image
Technical line drawing of a mechanical bracket with screws and a fastener inserted (no text or symbols)PRECAUTIONS FOR THE CORRECT OPERATION
Once the product has been embedded, place the rear part of the column in contact with the wall so as to prevent access to the compressor compartment.
For the product to operate correctly it is essential to allow adequate air circulation so as to cool down the condenser located in the rear part of the appliance.
For this reason, the column must be equipped with a rear chimney, whose upper opening must not be blocked and with a front slot which will be covered with a ventilation grill.
Dimensions of the column lock-pickings.

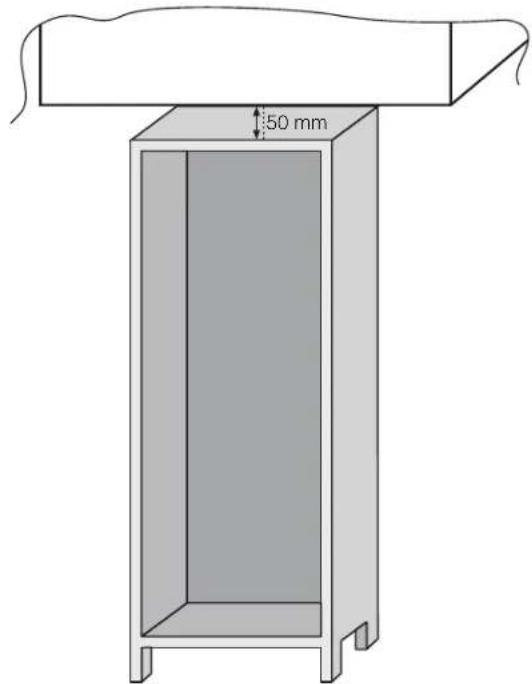
Dimensions of the gap to be left between the column and the ceiling.
DOUBLE PORTE ENCASTRABLE
PANNEAU DE COMMANDE

natural_image
Line drawing of a fish inside a container with wavy lines indicating depth (no text or symbols)natural_image
Line drawing of a refrigerator cabinet with shelves and doors open (no text or symbols)natural_image
Simple line drawing of a mechanical component or bracket with an arrow indicating direction (no text or symbols)natural_image
Simple line drawing of a water tank with a handle and outlet (no text or symbols)natural_image
Illustration of two stacked documents or folders with a numbered label (4) and an arrow pointing to one (no text or symbols on the objects themselves)DIMENSIONS DU PRODUIT ET COMPARTIMENT D'ENCASTREMENT


INSTALLATION DE L'APPAREIL DANS UNE COLONNE
natural_image
Line drawing of a refrigerator with two doors and a shelf, showing front and side views (no text or symbols)natural_image
Line drawing of a refrigerator with two doors and an arrow indicating front portion (no text or symbols)natural_image
Diagram of a pipe or channel with internal contour lines and a directional arrow (no text or labels)natural_image
Diagram showing a screw being inserted into a wooden plank, with no text or symbols present.natural_image
Line drawing of a 3D rectangular box with decorative wood patterns on one side (no text or symbols)natural_image
Pure technical line drawing of a mechanical component with no text, numbers, or symbolsACCOUPLEMENT DES PANNEAUX DE LA COLONNE INTEGREE AUX PORTES DE L'APPAREIL
natural_image
Technical line drawing of a mechanical component with a highlighted connector (no text or symbols)natural_image
Technical line drawing of a mechanical component with a rod inserted into a housing (no text or symbols)natural_image
Technical line drawing of a mechanical bracket with screws inserted (no text or symbols)PRECAUTIONS POUR UN FONCTIONNEMENT CORRECT
natural_image
Line drawing of a fish inside a container with wavy lines indicating depth (no text or symbols)natural_image
Line drawing of a refrigerator cabinet with shelves and doors, no text or symbols presentnatural_image
Diagram of a refrigerator with two doors and a side door, showing internal structure (no text or symbols)natural_image
Line drawing of a refrigerator with two doors and an arrow indicating front portion (no text or symbols)natural_image
Diagram of a pipe or channel with contour lines and directional arrow, no text or symbols presentnatural_image
Diagram showing a wooden plank with a screw and a spiral line, no text or symbols presentnatural_image
Line drawing of a room interior with woodwork and a small animal, no text or symbols presentnatural_image
Pure technical line drawing of a rectangular frame with mounting holes and a central recessed area (no text or symbols)KOPPLUNG DER SCHRANKTÜRENMIT DEN GERÄTETÜREN
natural_image
Technical diagram showing a mechanical component with dimension lines and arrows, no readable text or symbols present.natural_image
Technical line drawing of a mechanical component with a highlighted section and an arrow indicating direction (no text or symbols)natural_image
Technical line drawing of a mechanical component with a rod inserted into a housing (no text or symbols)natural_image
Technical line drawing of a mechanical component with screws and a bracket (no text or symbols)natural_image
Technical line drawing of a simple cabinet or support structure with a 50 mm height dimension label (no text or symbols beyond the measurement)DOBLE PUERTA INTEGRADA
CAJA DE MANDOS

natural_image
Line drawing of a fish inside a container with wavy walls and a small boat on the side (no text or symbols)natural_image
Line drawing of a refrigerator cabinet with shelves and doors open (no text or symbols)natural_image
Simple line drawing of a mechanical component or assembly (no text or symbols)natural_image
Simple line drawing of a container with a handle and a small object inside, no text or symbols present.natural_image
Diagram of a refrigerator with two doors and an open door, showing internal structure (no text or symbols)natural_image
Line drawing of a refrigerator with two doors and an arrow indicating front portion (no text or symbols)natural_image
Diagram of a pipe section with contour lines and a directional arrow, no text or symbols presentnatural_image
Diagram showing a screw inserted into a wooden strip with a spiral pattern, no text or symbols presentnatural_image
Line drawing of a 3D rectangular box with textured surface and corner detail (no text or symbols)natural_image
Pure technical line drawing of a rectangular frame with mounting holes and a central rectangular block (no text or symbols)natural_image
Technical diagram showing a mechanical assembly with arrows indicating force or movement, no text or symbols presentnatural_image
Technical line drawing of a mechanical component with a highlighted connector (no text or symbols)natural_image
Technical line drawing of a mechanical component with a rod inserted into a housing (no text or symbols)natural_image
Technical line drawing of a mechanical component with screws and a bracket (no text or symbols)natural_image
Line drawing of a fish inside a container with wavy walls and a small boat on the side (no text or symbols)natural_image
Line drawing of a refrigerator with shelves and doors open (no text or symbols)natural_image
Diagram of a mechanical or architectural component with a bracket and angled edge (no text or symbols)natural_image
Simple line drawing of a water tank with a handle and outlet (no text or symbols)Retire a porta inferior.

natural_image
Diagram of a refrigerator with two doors and an open door, showing internal structure and arrows indicating direction (no text or symbols)natural_image
Line drawing of a refrigerator with two doors and an arrow indicating front portion (no text or symbols)natural_image
Diagram of a pipe section with contour lines and a directional arrow, no text or symbols presentnatural_image
Diagram of a screw with a threaded fastener, showing no text or symbolsnatural_image
Line drawing of a room interior with a wooden floor and decorative wall (no text or symbols)natural_image
Pure technical line drawing of a rectangular frame with mounting holes and a central rectangular block (no text or symbols)natural_image
Technical line drawing of a mechanical component with a highlighted section and arrow indicator (no text or symbols)natural_image
Technical line drawing of a mechanical component with a rod inserted into a housing (no text or symbols)natural_image
Technical line drawing of a door handle assembly with screw fasteners inserted (no text or symbols)natural_image
Line drawing of a fish inside a container with wavy walls and a small boat on the side (no text or symbols)natural_image
Line drawing of a refrigerator cabinet with shelves and doors open (no text or symbols)natural_image
Simple line drawing of a mechanical component or assembly (no text or symbols)natural_image
Simple line drawing of a container with a handle and a small object inside, no text or symbols present.natural_image
Line drawing of a refrigerator with two doors and an open door, showing internal structure (no text or symbols)natural_image
Line drawing of a refrigerator with two doors and an arrow indicating front portion (no text or symbols)natural_image
Cross-sectional diagram of a mechanical component with internal contour lines and a dimension line (no text or labels)natural_image
Diagram of a wooden plank with a screw and spiral pattern, no text or symbols presentnatural_image
Line drawing of a room interior with decorative woodwork and a small figure on the floor (no text or symbols)natural_image
Pure technical line drawing of a rectangular frame with no text, numbers, or symbolsnatural_image
Technical line drawing of a mechanical component with a highlighted connector (no text or symbols)natural_image
Technical line drawing of a mechanical component with a rod inserted into a housing (no text or symbols)natural_image
Technical line drawing of a mechanical component with screws and fasteners (no text or symbols)natural_image
Technical line drawing of a rectangular cabinet with a 50 mm height dimension label (no other text or symbols)DWUDRZWIOWE DO ZABUDOWY
PANEL
STEROWANIA

natural_image
Line drawing of a fish inside a container with wavy walls and a small boat on the side (no text or symbols)natural_image
Line drawing of a refrigerator cabinet with shelves and doors open (no text or symbols)natural_image
Diagram of a mechanical or architectural component with a zigzag line and arrow, no visible text or symbolsnatural_image
Simple line drawing of a container with a handle and side panel, no text or symbols presentnatural_image
Simple line drawing of a folded paper or sheet with a handle, no text or symbols presentnatural_image
Line drawing of a rectangular enclosure with a small inset showing a tool, no text or symbols presentnatural_image
Diagram of a refrigerator with two doors and an open door, showing internal compartments and directional arrows (no text or labels)natural_image
Line drawing of a refrigerator with two doors and an arrow indicating front portion (no text or symbols)natural_image
Diagram of a pipe section with contour lines and an arrow indicating direction (no text or labels)natural_image
Diagram of a screw with a threaded fastener, showing no text or symbolsnatural_image
Line drawing of a room interior with a wooden floor and decorative wall (no text or symbols)natural_image
Pure technical line drawing of a rectangular frame with mounting holes and a central rectangular block (no text or symbols)PANELE ŁĄCZĄCE DRZWI URZĄDZENIA Z DRZWIAMI OBUDOWY
natural_image
Pure technical line drawing of a mechanical component with a connector (no text or symbols)natural_image
Technical line drawing of a mechanical assembly with a rod inserted into a housing (no text or symbols)natural_image
Technical line drawing of a mechanical bracket with screws and fasteners (no text or symbols)UWAGI DOTYCZĄCE PRAWIDŁOWEJ OBSŁUGI
natural_image
Line drawing of a fish inside a container with wavy walls and a small boat on the side (no text or symbols)natural_image
Line drawing of a refrigerator cabinet with shelves open and one shelf partially visible (no text or symbols)natural_image
Simple line drawing of a mechanical component or assembly (no text or symbols)natural_image
Simple line drawing of a container with a handle and a small object inside, no text or symbols present.natural_image
Diagram of a refrigerator with two doors and an open door, showing internal structure and arrows indicating direction (no text or symbols)natural_image
Line drawing of a refrigerator with two doors and an arrow indicating front door (no text or symbols)natural_image
Diagram of a pipe section with contour lines and an arrow indicating direction (no text or labels)natural_image
Diagram showing a screw being inserted into a wooden surface with a spiral pattern (no text or symbols)natural_image
Line drawing of a room interior with a wooden floor and decorative wall (no text or symbols)natural_image
Pure technical line drawing of a rectangular frame with mounting holes and a central rectangular block (no text or symbols)SPOJENÍ DVÍŘEK SKRÍNĚK INSTALOVANÝCH VE SLOUPCI S DVÍŘKY SPOTŘEBIČE
natural_image
Technical line drawing of a mechanical component with a highlighted connector (no text or symbols)natural_image
Technical line drawing of a mechanical assembly with a rod inserted into a housing (no text or symbols)natural_image
Technical line drawing of a mechanical bracket with screws inserted (no text or symbols)OPATŘENÍ NEZBYTNÁ PRO SPRÁVNÉ FUNGOVÁNÍ
natural_image
Technical line drawing of a rectangular cabinet with a 50 mm height dimension label (no other text or symbols)DUBBELDEURS INBOUW
BEDIENINGSPANEEEL

natural_image
Line drawing of a fish inside a container with wavy walls and a small boat on the side (no text or symbols)natural_image
Line drawing of a refrigerator cabinet with shelves and doors, no text or symbols presentnatural_image
Simple line drawing of a mechanical component or assembly (no text or symbols)natural_image
Simple line drawing of a water tank with a handle and valve (no text or symbols)natural_image
Simple line drawing of a folded paper or sheet with a handle, no text or symbols presentnatural_image
Diagram of a refrigerator with two doors and an open door, showing internal structure and arrows indicating direction (no text or symbols)natural_image
Line drawing of a refrigerator with two doors and an arrow indicating front portion (no text or symbols)natural_image
Diagram of a pipe or channel with contour lines and an arrow indicating direction (no text or symbols)natural_image
Diagram showing a cross-section of a layered structure with a spiral component and an upward arrow (no text or symbols)natural_image
Line drawing of a 3D rectangular box with textured surface and corner detail (no text or symbols)natural_image
Pure technical line drawing of a rectangular frame with mounting holes and a central rectangular block (no text or symbols)KOPPELEN VAN DE PANELEN VAN DE INBOUWKAST AAN DE DEUREN VAN HET APPARAAT
natural_image
Technical line drawing of a mechanical component with a highlighted section and an arrow indicating direction (no text or symbols)natural_image
Technical line drawing of a mechanical component with a rod inserted into a housing (no text or symbols)natural_image
Technical line drawing of a mechanical bracket with screws inserted, showing alignment and fastening (no text or symbols)VOORZORGSMAATREGELEN VOOR EEN JUISTE WERKING
natural_image
Line drawing of a fish inside a container with wavy walls and a diagonal line extending from the side (no text or symbols)natural_image
Line drawing of an open refrigerator with shelves and a small object on top (no text or symbols)natural_image
Diagram of a refrigerator with two doors and an open door, showing internal structure and arrows indicating direction (no text or symbols)natural_image
Line drawing of a refrigerator with two doors and an arrow indicating front door (no text or symbols)natural_image
Diagram of a pipe section with contour lines and an arrow indicating direction (no text or labels)natural_image
Diagram showing a screw being inserted into a wooden surface with a spiral pattern (no text or symbols)natural_image
Line drawing of a room corner with decorative woodwork and a small figure on the floor (no text or symbols)natural_image
Pure technical line drawing of a rectangular frame with mounting holes and a central rectangular block (no text or symbols)KIINTEÄN KAAPIN PANEELIEN ASENTAMINEN LAITTEEN OVIIN
natural_image
Technical line drawing of a mechanical component with a highlighted connector (no text or symbols)natural_image
Technical line drawing of a mechanical assembly with a rod inserted into a housing (no text or symbols)natural_image
Technical line drawing of a mechanical bracket with screws inserted, showing fastening (no text or symbols)TURVALLISEN KÄYTÖN VAROTOIMET
natural_image
Line drawing of a fish inside a container with wavy walls and a small boat on the side (no text or symbols)natural_image
Line drawing of a refrigerator cabinet with shelves and doors open (no text or symbols)Avising av kjøledelen foregår automatisk på dette produktet.
Vi anbefaler å avrime fryseren hvis frostlaget overstiger 3 mm i tykkelse.
natural_image
Diagram of a mechanical or architectural component with a bracket and angled edge (no text or symbols)natural_image
Simple line drawing of a rectangular container with a side arm and a handle, no text or symbols present.natural_image
Simple line drawing of a folded paper or document with a ruler, no text or symbols presentnatural_image
Line drawing of a 3D rectangular enclosure with a small bracket and metal fixtures nearby (no text or symbols)INSTALLERING AV APPARATET I SKAPET
natural_image
Diagram of a refrigerator with two doors and a side door, showing internal structure (no text or labels)natural_image
Line drawing of a refrigerator with two doors and an arrow indicating front portion (no text or symbols)Forsikre deg om at den øvre koplingsplaten til skapet passer perfekt.
3
natural_image
Diagram of a pipe section with contour lines and an arrow indicating direction (no text or labels)natural_image
Diagram showing a screw being inserted into a wooden surface with a spiral pattern (no text or symbols)natural_image
Line drawing of a room interior with a wooden floor and decorative wall (no text or symbols)Sett i ventilasjonsgrillen.
6

natural_image
Pure technical line drawing of a rectangular frame with mounting holes and a central rectangular block (no text or symbols)TILKOPLING AV SKAPVEGGENE TIL APPARATETS D∅RER
natural_image
Technical line drawing of a mechanical component with a highlighted section and an arrow indicating direction (no text or symbols)natural_image
Technical line drawing of a mechanical component with a rod inserted into a housing (no text or symbols)natural_image
Technical line drawing of a mechanical bracket with screws inserted, showing alignment and fastening (no text or symbols)FORHÄNDSREGLER FOR KORREKT DRIFT
natural_image
Line drawing of a fish inside a container with wavy walls and a diagonal line extending from the trough (no text or symbols)natural_image
Line drawing of a refrigerator cabinet with shelves and doors open (no text or symbols)natural_image
Simple line drawing of a mechanical component or assembly (no text or symbols)natural_image
Line drawing of a mechanical component with no visible text or symbolsPRODUKTENS DIMENSIONER OCH INBYGGT UTRYMME

MONTERING AV APPARATEN I RAMEN
natural_image
Diagram of a refrigerator with two doors and an open door, showing internal structure and arrows indicating direction (no text or symbols)natural_image
Line drawing of a refrigerator with two doors and an arrow indicating front portion (no text or symbols)natural_image
Diagram of a pipe section with contour lines and an arrow indicating direction (no text or labels)natural_image
Diagram showing a screw being inserted into a wooden surface with a spiral pattern (no text or symbols)natural_image
Line drawing of a room interior with a wooden floor and decorative wall (no text or symbols)Sätt fast ventilationsgallret.
6
natural_image
Pure technical line drawing of a rectangular frame with mounting holes and a central rectangular block (no text or symbols)FASTSÄTTNING AV PANELERNA VID DÖRRARNA TILL DEN INBYGGDA RAMEN
natural_image
Technical line drawing of a mechanical component with a highlighted section and arrow (no text or symbols)natural_image
Technical line drawing of a mechanical component with a rod inserted into a housing (no text or symbols)natural_image
Technical line drawing of a mechanical bracket with screws inserted, showing alignment and fastening (no text or symbols)FÖRSIKTIGHETSÄTGÄRDER FÖR KORREKT FUNKTION ANVÄNDNING
natural_image
Line drawing of a fish inside a container with wavy walls and a diagonal line extending from the trough (no text or symbols)natural_image
Line drawing of a refrigerator with shelves open and one door opening, showing internal compartments (no text or symbols)natural_image
Diagram of a mechanical or architectural component with a bracket and angled edge (no text or symbols)natural_image
Simple line drawing of a water tank with a handle and outlet (no text or symbols)INSTALLATION AF APPARATET I SKABET
natural_image
Diagram of a refrigerator with two doors and a side door, showing internal structure (no text or labels)natural_image
Line drawing of a refrigerator with two doors and an arrow indicating front portion (no text or symbols)natural_image
Diagram of a pipe section with contour lines and an arrow indicating direction (no text or labels)natural_image
Diagram showing a wooden plank with a screw and a spiral component, no text or symbols presentnatural_image
Line drawing of a cabinet with decorative woodwork on the side panel (no text or symbols)natural_image
Pure technical line drawing of a rectangular frame with mounting holes and a central rectangular block (no text or symbols)SAMMENF∅RING AF PANELERNE AF DEN INDBYGGEDE S∅JLE PÅ APPARATETS D∅RE
natural_image
Technical line drawing of a mechanical component with a highlighted section and arrow (no text or symbols)natural_image
Technical line drawing of a mechanical component with a rod inserted into a housing (no text or symbols)natural_image
Technical line drawing of a mechanical component with screws inserted (no text or symbols)FORHOLDSREGLER FOR KORREKT DRIFT

- DOPPIA PORTA INCASSO
- QUADRO COMANDI
- ACCOPPIAMENTO DELLE ANTE DELLA COLONNA INCASSO ALLE PORTE DELL APPARECCHIO
- BUILT-IN DOUBLE DOOR
- CONTROL
- PANEL
- DEFROSTING AND FREEZING
- REVERSING THE OPENING OF THE DOORS
- COUPLING OF THE PANELS OF THE BUILT-IN COLUMN OF THE APPLIANCE DOORS
- PRECAUTIONS FOR THE CORRECT OPERATION
- DOUBLE PORTE ENCASTRABLE
- PANNEAU DE COMMANDE
- INSTALLATION DE L'APPAREIL DANS UNE COLONNE
- ACCOUPLEMENT DES PANNEAUX DE LA COLONNE INTEGREE AUX PORTES DE L'APPAREIL
- PRECAUTIONS POUR UN FONCTIONNEMENT CORRECT
- KOPPLUNG DER SCHRANKTÜRENMIT DEN GERÄTETÜREN
- DOBLE PUERTA INTEGRADA
- CAJA DE MANDOS
- DWUDRZWIOWE DO ZABUDOWY
- STEROWANIA
- PANELE ŁĄCZĄCE DRZWI URZĄDZENIA Z DRZWIAMI OBUDOWY
- UWAGI DOTYCZĄCE PRAWIDŁOWEJ OBSŁUGI
- SPOJENÍ DVÍŘEK SKRÍNĚK INSTALOVANÝCH VE SLOUPCI S DVÍŘKY SPOTŘEBIČE
- OPATŘENÍ NEZBYTNÁ PRO SPRÁVNÉ FUNGOVÁNÍ
- DUBBELDEURS INBOUW
- BEDIENINGSPANEEEL
- KOPPELEN VAN DE PANELEN VAN DE INBOUWKAST AAN DE DEUREN VAN HET APPARAAT
- VOORZORGSMAATREGELEN VOOR EEN JUISTE WERKING
- KIINTEÄN KAAPIN PANEELIEN ASENTAMINEN LAITTEEN OVIIN
- TURVALLISEN KÄYTÖN VAROTOIMET
- INSTALLERING AV APPARATET I SKAPET
- TILKOPLING AV SKAPVEGGENE TIL APPARATETS D∅RER
- FORHÄNDSREGLER FOR KORREKT DRIFT
- MONTERING AV APPARATEN I RAMEN
- FASTSÄTTNING AV PANELERNA VID DÖRRARNA TILL DEN INBYGGDA RAMEN
- FÖRSIKTIGHETSÄTGÄRDER FÖR KORREKT FUNKTION ANVÄNDNING
- INSTALLATION AF APPARATET I SKABET
- SAMMENF∅RING AF PANELERNE AF DEN INDBYGGEDE S∅JLE PÅ APPARATETS D∅RE
- FORHOLDSREGLER FOR KORREKT DRIFT
Brand : ROSIERES
Model : RBD2653A
Category : Fridge