MyVideo - Camcorder MEMOREX - Free user manual and instructions
Find the device manual for free MyVideo MEMOREX in PDF.
| Product Type | Digital Camcorder |
| Brand | Memorex |
| Model | MyVideo |
| Sensor | VGA CMOS Sensor |
| Photo Resolution | 640 x 480 (VGA) |
| Video Resolution | VGA 640 x 480, 30 fps |
| Zoom | 1x to 2x (digital zoom) |
| Display | 2.0-inch Color LCD |
| Internal Storage | 2 GB (including 200 MB for software) |
| Recording Capacity | Up to 2 hours of video or 20,000 photos |
| File Formats | Photo: JPG; Video: MOV |
| Power | Rechargeable lithium-ion battery NP-60 (3.7V, 1050 mAh) |
| Battery Life | Approximately 5 hours of recording |
| Charging | Via USB port (computer); normal mode (12 h) and express mode (4.5 h) |
| TV Output | NTSC or PAL (selectable) |
| PC Interface | USB 2.0 |
| Dimensions (H x W x D) | 4.19 x 2.36 x 0.71 inches |
| Weight (without battery) | 0.16 lb (approx. 73 g) |
| Main Functions | Video recording, photo, zoom, stabilization, adjustable exposure, sound effects, time stamp, self-portrait mirror |
| Included Accessories | AV cable, Li-ion battery, strap, pouch, quick manual, warranty card |
| Care and Cleaning | Clean the lens with a soft cloth |
| Safety | FCC/ICES-003 compliant; do not open, avoid moisture, do not use while charging (rare) |
| Replacement Parts | References on page 50; order at 1-800-321-6993 (Fox International) |
| General Information | Made in China; website: memorex.com |
Frequently Asked Questions - MyVideo MEMOREX
User questions about MyVideo MEMOREX
0 question about this device. Answer the ones you know or ask your own.
Ask a new question about this device
Download the instructions for your Camcorder in PDF format for free! Find your manual MyVideo - MEMOREX and take your electronic device back in hand. On this page are published all the documents necessary for the use of your device. MyVideo by MEMOREX.
USER MANUAL MyVideo MEMOREX
Please read these instructions
completely before using this product.
Guía del usuario
Imation Electronic Products,
A Division of Imation Enterprises Corp., Weston, Florida, Dineras in China
Weston, Florida. Printed in China
Memorex and the Memorex logo are trademarks of Imation Corp. and its affiliates.
Imation Electronic Products,
A Division of Imation Enterprises Corp.,
Weston, Florida. Impresso en China memorex.com
The following table
Imation Electronic Products,
A Division of Imation Enterprises Corp.,
IMPORTANT SAFETY INSTRUCTIONS .... 3
Section 1 Getting to Know MyVideo™ 4
Section 2 Getting Started 6
Section 3 Preview Mode....9
Section 4 Playback Mode....13
Section 5 Setting Your Camcorder 16
Section 6 Viewing Videos and Photos on a TV 20
Section 7 Viewing Videos and Photo on PC or Mac 21
Section 8 Specifications and System Requirements 22
Section 9 Troubleshooting 24
IMPORTANT SAFETY INSTRUCTIONS
FCC WARNING
This equipment has been tested and found to comply with the limits for a Class B digital device, pursuant to Part 15 of the FCC Rules. Those limits are designed to provide reasonable protection against harmful interference in a residential installation. This equipment generates, uses, and can radiate radio frequency energy, and if not installed and used in accordance with the instructions, may cause harmful interference to radio communications. However, there is no guarantee that interference will not occur in a particular installation. If this equipment does cause harmful interference to radio or television reception, which can be determined by turning the equipment off and on, the user is encouraged to try to correct the interference by one or more of the following measures:
Reorient or relocate the receiving antenna.
Increase the separation between the equipment and receiver.
- Connect the equipment to an outlet on a circuit different from that to which the receiver is connected. Consult the dealer or an experienced radio/TV technician for help.
This device complies with Part 15 of the FCC Rules. Operation is subject to the following conditions: This device may not cause harmful interference.
- This device must accept any interference received, including interference that may cause undesired operation.
- Modifications not authorized by the manufacturer may void user's authority to operate this device.
SAFETY PRECAUTIONS
Be sure to observe the following precautions when using the camera/camcorder:
- Never try to take pictures or use the built-in display when operating a motor vehicle or while walking.
- Never try to open the case of the camera/camcorder or attempt your own repairs. Always leave service to authorized repair facilities.
- Keep the camera/camcorder away from water and other liquids, and never let it get wet. Never use when it is raining or snowing.
- Should foreign matter or water get into the camera/camcorder, immediately turn the power off and contact your local authorized service center.
- Physical damage and malfunction of this camera/camcorder can cause the data stored in its memory to be deleted. Be sure to always keep backup copies of data by transferring to a personal computer.
- In an environment with electrostatic discharge, the user may have to reset the camera/camcorder by removing the battery, and then reinserting it.
- Do not leave the camera/camcorder in places subject to extremely high temperatures, such as a sealed vehicle or in direct sunlight.
- Remove the rechargeable battery pack when the camera/camcorder is not used for long periods of time.
- Dispose of rechargeable battery pack in a manner that complies with applicable laws.
- Do not place the camera/camcorder in unstable locations, such as a sloping surface or unstable table where the camera/camcorder may fall.
- Do not touch or press on the display or lens.
IMPORTANT: DO NOT use the camera/camcorder while it's charging as rechargeable batteries can explode in rare instances while charging.
Getting to Know My Video™
Standard Accessories
Unpack the package and make sure all standard accessories listed below are included:
MyVideo Camcorder
• AV Cable (PART NO.0950A7356L-A03L*)
• Lithium-ion Rechargeable Battery (PART NO.084-07042L-020*)
Quick Start Guide
Software Installation Insert*
Warranty card •
- Strap (PART NO.221-04350L-B01*)
- Pouch (PART NO.2560A7355L-A02*)
Front & Rear View
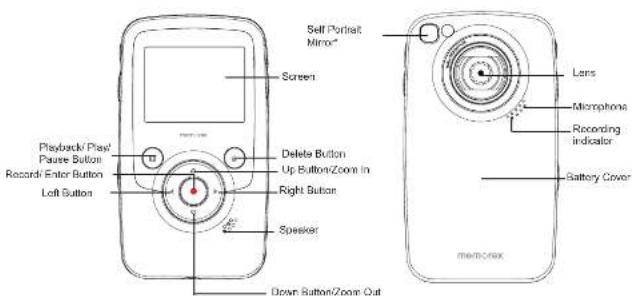
text_image
Self Portrait Mirror* Screen Delete Button Up Button/Zoom In Right Button Speaker Down Button/Zoom Out Playback/Play/ Pause Button Record/Enter Button Left Button Lens Microphone Recording indicator Battery Cover MEM/FOXMirror*: Frame your reflection to photograph or record yourself
BATTERY COVER PART NO.6086A9932L-A02*
*Consumer Replaceable Part
(See page 23 to order.)
EN
4
Side View
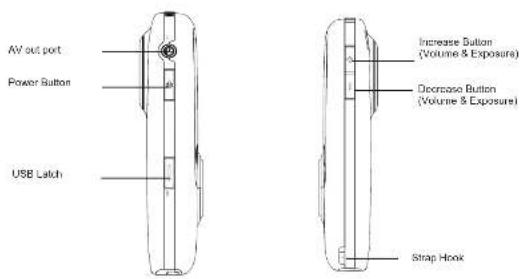
text_image
AV out port Power Button USB Latch Increase Button (Volume & Exposure) Decrease Button (Volume & Exposure) Strap HookTop View and Bottom View
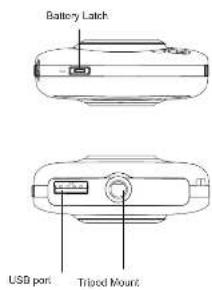
text_image
Battery Latch USB port Triod Mount5
EN
Section 2 Getting Started
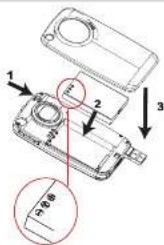
Loading the Battery
Before using the MyVideo, you must load Lithium-ion rechargeable battery
Push battery latch to remove cover. 1.
Insert the battery following to the correct polarity marks 2.
(+or-)
Close the battery cover firmly.3.

Note
When the battery is absent or low, the date and
time will be reset. See page 17 to set date/time.
text_image
Technical diagram showing a mechanical assembly with numbered components and a magnified detail viewCharging your battery
Fully charge the supplied battery before using the MyVideo for the first time.
Extend the USB port: Press the USB latch and the USB arm pops out automatically.
Connect MyVideo to the open USB port on your PC or Mac.
Retract the USB port: Press and release the USB latch and push the USB arm backward until it locked.
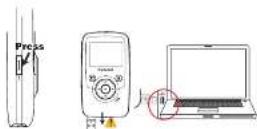
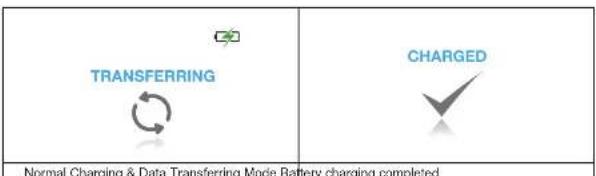
Two charging modes are available:
- Normal Charging Mode: When MyVideo is plugged to a computer, it is in normal charging mode.
Note: LCD will be turned off after 5 seconds. Press any button [except Record' Enter button (●)] to turn on the LCD again. (Normal charging time is approximately 12 hours.)
text_image
TRANSFERRING CHARGED Normal Charging & Data Transferring Mode Battery charging completed
Note
Product is not intended for children. Use caution when extending USB port to avoid injury.
EN
6
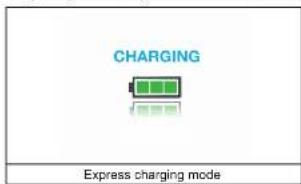
- Express charging Mode: In normal charging mode, press Record/Enter Button () switch to express charging mode. Press again to return to Normal Charging Mode (Express charging time is approximately 4.5 hours to fully charge the battery)
text_image
CHARGING Express charging mode
important
Fully charge your new battery for the first time using the Normal Charge Mode.
NOTE: During Express Charging Mode, camcorder will not able to transfer files to computer.
Safely Remove from Computer (PC)

Note
To avoid damage to the unit or data loss, always follow the procedure listed below before • disconnecting the unit from the USB port on your computer.
While in Normal Charging Mode, using your mouse, 1.
Remove Hardware icon (💡) on the tasktray.

- From the "Safely Remove Hardware" window (shown lower right), select "USB Mass Storage Device" and click the "Stop" button. The "Stop a Hardware Device" window will pop up. Click "OK". When the "Safe to Remove Hardware" window is displayed, you may remove the unit from the USB cable or remove the USB cable from the computer.
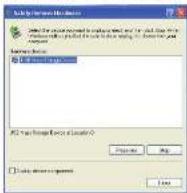

Note
If the "Safely Remove Hardware" icon is not displayed on the tasktray, please double click on [My Computer]. Right click on [Memorex] and left click on [Eject]. Then it is safe to remove unit from the computer.
To retract the USB: Press and release the USB latch and push the USB arm backward.
Hand Strap and Tripod Usage
- To use hand strap: Attach the strap to the strap hook. Place your hand through the strap loop to prevent the camcorder from damage by being dropped.
- To use tripod (Optional): Place the camcorder on a tripod to support and stabilize the camera and allow stabilized recording of videos and photos.
了
EN
double-c
Turning the Camcorder On/Off and Getting Started
To turn on the camcorder: Press the Power Button to turn it on.
To turn off the camcorder: Press and hold the Power Button for one second.
- To record video: In Preview Mode, press Left/Right Buttons (◀ / ▶) repeatedly until the Video Recording icon (◀) displayed on the screen. Then, press Record/ Enter Button ( ) to take videos. Press Record/ Enter Button ( ) again to stop.
- To take a photo: In Preview Mode, press Left/Right Buttons (◀/▶) repeatedly until the Photo Recording icon (▶) displayed on the screen. Then, press Record/ Enter Button ( ) to capture image.
- To view stored videos and photos, press Playback Button (☐) to switch to Playback Mode. Press Left/Right Buttons (☐) to view the previous/next video/photo. Press Playback Button (☐) to play/pause recorded video. Press Record/ Enter Button (☐) to return to Preview Mode.

Note
To conserve battery power, the camcorder will turn itself off automatically after idle for two minutes.
Section 3
Preview Mode
Button Function
 | Direction ButtonRight Button/Left Button:While in Preview mode, switch between Video Record Mode, Photo Capture Mode, and Menu Mode.Up Button: Zoom In.Down Button: Zoom Out.Record/ Enter Button:Press to start/slop video recording or to capture photo.In Playback Mode, press to return to Preview Mode.In Menu Mode, press to enter setting option screen. Validate the setting then return the menu mode. |
| Increase Button:In Preview Mode: press increase exposure value.In Playback Mode, press to increase volume.Decrease Button:In Preview Mode: press decrease exposure value.In Playback Mode, press to decrease volume. | |
| Power Button: Press to turn on the camcorder. Press and hold for one second to turn off the camcorder. | |
| Playback Button:In Preview Mode, press to switch to Playback Mode.Press to play/pause recorded video. | |
| Delete Button:Press to enter to delete screen. |
LCD Monitor Information
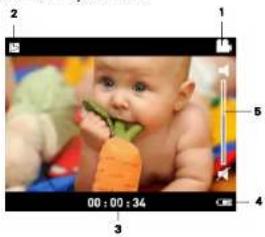
The indicator shown below may display on LCD when videos and pictures are recorded:
2 1

natural_image
Family photo of three people lying on grass, one holding a flower (no visible text or symbols)3
| (1) | Video Resolution | |
| VGA (640 x 480, 30fps) | ||
| Photo Resolution | ||
| 640 x 480 (VGA) | ||
| (2) | Stabilization | |
| (3) | 1350 | Number of photos that can still be taken. |
| 01:28:06 | Recording time of video that can still be taken at current resolution | |
| 00:00:12 | Recording time of video during video recording | |
| (4) | Battery: full power | |
| Battery: medium power | ||
| Battery: low power | ||
| Battery: power empty | ||
| (5) | Zoom meter:1X-2X (2X Digital zoom) | |
| Exposure compensation value | ||
EN
10
Video Recording
- Press Left/Right Buttons (◀/▶) repeatedly until the Video Recording icon (💡) is displayed on the screen. The icon will appear in the center of LCD around 2 seconds then move to the right-top corner.
Press Record/ Enter Button (●) to take videos. When a video is recording, a time indicator will on LCD monitor. Press Record/ Enter Button (●) again to stop.
Press Playback Button (☐) to switch to Playback Mode. Press Left/Right Buttons (☐) to view the previous/next video/photo. Press Playback Button (☐) to play/pause recorded video.
Photo Recording
Press Left/Right Buttons (◀, ▶) repeatedly until the Photo Recording icon (▶) displayed in the center of LCD around 2 seconds then move to the right-top corner.
Press Record/ Enter Button (●) to capture image.
Press Playback Button (☐) to switch to Playback Mode. Press Left/Right Buttons (◀/▶) to view the previous/next video/photo.
Using Exposure Function
- Adjust the exposure value to change the amount of light that the camcorder will receive when taking videos/photos or while in Preview Mode.
To • adjust the exposure value:
Use Increase/Decrease Buttons (1) to adjust preferred EV (Exposure Value). The exposure bar will automatically disappear after 2 seconds.
Press Record/ Enter Button (2.) to take videos/photos.
Using Zoom Function
- The zoom magnifies images while in Preview Mode, recording videos or taking photos.
- To zoom in/out, press the Up/Down Button (△/▽). It can be set from 1X to 2X (2X Digital zoom).
Press Record/ Enter Button (2.) to take videos/photos.
11
EN
Using Delete Function
Delete function works in both Preview and Playback modes.
- In Preview or Record Mode, press Delete Button (☐) to delete the current/ latest video or photo. In Playback mode, press Left/Right Buttons (◀/▶) to switch to the previous/next video/photo. Then press Delete Button (☑) delete the video or photo.
| Operation Display Screen | |
| Press Delete Button 1 to enter the delete screen.Move between [Yes], [No], and [All] by using Left/2.Right Buttons (◀, ▶).Press Record/ Enter Button3 to confirm[Yes], [No], or [All]. Or Press Delete Button (□)to cancel the operation. |  |
Section 4 Playback Mode
Button Function
The Buttons have the following functions in Video and Photo Playback Modes.
 | Direction ButtonRight Button:1. Go to the next video/photo.2. While the video is playing, press to stop playing and switch to the next video.Left Button:1. Go to the previous video/photo.2. While the video is playing, press to stop playing and switch to the previous video.Record/ Enter Button: Press to return to Preview Mode. |
| Increase Button: Press to increase volume.Decrease Button: Press to decrease volume. | |
| Playback Button: Press to play/pause recorded video. | |
| Delete Button:1. Press to enter to delete screen. |
EN
12
13
EN
LCD Monitor Information
Indicators on the LCD screen while in Playback Mode:
natural_image
Photo of a baby holding a carrot, captured in a video frame (no visible text or symbols)| (1) | Video Resolution | |
| VGA (640 x 480, 30fps) | ||
| Photo Resolution | ||
| 640 x 480 (VGA) | ||
| (2) | Play | |
| Pause | ||
| Stop | ||
| (3) | 50/99 | Current Number of photo/ Total number of photos. |
| 01:28:06 | Video playback time | |
| (4) | Fully Charged | |
| Partially Charge | ||
| Low power | ||
| Empty - Charge Need | ||
| (5) Volume | ||
Operations for Playback Mode
Press Playback Button() to switch to Playback Mode. Press Left/Right Button() to view the previous/next video/photo. Press Record/ Enter Button() to return to Preview Mode. Press Delete Button() to delete the current video or photo.
Video Playback
When in Playback Mode, press Left/Right Buttons ( ) to select the desired video that you want to view. Press Playback Button ( ) to play/pause recorded video. While the video is playing, press Left/Right Buttons ( ) to stop playing and switch to the previous/next video. Use Increase/Decrease Buttons ( ) to adjust volume.
Photo Review
- When in Playback Mode, Press Left/Right Buttons (◀/▶) to view the photo.
Section 5
Setting Your Camcorder
Operations for Menu Mode
| Operation Display Screen | |
| Press Left/Right Buttons 1 ( ) repeatedly until the SETTINGS screen appears. Press 2. Record/ Enter Button to enter Menu main screen. | SETTINGSPress to enter |
| Use Direction Button to move between options 3. Press 4. Record/ Enter Button to enter submenu of each option. Press Right/Left Buttons (5) to select the setting options, then press Record/ Enter Button ( ) validate and return to Menu Mode main screen. 6. In Menu Mode main screen, select option Exit to back to Preview Mode. |  |
SETTINGS menu options
| Menu Mode | |
| Time/Date | |
| Language | (English as default) |
| TV System | (NTSC as default) |
| Sound Effects | (ON as default) |
| Stabilization | (OFF as default) |
| Exit | |
Menu Mode Submenu Settings
Time/Date
| Operation | Display Screen |
| 1. In Menu Mode main screen, use Direction Button to select [TIME/DATE].2. Press Record/ Enter Button (●) to enter the submenu.3. Move between date or time items by using Left/Right Buttons (▲/▲). Adjust the number of date or time by using Up/Down Buttons (△/▽).4. Press Record/ Enter Button (●) to accept your changes and return to Menu Mode main screen. | 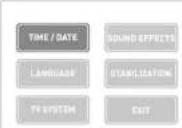  |

Note
If the 24 hour mode changes to 12 hour mode, be sure to check the AM or PM indicators to make sure you have set the hour correctly.
Language
Use this option to select your preferred of user interface language.
| Operation | Display Screen |
| 1. In Menu Mode main screen, use Direction Button to select [LANGUAGE].2. Press Record/ Enter Button (●) to enter the submenu.3. Use Direction Button to choose the language options.4. Press Record/ Enter Button (●) to confirm and return to Menu Mode main screen.Available languages:English (Default)FrenchSpanish | 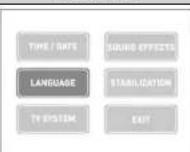  |
TV System
Make sure the appropriate TV standard of your area is selected – either NTSC or PAL.
The wrong TV system setting may cause image to flicker.
NTSC standard: USA, Canada, Japan, South Korea and Taiwan etc.
PAL standard: UK, Europe, China, Australia. Singapore and Hong Kong etc.
| Operation Display Screen | |
| In 1. Menu Mode main screen, use Direction Button to select [TV-SYSTEM].Press 2. Record/ Enter Button ➕ to enter the submenu.Use Left/Right Buttons (▲) ➕ to choose NTSC (60Hz) or PAL(50Hz).Press 4. Record/ Enter Button ➕ to validate and return to Menu Mode main screen. | 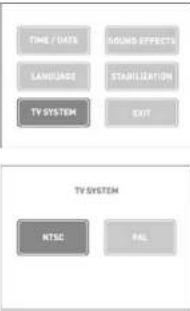 |
Sound Effects
Enable or disable operation sound.
| Operation Display Screen | |
| In 1. Menu Mode main screen, use Direction Button to select [SOUND EFFECTS].Press 2. Record/ Enter Button 📋 to enter the submenu.Use Left/Right Buttons (OK / ▶) to choose On or Off.Press 4. Record/ Enter Button 📋 to validate and return to Menu Mode main screen. | 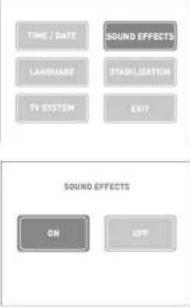 |
EN
18
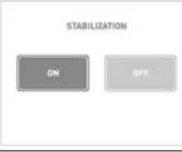
Stabilization
Select stabilization to shoot smooth video.
| Operation Display Screen | |
| In 1. Menu Mode main screen, use Direction Button to select [STABILIZATION].Press 2. Record/ Enter Button ➕ to enter the submenu.Use Left/Right Buttons ( ◀ / ▶ ) to choose On or Off.Press Record/ Enter Button ( ● ) to confirm and return to Menu Mode main screen. | 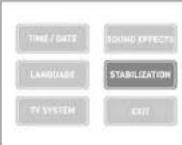 |
 |
19
EN
Section 6
Viewing Videos and Photos on a TV
Section 7
Viewing Videos and Photo on PC or Mac
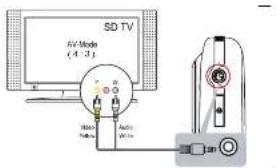
Connecting to a TV
Connect one end of the AV cable to your camcorder's AV Out port.1.
Connect the other end of the cable to a television.2.
Video In (Yellow) and Audio In (White) marked "mono" or "L".
The steps for viewing stored pictures and video on a TV are exactly the same as for viewing them 3.
on camcorder's LCD monitor.
text_image
SD TV AV Mode (4-3) Radio Pulse Audio Wise
Note
The LCD Panel on the camcorder does not display when connected to a TV.
Make sure to select the correct TV System setting as page 18.
Video and Photo Editing Software
ArcSoft™ MedialImpression2 editing software is embedded in the internal memory of MyVideo.
To transfer images to computer and view the User Guide, the software must be installed upon first
use when connecting MyVideo to your PC or Mac through USB port.
ArcSoft™ MedialImpression2 is a user-friendly application that helps you manage your media.
burn your video to CD/DVD, and upload your videos/photos easily to YouTube™ or FaceBook™.

Note
More detailed Instructions and Help menu for the editing software can be found within the
program once installation is complete. Click on the "Extra" button on the title bar and select
"Help" to open the ArcSoft™ instruction manual.
To download Photo or Video tiles from camcorder: You can also open the drive labelled
"Memorex" and simply drag and drop the files inside the folder "DCIM100MEDIA".
For more information about the ArcSoft™ MedialImpression2 software. Please visit the web site
http://mediaimpression.arcsoft.com for more information.
All other trademarks are the property of their respective owners.
EN
20
21
EN
Section 8
Specifications and System Requirements
Specification
| Image sensor VGA CMOS sensor | |
| Operation modes Video record, Photo capture | |
| Lens f=3.89mm; F2.4 | |
| Focus range Full Range | |
| Zoom 1X-2X (2X Digital) | |
| Shutter Electronic | |
| LCD monitor 2.0'LCD (Measured diagonally) | |
| Storage media Built-in 2GB memory (200MB of memory is used for system software) | |
| Record up to 2 hours of video or capture up to 20,000 photos. | |
| Image resolution 640 x 480 (VGA) | |
| Video resolution VGA 640X480(30fps) | |
| Power Source USB Power | |
| Battery Recording Time 5 hours | |
| Exposure +1EV~ -1EV | |
| File format Picture: JPG (Baseline) | |
| Video: MOV | |
| Image play Single Image | |
| Speaker | 1 x 8 ohm |
| PC interface | USB 2.0 Port |
| TV out | NTSC/PAL Selectable |
| Battery | Lithium-ion Rechargeable Battery (NP-60, 3.7V 1050mAh) |
| Dimension 4.19(H) x 2.36(W) x 0.71(D) inches | |
| Weight | 0.16 lb (without battery) |
Minimum System Requirement
Windows:
• Microsoft Windows XP/Vista
• Pentium IV 3.0 GHz or equivalent AMD Athlon
- Intel © Core™ 2 Duo CPU E6300 processor
(or higher recommended), AMD Athlon 64 X2
3800+ or higher for HD Video
• 512 MB RAM (1GB recommended)
• 300 MB available hard disk space
• NVIDIA EX5200 as AT1/8200 /as hi
• NVIDIA FX3200 of AIT 9200 (or higher)
• 1974 x 758 pixels, 32-bit sales mniles
- 1024 x 706 pixels, 32-bit color monitor
Macintosh:
• Mac OS 10.3, 10.4, 10.5
• PowerPC G4 800 MHz processor or Intel
processor
- 512 MB RAM
• 150 MB available hard disk space
- 800 × 600 pixels, 16-bit color monitor

Note
The LCD screen is manufactured using extremely high-precision technology so over 99.99% of the pixels are operational for effective use. However, some tiny black and/or bright dots (white, red, blue or green) may appear on the LCD screen. These dots are a normal result of the manufacturing process, and do not affect the recording quality.
Reset the Camcorder
If the camcorder acts erratically, reset it by removing the battery. Then reload the battery and turn on the camcorder again.
Formatting the Camcorder

WARNING!
The contained video/photo editing software may lost by formatting the camcorder. Do not format this camcorder unless it stops working and you are instructed to do so by technical support personnel!
To format the camcorder:
- Press the USB latch down and the USB arm pops out automatically.
- Connect the camcorder to the computer.
- Double click on [My Computer], then right click [Memorex] and left click on [Format].
- At the "Format" window, click [OK] to confirm and the camcorder will start to format (see figure below). When finished, click [OK] to close the Format window.
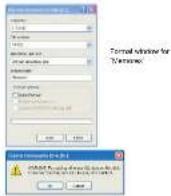

Note
Make sure you have selected "FAT 32" at the file system pull-down menu; otherwise, after formatting, the camera will not work properly. Then, click [OK] to confirm and the camcorder will start to format. When finished, click [Close] to close the Format window.
For Firmware Upgrade
Please visit our Web site at www.memorex.com to check if there is new firmware available.
IMPORTANT NOTE: Before upgrading the firmware, please back-up all of your media files on your computer. After upgrading, format the unit to complete the upgrade procedure.
FOR ADDITIONAL SET-UP OR OPERATING ASSISTANCE, PLEASE VISIT OUR WEBSITE AT: WWW.MEMOREX.COM
FOR CONSUMER REPLACEABLE PART(S), SEE PART NUMBER(S) ON PAGE 4, AND THEN CONTACT OUR PARTS FULFILMENT CENTER, FOX INTERNATIONAL AT: 1-800-321-6993.
Section 9 Troubleshooting
Troubleshooting
| Symptom Possible Cause Solution | ||
| Camcorder will not turn on. Power is off. Press the Power button for one second to turn on. (see page 8) | ||
| Images or photos are poor quality. | Poor lighting. Take picture in better lighting and/or adjust the EV setting. (see page 11) | |
| Lens is dirty. Clean lens with a soft cloth. | ||
| Subject or camcorder moved as picture was taken. | Hold the camcorder steady until picture is taken. | |
| Can't take video/photo. Memory is full. Delete some photos/videos. (see page 12) | ||
| Why do some of my indoor pictures look blurry and dark? | Camcorder extends pictures exposure time under low light/ indoor condition. | Keep camera (and photographed subject) steady for several seconds when taking pictures. |
| How do I charge battery? When camcorder is plugged to a computer, it is in normal charging mode as well as the USB storage device, then LCD will be turned off after 5 seconds. In normal charging mode, press Record' Enter Button (●) to switch to express charging mode. (see page 6-7) | ||
Contenido
text_image
Technical diagram of a mechanical component with numbered parts and an inset magnified view showing measurement markings.Cargando su Bateria
text_image
CARGANDO Express charging mode
Importante
natural_image
Family photo on grass with a child playing (no visible text or symbols)natural_image
Photo of a baby holding a carrot, captured in a video frame (no visible text or symbols)PAL standard: UK, Europe, China, Australia, Singapore and Hong Kong etc.
Enable or disable operation sound.
Formal window of
W markets


Nota
natural_image
Family photo of three people playing on grass with a flower, captured in a video camera interface (no text or symbols on the image itself)natural_image
Close-up photo of a baby holding a carrot, with colorful background and no visible text or symbolstext_image
SD TV NV Mode (4.3) Radio Radio Radio