
LE23H062 - TV AOC - Free user manual and instructions
Find the device manual for free LE23H062 AOC in PDF.
| Product Type | LED TV |
| Brand | AOC |
| Model | LE23H062 |
| Screen Size | 23 inches |
| Resolution | 1920 x 1080 (Full HD) |
| Picture Format | 16:9 |
| TV System | ATV (NTSC), DTV (ATSC) |
| Video Inputs | HDMI x2, YPbPr x1, S-Video x1, Composite x1, VGA x1, USB |
| Audio Inputs | RCA (AV/S-Video), HDMI, PC audio (jack) |
| Audio Output | Headphone jack |
| Audio Power | 5 W + 5 W (stereo) |
| Power Supply | 100 V ~ 240 V, 50/60 Hz |
| Power Consumption (typical) | 45 W |
| Standby Power Consumption | < 1 W |
| Dimensions (with stand) | 560.9 x 388.1 x 190.1 mm |
| Weight (with stand) | 4.5 kg |
| VESA Wall Mount | 75 x 75 mm, M4 screws (not included) |
| Main Features | Auto channel search, parental control, picture modes, timer, subtitles, USB playback (JPEG/MP3) |
| Care and Cleaning | Unplug before cleaning; use a soft, dry cloth; do not use liquid or aerosol cleaners |
| Safety | Do not open the cabinet; avoid exposure to water or rain; use only on a stable surface |
| Repairability | No user-serviceable parts; contact a qualified technician |
Frequently Asked Questions - LE23H062 AOC
User questions about LE23H062 AOC
0 question about this device. Answer the ones you know or ask your own.
Ask a new question about this device
Download the instructions for your TV in PDF format for free! Find your manual LE23H062 - AOC and take your electronic device back in hand. On this page are published all the documents necessary for the use of your device. LE23H062 by AOC.
USER MANUAL LE23H062 AOC
LED TV User Manual LE23H062
Full HD
1080P
HOMI
HIGH-DEFINITION MULTIMEDIA INTERFACE INTERFERENCE MULTIMEDIA KAUTI DEFINITION

ANESAS
ENVISION Series
Regulatory Information
FCC Compliance Statement
This device complies with part 15 of the FCC Rules. Operation is subject to the following two conditions: (1) This device may not cause harmful interference, and (2) this device must accept any interference received, including interference that may cause undesired operation.
Additional Information
This equipment has been tested and found to comply with the limits for a Class B digital device, pursuant to part 15 of the FCC Rules. These limits are designed to provide reasonable protection against harmful interference in a residential installation. This equipment generates, uses and can radiate radio frequency energy and, if not installed and used in accordance with the instructions, may cause harmful interference to radio communications. However, there is no guarantee that interference will not occur in a particular installation. If this equipment does cause harmful interference to radio or television reception, which can be determined by turning the equipment off and on, the user is encouraged to try to correct the interference by one or more of the following measures:
- Reorient or relocate the receiving antenna
- Increase the separation between the equipment and receiver
- Connect the equipment into an outlet on a circuit different from that to which the receiver is connected
- Consult the dealer or an experienced technician for help
Warning: The Federal Communications Commission warns that changes or modifications of the equipment not expressly approved by the party responsible for compliance could void your authority to operate the equipment.
DOC Compliance Notice 2
This digital apparatus does not exceed the Class B limits for radio noise emissions from digital apparatus as set out in the Radio Interference Regulations of the Canadian Department of Communications. This device complies with Canada ICES-003 Class B.
- applies only to products purchased in the United States of America
- applies only to products purchased in Canada
Explanation of WARNING Symbols
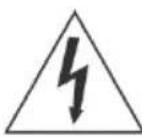
Dangerous Voltage: The lightning flash with arrowhead symbol, within an equilateral triangle, is intended to alert the user to the presence dangerous voltage within the inside of the product that may be sufficient level to constitute a risk of electric shock to persons.

Instruction: The exclamation point within an equilateral triangle is intended to alert the user to the presence of important operating and servicing instructions in the literature accompanying the appliance.
Safety instructions
1) Read these instructions.
2) Keep these instructions.
3) Heed all warnings.
4) Follow all instructions.
5) Do not use this LED TV near water.
6) Clean only with dry cloth. Do not use liquid, alcohol, or aerosol cleaners.
7) Do not block any ventilation openings. Install your LED TV in a well-ventilated area.
8) Keep your LED TV away from moisture, excessive dust and any heat sources, such as radiators, heat registers, stoves, or any other apparatus (including amplifiers) that produce heat.
9) Do not remove the back cover. There are no user-serviceable parts inside.
10) Do not defeat the safety purpose of the polarized or grounding-type plug. A polarized plug has two blades with one wider than the other. A grounding type plug has two blades and a third grounding prong. The third prong is provided for your safety. If the provided plug does not fit into your outlet, consult an electrician for replacement of the obsolete outlet.
11) Protect the power cord from being walked on or pinched particularly at plugs, receptacles, and the point where they exit from the LED TV.
12) Never rest objects on the power cord or place it in high traffic areas. It is better to use the point where they exit from the apparatus.
13) Only use attachments/accessories specified by the manufacturer.
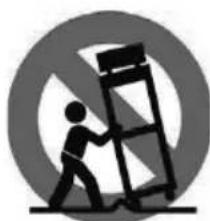
14) Use only with the cart, stand, tripod, bracket, or table specified by the manufacturer, or sold with the LED TV. When a cart is used, use caution to avoid injury from tip-over.
15) Unplug this LED TV during lightening storms or when unused for long periods of time.
16) Refer all servicing to qualified service personnel-- Servicing may be required if the LED TV has been damaged in any way, such as power-supply cord or plug is damaged, liquid has been spilled or objects have fallen into the apparatus, the apparatus has been exposed to rain or moisture, does not operate normally, or has been dropped.
| Place unit on even surfaces. | Don't place the TV in confined spaces or in a box when using it. |
| Unplug immediately if is malfunction like no picture, no video.audio,smoke and bad odor from TV. | Unplug immediately if other foreign materials are put inside TV box or if the TV fell down. |
| Don't throw any object inside the TV box like metals or other flammable materials. | Prohibit/Avoid opening TV cabinet |
17) Do not expose your LED TV to dripping or splashing, and no objects filled with liquids be placed on it.
18) The Shock Hazard Marking and Associated Graphical Symbol are provided on the back panel of unit.
19) This product is only to perform the useful function of entertainment and visual display tasks are excluded.
20) Wall or ceiling mounting: When mounting the product on a wall or ceiling, be sure to install the product according to the method recommended by the manufacturer. Use only their indicated mounting hardware for safety.

CAUTION: Any damage caused by incorrectly attempting to mount this LED TV is not covered under the terms of the manufacturers warranty.

WARNING: To reduce the risk of fire or electric shock, do not expose this LED TV to rain or moisture.
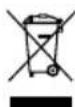
According to WEEE regulation, this monitor can't be handled as normal trash in Europe when it is out of usage. Please refer to the recycle information from our website to handle it.
| Remember to unplug the AC cord from the AC outlet before cleaning. Do not use liquid cleaners or aerosol cleaners to clean the display. × × | Avoid direct sunlight, dusty, high humidity and smoky areas. × × × × |
| Make sure to unplug the unit when not in use for a long period of time (days). × × × | Call service personnel to clean the internal part of the TV once a year. × × × × |
| Do not cover or block any vents and openings. Inadequate ventilation may shorten the life of the display unit and cause overheating. × × × | Do not place the display near water, such as bathtub, washbasin, kitchen sink laundry tub, swimming pool or in a damp basement. × × × × |

Notice for Remote Controller
| Avoid Dropping | Avoid Liquids | Avoid Aerosol Cleaners |
TableofContents
1.1 INSTALLATION INSTRUCTIONS 1
1.3 Control Panel 3
1.4Keypad 4
1.5 Remote Control 5
1.6 Input and Output Jacks 7
2.2 Connecting External Devices 9
2.2.1 Connecting External Earphones 9
2.2.2 Connecting to AV Devices 10
2.2.3 Connecting a VCR/ STB/ DVD Player Using Component Video 11
2.2.4 Connecting a VCR/ STB/ DVD Player Using Composite Video 11
2.2.5 Connecting a PC using VGA 12
2.2.6 Connecting a PC using DVI 12
2.2.7 Connecting HDMI 13
2.2.8 Connecting USB 13
2.3 Using the TV 14
2.3.1 Turning the TV On and Off 14
2.3.2 Switching Source Signals 14
2.3.3 Performing an Automatic Channel Search 14
2.3.4 Selecting Channels 14
2.3.5 Adjusting the Volume 15
2.3.6 Editing the Channel List or Favorite List 15
2.3.7 Viewing Images and Playing Music 15
- Adjusting On-Screen Display (OSD) Settings 16
3.1 OSD Setting Menus 17
3.2 Storing Channels into Memory 17
3.3 Viewing the Menus 18
3.4 Favorite Channel Setting 18
3.5 Showing/Hiding Channel 19
3.6 Channel Name Setting 19
3.7 Setting up Picture Options 20
3.8 Setting up Audio Options 20
3.9 Configuring System Setting 20
3.10 Setting up Time menu 21
TableofContents
3.11 Closed Caption Setting 22
3.12 Using the Parental Controls 23
3.13 To Block Unrated Movie or TV Programs 25
3.14 To Set Rating Region Table 26
3.15 To Change Password 26
3.16 To Block by Input Source 27
3.17 To Restore Factory Setting 27
3.18 Using PC Function 28
- Specifications 29
FACTORY PRESET TIMING TABLE(PC MODE) 30
SAFETY PRECAUTIONS 31
CARE AND MAINTENANCE 32
TROUBLESHOOTING 32
1.1.1 INSTALLATION INSTRUCTIONS
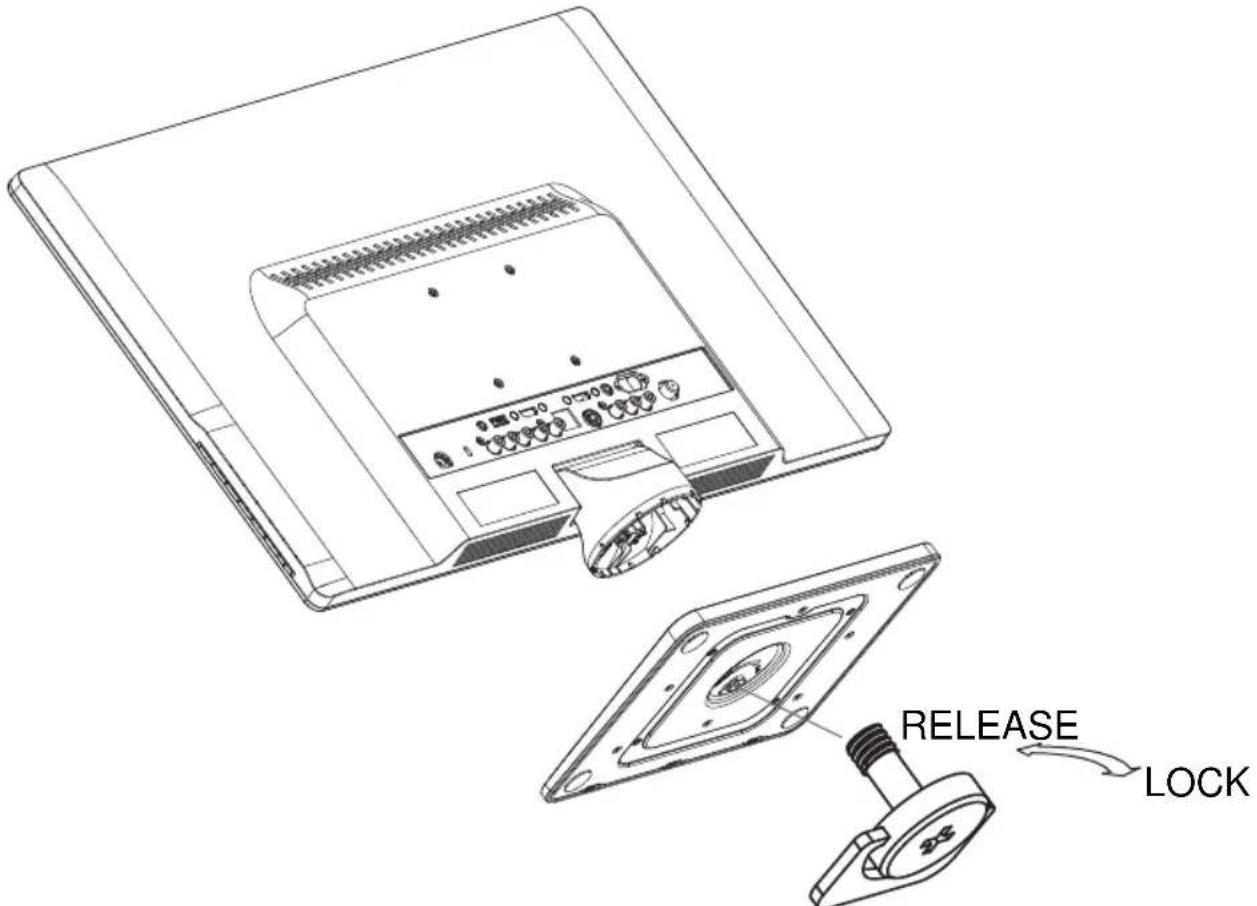
INSTALLATION:
- Turn the TV over and set it upside down.
- Align the TV to the slots on the stand.
- Please note that the longer edge of the stand should be facing forward.
4.Pull the screw ring upwards,then turn the screw clockwise to secure.Wh -en the stand is securely attached to the TV,pull down the screw ring to fla -tten it with the base of the screw. - Check the underside of the stand to stand to ensure that the TV has been firmly installed to the stand and that the screws do not loosen.
REMOVAL:
- Turn the TV over and set it upside down.
- Turn the screw counterclockwise to loosen it.
- Detach the stand from the TV.
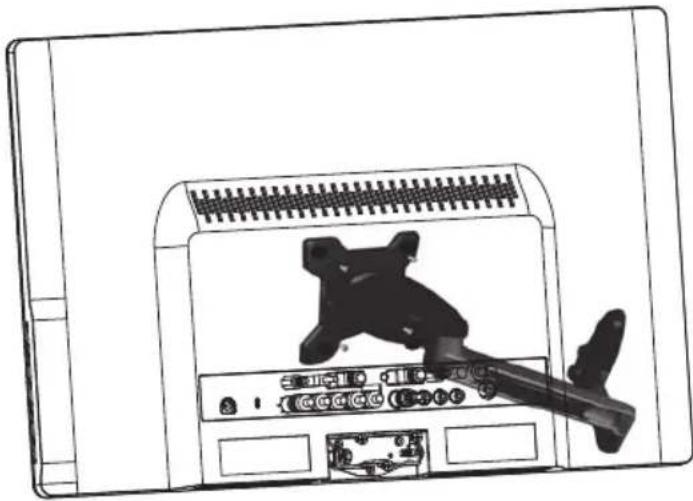
Follow these steps to finish installing the wall mounting arm:
- Place the wall mounting arm onto the back of the TV.
- Insert the 4 screws into the holes and tighten.Line up the holes of the arm with the holes in the back of the TV.
- Reconnect the cables.Refer to the user's manual that came with the optional wall mounting arm for instructions on attaching it to the wall.
NOTE
- 75mmx75mm VESA high hole(n=4),M4,pitch=0.7mm,deep=10mm screw mount -ing kit not included.
- Due to safety concerns, if the VESA mounting kit is purchased separately please make sure the mountingkit is UL-Listed, and replaceable only by service personnel.
1.3 Control panel
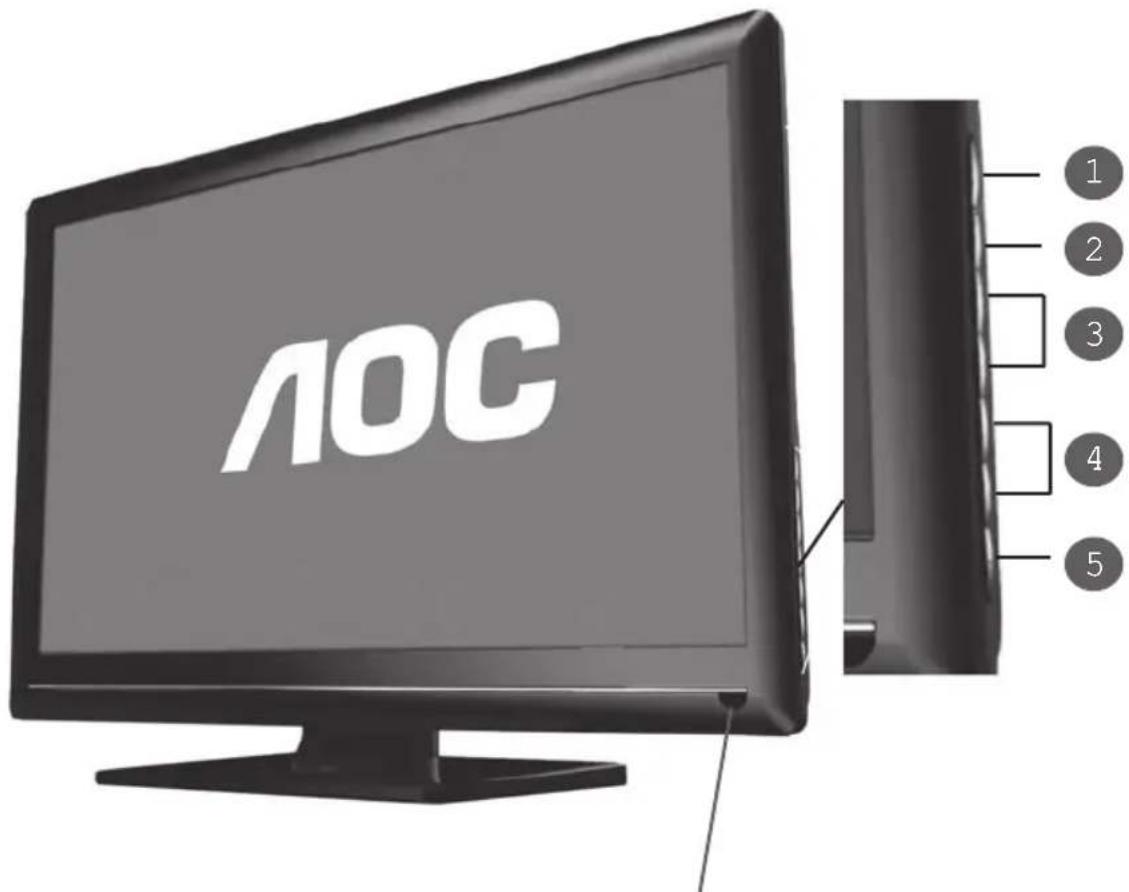
Remote Control Sensor: This is the window through which all of the remote controlsignals pass to the sensor.
1.4 Key pad
| 1 | Menu |
| 2 | Input |
| 3 | CH▲/▼ buttons |
| 4 | Volume+/-buttons |
| 5 | Power |

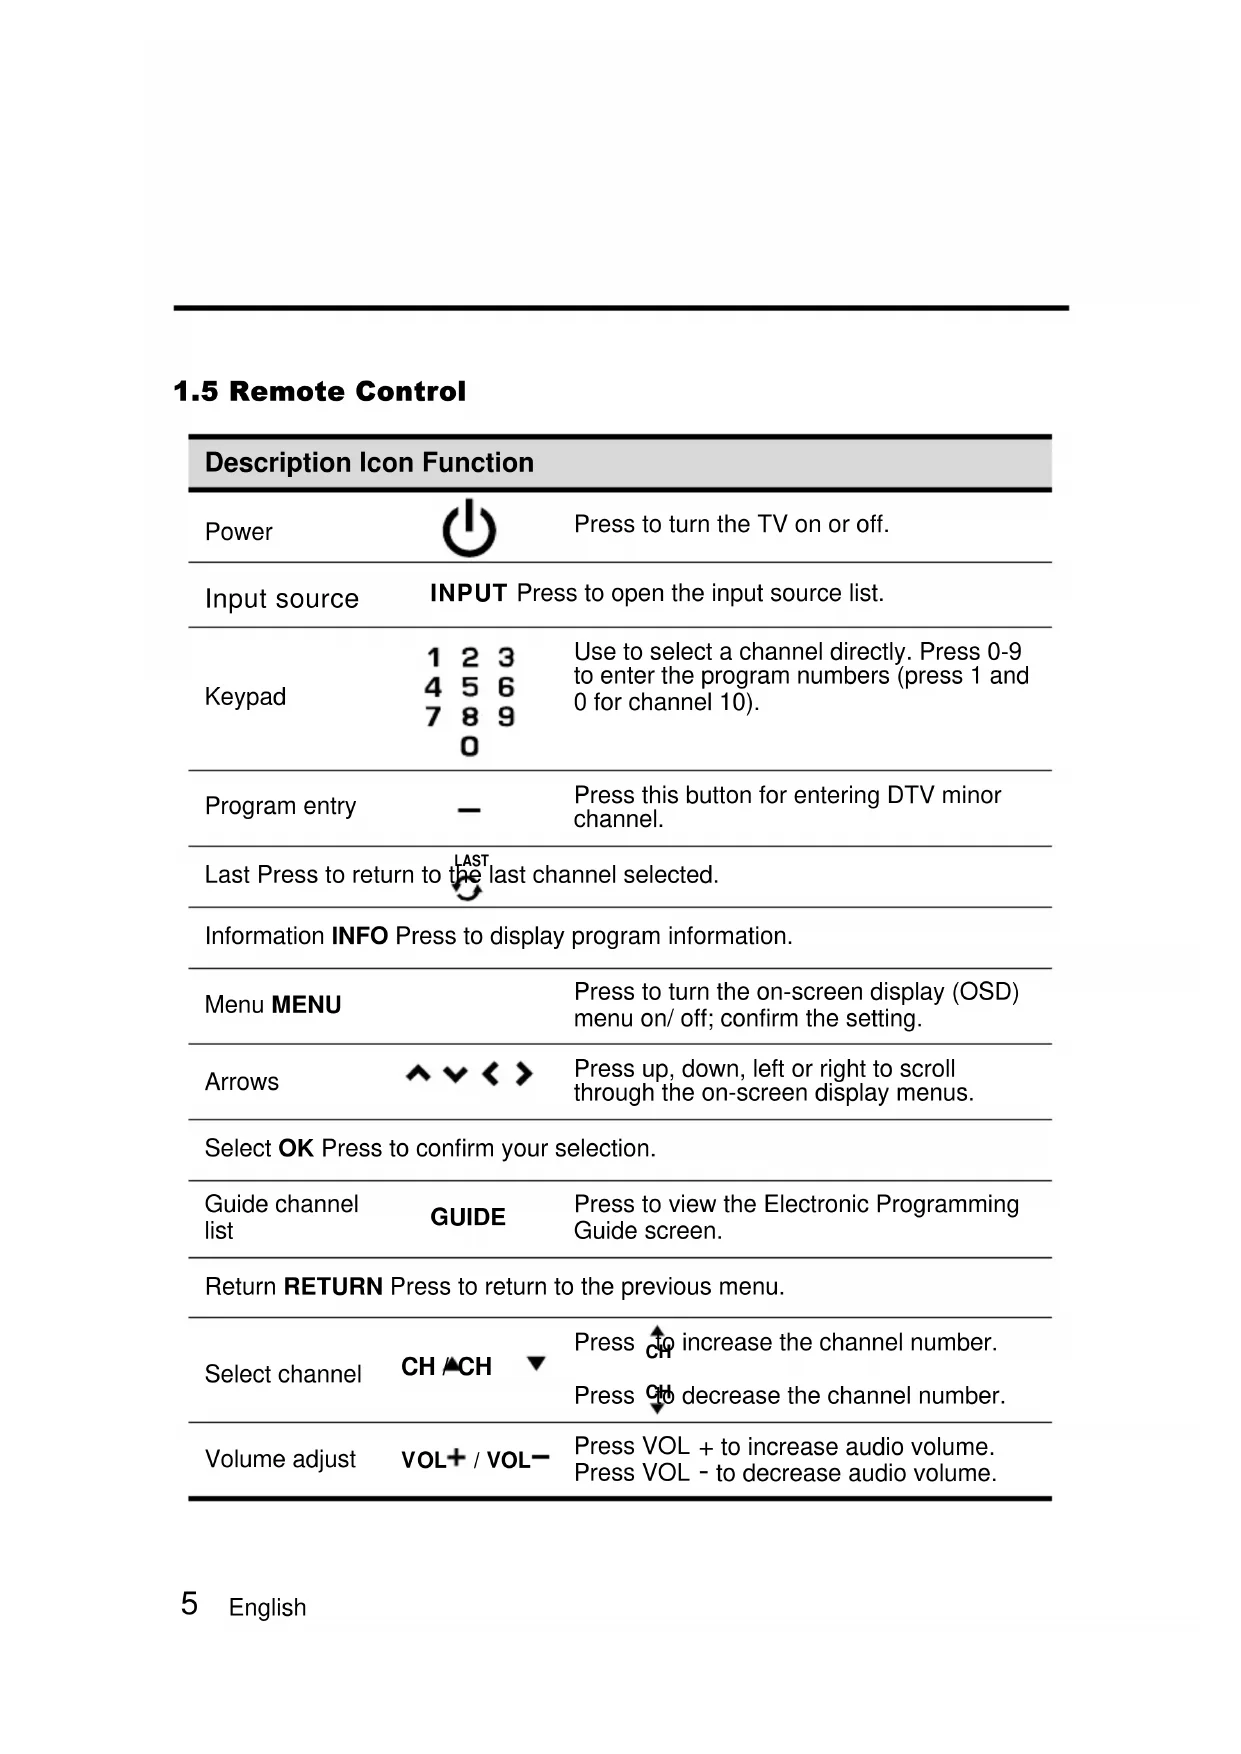
1.5 Remote Control
| Description Icon Function | ||
| Power | Press to turn the TV on or off. | |
| Input source | INPUT Press to open the input source list. | |
| Keypad | 1 2 3 4 5 6 7 8 9 0 | Use to select a channel directly. Press 0-9 to enter the program numbers (press 1 and 0 for channel 10). |
| Program entry | - | Press this button for entering DTV minor channel. |
| Last Press to return to the last channel selected. | ||
| Information INFO Press to display program information. | ||
| Menu MENU | Press to turn the on-screen display (OSD) menu on/ off; confirm the setting. | |
| Arrows | ← √ < > | Press up, down, left or right to scroll through the on-screen display menus. |
| Select OK Press to confirm your selection. | ||
| Guide channel list | GUIDE | Press to view the Electronic Programming Guide screen. |
| Return RETURN Press to return to the previous menu. | ||
| Select channel | CH ▲CH ▼ | Press to increase the channel number. Press to decrease the channel number. |
| Volume adjust | VOL+ / VOL- | Press VOL + to increase audio volume. Press VOL - to decrease audio volume. |
| Sleep timer | SLEEP | Press repeatedly to set the sleep time (Sleep off, 5, 10, 15, 30, 45, 60, 90, 120, 180, or 240 minutes). A Sleep Info appears on the middle of the screen to show the remaining time. Cancel the timer by pressing the button to sleep off mode. |
| Multichannel television sound | MTS | Press to toggle the audio mode (Mono/ Stereo/ SAP) in ATV or the audio services in DTV. |
| Favorite channels | FAV | Press to switch to favorite channels. |
| Aspect ratio | ASPECT | Press to adjust the width-to-height ratio of the image. The available options are: Full, Normal, Zoom and Cinema. |
| Close caption | C.C. | Press to open or close the close caption. |
1.6 Input and Output Jacks
| Description Connector Function | ||
| Power connector | DC IN | Connect to the included Adaptor. |
| HDMI 1 input | HDMI1 | Connect to an external device, such as a DVD player, set-top box, or a PC's DVI/ HDMI port. |
| HDMI 2 input | HDMI2 | Connect to an external device, such as a DVD player, a Set-Top Box, or a PC's DVI/ HDMI port. |
| VGA (PC) input | VGA | Connect to a PC's VGA port. |
| Audio input (PC) | AUDIO | Connect to a PC's audio port. |
| Component inputs (audio) | AUDIO | Connect to an external device, such as a VCR, Set-Top-Box, or a DVD player. |
| Component inputs (video) | VIDEO Y R P | Connect to an external device, such as a VCR, Set-Top-Box, or a DVD player. |
| Earphone output | ◎ | Connect to earphones or external speakers with built-in amplifiers. |
| Cable/ Antenna | TV | Connect to an antenna or cable TV. |
| S-Video input | S-VIDEO | Connect to an external device, such as a VCR, Set-Top-Box, or a DVD player. |
| Composite inputs | VIDEO L AUDIO | Connect to an external device, such as a VCR, Set-Top-Box, or a DVD player. |
| USB | Insert the USB flash drive into the USB port. | |
2.2 Connecting External Devices
Connect external devices such as VCRs, Set-Top-Box, DVD players, video game consoles, earphones, or a PC to the TV using the appropriate ports on the rear of the TV.
2.2.1 Connecting External Earphones

Note:
- External speakers or headphones are not included with the TV.
- The internal TV speakers will not output sound when headphones are plugged in.
- Use external speakers with built-in amplifiers only.
- Only one external device for sound can be connected at a time.
2.2.2 Connecting to AV Devices
2.2.3 Connecting a VCR/ STB/ DVD Player Using Component Video
Connect the TV to a VCR/ STB/ DVD player using the component video inputs.
2.2.4 Connecting a VCR/ STB/ DVD Player Using Composite Video
Connect the TV to a VCR/ STB/ DVD player using the composite video input.
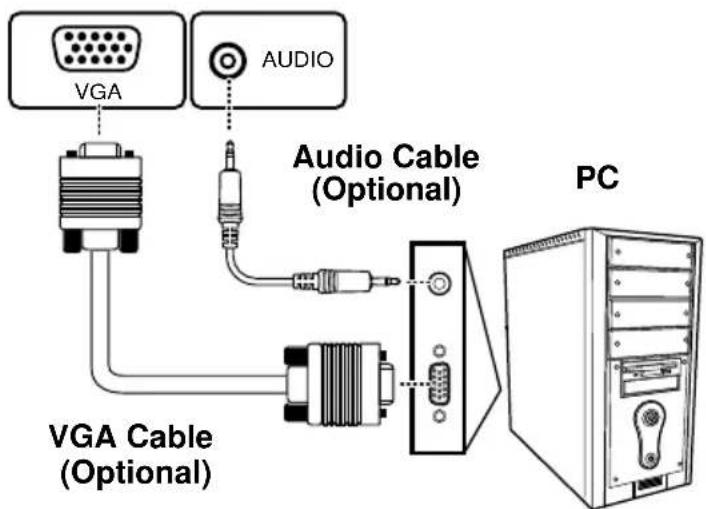
2.2.5 Connecting a PC using VGA
Connect the TV to your PC to use it as the monitor using the VGA port as shown.
1 Connect the VGA port of the TV to the VGA output of the PC.
2 Connect the AUDIO port of your TV to the line out port of the PC to listen to audio from the PC.
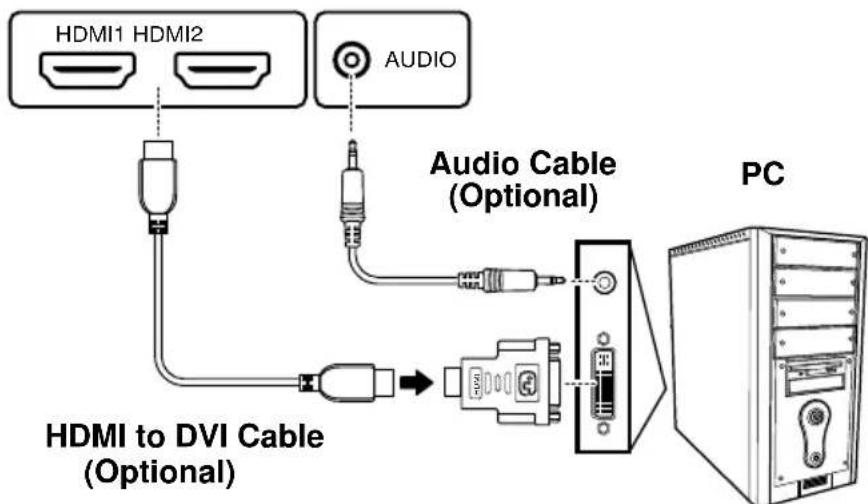
2.2.6 Connecting a PC using DVI
Connect the TV to your PC to use it as the monitor using the DVI port as shown.
1 Connect the HDMI 1 or HDMI 2 port of the TV to the DVI output of the PC.
2 Connect the AUDIO port of your TV to the line out port of the PC of your TV to listen to audio from the PC.
2.2.7 Connecting HDMI
HDMI (High Definition Multimedia Interface) assures that the best video signal is always sent from source to the TV.
Refer to the following illustration to connect an HDMI device to the TV.
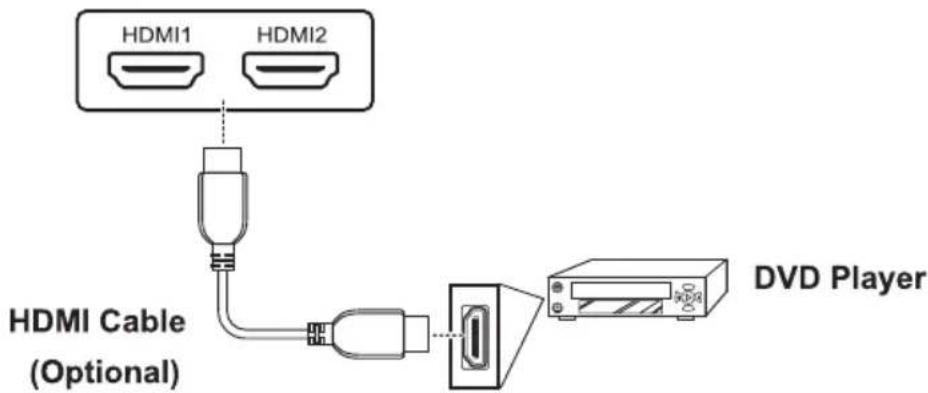
Note1:
When the HDMI cable is connected, connecting the audio cable is not necessary. However, it is necessary to do so if a HDMI to DVI cable is connected.
Note2:
CEC FUNCTION
- One Touch Play-Allows a device to be played and become the active source with a single button press.
2.System Standby-Enables the user to switch all devices to standby with one button press.
2.2.8 Connecting USB
Connect the USB flash drive to the TV using the USB port as shown. The JPEG and MP3 files are supported.
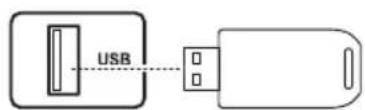
USB Flash Drive
(Optional)
Note:
The USB HDD is not supported.
2.3 Using the TV
2.3.1 Turning the TV On and Off
1 Press on the control panel or remote control. The power LED indicator on the TV changes from amber to blue, indicating that the TV is on.
2 Press again. The power LED changes from blue to amber, indicating that the TV is off.
2.3.2 Switching Source Signals
Press INPUT on the control panel or remote control to select the incoming source signal to set TV source for channel search. Press OK to confirm.
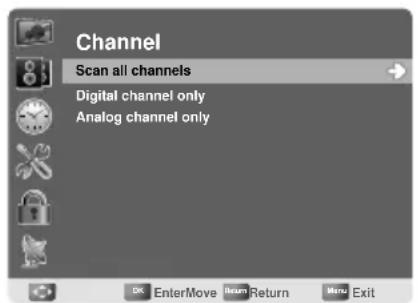
2.3.3 Performing an Automatic Channel Search
Before using the TV to view programs, you need to activate the channel search first.
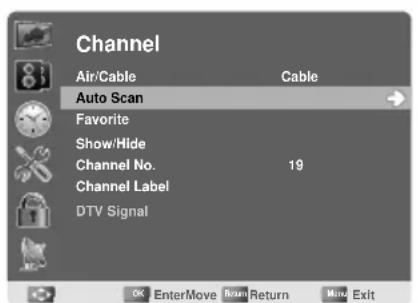
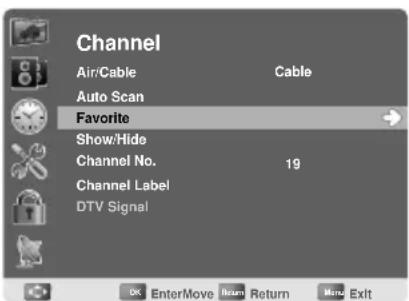
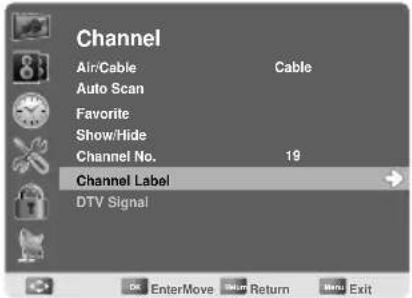
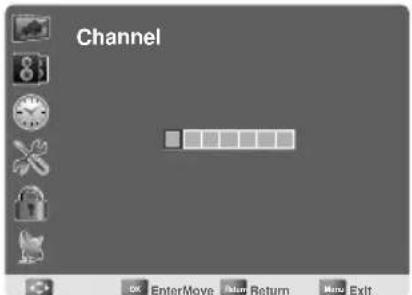
1 Press MENU on the control panel or remote control, then select to enter the Channel menu.
2 Select Air/Cable to set the signal source. (Air or Cable, default is Cable)
3 Select Auto Scan. Three options are available: Scan all channels, Digital channel only, and Analog channel only.
- To search for digital channels only, select Digital channel only.
- To search for analog channels only, select Analog channel only.
- To search for both, select Scan all channels.
4 Press on the remote control to run the channel search.
2.3.4 Selecting Channels
- Press CH▲ on the control panel or CH on the remote control to increase the channel number.
- Press CH▼ on the control panel or CH▼ on the remote control to decrease the channel number.
- Enter the specific channel number by pressing the number buttons on the remote control.
2.3.5 Adjusting the Volume
1 Press VOL+/VOL- on the control panel or +vol / on the remote control to increase/decrease the volume.
MUTE
MUTE
2 Press to eliminate sounds, and press again or press the volume buttons to restore the original volume.
2.3.6 Editing the Channel List or Favorite List
1 Press MENU on the control panel or remote control, then select to enter the Channel menu.
2 Select Show/Hide or Favorite to edit the channel list or favorite list.
3 To show/hide a channel from the channel list, select the channel and press OK to check/uncheck the channel. To add or remove a channel from the favorite list, select the channel and press OK to check/uncheck the channel.
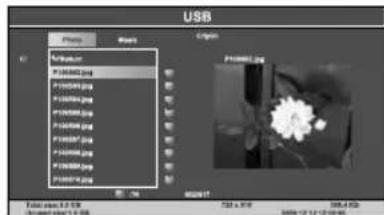
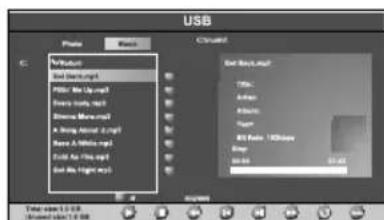
2.3.7 Viewing Images and Playing Music
1 Insert the USB flash drive into the USB port.
2 Press INPUT on the remote control to open the input source list.
3 Select USB to switch to the external storage screen.
4 Use < / > on the remote control to select Photo/Music to view images or play music files.
5 Use / to select a folder (if any) and press OK to open the folder.
6 Use / to select the desired image or music file.
7 Press OK to view the image in full screen or play the selected music file.
- Use / and OK to select and apply the on-screen buttons to play music.
- Use / to view the previous/next image.
- Press OK to start/stop image slideshow.
- Press RETURN to exit image slideshow.
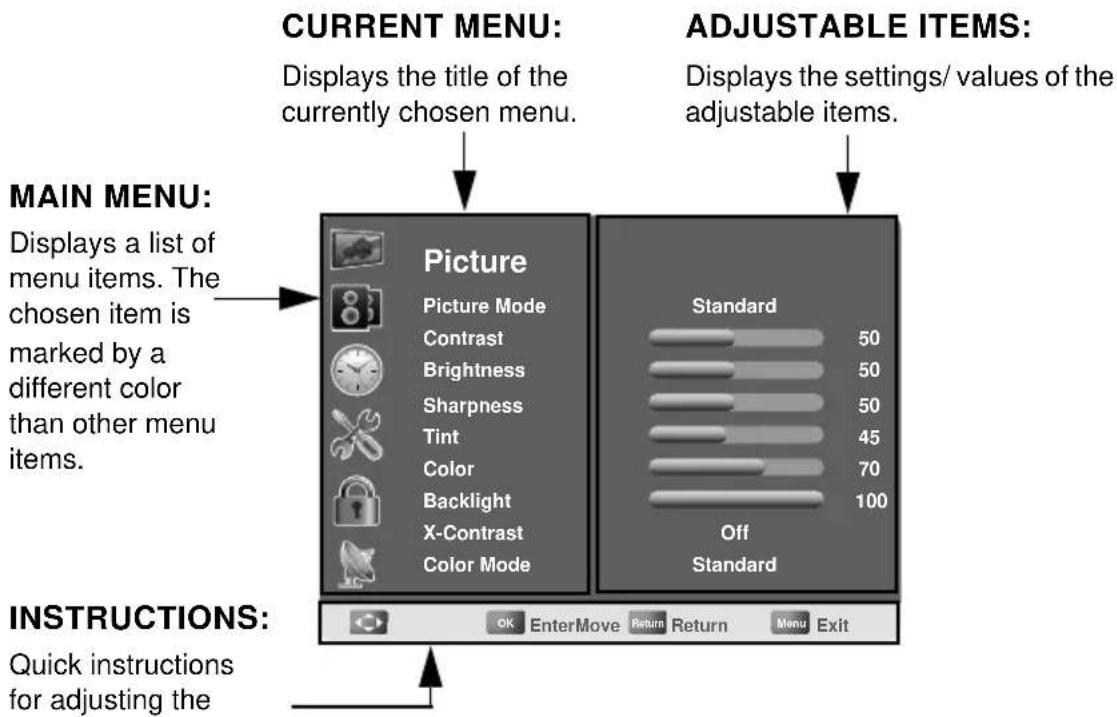
3 Adjusting On-Screen Display (OSD) Settings
The On-Screen Display (OSD) menu system provides a quick and simple method to adjust the TV settings. The OSD menu can be accessed through the buttons either on the control panel or the remote control.
Before going to details of each OSD item, you may get acquainted with the placement of the OSD system:
| Function TV Control Panel Remote Control | ||
| OSD Menu MENU | MENU | |
| Up | CH▲ | Arrow ^ |
| Down | CH▼ | Arrow √ |
| Increase | VOL + | Arrow > |
| Decrease VOL - | Arrow < | |
| Select/ Apply MENU | OK/ Arrow > | |
| Return INPUT | RETURN | |
3.1 OSD Setting Menus
Follow the instructions indicated on the bottom of the OSD Function Menu. Press CHCH / on-the control panel or / arrow keys on the remote control to scroll through the menus. press VOL+ on the control panel or OK on the remote control to select an item and then press MENU to exit the OSD menu. The following menus can be set by different adjustment methods.
3.2 Storing Channels into Memory
1 Press MENU to display the OSD main menu.
2 Press / to select the Channel menu, and then press × to enter.
3 Press / to select Air/Cable and use < / > to select Air or Cable.
Air: RF signal programs by air.
Cable: RF signal programs by cable.
4 Press / to select Auto Scan, and then press to enter.
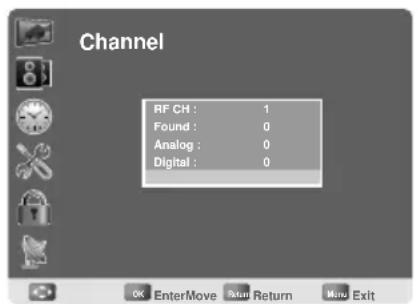
5 Press / to select Scan all channels, Digital channel only, or Analog channel only, and press to perform Auto Scan function. To stop scanning, press MENU at any time.
6 The Auto Scan screen will be shown, and after it is done, the screen will return to the first found channel.
3.3 Viewing the Menus
1 Press MENU to display the OSD main menu. There are six top menus on the screen: Picture, Audio, Time, Setup, Lock, and Channel.
2 Press /to select your desired top menu.
3 Press to enter the menu you select.
4 Use /to select the control you want to adjust.
5 When selecting the control with, press to enter next level menu or enable the function. (will only appear when the control is highlighted)
6 Press /<to adjust or select the settings.
7 Press MENU to exit from the OSD menu.
3.4 Favorite Channel Setting
To set your favorite channel into memory:
1 Press MENU to display the OSD main menu.
2 Press / to select Channel menu, and then press to enter.
3 Press / to select Favorite, then press to enter Favorite setting.
4 Press / select the channel you'd like to be your favorite channel. Press OK to confirm your selection.
5 To cancel the selection, press OK again on the selected channel.
6 Press MENU to exit.
Note:
To view your favorite channels, press the FAV. button to show Favorite List and select your favorite channels that have already been stored.
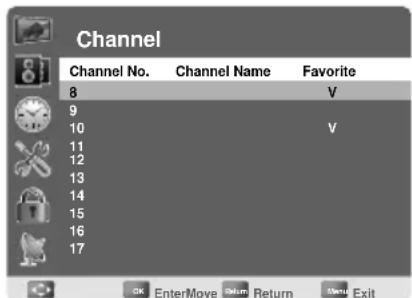
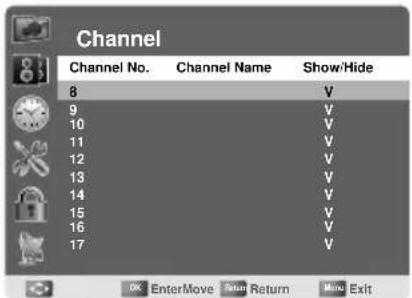
3.5 Showing/Hiding Channel
When the channel is hidden, it will not appear on the screen when you browse the channels with CH▲ / CH▼.
To show/hide a channel:
1 Press MENU to display the OSD main menu.
2 Press / to select Channel menu, and then press × to enter.
3 Press / to select Show/Hide, then press to enter Show/Hide setting.
4 Press /to select the channel you want to Show/Hide, and check or uncheck it with OK.
5 Press RETURN to return back to previous menu in Channel.
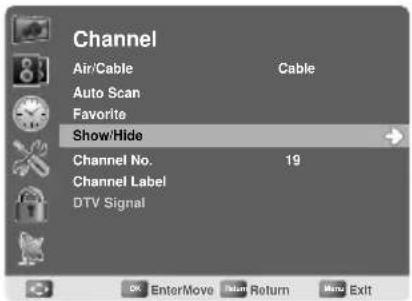
3.6 Channel Name Setting
To edit a name for the current channel:
1 Press MENU to display the OSD main menu.
2 Press / to select Channel menu, and then press × to enter.
3 Press / to select Channel No., then press < / > to select the channel you want to edit the name.
4 Press / to select Channel Label, then press to enter Channel Label setting.
5 Use /to choose letters or signs, / to move forward or backward.
6 After you input the channel name, press RETURN or OK to complete the setting.
7 Press RETURN to return back to previous menu in Channel.
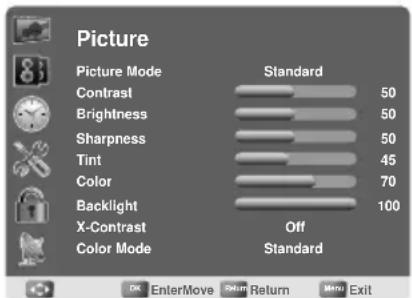
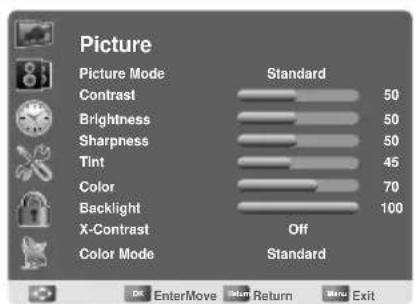
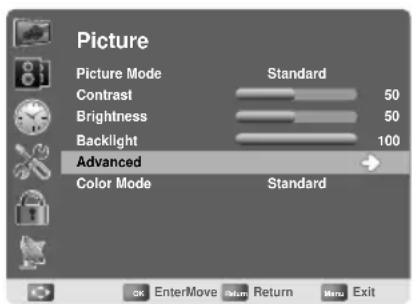
3.7 Setting up Picture Options
1 Press MENU to display the OSD main menu.
2 Press / to select Picture menu, and then press to enter.
3 Press /to select the control of Picture Mode, Contrast, Brightness, Sharpness, Tint, Color, Backlight, X-Contrast, Color Mode, Screen Mode, Noise Reduction, and then press /to adjust the level.
4 Press RETURN to return back to previous menu in Picture.
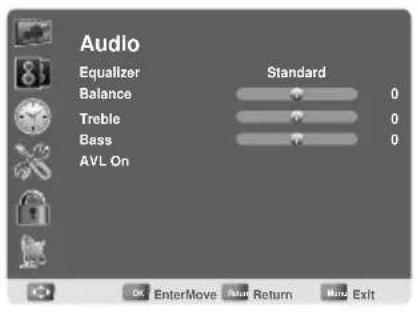
3.8 Setting up Audio Options
1 Press MENU to display the OSD main menu.
2 Press / to select Audio menu, and then press to enter.
3 Press / to select the control of Equalizer, Balance, Treble, Bass, AVL, and then press / to select your desired option.
4 Press RETURN to return back to top menu.
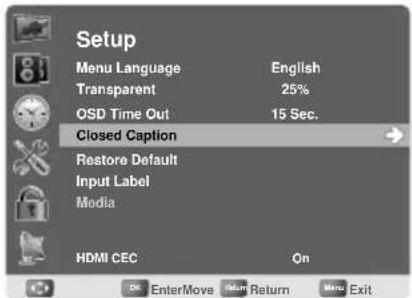
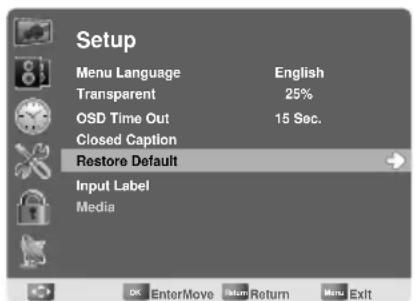
3.9 Configuring System Setting
1 Press MENU to display the OSD main menu.
2 Press / to select Setup menu, and then press to enter.
3 Press / to select the control of Menu Language, Transparent, OSD Time Out, Closed Caption, Restore Default, Input Label, Media, and then press to select your desired option.
4 Press RETURN to return back to top menu.
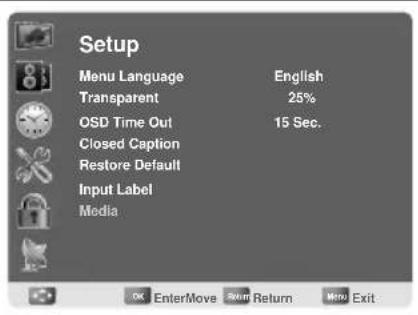
Note:
The Media is available only when a USB drive is connected and the input source is switched to USB.
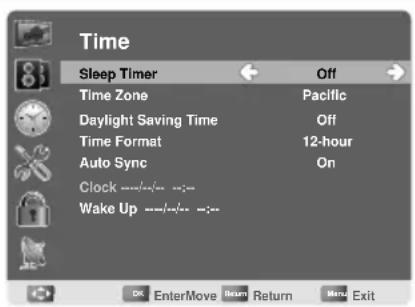
3.10 Setting up Time menu
1 Press MENU to display the OSD main menu.
2 Press to select Time menu, and then press to enter.
3 Press / to select Sleep Timer, and then press / to set Sleep Timer from 5~240 Min, or Off.
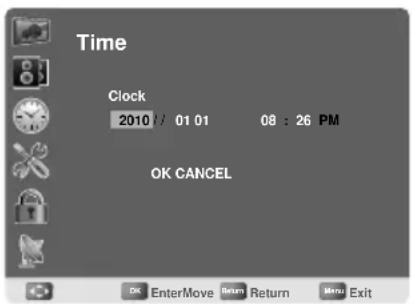
4 Press / to select Time Zone, and select the correct time zone of your area with . The displayed time of Clock will be changed at the same time automatically. To adjust Clock, select Clock and press
5 Press / to select Daylight Saving Time, and select On or Off with < / > according to the time zone of your area. The Clock time will change automatically.
6 Press / to select Time Format, and / to select 12-hour or 24-hour.
7 Press RETURN to return back to top menu.
Note:
The Clock time can only be adjusted manually when Auto Sync is set to Off.
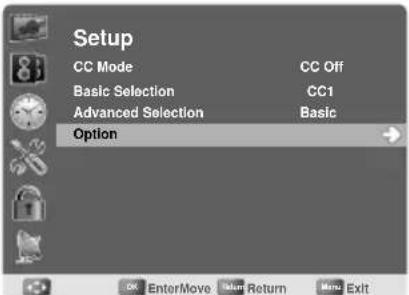
3.11 Closed Caption Setting
1 Press MENU to display the OSD main menu.
2 Press / to select Setup menu, and then press to enter.
3 Press / to select Closed Caption, then press to enter Closed Caption setting.
4 Press / to select CC Mode, Basic Selection, Advanced Selection, or Option, and use to make your choice.
Basic Selection: To set basic analog closed caption options. (CC1~CC4, Text1~Text4, Off) Advanced Selection: To select closed caption signal formats and set up caption modes for digital TV channels. (Service1~6, Basic)
For detailed Close Caption setting:
1 Press / to select Option, and then press to enter Option setting.
2 press / to select the Mode to be Custom, and then use to adjust desired options and use to adjust detailed settings.
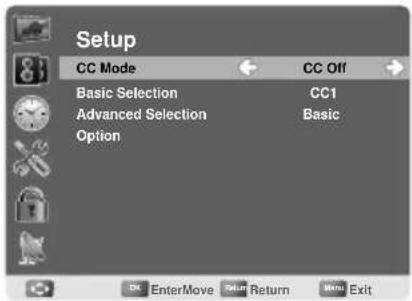
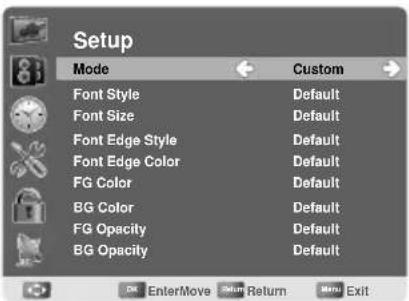
Note:
When you select the Mode to be Default, you can not adjust the detailed settings and those parameters would be set according to broadcast content.
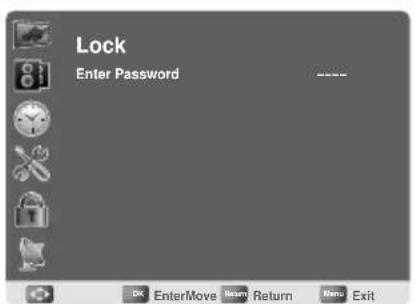
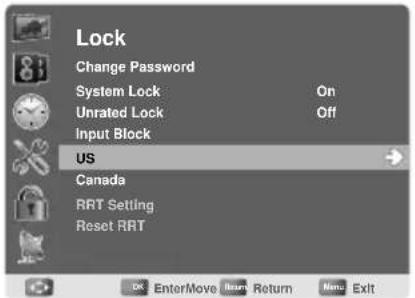
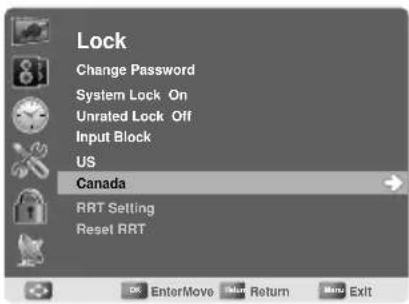
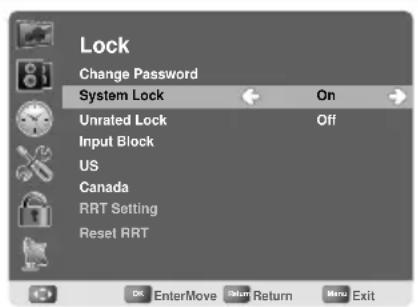
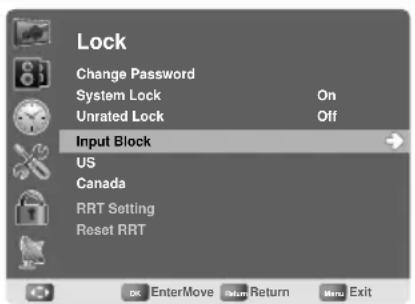
3.12 Using the Parental Controls
1 Press MENU to display the OSD main menu.
2 Press to select Lock menu, and then press to enter.
3 In the Enter Password field, enter the password. (The default password is 0000.)
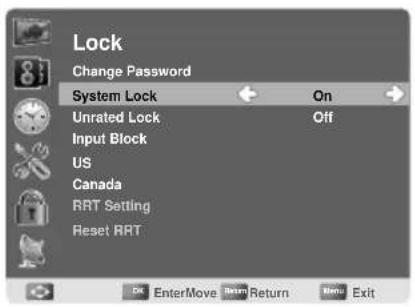
4 Move to System Lock, and select On to enable the detailed settings.
5 Move to US or Canada rating system.
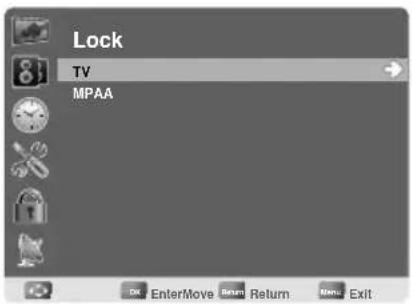
US: Press to set TV or MPAA ratings.
TV
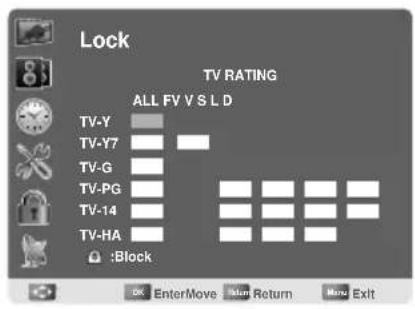
1 Press / to select TV, and then press to enter TV rating system setting.
The following screen will allow you to customize the following TV ratings:
Y (all children)
Y7 (older children)
G (general audience)
PG (guidance suggested)
14 (strongly cautioned)
MA (mature audience)
You can also customize the TV ratings for the following content:
ALL (All types content)
FV (fantasy violence)
V (violence)
S (sexual situations)
L (adult language)
D (sexual dialog)
2 Press OK to set or reset each area.
3 Press MENU to exit.
Note:
If you forget your password, use the super password, 70718512, to enter Lock menu and reset your password.
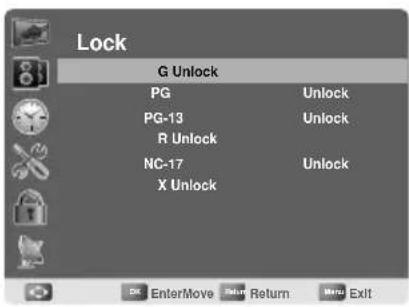
MPAA
1 Press to select MPAA, and then press to enter MPAA rating system setting.
2 Press /to select your desired MPAA ratings level. The MPAA ratings level are defined as following:
G (general audience)
PG (parental guidance suggested)
PG-13 (recommended for children 14 years of age or older)
R (mature audience)
NC-17 (no one under 17 years of age)
X (adult audience only)
3 Press OK to switch between Lock and Unlock.
4 Press MENU to exit.
Canada: Press to set Canadian English and French ratings.
Canadian English
1 Press / to select Canada Eng.
2 Press to enter.
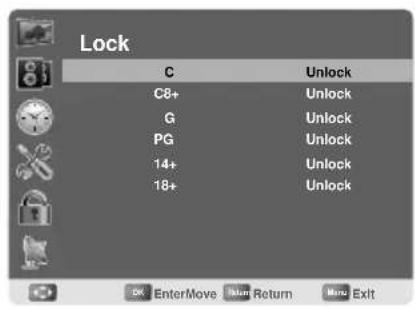
3 Press /to select your desired Canadian English rating level.
The Canadian English rating levels are defined as following:
C (children)
C8+ (children eight years and older)
G (general programming, suitable for all audiences)
PG (parental guidance)
14+ (viewers and older)
18+ (adult programming)
4 Press OK to switch between Lock and Unlock.
5 Press MENU to exit.
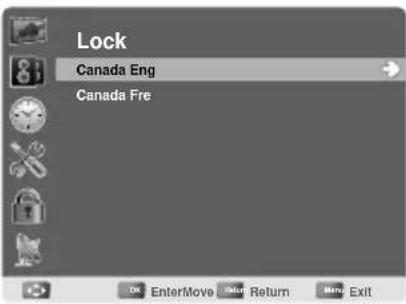
Canadian French
1 Press / to select Canada Fre.
2 Press to enter.
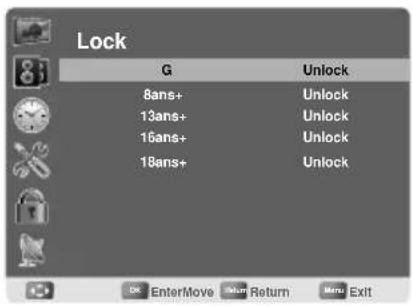
3 Press /to select your desired Canadian French rating level.
The Canadian French rating levels are defined as following:
G (general)
8ans+ (children eight years and older)
13ans+ (not appropriate for children of less than 13 years)
16ans+ (not appropriate for children of less than 16 years)
18ans+ (reserved to adults)
4 Press OK to switch between Lock and Unlock.
5 Press MENU to exit.
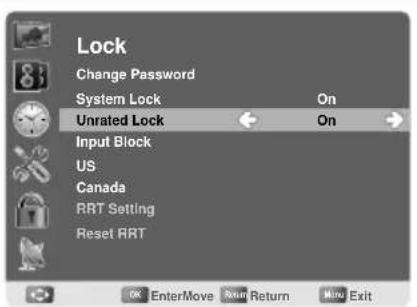
3.13 To Block Unrated Movie or TV Programs
1 Press / to select Unrated Lock, then press / to select On or Off. When On is selected all programs that are not rated will be blocked.
2 Press MENU to exit.
3.14 To Set Rating Region Table
RRT Setting defines the rating standard for a particular geographic region and/or country.
1 Press to select RRT Setting, and then press to enter PRT setting.
2 Select each adjustable setting with /then press to select the sub-selection.
3 Press MENU to exit.
Note:
The picture here only shows an example of the content of RRT Setting. However, the selections and sub-selections of RRT Setting may be different in your OSD menu according to the local broadcasting system.
To reset RRT setting, move to Reset RRT, and press to reset.
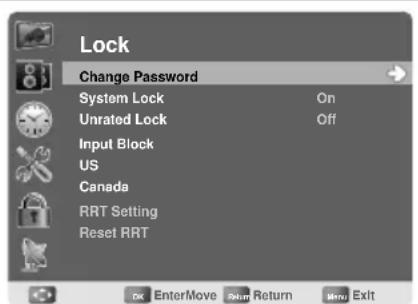
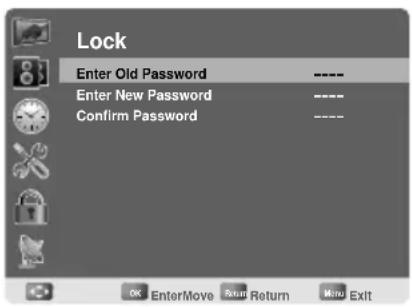
3.15 To Change Password
1 Press / to select Change Password, and then press × to enter Change Password setting.
2 Move to Enter Old Password, and then enter the old password with number keys.
3 Enter your new password on Enter New Password.
4 Enter your new password again on Confirm Password. After you complete the last step, the screen will return to the top page of Lock menu. If so, the password has been changed successfully.
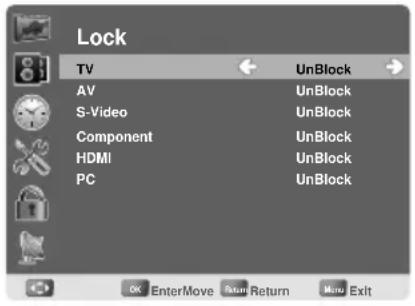
3.16 To Block by Input Source
1 Press / to select Input Block, and then press × to enter.
2 Press / to select the input source, then / > to select from Block or UnBlock.
3 Press MENU to exit.
3.17 To Restore Factory Setting
1 Press MEMU to display the OSD main menu.
2 Press / to select Setup menu, and then press × to enter.
3 Press / to select Restore Default, and then press to restore the factory default setting.
4 Select Yes and press OK to confirm the setting (Restore Factory Setting won't reset program data, for in case need to get latest program data, please execute Auto Scan in Channel menu again).
3.18 Using PC Function
1 When in PC source, press MENU to display the OSD main menu.
2 Press / to select the Picture menu, and then press to enter.
3 Press /to select your desired controls, and press to adjust.
4 For advanced PC functions, select Advanced (only in PC source), and then press to enter.
5 Press / to select Auto (Auto adjustment), H-Pos (H-Position), V-Pos (V-Position), Clock, or Phase, and adjust the level with .
Note:
When in PC source, the other menus are the same as or similar to when in other source.
When there is no signal in the PC mode, No Signal will be displayed on the screen and the TV will automatically turn into power-saving mode after a few seconds' idleness.
Press POWER on the remote control and the TV will return to VGA mode.
4 Specifications
| LED Panel Size 23 inch | TFT | |
| Screen Format 16:9 | ||
| Panel Resolution | 1920 (H) x 1080 (V) | |
| TV System ATV: NTSC | DTV: ATSC | |
| Video System | HDMI Input x 2 | |
| YPbPr Input x 1 | ||
| S-Video Input x1 | ||
| Composite Input x 1 | ||
| VGA (PC) Input x 1 | ||
| Tuner Input x 1 | ||
| Photo System USB (JPEG) | ||
| Audio System | AV/S-Video: (RCA x 1) R/L in | |
| HDTV: (RCAx1) R/L in | ||
| HDMI: HDMI1/HDMI2 | ||
| USB (MP3) | ||
| PC Audio in: Phone jack | ||
| Audio out: Earphone jack | ||
| Analog: MTS Digital: AC3 | ||
| Built-in Stereo Amplifier Output | 5W+5W | |
| ACInput 100V~240V / 50Hz~60Hz | ||
| Power Consumption | 45W (Typical) | |
| Standby Power Consumption (W) | < 1 (W) | |
| AC Power Supply (Vac) | 100~240 | |
| Dimension W x H x D | 560.9(22.08")mm x388.1(15.28")mm x190.1(7.48")mm | |
| Unit Weight | 4.5 Kg | 9.8 lbs |
| Unit Weight (w/o stand & base) | 3.7 Kg | 8.1 lbs |
Note: Specifications are subject to change without notice.
FACTORY PRESET TIMING TABLE(PC MODE):
| MODE | RESOLUTION | HORIZONTAL FREQUENCY (KHz) | VERTICAL FREQUENCY (Hz) |
| 1 640 | ×480 @60Hz 31.469 59.941 | ||
| 2 800 | ×600 @60Hz 37.879 60.317 | ||
| 3 102 | 4×768 @60Hz 48.363 60.004 | ||
| 4 115 | 2×864 @75Hz 67.5 75 | ||
| 5 128 | 0×720 @60Hz 44.955 59.940 | ||
| 6 128 | 0×960 @60Hz 60 60 | ||
| 7 128 | 0×1024 @60Hz 63.981 60.020 | ||
| 8 144 | 0×900 @60Hz 55.935 59.887 | ||
| 9 168 | 0x1050 @60Hz | 65.290 59.954 | |
| 10 | 1920x1080 @60Hz | 67.5 | 60.00 |
Video mode
| MODE | RESOLUTION |
| 1 720×480i @60Hz | |
| 2 | 720×480p @60Hz |
| 3 1280×720p @60Hz | |
| 4 | 1920×1080i @60Hz |
| 5 | 1920×1080p @60Hz |
| 6 | 1920×1080p @24Hz |
| 7 | 1920×1080p @30Hz |
SAFETY PRECAUTIONS
This LED TV is manufactured and testd on a ground principle that a user's safety comes first. However, improper use or installation may result danger to the LED TV as well as to the user. Carefully go over the following WAR -NINGS before installation and keep this guide handy.
Warnings
- This LED TV should be operated only at the correct power sources indicated on the label on the rear end of the LED TV. If you unsure of the power supply in your residence, consult your local dealer or power company.
- Do not try to repair the LED TV by yourself as it contains no user-serviceable parts. The LED TV should be repaired by a qualified technician only.
- Do not remove the LED TV cabinet. There is high-voltage parts inside that may cause electric shock to human bodies, even when the power cord is disconnected.
- Stop using the LED TV if the cabinet is damaged. Have it checked by a service technician.
- Put your LED TV only in a clean dry environment. Unplug the LED TV immediately if it gets wet, and consult your service technician.
- Always unplug the LED TV before cleaning it. Clean the cabinet with a clean dry cloth. Apply non-ammonia based cleaner onto the cloth, not directly onto the glass screen.
- Keep the LED TV away from magnetic objects, motors, TV sets, and transformer.
- Do not place heavy objects on the cable or power cord.
- For PLUG CABLE EQUIPMENT, the Socket-outlet shall be installed near the equipment and shall be easily accessible.
CARE AND MAINTENANCE
Care
- Avoid exposing your LED TV directly to sunlight or other heat source. Place your LED TV away from the sunlight to reduce glare.
- Put your LED TV in a well ventilated area.
- Do not place anything heavy on top of your LED TV.
- Make certain your LED TV is installed in a clean and moisture-free area.
- Keep your LED TV away from magnets, motors, transformers, speakers, and other TV sets.
Safety Tips
- If smoke, abnormal noise or odor appears to arise from your LED TV. Remove the power cord immediately and call your service center.
- CAUTION-Never remove the rear cover of your LED TV cabinet. The display unit inside contains high-voltage and may cause electric shock to human bodies.
- Never try to repair your LED TV yourself. Always call your authorized service center or a qualified technician to fix it.
TROUBLESHOOTING
No Power
- Make sure A/C power cord is securely connected to the power supply is firmly connected to the TV.
- Plug another electrical device into the power outlet to verify the outlet is working.
Power on but no screen image
Make sure the video are tightly secured.
- Your have selected the correct video input.
- Adjust brightness.
Make sure all cables are installed.
Wrong or abnormal colors
- If any colors(red,green,blue) are missing, check the video cable to make sure it is securely connected. Loose or broken pins in the cable connector could cause an improper connection.
- Connect the TV unit to another video source or use another TVs to make sure the video source is no problem.
The design and specifications are subject to change without notice. All rights reserved.